background image

7

English

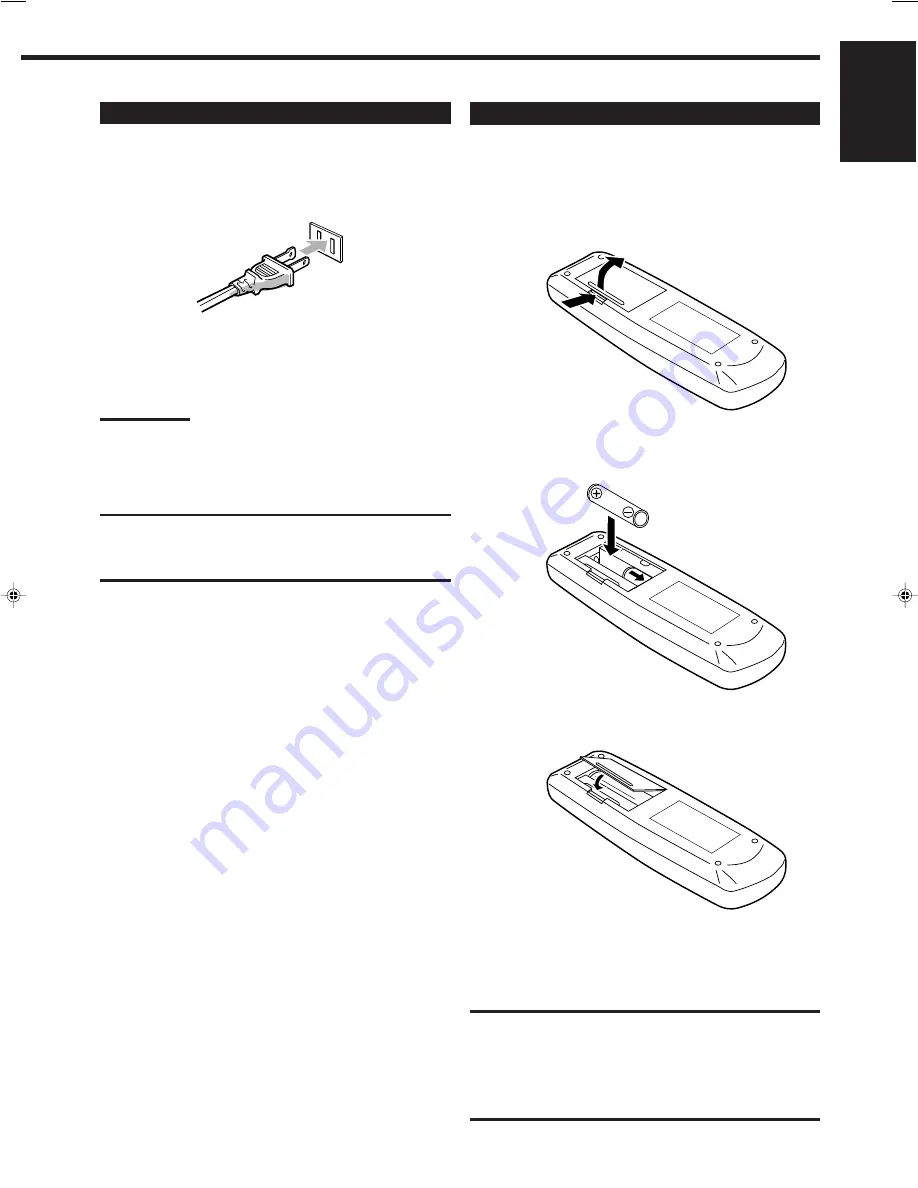
Putting Batteries in the Remote Control

Before using the remote control, put two supplied batteries first.
When using the remote control, aim the remote control directly at
the remote sensor on the receiver.

1. On the back of the remote control, remove the

battery cover as illustrated.

2. Insert batteries. Make sure to observe the proper

polarity: (+) to (+) and (–) to (–).

3. Replace the cover.

If the range or effectiveness of the remote control decreases, replace
the batteries. Use two R6P (SUM-3)/AA (15F) type dry-cell
batteries.

CAUTION:

Follow these precautions to avoid leaking or cracking cells:

• Place batteries in the remote control so they match the polarity

indicated: (+) to (+) and (–) to (–).

• Use the correct type of batteries. Batteries that look similar may

differ in voltage.

• Always replace both batteries at the same time.
• Do not expose batteries to heat or flame.

Connecting the Power Cord

Before plugging the receiver into an AC outlet, make sure that all
connections have been made.

Plug the power cord into an AC outlet.

Keep the power cord away from the connecting cables and the
antenna. The power cord may cause noise or screen interference.
We recommend that you use a coaxial cable to connect the
antenna, since it is well-shielded against interference.

Note:

The preset settings such as preset channels and sound adjustment
may be erased in a few days in the following cases:
– When you unplug the power cord.
– When a power failure occurs.

CAUTIONS:

• Do not touch the power cord with wet hands.
• Do not pull on the power cord to unplug the cord. When

unplugging the cord, always grasp the plug so as not to damage
the cord.

R6P (SUM-3)/AA (15F)

EN01-07.RX-5000V[C]/F

00.2.3, 8:17 PM

7

Содержание RX-5000VBK

Страница 1: ...4 1 7 4 1 RM SR558U REMOTE CONTROL TAPE MD FM AM VCR DVD SOUND CONTROL SLEEP 8 3 2 1 5 SURROUND TEST DELAY 6 5 4 EFFECT CENTER 5 9 8 7 P REAR L 5 TV VCR AUDIO CD 10 10 REAR R MENU ENT 5 TV CH TV VIDEO PHONO CD DISC TV VOL DVD MULTI ONE TOUCH OPERATION VCR CH MUTING VOLUME POWER RX 5000V AUDIO VIDEO CONTROL RECEIVER STANDBY PHONES SPEAKERS 1 2 ADJUST BASS BOOST SETTING MEMORY DVD MULTI CD DVD PHONO...

Страница 2: ... ni les panneaux et ne pas ouvrir le coffret de l appareil 2 Ne pas exposer l appareil à la pluie ni à l humidité RX 5000VBK Caution Proper Ventilation To avoid risk of electric shock and fire and to protect from dam age Locate the apparatus as follows Front No obstructions open spacing Sides No obstructions in 10 cm from the sides Top No obstructions in 10 cm from the top Back No obstructions in ...

Страница 3: ...ass 10 Adjusting the Tone 10 Basic Settings 11 Changing the Source Name 11 Setting Center and Rear Speakers for the DSP Modes 11 Storing the Basic Settings and Adjustments One Touch Operation 12 Using the Sleep Timer 12 Receiving Radio Broadcasts 13 Tuning in Stations Manually 13 Using Preset Tuning 13 Selecting the FM Reception Mode 14 Using the DSP Modes 15 Available DSP Modes According to the S...

Страница 4: ... 8 23 TV VCR AUDIO 2 Source selecting buttons 8 CD TAPE MD FM AM VCR DVD DVD MULTI PHONO 3 ONE TOUCH OPERATION button 12 4 VOLUME buttons 9 5 MUTING button 9 6 SLEEP button 12 7 Operating buttons for audio video components 22 8 10 keys for selecting preset channel 14 22 10 keys for adjusting sound 12 17 22 10 keys for operating other components 22 9 SOUND CONTROL button 12 17 22 p TV VOL buttons 2...

Страница 5: ...disassemble the receiver or remove screws covers or cabinet Do not expose the receiver to rain or moisture Checking the Supplied Accessories Check to be sure you have all of the following items which are supplied with the receiver The number in the parentheses indicates quantity of the pieces supplied Remote Control 1 Batteries 2 AM Loop Antenna 1 FM Antenna 1 If anything is missing contact your d...

Страница 6: ... each speaker except for a subwoofer connect the and terminals on the rear panel to the and terminals marked on the speakers For connecting a subwoofer see page 5 AM Antenna Connections AM Loop Antenna Snap the tabs on the loop into the slots of the base to assemble the AM loop Basic connecting procedure 1 Cut twist and remove the insulation at the end of each speaker signal cable 2 Open the termi...

Страница 7: ...75 COAXIAL Turntable If an earth cable is provided for your turntable connect the cable to the ground terminal H of the ANTENNA terminals on the rear panel Turntable To audio output Note Any turntables incorporating a small output cartridge such as an MC moving coil type must be connected to this receiver through a commercial head amplifier or step up transformer Direct connection may result in in...

Страница 8: ...nnect the DVD player with stereo output jacks DVD player VIDEO LEFT RIGHT MONITOR OUT OUT REC IN PLAY OUT REC IN PLAY DVD VCR L R LEFT FRONT CENTER REAR RIGHT SUBWOOFER DVD Å ı AUDIO DVD Å To front left right channel audio output or to audio mixed output if necessary ı To video output When you connect the DVD player with its analog discrete output 5 1 CH reproduction jacks VIDEO LEFT RIGHT MONITOR...

Страница 9: ...Batteries that look similar may differ in voltage Always replace both batteries at the same time Do not expose batteries to heat or flame Connecting the Power Cord Before plugging the receiver into an AC outlet make sure that all connections have been made Plug the power cord into an AC outlet Keep the power cord away from the connecting cables and the antenna The power cord may cause noise or scr...

Страница 10: ...the DVD player for viewing the digital video disc using the analog discrete output mode 5 1CH reproduction on the DVD player To enjoy the DVD MULTI playback see page 20 DVD Select the DVD player for viewing the stereo digital video disc VCR Select the video component connected to the VCR jacks FM Select an FM broadcast AM Select an AM broadcast TAPE MD Select the cassette deck or the MD recorder P...

Страница 11: ...eakers press SPEAKERS 1 and SPEAKERS 2 to set them in the OFF position Note When only one set of the speakers is connected to either the FRONT SPEAKERS 1 or 2 terminals do not activate both pairs of the speakers If you do no sound comes out of the front speakers MASTER VOLUME Listening only with headphones 1 Connect a pair of headphones to the PHONES jack on the front panel 2 Press SPEAKERS 1 and ...

Страница 12: ... this Bass Boost function you can boost the bass level Before you start remember There is a time limit in doing the following steps If the setting is canceled before you finish start from step 1 again On the front panel ONLY 1 Press ADJUST so that MULTI CURSOR fi buttons work for adjusting the sound 2 Press MULTI CURSOR fi until B BOOST appears on the display 3 Press MULTI CURSOR to switch this fu...

Страница 13: ...re required after connecting and positioning your speakers in your listening room while others will make operations easier 3 Press MULTI CURSOR to select your center speaker size LARGE Select this mode when the size of the center speaker is the same as that of the front speakers SMALL Select this mode when the size of the center speaker is smaller than that of the front speakers NO Select this mod...

Страница 14: ...so cancels the Sleep Timer On the front panel 1 Press SETTING so that MULTI CURSOR fi buttons work for setting the delay time 2 Press MULTI CURSOR fi repeatedly until DELAY appears on the display 3 Press MULTI CURSOR to select an appropriate delay time DELAY 1 Select this mode when the distance from you to your rear speakers is greater than that to the front speakers DELAY 2 Select this mode when ...

Страница 15: ...gain while the selected channel number is flashing on the display The selected channel number stops flashing The station is assigned to the selected channel number 5 Repeat steps 1 to 4 until you store all the stations you want To erase a stored preset station Storing a new station on a used number erases the previously stored one Tuning in Stations Manually On the front panel ONLY 1 Press FM or A...

Страница 16: ...tor lights up on the display To tune in a preset station On the front panel 1 Press FM or AM The last station of the selected band is tuned in MULTI CURSOR fi buttons can be now used for operating the tuner 2 Press MULTI CURSOR fi repeatedly until PRESET appears on the display 3 Press MULTI CURSOR to select a preset channel station Pressing decreases the preset channel number Pressing increases th...

Страница 17: ...ing there feeling This mode can be used when the front speakers are connected to this receiver without respect to the rear center speaker connection You can select one of the following to your preference DANCE CLUB Gives a throbbing bass beat LIVE CLUB Gives the feeling of a live music club with a low ceiling HALL Gives clear vocal and the feeling of a concert hall PAVILION Gives the spacious feel...

Страница 18: ...led TV Front speaker Front speaker Rear speaker Rear speaker Each time you press SURROUND the DSP modes change as follows PRO LOGIC THEATER DANCE C DANCE CLUB LIVE C LIVE CLUB HALL PAVILION 3D ACTION OFF DSP mode is canceled TV Front speaker Front speaker Center speaker Each time you press SURROUND the DSP modes change as follows 3 STEREO 3D THEATER DANCE C DANCE CLUB LIVE C LIVE CLUB HALL PAVILIO...

Страница 19: ...t you have set the speaker information correctly see page 11 There is a time limit in doing the following steps If the setting is canceled before you finish start from step 1 again On the front panel 1 Press SURROUND repeatedly until 3DACTION or 3D THEATR appears on the display The 3D PHONIC PRO LOGIC indicators also light up on the display 2 Press ADJUST so that the MULTI CURSOR fi buttons work f...

Страница 20: ...orrectly See page 11 From the remote control 1 Press SOUND CONTROL The 10 keys are activated for sound adjustments 2 Press SURROUND repeatedly until the mode PROLOGIC 3 STEREO or THEATER appears on the display For PROLOGIC and 3 STEREO the PRO LOGIC indicator lights up on the display For THEATER the PRO LOGIC and DAP indicators light up on the display 3 Press TEST to check the speaker output balan...

Страница 21: ...Surround and JVC Theater Surround play back a software which was processed with Dolby Surround and is labeled with DOLBY SURROUND mark To cancel the DSP mode Press SURROUND repeatedly until OFF appears on the display in step 2 above On the front panel You can also use the buttons on the front panel to adjust the Surround modes However no test tone is available when using the buttons on the front p...

Страница 22: ... to 10 dB Pressing REAR R increases the output level up to 10 dB Activating the DVD MULTI Playback Mode You can adjust the DVD MULTI playback mode while playing back a DVD using the analog discrete output mode on the DVD player Once you made adjustments the receiver memorizes the adjustments until you change them Before you start remember Make sure that you have set the speaker information correct...

Страница 23: ...mmediately In both cases the previously selected source continues playing without sound for a few seconds Turntable CD player Cassette deck or MD recorder Automatic Power On Off Standby only possible with the COMPU LINK 3 connection Both the CD player and cassette deck or MD recorder turn on and off standby along with the receiver When you turn on the receiver the CD player or cassette deck or MD ...

Страница 24: ...ne output for the Surround mode Note After adjusting sounds press the corresponding source selecting button or CD DISC to operate your target source by using the 10 keys otherwise the 10 keys cannot be used for operating your target source Cassette deck After pressing TAPE MD you can perform the following operations on a cassette deck 3 Starts playing 1 1 1 1 1 Fast winds the tape from right to le...

Страница 25: ...elects the number of a disc installed in a CD player changer If your CD changer is of 200 disc loading capability except for XL MC100 and XL MC301 you can do the following operations using the number buttons after pressing CD 10 button can function as 0 1 Select a disc number 2 Then select a track number always enter two digits 3 Start playback EXAMPLES Selecting disc number 3 track number 2 and s...

Страница 26: ...s not disappear unplug the AC power cord then plug it back again Press POWER on the front panel then check the speaker wiring If OVERLOAD does not disappear unplug the AC power cord then plug it back again If speaker wiring is not short circuited contact your dealer Remove the obstruction Replace batteries POSSIBLE CAUSE The power cord is not plugged in Speaker signal cables are not connected The ...

Страница 27: ...kHz with no more than 0 8 total harmonic distortion Total Harmonic Distortion 8 Ω 1 kHz 0 8 at 100 W output Measured by JVC Audio Analysis System Audio Audio Input Sensitivity Impedance 1 kHz PHONO MM 2 7 mV 47 k Ω CD TAPE MD VCR DVD 220 mV 47 k Ω Audio Output Level TAPE MD VCR 220 mV Signal to Noise Ratio 66 IHF 78 IHF PHONO 70 dB 77 dB at REC OUT CD TAPE MD VCR DVD 87 dB 67 dB Frequency Response...

Страница 28: ... 6 at 1 kHz Stereo Separation at REC OUT 35 dB at 1 kHz Alternate Channel Selectivity 45 dB 400 kHz Frequency Response 30 Hz to 15 kHz 0 5 dB 3 dB AM tuner Tuning Range 530 kHz to 1 710 kHz Usable Sensitivity Loop antenna 400 µV m Signal to Noise Ratio 50 dB 100 mV m General Power Requirements AC 120V 60 Hz Power Consumption 290 W 390 VA at operation 2 W in standby mode Dimensions W x H x D 435 mm...

Страница 29: ...alité 10 Réglages de base 11 Modification du nom de la source 11 Réglage de l enceinte centrale et des enceintes arrières pour les modes DSP 11 Mémorisation des ajustements et des réglages de base fonctionnement monotouche 12 Utilisation de la minuterie d arrêt 12 Réception d émissions de radio 13 Accord manuel d une station 13 Utilisation de l accord par préréglage 13 Sélection du mode de récepti...

Страница 30: ...ouches numériques pour choisir les canaux préréglés 14 22 Touches numériques pour ajuster le son 12 17 22 Touches numériques pour commander les appareils audio vidéo 22 9 Touche SOUND CONTROL 12 17 22 p Touches TV VOL 23 q Touche CD DISC 22 w Touches TV CH 23 e Touche TV VIDEO 23 r Touches VCR CH 23 IMPORTANT Pour utiliser les touches de commande du curseur q sur le panneau avant Le fonctionnement...

Страница 31: ... l ampli tuner Ne pas démonter l ampli tuner ni ne retirer les vis les couvercles ou le compartiment Ne pas exposer l appareil à la pluie ou à l humidité Vérification des accessoires fournis Vérifier que tous les articles suivants sont bien fournis avec l ampli tuner Le nombre entre parenthèses indique la quantité d articles fournis Télécommande 1 Piles 2 Antenne cadre AM 1 Antenne FM 1 Si quelque...

Страница 32: ...des enceintes Il est possible de connecter les enceintes suivantes Deux paires d enceintes avant pour produire un son stéréo normal Une paire d enceintes arrière pour profiter des effets surround Une enceinte centrale pour produire des effets surround plus efficaces pour accentuer les voix humaines Un caisson de grave pour améliorer les graves IMPORTANT Après la connexion des enceintes de la liste...

Страница 33: ...AM LOOP FM 75 COAXIAL A la sortie audio Tourne disque Si le tourne disque est muni d un câble de mise à la terre connecter ce câble à la prise de terre H des prises ANTENNA sur le panneau arrière Tourne disque Remarque Les tourne disques incorporant une cellule à faible signal de sortie telle qu une MC type à bobine mobile doivent être connectés à l ampli tuner à travers un amplificateur de tête o...

Страница 34: ...gnétoscope Magnétoscope Téléviseur ou moniteur A la sortie audio vidéo A l entrée audio vidéo VIDEO AUDIO LEFT RIGHT MONITOR OUT OUT REC IN PLAY OUT REC IN PLAY DVD VCR VHS A l entrée vidéo Å A la sortie audio des canaux avant gauche droit ou à la sortie audio mixée si nécessaire ı A la sortie vidéo Lors de la connexion du lecteur de DVD par les prises de sortie analogiques discrètes reproduction ...

Страница 35: ... Toujours remplacer les deux piles en même temps Ne pas exposer les piles à la chaleur ou à une flamme Connexion du cordon d alimentation secteur Avant de brancher l ampli tuner sur une prise d alimentation secteur s assurer que toutes les connexions ont été faites Brancher le cordon d alimentation sur une prise secteur murale Tenir le cordon d alimentation à l écart des câbles de connexion et d a...

Страница 36: ...ppareil vidéo connecté aux prises VCR FM Choisit la réception FM AM Choisit la réception AM TAPE MD Choisit la platine cassette ou l enregistreur de MD PHONO Choisit le tourne disque CD Choisit le lecteur CD A partir de la télécommande FM AM Choisit la réception FM ou AM Chaque fois que la touche est pressée la bande alterne entre FM et AM Les autres touches fonctionnent de la même façon que les t...

Страница 37: ...que Quand un seul jeu d enceintes est connecté aux prises FRONT SPEAKER 1 ou 2 ne pas mettre en service les deux paires d enceintes Aucun son ne sortirait des enceintes avant Écoute privée avec le casque d écoute 1 Connecter un casque d écoute à la prise PHONES sur le panneau avant 2 Mettre SPEAKERS 1 et SPEAKERS 2 en position OFF ATTENTION S assurer de diminuer le volume avant de connecter un cas...

Страница 38: ...d accentuer le niveau des graves Avant de commencer se rappeler Il y a un temps limite pour réaliser les étapes suivantes Si le réglage est annulé avant la fin recommencer à partir de l étape 1 Sur le panneau avant UNIQUEMENT 1 Appuyer sur ADJUST de façon que MULTI CURSOR fi fonctionnement pour ajuster le son 2 Appuyer répétitivement sur MULTI CURSOR fi jusqu à ce que B BOOST apparaisse sur l affi...

Страница 39: ...es arrière et réglé REAR SPK sur YES Voir ci dessus Le réglage du temps de retard n est valide que pour PROLOGIC Voir page 15 Modification du nom de la source Si un enregistreur de MD a été connecté aux prises TAPE MD sur le panneau arrière changer le nom de la source qui apparaît sur l affichage quand l enregistreur de MD est choisi comme source Sur le panneau avant UNIQUEMENT Pour changer le nom...

Страница 40: ... MULTI CURSOR MULTI CURSOR ONE TOUCH OPERATION ONE TOUCH OPERATION Sur la télécommande Sur le panneau avant 20 10 30 40 50 60 70 80 Canceled 0 Annulé SLEEP DELAY 1 DELAY 2 DELAY 3 Pour mémoriser les réglages sonores 1 Appuyer sur ONE TOUCH OPERATION Le témoin ONE TOUCH OPERATION s allume puis les réglages précédemment mémorisés sont rappelés 2 Ajustez le son en utilisant les fonctions décrites ci ...

Страница 41: ...r page 22 4 Appuyer de nouveau sur MEMORY pendant que le numéro du canal choisi clignote sur l affichage Le numéro du canal choisi s arrête de clignoter La station est attribuée au numéro de canal choisi 5 Répétez les étapes 1 à 4 jusqu à ce que toutes les stations souhaitées soient mémorisées Pour effacer une station préréglée Enregistrer une nouvelle station sur un numéro utilisé efface la stati...

Страница 42: ... une station préréglée Sur le panneau avant 1 Appuyer sur FM ou AM La dernière station de la bande choisie est accordée MULTI CURSOR fi peuvent être maintenant utilisées pour commander le tuner 2 Appuyer répétitivement sur MULTI CURSOR fi jusqu à ce que PRESET apparaisse sur l affichage 3 Appuyer sur MULTI CURSOR pour choisir un canal préréglé Appuyer sur diminue le numéro du canal préréglé Appuye...

Страница 43: ...tée Theater Surround de JVC Afin de reproduire un champ sonore plus réaliste dans la pièce d écoute lors de la reproduction de supports vidéo portant la marque DOLBY SURROUND le Theater Surround de JVC a été conçu pour rendre les voix plus claires et pour créer une réelle impression d y être Ce mode peut être utilisé quand des enceintes avant et des enceintes arrière sont connectées avec ou sans e...

Страница 44: ...e avant Enceinte arrière Enceinte arrière Chaque fois que la touche SURROUND est pressée les modes DSP changent comme suit PRO LOGIC THEATER DANCE C DANCE CLUB LIVE C LIVE CLUB HALL PAVILION 3D ACTION OFF Le mode DSP est annulé Chaque fois que la touche SURROUND est pressée les modes DSP changent comme suit 3 STEREO 3D THEATER DANCE C DANCE CLUB LIVE C LIVE CLUB HALL PAVILION 3D ACTION OFF Le mode...

Страница 45: ...ustement des modes DAP Avant de commencer se rappeler S assurer que les informations sur les enceintes ont été réglées correctement voir page 11 Il y a un temps limite pour réaliser les étapes suivantes Si le réglage est annulé avant la fin recommencer à partir de l étape 1 Il est uniquement possible d ajuster le niveau de sortie des enceintes arrière quand des enceintes arrière sont connectées et...

Страница 46: ...OUND CONTROL Les touches numériques sont actives pour l ajustement du son 2 Appuyer répétitivement sur SURROUND jusqu à ce que le mode PROLOGIC 3 STEREO ou THEATER apparaît sur l affichage Pour PROLOGIC et 3 STEREO l indicateur PRO LOGIC s allume sur l affichage Pour THEATER les indicateurs PRO LOGIC et DAP s allument sur l affichage 3 Appuyer sur TEST pour vérifier la balance de sortie des encein...

Страница 47: ... et du JVC Theater Surround reproduire une source qui a été traitée avec le Dolby Surround et qui porte la marque DOLBY SURROUND Pour annuler le mode DSP Appuyer répétitivement sur SURROUND jusqu à ce que OFF apparaisse sur l affichage à l étape 2 ci dessus Sur le panneau avant Il est aussi possible d utiliser les touches sur le panneau avant pour ajuster les modes surround Cependant aucune tonali...

Страница 48: ...usqu à 10 dB maximum Appuyer sur REAR R augmente le niveau de sortie jusqu à 10 dB maximum Mise en service du mode de lecture DVD MULTI Il est possible d ajuster le mode de lecture DVD MULTI lors de la lecture d un DVD en utilisant le mode de sortie analogique discrète sur le lecteur DVD Une fois que les ajustements sont terminés l ampli tuner les mémorise jusqu à la prochaine modification Avant d...

Страница 49: ...e commande à distance COMPU LINK vous permet de commander les appareils audio JVC à travers le capteur de télécommande de l ampli tuner Tourne disque Lecteur CD Platine cassette ou Enregistreur de MD COMPU LINK 3 SYNCHRO Mise sous et hors tension Attente automatique possible uniquement avec la connexion COMPU LINK 3 Le lecteur CD et la platine cassette ou l enregistreur de MD se mettent sous et ho...

Страница 50: ...usté le son appuyer sur la touche de sélection de source correspondante ou sur CD DISC pour commander la source souhaitée en utilisant les touches numériques Sinon les touches numérique ne peuvent pas utilisées pour commander la source souhaitée Platine cassette Après appuyer sur TAPE MD il est possible de réaliser les choses suivantes sur une platine cassette 3 Démarrer la lecture 1 1 1 1 1 Avanc...

Страница 51: ...yer sur 3 Remarque Pour commander une platine cassette ou un enregistreur de MD en utilisant le système de commande à distance COMPU LINK régler le nom de source correctement Voir page 11 IIMPORTANT Pour commander des appareils vidéo JVC en utilisant cette télécommande Diriger la télécommande directement sur le capteur de télécommande du magnétoscope lecteur de DVD ou téléviseur et non pas sur l a...

Страница 52: ...s enceintes du tourne disque Tourner MASTER VOLUME dans le sens contraire des aiguilles d une montre trois ou quatre fois puis appuyer sur POWER sur le panneau avant Si OVERLOAD ne disparaît pas débrancher le cordon d alimentation puis le rebrancher de nouveau Appuyer sur POWER sur le panneau avant puis vérifier le câblage des enceintes Si OVERLOAD ne disparaît pas débrancher le cordon d alimentat...

Страница 53: ... de 0 8 de distorsion harmonique totale Distorsion harmonique totale 8 Ω 1 kHz 0 8 avec une sortie de 100 W Mesuré par le système d analyse audio de JVC Audio Sensibilité d entrée audio Impédance 1 kHz PHONO MM 2 7 mV 47 k Ω CD TAPE MD VCR DVD 220 mV 47 k Ω Niveau de sortie audio TAPE MD VCR 220 mV Rapport signal sur bruit 66 IHF 78 IHF PHONO 70 dB 77 dB à REC OUT CD TAPE MD VCR DVD 87 dB 67 dB Ré...

Страница 54: ...ration stéréo à REC OUT 35 dB à 1 kHz Sélectivité de canal alterné 45 dB 400 kHz Réponse en fréquence 30 Hz à 15 kHz 0 5 dB 3 dB Tuner AM Plage d accord 530 kHz à 1710 kHz Sensibilité utile Antenne cadre 400 µV m Rapport signal sur bruit 50 dB 100 mV m Général Alimentation Secteur 120V 60 Hz Consommation 290 W 390 VA pendant le fonctionnement 2 W en mode d attente Dimensions L x H x P 435 mm x 146...

Страница 55: ...VICTOR COMPANY OF JAPAN LIMITED EN FR J VC 0200HIMMDWJEIN ...

Отзывы: