background image

2

Introduction

Merci pour avoir acheté un produit JVC.
Veuillez lire attentivement toutes les instructions avant d’utiliser l’appareil afin de bien comprendre 
son fonctionnement et d’obtenir les meilleures performances possibles.

Précautions

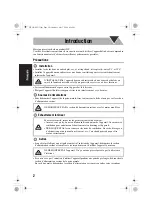
 Installation

• Installez la chaîne dans un endroit plat, sec, et ni trop chaud, ni trop froid—entre 5°C et 35°C.
• Installez l’appareil dans un endroit avec une bonne ventilation pour éviter tout échauffement 

intérieur de l’appareil.

• Laissez suffisamment d’espace entre l’appareil et le téléviseur.
• Éloignez l’appareil du téléviseur pour éviter toute interférence avec ce dernier.

Sources d’alimentations

• Pour débrancher l’appareil de la prise murale, tirez toujours sur la fiche et non pas sur le cordon 

d’alimentation secteur.

Échauffement intérieur

 Autres

• Si un objet métallique ou un liquide tombait à l’intérieur de l’appareil, débranchez le cordon 

d’alimentation secteur et consultez votre revendeur avant d’utiliser l’appareil à nouveau.

• Si vous n’avez pas l’intention d’utiliser l’appareil pendant une période prolongée, débranchez le 

cordon d’alimentation secteur de la prise murale.
En cas d’anomalie, débranchez le cordon d’alimentation secteur et consultez votre revendeur.

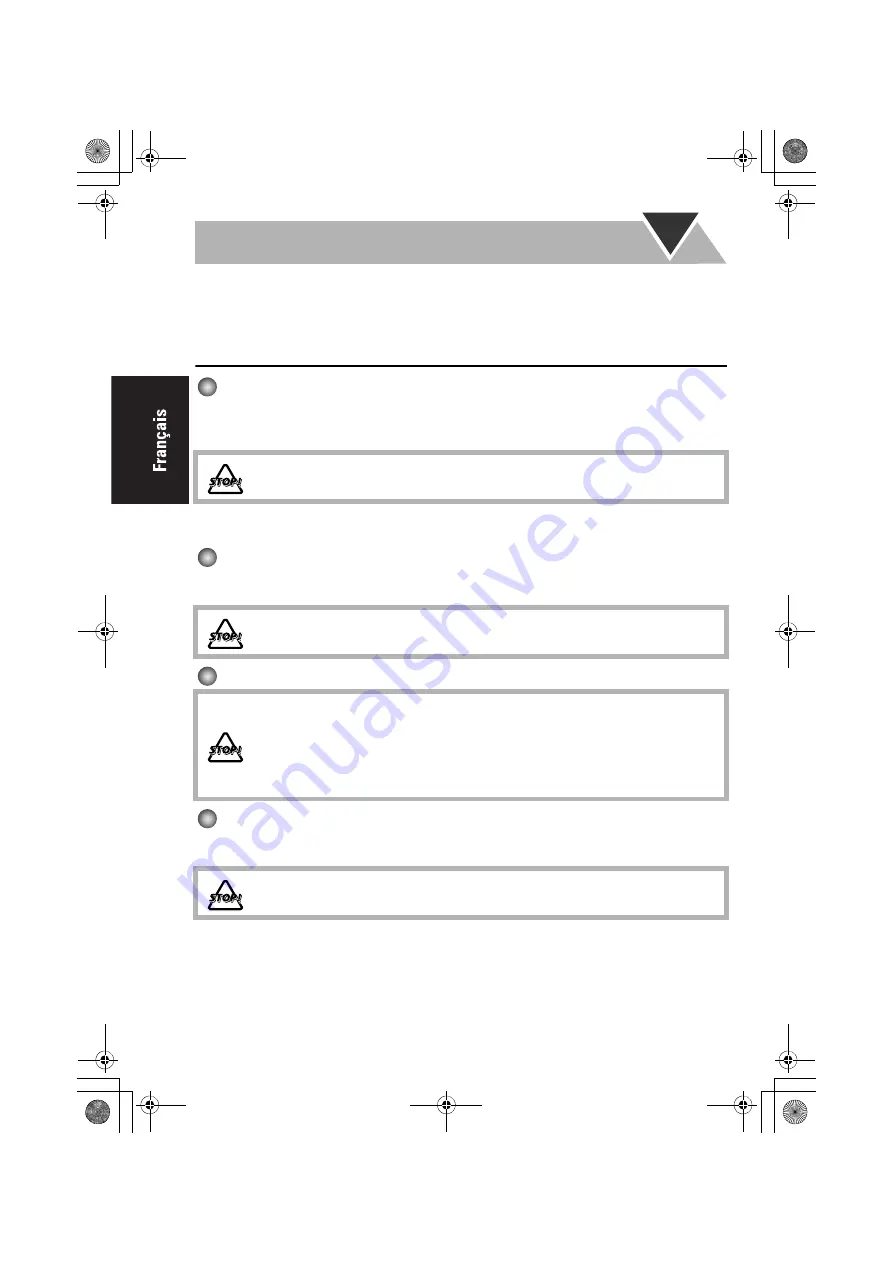
N’INSTALLEZ PAS l’appareil dans en endroit proche d’une source de chaleur ou 
sujet à la lumière directe du soleil, à un poussière excessive ou à des vibrations.

NE MANIPULEZ PAS le cordon d’alimentation secteur avec les mains mouillées.

Pour votre sécurité, respectez les points suivants attentivement:
• Assurez-vous qu’il y a une ventilation suffisante autour de l’appareil. Une mauvaise 

ventilation peut entraîner un échauffement et endommager l’appareil.

• NE BLOQUEZ PAS les ouvertures ni les trous de ventilation. En cas de blocage ou 

d’obstruction par un journal, un vêtement, etc., l’air chaud pourrait ne pas être 
évacué correctement.

NE DÉMONTEZ PAS l’appareil. Il n’y a aucune pièce réparable par l’utilisateur à 
l’intérieur.

FR_NX-PN7[C].fm  Page 2  Wednesday, May 7, 2008  4:26 PM

Содержание NX-PN7

Страница 1: ...COMPACT COMPONENT SYSTEM SYSTEME DE COMPOSANTS COMPACT NX PN7 INSTRUCTIONS MANUEL D INSTRUCTIONS LVT1864 002A C cover_NX PN7 C fm Page 1 Sunday April 27 2008 1 59 PM ...

Страница 2: ...he mains line Disconnect the mains plug to shut the power off completely the STANDBY lamp goes off The MAINS plug or an appliance coupler is used as the disconnect device the disconnect device shall remain readily operable When the system is on standby the STANDBY lamp lights red When the system is turned on the STANDBY lamp goes off The power can be remote controlled ATTENTION La touche dans n im...

Страница 3: ...ve des écouteurs ou du casque d écoute peut entraîner une perte auditive For Canada pour le Canada THIS DIGITAL APPARATUS DOES NOT EXCEED THE CLASS B LIMITS FOR RADIO NOISE EMISSIONS FROM DIGITAL APPARATUS AS SET OUT IN THE INTERFERENCE CAUSING EQUIPMENT STANDARD ENTITLED DIGITAL APPARATUS ICES 003 OF THE DEPARTMENT OF COMMUNICATIONS CET APPAREIL NUMERIQUE RESPECTE LES LIMITES DE BRUITS RADIOELECT...

Страница 4: ...of 10 cm or more Attention Aération correcte Pour prévenir tout risque de décharge électrique ou d incendie et éviter toute détérioration installez l appareil de la manière suivante 1 Avant Bien dégagé de tout objet 2 Côtés dessus dessous Assurez vous que rien ne bloque les espaces indiqués sur le schéma ci dessous 3 Dessous Posez l appareil sur une surface plane et horizontale Veillez à ce que sa...

Страница 5: ...ntrol 8 Playing Back from iPod 11 Connecting iPod Devices 12 Operations 13 Listening to FM AM Broadcasts 15 Playing Back from Other Equipment 17 Connecting Other Equipment 17 Operations 17 Setting the Clock and Timer 18 Setting the Clock 18 Setting the Timer 19 Troubleshooting 21 Specifications 22 EN_NX PN7 C BOOK Page 1 Sunday April 27 2008 1 54 PM ...

Страница 6: ...llic object or liquid fall into the unit unplug the AC power cord and consult your dealer before operating any further If you are not going to operate the unit for an extended period of time unplug the AC power cord from the wall outlet If anything goes wrong unplug the AC power cord and consult your dealer DO NOT install the unit in a location near heat sources or in a place subject to direct sun...

Страница 7: ...sult a doctor immediately Do not recharge short disassemble or heat the battery or dispose of it in a fire Doing any of these things may cause the battery to give off heat crack or start a fire Do not leave the battery with other metallic materials Doing this may cause the battery to give off heat crack or start a fire When throwing away or saving the battery wrap it in tape and insulate otherwise...

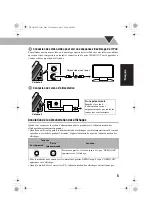
Страница 8: ...sensitivity of the AM loop antenna may be reduced Do not connect the AC power cord until all other connections have been made For better FM reception Disconnect the supplied FM antenna and connect to an outdoor FM antenna using a 75 Ω wire with coaxial type connector Left side AM loop antenna supplied Turn it until the best reception is obtained FM antenna supplied Extend it so that you can obtain...

Страница 9: ...automatically When you operate the unit the display demonstration stops temporarily If no operation is done for 2 minutes the unit starts the display demonstration again To activate again hold down DEMO until DEMO ON appears on the display When the ECO mode is activated P 9 the display demonstration does not function Buttons Function On the Unit On the remote Hold down until DEMO OFF appears on th...

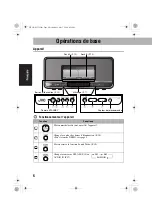
Страница 10: ...anges the color of the illumination bars P 10 For DEMO button see page 5 Activates Sound Turbo P 10 Changes the source to FM AM P 15 or AUDIO IN P 17 Display P 7 STANDBY lamp Remote control sensor Dock A P 12 Dock B P 12 Illumination bars P 10 FM AUDIO IN AM EN_NX PN7 C BOOK Page 6 Sunday April 27 2008 1 54 PM ...

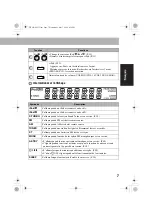
Страница 11: ... activated P 10 FM Lights up when FM is selected as the source AM Lights up when AM is selected as the source TUNED Lights up when a station of sufficient signal strength is tuned in ST Lights up when FM stereo broadcast is received MONO Lights up when FM monaural reception mode is activated A STBY Lights up when Auto Standby is activated P 10 Flashes for about 3 minutes before Auto Standby turns ...

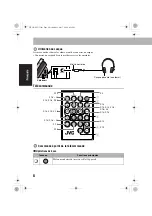
Страница 12: ...e Control Operating on the Remote Control Basic operations Buttons Main functions Turns on or off standby the power Right side Stereo mini plug Headphones not supplied P 9 P 10 P 14 P 14 P 15 P 10 P 18 20 P 10 P 10 P 13 P 18 P 20 P 13 P 15 P 16 P 14 P 16 20 P 13 P 15 P 16 P 18 20 P 10 EN_NX PN7 C BOOK Page 8 Sunday April 27 2008 1 54 PM ...

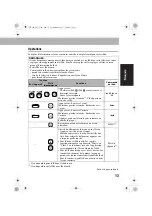
Страница 13: ... playback and pauses for iPod P 13 Changes the source to FM AM P 15 P 16 or AUDIO IN P 17 Adjusts the volume level VOL MIN VOL 1 to VOL 29 VOL MAX Drops the volume in a moment To restore the volume press again or adjust the volume level Press repeatedly while the unit is turned on DIM 1 Dims the display and the illumination bars DIM 2 Dims the display much more than DIM 1 and the illumination bars...

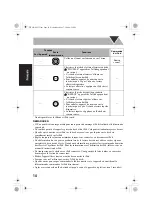
Страница 14: ... as the source Emphasize the sound Sound Turbo This function emphasizes the sound To cancel this function press SOUND TURBO again OFF appears on the display To adjust the tone You can adjust the bass and treble level Press repeatedly to change the color of the illumination bars You can select one of the nine colors Press repeatedly to specify the time in minutes as follows Hold down until A STBY a...

Страница 15: ...e com iPod model Audio Video iPod nano 1GB 2GB 4GB iPod nano 2nd Generation 2GB 4GB 8GB iPod nano 3rd Generation 4GB 8GB iPod mini 4GB iPod mini 2nd Generation 4GB 6GB iPod 4th Generation 20GB 40GB iPod photo 4th Generation 20GB 30GB 40GB 60GB iPod video 5th Generation 30GB 60GB 80GB iPod classic 80GB 160GB iPod touch 8GB 16GB 32GB iPhone 4GB 8GB 16GB iPod is a trademark of Apple Inc registered in...

Страница 16: ...iPod The battery of the iPod is always charged through the unit except when the unit is in ECO mode see page 9 When 2 iPod devices are connected both batteries are charged at the same time For details of the battery charging see the instruction manual for iPod Dock A Dock B Dock adapter supplied with the iPod or sold separately To detach the dock adapter from the dock Pull up the dock adapter with...

Страница 17: ...ource and starts playback Starts playback pauses Hold down 1 iPod is in sleep mode 38 3 or 8 Press Forward skip Hold down Forward search x Press Reverse skip Hold down Reverse search Press during playback to back to the beginning of the track 4 Goes back to the previous menu screen MENU 2 Selects an item on the menu screen Press Selects an item Hold down Scrolls through a list To stop scrolling pr...

Страница 18: ... to the connector part Turn off the unit when disconnecting an iPod Remove the iPod from the dock when you do not use it When you cannot operate the connected iPod through the unit or using the remote control operate the iPod directly After connecting an iPod wait until the unit is ready for operation about 3 seconds Buttons Functions Control of the iPod On the Unit On the remote Confirms an item ...

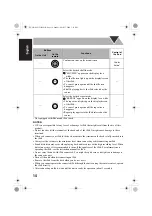
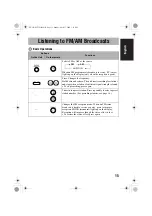
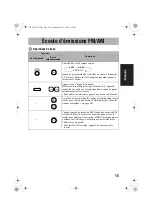
Страница 19: ...and stops when a station of sufficient signal strength is found To stop searching press again Tunes in to a preset station Press repeatedly to select a preset station number For presetting stations see page 16 Changes the FM reception mode When an FM stereo broadcast is hard to receive or noisy press to improve reception MONO monaural lights up on the display Reception will improve though the ster...

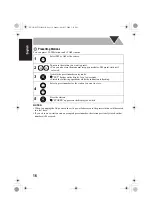
Страница 20: ...ill be erased 1 Select FM or AM as the source 2 Tune in to the station you want to preset You can also store the monaural reception mode for FM preset stations if selected 3 Activate the preset number entry mode SET flashes on the display for a few seconds Finish the following operations while the indication is flashing 4 Select a preset number for the station you want to store 5 Store the station...

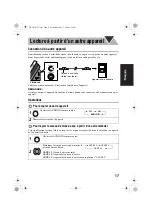
Страница 21: ...quipment To Adjust the Sound Input Level from the Equipment You can adjust the sound input level from the connected equipment if the incoming signal is too small or too large 1 Select AUDIO IN as the source 2 Start playing the equipment 1 Select AUDIO IN as the source 2 Hold down to adjust the sound input level LEVEL 1 Ordinary input level LEVEL 2 Increases the input level LEVEL 3 Increases the in...

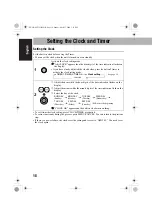
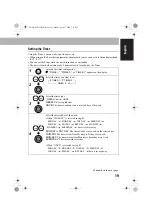
Страница 22: ...then the hour digit of the time indication flashes on the display If you have already adjusted the clock before press the button 2 times to activate the clock setting mode 2 1 Adjust the hour while the hour digits of the time indication flashes on the display 2 Adjust the minute while the minute digits of the time indication flash on the display 3 Select the day of the week CLOCK OK appears and th...

Страница 23: ...below ONCE The timer works once on a selected day of the week 4 Select the desired day of the week When WEEKLY is selected in step 3 SUN DAY to SAT DAY The timer works every week on the selected day MON FRI The timer works from Monday to Friday every week MON SAT The timer works from Monday to Saturday every week EVERYDAY The timer works everyday When ONCE is selected in step 3 TIMER 2 TIMER 1 TIM...

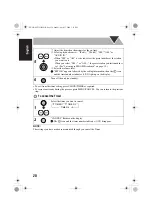
Страница 24: ...or AM is selected select the preset number of the station you want to use When you select FM or AM the preset station you last tuned in is set See Listening to FM AM Broadcasts on page 15 3 Select the volume level SET OK appears followed by the setting information then the icon and the timer number indicator 1 2 3 light up on the display 6 Turn off the unit on standby 1 Select the timer you want t...

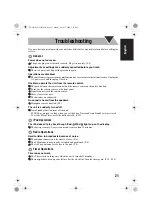
Страница 25: ... the unit The batteries are exhausted No sound is heard from the speakers Headphones are connected P 8 The unit is suddenly turned off Auto Standby function turns off the unit SLEEP was pressed too long when you set the Sleep Timer and Auto Standby was activated To set the Sleep Timer press the button briefly P 10 iPod Operations The iPod doesn t play back though iPod iPod lights up on the display...

Страница 26: ...r iPod Compatible iPod types See page 11 Output power each iPod DC 5 V 500 mA VIDEO OUT For iPod Composite PHONES 32 Ω 1 kΩ 15 mW ch output into 32 Ω Tuner FM tuning range 87 5 MHz 108 0 MHz 100 kHz channel space AM tuning range 530 kHz 1710 kHz 10 kHz channel space Unit Dimensions W H D 318 mm 148 mm 154 mm Mass Approx 2 6 kg Speaker Specifications Type Full range bass reflex type Speakers 7 cm c...

Страница 27: ...e 8 Lecture à partir d un iPod 11 Connexion de iPod 12 Opérations 13 Écoute d émissions FM AM 15 Lecture à partir d un autre appareil 17 Connexion d un autre appareil 17 Opérations 17 Réglage de l horloge et de la minuterie 18 Réglage de l horloge 18 Réglage de la minuterie 19 Guide de dépannage 21 Spécifications 22 FR_NX PN7 C TOC fm Page 1 Wednesday May 7 2008 4 25 PM ...

Страница 28: ...ntation secteur et consultez votre revendeur avant d utiliser l appareil à nouveau Si vous n avez pas l intention d utiliser l appareil pendant une période prolongée débranchez le cordon d alimentation secteur de la prise murale En cas d anomalie débranchez le cordon d alimentation secteur et consultez votre revendeur N INSTALLEZ PAS l appareil dans en endroit proche d une source de chaleur ou suj...

Страница 29: ...court circuitez pas ne chauffer pas la pile ni ne la jeter dans un feu Cela pourrait entraîner une surchauffe de la pile une fissure ou un incendie Ne laissez pas la pile avec d autres objets métalliques Cela pourrait entraîner une surchauffe de la pile une fissure ou un incendie Pour mettre au rebut la pile ou la conserver entourer la de ruban isolant sinon la pile peut chauffer se fissurer ou en...

Страница 30: ...antenne cadre AM seront réduites Ne branchez pas le cordon d alimentation secteur avant d avoir effectué toutes les autres connexions Pour une meilleure réception FM Déconnectez l antenne FM fournie et connectez l appareil à une antenne FM extérieure en utilisant un connecteur de type coaxial 75 Ω Côté gauche Antenne cadre AM fournie Tournez la jusqu a que vous obteniez la meilleure réception poss...

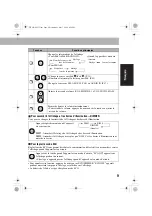
Страница 31: ...sez l appareil la démonstration des affichages s arrête temporairement Si aucune opération n est réalisée pendant 2 minutes l appareil démarre de nouveau la démonstration des affichages Pour la mettre de nouveau en service maintenez pressée DEMO jusqu à ce que DEMO ON apparaisse sur l affichage Quand le mode ECO est en service P 9 la démonstration des affichages ne fonctionne pas Touches Fonction ...

Страница 32: ... couleur des barres d illumination P 10 Pour la touche DEMO voir page 5 Met en service la fonction Sound Turbo P 10 Change la source sur FM AM P 15 ou AUDIO IN P 17 Affichage P 7 Témoin STANDBY Capteur de télécommande Dock A P 12 Dock B P 12 Barres d illumination P 10 FM AUDIO IN AM FR_NX PN7 C fm Page 6 Wednesday May 7 2008 4 26 PM ...

Страница 33: ... quand FM est choisi comme source AM S allume quand AM est choisi comme source TUNED S allume quand une station de signal suffisamment fort est accordée ST S allume quand une émission FM stéréo est reçue MONO S allume quand le mode de réception FM monophonique est en service A STBY S allume quand la mise en attente automatique est en service P 10 Clignote pendant environ 3 minutes avant que la fon...

Страница 34: ...de Commande à partir de la télécommande Opérations de base Touches Fonctions principales Met en marche arrête met en veille l appareil Côté droit Mini fiche stéréo Casque d écoute non fourni P 9 P 10 P 14 P 14 P 15 P 10 P 18 20 P 10 P 10 P 13 P 18 P 20 P 13 P 15 P 16 P 14 P 16 20 P 13 P 15 P 16 P 18 20 P 10 FR_NX PN7 C fm Page 8 Wednesday May 7 2008 4 26 PM ...

Страница 35: ...r iPod P 13 Change la source sur FM AM P 15 P 16 ou AUDIO IN P 17 Adjuste le niveau de volume VOL MIN VOL 1 à VOL 29 VOL MAX Permet de baisser le volume instantanément Pour rétablir le volume appuyez de nouveau sur la touche ou ajuster le niveau de volume Appuyez répétitivement quand l appareil est sous tension DIM 1 Assombrit l éclairage de l affichage de des barres d illumination DIM 2 Assombrit...

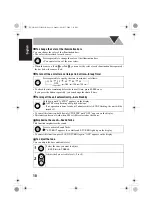
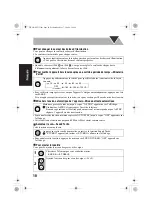
Страница 36: ...on Sound Turbo Cette fonction accentue le son Pour annuler cette fonction appuyez de nouveau sur SOUND TURBO OFF apparaît sur l affichage Pour ajuster la tonalité Vous pouvez ajuster le niveau des graves et des aigus Appuyez répétitivement sur la touche pour changer la couleur des barres d illumination Vous pouvez choisir une des neuf couleurs proposées Appuyez répétitivement sur la touche pour sp...

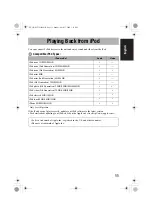
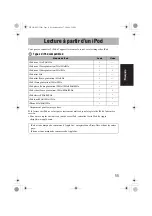
Страница 37: ...ttp www apple com Modèle de iPod Audio Vidéo iPod nano 1Go 2Go 4Go iPod nano 2ème génération 2Go 4Go 8Go iPod nano 3ème génération 4Go 8Go iPod mini 4Go iPod mini 2ème génération 4Go 6Go iPod 4ème génération 20Go 40Go iPod photo 4ème génération 20Go 30Go 40Go 60Go iPod video 5ème génération 30Go 60Go 80Go iPod classic 80Go 160Go iPod touch 8Go 16Go 32Go iPhone 4Go 8Go 16Go iPod est une marque de c...

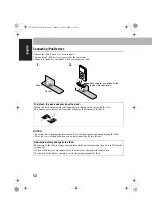
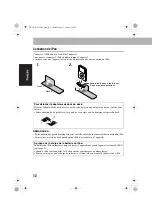
Страница 38: ...ie du iPod est toujours chargée à travers l appareil sauf quand l appareil est en mode ECO voir page 9 Quand 2 iPod sont connectés les deux batteries sont chargées en même temps Pour en savoir plus sur la charge de la batterie référez vous au manuel d instruction de iPod Dock A Dock B Adaptateur de dock fourni avec iPod ou vendu séparément Pour détacher l adaptateur de dock du dock Tirez sur l ada...

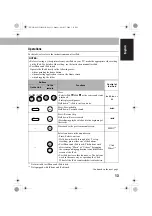
Страница 39: ...ée la touche 1 l iPod passe en mode de veille 38 3 ou 8 Appuyez sur Saut vers l avant Maintenez pressée la touche Recherche vers l avant x Appuyez sur Saut vers l arrière Maintenez pressée la touche Recherche vers l arrière Appuyez pendant la lecture pour retourner au début de la plage 4 Retourne au menu précrédent ou au écran précrédent MENU 2 Choisit un élément sur le menu ou sur l écran Appuyez...

Страница 40: ...ant de déconnecter le iPod Lorsque vous ne l utilisez pas retirez l iPod du dock Quand vous ne pouvez pas commander le iPod connecté via cet appareil ou en utilisant la télécommande commandez le iPod directement Après avoir connecté un iPod attendez jusqu à ce que l appareil soit prêt environ 3 secondes Touches Fonctions Commande du iPod Sur l appareil Sur la télécommande Valide un élément sur le ...

Страница 41: ...uffisamment fort est trouvée Pour arrêter la recherche appuyez à nouveau sur la touche Accorde une station préréglée Appuyez répétitivement sur la touche pour choisir un numéro de station préréglé Pour les stations préréglées voir page 16 Change le mode de réception FM Quand une émission FM stéréo est difficile à recevoir ou parasitée appuyez sur la touche pour améliorer la réception MONO monophon...

Страница 42: ... Choisissez FM ou AM comme source 2 Réglez la station que vous souhaitez mémoriser Vous pouvez aussi mémoriser le mode de réception monophonique pour les stations FM préréglée s il est choisi 3 Mettez en service le mode d entrée de numéro de préréglage SET clignote sur l affichage pendant quelques secondes Terminez les opérations suivantes pendant que l indication clignote 4 Choisissez un numéro d...

Страница 43: ...l Pour régler le niveau d entrée du son à partir d un autre matériel Si le signal entrant est trop faible ou trop fort vous pouvez régler le niveau d entrée du son à partir de l appareil connecté 1 Choisissez AUDIO IN comme source 2 Démarrez la lecture de l appareil 1 Choisissez AUDIO IN comme source 2 Maintenez la touche pressée pour ajuster le niveau d entrée du son LEVEL 1 Niveau d entrée norma...

Страница 44: ...e le mode de réglage de l horloge AdjCLOCK apparaît puis les chiffres de l heure clignotent sur l affichage Si vous avez déjà ajusté l horloge précédemment appuyez 2 fois sur la touche pour mettre en service le mode de réglage de l horloge 2 1 Ajustez les heures pendant que les chiffres des heures de l horloge clignotent sur l affichage 2 Ajustez les minutes pendant que les chiffres des minutes de...

Страница 45: ...hoisissez le type de minuterie WEEKLY Voir l étape 4 ci dessous ONCE La minuterie fonctionne une fois le jour choisi de la semaine 4 Choisissez le jour de la semaine souhaité Quand WEEKLY est choisi à l étape 3 SUN DAY à SAT DAY La minuterie fonctionne chaque semaine le jour choisi MON FRI La minuterie fonction du lundi au vendredi chaque semaine MON SAT La minuterie fonction du lundi au samedi ch...

Страница 46: ...IN Quand FM ou AM est choisi choisissez le numéro de préréglage de la station que vous souhaitez utiliser Quand vous choisissez FM ou AM la dernière station préreeglée accordée est réglée Voir Écoute d émissions FM AM à la page 15 3 Choisissez le niveau de volume SET OK apparaît suivi par les informations sur le réglage puis l icône et l indicateur du numéro de la minuterie 1 2 3 s allume sur l af...

Страница 47: ...ucun son n est entendu des enceintes Un casque est connecté P 8 L appareil se met soudainement hors tension La fonction de mise en attente automatique mets l appareil hors tension automatiquement La touche SLEEP a été pressée de façon trop prolongée lors du réglage de la minuterie d arrêt et la mise en attente automatique est entrée en service Pour régler la minuterie d arrête appuyez brièvement s...

Страница 48: ...page 11 Puissance de sortie pour chaque iPod CC 5 V 500 mA VIDEO OUT Pour iPod Composite PHONES 32 Ω 1 kΩ 15 sortie de mW voie pour 32 Ω Tuner Plage d accord FM 87 5 MHz 108 0 MHz 100 kHz par voie Plage d accord AM 530 kHz 1710 kHz 10 kHz par voie Appareil Dimensions L H P 318 mm 148 mm 154 mm Masse Approx 2 6 kg Caractéristiques des enceintes Type Enceinte acoustique à évent accordé de haute fidé...

Страница 49: ...NX PN7 COMPACT COMPONENT SYSTEM EN FR 2008 Victor Company of Japan Limited 0508YAMMDWBET cover_NX PN7 C fm Page 2 Sunday April 27 2008 1 59 PM ...

Отзывы: