background image

– 58 –

English

Continued

3

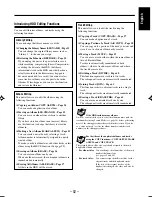
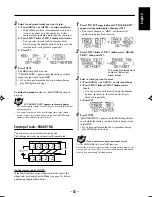
If necessary, select a track you want.
1) Press 

ALBUM + 

or

 ALBUM –

 to select an album.

2) Press 

SELECT 

¢


or


SELECT 

4

 to select a

track.

• You can select the track directly using the number

buttons. In this case, the selected track starts
playback repeatedly.

By holding 

SELECT 

¢


or 

SELECT 

4

, you can

fast-forward or fast-reverse the track to find the start
point.

4

Press 

SET

 when you find the start point (POSI.A) for

A-B copy.

The portion (of about 2-second length) following the
selected start point repeats playing.

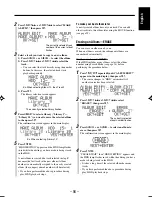
5

If necessary, press 

SELECT 

¢


or 

SELECT 

4

 to

precisely adjust the start point.

The unit repeats the newly selected start point.
• You can shift the start point up to ±128. This range

(±128) corresponds to about ±12 seconds from the
original point (ADJUST 0).

6

Press 

SET

.

Playback continues.

By holding 

SELECT 

¢


or 

SELECT 

4

, you can

fast-forward or fast-reverse the track to find the end
point.
• If you reach the end of the track while searching,

you will go back to the start point (POSI.A).

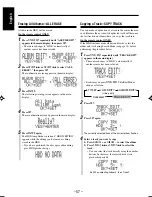
7

Press 

SET

 again when you find the end point

(POSI.B) for A-B copy.

The portion (of about 2-second length) following the
selected end point repeats playing.

3) Press 

SET

.

The album selection screen appears.

5

Press 

ALBUM + 

or

 ALBUM –

 to select an album

where to copy the track into, then press 

SET

.

6

Press 

ENTER

.

The editing you have made is being stored in the HDD.
• If you have performed the above procedure during

play, HDD playback stops.

If “CANNOT ENTRY LIB. Library TUN” appears
in the main display

You have selected the album in “Library TUNER” in step 

5

.

You cannot copy a track into the album in “Library TUNER.”

Copying a Portion of a Track—A-B COPY

You can copy only a portion of the track you want and store
it as a new track (the first track) in a new album.
• You cannot set a start point within the first second and

set an end point within the last 5 seconds of a track.

On the remote control ONLY:

If the HDD includes many albums and tracks, select the
album and track using Search Mode (see page 34) before
performing the procedure below.

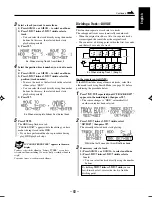
1

Press 

TITLE/EDIT

 repeatedly until “TRACK EDIT?”

appears in the main display, then press 

SET

.

• The source changes to “HDD” automatically if

another source has been selected.

2

Press 

SELECT 

¢


or 

SELECT 

4

 to select “A-B

COPY?,” then press 

SET

.

The currently selected track starts playing.

Within the first 4 seconds, this will not be shown.

EN58-62_NX-HD10[J_C]f.pm6

02.6.15, 0:58 PM

58

Содержание NX-HD10

Страница 1: ...l No and Serial No which are located either on the rear bottom or side of the cabinet Retain this information for future reference Model No Serial No STANDBY ON DISP CHARA CANCEL SET ENTER RM SNXHD10J REMOTECONTROL REPEAT ALBUM ALBUM SEARCH MODE TONE CONTROL ALBUM LIBRARY SELECT FM PLAY MODE TITLE EDIT DIMMER CONTRAST VOLUME AHBPRO AAC SOUND 10 0 10 1 MARK 2 ABC 3 DEF 4 GHI 5 JKL 6 MNO 7 PQRS 8 TU...

Страница 2: ...n the Hard Disk Drive HDD Otherwise you may have your warranty invalid and be penalized by law The manufacturer assumes no liability for any damage resulting from such conduct as mentioned above Attention Ne jamais essayer d analyzer ni d extraire les données qui se trouvent sur le disque dur HDD Sinon votre garantie risquerait d être invalidée et vous risqueriez d être pénalisé par la loi Le fabr...

Страница 3: ...te the receiving antenna Increase the separation between the equipment and receiver Connect the equipment into an outlet on a circuit different from that to which the receiver is connected Consult the dealer or an experienced radio TV technician for help For Canada pour le Canada CAUTION TO PREVENT ELECTRIC SHOCK MATCH WIDE BLADE OF PLUG TO WIDE SLOT FULLY INSERT ATTENTION POUR EVITER LES CHOCS EL...

Страница 4: ...e not going to operate the unit for an extended period of time unplug the AC power cord from the wall outlet DO NOT disassemble the unit since there are no user serviceable parts inside If anything goes wrong unplug the AC power cord and consult your dealer About This Manual This manual is organized as follows This manual mainly explains playback and editing operations using the remote control and...

Страница 5: ...ack the HDD Hard Disk Drive 28 Playing Back the Entire HDD Continuous Play 29 Basic HDD Operations 30 Playing Tracks in an Album Album Play 31 Playing Albums in a Library Library Play 32 Playing at Random Random Play 33 Repeating Tracks Repeat Play 33 Searching for Albums and Tracks to Play Search Modes 34 Recording into the HDD 38 Before You Start Recording 39 Using Automatic Recording Functions ...

Страница 6: ... 3 English Location of the Buttons Become familiar with the buttons on your unit Front Panel Display Window Inside of Front Door ...

Страница 7: ...cators 18 STEREO and MONO 5 BASS indicator 15 6 SOUND indicator 16 7 HDD operation indicators 31 32 34 35 ALBUM and LIBRARY 8 PROGRAM indicator 25 9 Repeat indicators 27 33 and 1 0 Auto recording indicators 41 42 TUNER CD and AUTO HDD indicator 30 Recording indicators 43 45 46 x2 x4 REC AAC 128 AAC 96 and PCM Clock and timer mode indicators clock 11 DAILY REC 1 2 3 SLEEP and A P off 64 68 SEARCH i...

Страница 8: ...ons SELECT 4 and 7 7 HDD operation buttons 31 ALBUM LIBRARY ALBUM and SEARCH MODE 8 TITLE EDIT button 49 50 53 62 9 DIMMER button 12 CONTRAST button 12 p SLEEP button 67 q STANDBY ON button 11 40 65 67 w DISP CHARA button 18 21 25 30 41 43 44 46 47 e CANCEL button r SET button t ENTER button y CD 3 8 play pause button 14 24 43 Pressing this button also turns on the unit u REC START button 43 47 i ...

Страница 9: ...g Antennas FM antenna 1 Attach the FM antenna to the FM 75 Ω COAXIAL terminal 2 Extend the FM antenna 3 Fasten it up in the position which gives you the best reception About the supplied FM antenna The FM antenna supplied with this unit can be used as temporary measure If reception is poor you can connect an outdoor FM antenna To connect an outdoor FM antenna Before connecting it disconnect the su...

Страница 10: ...etallic parts of the unit connecting cords and the AC power cord AM antenna AM loop antenna supplied Connecting Speakers You can connect the speakers using the speaker cords Use only speakers with the same speaker impedance more than 4 Ω as indicated by the speaker terminals on the rear of the unit 1 If cords are covered with insulation twist the core of the cord at the end of each cord then remov...

Страница 11: ... connecting a cassette deck By using audio cords not supplied connect Between the audio input jacks on the cassette deck and the LINE OUT jacks For recording on the cassette deck Between the audio output jacks on the cassette deck and the LINE IN jacks For playing a tape R L L R R L L R To remove the speaker grille The speaker grilles are removable as shown below To remove the speaker grille inser...

Страница 12: ...ries to heat or flame DO NOT leave the batteries in the battery compartment when you are not going to use the remote control for an extended period of time Otherwise it will be damaged from battery leakage R6P SUM 3 AA 15F 2 1 To the AC IN terminal 2 To a wall outlet AC power cord supplied Connecting a keyboard You can connect a PC compatible keyboard with the PS 2 plug to the KEYBOARD terminal in...

Страница 13: ... FM PLAY MODE TITLE EDIT DIMMER CONTRAST VOLUME AHBPRO AAC SOUND 10 0 10 1 MARK 2 ABC 3 DEF 4 GHI 5 JKL 6 MNO 7 PQRS 8 TUV 9 WXYZ HDD CD TUNER LINE RECSTART A P off CLOCK TIMER SLEEP DIMMER CONTRAST SELECT STANDBY ON CANCEL SET ENTER CLOCK TIMER HDD CD TUNER LINE RECSTART COMPACT COMPONENT HDD SYSTEM NX HD10 AUTO MODE STANDBY ON REC MODE VOLUME HDD CD SELECT LIBRARY ALBUM KEYBOARD CONNECTOR forTIT...

Страница 14: ...playing press STANDBY ON so that the STANDBY ON lamp on the unit lights in green The HDD lamp flashes then lights in blue The VOLUME lamp also lights in blue While the HDD lamp is flashing no remote control operations are accepted For detailed information on the HDD lamp see page 30 See also Changing the Display Brightness on the next page The indicator starts flashing if the built in clock is not...

Страница 15: ...starts flashing then follow steps 2 to 4 on the previous page To turn on off the clock indication You can turn on the clock indication on the display while the unit is in standby mode Press DIMMER CONTRAST on the remote control while the unit is in standby mode The clock indication appears on the display To turn off the clock indication for saving the power press DIMMER CONTRAST again while the un...

Страница 16: ... ALBUM LIBRARY SELECT FM PLAY MODE TITLE EDIT DIMMER CONTRAST VOLUME AHBPRO AAC SOUND 10 0 10 1 MARK 2 ABC 3 DEF 4 GHI 5 JKL 6 MNO 7 PQRS 8 TUV 9 WXYZ HDD CD TUNER LINE RECSTART A P off CLOCK TIMER SLEEP TONE CONTROL VOLUME AHBPRO AAC SOUND HDD CD TUNER LINE RECSTART COMPACT COMPONENT HDD SYSTEM NX HD10 AUTO MODE STANDBY ON REC MODE VOLUME HDD CD SELECT LIBRARY ALBUM KEYBOARD CONNECTOR forTITLE IN...

Страница 17: ... LINE is selected If the unit is in standby mode the power automatically comes on at the first press of the button Each time you press the button the source changes as follows FM To tune in to the last received FM station AM To tune in to the last received AM station LINE To use the external equipment connected to the LINE IN terminal If you have changed the source name of the external component t...

Страница 18: ...anceled Adjusting the Bass and Treble Sounds You can adjust bass and treble sounds to your taste and surroundings You can use this effect only for playback This function also affects the sound from headphones On the remote control ONLY 1 Press TONE CONTROL to select BASS or TREBLE The selected tone control mode and the current setting appear in the main display Each time you press the button the t...

Страница 19: ... SOUND AAC128 SOUND indicator HALL MID NIGHT HEAD PHONES MONO FILM AAC SOUND OFF canceled To check the current AAC sound mode press AAC SOUND once To cancel the AAC sound modes press AAC SOUND repeatedly until AAC SOUND OFF appears in the main display The SOUND indicator goes off from the display If NOT AAC appears in the main display While playing a non AAC track you cannot use any AAC sound mode...

Страница 20: ...T FM PLAY MODE TITLE EDIT DIMMER CONTRAST VOLUME AHBPRO AAC SOUND 10 0 10 1 MARK 2 ABC 3 DEF 4 GHI 5 JKL 6 MNO 7 PQRS 8 TUV 9 WXYZ HDD CD TUNER LINE RECSTART A P off CLOCK TIMER SLEEP SELECT DISP CHARA CANCEL SET 10 0 10 1 MARK 2 ABC 3 DEF 4 GHI 5 JKL 6 MNO 7 PQRS 8 TUV 9 WXYZ TUNER LINE FM PLAY MODE COMPACT COMPONENT HDD SYSTEM NX HD10 AUTO MODE STANDBY ON REC MODE VOLUME HDD CD SELECT LIBRARY AL...

Страница 21: ...reo broadcast is noisy or hard to receive you can change the FM reception mode to improve the reception Press FM PLAY MODE on the remote control Each time you press the button FM reception mode alternates between FM MONO and FM AUTO FM MONO Select this when an FM stereo broadcast is noisy or hard to receive Reception improves though stereo effect is lost The MONO indicator lights up on the display...

Страница 22: ...nually following the procedure below In some cases test frequencies have been already memorized for the tuner since the factory examined the tuner preset function before shipment This is not a malfunction You can preset the stations you want into memory by following the presetting method There is a time limit in doing the following steps If the setting is canceled before you finish start from step...

Страница 23: ... TONE CONTROL ALBUM LIBRARY SELECT FM PLAY MODE TITLE EDIT DIMMER CONTRAST VOLUME AHBPRO AAC SOUND 10 0 10 1 MARK 2 ABC 3 DEF 4 GHI 5 JKL 6 MNO 7 PQRS 8 TUV 9 WXYZ HDD CD TUNER LINE RECSTART A P off CLOCK TIMER SLEEP SELECT DISP CHARA CANCEL SET TUNER LINE COMPACT COMPONENT HDD SYSTEM NX HD10 AUTO MODE STANDBY ON REC MODE VOLUME HDD CD SELECT LIBRARY ALBUM KEYBOARD CONNECTOR forTITLE INPUT TUNER L...

Страница 24: ...ect LEVEL 2 if the current level is LEVEL 1 If the current level is LEVEL 2 adjust the output level on the external component Level OVER will not appear if the REC REMAIN time or the clock is shown in the main display AAC128 Selecting the External Component 1 Press TUNER LINE repeatedly until LINE external component is selected The unit automatically turns on Each time you press the button the sou...

Страница 25: ...CHANGE appears in the main display If you have changed the source name of the external component the currently selected source name will appear 2 Press SELECT or SELECT 4 to select an appropriate source name Each time you press the button the source name changes as follows LINE TAPE DBS VCR TV GAME back to the beginning To cancel the setting press CANCEL 3 Press SET to finish changing the source n...

Страница 26: ...ITLE INPUT TUNER LINE REC START SET CD COMPACT DIGITAL AUDIO SELECT CD CD STANDBY ON DISP CHARA CANCEL SET ENTER RM SNXHD10J REMOTECONTROL REPEAT ALBUM ALBUM SEARCH MODE TONE CONTROL ALBUM LIBRARY SELECT FM PLAY MODE TITLE EDIT DIMMER CONTRAST VOLUME AHBPRO AAC SOUND 10 0 10 1 MARK 2 ABC 3 DEF 4 GHI 5 JKL 6 MNO 7 PQRS 8 TUV 9 WXYZ HDD CD TUNER LINE RECSTART A P off CLOCK TIMER SLEEP SELECT DISP CH...

Страница 27: ... whether the compact disc logo is printed on the disc itself Reading the instructions or the note printed on the disc package When playing a CD R or CD RW User edited CD Rs CD Recordable and CD RWs CD ReWritable can be played back normally when they are already finalized If you play back unfinalized CDs UNFINALIZE appears in the main display You can play back your original CD Rs or CD RWs recorded...

Страница 28: ...en 5 For track number 20 press 10 then 10 For track number 32 press 10 10 10 then 2 Source is CD but no CD is loaded A CD is loaded During playback During a pause To change the information shown in the main display Each time you press DISP CHARA on the remote control the information in the main display changes as follows 1 Current track number 2 Elapsed playing time 3 Remaining recording time in t...

Страница 29: ...rogram after stopping the playback press and hold CANCEL until CD PROGRAM ALL CLEAR appears in the main display Turning off the unit or ejecting a CD also erases the entire program RANDOM indicator RANDOM AAC128 Continued If you try to program a 33rd step MEMORY FULL will appear in the main display If your entry is ignored You have tried to program a track number that does not exist on the CD for ...

Страница 30: ...s all the tracks on the CD in Normal play or Random play or all the tracks in the program REPEAT 1TRK Repeats one track REPEAT OFF Cancels Repeat play To cancel Repeat play press REPEAT repeatedly until REPEAT OFF appears in the main display The Repeat indicator goes off from the display Repeat indicator Prohibiting Disc Ejection Disc Lock You can prohibit CD ejection from the unit and can lock a ...

Страница 31: ...ART SET CD COMPACT DIGITAL AUDIO HDD SELECT LIBRARY ALBUM STANDBY ON DISP CHARA CANCEL SET ENTER RM SNXHD10J REMOTECONTROL REPEAT ALBUM ALBUM SEARCH MODE TONE CONTROL ALBUM LIBRARY SELECT FM PLAY MODE TITLE EDIT DIMMER CONTRAST VOLUME AHBPRO AAC SOUND 10 0 10 1 MARK 2 ABC 3 DEF 4 GHI 5 JKL 6 MNO 7 PQRS 8 TUV 9 WXYZ HDD CD TUNER LINE RECSTART A P off CLOCK TIMER SLEEP 10 0 10 1 MARK 2 ABC 3 DEF 4 G...

Страница 32: ...rd a song it is recorded as a track then these recorded tracks can be grouped into an album For example if you record the entire CD into the HDD all tracks of the CD are recorded as separate tracks and the entire CD can be considered and grouped as an album You can record and store these albums separately into 10 libraries In other words tracks recorded in the HDD are grouped into albums and album...

Страница 33: ... 4 repeatedly Skips to the beginning of the next or succeeding tracks 4 Goes back to the beginning of the current or previous tracks Before starting play you can continuously skip or go back to any track by holding the button To change the information shown in the main display Each time you press DISP CHARA on the remote control the information in the main display changes as follows Before playing...

Страница 34: ...ress the button the next library is selected You cannot select libraries without any album recorded Playing Tracks in an Album Album Play You can play back tracks in an album To make or edit albums see pages 40 to 47 and 54 to 56 On the remote control ONLY 1 Press HDD 3 8 then 7 The source is changed to HDD 2 Press FM PLAY MODE repeatedly until HDD ALBUM appears in the main display The ALBUM indic...

Страница 35: ...ANDOM appears in the main display while selecting a play mode you want 3 Press LIBRARY to select a library Library 1 Library 10 Library CD or Library TUNER 4 Press HDD 3 8 The albums in the library are played Library play ends when all the albums in the library are played once If you move to another library during Library play another Library play starts with the newly selected library To go to an...

Страница 36: ...g Random play you cannot use the following buttons LIBRARY ALBUM and ALBUM RANDOM AAC128 Repeat and RANDOM indicators Repeating Tracks Repeat Play You can repeat the tracks in the HDD as many times as you like What you can repeat differs depending on the current play mode selected Continuous play Album play Library play or Random play On the remote control ONLY To repeat play press REPEAT during o...

Страница 37: ...g for it by its number Album Title Search ALBUM T See page 35 To select and play an album after searching for it by its title Track Title Search TRACK T See page 35 To select and play a track after searching for it by its title Last 10 Search LAST 10 See page 37 To select and play one of the last 10 albums recently played or recorded You can use a PC compatible keyboard for the following Search Mo...

Страница 38: ... position then press CANCEL To cancel the setting press SEARCH MODE Character entry position Character set Capital letters Symbols Small letters Symbols Numerals SEARCH and ALBUM indicators ALBUM SEARCH AAC128 SEARCH indicator To search for an album or a track by entering its title ALBUM T TRACK T You can easily find and play an album or a track by entering its title up to the first 5 characters A...

Страница 39: ...start Continuous play with the current or selected album press SET Search Mode is canceled and playback continues in Continuous play the SEARCH and ALBUM indicators go off Retrieved album number Retrieved album title Retrieved track number Retrieved track title Continued For Track Title Search When the title with the entered characters is found a retrieved track will be shown in the main display a...

Страница 40: ...cently played album LAST 10 ALBUM T Album title ALBUM No Album number TRACK T Track title Canceled To search for one of the last 10 albums recently played or recorded LAST 10 You can easily find and play one of the last 10 albums recently played or recorded Tracks played for more than one second can be stored as the played tracks in memory On the remote control ONLY 1 Press HDD 3 8 then 7 The sour...

Страница 41: ...UM KEYBOARD CONNECTOR forTITLE INPUT TUNER LINE REC START SET CD COMPACT DIGITAL AUDIO AUTO MODE REC MODE SELECT LIBRARY REC START SET CD TUNER LINE STANDBY ON STANDBY ON DISP CHARA CANCEL SET ENTER RM SNXHD10J REMOTECONTROL REPEAT ALBUM ALBUM SEARCH MODE TONE CONTROL ALBUM LIBRARY SELECT FM PLAY MODE TITLE EDIT DIMMER CONTRAST VOLUME AHBPRO AAC SOUND 10 0 10 1 MARK 2 ABC 3 DEF 4 GHI 5 JKL 6 MNO 7...

Страница 42: ...u can use the DIVIDE function see page 60 About the digital formats used for recordings When recording into the HDD you can select either linear PCM or AAC Advanced Audio Coding format Linear PCM format is the one used for regular audio CD Audio signals are recorded without any compression On the other hand AAC is a newly developed audio compression technology which can eliminate over 90 percent o...

Страница 43: ...ways works because the unit starts searching for linear PCM tracks Using Automatic Recording Functions This unit features three Auto Modes Smart Compression CD Auto Recording and Tuner Auto Recording You can activate these functions whether playing a source or not the unit must be turned on Smart Compression SMART COMP See below To automatically compress linear PCM tracks into AAC formated data CD...

Страница 44: ...tart playing a CD How CD Auto Recording actually works Recording automatically starts when you start CD play in Normal play by pressing CD 3 8 The HDD lamp lights in red and the CD and AUTO indicators start flashing on the display CD Auto Recording will be automatically canceled if you turn off the unit you change the source you stop skip search pause or eject CD you select a track number directly...

Страница 45: ...cording or assign the title to an album or a track To select Repeat play These operations cannot be accepted during CD Auto Recording To automatically record broadcast programs Tuner Auto Recording You can automatically record broadcast program s while you are tuning in to the FM or AM stations So you can always keep the most recent tuned program s for up to 30 minutes in the HDD When you stop tun...

Страница 46: ...n Linear PCM format normal speed PCM x2 REC To record in Linear PCM format at double normal speed No playback sound will be heard while recording PCM x4 REC To record in Linear PCM format at four times normal speed No playback sound will be heard while recording You cannot select PCM x4 REC to record Program play and Random play X4 PCM Current recording mode setting 1 Prepare a CD Press CD 3 8 the...

Страница 47: ...me will be shown If CD AUTO REC OFF PLEASE appears in the main display You cannot record a track using this method while CD Auto Recording is being performed see page 41 To change the information shown in the main display while recording Each time you press DISP CHARA on the remote control the information in the main display changes as follows 1 Current track number of the CD played 2 Remaining pl...

Страница 48: ...t setting of the recording mode 4 When the broadcast program ends press 7 to stop recording The following message appears in the main display 5 Press LIBRARY to select a library where you store the recording just done Each time you press LIBRARY the library changes Library 1 to Library 10 If you do not select any library within one minute Library 1 is automatically selected 6 Press SET to finish t...

Страница 49: ...peatedly to select the recording mode AAC128 Current recording mode setting Ex When selecting AAC128kbps REC indicator Each time you press the button the recording modes change as follows The indicator corresponding to the selected recording mode lights up on the display 3 Press REC START The REC indicator starts flashing on the display and the unit now stands by for Sound Synchronized Recording R...

Страница 50: ...recorded Clock 1 2 4 3 If Level OVER appears while recording Stop recording then adjust the input level on this unit see page 21 or if possible adjust the output level on the external component Level OVER will not appear if the album track numbers or the clock is shown in the main display To record CD into the HDD using analog recording mode If the recording is not done correctly or a track is ski...

Страница 51: ... the front door it makes easier for you to enter your own titles see page 69 STANDBY ON DISP CHARA CANCEL SET ENTER RM SNXHD10J REMOTECONTROL REPEAT ALBUM ALBUM SEARCH MODE TONE CONTROL ALBUM LIBRARY SELECT FM PLAY MODE TITLE EDIT DIMMER CONTRAST VOLUME AHBPRO AAC SOUND 10 0 10 1 MARK 2 ABC 3 DEF 4 GHI 5 JKL 6 MNO 7 PQRS 8 TUV 9 WXYZ HDD CD TUNER LINE RECSTART A P off CLOCK TIMER SLEEP SELECT DISP...

Страница 52: ...ters If the character you want to enter next is assigned to the same button you have just pressed in step 5 2 press once to move the character entry position to the right Assigning Titles to Albums and Tracks You can assign a title to each album and track Once a title is assigned it is displayed during playback The maximum number of the characters used for each title is 64 When you want to change ...

Страница 53: ...o select the album number you can also use ALBUM or ALBUM 3 Press TITLE EDIT once then press SET 4 Press SELECT or SELECT 4 to enter the track title entry mode TRACK Each time you press the button the album title entry mode or the track title entry mode TRACK or ALBUM is alternately selected 5 Press SET 6 Press the number buttons or SELECT SELECT 4 to select the track you want to assign a title to...

Страница 54: ...ON DISP CHARA CANCEL SET ENTER RM SNXHD10J REMOTECONTROL REPEAT ALBUM ALBUM SEARCH MODE TONE CONTROL ALBUM LIBRARY SELECT FM PLAY MODE TITLE EDIT DIMMER CONTRAST VOLUME AHBPRO AAC SOUND 10 0 10 1 MARK 2 ABC 3 DEF 4 GHI 5 JKL 6 MNO 7 PQRS 8 TUV 9 WXYZ HDD CD TUNER LINE RECSTART A P off CLOCK TIMER SLEEP SELECT 10 0 10 1 MARK 2 ABC 3 DEF 4 GHI 5 JKL 6 MNO 7 PQRS 8 TUV 9 WXYZ CANCEL SET ENTER ALBUM T...

Страница 55: ...ill be erased Track Editing This unit allows you to edit the tracks using the following functions Copying a Track COPY TRACK Page 57 You can make a duplication of a track Copying a Portion of a Track A B COPY Page 58 You can copy only a portion of the track you want and store it as a track in an album newly created Moving a Track MOVE Page 59 You can move a track either within the same album or in...

Страница 56: ...TITLE EDIT To return to the previous screen any time during the process press CANCEL You cannot enter Title Edit modes during Random play and Search Modes Library play Album play and Repeat play are canceled when you press TITLE EDIT Continuous play will resume Changing the Library Names LIB NAME You can change the library names as you like The maximum number of the characters used for each librar...

Страница 57: ... select RESTORE Each time you press SELECT or SELECT 4 RESTORE or LIB NAME is alternately selected 3 Press SET 4 Press ENTER HDD WRITING appears and the HDD lamp flashes in red while the unit is restoring the libraries If you have performed the above procedure during play HDD playback stops Copying an Album COPY ALBUM You can make a duplication of an album A new album number is automatically assig...

Страница 58: ...to HDD automatically if another source has been selected 2 Press SELECT or SELECT 4 to select LIB CHANGE then press SET Ex When selecting Library 9 3 Press ALBUM or ALBUM to select the album you want to move then press SET The library selection screen appears 4 Press LIBRARY to select a library Library 1 Library 10 you want to move the selected album to then press SET The confirmation screen appea...

Страница 59: ...rformed the above procedure during play HDD playback stops 2 Press SELECT or SELECT 4 to select MAKE ALBUM then press SET 3 Select a track you want to copy to a new album 1 Press ALBUM or ALBUM to select the album 2 Press SELECT or SELECT 4 to select the track You can select the track directly using the number buttons In this case the selected track starts playback repeatedly 3 Press SET The libra...

Страница 60: ...duplication of a track in the same album or in a different album A newly duplicated track will become the last track in an album where you copy the track into On the remote control ONLY If the HDD includes many albums and tracks select the album and track using Search Mode see page 34 before performing the procedure below 1 Press TITLE EDIT repeatedly until TRACK EDIT appears in the main display T...

Страница 61: ... of about 2 second length following the selected end point repeats playing 3 Press SET The album selection screen appears 5 Press ALBUM or ALBUM to select an album where to copy the track into then press SET 6 Press ENTER The editing you have made is being stored in the HDD If you have performed the above procedure during play HDD playback stops If CANNOT ENTRY LIB Library TUN appears in the main ...

Страница 62: ... a long time if you have copied a long portion The currently selected library flashes Ex When selecting Library 9 Moving a Track MOVE You can move a track either within the same album or into a different album Tracks are automatically renumbered in both albums where a track has been moved from and where the track has moved to On the remote control ONLY If the HDD includes many albums and tracks se...

Страница 63: ...ou want to move from 1 Press ALBUM or ALBUM to select an album 2 Press SELECT or SELECT 4 to select a track You can select the track directly using the number buttons In this case the selected track starts playback repeatedly 3 Press SET 4 Select the position track number you want to move to 1 Press ALBUM or ALBUM to select an album 2 Press SELECT or SELECT 4 to select the position track number To...

Страница 64: ... Track No 1st 2nd 3rd 4th 5th 1st 2nd 3rd 4th 4 Press SET when you find the dividing point The portion of 2 second length following the selected dividing point repeats playing 5 If necessary press SELECT or SELECT 4 to precisely adjust the dividing point The unit repeats the newly selected dividing point You can shift the dividing point up to 128 This range 128 corresponds to about 12 seconds from...

Страница 65: ...omatically renumbered On the remote control ONLY If the HDD includes many albums and tracks select the album and track using Search Mode see page 34 before performing the procedure below The currently selected track number of the current album flashes C D E A B C D A After erasing track 2 Track No 1st 2nd 3rd 4th 5th 1st 2nd 3rd E 4th 1 Press TITLE EDIT repeatedly until TRACK EDIT appears in the m...

Страница 66: ...KEYBOARD CONNECTOR forTITLE INPUT TUNER LINE REC START SET CD COMPACT DIGITAL AUDIO STANDBY ON STANDBY ON DISP CHARA CANCEL SET ENTER RM SNXHD10J REMOTECONTROL REPEAT ALBUM ALBUM SEARCH MODE TONE CONTROL ALBUM LIBRARY SELECT FM PLAY MODE TITLE EDIT DIMMER CONTRAST VOLUME AHBPRO AAC SOUND 10 0 10 1 MARK 2 ABC 3 DEF 4 GHI 5 JKL 6 MNO 7 PQRS 8 TUV 9 WXYZ HDD CD TUNER LINE RECSTART A P off CLOCK TIMER...

Страница 67: ...K TIMER repeatedly until REC TIMER SET UP appears in the main display The REC Recording Timer indicator and the number indicator for the currently selected timer start flashing on the display Then the timer number also starts flashing in the main display Ex When selecting REC TIMER 2 Ex When selecting Mon Monday Fri Friday Continued REC Recording Timer indicator 2 Press SELECT or SELECT 4 to selec...

Страница 68: ...r indicator stop flashing and remain lit on the display For each recording mode see page 39 9 Press STANDBY ON to turn off the unit if necessary To turn off the Recording Timer after its setting is done 1 Press CLOCK TIMER once The currently selected Recording Timer ON OFF setting screen appears in the main display 2 Press SELECT or SELECT 4 to select the timer number REC TIMER 1 2 or 3 you want 3...

Страница 69: ...e then press SET The timer off time setting screen appears 4 Set the timer off time 1 Press SELECT or SELECT 4 to adjust the hour then press SET The minute digit starts flashing 2 Press SELECT or SELECT 4 to adjust the minute then press SET The playback source setting screen appears 5 Select the source to play 1 Press SELECT or SELECT 4 to select the source Each time you press the button the sourc...

Страница 70: ...e the source or turn off the unit while Daily Timer is working Daily Timer is canceled temporarily If you press CLOCK TIMER SLEEP or TITLE EDIT during timer recording Daily Timer is canceled temporarily and the unit will not turn off when the timer off time comes Using Sleep Timer With Sleep Timer you can fall asleep to your favorite music You can set Sleep Timer when the unit is turned on How Sle...

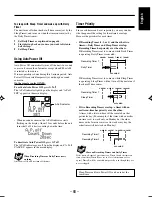
Страница 71: ...AC128 Timer Priority Since each timer can be set separately you may wonder what happens if the setting for these timers overlaps Here are the priorities for each timer If Recording Timer 1 2 or 3 and the other two timers Daily Timer and Sleep Timer overlap Recording Timer has priority over the others If Recording Timer is set to come on while Daily Timer is operating Daily Timer is canceled If Rec...

Страница 72: ...ont door see page 9 You can use the following keys to operate this unit for Edit and Search Modes You can use such a keyboard as a PS 2 US101 keyboard or an equivalent However the keyboard connected to this unit must be a type of DC 5 V and less than 100 mA Keys Used for Operating This Unit F1 Enter Album Title Edit Mode see page 70 Press again to exit from Edit Mode F2 Enter Track Title Edit Mode...

Страница 73: ... track title entry screen appears If you are recording the unit exits from Track Title Edit mode Currently selected album number appears first Character entry position Character set Ex When selecting Album 19 Character entry position Character set Ex When selecting Track 12 Currently selected track number of the current album appears first Continued Moves the cursor at the beginning of the title e...

Страница 74: ...lso To search for an album or a track by entering its title ALBUM T TRACK T on pages 35 and 36 1 Press F7 so that the following screen appears in the main display 2 Enter a title up to 5 characters then press Enter SEARCH starts flashing in the main display The unit starts searching for the title To change a library name F3 See also Changing the Library Names LIB NAME on page 53 1 Press F3 so that...

Страница 75: ...exposure to direct sunlight temperature extremes and moisture To clean the CD Wipe the CD with a soft cloth in a straight line from center to edge DO NOT use any solvent such as conventional record cleaner spray thinner or benzine to clean the CD Cleaning the unit Stains on the unit Should be wiped off with a soft cloth If the unit is heavily stained wipe it with a cloth soaked in water diluted ne...

Страница 76: ...tracks After searching for an album or a track by its name no album or track is found You are trying to record the 2nd generation digital source No more track can be additionally made in the current album Solution Erase unnecessary albums from the HDD The maximum number of the albums is 999 This is not a malfunction This track cannot be divided Erase unnecessary tracks from the album The maximum n...

Страница 77: ...it is always skipped This unit cannot record or erase these Track Skip marks How to rebuild the HDD If EMERGENCY YES SET appears in the main display follow the procedure below 1 Press SET REBUILD starts flashing in the main display If you want to erase all the data recorded now press SELECT or SELECT 4 so that ALL ERASE appears in the main display each time your press the button REBUILD or ALL ERA...

Страница 78: ... while recording compressing Smart Compression or editing the data in the HDD Action Reconnect the antenna securely Change the position and direction of the AM loop antenna Extend FM antenna to the best reception position Press FM PLAY MODE to select FM AUTO see page 18 Plug in the AC power plug Turn off the Disc Lock function see page 27 Put the disc in with the label side up Wait until the unit ...

Страница 79: ...gh There is no space left in the HDD HDD FULL You have tried to copy a portion of a track of less than 6 seconds long You have tried to move a track to exactly the same position where it now located Already 254 tracks are created in the album You have tried to divide the track album in Library TUNER You have tried to divide a track of less than 7 seconds long Action Erase unnecessary albums This i...

Страница 80: ...Something is wrong with your unit The volume is too high The keyboard is not fully discharged electrically The built in microprocessor has malfunctioned due to external electrical interference HDD editing General DO NOT press REC START and 0 CD on the unit at the same time or do not unplug the unit then plug it back in while recording compressing Smart Compression or editing the data in the HDD ot...

Страница 81: ...0V 60 Hz Power consumption 55 W in operation 1 0 W on standby with display off 1 2 W on standby with display on Dimensions W H D approx 150 mm x 237 mm x 274 mm 5 15 16 in x 9 3 8 in x 10 13 16 in Mass approx 4 8 kg 10 6 lbs Speaker system SP NXHD10 Type 2 way bass reflex type Speakers Woofer 10 0 cm 3 15 16 in cone x 1 Tweeter 2 0 cm 13 16 in dome x 1 Power handling capacity 25 W Impedance 4 Ω Fr...

Страница 82: ...rized servicer or visit our website at www JVC com Remember to retain your Bill of Sale for Warranty Service Do not service the television yourself Caution To prevent electrical shock do not open the cabinet There are no user serviceable parts inside Please refer to qualified service personnel for repairs Accessories To purchase accessories for your JVC product please call toll free 1 800 882 2345...

Страница 83: ...urs in shipment due to act of God and cosmetic damage 5 Signal reception problems and failures due to line power surge 6 Video Pick up Tubes CCD Image Sensor Cartridge Stylus Needle are covered for 90 days from the date of purchase 7 Batteries except that Rechargeable Batteries are covered for 90 days from the date of purchase There are no express warranties except as listed above THE DURATION OF ...

Страница 84: ...0602NSMMDWJEM EN FR VICTOR COMPANY OF JAPAN LIMITED J VC ...

Отзывы: