background image

EN

77

Warning Indications

Indications

 Function

Displays the battery remaining power.

Remaining power level: high

Remaining power level: exhausted

As the battery power comes close to nil, the battery indicator 

 blinks.

When the battery power is exhausted, power turns off automatically.

Appears when no tape is loaded, or when the erase protection tab is set to “SAVE”.

(

Z

 pg. 11)

Appears if dirt is detected on the heads during recording.

(

Z

 pg. 81)

Appears if condensation occurs. When this indication is displayed, the camcorder turns
off automatically.

Appears for 10 seconds after power is turned on if there is no tape loaded.

Appears when the tape ends during recording or playback.

(

Z

 pg. 17)

Appears when the date/time is not set.

(

Z

 pg. 10)

Appears when the clock (lithium) battery is discharged and the previously set date/

time is erased.

(

Z

 pg. 10)

Appears when Audio Dubbing or Insert Editing is unavailable.

(

Z

 pg. 66, 67)

The error indications (E01 — E06) show what type of malfunction has occured. When
an error indication appears, the camcorder turns off automatically. Remove the power
supply (battery, etc.) and wait a few minutes for the indication to clear. When it does,
you can resume using the camcorder. If the indication remains, consult your nearest JVC
dealer.

(

Z

 pg. 72)

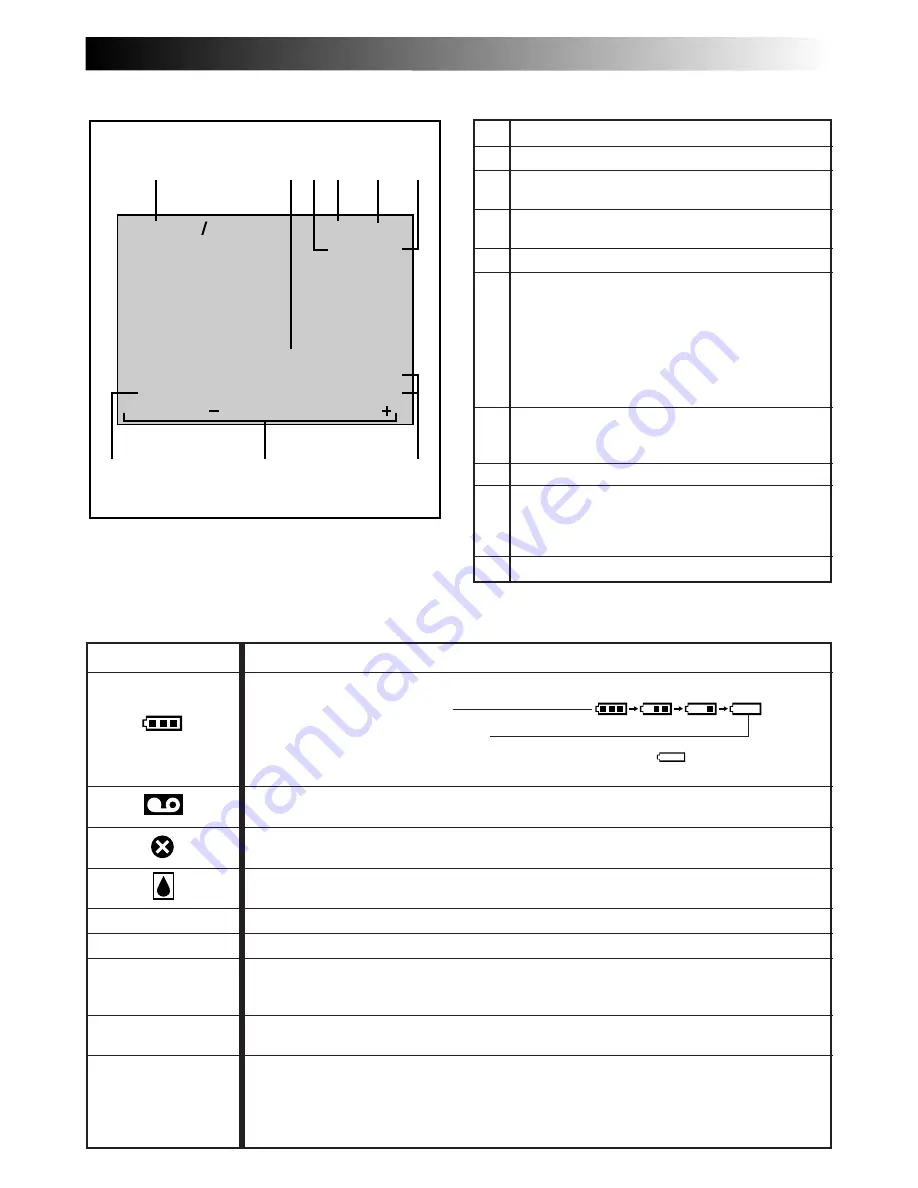
LCD Monitor/Viewfinder Indications During Playback

No.

Function

1

Displays the sound mode.

(

Z

 pg. 43)

2

Appears when playing back images recorded in
High Speed Recording mode.

(

Z

 pg. 47)

3

Displays playback of images recorded in
Progressive mode.

(

Z

 pg. 24)

4

Displays the recording mode.

5

Appears while a tape is running.

4

: Playback

3

: Fast-Forward/Shuttle search

2

: Rewind/Shuttle search

6

: Pause

64

: Forward slow-motion

16

: Reverse slow-motion

e

: Audio Dubbing

6

During playback of image recorded in High
Speed Recording mode, the screen mode
(Zoom or Wide) is displayed.

(

Z

 pg. 47)

7

Displays the date/time.

(

Z

 pg. 43)

8

BRIGHT: Displays the brightness of the LCD

monitor or the viewfinder. (

Z

 pg. 19)

VOLUME: Displays the speaker or headphone

volume.

(

Z

 pg. 45)

9

Displays the time code.

(

Z

 pg. 43)

HIGH  SPEED

DEC 25 ’ 99

WIDE

PM   5 : 30

TC

VOLUME

– – – – –

6

– – – – –

SOUND1

32kHz

LP
PS

4

01 : 28 : 15

1

4

3

6

2

5

7

8

9

TAPE!

TAPE END

SET DATE/TIME!

E01 — E06

ERROR!

REFER MANUAL

Содержание LYT0291-001B

Страница 1: ...CyberCam Homepage on the World Wide Web and answer our Consumer Survey in English only http www jvc victor co jp index e html For Customer Use Enter below the Model No and Serial No which is located on the bottom of cabinet Retain this information for future reference Model No Serial No ...

Страница 2: ...osure that may be of sufficient magnitude to constitute a risk of electric shock to persons The exclamation point within an equilateral triangle is intended to alert the user to the presence of important operating and maintenance servicing instructions in the literature accompanying the appliance WARNING TO PREVENT FIRE OR SHOCK HAZARD DO NOT EXPOSE THIS UNIT TO RAIN OR MOISTURE Warning on lithium...

Страница 3: ...rsonal safety In order not to defeat the built in safeguards observe the following basic rules for its installation use and servicing ATTENTION Follow and obey all warnings and instructions marked on your product and its operating instruc tions For your safety please read all the safety and operating instructions before you operate this product and keep this manual for future reference INSTALLATIO...

Страница 4: ...ing amplifiers that produce heat SERVICING 1 Servicing If your product is not operating correctly or exhibits a marked change in performance and you are unable to restore normal operation by following the detailed procedure in its operating instructions do not attempt to service it yourself as opening or removing covers may expose you to dangerous voltage or other hazards Refer all servicing to qu...

Страница 5: ...cables will cause the camcorder to fall resulting in damage n This camcorder is designed exclusively for the digital video cassette Only cassettes marked can be used with this unit Before recording an important scene make sure you only use cassettes with the Mini DV mark remember that this camcorder is not compatible with other digital video formats remember that this camcorder is intended for pri...

Страница 6: ...ded here 4 ITI Insert and Tracking Information Area Insert editing and post recording editing tracking signals are recorded here 1 Sub Code Area The Time Code and Date Time data are written here separate from the video data This enables you to display the date and time during playback even if they were not displayed while recording 2 Video Area The digital video signal is recorded here 10 tracks f...

Страница 7: ...asic Recording 16 Advanced Features 22 PLAYBACK 45 53 Basic Playback 45 Advanced Features 48 Basic Connections 50 Advanced Connections 52 TAPE DUBBING 54 55 Tape Dubbing 54 Digital Dubbing 55 USING THE REMOTE CONTROL UNIT 56 67 Random Assemble Editing 60 For More Accurate Editing 64 Audio Dubbing 66 Insert Editing 67 TROUBLESHOOTING 68 72 USER MAINTENANCE 73 INDEX 74 78 Controls Connectors And Ind...

Страница 8: ...ing stops Since the AC Power Adapter Charger processes electricity internally it becomes warm during use Be sure to use it only in well ventilated areas When charging the battery pack for the first time or after a long storage period the charger indicator may not light In this case remove the battery pack from the AC Power Adapter Charger then try charging again If the battery operation time remai...

Страница 9: ...st the battery pack mount 1 then slide down the battery pack to attach it 2 If the battery pack is attached with its mark set in the wrong direction a malfunction may occur To Detach The Battery Pack tilt the viewfinder upward and slide the battery pack up slightly while pressing the Battery Release Button to detach it NOTES Continuous shooting is possible when the temperature is approx 20 C 68 F ...

Страница 10: ...N to exit Regarding Built in Clock s Rechargeable Lithium Battery To store the date time in memory a clock s rechargeable lithium battery is integrated in the camcorder While the camcorder is connected to an AC outlet using the AC Power Adapter Charger or while the battery pack attached to the camcorder continues to supply power to the camcorder the clock s rechargeable lithium battery is always c...

Страница 11: ...he cassette cover and try again If the cassette holder still does not open turn the camcorder off then on again If the tape does not load properly open the cassette cover fully and remove the cassette A few minutes later insert it again When the camcorder is suddenly moved from a cold place to a warm environment wait a short time before opening the cover Closing the cassette cover before the casse...

Страница 12: ... bar to REC MODE by rotating the Select Dial Press the Select Dial and the parameter SP or LP is highlighted Select SP or LP by rotating the Select Dial Press the Select Dial twice to exit from the Recording Menu Insert Editing or Audio Dubbing is impossible on a tape recorded in the LP mode LP Long Play is more economical providing 1 5 times the recording time NOTES If the recording mode is switc...

Страница 13: ...n and Power Zoom Lever Refasten the Velcro strip Viewfinder Adjustment 1 SELECT OPERATION MODE Set the Power Switch to 5S or while pressing down the Lock Button located on the switch 2 POSITION VIEWFINDER Pull out the viewfinder fully and adjust it manually for best viewability see illustration on left 3 ADJUST DIOPTER Turn the Diopter Adjustment Control until the indications in the viewfinder are...

Страница 14: ...CH TO THE OTHER EYELET Repeat step 1 to attach the other end of the strap to the other eyelet 4 making sure the strap is not twisted CAUTION When using a tripod be sure to open and extend its legs fully to stabilize the camcorder To prevent damage to the unit caused by falling over do not use a small sized tripod Tripod Mounting 1 ALIGN AND TIGHTEN Align the screw and camera direction stud on the ...

Страница 15: ... special effects or manual adjustments Suitable for standard recording Allows you to set various recording functions using the Menus If you want more creative capabilities than Full Auto recording try this mode Allows you to record in 5 second clips to keep the action moving Enables shooting in Manual mode However Focus and Exposure are the same as in the Full Auto mode and it is not possible to c...

Страница 16: ...ely before closing the cassette cover Shooting While Watching The Viewfinder 2 ENTER RECORD STANDBY MODE Make sure the LCD monitor is closed and locked Set the Power Switch to the camera position 5S or while pressing down the Lock Button located on the switch then pull out the viewfinder fully The lens cover opens the power lamp lights and the camcorder enters the Record Standby mode The scene you...

Страница 17: ...ts end is loaded If the Record Standby mode continues for 5 minutes the camcorder s power shuts off automatically To turn the camcorder on again push back and pull out the viewfinder again or close and re open the LCD monitor When a blank portion is left between recorded scenes on the tape the time code is interrupted and errors may occur when editing the tape Continue recording from where you sto...

Страница 18: ...superimposed upon it 3 START SHOOTING Tilt the LCD monitor upward downward for best viewability Z pg 19 and press the Recording Start Stop Button appears in the LCD monitor while recording is in progress 4 STOP RECORDING Press the Recording Start Stop Button again to stop recording The camcorder re enters the Record Standby mode NOTES When you use the LCD monitor outdoors in direct sunlight the LC...

Страница 19: ...tch on 2 START RECORDING Point the lens toward the subject yourself when self recording and start recording During Interface Shooting the Tape Running indicator and warning indications Z pg 77 are the only ones that are shown they appear reversed in the display as they would when viewing a mirror but are not reversed in the recording NOTE The tape remaining indicator does not appear during interfa...

Страница 20: ... when the Power Switch is set to zoom magnification of up to 40X is possible In Manual mode when the Power Switch is set to 5S or zooming is possible to a maximum of 200X or can be switched to 10X magnification offered by optical zoom Zoom magnification of over 10X is done through Digital image processing and is therefore called Digital Zoom During Digital zoom the quality of image may suffer Digi...

Страница 21: ... when you shoot again When power shuts off during shooting When a tape is removed and re inserted during shooting When shooting using a partially recorded tape When shooting on a blank portion located partway through the tape When shooting again after already shooting a scene and opening closing the cassette cover Recording From The Middle Of A Tape 1 Play back a tape to find the spot at which you...

Страница 22: ... the Date Time Menu appears 4 SELECT FUNCTION Move the highlight bar to DISPLAY by rotating the Select Dial then press it 5 SET FUNCTION PARAMETERS Cycle through the available settings of the selected functions by rotating the Select Dial and stop when the one you want is displayed Then press it and the highlight bar automatically moves to RETURN 6 CLOSE RECORDING MENU Press the Select Dial twice ...

Страница 23: ...ndby mode is not engaged 3 END 5S MODE Set the Power Switch to the or OFF position To Take A Snapshot In The 5 Second Recording Mode instead of pressing the Recording Start Stop Button in step 2 set the Snapshot Dial to the desired mode then press SNAPSHOT The camcorder records a 5 second still Z pg 26 When SCENE is set to ANIM Z pg 28 this function is not available NOTE When SCENE is set to ANIM ...

Страница 24: ...lights and PS appears 2 START PROGRESSIVE MODE RECORDING Press the Recording Start Stop Button The tally lamp lights To End Progressive Video Recording press the Recording Start Stop Button The camcorder enters the Record Standby mode NOTES When an image recorded using the Progressive Mode is played back the image may not look natural When the Power Switch is set to Picture Wipe Dissolve Z pg 34 a...

Страница 25: ... there is a time lag between an odd and even Field when they are combined to make 1 Frame the part of the image that is moving appears as image jitter However during normal playback the moving picture looks smooth and natural 2 Progressive mode shooting of moving images Progressive Mode Recording Z pg 24 Scan A is recorded divided into an odd and even number Field and then Scan B is skipped Scans ...

Страница 26: ... not available 2 SELECT PRO SNAPSHOT MODE Choose the appropriate mode from among the 6 Pro Snapshot modes Z pg 27 by setting the Snapshot Dial PRO SNAPSHOT RECORDING 1 TAKE PRO SNAPSHOT Press SNAPSHOT When the flash ready indicator is displayed flash takes place If you press during Record Standby PHOTO appears and a still image will be recorded for approx 5 seconds then the camcorder re enters the...

Страница 27: ... used Multi Analyzer 4 and Multi Analyzer 9 will be disabled when Program AE with special effects other than SHUTTER and TWILIGHT Z pg 37 is activated Nega Posi mode will be disabled when CLASSIC FILM STROBE SLOW or VIDEO ECHO of Program AE with special effects Z pg 37 is activated If the camcorder is in a dark lit environment with GAIN UP set to AUTO on the Recording Menu Z pg 31 Auto Slow Shutte...

Страница 28: ...rst flash is for reduction of the human eye s red reflection and the second flash is for actual recording Flash Flash ready indicator MENU Button Flash sensor Display RECORDING Advanced Features cont Power lamp Red Eye Reduction Button Recording Menu Lock Button Red Eye reduction indicator NOTES Do not flash at a person at short range In Multi Analyzer 4 Multi Analyzer 9 or Nega Posi mode the flas...

Страница 29: ...H ADJUSTMENT Press the Select Dial The Manual Mode Item Menu disappears FLASH appears in the upper left corner and a number appears next to the indication to allow adjustment of the flash manually on the screen 4 ADJUST BRIGHTNESS OF FLASH Rotating the Select Dial upward increases the number of the brightness adjustment indicator and rotating the Select Dial downward decreases it The adjustment ra...

Страница 30: ...t be found in the Menu Screen place the highlight bar on END then go to step 6 3 MAKE SETTING Press the Select Dial The setting procedure depends on the function you select If you select a function other than TO DATE TIME MENU or TO SYSTEM MENU each function s parameter starts blinking Rotate the Select Dial until the desired parameter appears Go to step 5 If you select TO DATE TIME MENU the Date ...

Страница 31: ...he Digital Zoom By digitally processing and magnifying images zooming is possible from 10 times the optical zoom limit to a maximum of 200 times digital magnification To compensate for unstable images caused by camera shake particularly at high magnification NOTES Accurate stabilization may not be possible if hand shake is excessive or under the following conditions When shooting subjects with ver...

Страница 32: ... subject as though it is moving Z pg 23 The tally lamp comes on to signal the start of recording The beep sounds when the power is turned on or off and at the beginning and end of recording Also to activate the shutter sound effect Z pg 27 The tally lamp remains off at all times Even though not heard while shooting shutter sound is recorded on the tape Disengages the function which cuts down on no...

Страница 33: ...D monitor fully 2 ACCESS MANUAL MODE ITEM MENU Press the Select Dial The Manual Mode Item Menu appears 3 ACCESS FADER WIPE MENU Rotate the Select Dial to move the highlight bar to FADER WIPE then press it 4 SELECT EFFECT Rotate the Select Dial to move the highlight bar to the desired function then press it The FADER WIPE Menu disappears and the effect is reserved The indicator representing the sel...

Страница 34: ...g Record Standby mode after performing a Picture Wipe Dissolve the point at which the scene ended is already stored in memory 6 START RECORDING If you start recording a new scene within 5 minutes of the end of the previous recording without having turned the camcorder s power off the previous scene wipes out revealing the new scene NOTES You can extend the length of a Fade or Wipe by pressing and ...

Страница 35: ...wipe out from the center toward the top and bottom leaving a black screen The new scene gradually appears as the old one gradually disappears The new scene wipes in over the previous one from the upper right corner to the lower left corner The next scene gradually wipes in from the center of the screen toward the corners covering the previous scene The next scene gradually wipes in over the previo...

Страница 36: ...nual Mode Item Menu appears 3 ACCESS P AE EFFECT SELECT MENU Rotate the Select Dial to move the highlight bar to P AE EFFECT then press it 4 SELECT MODE Move the highlight bar to the desired mode by rotating the Select Dial then press it The P AE EFFECT Menu disappears and the selected mode is activated The symbol of the selected mode appears 5 DISABLE MODE To turn off the selected mode re access ...

Страница 37: ...100th of a second The flickering that occurs when shooting under a fluorescent light or mercury vapor lamp is reduced 1 250 1 500 These settings allow fast moving images to be captured one frame at a time for vivid stable slow motion playback The faster the shutter speed the darker the picture becomes Use the shutter function under good lighting condi tions Makes evening scenes look more natural W...

Страница 38: ...s or identical patterns that are regularly repeated When the scene is affected by sunbeams or light reflecting off the surface of a body of water When shooting a scene with a high contrast background The following low contrast warnings appear blinking and NOTES If the lens is smeared or blurred accurate focusing is not possible Keep the lens clean wiping with a piece of soft cloth if it gets dirty...

Страница 39: ...JUST FOCUS To farther subject rotate the Select Dial upward appears and blinks Go to step 5 To nearer subject rotate the Select Dial downward appears and blinks Go to step 5 5 END ADJUSTMENT OF FOCUS Press the Select Dial Focus adjustment is complete The indication changes from FOCUS to MANUAL If you want to reset the focus repeat from step 2 To Change To Auto Focus rotate the Select Dial to displ...

Страница 40: ...Dial upward The exposure control indicator increases maximum 6 Go to step 5 To darken the image rotate the Select Dial downward The exposure control indicator decreases maximum 6 Go to step 5 5 END ADJUSTMENT OF EXPOSURE Press the Select Dial Exposure adjustment is complete The indication EXP changes to MANUAL and the highlight bar on the exposure control indicator goes out If you want to reset th...

Страница 41: ... viewfinder then press and hold the Select Dial for over 2 seconds The exposure control indicator and appear indicating that the iris is locked Press the Select Dial The indication displayed in the upper left corner changes from EXP to MANUAL To Return To Automatic Iris Control rotate the Select Dial to display AUTO then press it in step 3 The exposure control indicator and disappear Or set the Po...

Страница 42: ...the highlight bar to W BALANCE by rotating the Select Dial Then press it The Manual Mode Item Menu disappears W BAL appears in the upper left corner and the currently selected mode indication is also displayed 4 SET FUNCTION PARAMETERS Cycle through the available settings of the selected functions by rotating the Select Dial and stop when the one you want is displayed AUTO The white balance is adj...

Страница 43: ...the Manual White Balance indicator is displayed To Change The Tint For Recording in step 2 substitute colored paper for white The white balance is adjusted based on the color changing the tint Red paper deeper green blue paper orange yellow paper deeper purple NOTES In step 2 it may be difficult to focus on the white paper in some circumstances In such a case adjust focus manually Z pg 39 A subjec...

Страница 44: ...n If shooting is attempted under a fluorescent lamp the screen may jitter It is possible to copy scenes recorded in High Speed Recording mode from this camcorder only to another GR DVL9500 During High Speed Recording the following functions are disabled Fade Wipe effect other than WHITE BLACK and B W Z pg 35 Program AE with special effects other than TWILIGHT SEPIA MONOTONE and SHUTTER Z pg 37 DIS...

Страница 45: ...ut or on a connected TV Z pg 50 51 Camcorder operation is the same as described in this section You can also view the playback picture on the LCD monitor with it flipped over and retracted LCD monitor viewfinder indications When power is supplied from the battery pack the battery pack remaining power indicator is displayed on the LCD monitor when it is turned on When power is supplied through the ...

Страница 46: ... either direction OPERATION 1 Press FF 3 to forward or press REW 2 to reverse during playback 2 To resume normal playback press PLAY PAUSE 6 4 NOTES During playback press and hold REW 2 or FF 3 The search continues as long as you hold the button Once you release it normal playback resumes A slight mosaic effect appears on screen during Shuttle Search This is not a malfunction FEATURE Slow Motion P...

Страница 47: ...een will appear divided into 2 and the images are displayed both in the upper and lower halves of the screen Since in Slow Motion with Zoom mode the image is magnified with an aspect ratio of 4 3 the image may become coarse If a tape recorded in High Speed Recording mode is dubbed between 2 video units which are not GR DVL9500 Progressive Slow Motion Playback of the dubbed tape is not possible Dur...

Страница 48: ...n located on the switch and pull out the viewfinder fully or open the LCD monitor fully 2 ACCESS PLAYBACK MENU Press MENU The Playback Menu appears 3 SELECT FUNCTION Move the highlight bar to the desired function by rotating the Select Dial Press the Select Dial to activate 4 SET FUNCTION PARAMETERS Rotate the Select Dial to cycle through the available settings for the selected function and stop w...

Страница 49: ... the setting Z pg 48 ON The date is displayed on the playback screen OFF The date is not displayed DEC 25 98 PM 5 30 TC 12 34 24 TC 12 34 24 DEC 25 99 PM 5 30 Display Minutes Seconds Frames 30 frames 1 second Recording sound Display Output sound 32 kHz FULL SOUND SOUND 1 Stereo sound SOUND 2 48 kHz FULL SOUND Stereo sound SOUND 1 L sound is output on both channels SOUND 2 R sound is output on both...

Страница 50: ... Video cable provided TV VCR A Connection to a TV or VCR equipped with an S VIDEO Audio Video cable provided To AV OUT Red to AUDIO R IN TV VCR To TV or VCR White to AUDIO L IN When connecting the cables open this cover Connector cover Yellow to VIDEO IN Yellow to VIDEO IN When connecting the S Video cable open the LCD monitor A Connection to a TV or VCR equipped with an S VIDEO IN and A V input c...

Страница 51: ...arger as the power supply instead of the battery pack Z pg 9 Never connect any other Audio Video cable than the provided Audio Video cable to the camcorder s AV OUT connector When using the provided cables make sure you connect the end of the cable with the core filter to the camcorder The core filter reduces interference To monitor the picture and sound from the camcorder without inserting a tape...

Страница 52: ...POWER Turn the camcorder s Power Switch to while pressing down the Lock Button located on the switch and turn on the PC NOTES It is recommended to use the AC Power Adapter Charger as the power supply instead of the battery pack Z pg 9 Never connect the JLIP PC connection cable and the DV cable simultaneously to the camcorder Connect only the cable you wish to use to the camcorder The date time inf...

Страница 53: ...nnections to the device you want to connect to using the DV cable as shown in the illustration 3 CONNECT PRINTER TO PC IF NECESSARY Connect the JLIP PC connection cable provided to the printer s PC connector and the PC s RS 232C connector 4 TURN ON POWER Turn the camcorder s Power Switch to or while pressing down the Lock Button located on the switch and turn on the other units NOTES It is recomme...

Страница 54: ... Repeat steps 4 through 6 for additional editing then stop the VCR and camcorder when finished NOTES You can use Playback Zoom Z pg 58 or Playback Special Effects Z pg 59 in step 5 Before you start dubbing make sure that the indications do not appear on the connected TV If they do appear during dubbing they are being recorded onto the new tape To clear the Playback Sound Mode Display press DISPLAY...

Страница 55: ...so that an usual image is not dubbed Even though the DV cable is connected correctly some times the image may not appear in step 3 If the above occurs turn off power and make connections again 1 If Playback Zoom Z pg 58 Playback Special Effects Z pg 59 or Snapshot is attempted during playback only the original playback image recorded on the tape is output from the DV OUT connector During Digital D...

Страница 56: ...ile pressing the knob as shown 2 INSERT BATTERY IN HOLDER Insert the battery in the holder and be sure to have the mark visible 3 RE INSERT HOLDER Slide the holder back in until you hear a click Read the caution concerning lithium batteries Z pg 2 When using the remote control be sure to point it at the remote sensor The illustra tion shows the approximate transmitted beam effective area for indoo...

Страница 57: ...utton FF Button PLAY Button PAUSE Button STOP Button R A EDIT Buttons Functions With the camcorder s Power Switch set to the camera position 5S or Zoom in out Z pg 20 Transmits the beam signal Functions same as the Recording Start Stop button on the camcorder With the camcorder s Power Switch set to Z pg 61 Zoom in out Z pg 58 Z pg 54 Z pg 58 Z pg 58 Z pg 58 Z pg 61 Rewind Reverse Shuttle Search Z...

Страница 58: ...actually begins playback in slow motion During Slow Motion Playback there will be distur bances in video and the picture may seem unstable especially with steady images This is not a malfunction During Slow Motion Playback press PAUSE 6 to pause playback FEATURE Frame By Frame Playback PURPOSE To allow frame by frame search OPERATION 1 To change from normal to Frame By Frame Playback press PAUSE 6...

Страница 59: ...to the desired effect by pressing EFFECT The selected function is activated and after 2 seconds the menu disappears n To deactivate the selected effect press EFFECT ON OFF on the remote control Pressing it again re activates the selected effect n To change the selected effect repeat from step 2 of the above OPERATION NOTES When Playback Special Effects are used the Multi Analyser 4 and Multi Analy...

Страница 60: ...owards the VCR s infrared sensor Then referring to the VCR CODE LIST on the left press and hold MBR SET and press button A and then B The code is automatically set once you release MBR SET and the VCR s power comes on 2 OPERATE VCR Make sure the VCR s power is on Then while holding SHIFT press the button on the remote for the desired function The functions the remote can control are PLAY STOP PAUS...

Страница 61: ...y and stop when the one you want is displayed You cannot use a Picture Wipe Dissolve at the beginning of Program 1 CONTINUED ON NEXT PAGE FADE WIPE PLAY R A EDIT ON OFF DISPLAY To Remote PAUSE S Video cable provided To S VIDEO OUT To EDIT RM V711U provided VCR TV Audio Video cable provided White to AUDIO L IN Red to AUDIO R IN To S VIDEO IN To PAUSE IN NOTES Before Random Assemble Editing make sur...

Страница 62: ...ONTROL UNIT cont PLAY R A EDIT ON OFF EFFECT Random Assemble Editing Menu Program Power Switch Remote sensor CANCEL RM V711U provided EDIT IN OUT FADE WIPE NOTES When the source tape has more than 2 identical time codes Z pg 21 the camcorder may not find the Edit In point you chose and a malfunction may occur When choosing a scene set Edit In and Edit Out points so that there is a relatively large...

Страница 63: ...and the recording deck enters its Record Standby mode If you do not register an Edit Out point the tape will be dubbed all the way to the end automatically 1 14 STOP EDITING Engage the Stop modes for the camcorder and the VCR To make the R A Edit counter display disappear press R A EDIT ON OFF on the remote control NOTES Pressing R A EDIT ON OFF on the remote control clears all settings registered...

Страница 64: ... EDIT Play back the tape in the camcorder then point the remote control at the camcorder s remote sensor and press R A EDIT ON OFF Random Assemble Editing Menu appears 2 CHOOSE A SCENE Perform Random Assemble Editing on Program 1 only In order to check VCR and camcorder timing select the beginning of a scene transition as your Edit In point 3 PLAY BACK DUBBED SCENE If any images from the scene pri...

Страница 65: ...CORRECTION DATA Based on the diagnostics performed Z pg 64 you can now increase the VCR s speed by rotating the Select Dial upward You can also slow down the VCR s speed by rotating the Select Dial downward The adjustment range is from 1 3 to 1 3 seconds in 0 1 second increments 7 CLOSE MENU Press the Select Dial twice Now perform Random Assemble Editing beginning with step 4 on page 61 NOTES Befo...

Страница 66: ...tracks are recorded separately To select the desired sound for playback press AUDIO MONITOR on the remote control If you dub onto a blank space on the tape the sound may be disrupted Make sure you only edit recorded areas If feedback or howling occurs during TV Playback move the camcorder s microphone away from the TV or turn down the TV s volume Sound is not heard from the speaker during Audio Du...

Страница 67: ...ert Pause mode 4 START RECORDING Press START STOP to begin editing Confirm the insert at the time code you checked in step 1 5 PAUSE DURING EDITING Press START STOP The camcorder re enters Insert Pause mode Press again to resume editing 6 STOP EDITING Press STOP 5 while the camcorder is in the Insert Pause mode NOTES Program AE with special effects Z pg 36 can be used to spice up the scenes being ...

Страница 68: ...ash is being charged 1 Connect the AC Power Adapter Charger securely Z pg 9 Replace the dead battery with a fully charged one Z pg 8 9 Open the LCD monitor fully or pull out the viewfinder The LCD monitor turns on off when it is opened closed at approx 90 while the Power Switch is set to any position except OFF if the viewfinder is not fully pulled out 2 Connect the camcorder to an AC outlet using...

Страница 69: ... Shutter mode of Program AE with special effects is activated The Squeeze mode is selected The previously selected mode of Program AE with special effects was changed after the last selected scene for editing was registered 12 The subject should look straight toward the flash especially the first flash If the subject does not see the first flash it will be difficult for Red Eye Reduction to take p...

Страница 70: ...ade Out is in progress White Fader Black Fader or Black White Fader Dissolve during 5 second mode recording is in use 24 When shooting in the dark the unit becomes highly sensitive to light and the image takes on an effect similar to Slow Shutter 25 The Picture Wipe or Dissolve function is in use Dissolve during 5 second mode recording is in use 26 The Sepia or Monotone mode is activated 27 This i...

Страница 71: ... 99 36 The optional headphones are not connected to the headphones connector The sound volume of the headphones connector was not adjusted appropriately The sound volume at this point is the same as the level it was adjusted to during playback 29 Set DISPLAY to ON in the Date Time Menu Z pg 22 During interface shooting the date time does not appear Z pg 19 Press IND ON OFF for longer than 1 second...

Страница 72: ...ces subject to extremely high low temperatures 45 This occurs when recording in the LP mode is not available After the indicator blinks the recording mode switches to SP and recording goes on 46 The viewfinder is pulled out The LCD monitor s brightness setting is too dark 47 This is not a malfunction 48 The camcorder was turned on when the battery power was almost gone 37 Set the Power Switch to Z...

Страница 73: ... damage the monitor Close the LCD monitor 3 CLEAN LENS Blow it with a blower brush then wipe gently with lens cleaning paper 4 PULL OUT VIEWFINDER FULLY 5 TILT VIEWFINDER VERTICALLY Tilt the viewfinder upward to 90 degrees 6 OPEN COVER Open the cover located on the bottom of the viewfinder 7 CLEAN VIEWFINDER Remove dust using a blower brush 8 PUSH VIEWFINDER BACK IN Close the cover until it locks ...

Страница 74: ...74EN INDEX Controls Connectors And Indicators 1 2 3 4 u y i o p Q W r 8 T Y I 0 7 6 5 9 q w e R I U t 5 S P L A Y OFF E ...

Страница 75: ... Z pg 50 Headphones Connector Z pg 66 External Stereo Microphone Input Connector MIC Z pg 66 Digital Video Connector DV IN OUT i link Z pg 53 i Link refers to the IEEE1394 1995 industry specification and extensions thereof The logo is used for products compliant with the i Link standard q J terminal JLIP Joint Level Interface Protocol DIGITAL STILL Z pg 52 It is used to connect the camcorder to a ...

Страница 76: ...g 44 5S MODE 5SD MODE ANIM Displays the 5 second recording mode Dissolve during 5 second recording mode or Animation recording mode Z pg 23 Displays the date time Z pg 22 Displays the brightness of the LCD monitor or the viewfinder Z pg 19 Displays the sound mode for approx 5 seconds after turning on the camcorder Z pg 32 Appears when the iris is locked Z pg 41 Appears when the focus is adjusted m...

Страница 77: ...n error indication appears the camcorder turns off automatically Remove the power supply battery etc and wait a few minutes for the indication to clear When it does you can resume using the camcorder If the indication remains consult your nearest JVC dealer Z pg 72 LCD Monitor Viewfinder Indications During Playback No Function 1 Displays the sound mode Z pg 43 2 Appears when playing back images re...

Страница 78: ...V Video Echo Z pg 37 W White Balance Z pg 42 43 Wide Mode Z pg 31 Wind Cut Z pg 32 Wipe In Out Z pg 33 Z Zooming Z pg 20 A AC Power Adapter Charger Z pg 8 9 Animation Z pg 31 Audio Dubbing Z pg 66 Auto Focus Z pg 38 Auto Shut off Z pg 17 45 B Battery Low Z pg 77 Battery Pack Z pg 8 9 79 Beep Tally Z pg 32 Brighten The LCD Monitor Z pg 19 Built in Clock s Lithium Battery Z pg 10 C Charge The Batter...

Страница 79: ...on t be exposed to strong magnetic fields such as those generated by motors transformers or magnets vertically in their original cases LCD Monitor 1 To prevent damage to the LCD monitor DO NOT push it strongly or apply any shocks place the camcorder with the LCD monitor on the bottom 2 To prolong service life avoid rubbing it with coarse cloth 3 Be aware of the following phenomena for LCD monitor ...

Страница 80: ...D monitor or the viewfinder swing it excessively when using the hand strap or the grip swing the soft camera case excessively when the camcorder is inside it 5 Dirty heads can cause the following problems No picture during playback Blocks of noise appear during playback During recording the Head Clog Warning indicator appears In such cases use the optional Cleaning Cassette Insert it and play back...

Страница 81: ...can be determined by turning the equipment off and on the user is encouraged to try to correct the interference by one or more of the following measures Reorient or relocate the receiving antenna Increase the separation between the equip ment and receiver Connect the equipment into an outlet on a circuit different from that to which the receiver is connected Consult the dealer or an experienced ra...

Страница 82: ...nsions 72 W x 94 H x 128 D mm 2 7 8 x 3 3 4 x 5 1 16 with the LCD monitor closed and with the viewfinder fully tilted downward and pushed back in Weight Approx 660 g 1 5 lbs Connectors S Video output Y 1Vp p 75 Ω analog output C 0 29 Vp p 75 Ω analog output Video output 1 Vp p 75 Ω unbalanced analog output via AV OUT connector JLIP Digital still output ø3 5 mm 4 pole mini head jack compatible with...

Страница 83: ...EN83 MEMO ...

Страница 84: ...GR DVL9500 COPYRIGHT 1998 VICTOR COMPANY OF JAPAN LTD U Printed in Japan 1298FOV UN YP VICTOR COMPANY OF JAPAN LIMITED EN ...

Отзывы: