EN
57
1
CONNECT DOCKING STATION TO
TV OR VCR
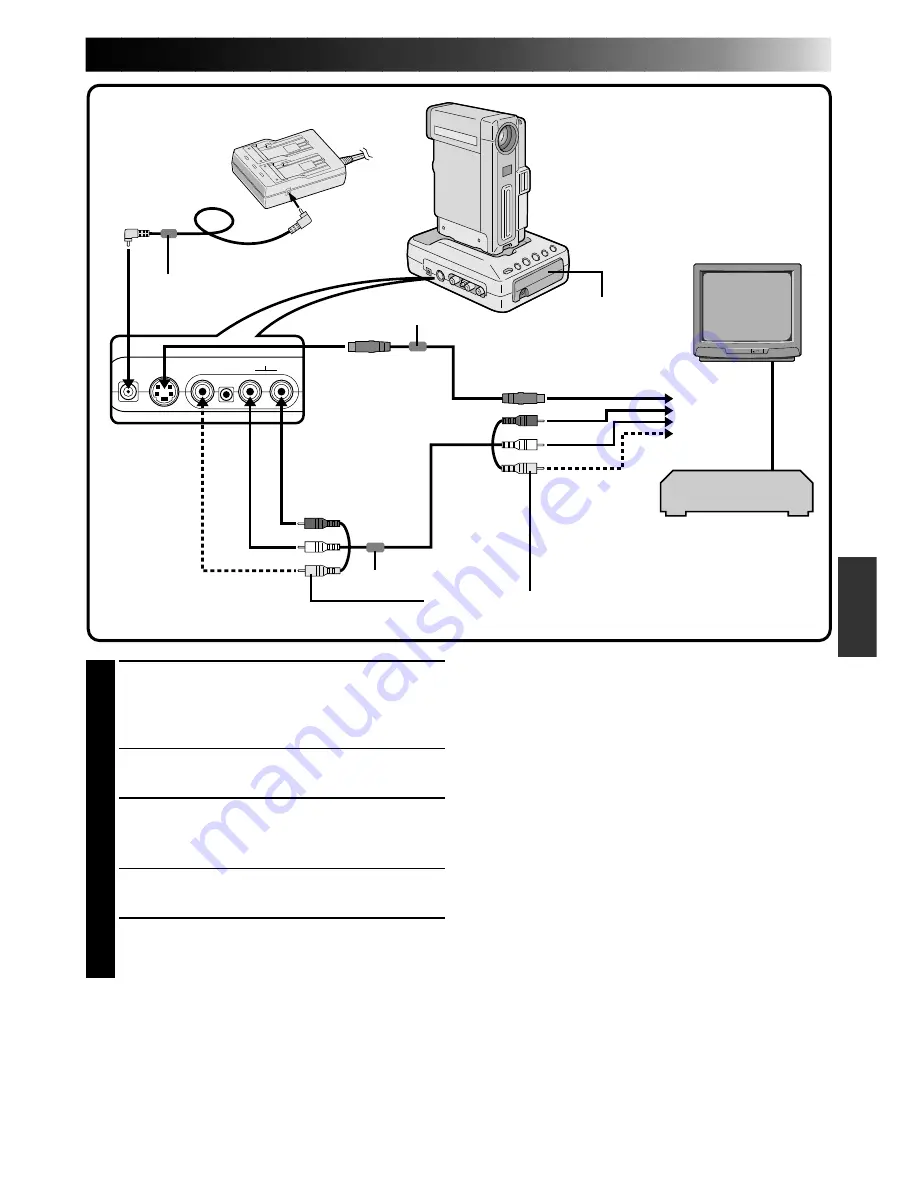
Connect as shown in the illustration
1
,
2
or
3
(
Z
pg. 56, 57).
If Using A VCR . . . go to step 2.
If not . . . go to step 3.
2
CONNECT VCR OUTPUT TO TV
INPUT
Refer to your VCR’s instruction manual.
3
TURN ON POWER
4
SELECT TV’S VIDEO MODE
Set the TV to the channel or mode appropriate
for video playback.
NOTES:
●
When using the provided VIDEO/AUDIO cable
(Docking Station to TV or VCR), DC cord, S-
VIDEO cable or editing cable, make sure you
connect the end of the cable with the core filter to
the Docking Station. The core filter improves
performance of equipment.
●
If TV/VCR is equipped with only one audio
connector, use a conversion plug (commercially
available).
●
Set the VIDEO OUT select switch of the cable
adapter as required:
Y/C: When connecting to a TV or VCR which
accepts Y/C signals and uses an S-VIDEO cable.
CVBS: When connecting to a TV or VCR which
does not accept Y/C signals and uses an audio/
video cable.
●
To turn off the speaker’s sound,
Z
pg. 49.
3
Red
White
Yellow
Red
Yellow
White
Connection to a TV or VCR
equipped with an S-VIDEO
IN and/or A/V input (RCA
type) connectors
AC Power Adapter/Charger
VCR
To DC
output jack
DC cord
Core filter
Core filter
To VIDEO
input jack
(connect when the S-VIDEO cable is not used)
To VIDEO output jack
To AUDIO input jacks (L/R)
To S-VIDEO input jack
Core filter
S-VIDEO cable (provided)
To S-VIDEO
output jack
To AUDIO
output jacks (L/R)
To DC
input jack
Using the remote control unit with the camcorder attached to the Docking Station
While the camcorder is attached to the Docking Station, the camcorder’s remote sensor does not function.
Point the remote control at the sensor located on the Docking Station.
To
TV or VCR
Remote sensor
VIDEO/
AUDIO cable
(provided)


