background image

54

 EN

PLAYBACK

  Basic Connections

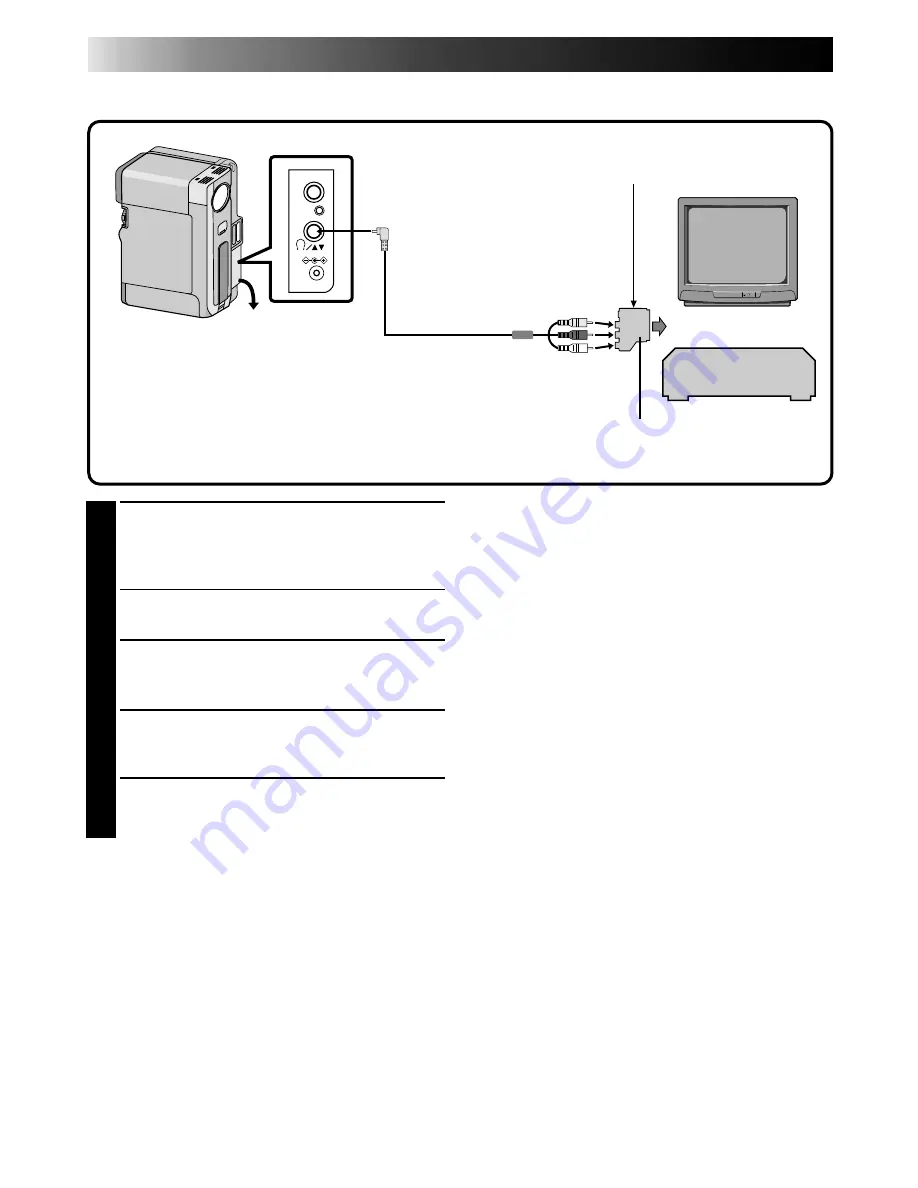
VCR/TV Connection (when connecting directly to the camcorder)

MIC

DC-IN

1

CONNECT CAMCORDER TO TV OR
VCR

Pull out the jack cover and open it. Connect as
shown in the illustration.

If Using A VCR . . . go to step 2.
If not . . . go to step 3.

2

CONNECT VCR OUTPUT TO TV
INPUT

Refer to your VCR’s instruction manual.

3

TURN ON POWER

Turn the Power Dial to “PLAY” and turn on the
TV/VCR.

4

SELECT TV’S VIDEO MODE

Set the TV to the channel or mode appropriate
for video playback.

To choose whether or not the following displays
appear on the connected TV . . .

• Date/Time, Time Code

.... set to “ON” or “OFF” in the Playback Menu

(

Z


pg. 52).

• Playback Sound Mode Display

.... Press the MENU button, and set “ON

SCREEN” in the Date/Time Menu (

Z


pg. 11)

to “ON” or “OFF”. Then set the Power Dial
back to “PLAY”.

NOTES:

Turn on the TV/VCR after connection is com-
pleted. Otherwise damage to this unit and other
equipment may result.

Input mode setting varies depending on the type
of TV used. Refer to your TV’s instruction manual.

Make sure you adjust the TV sound volume to its
minimum level to avoid a sudden burst of sound
when the camcorder is turned on.

To keep the camcorder's display from appearing
on the TV screen during playback, press the
IND.ON/OFF button for longer than 1 second.

It is recommended to use the AC Power Adapter/
Charger as the power supply instead of the
battery pack. (

Z

 pg. 10)

Never connect any other VIDEO/AUDIO cable
than the provided VIDEO/AUDIO cable to the
camcorder’s AV OUT jack.

Cable adapter (provided)
If your VCR has the 21 pin AV input connector (SCART),
use the provided cable adapter.

VCR

To TV or VCR

To VIDEO/AUDIO IN
connectors

To AV OUT

VIDEO OUT select switch (set to CVBS)

Open the
jack cover.

VIDEO/AUDIO cable (provided)
(ø3.5, camcorder to TV or VCR)

Содержание LYT0002-0W3A

Страница 1: ...X 2LTD DIGITAL VIDEO CAMERA LYT0002 0W3A INSTRUCTIONS ENGLISH EN Please visit our CyberCam Homepage on the World Wide Web and answer our Consumer Survey in English only http www jvc victor co jp index e html ...

Страница 2: ...wer cord from AC outlet WARNING TO PREVENT FIRE OR SHOCK HAZARD DO NOT EXPOSE THIS UNIT TO RAIN OR MOISTURE Warning on lithium cell battery The battery used in this device may present a fire or chemical burn hazard if mistreated Do not recharge disassemble heat above 100 C 212 F or incinerate Replace battery with Panasonic Matsushita Electronic Sanyo or Maxell CR2025 use of another battery may pre...

Страница 3: ...k CAUTION The following notes concern possible physical damage to the camcorder and to the user When carrying be sure to always attach and use the provided hand strap Hold the camcorder firmly in your hand with the strap securely around your wrist Carrying or holding the camcorder by the viewfinder and or the LCD monitor can result in dropping the unit or in a malfunction Take care not to get your...

Страница 4: ...IDEO cable DC cord VIDEO AUDIO cable Docking Station to TV or VCR RCA plug 4 RCA plug Soft camera case AC Power Adapter Charger AA V90EG Battery pack BN V907U VIDEO AUDIO cable camcorder to TV or VCR ø 3 5 mini plug 4 RCA plug Editing cable ...

Страница 5: ...N 5 T W Docking Station Remote control unit RM V711U MiniDV Cassette Tape 30 min DVM 30 M DV30ME Power Pack CU V900U Cable adapter Cleaning cloth Lithium battery CR2025 for remote control unit Grip strap ...

Страница 6: ...digital audio signal is recorded here 4 ITI Insert and Tracking Information Area Insert editing and post recording editing tracking signals are recorded here 1 Sub Code Area The Time Code and Date Time data are written here separate from the video data This enables you to display the date and time during playback even if they weren t displayed while recording 2 Video Area The digital video signal ...

Страница 7: ...nit 17 Operation Mode 18 RECORDING 19 Basic Recording 19 Advanced Features 25 PLAYBACK 49 Basic Playback 49 Advanced Features 50 Playback Menu 52 Basic Connections 54 EDITING 58 Dubbing 58 Brand Setting 59 Random Assemble Editing 60 For More Accurate Editing 63 Audio Dubbing 65 Insert Editing 66 TROUBLESHOOTING 67 AFTER USE 72 CONTROLS INDICATIONS AND CONNECTORS 73 Camcorder 73 Docking Station 75 ...

Страница 8: ...r 1 DETACH 1 SUPPLY POWER TO CHARGER Plug the AC Adapter Charger s power cord in to an AC outlet The power lamp comes on 2 ATTACH BATTERY BATTERIES Remove the battery pack s protective cap and attach while making sure the marks are facing down and aligned with the correspond ing marks on the AC Power Adapter Charger The Charger Indicator 1 or 2 begins blinking to indicate charging has started 3 CO...

Страница 9: ...ntinuous Shooting Continuous shooting is possible See table below for recording time under the following conditions A BN V907U Battery Pack is in use The temperature is approximately 20 C 68 F However If the temperature is below 10 C 50 F or If zoom or Record Standby are engaged or LCD monitor is used repeatedly continuous shooting capability is reduced significantly Before extended use it is reco...

Страница 10: ...ck in the camcorder does not begin to supply power Detach the Power Pack and turn off the camcorder to use the battery pack installed in the camcorder GETTING STARTED Cont 1 SUPPLY POWER TO ADAPTER Plug the AC Adapter Charger s power cord in to an AC outlet 2 SUPPLY POWER TO CAMCORDER Connect the AC Adapter to the camcorder NOTE When using the provided DC cord make sure you connect the end of the ...

Страница 11: ...se input the day Press the Select Dial Repeat the procedure to input the month year hour and minute Press the Select Dial twice when the pointer and highlight bar are set to RETURN to exit LCD monitor MENU button Recording Menu Date Time Menu Lock button Power Dial Power lamp Select Dial Regarding Built in Rechargeable Battery To store the date time in memory a rechargeable clock lithium battery i...

Страница 12: ...your fingers caught in the holder when it s closing If this happens the holder will open automatically after a few seconds When the camcorder is suddenly moved from a cold place to a warm environment wait a short time before opening the cover Closing the cassette cover before the cassette holder comes out may cause damage to the camcorder When shooting again after already shooting a scene a blank ...

Страница 13: ... ACCESS RECORDING MENU Press MENU The Recording Menu appears 4 SET RECORDING MODE First move the pointer and highlight bar to REC MODE by rotating the Select Dial Press the Select Dial and the parameter SP or LP is highlighted Select SP or LP by rotating the Select Dial Press the Select Dial to exit from the Recording Menu Insert Editing or Audio Dubbing is impossible on a tape recorded in the LP ...

Страница 14: ...et Using The Soft Camera Case Keep the camcorder in the soft camera case when transporting it 1 OPEN FLAP 2 PUT CAMCORDER IN Insert with lens side down By doing this you can begin shooting as soon as you take out the camcorder from the soft camera case 3 CLOSE FLAP Velcro Flap During transporting Thread your belt through the soft camera case s loop for no hands carrying When putting the camcorder ...

Страница 15: ...O SUB HAND STRAP EYELET Open the pad and thread the end of the grip strap through the sub hand strap eyelet 3 ADJUST LENGTH Adjust so your thumb and fingers can easily operate the START STOP button and the zoom switch 1 Position the pad so that it contacts the back of your hand 2 then re attach it 3 NOTE If you want to take a snapshot Z pg 25 while grasping the camcorder through the Grip strap att...

Страница 16: ... for best viewing 1 SELECT OPERATION MODE Set the Power Dial to A or M 2 TURN ON CAMCORDER Pull out the viewfinder fully 3 ADJUST DIOPTRE Slide the Dioptre Adjust Lever located on the bottom of the viewfinder Slide in either direction while looking at the viewfinder display until it looks best to you Dioptre adjust lever ...

Страница 17: ... while pressing the knob as shown 2 INSERT BATTERY IN HOLDER Insert the battery in the holder and be sure to have the mark visible 3 RE INSERT HOLDER Slide the holder back in until you hear a click Read the caution concerning lithium batteries Z pg 2 Operation Buttons Z pg 50 66 Up Button Z pg 50 INSERT Button Z pg 66 Down Button Z pg 50 AUDIO MONITOR Button Z pg 65 MBR SET Button Z pg 59 A DUB Bu...

Страница 18: ... you to play back a recording Z pg 49 57 Self Timer Operation Mode Tuning the Power Dial allows you to choose the appropriate operation mode among the following modes Full Auto mode A Manual mode M 5 second mode recording 5S Self Timer mode and PLAY GETTING STARTED Cont OFF P L A Y A M 5 S F AUTO PAUSE MANUAL PAUSE According to the Power Dial position you have selected F AUTO or MANUAL appears in ...

Страница 19: ... monitor and the viewfinder No image appears on the LCD monitor when the viewfinder is pulled out It is not possible to shoot using both LCD monitor and viewfinder If 5 minutes elapse in the Record Standby mode power shuts off automatically to conserve energy and protect the heads To turn the camcorder on again push back and pull out the viewfinder again or close and re open the LCD monitor As lon...

Страница 20: ...s 4 6 to engage the Still mode 5 START RECORDING Turn the Power Dial to any operation mode except PLAY and OFF then press START STOP Start recording from a point prior to the end of the last recording A few seconds of the end of the last recording will be erased NOTE If you start recording from the end of the previous recording leaving no blank space there may be situations where a clean transitio...

Страница 21: ... Middle of A Tape Z pg 20 in the following cases After playing back the recorded tape when you shoot again When power shuts off during shooting When a tape is removed and re inserted during shooting When shooting using a partially recorded tape When shooting on a blank portion located partway through the tape When shooting again after already shooting a scene and opening closing the cassette cover...

Страница 22: ...y rotating the Select Dial 1 ADJUST BRIGHTNESS If you want to brighten the image Rotate the Select Dial upward until the brightness indicator moves and the LCD monitor reaches its appropriate brightness If you want to darken the image Rotate the Select Dial downward until the brightness indicator moves and the LCD monitor reaches its appropriate brightness The brightness indication appears in the ...

Страница 23: ... reversed in the display but are not reversed in the recording NOTE The tape remaining indicator does not appear during interface shooting However when the remaining time reaches 2 minutes the indicator appears showing the remaining time blinking blinking blinking Journalistic shooting In some situations different angles of shooting may be required for more dramatic results 1 OPEN LCD MONITOR Make...

Страница 24: ...image processing and is therefore called Digital Zoom During Digital Zoom the quality of image may suffer Digital zoom cannot be used while the Video Echo effect Z pg 43 Snapshot Dissolve the Picture Wipe Dissolve function Z pg 38 or the 5SD mode Z pg 28 are activated Macro shooting as close as approx 3 cm to the subject is possible when the zoom switch is set all the way to W T D W T D W T D W T ...

Страница 25: ...the viewfinder or the LCD monitor when taking a snapshot in Record Standby Z pg 26 Motor Drive mode Keeping SNAPSHOT pressed provides an effect similar to serial photography The interval between the still pictures approx 0 7 seconds Changing the Snapshot Setting Still image with no frame can also be recorded Z pg 34 When you don t want to hear the shutter sound set BEEP TALLY to OFF in the system ...

Страница 26: ...er automatically darkens the picture when using the flash When shooting a subject at a distance where the flash light cannot reach over 2 m set the flash to OFF to prevent the picture from becoming too dark The colour tone changes depending on the background lighting conditions such as under fluorecent or halogen lamps When you want to change the brightness of the flash refer to Adjusting Flash Br...

Страница 27: ...d in P AE Effect the flash will not light 1 SELECT MODE First turn the Power Dial to M while pressing down the lock button located on the dial Make sure the LCD monitor is open fully or the viewfinder is pulled out 2 ACCESS MANUAL MODE ITEM MENU Press the Select Dial and move the pointer and highlight bar to FLASH ADJ by rotating the Select Dial 3 ACCESS FLASH ADJUSTMENT Press the Select Dial The ...

Страница 28: ...r enters Record Standby mode If you press and hold START STOP within 5 seconds after recording starts Record Standby mode is not engaged Scene 5 second recording Record a vacation or an important event in 5 second clips to keep the action moving The 5 Second function may also be activated during Full Auto operation But the White Balance remains in the previously adjusted condition While the 5 Seco...

Страница 29: ...ss START STOP The tally lamp lights and begins blinking After approx 15 seconds the light stops blinking and stays on and recording begins with a beep sound 4 STOP SELF TIMER RECORDING Press START STOP The camcorder re enters Record Standby mode 5 END SELF TIMER RECORDING Set the Power Dial to the A M or OFF position When turning to OFF it is not necessary to press down the lock button To Take A S...

Страница 30: ... the lock button located on the dial make sure the LCD monitor is open fully or the viewfinder is pulled out 2 ACCESS RECORDING MENU Press MENU The Recording Menu appears 3 SELECT FUNCTION Move the pointer and highlight bar to the desired function by rotating the Select Dial then press it The pointer stops blinking indicating that the function has been selected Display Recording Menu RECORDING Adv...

Страница 31: ...d at the top and bottom of the screen and the image appears like a letterboxed 16 9 movie OFF Select OFF when you don t want to use either of the above modes A discriminating signal is automatically recorded when you select either SQUEEZE or CINEMA for recording If your wide TV has the automatic discriminating function connect an S Video cable between S2 connector on the TV and the S Video output ...

Страница 32: ...s while shooting The Stabilizer will not work when certain P AE Effects Classic Film Strobe Slow 1 2 Z pg 43 and Fade Wipe Effects Picture Wipe Dissolve Z pg 38 are activated or if the scene has little or no contrast The indicator appears blinking GAIN UP Bright natural recordings can be taken even in areas with low or poor lighting AUTO A The shutter speed is automatically adjusted 1 25 1 200 sec...

Страница 33: ...nking indicating that the function has been selected 5 SET FUNCTION PARAMETERS Cycle through the available settings of the selected functions by rotating the Select Dial and stop when the one you want is displayed Then press it and the pointer and highlight bar automatically move to RETURN 6 CLOSE RECORDING MENU Press the Select Dial twice Selection is complete and the menu disappears NOTES Connec...

Страница 34: ...N Place the pointer and highlighlt bar to the desired function by rotating the Select Dial then press it The pointer stops blinking indicating that the function has been selected System Menu The System Menu allows you to set the following functions Photo Frame Scene Beep Tally Wind Cut Sound Mode and ID numbers System Menu 5 SET FUNCTION PARAMETERS Rotate the Select Dial to cycle through the avail...

Страница 35: ...ecording mode indicator LP begins to blink and recording goes on in the SP mode NOTE During use of SCENE effect focus Z pg 44 and exposure control Z pg 45 enter Full Auto operation BEEP TALLY The beep sounds when the power is turned on or off and at the beginning and end of recording Tally lamp lights up during recording Shutter sound is heard when pressing the SNAP SHOT button ON To activate the ...

Страница 36: ...t Dial 3 ACCESS FADER WIPE MENU Move the pointer and highlight bar to FADER WIPE by rotating the Select Dial and then press it The Fader Wipe Menu appears 4 SELECT EFFECT Move the pointer and highlight bar to the desired effect by rotating the Select Dial then press it The Fader Wipe Menu disappears and the effect is reserved The indicator representing the selected effect appears 5 START RECORDING...

Страница 37: ... IN OR WIPE IN Press START STOP to start recording and the Fade In or Wipe In occurs automatically 2 ACTIVATE FADE OUT OR WIPE OUT When you want to stop recording the scene press START STOP Before the camcorder enters the Record Standby mode the Fade Out or Wipe Out occurs automatically FADE WIPE Example WH FADER WHITE Example WIPE SCROLL Fade Out Wipe In NOTE You can extend the length of a fade o...

Страница 38: ...g turned the camcorder s power off the previous scene wipes out revealing the new scene The next scene gradually wipes in over the previous scene NOTES If you turn off the power after having finished recording a scene the stored point is erased This disables the Picture Wipe Dissolve combination When this happens the Picture Wipe Dissolve indicator blinks Try recording again but don t turn the pow...

Страница 39: ...rest selecting an effect at random The recording starts with a Fade In or Wipe In If you press START STOP during record ing Record Standby mode is preceded by a Fade Out or Wipe Out when you resume recording it begins with a Fade In or Wipe In NOTE The Picture Wipe Dissolve feature is not available when Random Fader is activated WH BK B W START STOP button ...

Страница 40: ...in from the corners gradually wiping out to the centre Wipe in from right to left or wipe out from left to right Wipe in as the two halves of a black screen open to the left and right revealing the scene or wipe out and the black screen reappears from left and right to cover the scene The scene wipes in from the bottom to the top of a black screen or wipes out from top to bottom leaving a black sc...

Страница 41: ...rom right to left The previous scene wipes out from the centre to the right and left like a door being pushed open to reveal the next scene The new scene wipes in over the last one from the bottom of the screen to the top The new scene wipes in over the previous one from the center toward the top and bottom of the screen When this function is activated the camcorder randomly selects the effect use...

Страница 42: ...TER SHUTTER SLOW X10 VIDEO ECHO OFF SHUTTER 1 250 1 50 1 100 1 250 1 50 1 100 2 SHUTTER 1 500 1 500 SEL 4 Display Manual Mode Item Menu The indicator for the selected mode appears and the selected mode is engaged P AE EFFECTS Menu 1 SELECT OPERATION MODE First turn the Power Dial to M while pressing down the lock button located on the dial make sure the LCD monitor is open fully or the viewfinder ...

Страница 43: ...ndication appears Like classic black and white films your footage is shot in B W Used together with the Wide Cinema function it enhances the classic film effect Recorded scenes have a brownish tint like old photos Combine this with the Cinema mode for a classic look CLASSIC FILM Gives recorded scenes a strobe effect STROBE Your recording looks like a series of consecutive snapshots SLOW Slow Shutt...

Страница 44: ...between the camcorder and the subject When shooting objects with a detailed design or pattern When shooting under flourescent or flickering lighting 1 SELECT OPERATION MODE First turn the Power Dial to M while pressing down the lock button located on the dial make sure the LCD monitor is open fully or the viewfinder is pulled out 2 ACCESS MANUAL MODE ITEM MENU Press the Select Dial The Manual Mode...

Страница 45: ...too dark in compari son with the subject the exposure could be corrected manually To Return To Automatic Exposure Control Rotate the Select Dial to display AUTO then press it in step 3 The Exposure Control indicator disappears Or set the Power Dial to A NOTES When EXP is not displayed Manual Exposure Control is not available To make it appear press the IND ON OFF for longer than 1 second or repeat...

Страница 46: ...hen the subject is close keep the iris locked Even when the subject moves away from you the image will not darken To Return To Automatic Iris Control Rotate the Select Dial to display AUTO then press it in step 3 The Exposure Control indicator and L disappear Or set the Power Dial to A NOTES Iris lock is recommended in the following situa tions When shooting on a reflective natural background such...

Страница 47: ...3 ACCESS WHITE BALANCE ADJUST MENT Move the pointer and highlight bar to W BALANCE by rotating the Select Dial Then press it The Manual Mode Item menu disappears and W BAL appears in the upper left corner and AUTO appears on the screen 4 SET FUNCTION PARAMETERS Cycle through the available settings of the selected functions by rotating the Select Dial and stop when the one you want is displayed 5 C...

Страница 48: ...ce operation the setting is retained even if the power is turned off or the battery removed Manual White Balance Operation If the camera is operating in manual mode perform a Manual White Balance when shooting under various types of lighting 1 SELECT OPERATION MODE Follow steps 1 through 4 of the white balance adjustment Z pg 47 select MAN 2 SET MANUAL WHITE BALANCE Hold a sheet of plain white pap...

Страница 49: ... then the screen may become blue back for a few seconds This is not a malfunction There may be a small margin between the slow motion playback start point you chose and the start point at which the camcorder actually begins playback in slow motion NOTES The sound is not available during High Speed Search Copy guarded tapes cannot be played back The screen becomes blue back 1 SELECT OPERATION MODE ...

Страница 50: ...om buttons T W on the remote control Make sure the remote control is pointed at the camcorder s remote sensor Pressing T zooms in 3 LOCATE PORTION OF MAGNIFIED SCENE You can move the image on screen around to find a particular portion of the picture While holding down SHIFT press Left Right Up and Ä Down Playback Zoom The recorded pictures can be magnified up to 10X at any time during playback O F...

Страница 51: ... again re activates the selected effect Repeat from step 2 when you want to change the selected effect The effects that can be used during playback are Classic Film Monotone Sepia Strobe and Video Echo The effects work the same in playback as they did in recording Refer to page 43 for more information Playback Effects These effects allow you to be creative with the playback picture You can use any...

Страница 52: ...ble settings for the selected function and stop when the desired setting appears Then press the Select Dial and the pointer and highlight bar automatically move to END To set parameters for other functions repeat steps 3 and 4 5 CLOSE MENU Press the Select Dial again and the menu disappears 1 SELECT OPERATION MODE First turn the Power Dial to PLAY while pressing down the lock button located on the...

Страница 53: ...back Menu Make sure you point the remote control at the camcorder s remote sensor During playback the camcorder detects the sound mode in which the recording was made This detection cannot be made during fast forward or rewind During playback the sound mode is displayed in the upper left corner TIME CODE Displaying The Time Code During Playback You can display the Time Code on screen during playba...

Страница 54: ...PLAY NOTES Turn on the TV VCR after connection is com pleted Otherwise damage to this unit and other equipment may result Input mode setting varies depending on the type of TV used Refer to your TV s instruction manual Make sure you adjust the TV sound volume to its minimum level to avoid a sudden burst of sound when the camcorder is turned on To keep the camcorder s display from appearing on the ...

Страница 55: ...r to the Docking Station you can add many interesting effects during playback Core filter Power cord To DC output jack AC Power Adapter Charger 1 CONFIRM POWER OFF STATUS Make sure the camcorder s power is off 2 ATTACH AND LOCKS First open the Multi connector cover MULTI on the bottom of the camcorder Align the mark on the camcorder with the one on the Docking Station and slide the camcorder in th...

Страница 56: ...IDEO OUT select switch Set to CVBS AC Power Adapter Charger Core filter Core filter To S VIDEO output jack S VIDEO cable provided To S VIDEO input jack To AUDIO input jacks L R To VIDEO input jack To AUDIO output jacks L R Core filter VIDEO OUT select switch set to Y C VCR Core filter Connection to a TV or VCR equipped with a SCART connector compatible only with regular video signal Connection to ...

Страница 57: ...e sure you connect the end of the cable with the core filter to the Docking Station The core filter improves performance of equipment If TV VCR is equipped with only one audio connector use a conversion plug commercially available Set the VIDEO OUT select switch of the cable adapter as required Y C When connecting to a TV or VCR which accepts Y C signals and uses an S VIDEO cable CVBS When connect...

Страница 58: ...e Code on the recording To show or hide all indications press the IND ON OFF button on the camcorder for longer than 1 second 1 MAKE CONNECTIONS Connect the Docking Station to your VCR as shown in the illustration on pages 56 57 Please also refer to your VCR s instruction manual before dubbing 2 START PLAYBACK Press the Play button to play back the source tape 3 START RECORDING While watching on t...

Страница 59: ... VCR CODE LIST on the left press and hold MBR SET and press button A and then B The code is automatically set once you release the MBR SET button and the VCR s power comes on 2 OPERATE THE VCR Make sure the VCR s power is on Then while holding SHIFT press the button on the remote for the desired function The functions the remote can control are PLAY STOP PAUSE FF REW and VCR REC STBY you don t nee...

Страница 60: ...t the Docking Station s editing jack to the remote control s remote pause terminal using an editing cable Set the VIDEO OUT select switch of the cable adapter as required Y C When connecting to a TV or VCR which accepts Y C signals and uses an S VIDEO cable CVBS When connecting to a TV or VCR which does not accept Y C signals and uses an audio video cable Before Random Assemble Editing make sure t...

Страница 61: ... steps 4 and 5 only Remote sensor NOTES When the source tape has more than 2 identical time codes Zpg 21 the camcorder may not find the Edit In point you chose and a malfunc tion may occur When choosing a scene set Edit In and Edit Out points so there s a relatively large difference between them If the search time for an in point exceeds 5 minutes the recording deck s Record Standby mode will be c...

Страница 62: ...gistered scene When dubbing is complete the camcorder enters the Pause mode and the recorder enters its Record Standby mode If you don t register an Edit Out point the tape will be dubbed all the way to the end automatically 12 STOP EDITING Engage the Stop modes for the camcorder and the recorder To make the R A Edit counter display disap pear press R A EDIT ON OFF on the remote control EDIT IN OU...

Страница 63: ...ted or find that you ve recorded scenes you didn t want For a cleanly edited tape confirm and adjust the timing of the camcorder against your VCR Diagnosing VCR s against Camcorder Timing 1 PREPARE FOR R A EDIT Play back the tape in the camcorder then point the remote control at the camcorder s remote sensor and press R A EDIT ON OFF Random Assemble Editing Menu appears on the TV screen 2 CHOOSE A...

Страница 64: ...r and highlight bar to SYNCHRO by rotating the Select Dial then press it The value for SYNCHRO is high lighted 6 INPUT CORRECTION DATA Based on the diagnostics performed Z pg 63 you can now increase the VCR s speed by rotating the Select Dial upward You can also slow down the VCR s speed by rotating the Select Dial downward The adjustment range is from 1 3 to 1 3 seconds in 0 1 second increments O...

Страница 65: ...DISPLAY External microphone input connector Located beneath the cover NOTES Audio dubbing is possible using an optional microphone connected to the external microphone input connector MIC While an optional microphone is connected the built in microphone is disabled When editing onto a tape that was recorded at 32 kHz the old and new soundtracks are recorded separately To select the desired sound f...

Страница 66: ... START STOP to begin editing Confirm the insert at the time code you checked in step 1 5 PAUSE DURING EDITING Press START STOP The camcorder re enters Insert Pause mode Press again to resume editing 6 STOP EDITING Press STOP while the camcorder is in the Insert Pause mode Power Dial START STOP DISPLAY INSERT PLAY PAUSE REW IND NOTES P AE Effects Z pg 42 can be used to spice up the scenes being edi...

Страница 67: ...l is not set to PLAY 9 Your TV has AV input terminals but is not set to its VIDEO mode The cassette s cover is open 10 The 5 Second mode in the System Menu is set to ANIM 1 Connect the AC Adapter securely Z pg 10 Replace the dead battery with a fully charged one Z pg 9 Open the LCD monitor fully or pull out the viewfinder The LCD monitor turns on off when it is opened closed at approx 90 while the...

Страница 68: ...fects are activated 17 P AE Effects Sepia Monotone or Slow are activated The Squeeze mode is selected The previously selected P AE Effect was changed after the last selected scene for editing was registered 18 When using Picture Wipe Dissolve Z pg 38 or Dissolves during 5 second mode recording Z pg 28 there is a delay of a fraction of a second between the previous record stop point and the Dissolv...

Страница 69: ...it In and Edit Out points as they will all be erased Z pg 38 The camcorder automatically shuts off after 5 minutes have elapsed in the Record Standby mode Make sure you continue operations within 5 minutes after engaging Record Standby mode Z pg 38 20 Make sure the Squeeze mode Cinema mode or Slow effect is not activated when preparing to use the Picture Wipe function Z pg 31 43 21 If you want the...

Страница 70: ... pg 65 66 27 Set DISPLAY to ON in the Date Time Menu Zpg 11 During interface shooting the date time does not appear Z pg 23 Press the IND ON OFF button for longer than 1 second to make the indica tors appear Z pg 22 28 Set ON SCREEN to ON in the Date Time Menu Z pg 33 Press the IND ON OFF button for longer than 1 second to make the indica tors appear Z pg 22 29 Press the IND ON OFF button for long...

Страница 71: ...LCD monitor s brightness setting is too dark 35 Re read the sections covering FADE WIPE P AE Effects and DIS Z pgs 32 36 43 36 37 38 Check the section of the manual that explains LCD monitor viewfinder indications Z pgs 73 78 39 Remove the power supply battery pack etc and press RESET button and wait a few minutes for the indication to clear When it does you can resume using the camcorder If the i...

Страница 72: ...ower or a soft cloth 6 PUSH VIEWFINDER BACK IN Return the viewfinder eject knob to its original position and push the viewfinder back in AFTER USE 7 OPEN LCD MONITOR Open the LCD monitor fully 8 CLEAN LCD MONITOR With soft cloth gently wipe the LCD monitor in a semicircular pattern Avoid using too much pressure as this will smear the monitor screen making it much more difficult to clean 9 CLOSE LC...

Страница 73: ...of an AC Power Adapter or Power Pack can be connected 1 Cassette cover Z pg 12 Cassette is loaded inside the cover 2 Stereo microphone Z pg 65 For use when recording or audio dubbing 3 White balance sensor Adjusts the colour reproduction Take care not to cover the sensor with your hand while shooting 4 Lens cover Opens when the viewfinder is pulled out or the LCD monitor is opened fully 5 Remote s...

Страница 74: ...ripod mounting socket Z pg 15 QMulti connector MULTI Z pg 55 LCD monitor Z pg 23 The image appears during recording or play back RESET button Z pg 71 When a malfunction occurs press this button after removing the power supply battery etc Pressing this button also resets the date time or various settings MENU button Z pg 30 Press this button to make the Menu appear IND ON OFF button Z pg 22 Press a...

Страница 75: ...multi connector 3 DC input jack Z pg 55 Connect the DC cord to the jack 4 S2 video output jack Z pg 56 Outputs S Video signal Also this is compatible with S S1 and S2 connectors Using an S Video cable connect to a VCR or a TV 5 JLIP jack Using an optional JLIP Player Pack etc connect to a JLIP compatible camcorder or VCR to control it from a computer 6Video output jack Z pg 56 Using a video cable ...

Страница 76: ...lash is ready A number appears next to the indication while adjusting the brightness of the flash Z pg 26 27 Appears when the wind cut mode is engaged to cut down on noise created by wind Z pg 35 Displays the 5 second mode recording or animation recording mode Z pg 28 Displays the sound mode for approx 5 seconds after turning on the camcorder Z pg 35 Displays the date time Z pg 33 Appears during s...

Страница 77: ...plays the recording mode of the tape being played back 3 Appears while a tape is running 4 Playback 3 Fast Forward High speed search 2 Rewind High speed search 64 Forward slow motion 61 Reverse slow motion 6 Pause w Insert e Audio Dubbing 4 Displays the date time Z pg 53 5 Displays the brightness of the LCD monitor or the speaker volume Z pg 22 6 Displays the time code Z pg 53 ...

Страница 78: ...loaded Appears when the tape ends during recording or playback Z pg 22 Appears when the date time is not set Z pg 11 Appears when the built in rechargeable battery is discharged and the previously set date time is erased Z pg 11 Appears when Audio Dubbing is unavailable Z pg 65 Appears when Insert Editing is unavailable Z pg 66 The error indications E01 E07 show what type of malfunction has occure...

Страница 79: ... recharging takes CAUTIONS Terminals Cassettes To properly use and store your cassettes be sure to read the following cautions 1 During use make sure the cassette bears the Mini DV mark be aware that recording onto prerecorded tapes automatically erases the previously recorded video and audio signals make sure the cassette is positioned properly when inserting do not load and unload the cassette r...

Страница 80: ...ecommended after using the unit for about 1 000 hours For periodic check ups please consult your nearest JVC dealer LCD monitor 1 To prevent damage to the LCD monitor DO NOT push it strongly or apply any shocks place the camcorder with the LCD monitor on the bottom 2 To prolong service life avoid rubbing it with coarse cloth 3 Be aware of the following phenomena for LCD monitor use These are not m...

Страница 81: ...humidity 35 to 80 Storage temperature 20 to 50 C Dimensions 49 W x 131 H x 93 D mm Weight Approx 590 g incl cassette and battery Video Output 1 Vp p 75 Ω unbalanced analogue output via ø3 5 mm AV output jack Audio Output 8 dBs 1 kΩ analogue output via ø3 5 mm AV output jack Headphone stereo via ø3 5 mm AV output jack External microphone input 62 dBs high impedance unbalanced with ø3 5 mm STEREO Sp...

Страница 82: ...mode by pressing START STOP during Stop or Record modes It means that the camcorder or your VCR is paused and ready to record CCD Charge coupled device Solid state imaging device used in camcorders as the camera s image pickup analogous to the eye s retina except that picture information is output as electric signals Dew sensor If condensation forms inside the unit due to a temperature change the ...

Страница 83: ...6 Iris Z pg 46 Iris Lock Z pg 46 L LCD monitor Viewfinder indications Z pg 76 78 Lithium Battery Z pg 2 3 79 Loading A Tape Z pg 12 M Motor Drive Mode Z pg 25 O On Screen Menus Z pg 30 35 52 53 Operation Mode Z pg 18 P P AE Effects Z pg 42 43 Photo Frame Z pg 35 Playback Zoom Z pg 50 Power AC Battery Z pg 9 10 R Random Assemble Editing Z pg 60 64 Record Safety Tab Z pg 12 Record Standby Z pg 19 Re...

Страница 84: ...GR DVX 2LTD COPYRIGHT 1997 VICTOR COMPANY OF JAPAN LTD EG Printed in Japan 1097TOV UN SN VICTOR COMPANY OF JAPAN LIMITED EN ...

Отзывы: