background image

English

   - 11 -

When you select one of these files, all services and 

related satellites and transponders in the selected 

file will be stored in the TV. If there are any installed 

terrestrial, cable and/or analogue services, they will 

be kept and only satellite services will be removed. 
Afterwards, check your antenna settings and make 

changes if necessary. An error message stating “

No 

Signal

” may be displayed if the antenna settings are 

not configured properly.

E-Manual

You can find instructions for your TV’s features in the 

E-Manual. 

To access the E-Manual, enter 

Settings

 menu, select 

Manuals

 and press 

OK

. For quick access press 

Menu


button and then 

Info

 button.

By using the directional buttons select a desired 

category.  Every  category  includes  different  topics. 

Select a topic and press 

OK

 to read instructions.

To close the E-Manual screen press the 

Exit

 or 

Menu


button.

Note: Depending on model, your TV may not support this 

function. The contents of the E-Manual may vary according 
to the model.

Connectivity

Wired Connectivity

To Connect to a Wired Network

• 

You must have a modem/router connected to an 

active broadband connection.

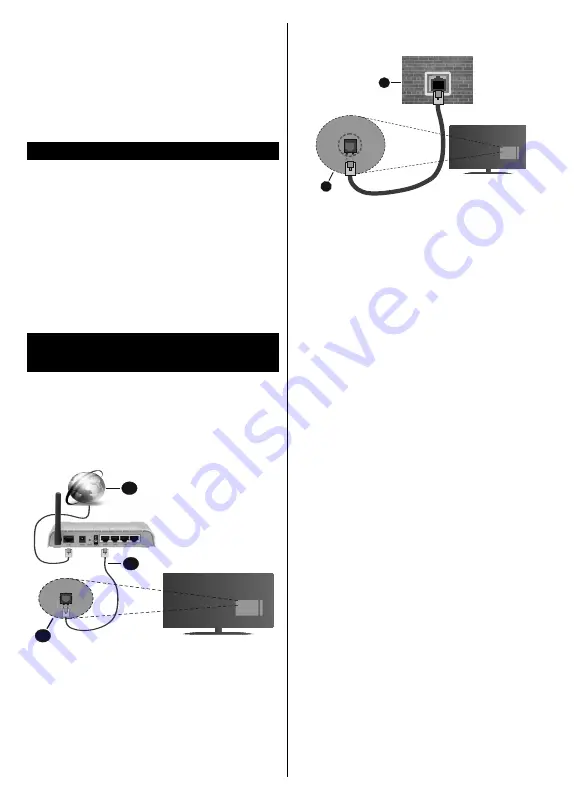
•  Connect  your  TV  to  your  modem/router  via  an 

Ethernet  cable.  There  is  a  LAN  port  at  the  rear 

(back) of your TV.

2

3

1

1. 

Broadband ISP connection

2. 

LAN (Ethernet) cable

3. 

LAN input on the rear side of the TV

To configure wired settings refer to the Network 

section in the


Settings menu.

•  You might be able to connect your TV to your LAN 

depending on your network’s configuration. In such 

a case, use an Ethernet cable to connect your TV 

directly to the network wall outlet.

1

2

1. 

Network wall socket

2. 

LAN input on the rear  side of the TV

Configuring Wired Device Settings

Network Type

The 

Network Type

 can be selected as 

Wired


Device,


Wireless Device 

or 

Disabled

, in accordance with the 

active connection to the TV set. Select this as 

Wired 

Device

 if you are connecting via an Ethernet cable.

Internet Speed Test

Highlight 

Internet Speed Test

 and press the 

OK


button. TV will check the internet connection bandwidth 

and display the result when complete. 

Advanced Settings

Highlight 

Advanced


Settings

 and press the 

OK


button. On the next screen you can change the IP and 

DNS settings of the TV. Highlight the desired one and 

press Left or Right button to change the setting from 

Automatic

 to 

Manual

. Now you can enter the 

Manual 

IP

 and / or 

Manual DNS

 values. Select the related item 

in the drop down menu and enter the new values using 

the numeric buttons of the remote. Highlight 

Save

 and 

press the 

OK

 button to save settings when complete. 

Содержание LT-32V55LWA

Страница 1: ...8MTH VT VT ENGLISH ESPAÑOL PORTUGUÊS GERMAN ČEŠTINA SLOVENČINA MAGYAR INSTRUCTIONS LCD TV INSTRUCCIONES TV LCD INSTRUÇÕES TV LCD BEDIENUNGSANLEITUNG LCD TV POKYNY LCD TV INŠTRUKCIE LCD TV UTASÍTÁSOK LCD TV ...

Страница 2: ......

Страница 3: ...weltinformationen 4 Zubehör im Lieferumfang 4 Anleitung zur Wandbefestigung 5 TV Bedientasten Betrieb 6 Einlegen der Batterien in die Fernbedienung 6 Netzanschluss 6 Anschluss der Antenne 7 Lizenzinformationen 7 Informationen zur Entsorgung 8 Fernbedienung 9 Ein Ausschalten 10 Erste Installation 10 Verwenden der Satellitenkanaltabellenfunktion 12 E Handbuch 12 Konnektivität 12 Drahtgebundene Konne...

Страница 4: ...etzstecker können zu Bränden oder Stromschlägen führen Handhaben Sie das Netzkabel immer am Stecker trennen Sie das TV Gerät nicht durch Ziehen des Netzkabels vom Netz Berühren Sie niemals das Netzkabel den Stecker mit nassen Händen da dies einen Kurzschluss oder elektrischen Schlag verursachen kann Machen Sie niemals Knoten in das Netzkabel und binden Sie es nie mit anderen Kabeln zusammen Wenn e...

Страница 5: ... Verletzungen mit möglicher Todesfolge verursachen Viele Verletzungen insbesondere bei Kindern können vermieden werden wenn die folgenden einfachen Vorsichtsmaßnahmen getroffen werden Verwenden Sie nur vom Hersteller des TV Geräts empfohlene TV Möbel oder Standfüße Verwenden Sie nur Möbelstücke die das Gewicht des TV Geräts sicher tragen können Stellen Sie sicher dass das TV Gerät nicht über die R...

Страница 6: ...finden sich im Sys tem Bild Menü Ist dies nicht der Fall können die Einstellungen nicht geändert werden Wenn die rechte Taste und linke Taste nacheinander gedrückt wird wird die Der Bildschirm wird sich in 15 Sekunden ausschalten Meldung auf dem Bildschirm angezeigt Wählen Sie Fortfahren und drücken Sie OK um den Bildschirm umgehend auszuschalten Wenn Sie keine Taste drücken wird der Bildschirm na...

Страница 7: ...te an einen qualifizierten Installateur Das Gewinde der Schraube darf die X mm im TV Gerät nicht überschreiten Kontaktieren Sie den Händler bei dem Sie das Produkt gekauft haben über Informationen wo Sie den VESA Kit erwerben können Lesen Sie dazu bitte die zusätzliche Seite über die korrekte VESA Maße sowie die für die Montage geeigneten Schrauben Entfernung des Untergrund Um den Standfuß zu entf...

Страница 8: ...ie Navigationstasten und die OK Taste zum Navigieren und Einstellen Drücken Sie die Return Back Taste bzw die Menu Taste um einen Menü Bildschirm zu verlassen Eingangsauswahl Sobald Sie ein externes System an Ihr Gerät angeschlossen haben können Sie zwischen den verschiedenen Eingangsquellen schalten Drücken Sie auf Ihrer Fernbedienung hintereinander die Quelle Taste um die verschiedenen Signalque...

Страница 9: ...mbol sowie DTS und das Symbol zusammen sind registrierte Markenzeichen und DTS TruSurround ist ein Markenzeichen der DTS Inc DTS Inc Alle Rechte vorbehalten Für DTS patente siehe http patents dts com Hergestellt mit Lizenz der DTS Licensing Limited DTS DTS HD das Symbol DTS oder DTS HD sowie die Symbole zusammen sind eingetragene Markenzeichen der DTS Inc DTS Inc Alle Rechte vorbehalten Die Marke ...

Страница 10: ... am Ende ihrer Nutzungsdauer nicht als normaler Haushaltsmüll entsorgt werden dürfen Stattdessen müssen diese Produkt an einer geeigneten Sammelstelle für die Wiederverwertung von elektrischen und elektronischen Geräten zur richtigen Behandlung Wiedergewinnung und Wiederverwertung in Übereinstimmung mit den gesetzlichen Regelungen und den EU Richtlinien 2012 19 EU und 2013 56 EU abgegeben werden I...

Страница 11: ...s Fernsehen um zeigt und ändert die Audio Untertitelsprache und schaltet die Untertitel ein oder aus digitales Fernsehen wo verfügbar 4 Stummschaltung Schaltet die Lautstärke des Fernsehgeräts ganz aus 5 Lautstärke 6 Guide Zeigt den Elektronischer Programmführer 7 Navigationstasten Hilft beim Navigieren durch Menüs Inhalt usw und zeigt die Unterseiten im TXT Modus an wenn sie nach rechts oder link...

Страница 12: ...hlen für die Verwendung zu Hause den Home Modus auszuwählen Diese Option ist in Einstellungen System Sonstige verfügbar und kann später ein bzw ausgeschaltet werden Treffen Sie IhreAuswahl und drücken Sie OK um fortzufahren Je nach entsprechendem TV Modell und der Landesauswahl wird nun ggf das Menü mit den Datenschutzeinstellungen angezeigt Mithilfe dieses Menüs können Sie die Zugriffsrechte auf ...

Страница 13: ...chten Satelliten ausgewählt haben drücken Sie OK um die Satelliteninstallationsparameter im Untermenü zu ändern Um eine Fransat Installation zu starten legen Sie den Installationstyp als Betreiber und dann den Satellitenbetreiber als zugehörigen Fransatbetreiber fest Drücken Sie dann die Taste OK um die Fransat Installation zu starten Sie können zwischen der automatischen bzw manuellen Installatio...

Страница 14: ...führen Es gibt zwei Optionen in Bezug auf diese Funktion Sie können Satelliten Kanaltabellendaten hoch oder runterladen Um diese Funktionen nutzen zu können muss ein USB Gerät an den Fernseher angeschlossen werden Sie können die aktuellen Dienste und damit verbundene Satelliten Transponder vom TV Gerät auf ein USB Gerät laden Des Weiteren können Sie eine auf dem USB Gerät gespeicherte Satelliten K...

Страница 15: ...g ein Markieren Sie Speichern und drücken Sie die OK Taste um die Einstellungen zu speichern Drahtlose Verbindung Anschluss an ein kabelgebundenes Netzwerk Der Fernseher kann keine Verbindung zu einem Netzwerk mit versteckter SSID herstellen Um die SSID Ihres Modems sichtbar zu machen müssen Sie die SSID Einstellungen über die Modem Software ändern 1 1 Breitband ISP Verbindung Konfiguration der ka...

Страница 16: ...spielsweise ein Smartphone Ihr TV Gerät ist WoL und WoWLAN kompatibel Diese Funktion ist möglicherweise während der Erstinstallation deaktiviert Um diese Funktion zu aktivieren stellen Sie die Option Wake On im Menü Netzwerk auf Ein Es ist notwendig dass sowohl das Gerät von dem die Netzwerknachricht an das TV Gerät gesendet wird als auch das TV Gerät an das gleiche Netzwerk angeschlossen sind Die...

Страница 17: ...eicherte Fotos und Videos anzeigen und Musikdateien hören 1 Installation der Serversoftware Die Audio Video Sharing Funktion kann nicht ohne das auf Ihrem PC installierte Server Programm verwendet werden Außerdem muss die erforderliche Mediaserver Software auch auf dem dazugehörigem Gerät installiert sein Bereiten Sie Ihren PC mit einem geeigneten Serverprogramm vor 2 Verbindung mit einem kabelgeb...

Страница 18: ...ng umfasst während der Garantiedauer nach unserer Wahl die Instandsetzung Ihres Gerätes oder den Austausch gegen ein gleichwertiges Gerät die bei uns anfallenden Arbeitslöhne Materialkosten und die Transportkos ten des Gerätes innerhalb Deutschland wenn die Ware an uns in der Originalver packung versendet wird Nicht von der Garantieleistung umfasst sind die Kosten einer anderenfalls notwendig werd...

Страница 19: ...urückzuführen sind bei übermäßiger Nutzung insbesondere bei anderer als privater Nutzung bei Missachtung der Bedienungsanleitung wenn das Gerät keinen technischen Defekt aufweist bei Pixelfehlern die innerhalb der in der ISO Norm 9241 307 Pixelfehlerklasse II festgelegten Toleranzen liegen 10 Zur Validisierung Ihres Anspruches und um eine zeitnahe Bearbeitung zu gewähr leisten senden Sie uns bitte...

Страница 20: ...t 2 Environmental Information 3 Accessories Included 3 Wall mounting instructions 4 TV Control Switch Operation 5 Inserting the Batteries into the Remote 5 Power Connection 5 Antenna Connection 5 License Notification 6 Disposal Information 7 Remote Control 8 Switching On Off 9 First Time Installation 9 Using Satellite Channel Table Feature 10 E Manual 11 Connectivity 11 Wired Connectivity 11 Wirel...

Страница 21: ... other cords When damaged it must be replaced this should only be done by qualified personnel Do not expose the TV to dripping or splashing of liquids and do not place objects filled with liquids such as vases cups etc on or over the TV e g on shelves above the unit Do not expose the TV to direct sunlight or do not place open flames such as lit candles on the top of or near the TV Do not place any...

Страница 22: ...tion to a television distribution system has therefore to be provided through a device providing electrical isolation below a certain frequency range galvanic isolator WALL MOUNTING WARNINGS Read the instructions before mounting your TV on the wall The wall mount kit is optional You can obtain from your local dealer if not supplied with your TV Do not install the TV on a ceiling or on an inclined ...

Страница 23: ... In case of any doubt please contact a qualified installer The screw thread length must not exceed X mm into the TV Contact the store where you purchased the product for information on where to purchase the VESA kit Refer to the related additional page for the accurate VESA measurements and screw specifications Removing the base stand To remove the base stand protect the screen and lay the TV flat...

Страница 24: ...to your TV you can switch to different input sources Press the Source button on your remote control consecutively to select the different sources Changing Channels and Volume You can change the channel and adjust the volume by using the Programme and Volume buttons on the remote Inserting the Batteries into the Remote Remove the back cover to reveal the battery compart ment Insert two size AAA bat...

Страница 25: ...ights of Microsoft Use or distribution of this technology outside of this product is prohibited without the appropriate license s from Microsoft Content owners use Microsoft PlayReady content access technology to protect their intellectual property including copyrighted content This device uses PlayReady technology to access PlayReady protected content and or WMDRM protected content If the device ...

Страница 26: ... inappropriate waste handling of these products For more information about collection points and recycling of these products please contact your local municipal office your household waste disposal service or the shop where you purchased the product Penalties may be applicable for incorrect disposal of this waste in accordance with national legislation Business users If you wish to dispose of this...

Страница 27: ...e and turns subtitles on or off digital TV where available 4 Mute Completely turns off the volume of the TV 5 Volume 6 Guide Displays the electronic programme guide 7 Directional buttons Helps navigate menus content etc and displays the subpages in TXT mode when pressed Right or Left 8 OK Confirms user selections holds the page in TXT mode views Channels menu DTV mode 9 Back Return Returns to prev...

Страница 28: ... screen for each highlighted feature before making any changes You can use Programme buttons to scroll up and down to read the entire text You will be able to change your preferences at any time later from the Settings System Privacy Settings menu If the Internet Connection option is disabled Network Internet Settings screen will be skipped and not displayed If you have any questions complaints or...

Страница 29: ...Press OK to continue Select an available satellite on the next screen and press OK to scan for services Single Satellite Cable If you have multiple receivers and a single satellite cable system select this antenna type Press OK to continue Configure settings by following instructions on the next screen Press OK to scan for services DiSEqC switch If you have multiple satellite dishes and a DiSEqC s...

Страница 30: ...rnet cable There is a LAN port at the rear back of your TV 2 3 1 1 Broadband ISP connection 2 LAN Ethernet cable 3 LAN input on the rear side of the TV To configure wired settings refer to the Network section in the Settings menu You might be able to connect your TV to your LAN depending on your network s configuration In such a case use an Ethernet cable to connect your TV directly to the network...

Страница 31: ...ice via WLAN If your mobile device has WLAN feature you can connect it to your TV via a router in order to access the content in your device For this your mobile device must have an appropriate sharing software Connect your TV to your router following the steps mentioned in the sections above Afterwards connect your mobile device to the router and then activate the sharing software on your mobile ...

Страница 32: ...vices you should use the Bluetooth option in the Settings Sound menu for remote controllers the Smart Remote option in the Settings System More menu Select the menu option and press the OK button to open the related menu Using this menu you can discover and connect the devices that use the Bluetooth wireless technology and start to use them Follow the on screen instructions Using Audio Video Shari...

Страница 33: ......

Страница 34: ...50464637 Importer Addresses ...

Отзывы: