background image

7

(Red)

(Green)

(Yellow)

> Edit

PR

     ID

CH/CC

01

     CAT

CH02

02

     DOG

CH03

03

CH47

04

_ _ _ _ _ _

CH76

05

_ _ _ _ _ _

CH12

06

CH09

07

CH05

08

CH02

09

CH15

10

CH28

Set Up

> Edit

PR

     ID

CH/CC

01

A

CH02

02

     DOG

CH03

03

CH47

04

_ _ _ _ _ _

CH76

05

_ _ _ _ _ _

CH12

06

CH09

07

CH05

08

CH02

09

CH15

10

CH28

Set Up

> Edit

PR

     ID

CH/CC

01

CH02

02

ABCDEF

CH**

03

CH47

04

_ _ _ _ _ _

CH76

05

_ _ _ _ _ _

CH12

06

CH09

07

CH05

08

CH02

09

CH15

10

CH28

Set Up

> Manual

PR

     ID

CH/CC

01

BBC1

CH02

02

LOVE

CH03 (B/G)

03

ABCD

CH47

04

DOG

CH76

05

CH12

06

_ _ _ _ _ _

CH09

07

_ _ _ _ _ _

CH05

08

CH02

09

CH15

10

CH28

Set Up

> Channel Summary

CH/CC

     ID

Skip

02

03

     DOG

Yes

04

Yes

05

_ _ _ _ _ _ Yes

06

_ _ _ _ _ _ Yes

07

Yes

08

Yes

09

10

11

Set Up

> Channel Summary

CH/CC

     ID

Skip

02

     CAT

Yes

03

     DOG

Yes

04

Yes

05

_ _ _ _ _ _ Yes

06

_ _ _ _ _ _ Yes

07

Yes

08

Yes

09

10

11

Set Up

> Channel Summary

CH/CC

     ID

Skip

02

     CAT

03

     DOG

Yes

04

Yes

05

_ _ _ _ _ _

Yes

06

_ _ _ _ _ _

Yes

07

Yes

08

Yes

09

10

11

Set Up

> Channel Summary

CH/CC

    ID

Skip

02

A

Yes

03

    CAT

Yes

04

    DOG

Yes

05

_ _ _ _ _ _ Yes

06

_ _ _ _ _ _ Yes

07

Yes

08

Yes

09

10

11

Set Up

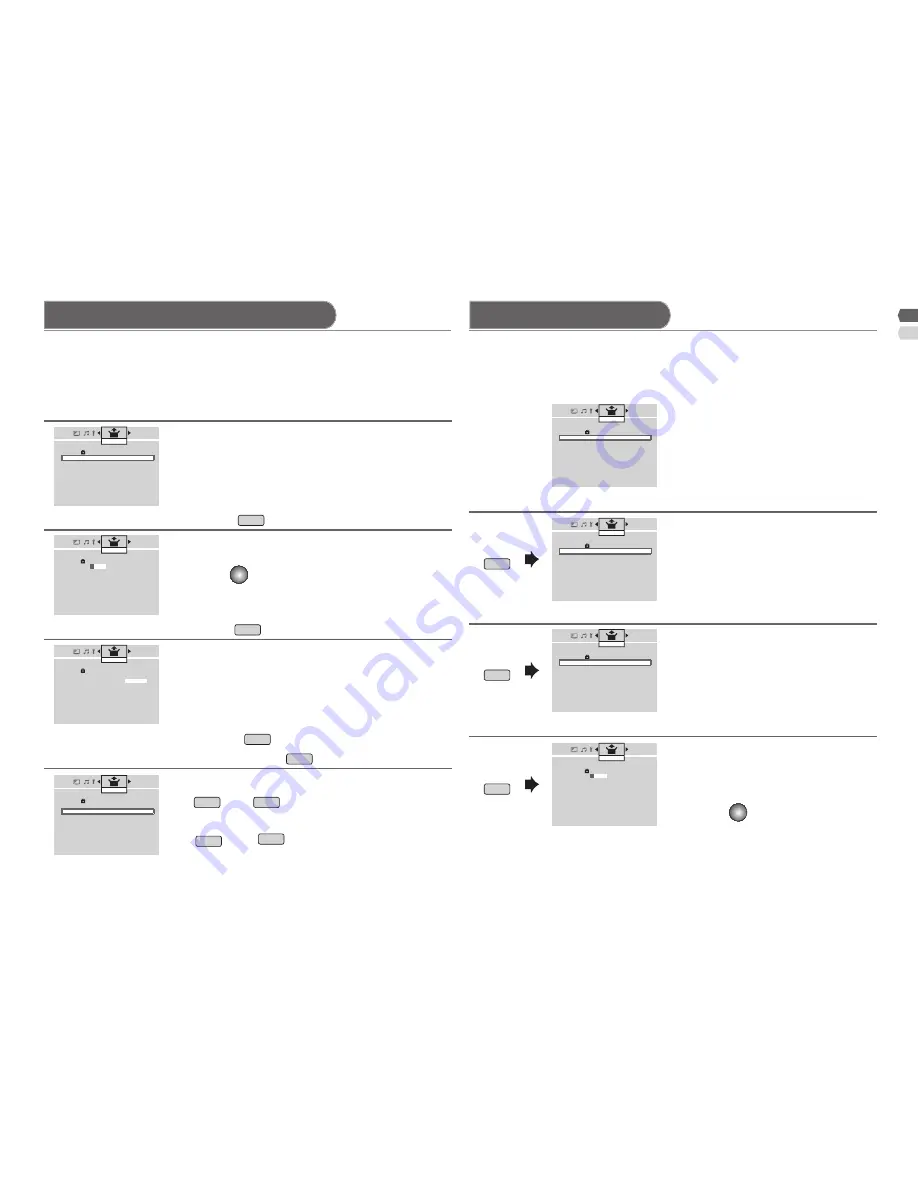
You can edit the channel list or register new channel manually.

This function is available when select "Country Area" to "Area-1" only.

• 

To edit a channel after initial setting has completed, select "Edit/Manual" 

• 

in "Set Up" menu.

You can edit the channel list.

This function is available when select "Country Area" to "Area-2" only.

• 

To edit a channel after initial setting has completed, select "Channel 

• 

Summary" in "Set Up" menu.

Channels are to be skipped cannot be selected by CH-/+ button.

• 

The skip can be set to all channel of "Air" (CH02 - CH69) and "Cable" 

• 

(CC01-CC125)

1.  Select a channel by press 

/

.

2.  Start by press 

.

3.  Move by press 

/

.

4.  Set by press 

.

Select a channel by press 

/

.

1.  Select the character by press 

/

.

2.  Move to the next column by press 

/

.

3.  Set by 

OK

 button.

1.  Select the character by press 

/

.

2.  Move to the next column by press 

/

.

3.  Set by 

OK

 button.

1.  Select a "CH/CC" by press 

/

.

2.  Enter a number 0-9 button then, receive the 

broadcast signal.

1.  Beginning channel search by press 

(Red)

 and 

(Green)

.

2.  Channel fine tunning by press 


(Yellow)

 and 

(Blue)

.

If the picture or sound is unnatural press 

• 


for select a system.

[

Move

]

 Move a channel position.

[

Skip

]

 Skip the channel.

[

Cancel

]

 Cancel the skip channel.

[

ID

]

 Edit a channel name.

[

ID

]

 Edit a channel name by press 

(Red)

.

[

Insert

]

 Insert a channel by press 

(Green)

.

[

Delete

]

 Delete a channel by press 

(Yellow)

.

[

Manual

]

 Register a new channel by press 

(Blue)

.

R

egistering / Editing channels

C

hannel Summary

Содержание LT-32G2

Страница 1: ...ions 3 Remote control buttons and functions 4 Connection to External device 5 Initial settings 6 Registering Editing channels 7 Channel Summary 7 FUNCTIONS Simple menu 8 Useful functions 10 Watching from external source 13 REFERENCE Troubleshooting 16 Technical information 17 CH CC List 19 Specification 20 ENGLISH 中文 ...

Страница 2: ... set can be damaged Place the TV set in a neat and dry place Do not place the product close to source of steam heat moisture or oil Because it may cause a fire hazard or electric shock hazard Don t touch an external metal part of the TV set It may cause an electrocuted For keep a distance from potential ignition sources to the components or part in side TV set customer should install TV set with a...

Страница 3: ...AL OR VCR DVD Player x2 Silver screw x2 Black screw To prevent the TV from falling thread the belt through the hole on the back of the stand and secure it to the TV rack Touch on the function name to operate the function You will see the power lamp light up if you have touched the button correctly Except Power Lamp set to Off P 9 Eco Sensor available for model LT 32G20 only If the microphone is in...

Страница 4: ...ewed channel Freeze Take snapshot of the screen WARNING Batteries shall not be exposed to excessive heat such as direct sunshine fire or the like Select Main menu Picture Sound Features Set Up Select sub menu Change setting When is shown Display function setting Select function Change setting OK Confirm after setting TV VIDEO or MENU Exit from Menu Please see Menu operation guide at the bottom of ...

Страница 5: ...onsider to use USB device with the appropriate thickness Composite input VCR Component input DVD Player Sound 5 1Ch output Front Speaker Surround Speaker Center Speaker White jack Red jack HD Video camera Subwoofer Game Video To Video USB To Video To HDMI 2 To HDMI 1 To HDMI 3 PC Microphone 2 Microphone 1 Subwoofer PC input line in HDMI 1 DVI ANALOG AUDIO Digital satellite broadcast tuner DVD play...

Страница 6: ...l see Registering Editing channels P 7 If you want to set undesired channels to be skipped see Channel Summary P 7 See Language group for Teletext P 18 Initial Settings Show only when powering on for the first time The power on the unit can also be used The select the new Country Area after Initial Setting has completed Area 1 Asia Middle East Europe Oceania Africa Area 2 South America Philippines...

Страница 7: ...annel manually This function is available when select Country Area to Area 1 only To edit a channel after initial setting has completed select Edit Manual in Set Up menu You can edit the channel list This function is available when select Country Area to Area 2 only To edit a channel after initial setting has completed select Channel Summary in Set Up menu Channels are to be skipped cannot be sele...

Страница 8: ...tness of the backlight when the screen is dark Off On Colour System Select an appropriate colour system Auto PAL SECAM NTSC 3 58 NTSC 4 43 PAL M PAL N Zoom Change the aspect ratio P 10 Auto Regular Panoramic 14 9 Zoom 16 9 Zoom 16 9 Zoom Subtitle Full Stereo I II Select the stereo mono or bilingual language I II Mono MTS Select the stereo and SAP broadcasted programs Stereo SAP Mono Sound Meister ...

Страница 9: ... Mode Adjust picture contrast manually according to the brightness of your room to reduce power consumption Off Eco 1 Eco 2 Max Eco P 11 Eco Mode available for model LT 32G2 only Eco Sensor Adjust picture contrast automatically according to the brightness of your room to reduce power consumption Off On Demo Max Eco P 11 Eco Sensor available for model LT 32G20 only Auto Program Automatically regist...

Страница 10: ...d from WSS Wide Screen Identification Signal video signal or control signal of the external devices Without receiving the aspect information it will be the setting in Auto in Zoom menu Not available in PC mode You can select a default aspect ratio for Auto as Regular 14 9 Zoom Panoramic View a locked channel by use the numerical buttons to enter the channel number When appear press DISPLAY and ent...

Страница 11: ...to reduce power consumption Favourite channel setting Register recall the Favourite channel 5 1Ch Out Setting the 5 1Ch Out Off 0 1Ch 2 1Ch 3 1Ch 3 1ChTV 4 1Ch 5 1Ch 5 1ChTV Test Tone Setting the test tone You can adjust the speaker level by following on screen menu Off Deactivates the function On Output 5 1Ch working together with driving noise from the speakers 5 1Ch Confirm Output 5 1Ch execute...

Страница 12: ...on or text channel List Mode Bookmark your favourite page To bookmark Press number button for enter the number of page Save Red Green Yellow Blue MODE Recall your favourite page by press the colour button Hold Hold the current page Cancel by press this button again Reveal Display hidden information Example answer to a quiz etc Size Double the size of the displayed text Index Returns to page 100 or...

Страница 13: ...2 Switch between video and component signal Video Component 1 Select HDMI Setting in Set Up menu 2 Setting for HDMI input 1 Select PC Setting in Set Up menu 2 Setting for PC input You can enjoy pictures musics movies and text file stored on your USB device that connected to TV Not all USB devices are guaranteed to work on this TV See Format file in USB that this TV can support P 17 It is recommend...

Страница 14: ...s S Listen to music during a slideshow Music file must exit in USB BACK Exit to folder index or Play pause the music or BACK Stop the music VOL Volume adjust Mute Watching from the Multi Media input continued Ê Ê 1 Select SETTINGS in Home menu 2 Select USB in Home menu SETTINGS Setting for Multi Media input PHOTO To display the photographs MUSIC To display the musics To select item OK To set or To...

Страница 15: ... OK on the folder To select a movie To show the file list press the folder To display the operation bar by press DISPLAY select the operation by press then press OK Display subtitle by select in the operation bar When subtitle displayed the icon will show if your file has subtitle When watch the movie you can select time at the operation by press to choose position as press for setting time then p...

Страница 16: ...hing from external source USB may be damaged 5 13 Poor picture quality Page Unnatural colour Adjust Colour and Backlight 8 Check Colour System If Auto is selected Select the specific colour system manually Poor sound Adjust the Bass and Treble If receiving a poor signal in Stereo I II switch to Mono Adjust the channel reception using Manual 8 8 7 For HDMI signal wrong screen size Switch Size in HD...

Страница 17: ...esolution of 1920 x 1080 It exposes flaws in the video that were hidden when viewing on Full PHOTO JPEG PNG BMP GIF MUSIC MP3 WMA WAV MOVIE MPEG1 MPEG2 MPE4 RMVB TEXT Text L Left Speaker R Right Speaker C Center Speaker TV TV Speaker 0 L or R sound like the usual TV Speaker But you can not change the volume on the menu 5 1Ch Out P 11 1 It functions as LR speaker 2 It functions as Center speaker RS...

Страница 18: ...e group for Teletext Ê Ê Sound and Colour system in your country or region Ê Ê Group Languages Group 1 Turkish Hungarian English German French Italian Spanish Portuguese Greek Swedish Finnish Group 2 Polish Serbian Croatian Slovenian Czech Slovak Rumanian German French Group 3 Russian Bulgarian Lettish Lithuanian Estonian Ukrainian Serbian Croatian Slovenian Czech Slovak English German Group 4 Ara...

Страница 19: ...S 19 CC 20 G S 20 CC 21 H S 21 CC 22 I S 22 CC 23 J S 23 CH Channel US CCIR OIRT AUSTRALIA CH 02 US 02 E2 R1 AU 0 CH 03 US 03 E3 AU 1 CH 04 US 04 E4 R2 AU 2 CH 05 US 05 E5 R6 AU 6 CH 06 US 06 E6 R7 AU 7 CH 07 US 07 E7 R8 AU 8 CH 08 US 08 E8 R9 AU 9 CH 09 US 09 E9 CH 10 US 10 E10 R10 AU 10 CH 11 US 11 E11 R11 AU 11 CH 12 US 12 E12 R12 CH 13 US 13 CH 14 US 14 W 29 CH 15 US 15 W 30 CH 16 US 16 W 31 C...

Страница 20: ...els and frequencies Area 1 VHF low channel VL 46 25 to 140 25 MHz VHF high channel VH 147 25 to 423 25 MHz UHF channel U 431 25 to 863 25 MHz Area 2 VHF low channel VL 55 25 to 127 25 MHz VHF high channel VH 133 25 to 361 25 MHz UHF channel U 367 25 to 801 25 MHz Receives cable channels in mid band X to Z 2 S1 to S10 super band S11 to S20 and hyper band S21 to S41 Sound multiplex systems NICAM I B...

Отзывы: