background image

53

54

IMPORT

ANT!

PREP

ARE

USE

SETTINGS

TROUBLE?

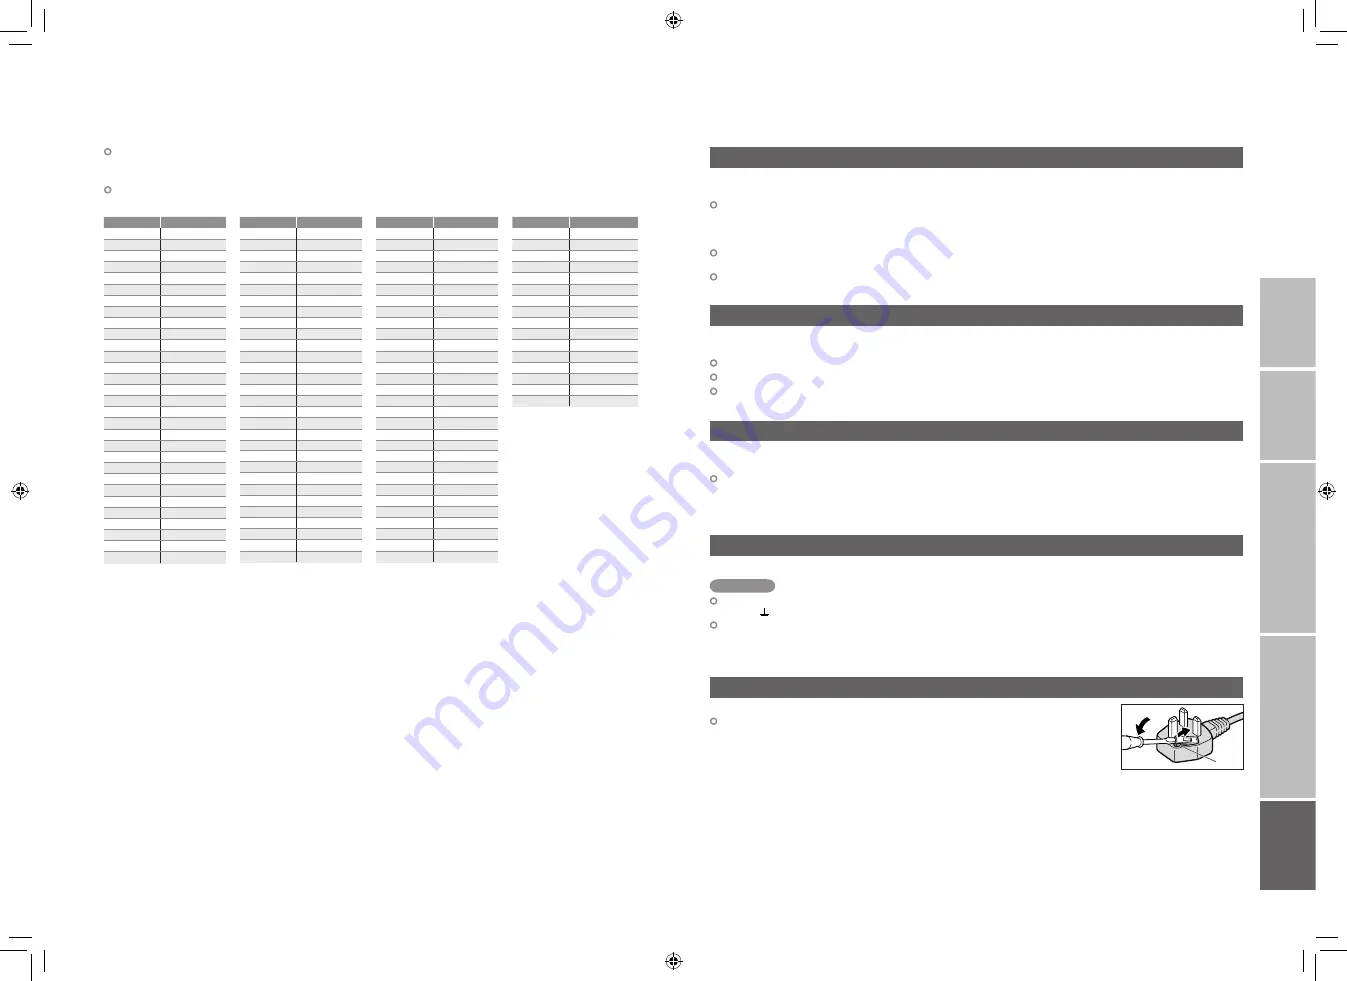
“CH/CC” List

“T-V LINK” allows the TV to share information easily with a connected “T-V LINK” compatible device.

By using T-V LINK :

You can send the analogue channel information programmed on the TV to the “T-V LINK” compatible device, 

so that both the TV and the external device have the same channel settings. When connecting a new external 

device, channel information is loaded into it, allowing channel setup to be completed very quickly. For more 

details, refer to the external device’s manual.

You can easily record the TV programme you are viewing on a “T-V LINK” compatible device by using the 

“DIRECT REC” feature. For more details, refer to the external device’s manual.

After timer-record setting, the TV will instruct the recorder to start and stop recording, via DIRECT REC.

Technical information

What is “T-V LINK”?

Connect a “DVI“ device to “EXT-4 (HDMI)” using “DVI-HDMI” conversion cable. Connect analogue sound output of 

the DVI device to L and R terminals in EXT-3.

Set “AUDIO” in “HDMI SETTING” to “ANALOGUE” or “AUTO” 

 (P. 34)

EXT-5 input does not support analogue sound (EXT-3).

EXT-5 input does not support DVI devices.

Connect “DVI” devices

When “AUTO” is selected in ZOOM, the aspect ratio will turn to the ratio obtained from the information the TV 

received.

The aspect ratio will turn to the ratio obtained from WSS (Wide Screen Identification Signal), video signal, or 

control signal of the external devices. Without receiving the aspect information, it will be the setting in “4:3 AUTO 

ASPECT” (P. 38)

AUTO in “ZOOM”

Fuse

Attach a new plug following the steps below. If in doubt, contact your local retailer.

Never connect to the larger terminal marked with an “E”, the safety earth  

symbol “ ” or coloured green or green-and-yellow.

The wires in the mains lead on this product are coloured with the following code:

· Blue: Neutral wire (connect to the black terminal, or one marked “N”)

· Brown: Live wire (connect to the red terminal, or one marked “L”)

Open the plug as illustrated on the right.

When replacing the fuse, always use a correctly rated and approved type and 

re-fit the fuse cover when finished.

If in doubt, contact your local retailer.

If you accidentally cut the power cord

Change the fuse in the plug

Important

To use the INSERT function (P. 48), find the CH/CC number corresponding to the TV’s channel number  

from this table. If you want to know a particular TV channel’s channel menu, look in TV listings magazines or 

contact the broadcaster.

When the Country setting is United Kingdom, the CC number channels and channels from CH02 to  

CH12 cannot be received.

CH

Channel

CH 02

E2, IR A

CH 03

E3, IR B

CH 04

E4, IR C

CH 05

E5, IR D

CH 06

E6, IR E

CH 07

E7, IR F

CH 08

E8, IR G

CH 09

E9

CH 10

E10, IR H

CH 11

E11, IR J

CH 12

E12

CH 21

E21

CH 22

E22

CH 23

E23

CH 24

E24

CH 25

E25

CH 26

E26

CH 27

E27

CH 28

E28

CH 29

E29

CH 30

E30

CH 31

E31

CH 32

E32

CH 33

E33

CH 34

E34

CH 35

E35

CH 36

E36

CH 37

E37

CH 38

E38

CH 39

E39

CH

Channel

CH 40

E40

CH 41

E41

CH 42

E42

CH 43

E43

CH 44

E44

CH 45

E45

CH 46

E46

CH 47

E47

CH 48

E48

CH 49

E49

CH 50

E50

CH 51

E51

CH 52

E52

CH 53

E53

CH 54

E54

CH 55

E55

CH 56

E56

CH 57

E57

CH 58

E58

CH 59

E59

CH 60

E60

CH 61

E61

CH 62

E62

CH 63

E63

CH 64

E64

CH 65

E65

CH 66

E66

CH 67

E67

CH 68

E68

CH 69

E69

CC

Channel

CC 31

S31

CC 32

S32

CC 33

S33

CC 34

S34

CC 35

S35

CC 36

S36

CC 37

S37

CC 38

S38

CC 39

S39

CC 40

S40

CC 41

S41

CC 75

X

CC 76

Y

CC 77

Z

CC 78

Z+1

CC 79

Z+2

CC

Channel

CC 01

S1

CC 02

S2

CC 03

S3

CC 04

S4

CC 05

S5

CC 06

S6

CC 07

S7

CC 08

S8

CC 09

S9

CC 10

S10

CC 11

S11

CC 12

S12

CC 13

S13

CC 14

S14

CC 15

S15

CC 16

S16

CC 17

S17

CC 18

S18

CC 19

S19

CC 20

S20

CC 21

S21

CC 22

S22

CC 23

S23

CC 24

S24

CC 25

S25

CC 26

S26

CC 27

S27

CC 28

S28

CC 29

S29

CC 30

S30

   53-54

19/03/2007   08:49:42

Содержание LT-32DG8BJ

Страница 1: ...problems setting up your new TV please call the Helpline on 1890 582500 If you have any problems setting up your new TV please call the Helpline on 0870 330 5000 For users in the UK For users in the Republic of Ireland LT 42DG8BJ LT 37DG8BJ LT 32DG8BJ 2007 Victor Company of Japan Limited 0207GLT CR MU GGT0169 001B U 1 2 19 03 2007 08 48 24 ...

Страница 2: ... municipal office your household waste disposal service or the shop where you purchased the product Penalties may be applicable for incorrect disposal of this waste in accordance with national legislation Business users If you wish to dispose of this product please visit our web page www jvc europe com to obtain information about the take back of the product Other Countries outside the European Uni...

Страница 3: ...l functions 29 Subtitle Audio selection Sleep timer Zoom etc Just the way you like it Customising your TV 33 Using DTV menu 35 Advanced picture adjustment 37 Reduce noise Watch a more natural picture etc DTV configuration 39 DTV setup 41 DTV installation 43 Editing digital channels 45 Editing analogue channels 47 When you have trouble Troubleshooting 49 CH CC List 53 Technical information 54 Specifi...

Страница 4: ...binet openings It may cause a fatal electric shock Take care when children are near On disposal of the TV Follow the instruction in Information for Users on Disposal of Old Equipment P i When attaching the TV to the wall use the optional JVC wall mounting unit Consult a qualified technician See the included manual on mounting procedures JVC assumes no responsibility for damage due to improper mount...

Страница 5: ...watching TV Video Mute Channel information P 17 To menu P 33 The coloured buttons can perform different functions according to the situation When viewing teletext Analogue channels P 21 Follow on screen instructions Other uses Follow instructions in on screen guides Change the channel page Switch TV RADIO P 17 View the electronic programme guide EPG P 19 When watching digital channels When viewing...

Страница 6: ...rial P 55 Power requirements Connect the power cord only to a 220 240V 50Hz AC outlet When attaching the TV to the wall use the optional JVC wall mounting unit Consult a qualified technician See the included manual on mounting procedures JVC assumes no responsibility for damage due to improper mounting 200mm 200mm mount which conforms to VESA standards Installation requirements To avoid overheating...

Страница 7: ...ces Output Input HDMI signal P 58 HDMI SETTING P 34 EXT 5 input does not support analogue sound DIGITAL AUDIO OUT Listening to the digital audio of digital channels on external speakers Output Digital sound P 56 The sound from analogue channels and external devices cannot be output Dolby Digital output from the DIGITAL AUDIO OUT terminal P 56 AERIAL VCR DVD recorder T V LINK compatible Headphone H...

Страница 8: ... changes later Digital channel settings Configuration P 39 Installation P 43 Analogue channel settings SET UP P 34 Set digital channels Confirm English is set Confirm United Kingdom is set Scan digital channels Register digital channels 1 2 4 5 What is T V LINK Connecting the TV to a T V LINK compatible device allows Analogue channels to be instantly registered on the device The DIRECT REC function t...

Страница 9: ...ange the direction of the indoor aerial Is there a digital channels transmission tower nearby Turn ATTENUATOR to ON P 34 since the radio waves are too strong Check the following points Register digital channels again Service Scan P 43 If you still cannot watch digital channels after following the steps above there may be a problem with your aerial or its cable Or the signal may be too weak Consult...

Страница 10: ...y video S VIDEO Name connected devices Dub videos Using EPG 19 PAGE View the programme list for 8 days Search from a genre Reserve a programme to watch record Watching videos DVDs Personal preferences Watching digital channels Watching analogue channels 23 PAGE Display the current time Using the PR list Adjust the picture Adjust the sound Basic settings channel settings etc Advanced settings sleep...

Страница 11: ...mme Symbols No indication 2view 1select PR List EPG Channels Channels registered in Initial settings will appear here You can select only from your favourite channels Favourite Mode P 39 3view 2select a channel Display only programmes which match your selected genre Genre P 20 up down Move up or down a channel You can select only from your favourite channels Favourite Mode P 39 E g 1 15 Enter a ch...

Страница 12: ...el a programme 3 2 Date Channel Programme Display only programmes which match your selected genre Genre Reserve a programme to watch and record Timer You can find a digital channel programme from an eight day programme guide check its information and make a reservation Using EPG Electronic Programme Guide Display EPG Genre Select a genre Only programmes in the selected genre are displayed Find a pr...

Страница 13: ... step 2 Press again Reveal hidden pages REVEAL Enlarge the text SIZE To the index page INDEX Switch briefly from teletext to TV CANCEL red blue green yellow Move up or down a page Display sub pages View sub pages Sub page Release Press again up down red blue green yellow When watching analogue channels Switch digital analogue channels Enter a teletext page Move up or down a page up down 2 1 Operate...

Страница 14: ...nnels registered in Initial settings will appear here select Select a page 3 times Close PR LIST Set to TV 1 Using PR list Using the number buttons up down buttons FAVOURITE CHANNEL Register a channel to a button Press the number to register it on Hold down for 3 seconds Disappears after a few seconds Press the number you registered select Customisations P 34 to the picture of a favourite channel ...

Страница 15: ...2 to S2 Cancel this mode Clear the name Select the blank space in 3 Set up dubbing on EXT 2 DUBBING Edit names of connected devices ID LIST 1Select the EXT 2 3Select a name from the list 1Select the arrow 2Select the dubbing source 2Set S VIDEO input Switch to S VIDEO input S IN select 1Select an EXT to assign a name to 2Show the name list 1select 2set select select Operate the connected device an...

Страница 16: ... mode before the start time Manually set the timer on T V LINK incompatible devices For details refer to the device s manual Make sure that recording times on the recording device do not overlap with recording times on the TV Some T V LINK compatible DVD recorders may not work correctly When Rec Timer has been set the power lamp on the TV will Start blinking 3 minutes before the start time green o...

Страница 17: ...he broadcast OFF Turns off 3D CINEMA SOUND ON For 3D CINEMA SOUND Adjust the ambience level MENU SOUND 3D CINEMA SOUND Emphasize the bass sound MENU SOUND 3D CINEMA SOUND LOW MID HIGH level 1select SURROUND 2select LOW MID HIGH level 1select BASS BOOST 3set 2select 3set Using AUTO AUTO in ZOOM P 54 When 720p 750p or 1080i 1125i signal is received the signal will be displayed as FULL The zoom menu ...

Страница 18: ...ime to 0 in step 2 Set a time for the TV to turn itself off SLEEP TIMER Stop children from watching specific channels CHILD LOCK select CHILD LOCK select a channel to lock Remaining time You can confirm the remaining time at step 2 after repeating this process Lock more channels Repeat steps 3 and 4 2next 1select SLEEP TIMER 1select a time in minutes Display the menu Select FEATURES Select 1 2 3 BLU...

Страница 19: ...Mode Language v MONO s STEREO t SUB1 u SUB2 BASS Low tones Weaker Stronger TREBLE High tones Weaker Stronger BALANCE Speaker balance Left Stronger Right Stronger HYPER SOUND Ambient sound ON OFF 3D CINEMA SOUND Finer sound adjustments P 30 MaxxBass 1 Emphasize the bass sound OFF LOW HIGH P 30 FEATURES SLEEP TIMER Timer for turning off the TV P 31 CHILD LOCK Stops children from watching specific cha...

Страница 20: ...Change PIN code P 39 Favourite Mode Enable your favourite channels P 39 Setup Digital Audio Output When the Dolby Digital signal is received you can select to output the signal from the DIGITAL AUDIO OUTPUT terminal P 41 Banner Duration Select the display time for channel information 2 sec 5 sec 8 sec Receiver Upgrade Upgrade your tuner software as newer versions becomes available P 41 Common Inte...

Страница 21: ...e menu disappears after one minute of inactivity 2 3 4 5 6 2next 1select 2next 1select 2next 1select 2set 1select To the previous screen Exit COLOUR SYSTEM PAL PAL Western Europe Select the colour system NTSC 3 58 USA 3 58 MHZ NTSC 4 43 USA 4 43 MHZ AUTO When watching videos etc COLOUR SYSTEM When there is no colour AUTO MOVIE THEATRE For smooth cinema film Function is turned off OFF ON AUTO Automa...

Страница 22: ...de Favourite Mode Off On IMPORTANT PREPARE USE SETTINGS TROUBLE 1 2 3 4 5 6 select Display the menu Select DTV Select Configuration Select an item Switch to digital channels Finish 1select 2next 1select 2next DTV configuration To the previous screen Exit Note When not broadcast in the default language on screen displays and audio output in that language are not available In this case the language th...

Страница 23: ...the screen to set up pay TV The content of the menu is different depending on the broadcasting company For details consult your broadcasting company The language shown in the menu may differ to the Language set for the TV Available for setting power supply for the aerial and upgrading the tuner software etc Please read Dolby Digital output from the DIGITAL AUDIO OUT terminal P 56 before setting To...

Страница 24: ... Service Scan Initialise the DTV settings Factory Settings Scan Automatic Scan automatically Manual Scan a specified channel range Network You can select and register only necessary networks Start Channel Specify a scanning channel range For Manual Stop Channel Mode Add Add a new channel to the registered channel Reinstall Register all channels again 2change 1select an item 3Select Yes 2Select Star...

Страница 25: ...ceed No Yes The selected PR will be permanently Edit PR List 14 00 05 05 2006 TV Name Delete Favourites Number Lock 4 Channel 4 5 five 6 ITV2 1 BBC ONE 2 BBC TWO 7 BBC THREE 8 BBC FOUR 3 ITV1 Edit PR List 14 00 TV Name Delete Favourites Number Lock 4 Channel 4 5 five 6 ITV2 1 BBC ONE 2 BBC TWO 7 BBC THREE 8 BBC FOUR 3 ITV1 Edit PR List 14 00 05 05 2006 TV Name Delete Favourites Number Lock 4 Chann...

Страница 26: ...11 10 12 13 14 15 16 17 18 19 CH CH 22 CH 29 PR ID _____ _____ _____ _____ _____ _____ EDIT 11 10 12 13 14 15 16 17 18 19 CH CH 35 CH 29 PR ID _____ _____ _____ _____ _____ _____ IMPORTANT PREPARE USE SETTINGS TROUBLE Display the menu Select SET UP Select EDIT MANUAL Confirm settings Finish When coming from Initial settings P 13 skip to Select a row Edit Editing analogue channels Edit the channels ...

Страница 27: ...evere noise or snow can solve this problem Digital channels are not displayed When the TV cannot find the digital channels There may be problems at the aerial radio waves or the area you live in where reception is bad Consult your retailer Not displayed black screen 49 14 Adjust the BASS and TREBLE If receiving a poor signal in STEREO t u switch to MONO Poor sound 34 34 Press to return to your sett...

Страница 28: ...d Do you want to Update PR list is diplayed 57 LCD panels use fine dots pixels to display images While more than 99 99 of these pixels function properly a very small number of pixels may not light or may light all the time Please understand that this is not a malfunction Black or white dots appear on the screen When Dolby Digital is selected in Digital Audio Output the sound of a programme containi...

Страница 29: ... lead on this product are coloured with the following code Blue Neutral wire connect to the black terminal or one marked N Brown Live wire connect to the red terminal or one marked L Open the plug as illustrated on the right When replacing the fuse always use a correctly rated and approved type and re fit the fuse cover when finished If in doubt contact your local retailer If you accidentally cut th...

Страница 30: ...layed in the Audio Selection menu P 29 the Digital Audio Output setting can be temporarily changed from PCM to Dolby Digital A message recommending you to change the Digital Audio Output setting to Dolby Digital is displayed for a few seconds If you want to record a Dolby Digital signal using timer record P 27 change the timer record setting from PCM Analogue to Dolby Digital However if the settin...

Страница 31: ...ss the OK button 2 Service Scan menu is displayed Run the service scan to update the PR list Service Scan P 43 If Reinstall is set in Mode of Service Scan menu All PR list setting will reset and all the reservations for Record and Remind will be cancelled If you want to leave those settings and just add channels set the Mode of Service Scan menu to Add P 43 If Add is set in Mode of Service Scan me...

Отзывы: