background image

Basic Operations

8

6

  Enter a security code with 4 to 8 digits 

and touch 

[

Enter

]

.

7

  Enter the same code again and touch 

[

Enter

]

.

Now, your security code is registered.

NOTE

•  Touch 

[

BS

]

 to delete the last entry.

•  If you enter a different security code, the 

procedure returns to step 6 (for first code entry).

•  If you have disconnected the Receiver from the 

battery, enter the correct security code as that 
you have entered in step 6 and touch 

[

Enter

]

. You 

can use your receiver.

To change the security code:

1

 Touch 

[

Security Code Change

]

 on the 

Security screen.

h

h

Security Code Set screen appears.

2

  Enter the current registered security code 

and touch 

[

Enter

]

.

3

  Enter a new security code with 4 to 8 

digit number and touch 

[

Enter

]

.

4

  Enter the same code again and touch 

[

Enter

]

.

The new security code is registered.

To clear the security code: 

1

 Touch 

[

Security Code Cancellation

]

 on 

the Security screen.

h

h

Security Code Set screen appears.

2

  Enter the current registered security code 

and touch 

[

Enter

]

.

The security code is cleared.

Calendar/clock settings

1

  Press the 

[

]

/

[ ]

 button.

2

 Touch 

[

]

.

3

 Touch 

[

SETUP

]

.

h

h

SETUP Menu screen appears.

4

 Touch 

[

System

]

.

h

h

System setting menu appears.

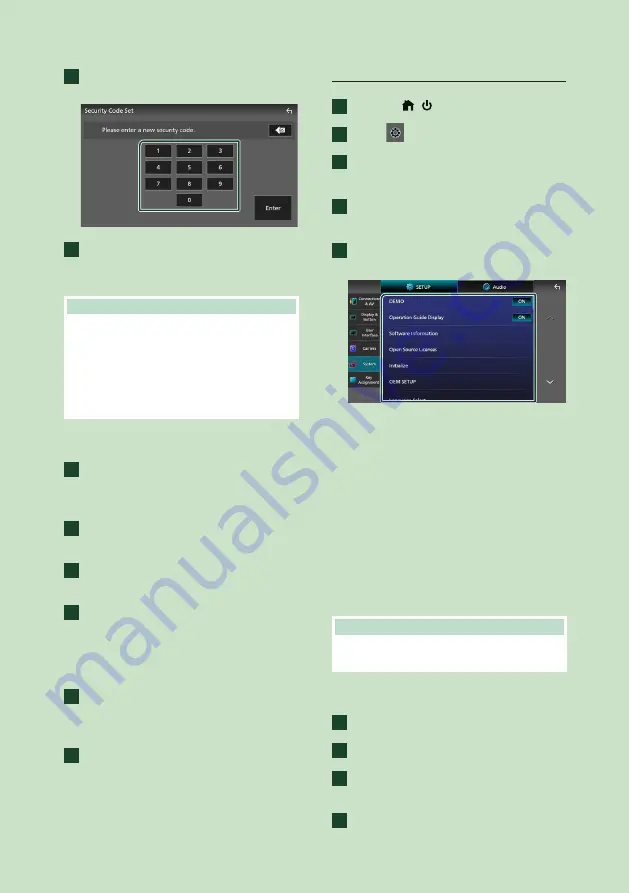
5

  Set each item as follows.

Scroll the page to show hidden items.


[

Time Format

]


Select the time display format.

[

12-Hour

]

 (Default)/

[

24-Hour

]


[

Clock

]


[

GPS-SYNC

]


(Default): Synchronizes the clock 

time with the GPS.

[

Manual

]

: Set the clock manually.


[

Time Zone

]

Select the time zone.


[

Clock Adjust

]

If you select 

[

Manual

]

 for Clock, adjust the 

date and time manually

(P.8)

NOTE

•  Please set the date and time. If they are not set, 

some functions may not work.

Adjust the date and time manually

1

 Touch 

[

Clock

]

 in the System setting menu.

2

 Select 

[

Manual

]

.

3

 Touch 

[

Time Zone

]

 in the System setting 

menu.

4

  Select the time zone.

Содержание KW-Z1000W

Страница 1: ...der license from Japan Audio Society IM407_ref_K_En_00 K 2020 JVCKENWOOD Corporation KW Z1000W MONITOR WITH RECEIVER INSTRUCTION MANUAL Updated information the latest Instruction Manual system updates new functions etc is available from https www jvc net cs car ...

Страница 2: ...CarPlay Operation 18 Android Auto Operation 20 Wireless Mirroring Operation 22 USB 23 Connecting a USB device 23 USB Basic Operation 23 Search Operation 24 iPod iPhone 26 Preparation 26 iPod iPhone Basic Operation 27 Search Operation 28 HD Radio Tuner 29 HD Radio Tuner Basic Operation 29 Receive Mode 31 Memory Operation 31 Selecting Operation 31 Bookmark 33 Tuner Setup 34 SiriusXM 35 SiriusXM Basi...

Страница 3: ...on Setup 65 User Interface Setup 67 System Setup 68 Key Assignment Setup 69 Controlling Audio 71 3 way speaker system setup 71 Speaker X over setup 72 Equalizer Control 73 Listening Position DTA 74 Fader Balance Zone Control 76 Volume Offset 78 Sound Effect 78 Parametric Equalizer 79 Audio Setup memory 82 Remote control 83 Battery Installation 83 Functions of the Remote control Buttons 83 Connecti...

Страница 4: ...Wiping the faceplate with a hard cloth or using a volatile liquid such as thinner or alcohol may scratch the surface or erase the screened print Ñ Ñ Acquiring GPS signal The first time you turn on this unit you must wait while the system acquires satellite signals for the first time This process could take up to several minutes Make sure your vehicle is outdoors in an open area away from tall buil...

Страница 5: ...me Adjusts the volume The volume will go up to 15 when you keep pressing P 9 3 FNC Displays the popup menu screen Pressing and holding displays the screen you have set in the Favorite Customize screen P 70 4 Displays the HOME screen P 11 When the power is off turns the power on Pressing and holding turns the power off 5 Switches the voice recognition function on off See P 20 22 59 When neither App...

Страница 6: ...d setting items Default is American English en 1 Touch Language 2 Touch Language Select 3 Select the desired language 4 Touch For details see System Setup P 68 Clock Sets the synchronization of the clock and adjusts it For details see Calendar clock settings P 8 Display Button Set the button illumination color 1 Touch Display Button 2 Touch Button Illumination Color 3 Select the desired color 4 To...

Страница 7: ...n the Security Code function is activated the code cannot be changed and the function cannot be deactivated Note that the Security Code can be set with a 4 to 8 digit number of your choice Preparation Set DEMO to OFF in the System setting menu P 68 1 Press the button 2 Touch 3 Touch SETUP h h SETUP Menu screen appears 4 Touch System h h System setting menu appears 5 Touch Security Code Set in the ...

Страница 8: ...urity code is registered To clear the security code 1 Touch Security Code Cancellation on the Security screen h h Security Code Set screen appears 2 Enter the current registered security code and touch Enter The security code is cleared Calendar clock settings 1 Press the button 2 Touch 3 Touch SETUP h h SETUP Menu screen appears 4 Touch System h h System setting menu appears 5 Set each item as fo...

Страница 9: ... changes or a message is displayed Flick Slide your finger quickly to the left or right on the screen to change the page You can scroll a list screen by flicking up down on the screen Swipe Slide your finger up or down on the screen to scroll the screen Gesture Touch Control You can also control playback by moving your finger on the touch panel as follows for some sources the gesture touch control...

Страница 10: ...n P 52 Displays the SETUP Menu screen 1 Function key1 to 3 The current screen changes to the one you have set The function key1 and 2 are set to Camera and Speaker function as default For the function setting refer to Customize popup menu functions P 70 Displays the view camera screen P 47 Displays the Audio screen P 71 Touch and hold to display the Customize FNC Menu screen P 70 2 Short cut sourc...

Страница 11: ...n P 63 8 Swipe your finger from left hand side to right hand side on the screen to display the widget selection menu P 16 9 Swipe your finger from right hand side to left hand side on the screen to display the setting menu for some functions P 11 Display the HOME screen 1 Press the button h h HOME screen appears Display the setting menu for some functions Swipe your finger from right hand side to ...

Страница 12: ...ays the Hands Free screen P 57 When neither Apple CarPlay Android Auto nor a Bluetooth Hands Free phone is connected displays Bluetooth pairing waiting dialog 1 P 52 Switches to the HD Radio broadcast P 29 Switches to the SiriusXM satellite radio broadcast P 35 Plays a Bluetooth audio player P 55 Plays an iPod iPhone P 26 Plays files on a USB device P 23 Switches to an external component connected...

Страница 13: ... on the left side of the source selection screen are shown on the HOME screen You can change the items displayed on this area by customizing the source selection screen P 13 To turn off the AV source 1 Press the button h h HOME screen appears 2 Touch 3 Touch AV Off Customize Short cut source icons You can arrange the positions of the source icons as you like 1 Press the button h h HOME screen appe...

Страница 14: ...t 8 Operation keys You can operate the current source with these operation keys The available functions are different depending on the source type For right hand drive vehicles the left and right drawers are swapped For how to set up the driving position see User Interface Setup P 67 List screen There are some common function keys in the list screens of most sources P 24 28 57 Display the list scr...

Страница 15: ...Radio source control screen P 30 When an Alert Message comes 1 2 3 1 The alert message is erased Same alert message cannot be displayed for next 10 minutes 2 The alert message is erased Same alert message cannot be displayed for next 12 hours 3 Touch to tune to that channel of HD Radio source Display of the received Alert Message You can read the received alert message afterward 1 Touch on the rig...

Страница 16: ...o change the widget style Touch the widget area You can change the displayed information or design To change the widget Slide two fingers leftward rightward When the split widgets mode is selected you should put the fingers on each of the windows before slide To select the widget Swipe your finger from the left edge on the display to right hand side to display the widget selection menu Touch to re...

Страница 17: ...Widget P 17 and To register an original image P 66 Preparation Install the latest version of the JVC Portal APP application on your iPhone or Android iPhone Search for JVC Portal APP in the Apple App Store to find and install the most current version Android Search for JVC Portal APP in Google play to find and install the most current version For details see JVC Portal APP application 1 Connect th...

Страница 18: ...nnection 1 Connect your iPhone using KS U62 via the USB terminal P 96 When an iPhone compatible with Apple CarPlay is connected to the USB terminal the Bluetooth Hands Free phone currently connected is disconnected If another Bluetooth Hands Free phone is being used disconnection will occur after ending the call 2 Unlock your iPhone Wireless connection You can select the iPhone registered in Devic...

Страница 19: ... been registered select the iPhone to be used as the Apple CarPlay source See Switch the connected device P 53 Ñ Ñ Operation keys and available Apps on the home screen of Apple CarPlay You can use the Apps of the connected iPhone The items displayed and the language used on the screen differ among the connected devices To enter the Apple CarPlay mode touch Apple CarPlay icon on the source selectio...

Страница 20: ... on the Android smartphone while driving For details about Android Auto visit https www android com auto and https support google com androidauto Compatible Android smartphones You can use Android Auto with Android smartphones of Android version 5 0 or later For Wi Fi connection Android 8 0 or later NOTE Android Auto may not be available on all devices and may not be available in all countries or ...

Страница 21: ...d smartphone If two or more Android smartphones have been registered select the Android smartphone to be used as the Android Auto source P 21 To change the password for wireless connection manually refer to Reset Android Auto Wireless Connection P 64 When the Wi Fi connection becomes unavailable the HOME screen is displayed Ñ Ñ Select an Android smartphone If two or more Android smartphones have b...

Страница 22: ...function This function may be called Wireless Display Screen Mirroring AllShare Cast etc depending on the manufacturer The settings on the Android smartphone differ depending on the device type For details refer to the instruction manual supplied with your Android smartphone If your Android smartphone is locked Mirroring screen may not appear If the Android smartphone is not ready for UIBC you can...

Страница 23: ...ing You cannot connect a USB device via a USB hub and Multi Card Reader Take backups of the audio files used with this unit The files can be erased depending on the operating conditions of the USB device We shall have no compensation for any damage arising from any erased data USB Basic Operation Most functions can be controlled from the source control screen and playback screen Control screen 5 6...

Страница 24: ...Meanings of individual icons are as follows D play B fast forward A fast backward H pause For confirmation of current playing position You can drag the circle left or right to change the playing position 6 Function panel Touch the right side of the screen to display the function panel Touch again to close the panel Searches for the previous next folder 7 Artwork The jacket of the currently playing...

Страница 25: ...ect from artists albums and genres h h The list corresponding to your selection appears 3 Touch the desired item in the content list Ñ Ñ Folder search You can search for a file according to hierarchy 1 Touch Folder List 2 Touch the desired folder When you touch a folder its contents are displayed 3 Touch to select your desired item in the list Repeat this step until you find the desired file ...

Страница 26: ...e with Apple CarPlay turn off Apple CarPlay by operating the iPhone at functional setup before connecting iPhone For details of the setup method contact the manufacturer of the terminal Plug the iPod iPhone into the USB terminal with the KS U62 optional accessory Only one iPod iPhone can be connected 1 Connect the iPod iPhone using the KS U62 P 96 2 Press the button h h HOME screen appears 3 Touch...

Страница 27: ...he key repeat modes are switched in the following sequence Song repeat All songs repeat Repeat off Randomly plays all tracks in the current album Each time you touch the key random modes are switched in the following sequence Song random Random off 2 Content list Touch the left side of the screen to display the Content list Touch again to close the list Displays the playing list When you touch a t...

Страница 28: ...ch the desired category h h The list corresponding to your selection appears 3 Touch to select the desired item in the list Repeat this step until you find the desired file Ñ Ñ Link search You can search for a file of the same artist album genre composer as that in the current track 1 Touch Link Search 2 Touch the desired tag type You can select from artists albums genres and composers h h The lis...

Страница 29: ...ion or channel When touched for 2 seconds stores the currently being received station or channel in the memory 3 Band keys Switches bands between FM and AM 4 Seek mode Touch to switch seek mode in the following sequence AUTO1 AUTO2 MANUAL AUTO1 Tunes in a station with good reception automatically AUTO2 Tunes in the memorized stations one after another MANUAL Switches to the next frequency manually...

Страница 30: ...o light Emergency Alert is off Orange Interrupting or in snooze ignore state ST A stereo broadcast is being received 9 Indicator display While receiving an HD Radio station it lights with orange when the audio is digital and lights with gray when it is analog While receiving an analog station it is off Adjacent to traditional main stations are HD2 HD3 Channels providing new original programming on...

Страница 31: ...eption in the memory automatically 1 Touch desired band key 2 Touch on the right side of the screen Touch AME 3 Touch Yes h h Auto memory starts Ñ Ñ Manual memory You can store the currently being received station or channel in the memory 1 Select the station or channel you wish to store in the memory 2 Touch FM 1 15 or AM 1 5 in which you want to store the station or channel for 2 seconds until a...

Страница 32: ...ecify the desired channel 1 Touch 1 2 Select the desired content from the list NOTE Touch Info Change in the channel list Select the sequence of the list Song title artist name album name Ñ Ñ Search by program type FM only You can tune in the station broadcasting the specified type of program when listening to FM 1 Touch on the right side of the screen Touch PTY h h PTY Search screen appears 2 Sel...

Страница 33: ... to this unit Ñ Ñ Bookmark list Displaying a list of registered bookmarks and detailed information and QR code of the song 1 Touch 2 Select the desired bookmark from the list h h The bookmark information appears Delete Deletes the bookmarks being displayed Touch Delete and then touch YES on the confirmation screen Bookmark delete Deleting a bookmark 1 Touch Delete 2 Select the bookmark to delete f...

Страница 34: ...es depending on the area where you use this unit US Default Select this when using this unit in North Central South America FM and AM intervals are set to 200 kHz and 10 kHz respectively SA Select this when using this unit in South American countries where the FM interval is 50 kHz The AM interval is set to 10 kHz Europe Select this when using this unit in any other areas FM and AM intervals are s...

Страница 35: ... F Activate the SiriusXM Connect Vehicle Tuner using either one of the two methods below For users in U S A Online Visit www siriusxm com activatenow Phone Call SiriusXM Listener Care at 1 866 635 2349 For users in Canada Online Visit https www siriusxm ca help activation help Phone Call XM customer Care at 1 877 438 9677 NOTE To use SiriusXM Satellite Radio the optional accessory is necessary Con...

Страница 36: ...ying Gray No information For SXV200 or SXV100 2 Turns the Traffic Weather Jump function on or off White Function on Purple Playing Gray Function off TuneScan 3 Allows you to hear a few seconds of songs from each of the SmartFavorite music channels on the current preset band See TuneScan P 39 TuneMix 4 When turned ON shuffles the preset channels on P1 P6 to play a blend of songs from your favorite ...

Страница 37: ...nel for 2 seconds until a beep sounds Preset select You can list and select memorized channels This function can be used from the remote control P 84 To select from the preset list 1 Touch on the left side of the screen Select a channel from the list Direct search You can tune in a channel directly 1 Touch on the right side of the screen Touch Direct Channel 2 Enter the channel number and touch En...

Страница 38: ...e dynamic and can change often allowing you to discover new channels You can set whether to be notified when the featured seasonal theme is updated P 46 Replay You can replay the last 60 minutes of the program from the current channel 1 Touch Replay on the function panel E F Press to skip to the previous next track Press and hold to rewind or fast forward DH Plays or pauses Replay time bar Play mo...

Страница 39: ... channel songs will be played from the beginning of each track TuneStart You can enable disable TuneStart See TuneStart P 46 NOTE Compatible with SXV200 or later tuner models TuneScan TuneScan is a feature that plays samples from the starts of multiple buffered songs from each of the SmartFavorites channels that predominantly play music selections You have easy access to a large sampling of music ...

Страница 40: ...mpatible with SXV300 or later tuner models Content Alerts When a broadcast program related to the registered artist song or team starts an Alert Content List screen appears to allow you to switch the current channel to the relevant channel 1 When the broadcast of the registered content starts an Alert Content List screen appears 2 Select a content from the list NOTE Touch Type Select a desired ite...

Страница 41: ...rts for this game Cancel Touch to cancel SportsFlash alert No alerts for this game will be displayed afterward NOTE Compatible with SXV300 or later tuner models To learn how to set up the SportsFlash alert function see SportsFlash setup P 45 SiriusXM SETUP 1 Touch on the right side of the screen Touch SETUP h h SiriusXM SETUP screen appears See the following sections for each setting Set up the pa...

Страница 42: ...content and user selected channels 1 Touch Parental Control on the SiriusXM SETUP screen 2 Touch User Mature or OFF User Locks only the selected channels Mature Locks channels classified as mature only OFF Deactivates the parental mature and user locks 3 Enter the parental code you originally input in as stated in Parental code P 42 and touch Enter When selecting User This allows you to limit acce...

Страница 43: ...ategory 3 Touch each channel in the list and set to ON or OFF NOTE To delete the skip channel setting touch Disable All and then touch YES on the confirmation screen Touch Info Change Select a desired item content info channel name artist name song title category name Direct Channel and Preset Memory functions allow you to select channels Ñ Ñ Content Alerts setup Activating content alert 1 Touch C...

Страница 44: ...list you want to select þ All Selects all contents All Clears all check marks 3 Touch Delete and then touch YES on the confirmation screen To select a Team Get alerted when your favorite sports team is playing on another SiriusXM channel with GameAlert 1 Touch My Games 2 Touch the desired league in the list 3 Touch the team s in the list you want to select NOTE You can select þ up to 30 teams ...

Страница 45: ...on the SiriusXM SETUP screen h h Team Set screen appears 2 Touch Edit 3 Touch the desired league in the list 4 Touch each team s in the list you want to select 5 Touch twice Edit Sets and removes teams Priority Sets the priority of a team Clear Removes all teams that have been set Touch Clear When the confirmation screen appears touch YES NOTE SportsFlash is available on SXV300 or later tuner mode...

Страница 46: ...he SiriusXM SETUP screen 2 Touch T and U to select a city 3 Touch Close Ñ Ñ Selecting Featured Bands Update Messages You can set whether to be notified when the featured seasonal theme is updated 1 Touch Featured Bands Update Messages on the SiriusXM SETUP screen Featured Bands Update Messages is turned on or off Ñ Ñ TuneStart 1 Touch Tune Start on the SiriusXM SETUP screen The TuneStart is turned...

Страница 47: ...tion key P 70 1 Press the FNC button h h Popup menu appears 2 Touch Camera h h View camera screen appears 3 Adjust each item as follows 2 1 1 Camera Switching Keys 1 Touch to switch the view camera It is necessary to set Camera Assignment Settings beforehand except Rear See To set up the camera assignment settings P 48 2 Camera off Touch to exit the camera screen 1 When two or more cameras of rear...

Страница 48: ...nt position to the view camera in Camera Assignment Settings P 48 Ñ Ñ To set up the camera assignment settings 1 Touch Camera Assignment Settings in the Camera setting menu P 47 2 Select the item to set up FRONT VIEW CAMERA Set the camera assignment from view camera connected to Front view camera input terminal 3rd VIEW CAMERA Set the camera assignment from view camera connected to 3rd view camera...

Страница 49: ...d mark A B C D Make sure that lines A and B are horizontally parallel and that lines C and D are of the same length NOTE Touch Initialize and then touch Yes to set all the marks to their initial default position External audio video players AV IN 1 Connect an external component to the AV Audio input and the Video input terminal P 94 2 Select AV IN as the source P 12 3 Turn on the connected compone...

Страница 50: ...ded for the vehicle Displays the control screen of the Bluetooth streaming source provided for the vehicle Displays information about the Radar Detector Displays information about the instruments such as a speedometer Displays information about the air conditioner of the vehicle Displays information about the Parking Distance Sensor of the vehicle Displays the control screen of the accessories in ...

Страница 51: ...cting conditions may vary depending on your environment Some Bluetooth devices are disconnected when this unit is turned off The Bluetooth devices cannot be used while using Apple CarPlay The Bluetooth currently connected with other device is disconnected when an iPhone compatible with Apple CarPlay is connected Ñ Ñ About the smartphone cell phone and Bluetooth audio player This unit conforms to t...

Страница 52: ... 2 Touch 3 Touch SETUP h h SETUP Menu screen appears 4 Touch Connections AV 5 Touch Device List 6 Select a device type Bluetooth To connect as Bluetooth Hands Free and Bluetooth audio source Apple CarPlay To connect as Apple CarPlay source Android Auto To connect as Android Auto source 7 Touch h h Bluetooth pairing waiting dialog appears NOTE If an Apple CarPlay device is currently connected the A...

Страница 53: ...ooth audio source Apple CarPlay To connect as Apple CarPlay source Android Auto To connect as Android Auto source 3 Touch the name of the device you want to connect NOTE If the icon is lighted it means that the unit will use that device If you touch the device name with the icon on the list of Apple CarPlay devices it will be disconnected You can quickly display the Device List screen by touching ...

Страница 54: ...cted When you select Android Auto tab is not displayed 3 Touch Delete h h Confirmation message appears 4 Touch Yes h h All the selected device s is deleted Bluetooth Setup NOTE The Bluetooth Setup is disabled while using Apple CarPlay 1 Press the button 2 Touch 3 Touch SETUP h h SETUP Menu screen appears 4 Touch Connections AV h h Connections AV setting menu appears 5 Touch Bluetooth and set to ON...

Страница 55: ...hile using Apple CarPlay The Bluetooth audio source is disabled when the device set as Audio App is using Android Auto Ñ Ñ Bluetooth basic operation Control screen 2 3 5 1 6 4 1 Operation keys 1 Searches for a file See File search P 57 E F Searches for the previous next content Touch and hold to fast forward or fast backward D Plays H Pauses Touch to attenuate restore the sound Repeats the current...

Страница 56: ...text information may not appear If the volume is too low raise it on your smartphone cell phone or audio player It is recommended that you change the playback quality from priority on sound quality to priority on stable connection in the settings of your LDAC compatible device so that the intermittent sound problem is less likely to occur Ñ Ñ JVC Streaming DJ Up to 5 Bluetooth audio device can be ...

Страница 57: ...u can use the telephone function by connecting the Bluetooth telephone to this unit NOTE While Apple CarPlay or Android Auto is connected the Bluetooth Hands Free function and two Bluetooth devices connections cannot be used Only the Apple CarPlay or Android Auto Hands Free function can be used Ñ Ñ Make a call 1 Press the button h h HOME screen appears 2 Touch 3 Touch Phone P 12 h h Hands Free scr...

Страница 58: ...l phone Setting the smartphone cell phone in the private mode can disable the Hands Free function Call using call records 1 Touch 2 Select the phone number from the list Call using the phonebook 1 Touch 2 Touch 3 Select the initial Characters with no corresponding name will not appear A first character with an accent character such as ü can be searched for with a non accent character u A character...

Страница 59: ... the preset number 1 Touch 2 Touch the name or phone number Call by entering a phone number 1 Touch 2 Enter a phone number with number keys 3 Touch Ñ Ñ Voice Recognition You can access the voice recognition function of the smartphone cell phone connected to this unit You can search the smartphone cell phone phonebook by voice The functionality depends on the smartphone cell phone 1 Press the butto...

Страница 60: ...ted device To end call 1 While talking touch Ñ Ñ Operations during a call Adjust the volume of your voice 1 Touch Speech Quality 2 Touch T or U for Microphone Level Adjust the receiver volume Press the or button Mute your voice Touch to mute or not to mute your voice Output the dial tone Touch DTMF to display the tone input screen You can send tones by touching desired keys on the screen Switching...

Страница 61: ...tphone using PBAP 1 Touch 2 Touch h h Phonebook data transfer starts NOTE If the Phonebook contains more than 1000 entries only 1000 entries are transferred The 1001st and later entries are not transferred If no Phonebook has been downloaded touching Download Phonebook Now will start downloading the Phonebook The portrait registered in the phonebook is displayed while making receiving calls and du...

Страница 62: ...ult Outputs sound from all speakers Auto Response Set the automatic response time to pick up an incoming call OFF Default Turns off the Automatic response function 1 5 10 15 20 25 30 Sets the ringing time second Auto Pairing When set to ON the Apple Auto Pairing function is turned on to automatically register the iPod touch or iPhone connected to this unit ON Default Turns on the Apple Auto Pairin...

Страница 63: ...ws Backlight Contrast Black Brightness Color Tint Adjust each setting Aspect Select a screen mode Full Changes the aspect ratio of video and displays video fully on the screen Normal Displays video at the ratio of 4 3 Auto Displays video fully vertically or horizontally with no ratio change NOTE Settings to adjust vary depending on the current source Connections AV Setup You can set connections an...

Страница 64: ... outputting sound from the iPod source P 27 AV OUT You can select an AV source to be output from the AV OUTPUT port OFF iPod USB or AV IN You cannot select AV IN if the Video input terminal is used for camera You cannot select iPod if it is connected via Bluetooth or Apple CarPlay is connected If you select iPod as the main source you cannot select USB as the AV output source If you select USB as ...

Страница 65: ...ing video files etc ON Default OFF Button Illumination Color You can set the button illumination color P 66 Wallpaper Customize You can change the wallpaper image or color P 65 Screen transition effect Select whether to use the screen transition effect when the source control screen is switched to the Home screen ON Default OFF Ñ Ñ Change the wallpaper image 1 Touch Wallpaper Customize in the Disp...

Страница 66: ...tal APP application installed on your iPhone or Android smartphone you can upload image files to this unit and set an image as the wallpaper image See Importing Image Files P 17 Ñ Ñ Customizing the button color You can set the button illumination color 1 Touch Button Illumination Color in the Display Button setting menu or on the Wallpaper color screen 2 Touch the desired color Live wallpaper Stat...

Страница 67: ...the sensor detects obstacles OFF Cancels this function This can be set when the iDatalink commercially available is connected Parking Assist Position Select where to display information about obstacles on the screen left or right Left Right Default This can be set when the iDatalink commercially available is connected Driving Position Select the driving position left or right Left Default Right Ñ ...

Страница 68: ...h h System setting menu appears 5 Set each parameter as follows DEMO Select the demonstration mode Default is ON Operation Guide Display Determine whether to show the touch screen operation guide screen every time before HOME screen is displayed Default is ON Software Information Confirm the software version of this unit P 69 Open Source Licenses Display the open source licenses Initialize Touch I...

Страница 69: ...creen appears 4 Touch Key Assignment h h Key Assignment setting menu appears 5 Set each parameter as follows Customize Favorite Key Select the function which you wish to set for Favorite icon P 70 Customize FNC Menu Select the function which you wish to set for the function key1 to 3 P 70 DISP Key Select the source screen displayed when in the popup menu screen is touched OFF Displays the control ...

Страница 70: ...nt 3 Select a favorite function 4 Touch Close NOTE You can also change the assignment when you touch and hold Favorite icon on the HOME screen If it is your first time to touch Favorite icon after installation the function list dialog will appear Ñ Ñ Customize popup menu functions You can register a function for each of the function key1 to 3 Function key1 key2 key3 To register a function 1 Touch ...

Страница 71: ...er X over EQ SW Level Position DTA Fader Balance Sound Effect To recall the settings automatically adjusted by the iDatalink connection when the settings are changed manually touch Audio SETUP Clear in the Audio Memory setting menu P 82 3 way speaker system setup Select the appropriate crossover network mode for the speaker system used 2 way or 3 way speaker system CAUTION Connecting 3 way speaker...

Страница 72: ... car type the Delay Time Alignment is activated automatically for timing adjustment of sound output for each channel to have the highest surround effects 6 Touch the speaker 1 you wish to adjust and set each parameter 2 as follows 2 2 1 Speaker You can select a speaker type and its size to get the best sound effects When the speaker type and size are selected the speaker crossover network is set a...

Страница 73: ...3 way speaker system see 3 way speaker system setup P 71 Equalizer Control You can adjust equalizer by selecting the optimized setting for each category 1 Press the button 2 Touch 3 Touch Audio h h Audio screen appears 4 Touch EQ SW Level 5 Touch the screen and set the Graphic Equalizer as desired Gain level area in dotted frame Adjust the gain level by touching each frequency bar You can select a...

Страница 74: ... Focus You cannot set both at the same time 1 Press the button 2 Touch 3 Touch Audio h h Audio screen appears 4 Touch Position DTA Set up Listening Position P 74 Set up Front Focus P 75 Ñ Ñ Listening Position Adjust the sound delay time so that the sounds from different speakers arrive at the listener sitting on the selected seat at the same time 1 Touch Listening Position on the Position DTA scre...

Страница 75: ...aker NOTE To initialize the Delay and Level settings touch Initialize and YES on the confirmation screen Ñ Ñ Front Focus You can focus the imaginary sound image on the front of the selected seat 1 Touch Front Focus in the Position DTA screen 2 Select a front focus position For Front All and All select Priority L or R depending on which side you want to put the imaginary sound image NOTE When the 3...

Страница 76: ...ofer sound 4 Touch Level 5 Touch T or U to adjust the sound level of the selected speaker NOTE To initialize the Delay and Level settings touch Initialize and YES on the confirmation screen Fader Balance Zone Control 1 Press the button 2 Touch 3 Touch Audio h h Audio screen appears 4 Touch FAD BAL Zone Fader Balance Control P 76 Set up Zone Control P 77 Ñ Ñ Fader Balance Control You can adjust the...

Страница 77: ... Equalizer Control Sound Effect Listening Position P 73 78 74 Speaker Setup P 72 Fader for Controlling General Audio High resolution Sound Source File Playback When the dual zone is selected and audio source other than OFF is selected as Rear Source the speaker system cannot be switched You cannot select AV IN if the Video input terminal is used for camera Rear Source You cannot select iPod if it ...

Страница 78: ...meter as follows Bass Boost Set the amount of bass boost OFF 1 2 3 Loudness Set the amount of boost of low and high tones OFF Low High Volume Link EQ Reduce the driving noise by boosting specific frequencies in the audio signal OFF ON Space Enhancement Select the feeling of sound space enhancement OFF Small Medium Large This setting is not available for the HD Radio tuner source K2 Turn ON OFF the...

Страница 79: ...ts common for front rear subwoofer 2 points for front only 2 points for rear only and one point for subwoofer only NOTE Configure the Parametric Equalizer to establish the basis for adjustments before making adjustments using the Graphic Equalizer The changes made using the Parametric Equalizer are not shown on the Graphic Equalizer screen You can check the effects using the Parametric Equalizer O...

Страница 80: ... shelf controls the high frequencies Use these in the following cases for example When you want to change the volume of the tweeters for example when they are close to your ears and are sounding too loud When you want to change the subwoofer volume at hand dB Hz fc Peaking Filter The frequencies in the vicinity of a certain frequency f0 center frequency are boosted or attenuated Use this in the fo...

Страница 81: ...sted EQ point blue yellow EQ points that are not currently being adjusted Curve orange EQ curve of the speaker currently being adjusted Curve blue Overall EQ curve 3 Filter Select the filter High Pass High Shelving Peaking Low Shelving Low Pass 4 Affects All Speakers 1 ON Outputs sound from all speakers OFF Outputs sound from the currently selected speaker only 5 Initialize Flat Initialize Initial...

Страница 82: ... the button 2 Touch 3 Touch Audio h h Audio screen appears 4 Touch Audio Memory SETUP Memory Lock or unlock the Audio SETUP Memory Recall Clear Audio SETUP Memory Memorize the current audio settings Fader Balance Speaker X over Equalizer User Preset SW Level Position DTA Sound Effect P 71 Audio SETUP Recall Recall the memorized audio setting Audio SETUP Clear Clear the Audio SETUP Memory and the c...

Страница 83: ... is left in an extremely high temperature surrounding environment and or subjected extremely low air pressure The battery pack or batteries shall not be exposed to excessive heat such as sunshine fire or the like Risk of fire explosion or the leakage of flammable liquid or gas if the battery is disposed into fire or a hot oven recharged shorted mechanically crushed or cut of the battery If spilled...

Страница 84: ...ct search mode see Direct search mode P 84 For the HD Radio and SiriusXM sources allows you to enter the preset number If the preset number is single digit press the number If the preset number is double digits press continuously the numbers within 3 seconds Pressing E or F within 3 seconds allows you to determine the preset number of single digit CLR Not used ENT Not used Ñ Ñ Direct search mode U...

Страница 85: ... the speaker wire may have a short circuit or touched the chassis of the vehicle and the protection function may have been activated Therefore the speaker wire should be checked If your car s ignition does not have an ACC position connect the ignition wires to a power source that can be turned on and off with the ignition key If you connect the ignition wire to a power source with a constant volta...

Страница 86: ...m the front or visible through the car rear view mirror as shown 1 2 0 3 m 0 3 m 0 3 m 2 m 2 m 1 m 0 7 m 0 9 m Pole height 1m diameter 0 3m Field of vision from steering position Exempted area pole size is subject to regulation For right hand drive vehicles standards are reversed 1 The pole must be visible from the driver s position as direct forward field of vision 2 The pole must be directly vis...

Страница 87: ...ctions for each unit 4 Connect the speaker wires of the wiring harness 5 Connect the wiring harness wires in the following order ground battery ignition 6 Determine the height of the display unit and position of the slider See Distance between the display unit and the main unit P 88 7 Connect the wiring harness connector to the unit 8 Install the main unit to the vehicle 9 Reinstall the vehicle pa...

Страница 88: ...b c 4 3 2 1 a 4 3 2 1 4 3 2 1 4 3 2 1 4 3 2 1 4 3 2 1 b a c a a b b d d b c 4 3 2 1 a 4 3 2 1 4 3 2 1 4 3 2 1 4 3 2 1 4 3 2 1 b a c a a b b d d b c 10 a 10 b 38 1 50 9 63 8 76 5 0 a 26 7 b 34 7 47 7 60 7 73 7 45 c 5 7 14 4 24 1 33 4 d 45 8 36 6 27 4 18 2 Forward position 4 3 2 1 a 4 3 2 1 4 3 2 1 4 3 2 1 4 3 2 1 4 3 2 1 b a c a a b b d d b c 4 3 2 1 a 4 3 2 1 4 3 2 1 4 3 2 1 4 3 2 1 4 3 2 1 b a c ...

Страница 89: ... for back position Bracket for back position Hexagon head screw 4 Install the bracket for forward position accessory 0 each side so that its projections are aligned with the slots on the main unit Projection Projection 0 5 Fix the bracket for forward position to the slider block with the two hexagon head screws Push the slider block until it stops and then fix the bracket for forward position to t...

Страница 90: ... other surface 2 Remove the separator of the metal plate accessory 7 3 Press the metal plate accessory 7 down firmly on your dashboard or other mounting surface You can bend the metal plate accessory 7 to conform to a curved surface if necessary 4 Remove the separator of the GPS antenna accessory 6 and stick the antenna to the metal plate accessory 7 7 6 NOTE Use the supplied GPS antenna Using the...

Страница 91: ...e slider position cannot be changed after installing to the vehicle Make sure that the unit is installed securely in place If the unit is unstable it may malfunction eg the sound may skip 1 Remove parts that interfere with installing such as a panel on the vehicle 2 Install the car bracket to the main unit Car bracket 4 or 5 Main unit 3 Connect the wiring harness wires and peripheral equipment 4 I...

Страница 92: ...rt and then fix it with two binding head screws accessory NOTE If the protective cover accessory is not attached this unit will not turn on Even if the unit is turned on the power may be turned off halfway Be sure to attach the protective cover accessory 9 Raise the display manually ...

Страница 93: ...sing the optional rear view camera To steering remote To use the steering wheel remote control feature you need an exclusive remote adapter not supplied matched to your car If no connections are made do not let the cable come out from the tab Purple Black To rear right speaker To rear left speaker To front right speaker To front left speaker Speaker impedance 4 8 Ω Purple Green Black Green Gray Bl...

Страница 94: ...stall the SiriusXM Connect Vehicle tuner consult the installation guide included with the tuner When connecting to an external amplifier connect its ground wire to the car s chassis to avoid damaging the unit White Black Gray Black Green Black Purple Black Speaker impedance 4 8 Ω Purple Green Gray White To mid range left speaker Subwoofer Preout To mid range right speaker Mid Range Preout To tweet...

Страница 95: ...e may cause a drop in positioning accuracy 11 3rd view camera input Yellow For more information see To set up the camera assignment settings P 48 12 Rear view camera input Yellow 13 Front view camera input Yellow 1 For more information see To set up the camera assignment settings P 48 14 Video output Yellow 15 Video input Yellow 1 Side Left or Right view camera can also be connected to 9 or 13 Ñ Ñ...

Страница 96: ... 8 m 3 Lightning Digital AV Adapter 2 iPod iPhone 2 iPhone with Apple CarPlay 2 USB terminal 1 Accessory 2 1 m 4 1 USB maximum power supply current DC 5 V 1 5 A 2 Sold separately 3 Optional accessory 4 See Securing the USB extension cable P 96 Ñ Ñ Connecting an Android smartphone USB cable 2 Android smartphone with Android Auto 2 USB terminal 1 Accessory 2 1 m 3 1 USB maximum power supply current ...

Страница 97: ...ont view camera 1 Left side view camera and Right side view camera 1 Video input Yellow 3rd view camera input Yellow Front view camera input Yellow Rear view camera input Yellow Rear view camera 1 1 Sold separately 2 See To set up the camera assignment settings P 48 ...

Страница 98: ...f See Zone Control P 77 Cannot select the output destination of the subsource in the dual zone Cannot adjust the volume of the rear speakers The dual zone function is disabled Set the dual zone function to on See Zone Control P 77 Cannot set up the equalizer Cannot set up the crossover network The dual zone function is enabled Set the dual zone function to off See Zone Control P 77 Ñ Ñ About audio...

Страница 99: ...ouble may have occurred to the connected USB device Change the source to any source other than USB Remove the USB device The speed sense wire is not connected Please check the connection The speed pulse disconnection is detected By default it is treated as connected To improve precision of a vehicle position recognition check the connection of the speed pulse Starting tuner failed The tuner unit i...

Страница 100: ...he proper connections or plug in by USB to use Apple CarPlay The GPS antenna is not connected when the Apple CarPlay is started by connecting wirelessly or when the iPhone compatible with wireless Apple CarPlay is registered in Device List Check the connection of the GPS antenna or plug in over USB to use Apple CarPlay ...

Страница 101: ...mChinks tag of DSDIFF is not supported Although the audio files complies with the standards listed above they may not be played depending on the types or conditions of media or device This unit supports playback of High Resolution Audio files It is recommended that a car audio system should be configured with all High Resolution Audio compatible products from player to speaker to enjoy its high qu...

Страница 102: ... layers 8 Maximum number of files per folder 999 Maximum number of folders per folder 9999 Maximum number of folders per device Unlimited You can enter a folder name and file name with 255 or fewer single byte characters Files in the folder whose folder name begins with a dot cannot be played ...

Страница 103: ...Input Audio Type 32K 44 1K 48K 88 2K 96K 176 2K 192K Hz 16 bit 20 bit 24 bit Linerar PCM Wireless Mirroring section Mode Sink Copyright protection HDCP2 2 Touch Control UIBC Wi Fi section IEEE Standard 802 11 a b g n ac Frequency Range Dual Band 2 4GHz 5GHz Channels Auto 1 11ch Auto 149 153 157 161ch Transfer rates MAX 11a 54 Mbps 11b 11 Mbps 11g 54 Mbps 11n 300 Mbps 11ac 867 Mbps Output Power 2 4...

Страница 104: ...Input NTSC External Video Input Level RCA jacks 1 Vp p 75 Ω External Audio Max Input Level mini jack 2 V 25 kΩ Video Output Level RCA jacks 1 Vp p 75 Ω Audio Output Level mini jack 0 9 V 10 kΩ Audio section Maximum Power Front Rear 50 W 4 Typical Power Output Front Rear Full Bandwidth Power at less than 1 THD 22 W 4 Output frequency band 20 88 000 Hz Preout Level V 5 V 10 kΩ Preout Impedance 300 Ω...

Страница 105: ... 18 24 dB Oct Gain 8 7 6 5 4 3 2 1 0 dB Low pass filter Frequency 30 40 50 60 70 80 90 100 120 150 Hz Through Slope 12 18 24 dB Oct Gain 8 7 6 5 4 3 2 1 0 dB General Operating Voltage 12V DC car battery Installation Dimensions W H D 178 100 155 mm 7 3 15 16 6 1 8 inch Weight 3 25 kg 7 28 lbs NOTE Although the effective pixels for the liquid crystal panel is given as 99 99 or more 0 01 of pixels ma...

Страница 106: ... presented Ñ Ñ EULA Software License Agreement JVCKENWOOD Corporation hereinafter called Licensor holds either the copyright to the embedded software or the right to sublicense it This agreement establishes the conditions under which the customer uses this Licensed Software The customer shall agree to the terms of this license agreement before proceeding to use Licensed Software This agreement is ...

Страница 107: ...ions of this agreement or 2 Has received a petition for seizure provisional seizure provisional disposition or any other kind of compulsory execution Article 9 Destruction of Licensed Software If this agreement is terminated under the provision of the foregoing paragraph User shall destroy Licensed Software along with all associated literature and its duplicates within two 2 weeks from the date of...

Страница 108: ...your car display you ll need an Android Auto compatible vehicle or aftermarket stereo an Android phone running Android 5 0 or higher and the Android Auto app Wi Fi is a registered trademark of Wi Fi Alliance The Wi Fi CERTIFIED Logo is a certification mark of Wi Fi Alliance The terms HDMI and HDMI High Definition Multimedia Interface and the HDMI Logo are trademarks or registered trademarks of HDM...

Страница 109: ... Xiph org Foundation nor the names of its contributors may be used to endorse or promote products derived from this software without specific prior written permission THIS SOFTWARE IS PROVIDED BY THE COPYRIGHT HOLDERS AND CONTRIBUTORS AS IS AND ANY EXPRESS OR IMPLIED WARRANTIES INCLUDING BUT NOT LIMITED TO THE IMPLIED WARRANTIES OF MERCHANTABILITY AND FITNESS FOR A PARTICULAR PURPOSE ARE DISCLAIME...

Страница 110: ...located or operated in conjunction with any other antenna or transmitter ISED CAUTION This device contains licence exempt transmitter s receiver s that comply with Innovation Science and Economic Development Canada s licence exempt RSS s Operation is subject to the following two conditions 1 This device may not cause interference 2 This device must accept any interference including interference th...

Страница 111: ...recto del reciclaje y la eliminación de residuos ayuda a conservar los recursos y evita al mismo tiempo efectos perjudiciales en la salud y el medio ambiente Informação sobre a eliminação de pilhas Este produto não deve ser eliminado como lixo doméstico geral Devolva a pilha usada ao revendedor ou entidade autorizada para que a mesma seja devolvida ao fabricante ou importador A reciclagem e a elim...

Страница 112: ......

Отзывы: