background image

29

ENGLISH

Category Menu item

Selectable setting, [

 Initial:


Underlined


]

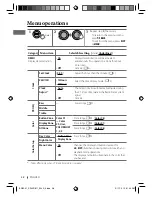
Color Setup

Ring Color

 *

2

• 

On

• 

Off

:  When a call comes in, the display will flash in blue.
  • The display will change to the original color when 

the call is answered or the incoming call stops.

  When the unit receives a SMS, the display only 

illuminate in blue.

: Cancels.

Audio

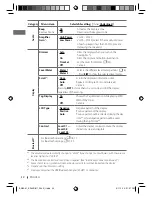
Fad/Bal

 *

3, 

*

4

Fader/balance

R6 – F6

, [ 

0

 ]

L6 – R6

, [ 

0

 ]

Fad

 (fader): Press 

5

 / 

 to adjust the front and rear 

speaker output balance.

Bal

 (balance): Press 

4


 / 

¢


 to adjust the 

left and right speaker output balance.

Loud

Loudness

• 

Loud 1/2/3

• 

Off

:  Boost low and high frequencies to produce a well-

balanced sound at a low volume level.

: Cancels.

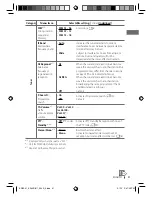
Volume 
Adjust

Level –5 — 
Level +5

Level 0

 ]

:  Preset the volume adjustment level of each source 

(except FM), compared to the FM volume level. The 
volume level will automatically increase or decrease 
when you change the source.

  • Before making an adjustment, select the source you 

want to adjust.

  • “FIX” appears on the display if “FM” is selected as the 

source.

Subwoofer

• 

LPF

• 

Level

• 

Phase

:  Turn the control dial to select the cutoff frequency 

to the subwoofer.


Off

: All signals are sent to the subwoofer.


LPF 55Hz/LPF 85Hz/LPF 120Hz

: Frequencies 

higher than 55 Hz/85 Hz/120 Hz are cut off.

:  Turn the control dial to adjust the subwoofer 

output level. 

Level 00

 to 

Level 08

 [ 

Level 04

 ]

:  Turn the control dial to select the subwoofer phase. 

0deg 

(normal) or 

180deg 

(reverse)

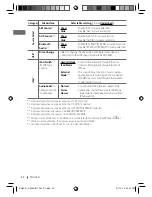
HPF

High Pass 
Filter

Select the cutoff frequency to the front/rear speakers. Set this to 
match the LPF settings.
• 

62Hz/95Hz/
135Hz

• 

Off

:  Frequencies lower than 62 Hz/95 Hz/135 Hz are cut 

off.

:  All signals are sent to the front/rear speakers.

*

2

  Displayed only when USB Bluetooth adapter, KS-UBT1 is connected.

*

If you are using a two-speaker system, set the fader level to <0>.

*

This adjustment will not affect the subwoofer output.

EN22-31_KW-XR811_003A_2.indd   29

EN22-31_KW-XR811_003A_2.indd   29

2/1/10   2:47:25 PM

2/1/10   2:47:25 PM

Содержание KW-XR811

Страница 1: ...epresentative of Victor Company of Japan Limited is JVC Technical Services Europe GmbH Postfach 10 05 04 61145 Friedberg Germany Cher e client e Cet appareil est conforme aux directives et normes européennes en vigueur concernant la compatibilité électromagnétique et à la sécurité électrique Représentant européen de la société Victor Company of Japan Limited JVC Technical Services Europe GmbH Post...

Страница 2: ...ance from the unit IMPORTANT FOR LASER PRODUCTS 1 CLASS 1 LASER PRODUCT 2 CAUTION Do not open the top cover There are no user serviceable parts inside the unit leave all servicing to qualified service personnel 3 CAUTION Visible and or invisible class 1M laser radiation when open Do not view directly with optical instruments 4 REPRODUCTION OF LABEL CAUTION LABEL PLACED OUTSIDE THE UNIT Information...

Страница 3: ...digital sources to avoid damaging the speakers by sudden increase of the output level CONTENTS 3 How to read this manual 3 How to reset your unit 3 How to forcibly eject a disc 4 Canceling the display demonstration 4 Setting the clock 5 Preparing the remote controller RM RK50 6 Basic operations 8 Listening to the radio 11 Listening to a disc 13 Listening to the USB device 14 Using the Bluetooth de...

Страница 4: ...7 Select 24H 12H Clock Set Clock 24H 12H Clock Adjust 8 Select 24Hours or 12Hours 24H 12H 24Hours 12Hours Clock Adjust 9 Finish the procedure 1 Turn on the power 2 SET UP DEMO Clock PRO EQ 3 Select Clock SET UP DEMO Clock PRO EQ 4 Select Set Clock Clock 24H 12H Set Clock Clock Adjust 5 Adjust the hour Set Clock 0 00 AM Initial setting Initial setting Hold Hold EN02 11_KW XR811_003A_1 indd 4 EN02 1...

Страница 5: ...ntrol function Before operating connect a JVC s OE remote adapter not supplied which matches your car to the steering wheel remote input terminal on the rear of the unit For details refer also to the instructions supplied with the remote adapter Preparing the remote controller RM RK50 When you use the remote controller for the first time pull out the insulation sheet If the effectiveness of the re...

Страница 6: ...the disc Loading slot USB Universal Serial Bus input terminal Display window Remote sensor DO NOT expose to bright sunlight Source operation display Audio level meter display Level Meter 30 Auxiliary input jack Selects preset station EN02 11_KW XR811_003A_1 indd 6 EN02 11_KW XR811_003A_1 indd 6 1 20 10 4 37 54 PM 1 20 10 4 37 54 PM ...

Страница 7: ... 12 20 25 directly if pressed RPT Enters random mode menu directly 12 20 25 if pressed RND Selects the sound mode Enters tone level adjustment directly 27 if pressed and held EQBASS TRE on the main unit Enters Call Menu screen or answers incoming call when the unit rings Ends a call if pressed and held after a phone call conversation Switches the connected mobile phone to the last connected mobile...

Страница 8: ...reset up to 18 stations for FM While listening to a station 1 2 Tuner SSM SSM 01 06 SSM 07 12 SSM 13 18 SSM appears and local stations with the strongest signals are searched and stored automatically To preset another 6 stations repeat the above procedure by selecting one of the other 6 SSM setting ranges Hold Hold Hold Listening to the radio FM or AM Ÿ lights up when receiving an FM stereo broadc...

Страница 9: ...adio Data System stations Searching for your favourite FM Radio Data System programme PTY Search You can tune in to a station broadcasting your favourite programme by searching for a PTY code 1 The last selected PTY code appears 2 Select one of your favourite programme types or a PTY code and start searching If there is a station broadcasting a programme of the same PTY code as you have selected t...

Страница 10: ...ated To activate the reception tune in to another station providing these signals To deactivate the reception select Off 31 for the PTY code The PTY indicator goes off The unit will not switch to Traffic Announcement or PTY programme when a call connection is established through BT FRONT BT REAR Tracing the same programme Network Tracking Reception When driving in an area where FM reception is not...

Страница 11: ...will be played repeatedly until you change the source or eject the disc Hold Hold Selecting a folder track on the list While listening to a disc 1 Enter the list menu 2 Select your desired item MP3 WMA Select your desired folder then the desired track by repeating this step If the MP3 WMA disc contains many tracks you can fast search 10 100 1000 through the disc by turning the control dial quickly...

Страница 12: ...y change the character of the search menu If your disc contains many tracks searching take some time Using the remote controller 5U D Selects folder of the MP3 WMA 2R F3 Selects track 2R F3 Hold Fast forwards or reverses the track Selecting the playback modes You can use only one of the following playback modes at a time 1 Repeat or Random Pressing and holding the control dial will enter the playb...

Страница 13: ...wer Ÿ and or All tracks will be played repeatedly until you change the source or detach the USB device USB cable from the rear of the unit USB input terminal USB memory If you have turned off the power without detaching the USB device Pressing SOURCE turns on the power and playback starts from where it has been stopped previously If a different USB device is currently attached playback starts from...

Страница 14: ...on the display Do not pull out and attach the USB device repeatedly Do not pull out or attach another USB device Do not start the car engine if a USB device is connected This unit may not be able to play the files depending on the type of USB device Operation and power supply may not work as intended for some USB devices You cannot connect a computer to the USB input terminal of the unit Make sure...

Страница 15: ...USB input terminal KS UBT1 USB cable from the rear of the unit Pairing a device When you connect a Bluetooth device to the unit for the first time make pairing between the unit and the device Once the connection is established it is registered in the unit even if you reset the unit Up to five devices can be registered in total Only one device for Bluetooth phone and one for Bluetooth audio can be ...

Страница 16: ... Bluetooth device to connect Refer to the following table for connectivity results shown on the display Operations may be different according to the connected device Display result Hands Free Call Audio Streaming Connect OK Device Name Handsfree OK Device Name Audio Stream OK Device Name Connect Fail Try Reconnect The device remains registered even after you disconnect the device Use Connect Phone...

Страница 17: ...the name phone number of the phonebook registered in the unit or from the connected phone 3 Go to the following step To copy the phonebook memory Phonebook Trans 22 If the phonebook contains many numbers you can fast search 10 100 1000 numbers through the phonebook by turning the control dial quickly To search through the phonebook 18 Dial Number Shows the Dial Number screen 18 Voice Dial only acc...

Страница 18: ... the control dial to select the name phone number you want to delete 4 Press and hold T P BACK to enter the Delete Entries screen 5 Turn the control dial to select Delete or Delete All If Delete is selected the selected name phone number in step 3 is deleted If Delete All is selected the listed numbers in step 2 selection are deleted 6 Press the control dial to confirm Selecting a contact from the...

Страница 19: ...e Press the control dial during a phone call conversation then continue your conversation using the other media Operations may be different according to the connected Bluetooth device Switching the connected mobile phone You can switch the current connected mobile phone to the last connected mobile phone Phone icon appears and Connecting flashes on the display When the last connected phone is bein...

Страница 20: ... random play select Off To return to the previous menu press T P BACK Starts or resumes playback Mutes the sound Selects group folder Forward skips or reverse skips Fast forwards or reverses the track Using the remote controller 2R F3 Forward skips or reverse skips 2R F3 Hold Fast forwards or reverses the track Hold Using a Bluetooth audio player Operations and display indications differ depending...

Страница 21: ...ou of the arrival of a SMS by ringing and displaying Received Message The unit does not inform you of the arrival of a SMS MIC Setting Adjust the volume of the microphone connected to the unit Level 01 02 03 NR EC Mode On Off The unit adjusts the Noise Reduction and Echo Cancelation of the microphone connected to the unit for clearer sound Cancels Ringing Tone In Unit In Phone The unit rings to al...

Страница 22: ...table only when the connected phone supports PBAP 2 Displayed only when a Bluetooth phone audio player is connected Warning messages Connection Error The device is registered but the connection has failed Use Connect Phone Connect Audio to connect the device again 17 Error Try the operation again If Error appears again check if the device supports the function you have tried Please Wait The unit i...

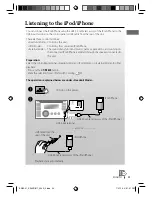
Страница 23: ...Pod iPhone is emitted through the speakers connected to this unit Preparation Select the controlling terminal Headunit Mode iPod Mode or External Mode for iPod playback Press and hold T P BACK button Make the selection from iPod Switch setting 32 The operations explained below are under Headunit Mode Turn on the power Ÿ and or Playback starts automatically USB input terminal USB cable from the rea...

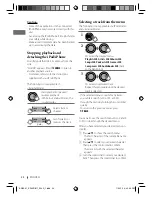
Страница 24: ...Mode and External Mode 1 2 Select the desired menu Playlists j Artists j Albums j Songs j Podcasts j Genres j Composers j Audiobooks j back to the beginning 3 Select your desired track Repeat this procedure until the desired track is selected If the selected menu contains many tracks you can fast search 10 100 1000 through the menu by turning the control dial quickly To return to the previous menu...

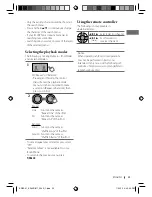
Страница 25: ...Repeat One of the iPod All Functions the same as Repeat All of the iPod Random Song Functions the same as Shuffle Songs of the iPod Album Functions the same as Shuffle Albums of the iPod To cancel repeat play or random play select Off Random Album is not available for some iPod iPhone To return to the previous menu press T P BACK Using the remote controller The following is not applicable in Exter...

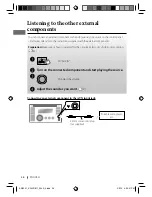
Страница 26: ...nts Preparation Make sure Show is selected for the Source Select AUX Source setting 32 AUX IN Ÿ Turn on the connected component and start playing the source Adjust the volume Adjust the sound as you want 27 Connecting an external component to the AUX input jack 3 5 mm stereo mini plug not supplied Portable audio player etc EN22 31_KW XR811_003A_3 indd 26 EN22 31_KW XR811_003A_3 indd 26 2 9 10 3 55...

Страница 27: ...of the selected tone table below 1 Press 4 to adjust the frequency 2 Press 5 to adjust the level 3 Turn the control dial to adjust the Q slope 4 Press the control dial to store the adjustment 4 Repeat steps 2 and 3 to adjust other tones 5 or Exit from the menu The adjustments made will be stored automatically in USER The current sound mode changes to USER automatically Tone Sound element Bass Freq...

Страница 28: ...ly adjusted using the CT clock time data in the Radio Data System signal Cancels PRO EQ Bass For settings 27 Middle Treble Color Button Zone Color 01 Color 29 User COLORFLOW 1 2 3 For settings 33 Color 06 Display Zone For settings 33 Color 01 All Zone For settings 33 Color 06 Color Setup Day Color Button Zone Display Zone For settings 34 Night Color Menu Color On Off Changes the display and button...

Страница 29: ...he source Before making an adjustment select the source you want to adjust FIX appears on the display if FM is selected as the source Subwoofer LPF Level Phase Turn the control dial to select the cutoff frequency to the subwoofer Off All signals are sent to the subwoofer LPF 55Hz LPF 85Hz LPF 120Hz Frequencies higher than 55 Hz 85 Hz 120 Hz are cut off Turn the control dial to adjust the subwoofer...

Страница 30: ...ting Tag Display On Off Shows the Tag information while playing MP3 WMA WAV tracks Cancels LCD Type Negative Positive Auto Negative pattern of the display Positive pattern of the display Positive pattern will be selected during the day time 8 while negative pattern will be used during the night time 8 Contrast Level 01 Level 08 Level 05 Adjust the display contrast to make the display indications c...

Страница 31: ...iffer from the one currently received The AF indicator lights up When the currently received signals become weak the unit switches to another station broadcasting the same programme The AF and REG indicators light up Cancels P Search 11 Programme search On Off Activates Programme Search 10 Cancels TA Volume 11 Traffic announcement volume Vol 00 Vol 50 or Vol 00 Vol 30 12 Vol 15 PTY Standby 10 11 O...

Страница 32: ...ns etc running on the connected iPod iPhone is emitted through the speakers connected to this unit Audiobooks 20 Speed control of Audiobooks Normal Faster Slower You can select the playback speed of the Audiobooks sound file in your iPod iPhone Initial selected item depends on your iPod iPhone setting 13 Displayed only when any source other than AM is selected 14 Displayed only when any source oth...

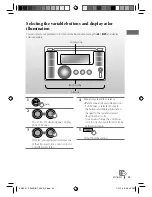
Страница 33: ...ors User color or COLORFLOW 1 2 3 All zone Display zone Hold 4 Repeat steps 2 and 3 to select a different zone and your preferred color If All Zone is selected in step 2 the buttons and display illumination changed to the current selected Button Zone color You can also change the All Zone color to one of your preferred color by performing step 3 5 Exit from the setting Button zone EN32 41_KW XR811...

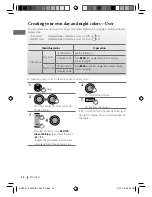
Страница 34: ... Color Creating your own day and night colors User You can create your own colors for Day Color and Night Color to apply to button zone and display zone Day Color Displayed when Dimmer is set to Off 30 Night Color Displayed when Dimmer is set to On 30 Menu hierarchy Operation Color Setup Day Color Button Zone See the following Display Zone Press BACK after step 4 then select Display Zone in step 2...

Страница 35: ...ed anew When SSM is over the station stored in the lowest preset number will be automatically tuned in When storing a station manually the previously preset station is erased when a new station is stored in the same preset number FM Radio Data System operations Network Tracking Reception requires two types of Radio Data System signals PI Programme Identification and AF Alternative Frequency to wor...

Страница 36: ...Hz 44 1 kHz 48 kHz for MPEG 1 16 kHz 22 05 kHz 24 kHz for MPEG 2 Sampling frequency of WMA 8 kHz 48 kHz Disc USB operations Caution for DualDisc playback The Non DVD side of a DualDisc does not comply with the Compact Disc Digital Audio standard Therefore the use of Non DVD side of a DualDisc on this product may not be recommended General This unit has been designed to reproduce CDs CD Texts and C...

Страница 37: ...maximum number of characters for file folder names is 25 characters including mp3 wma 128 characters for MP3 WMA Tag This unit can recognize a total of 20 000 files and 2 000 folders 999 files per folder This unit can play back files recorded in VBR variable bit rate Files recorded in VBR have a discrepancy in the elapsed time display and do not show the actual elapsed time In particular this diff...

Страница 38: ...2 or more partitions When connecting with a USB cable use the USB 2 0 cable This unit may not recognized some of the USB device connected through a USB card reader This unit may not play back files in a USB device properly when using a USB extension cord This unit cannot assure proper functions or supply power to all types of USB devices Bluetooth operations While driving do not perform complicate...

Страница 39: ...e either registered trademarks or trademarks of Microsoft Corporation in the United States and or other countries The Bluetooth word mark and logos are owned by the Bluetooth SIG Inc and any use of such marks by Victor Company of Japan Limited JVC is under license Other trademarks and trade names are those of their respective owners Made for iPod means that an electronic accessory has been designe...

Страница 40: ...malfunction In this case eject the disc and leave the unit turned on for a few hours until the moisture has evaporated How to handle discs When removing a disc from its case press down the center holder of the case and lift the disc out holding it by the edges Always hold the disc by the edges Do not touch its recording surface When storing a disc in its case gently insert the disc around the cent...

Страница 41: ... Disc cannot be played back Insert the disc correctly CD R CD RW cannot be played back Tracks on the CD R CD RW cannot be skipped Insert a finalized CD R CD RW Finalize the CD R CD RW with the component which you used for recording Disc can neither be played back nor ejected No Eject appears on the display Unlock the disc 11 Eject the disc forcibly 3 Disc sound is sometimes interrupted Stop playba...

Страница 42: ...their names are sorted according to the file system of the CD The elapsed playing time is not correct This sometimes occurs during playback This is caused by how the tracks are recorded on the disc eg variable bit rate Please Eject appears on the display Insert a disc that contains MP3 WMA tracks The unit beeps when a folder is selected Selected folder is an empty folder Select another folder that...

Страница 43: ...playable file format Tracks folders are not played back in the order you have intended The playback order is determined by the file name Folders with numbers on the initial of their names are sorted in numerical order However folders with no numbers on the initial of their names are sorted according to the file system of the USB device No USB appears on the display The unit cannot detect the USB d...

Страница 44: ...ress DISP or T P BACK to exit The sound is interrupted or skipped during playback of a Bluetooth audio device Reduce the distance between the unit and the Bluetooth audio device Disconnect the device connected for Bluetooth Phone Turn off then turn on the unit Connect the Bluetooth audio device again when the sound is not yet restored The connected audio player cannot be controlled Check whether t...

Страница 45: ...ither on this unit or the iPod iPhone A lot of noise is generated Turn off uncheck the VoiceOver feature of the iPod For details visit http www apple com Playback stops The headphones are disconnected during playback Restart the playback operation 23 No File appears on the display No tracks are stored Import tracks to the iPod iPhone Restricted appears on the display Check whether the connected iP...

Страница 46: ...ine Out Level Impedance 2 5 V 20 kΩ load full scale Subwoofer Out Level Impedance 2 5 V 20 kΩ load full scale Output Impedance 1 kΩ Other Terminal AUX auxiliary input jack USB input terminal USB cable Aerial input Steering wheel remote input TUNER SECTION Frequency Range FM 87 5 MHz to 108 0 MHz AM MW 522 kHz to 1 620 kHz LW 144 kHz to 279 kHz FM Tuner Usable Sensitivity 9 3 dBf 0 8 μV 75 Ω 50 dB ...

Страница 47: ...rage class except HDD Compatible File System FAT 32 16 12 Playable Audio Format MP3 WMA WAV Max Current DC 5 V 500 mA BLUETOOTH Version Bluetooth 2 0 certified Power Class Class 2 Radio possible distance 10 m Service Area 10 m Profile HFP 1 5 OPP 1 1 A2DP 1 2 AVRCP 1 3 PBAP 1 0 Max Current DC 5 V 54 3 mA GENERAL Power Requirement Operating Voltage DC 14 4 V 11 V to 16 V allowance Grounding System ...

Страница 48: ...les meilleures performances possibles IMPORTANT POUR PRODUITS LASER 1 PRODUIT LASER CLASSE 1 2 ATTENTION N ouvrez pas le couvercle supérieur Il n y a aucune pièce réparable par l utilisateur à l intérieur de l appareil confiez toute réparation à un personnel qualifié 3 ATTENTION Rayonnement laser visible et ou invisible de classe 1M une fois ouvert Ne pas regarder directement avec des instruments ...

Отзывы: