background image

24

Data Size: 

B6L (182 mm x 128 mm)

Book Size: 

B6L (182 mm x 128 mm)

 Warning

•  The unit can only be used with a 12 V DC power supply, negative ground.
•  Disconnect the battery’s negative terminal before wiring and mounting.
•  Do not connect Battery wire (yellow) and Ignition wire (red) to the car 

chassis or Ground wire (black) to prevent a short circuit.

•  Insulate unconnected wires with vinyl tape to prevent a short circuit.
•  Be sure to ground this unit to the car’s chassis again after installation.

 Caution

•  For safety’s sake, leave wiring and mounting to professionals. Consult the 

car audio dealer.

•  Install this unit in the console of your vehicle. Do not touch the metal 

parts of this unit during and shortly after use of the unit. Metal parts such 
as the heat sink and enclosure become hot.

•  Do not connect the 

[

 wires of speakers to the car chassis or Ground wire 

(black), or connect them in parallel.

•  Connect speakers with a maximum power of more than 50 W. If the 

maximum power of the speakers is lower than 50 W, change the 

[AMP GAIN]

 setting to avoid damaging the speakers. 

(


17)

•  Mount the unit at an angle of less than 30º.
•  If your vehicle wiring harness does not have the ignition terminal, 

connect Ignition wire (red) to the terminal on the vehicle’s fuse box 
which provides 12 V DC power supply and is turned on and off by the 
ignition key.

•  After the unit is installed, check whether the brake lamps, blinkers, 

wipers, etc. on the car are working properly.

•  If the fuse blows, first make sure the wires are not touching car’s chassis, 

then replace the old fuse with one that has the same rating.

Basic procedure

Remove the key from the ignition switch, then 
disconnect the 

[

 terminal of the car battery.

Connect the wires properly.

  See 

Wiring 

connection. 

(


25)

Install the unit to your car.

    See Installing the unit (in-dash mounting).

Connect the 

[

 terminal of the car battery.

Reset the unit. 

(


3)

Installing the unit (in-dash mounting)

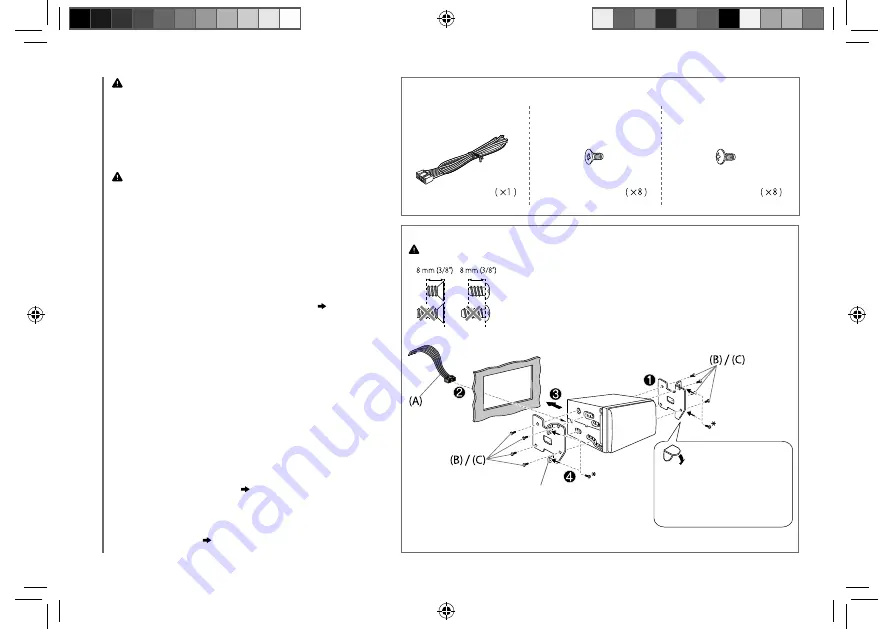
  Use only the specified screws. Using wrong screws might damage the unit.

Part list for installation

(A)

 Wiring harness

(B)

  Flat head screw

M5 × 8 mm (M5 × 3/8")

(C)

  Round head screw

M5 × 8 mm (M5 × 3/8")

Mounting bracket 
removed from the car

If there is an interfering tab 
on the mounting bracket, 
bend it flat.

* Screw removed from the car.

INSTALLATION / CONNECTION

JS_JVC_KW_R910BT_J_02_EN.indd   24

JS_JVC_KW_R910BT_J_02_EN.indd   24

13/12/2013   4:48:56 PM

13/12/2013   4:48:56 PM

Содержание KW-R910BT

Страница 1: ... este manual para comprender a fondo todas las instrucciones y obtener un máximo disfrute de esta unidad Veuillez lires les instructions attentivement avant d utiliser l appareil afin d obtenir les meilleures performances possibles de l appareil For customer Use Enter below the Model No and Serial No which are located on the top or bottom of the cabinet Retain this information for future reference...

Страница 2: ...asures Reorient or relocate the receiving antenna Increase the separation between the equipment and receiver Connect the equipment into an outlet on a circuit different from that to which the receiver is connected Consult the dealer or an experienced radio TV technician for help CALIFORNIA USA ONLY This product contains a CR Coin Cell Lithium Battery which contains Perchlorate Material special han...

Страница 3: ... d un gain maximal ou inférieur approuvé pour l émetteur par Industrie Canada Dans le but de réduire les risques de brouillage radioélectrique à l intention des autres utilisateurs il faut choisir le type d antenne et son gain de sorte que la puissance isotrope rayonnée équivalente p i r e ne dépasse pas l intensité nécessaire à l établissement d une communication satisfaisante Contains Bluetooth ...

Страница 4: ... be exposed to excessive heat such as sunshine fire or the like Keep the battery out of reach of children and in its original packaging when not in used Dispose of used batteries promptly If swallowed contact a physician immediately BEFORE USE 2 BASICS 3 GETTING STARTED 4 CD USB iPod 5 RADIO 7 AUX 8 Pandora 9 iHeartRadio 10 BLUETOOTH 11 AUDIO SETTINGS 16 DISPLAY SETTINGS 18 MORE INFORMATION 19 TRO...

Страница 5: ...el Select a source Press B SOURCE repeatedly Press B SOURCE then turn the volume knob within 2 seconds Press SOURCE repeatedly Change the display information Press DISP repeatedly 20 Press and hold to scroll the current display information not available BASICS How to reset Your preset adjustments will also be erased Volume knob turn press Loading slot Display window Faceplate ENGLISH Pull out the ...

Страница 6: ...ss the knob 3 Press MENU to exit To return to the previous setting item or hierarchy press G PTY Default XX CLOCK CLOCK ADJ AUTO The clock time is automatically set using the Clock Time CT data in FM Radio Broadcast Data System signal OFF Cancels CLOCK DISP ON The clock time is shown on the display even when the unit is turned off OFF Cancels SETTINGS BEEP ON Activates the keypress tone OFF Deacti...

Страница 7: ...V file or JPC JMC file FOLDER RND ALL RND RND OFF iPod SONG RND ALL RND RND OFF 1 Do not leave the cable inside the car when not using 2 You can still play pause file skip fast forward or reverse files from the unit 3 Only for MP3 WMA WAV files This does not work for iPod 4 For iPod Applicable under HEAD MODE only Start playback The source changes automatically and playback starts CD USB iPod iPho...

Страница 8: ...ne Mass Storage Class is connected to the USB input terminal you can select its internal memory or external memory such as an SD card to playback the stored songs You can also select the desired drive to playback when a multiple drives device is connected Press number button 5 iPod MODE repeatedly to select the desired drive or 1 Press and hold MENU 2 Turn the volume knob to select USB IPOD then p...

Страница 9: ...t a preset number and press the knob to confirm Search for your favorite program PTY Search Available only for FM source 1 Press and hold G PTY 2 Turn the volume knob to select a PTY code then press the knob to start searching If there is a station broadcasting a program of the same PTY code as you have selected that station is tuned in PTY code NEWS INFORM information SPORTS TALK ROCK CLS ROCK cl...

Страница 10: ...o Timer will not activate for the following cases The unit is turned off OFF is selected for AM in SRC SELECT after Radio Timer for AM is selected 4 SSM SSM 01 06 SSM 07 12 SSM 13 18 Automatically presets up to 18 stations for FM SSM stops flashing when the first 6 stations are stored Select SSM 07 12 SSM 13 18 to store the following 12 stations IF BAND AUTO Increases the tuner selectivity to redu...

Страница 11: ...eate a new station 1 Press MENU 2 Turn the volume knob to select NEW STATION then press the knob 3 Turn the volume knob to select FROM TRACK or FROM ARTIST then press the knob A new station is created based on the current song or artist Search for a registered station 1 Press MENU 2 Turn the volume knob to make a selection then press the knob BY DATE According to the registered date A Z Alphabetic...

Страница 12: ...or custom station Press T or press I on RM RK52 Create a new custom station Press and hold the volume knob Add to favorite stations for live station Press and hold 3 Scan for live station Press 3 Search for a station 1 Press MENU 2 Turn the volume knob to select a category then press the knob 3 Turn the volume knob to the desired station then press the knob When a city list appears you can skip ci...

Страница 13: ... passkey randomly generated during each pairing Ensure that the passkey which appears on the unit and Bluetooth device is the same Press the volume knob to confirm the passkey Operate the Bluetooth device to confirm the passkey B Device Name VOL YES BACK NO Press the volume knob to start pairing If PAIRING PIN 0000 scrolls on the display enter the PIN code 0000 into the Bluetooth device You can ch...

Страница 14: ...tooth device and the unit Make sure there is no Bluetooth device connected 1 Press and hold BLUETOOTH CHECK MODE appears SEARCH NOW USING PHONE PIN IS 0000 scrolls on the display 2 Search and select JVC UNIT on the Bluetooth device within 3 minutes 3 Perform A B or C depending on what appears on the display A PAIRING XXXXXX 6 digit passkey Ensure that the same passkey appears on the unit and Bluet...

Страница 15: ... unit rings and RCV MESSAGE appears You cannot read edit or send a message through the unit To clear the message press any button Default XX MIC LEVEL 20 08 0 The sensitivity of the microphone increases as the number increased NOISE RDCT 05 20 10 Adjust the noise reduction level until the least noise is being heard during a phone conversation ECHO CANCEL 1 10 4 Adjust the echo cancellation delay t...

Страница 16: ...n press the knob 3 Turn the volume knob to select a contact or enter a phone number If a contact is selected press the volume knob to show the phone number 4 Press and hold one of the number buttons 1 to 6 MEMORY P selected preset number appears when the contact is stored To erase a contact from the preset memory select DIAL NUMBER in step 2 and store a blank number BLUETOOTH Make a call from memo...

Страница 17: ...ancels INFORMATION MY BT NAME Displays the unit name JVC UNIT MY ADDRESS Shows address of this unit 1 JVC Smart Music Control is designed to view JVC car receiver status and perform simple control operations on Android smart phones For JVC Smart Music Control operations visit JVC website http www jvc net cs car 2 Selectable only when the connected phone supports OPP Internet radio via Bluetooth Li...

Страница 18: ... and hold MENU 2 Turn the volume knob to make a selection 17 then press the knob Repeat step 2 until the desired item is selected 3 Press MENU to exit To return to the previous setting item or hierarchy press G PTY Bluetooth audio player Operations and display indications may differ according to their availability on the connected device To Do this Playback 1 Press B SOURCE to select BT AUDIO 2 Op...

Страница 19: ...GH 120Hz Audio signals with frequencies lower than 55 Hz 85 Hz 120 Hz are sent to the subwoofer FADER 3 4 R06 F06 00 Adjusts the front and rear speaker output balance BALANCE 3 L06 R06 00 Adjusts the left and right speaker output balance VOL ADJUST 05 05 00 Presets the volume adjustment level of each source compared to the FM volume level Before adjustment select the source you want to adjust VOL ...

Страница 20: ...R GUIDE ON Changes the button display and USB input terminal illumination when settings are performed on menu and list search Display zone will automatically change depending on volume level OFF Cancels NIGHT COLOR or DAY COLOR is changed by turning on or off your car s headlight 1 Press and hold MENU 2 Turn the volume knob to make a selection see the following table then press the knob Repeat ste...

Страница 21: ...ize a total of 20 480 files 999 folders 999 files per folder including folder without unsupported files and of 8 hierarchies This unit cannot recognize a USB device whose rating is other than 5 V and exceeds 1 A About iPod iPhone Made for iPod touch 1st 2nd 3rd 4th and 5th generation iPod classic iPod nano 3rd 4th 5th 6th and 7th generation iPhone iPhone 3G 3GS 4 4S 5 It is not possible to browse ...

Страница 22: ...ith this unit and ensure the files are in supported formats 19 Reattach the device About JVC Playlist Creator and JVC Music Control This unit supports the PC application JVC Playlist Creator and AndroidTM application JVC Music Control When you play audio file with song data added using the JVC Playlist Creator or JVC Music Control you can search for audio file by Genres Artists Albums Playlists an...

Страница 23: ...tion is impossible Symptom Remedy iHeartRadio UPDATE APP Make sure you have installed the latest version of the iHeart Link for JVC application on your device PLS LOGIN You haven t log in Log in again STATION NOT AVAILABLE Broadcast from the station is over STATION NOT SELECTED No station is selected STREAM ERR Broadcast data is interrupted THUMBS ERR Registration of Thumbs Up Down has failed TIME...

Страница 24: ...ture ERROR appears Try the operation again If ERROR appears again check if the device supports the function you have tried The unit does not respond when you try to copy the phonebook to the unit You may have tried to copy the same entries as stored to the unit Press DISP or G PTY to exit Sound is being interrupted or skipped during playback of a Bluetooth audio player Reduce the distance between ...

Страница 25: ... Line of sight approx 10 m 32 8 ft Profile HFP1 5 Hands Free Profile A2DP Advanced Audio Distribution Profile AVRCP1 3 Audio Video Remote Control Profile OPP Object Push Profile PBAP Phonebook Access Profile SPP Serial Port Profile Audio Maximum Output Power 50 W 4 Full Bandwidth Power at less than 1 THD 22 W 4 Speaker Impedance 4 Ω 8 Ω Preout Level Load CD 2 500 mV 10 kΩ load full scale Preout Im...

Страница 26: ... an angle of less than 30º If your vehicle wiring harness does not have the ignition terminal connect Ignition wire red to the terminal on the vehicle s fuse box which provides 12 V DC power supply and is turned on and off by the ignition key After the unit is installed check whether the brake lamps blinkers wipers etc on the car are working properly If the fuse blows first make sure the wires are...

Страница 27: ...Wiring connection Signal cord not supplied Remote wire not supplied To the steering wheel remote control adapter Fuse 10 A Microphone input jack 11 Antenna terminal Front output Rear subwoofer output JVC Amplifier Factory wiring harness vehicle Vehicle dashboard Black Ground Yellow Battery 12 V White Front speaker left White black Gray Front speaker right Gray black Green Rear speaker left Green b...

Страница 28: ...erse a una fuente de calor excesiva como luz solar fuego o similar Mantenga la batería fuera del alcance de los niños y en su estuche original cuando no esté en uso Deseche las baterías utilizadas de forma rápida En caso de tragarse póngase con un médico inmediatamente ANTES DEL USO 2 PUNTOS BÁSICOS 3 PROCEDIMIENTOS INICIALES 4 CD USB iPod 5 RADIO 7 AUX 8 Pandora 9 iHeartRadio 10 BLUETOOTH 11 AJUS...

Страница 29: ...lse B SOURCE repetidamente Pulse B SOURCE y a continuación gire la rueda de volumen antes de que transcurran 2 segundos Pulse SOURCE repetidamente Cambiar la información en pantalla Pulse DISP repetidamente 20 Pulse y mantenga pulsado para desplazar la información en pantalla no disponible PUNTOS BÁSICOS Cómo reinicializar También se borrarán los ajustes preestablecidos por usted Rueda de volumen ...

Страница 30: ...a y luego púlsela 3 Pulse MENU para salir Para volver al elemento de ajuste o la jerarquía anterior pulse G PTY Predeterminado XX CLOCK CLOCK ADJ AUTO ElrelojseajustaautomáticamenteensincronizaciónconlosdatosdeCT horadel reloj delaseñaldelFMRadioBroadcastDataSystem OFF Secancela CLOCK DISP ON Lahoradelrelojsiempresevisualizaenlapantallacuandolaunidadestáapagada OFF Secancela SETTINGS BEEP ON Activ...

Страница 31: ... WMA WAV o archivo JPC JMC FOLDER RND ALL RND RND OFF iPod SONG RND ALL RND RND OFF 1 No deje el cable dentro del vehículo cuando no lo esté utilizando 2 Aún podrá continuar controlando la reproducción pausa salto de archivos avance rápido o retroceso de archivos desde la unidad 3 Sólo para archivos MP3 WMA WAV Esto no funciona para iPod 4 Para iPod Aplicable en HEAD MODE solamente Inicie la repro...

Страница 32: ...rminal de entrada USB puede seleccionar su memoria interna o externa tal como una tarjeta SD para reproducir las canciones guardadas También es posible seleccionar la unidad de reproducción que desee cuando se conecta un dispositivo de múltiples unidades Presione repetidamente el botón numérico 5 iPod MODE para seleccionar la unidad que desee o 1 Pulse y mantenga pulsado MENU 2 Gire la rueda de vo...

Страница 33: ...rueda de volumen para seleccionar un número de preajuste y púlsela para confirmar Búsqueda de su programa favorito Búsqueda PTY Disponible solamente para la fuente FM 1 Pulse y mantenga pulsado G PTY 2 Gire la rueda de volumen para seleccionar un código PTY y a continuación púlsela para in iniciar la búsqueda Si hay una emisora que esta difundiendo un programa que tenga el mismo código PTY que el ...

Страница 34: ...na ONCE o WEEKLY enelpaso1 Eltemporizadordelaradionoseactivaráenlossiguientescasos Launidadestáapagada Sehaseleccionado OFF para AM en SRC SELECT despuésdehaberseleccionado AMparaeltemporizadordelaradio 4 SSM SSM 01 06 SSM 07 12 SSM 13 18 Memorizaautomáticamentehasta 18emisorasdeFM SSM dejadeparpadearcuandosememorizanlasprimeras6emisoras SeleccioneSSM 07 12 SSM 13 18paraalmacenarlas12emisorassigui...

Страница 35: ... Crear una emisora nueva 1 Pulse MENU 2 Gire la rueda de volumen para seleccionar NEW STATION y luego púlsela 3 Gire la rueda de volumen para seleccionar FROM TRACK o FROM ARTIST y luego púlsela Una nueva emisora se crea en base a la canción o al artista actual Buscar una emisora registrada 1 Pulse MENU 2 Gire la rueda de volumen para seleccionar y luego púlsela BY DATE Según la fecha de registro ...

Страница 36: ...ulse T o pulse I en el RM RK52 Crear una emisora nueva personalizada Pulse y mantenga pulsada la rueda de volumen Agregar emisoras favoritas para emisoras en vivo Pulse y mantenga pulsado 3 Buscar una emisora en vivo Pulse 3 Búsqueda de una emisora 1 Pulse MENU 2 Gire la rueda de volumen para seleccionar una categoría y luego púlsela 3 Gire la rueda de volumen a la emisora deseada y luego pulse la...

Страница 37: ...ue se genera aleatoriamente durante cada emparejamiento Asegúrese de que la clave que aparece en la unidad coincida con la que aparece en el dispositivo Bluetooth Pulse la rueda de volumen para confirmar la clave Opere el dispositivo Bluetooth para confirmar la clave B Nombre del dispositivo VOL YES BACK NO Pulse la rueda de volumen para iniciar el emparejamiento Si PAIRING PIN 0000 aparece en la ...

Страница 38: ...etooth conectado 1 Pulse y mantenga pulsado Aparece BLUETOOTH CHECK MODE SEARCH NOW USING PHONE PIN IS 0000 se desplazan en la pantalla 2 Busque y seleccione JVC UNIT en el dispositivo Bluetooth en el lapso de 3 minutos 3 Realice A B o C dependiendo de los datos mostrados en la pantalla A PAIRING XXXXXX Clave de paso de 6 dígitos Asegúrese de que la clave de paso que aparece en la unidad coincida ...

Страница 39: ...ede leer editar ni enviar mensajes a través de la unidad Para borrar el mensaje pulse cualquier botón Predeterminado XX MIC LEVEL 20 08 0 Lasensibilidaddelmicrófonoaumentaamedidaqueaumentael número NOISE RDCT 05 20 10 Ajusteelniveldereducciónderuidohastaqueelruidoqueseescucha duranteunaconversacióntelefónicaseamínimo ECHO CANCEL 1 10 4 Ajusteeltiempoderetardodecancelacióndeecohastaqueelecoqueescuc...

Страница 40: ...ER y luego púlsela 3 Gire la rueda de volumen para seleccionar un contacto o ingrese un número de teléfono Si se ha seleccionado un contacto pulse la rueda de volumen para que aparezca el número de teléfono 4 Pulse y mantenga pulsado uno de los botones numéricos 1 a 6 Aparece MEMORY P número de preajuste seleccionado cuando se guarda el contacto Para borrar un contacto de la memoria preajustada se...

Страница 41: ...DRESS Muestraladireccióndelaunidad 1 JVC Smart Music Control ha sido diseñada para ver el estado del receptor para automóvil JVC y realizar operaciones de control simples en los teléfonos inteligentes que ejecutan Android Si desea conocer las operaciones de JVC Smart Music Control visite el sitio web de JVC http www jvc net cs car 2 Puede seleccionarse solamente cuando el teléfono conectado es com...

Страница 42: ...e volumen para seleccionar 17 y luego púlsela Repita el paso 2 hasta que se seleccione el elemento que desee 3 Pulse MENU para salir Para volver al elemento de ajuste o la jerarquía anterior pulse G PTY Reproductor de audio Bluetooth Las operaciones y las indicaciones en pantalla difieren según su disponibilidad en el dispositivo conectado Para Hacer esto Reproducción 1 Pulse B SOURCE para selecci...

Страница 43: ... LOW55Hz MID85Hz HIGH 120Hz Lasseñalesdeaudioconfrecuenciasinferioresa 55Hz 85Hz 120Hzseenvíanalsubwoofer FADER 3 4 R06 F06 00 Ajustaelbalancedesalidadelosaltavocesdelanterosy traseros BALANCE 3 L06 R06 00 Ajustaelbalancedesalidadelosaltavocesizquierdoy derecho VOL ADJUST 05 05 00 Preajustaelniveldeajustedevolumendecadafuente al compararseconelniveldevolumendeFM Antesdelajuste seleccionelafuente q...

Страница 44: ...losbotones lapantallaydelterminaldeentradaUSB cuandoserealizanajustesenelmenúylabúsquedadelista Lazonadevisualización cambiaautomáticamentesegúnelniveldevolumen OFF Secancela NIGHT COLOR o DAY COLOR cambian al encender o apagar los faros de su vehículo 1 Pulse y mantenga pulsado MENU 2 Gire la rueda de volumen para seleccionar consulte la siguiente tabla y luego púlsela Repita el paso 2 hasta que ...

Страница 45: ...Estaunidadpuedereconoceruntotalde20480archivos 999carpetas 999archivosporcarpetaincluyendocarpetasinarchivosnocompatibles y8jerarquías EstaunidadnopuedereconocerningúndispositivoUSBcuyorégimensea distintode5Vyqueexcedade1A Acerca del iPod iPhone Madefor iPodtouch 1st 2nd 3rd 4thy5thgeneration iPodclassic iPodnano 3rd 4th 5th 6thy7thgeneration iPhone iPhone3G 3GS 4 4S 5 Nosepuedenavegaratravésdearc...

Страница 46: ...resedequelosarchivosesténenformatoscompatibles 19 Vuelvaaconectareldispositivo Acerca de JVC Playlist Creator y JVC Music Control EstaunidadescompatibleconlaaplicaciónparaPCJVCPlaylistCreatorylaaplicaciónAndroidTM JVCMusicControl CuandoreproduceaudiocondatosdecancionesañadidosmedianteJVCPlaylistCreatoroJVCMusicControl puede buscararchivosdeaudioporgénero artista álbum listadeproducciónocanción JVC...

Страница 47: ...ma Solución iHeartRadio UPDATEAPP Asegúresedehaberinstaladoensudispositivo laúltimaversióndela aplicacióniHeartLinkforJVC PLSLOGIN Noseiniciósesión Iniciesesiónotravez STATIONNOTAVAILABLE Finalizóladifusióndelaemisora STATIONNOTSELECTED Nohayningunaemisoraseleccionada STREAMERR Sehainterrumpidoladifusióndedatos THUMBSERR Elregistroconelpulgararriba abajohafracasado TIMEDOUT Haexpiradoeltiempodelas...

Страница 48: ...Sivuelveaaparecer ERROR verifiquesiel dispositivoescompatibleconlafunciónqueestáintentandoutilizar Launidadnorespondecuando seintentacopiareldirectorio telefónicoalaunidad Esposiblequehayaintentadocopiarlasmismasentradas quelas almacenadas alaunidad PulseDISPoG PTYparasalir Elsonidoseinterrumpeose omitedurantelareproducción deunreproductordeaudio Bluetooth Reduzcaladistanciaentrelaunidadyelreprodu...

Страница 49: ...nte10m 32 8pies Perfil HFP1 5 Perfilmanoslibres A2DP PerfilAvanzadodeDistribucióndeAudio AVRCP1 3 PerfildeControlRemotodeAudio Video OPP Perfildecargadeobjetos PBAP Perfildeaccesoalaguíatelefónica SPP Perfildelpuertoenserie Audio Potenciadesalidamáxima 50W 4 Potenciaentodoelanchodebanda amenosdel1 THD 22W 4 Impedanciadelaltavoz 4Ω 8Ω Niveldesalidadepreamplificador carga CD 2500mV 10kΩdecarga plena...

Страница 50: ...endido conecteel cabledeencendido rojo alterminaldelacajadefusiblesdelvehículo elcualsuministrará unaalimentaciónde12VCCypodráconectarseydesconectarsemediantelallavede encendido Despuésdeinstalarlaunidad compruebequelaslámparasdefreno lasluces intermitentes ellimpiaparabrisas etc funcionensatisfactoriamente Sisefundeelfusible enprimerlugarasegúresedequeloscablesnoesténencontacto conelchasisdelvehí...

Страница 51: ...Cabledeseñal nosuministrado Cableremoto nosuministrado Aladaptadordel mandoadistancia delvolantedela dirección Fusible 10A Jackdeentradademicrófono 11 Terminaldelaantena Salidadelantera Salidaposterior subwoofer Amplificador deJVC Mazodecablesde fábrica vehículo Salpicaderodelvehículo Negro Tierra Amarillo Bateríade12V Blanco Altavozdelantero izquierdo Blanco negro Gris Altavozdelantero derecho Gr...

Страница 52: ...tier de la pile ou les piles ne doivent pas être exposés à des chaleurs excessives telles que les rayons du soleil du feu etc Gardez la pile hors de la portée des enfants et dans son emballage d origine quand elle n est pas utilisée Débarrassez vous des piles usagées rapidement En cas d ingestion contactez un médecin immédiatement AVANT L UTILISATION 2 FONCTIONNEMENT DE BASE 3 PRISE EN MAIN 4 CD U...

Страница 53: ...rce Appuyez répétitivement sur B SOURCE Appuyez sur B SOURCE puis tournez le bouton de volume avant 2 secondes Appuyez répétitivement sur SOURCE Changez l information sur l affichage Appuyez répétitivement sur DISP 20 Maintenez la touche enfoncée pour faire défiler les informations actuelles de l affichage non disponible FONCTIONNEMENT DE BASE Comment réinitialiser Vos ajustements préréglés sont a...

Страница 54: ... appuyez sur le bouton 3 Appuyez sur MENU pour quitter Pour retourner à l option de réglage ou à la hierarchie précédente appuyez sur G PTY Défaut XX CLOCK CLOCK ADJ AUTO L horlogeestrégléeautomatiquementàl aidedesdonnéesd horloge CT comprises danslesdonnéesdusignalFMRadioBroadcastDataSystem OFF Annulation CLOCK DISP ON L horlogeapparaîtsurl affichagemêmequandl appareilesthorstension OFF Annulatio...

Страница 55: ...ier JPC JMC FOLDER RND ALL RND RND OFF iPod SONG RND ALL RND RND OFF 1 Ne laissez pas le câble à l intérieur de la voiture quand il n est pas utilisé 2 Vous pouvez toujours faire une lecture pause sauter des fichiers et faire une recherche rapide de fichiers vers l arrière vers l avant à partir de l appareil 3 Uniquement pour les fichiers MP3 WMA WAV Cela ne fonctionne pas pour l iPod 4 Pour iPod ...

Страница 56: ...hérique à mémoire de grande capacité est connecté à la prise d entrée USB vous pouvez sélectionnez sa mémoire interne ou sa mémoire externe une carte SD par exemple pour lire les morceaux mémorisés Vous pouvez aussi choisir le lecteur que vous souhaitez quand plusieurs lecteurs sont connectés Appuyez répétitivement sur la touche numérique 5 iPod MODE pour choisir le lecteur souhaité ou 1 Maintenez...

Страница 57: ...on de volume pour choisir un numéro préréglé puis appuyez sur le bouton pour valider Recherche de votre programme préféré recherche PTY Disponible uniquement pour la source FM 1 Maintenez enfoncée G PTY 2 Tournez le bouton de volume pour sélectionner un code PTY puis appuyez sur la bouton pour démarrer la recherche S il y a une station diffusant un programme du code PTY que vous avez choisi la sta...

Страница 58: ...onnableuniquementquand ONCE ou WEEKLY estchoisiàl étape1 Laminuteriederadionesemetpasenservicedanslescassuivants L appareilestmishorstension OFF estsélectionnépour AM dans SRC SELECT aprèslasélectiondelaminuterie deradiopourAM 4 SSM SSM 01 06 SSM 07 12 SSM 13 18 Prérègleautomatiquementun maximumde18stationspourFM SSM s arrêtedeclignoterquandles6premièresstations sontmémorisées SélectionnezSSM 07 1...

Страница 59: ...z une nouvelle station 1 Appuyez sur MENU 2 Tournez le bouton de volume pour choisir NEW STATION puis appuyez sur le bouton 3 Tournez le bouton de volume pour choisir FROM TRACK ou FROM ARTIST puis appuyez sur le bouton Une nouvelle station est créée sur la base du morceau ou de l artiste actuel Recherchez une station mémorisée 1 Appuyez sur MENU 2 Tournez le bouton de volume pour faire une sélect...

Страница 60: ...yez sur T ou appuyez sur I sur la RM RK52 Crée une nouvelle station station personnalisée Maintenez enfoncé le bouton de volume Ajoute la station actuelle aux stations préférées Maintenez enfoncée 3 Recherche d une station en direct Appuyez sur 3 Recherchez une station 1 Appuyez sur MENU 2 Tournez le bouton de volume pour choisir une catégorie puis appuyez sur le bouton 3 Tournez le bouton de volu...

Страница 61: ...ement pendant chaque pairage Assurez vous que le code qui apparaît sur l appareil et le périphérique Bluetooth est le même Appuyez sur le bouton de volume pour valider le code Utilisez le périphérique Bluetooth pour valider le code B Nom du périphérique VOL YES BACK NO Appuyez sur le bouton de volume pour démarrer le pairage Si PAIRING PIN 0000 défile sur l affichage entrez le code PIN 0000 sur le...

Страница 62: ...que Bluetooth et l appareil Assurez vous que le périphérique Bluetooth est connecté 1 Maintenez enfoncée BLUETOOTH CHECK MODE apparaît SEARCH NOW USING PHONE PIN IS 0000 défile sur l affichage 2 Cherchez et sélectionnez JVC UNIT sur le périphérique Bluetooth avant 3 minutes 3 Réalisez A B ou C en fonction de ce qui apparait sur l affichage A PAIRING XXXXXX code de 6 chiffres Assurez vous que le mê...

Страница 63: ...n message via cet appareil Pour annuler le message appuyez sur n importe quelle touche Défaut XX MIC LEVEL 20 08 0 Lasensibilitédumicrophoneaugmentequandlenuméroaugmente NOISE RDCT 05 20 10 Ajustezleniveauderéductiondebruitjusqu àcequ unminimumde bruitsoitentendupendantuneconversationtéléphonique ECHO CANCEL 1 10 4 Ajustezletempsderetardd annulationdel échojusqu àcequeledernierécho estentendupenda...

Страница 64: ...ctionner un contact ou entrez un numéro de téléphone Si un contact est sélectionné appuyez sur le bouton de volume pour afficher le numéro de téléphone 4 Maintenez pressée une des touches numériques 1 à 6 MEMORY P numéro préréglé sélectionné apparaît quand les contacts sont mémorisés Pour supprimer un contact de la mémoire préréglée choisissez DIAL NUMBER à l étape 2 et mémorisé un numéro vide BLU...

Страница 65: ...BTNAME Affichelenomdel appareil JVCUNIT MYADDRESS Affichel adresse decetappareil 1 JVC Smart Music Control est conçu pour voir l état de l autoradio JVC et réaliser des commandes simple à partir de smartphones Android Pour JVC Smart Music Control consultez le site Web JVC http www jvc net cs car 2 Peut être sélectionné uniquement quand le téléphone connecté prend en charge OPP Internet radio via B...

Страница 66: ...yez sur le bouton Répétez l étape 2 jusqu à ce que l élément souhaité soit sélectionné 3 Appuyez sur MENU pour quitter Pour retourner à l option de réglage ou à la hierarchie précédente appuyez sur G PTY Lecteur audio Bluetooth Les opérations et les indications de l affichage peuvent différer en fonction de leur disponibilité sur le périphérique connecté Pour Faire Lecture 1 Appuyez sur B SOURCE p...

Страница 67: ...auxaudioavecdesfréquencesinférieuresà55Hz 85Hz 120Hzsontenvoyéssurlecaissondegrave FADER 3 4 R06 F06 00 Règlelabalancedesortiedesenceintesavantetarrière BALANCE 3 L06 R06 00 Règlelabalancedesortiedesenceintesgaucheetdroite VOL ADJUST 05 05 00 Prérègleleniveaud ajustementduvolumedechaquesource encomparaisonavecleniveaudevolumeFM Avantunajustement choisissezlasourceque voussouhaitezajuster VOLADJFIX...

Страница 68: ...hageetdelaprised entréeUSBquandles réglagessontréaliséssurlemenuetlarecherchedeliste Lazoned affichagechange automatiquementenfonctionniveaudevolume OFF Annulation NIGHT COLOR ou DAY COLOR est changé quand vous allumez ou éteignez les feux de la voiture 1 Maintenez enfoncée MENU 2 Tournez le bouton de volume pour réaliser une sélection voir le tableau suivant puis appuyez sur le bouton Répétez l é...

Страница 69: ...etappareilpeutreconnaîtreunmaximumde20480fichiers 999dossiers 999fichierspardossierycomprislesdossierssansfichier et8hiérarchies CetappareilnepeutpasreconnaîtrelespériphériquesUSBdont l alimentationn estpasde5Vetdépasse1A À propos de l iPod iPhone Madefor iPodtouch 1st 2nd 3rd 4thet5thgeneration iPodclassic iPodnano 3rd 4th 5th 6thet7thgeneration iPhone iPhone3G 3GS 4 4S 5 Iln estpaspossibledeparc...

Страница 70: ...ntdansunformatcompatible 19 Reconnectezlepériphérique À propos de JVC Playlist Creator et de JVC Music Control Cetappareilprendenchargel applicationPCJVCPlaylistCreatoretl applicationAndroidTM JVCMusicControl QuandvousreproduisezunfichieraudioavecdesdonnéesdechansonajoutéeenutilisantJVCPlaylistCreatorou JVCMusicControl vouspouvezrechercherdesfichiersaudiopargenre artiste album listedelectureetchan...

Страница 71: ...tRadio UPDATEAPP Assurez vousquevousavezbieninstalléladernièreversionde l applicationiHeartLinkforJVCsurvotreappareil PLSLOGIN Vousn êtespasconnecté Connectez vousdenouveau STATIONNOTAVAILABLE Ladiffusiondelastationestterminée STATIONNOTSELECTED Aucunestationn estsélectionnée STREAMERR Ladiffusiondesdonnéesestinterrompue THUMBSERR L enregistrementdudéfilementverslehaut verslebasaéchoué TIMEDOUT Le...

Страница 72: ...nouveau vérifiezsil appareilextérieurprendenchargelafonctionquevous avezessayée L appareilnerépondpasquand vousessayezdecopierle répertoired adresse Vousavezpeut êtreessayédecopierlesmêmesentrées déjà mémorisées surl appareil AppuyezsurDISPouG PTY pourquitter Lesonestinterrompuousaute pendantlalectured unlecteur audioBluetooth RéduisezladistanceentrecetappareiletlelecteuraudioBluetooth Mettezcetap...

Страница 73: ...stributionProfile Profilede distributionaudioavancé AVRCP1 3 Audio VideoRemoteControlProfile Profilede télécommandeaudio vidéo OPP ObjectPushProfile Profiledepousséed objet PBAP PhonebookAccessProfile Profiled accèsau répertoired adresses SPP SerialPortProfile Profiledeportsérie Audio Puissancedesortiemaximum 50W 4 PleinePuissancedeLargeurdeBande avecmoinsde1 DHT 22W 4 Impédanced enceinte 4Ω 8Ω Ni...

Страница 74: ...de30 Silefaisceaudefilsdevotrevéhiculenepossèdepasdeborned allumage connectez lefild allumage rouge àlaborneduboîtierdefusibledevotrevéhiculequioffreune alimentationde12VCCetquisemetenethorsserviceaveclaclédecontact Aprèsavoirinstallél appareil vérifiezsileslampesdefrein lesindicateurs lesclignotants etc delavoiturefonctionnentcorrectement Siunfusiblesaute assurez vousd abordquelescâblesnetouchesp...

Страница 75: ...ons Cordondesignal nonfournie Fildetélécommande nonfournie Àl adaptateurde télécommande volant Fusible 10A Prised entréedumicrophone 11 Bornedel antenne Sortieavant Sortiearrière caissondegrave JVCAmplificateur Faisceaudecâblesde l usine véhicule Tableaudebordduvéhicule Noir Masse Jaune Batterie12V Blanc Enceinteavant gauche Blanc noir Gris Enceinteavant droit Gris noir Vert Enceintearrière gauche...

Страница 76: ...ne may affect wireless performance iPhone iPod iPod classic iPod nano and iPod touch are trademarks of Apple Inc registered in the U S and other countries Lightning is a trademark of Apple Inc Android is trademark of Google Inc Pandora the Pandora logo and the Pandora trade dress are trademarks or registered trademarks of Pandora Media Inc used with permission iHeartRadio is a registered mark of C...

Отзывы: