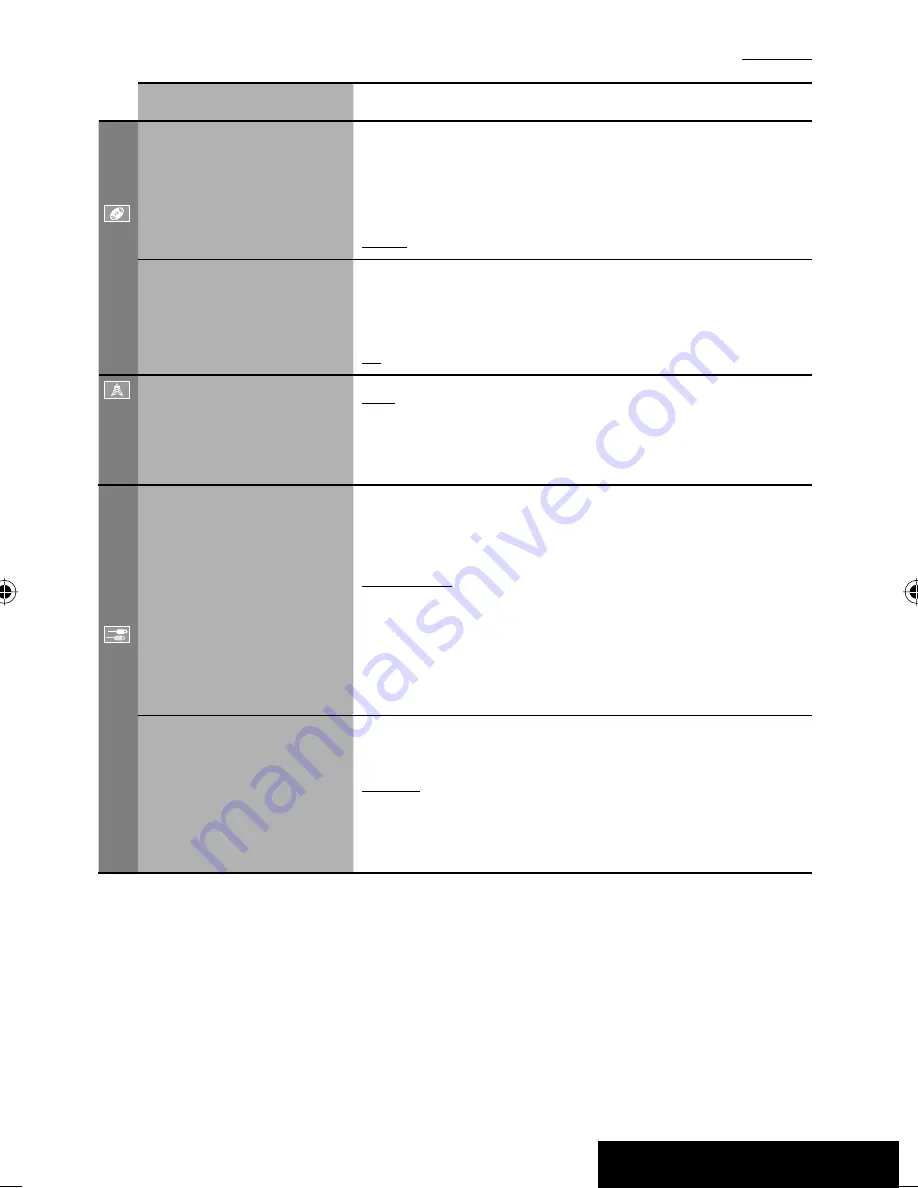
JVC KW-ADV790 Скачать руководство пользователя страница 645

SETTINGS

47

Menu items

Selectable settings, [reference page]

Disc

Down Mix*

1

When playing back a multi-channel disc, this setting affects the signals 
reproduced through the LINE OUT terminals.

Dolby SR

 : Select this to enjoy multi-channel surround audio by 

connecting an amplifier compatible with Dolby Surround.

Stereo

 : Normally select this.

D. (Dynamic) Range 
Compres. (Compression)*

1

You can enjoy a powerful sound at a low volume level while playing 
Dolby Digital software.

Auto

: Select to apply the effect to multi-channel encoded software.

On

: Select to always use this function.

Tuner

IF Band Width

Auto

: Increases the tuner selectivity to reduce interference noises 

between adjacent stations. (Stereo effect may be lost.)

Wide

: Subject to the interference from adjacent stations, but sound 

quality will not be degraded and the stereo effect will remain.

Input

AV Input*

2

You can determine the use of LINE IN and VIDEO IN terminals. 

 [38, 39]

Off

: Select when no component is connected (“AV-IN” is skipped while 

selecting the source).

Audio&Video

: Select when connecting an AV component such as a 

VCR.

Audio

: Select when connecting an audio component such as a portable 

audio player.

Camera

*

3

 : Select when connecting a rear view camera.

Navigation

 : Select when connecting a Navigation System.

External Input*

4

For connecting an external component to the CD changer jack on the 
rear.

Changer/iPod

*

5

: CD changer or iPod. 

 [34, 36]

External

: Any other than the above. 

 [40]

•  For connecting the Bluetooth adapter, this setting is not required. It is 

automatically detected.

*

2

  Not selectable when “AV-IN” is selected as the source.

*

3

  The REVERSE GEAR SIGNAL lead connection is required. See Installation/Connection Manual. The rear view through 

the camera appears on the screen in <Full> aspect ratio (regardless of the aspect ratio setting) when you shift the 
gear to the reverse (R) position. When you press DISP on the control panel, or when you shift the gear to another 
position other than the reverse (R) position, the rear view screen is cleared.

*

4

  Not selectable when the component connected to the CD changer jack is selected as the source.

*

5

  The name of the component detected through the CD changer jack is shown.

Initial:


Underlined

EN_KW-AVX714[UI].indb   47

EN_KW-AVX714[UI].indb   47

08.1.16   2:38:23 PM

08.1.16   2:38:23 PM

Содержание KW-ADV790

Страница 1: ...the display demonstration see page 8 Para cancelar la demonstración en pantalla consulte la página 8 Pour annuler la démonstration des affichages référez vous à la page 8 KW ADV790 DVD RECEIVER WITH MONITOR KW AVX710 For customer Use Enter below the Model No and Serial No which are located on the top or bottom of the cabinet Retain this information for future reference Model No Serial No KW ADV790...

Страница 2: ...mits for a Class B digital device pursuant to Part 15 of the FCC Rules These limits are designed to provide reasonable protection against harmful interference in a residential installation This equipment generates uses and can radiate radio frequency energy and if not installed and used in accordance with the instructions may cause harmful interference to radio communications However there is no g...

Страница 3: ...Monitor panel touch panel 5 Basic operations Remote controller RM RK252 6 OPERATIONS Before operating the unit 8 Common operations 9 Listening to the radio 10 Disc operations 13 EXTERNAL DEVICES Bluetooth operations Cellular phone audio player 27 Listening to the CD changer 34 Listening to the satellite radio 36 ListeningtotheHDRadio Broadcast 39 Listening to the iPod 40 Using other external compo...

Страница 4: ... I Ready CD Recordable Rewritable CD R RW ISO 9660 level 1 level 2 Romeo Joliet CD DA MP3 WMA WAV JPEG DivX MPEG1 MPEG2 AAC MPEG4 1 IfyouinsertaDVDVideodiscofanincorrectRegionCode Regioncodeerror appearsonthescreen 2 DVD Rrecordedinmulti borderformatisalsoplayable exceptforduallayerdiscs DVD RWduallayerdiscsarenotplayable 3 Itispossibletoplaybackfinalized R RW Videoformatonly discs RWdoublelayerdi...

Страница 5: ...ach source operation section Change the display information OPEN Open the monitor panel EJECT Eject the disc CLOSE Close the monitor panel TILT Tilt the monitor panel Exit Erase this screen Shaded icons cannot be used In the explanation buttons on the touch panel are indicated inside For details on the touch panel operations see each source operation section Display Source Menu screen Display AV M...

Страница 6: ...ogram screen 6 Shows the on screen bar Does not function as R03 LR03 AAA Installing the battery Insert the batteries into the remote controller by matching the polarity and correctly Caution Battery shall not be exposed to excessive heat such as sunshine fire or the like If the range or effectiveness of the remote controller decreases replace both batteries Before using the remote controller Aim t...

Страница 7: ...ation directly 1 Functionsasanumberbuttononly seeo 2 Notusedforthisunit 3 FunctionswhenpressedwithSHIFT 7 Functions with other buttons see i and o 8 Changes the display information 9 For disc operations 5 DVD Selects the title DVD VR Selects the program Playlist Other discs except VCD CD Selects the folders 4 Pressbriefly reverse skip forward skip Pressandhold reverse search forward search For FM ...

Страница 8: ...al English indications are used for purpose of explanation You can select the indication language page 49 Turn on the power Ÿ Display AV Menu screen Display Setup menu Cancel the demonstration Select Off Set the clock settings Finish the procedure Beforeoperatingtheunit Moves to the succeeding menu page Moves to the preceding menu page Return to the previous screen ...

Страница 9: ... components you have connected media you have attached and the Input settings you have made page 52 On the touch panel On the monitor panel TUNER or HD Radio SAT DISC DVD VCD CD CD CH iPod or EXT IN Bluetooth PHONE Bluetooth AUDIO AV IN back to the beginning You cannot select these sources if they are not ready Exit Source information screen Clock time in large numbers Navigation screen When Navig...

Страница 10: ... either 4 or until Manual Search appears on the screen then press it repeatedly The ST indicator lights up when receiving an FM stereo broadcast with sufficient signal strength 3 Reception improves but stereo effect will be lost The MONO indicator lights up To restore stereo effect select Off Preset no Band Tuner indicators Assigned station name page 46 If no name is assigned the frequency of the ...

Страница 11: ...ith the strongest signals are searched and stored automatically in the FM band Tuning in to stations with sufficient signal strength This function works only for FM bands Once you have activated this function selected Local it always works when searching for FM stations 1 Press AV MENU You can also use AV MENU on the monitor panel 2 Press Mode 3 Only stations with sufficient signal strength will b...

Страница 12: ... panel To select from the Preset List 1 2 or Hold Manual presetting Ex Storing FM station of 92 5 MHz into preset number 4 of the FM1 band 1 Display the Preset List 2 Tune in to a station you want to preset 3 Select a preset number The station selected in step 2 is now stored in preset number 4 Hold ...

Страница 13: ...he unit cannot accept the operation you have tried to do In some cases without showing operations will not be accepted Label side Caution on volume setting Discs produce very little noise compared with other sources Lower the volume before playing a disc to avoid damaging the speakers by the sudden increase of the output level When playing back a multi channel encoded disc the multi channel signal...

Страница 14: ...ampling frequency Bit rate Recorded signal channel no page 19 3 8 Start and pause playback 7 Stop playback 4 Press Select chapter Hold Reverse forward search 2 5 Select title program playlist 1 DVD VRalsoindicateseitherPRG program orPLAY playlist playback 2 Searchspeed x2 x10 Buttons on the touch panel In the explanation they are indicated inside These buttons also work when they are not shown on ...

Страница 15: ...ct track Hold Reverse forward search for DivX MPEG1 MPEG2 1 5 Press Select folder Hold Display Folder list While playing the following discs press Each time you press the button the display changes to show the different information page 9 Disc type page 19 page 19 The PBC indicator lights up when PBC is in use Total track no included on the disc Total track no included on the disc Total playing ti...

Страница 16: ... when it is recorded Sound mode page 45 page 19 3 8 Start and pause playback 7 Stop playback 4 Press Select track Hold Reverse forward search 4 5 Press Select folder Hold Display Folder list 3 8 Start and pause playback 7 Stop playback 4 Press Select track Hold Reverse forward search 4 Total track no included on the disc Total playing time Total track no included on the disc Sound mode page 45 ...

Страница 17: ...top playback 4 Press Select track Hold Reverse forward search 5 Select folders The above buttons also work when they are not shown on the screen while watching the playback picture WhileadiscmenuisplayedbackforDVD KEY is automaticallydisplayed Onthediscmenu you canselecta menuitemdirectlybytouchingitonthescreen B For DVD VCD DivX menu operation playback 235 Select the menu items ENT Confirm the se...

Страница 18: ... program not available for Playlist playback Track Repeats current track Folder Repeats current folder Folder Randomly plays all tracks of current folder then tracks of next folders Disc All Randomly plays all tracks Folder Repeats current folder Track Repeats current track PBC not in use Disc All Randomly plays all tracks PBC not in use Track Repeats current track 1 Disc All Randomly plays all tr...

Страница 19: ...rs you can display the Folder Track File Lists then start playback 1 You can also use AV MENU on the monitor panel 2 3 Select a folder 1 then a track 2 Selected track starts playing Press to move to the previous next pages of the list 1 Current folder list number total folder list number 2 Current track list number total track list number of the current folder You can easily access the Track List ...

Страница 20: ...lect chapter Select title when not playing Select title during playback or pause Using menu driven features 1 2 Select an item you want to start playback 3 1 Searchspeed x2 x5 x10 x20 x60 2 Slowmotionspeed 1 32 1 16 1 8 1 4 1 2 3 Searchspeed x2 x10 Operations using the remote controller RM RK252 Also functions as CLR clear Erases a misentry if pressed while holding SHIFT You can change the followi...

Страница 21: ... or pause Hold Reverse forward search 6 Select program Select playlist during playback or pause Select aspect ratio Select chapter Select program when not playing Select program playlist during playback or pause Using Original Program Playlist screens page 25 1 For Original Program For Playlist 2 Select an item you want to start playback 3 To erase the screen 4 Searchspeed x2 x5 x10 x20 x60 5 Slow...

Страница 22: ...ect track Hold Reverse forward search 2 No sound can be heard Select folder Select aspect ratio Select track within the same folder Select folder While playing Reverse advance the scenes by five minutes For DivX6 Using menu driven features 1 2 Select an item you want to start playback 3 1 Searchspeed 1 2 3 2 Searchspeed 1 2 Current playback position twice 2nd press 2nd press 1st press 1st press 3r...

Страница 23: ... the menu To return to the previous menu press To cancel PBC playback 1 2 Select the desired track To resume PBC press Stop playback Start playback pause if pressed during playback Reverse forward search 3 Forward slow motion during pause 4 No sound can be heard Reverse slow motion does not work Press Select track Hold Reverse forward search 5 No sound can be heard Select aspect ratio twice 3 Sear...

Страница 24: ... x2 x5 x10 x20 x60 2 Searchspeed x2 x10 Stop playback Start playback pause if pressed during playback Reverse forward search 3 Press Select track Hold Reverse forward search 4 Select folder Select track within the same folder Select folder 3 Searchspeed x2 x5 x10 x20 x60 4 Searchspeed x2 x10 twice Also functions as CLR clear Erases a misentry if pressed while holding SHIFT ...

Страница 25: ...ist screens You can use Original Program or Playlist screen anytime while playing DVD VR with its data recorded 1 Display the Original Program Playlist screen 2 Select an item you want To erase the screen 1 Original Program Playlist number 2 Recording date 3 Recording source TV station the input terminal of the recording equipment etc 4 Start time of recording 5 Title of the program playlist 6 Hig...

Страница 26: ... play 1 Random play 1 Change the audio language audio stream or audio channel Change or erase the subtitle language Change the view angle 1 page18 2 NotapplicableforDVD VR Above example is of DVD Video Items shown on the bar vary due to the disc type 1 Disc type 2 DVD Audio signal format VCD PBC 3 Playback mode 1 DVD Video C RPT Chapter repeat T RPT Title repeat DVD VR C RPT Chapter repeat PG RPT ...

Страница 27: ...ONE and Bluetooth AUDIO Connecting a new Bluetooth device Registration Pairing methods Use either of the following items in Bluetooth menu to register and establish the connection with a device Select Bluetooth PHONE or Bluetooth AUDIO as the source to operate Bluetooth menu Open Make the unit ready to establish a new Bluetooth connection The connection is established by operating the Bluetooth de...

Страница 28: ... to the unit Refer to the instructions supplied with the device to check the PIN code 6 Operate the Bluetooth device to connect while Connecting is displayed on the screen Now connection is established and you can use the device through the unit To connect a special device Special Device 1 Press AV MENU on the touch panel or AV MENU on the monitor panel 2 Press Bluetooth 3 Press Special Device The...

Страница 29: ...rophone volume page 55 Press SOURCE then press Bluetooth PHONE page 9 You can also use SOURCE on the monitor panel Press it repeatedly Ÿ Press AV MENU You can also use AV MENU on the monitor panel Press Bluetooth Establish the connection with a device then make a call or settings using Bluetooth menu page 55 Sound mode page 45 Status of the device Signal strength Battery remainder only when the in...

Страница 30: ...he name you want to call When a Text Message comes in If the cellular phone is compatible with Text Message you can read the messages on the screen You cannot edit or send a message through the unit When Message Info is set to Auto The unit rings and the following screen is displayed to inform you of a message arrival page 55 To read the message press Yes The source is changed to Bluetooth PHONE T...

Страница 31: ...eset Goes to Preset List You can preset the entered number by selecting a preset number page 32 Dial Calls the entered number You can easily access Dial Menu by pressing SHORT CUT on the touch panel then You can also access Dial Menu by holding SOURCE on the monitor panel You can easily activate Voice Dialing by pressing SHORT CUT on the touch panel then You can also activate Voice Dialing by hold...

Страница 32: ...l Received Calls or Missed Calls 1 Press AV MENU on the touch panel or AV MENU on the monitor panel 2 Press Bluetooth 3 Press Dial Menu then Ex Selecting Received Calls 2 Select a telephone number to store 3 Select a preset number Now Tom is stored into preset no 1 Display Dial Menu screen Answer the incoming call Display the Redial menu if pressed and held regardless of the current source End the...

Страница 33: ... device can be registered 3 Status of the device Signal strength Battery remainder only when the information comes from the device The Bluetooth icon lights up when the adapter is connected Press SOURCE then press Bluetooth AUDIO page 9 You can also use SOURCE on the monitor panel Press it repeatedly Ÿ Start playback Buttons on the touch panel In the explanation they are indicated inside 2 1 1 Whe...

Страница 34: ...aying time Disc no MP3 indicator page 35 Tag data appears only when it is recorded Select a disc to start playing If you select an MP3 disc the Track list of the current folder appears You can select a track and start playing also page 19 If you select a folder on the list you can start playing the first track of the folder To go to the other list Sound mode page 45 4 Press Select track Hold Rever...

Страница 35: ...isc Randomly plays all tracks of the current disc All Randomly plays all tracks of all loaded discs Track Repeats current track Folder Repeats all tracks of the current folder Disc Repeats all tracks of the current disc Folder Randomly plays all tracks of current folder then tracks of next folders Disc Randomly plays all tracks of the current disc All Randomly plays all tracks of all loaded discs ...

Страница 36: ...d in automatically GCI update column below 3 Check your XM Satellite radio ID labelled on the casing of the XMDirectTM Universal Tuner Box or tune in to Channel 0 see page 37 4 Contact XM Satellite radio on the internet at http xmradio com activation to activate your subscription or you can call 1 800 XM RADIO 1 800 967 2346 Once completed the unit tunes in to one of the available channels Channel...

Страница 37: ...ing either button changes the channel rapidly While searching invalid and unsubscribed channels are skipped For XM Radio Press SOURCE then press SAT page 9 Ÿ Press BAND Press 5 or to select a category To select a channel from all categories including non categorised channels skip this step If you do not select a channel within 15 seconds the category selected is canceled You can select a channel f...

Страница 38: ...g preset channels On the remote only 1 2 Selecting on the lists You can select a channel using the lists Category list Channel list 1 Press AV MENU on the touch panel or AV MENU on the monitor panel 2 Press List 3 Select a category 1 then a channel 2 from the selected category Press to move to the previous next pages of the list 1 Current category list number total category list number 2 Current c...

Страница 39: ...eption mode Searching for HD Radio stations only Flashes first then lights up when a digital audio broadcast is tuned in Up and down the HD Radio multicast channels Buttons on the touch panel In the explanation they are indicated inside ListeningtotheHDRadio Broadcast Before operating connect HD Radio tuner box KT HD300 separately purchased to the CD changer jack on the rear of the unit What is HD...

Страница 40: ... Press SOURCE then press iPod page 9 Playback starts automatically You can also use SOURCE on the monitor panel Press it repeatedly Ÿ Press 4 or to select a track Track no Playing time page 41 4 Press Select track Hold Reverse forward search 5 Enter player s menu Start playback pause To resume press again Sound mode page 45 Buttons on the touch panel In the explanation they are indicated inside ...

Страница 41: ...to confirm the selection 4 Repeat steps 2 and 3 to select a track When a track is selected finally playback starts To return to the previous menu press 5 Selecting playback modes 1 You can also use AV MENU on the monitor panel 2 3 Select an appropriate option Repeat One Functions the same as Repeat One All Functions the same as Repeat All Random Album Functions the same as Shuffle Albums Song Func...

Страница 42: ... watching the playback picture If no operations are done for about five seconds the operation buttons disappear KEY does not work when the source is AV IN Touch the screen center portion You can easily access to Aspect setting menu by pressing SHORT CUT on the touch panel then Assigned title page 46 Sound mode page 45 Touch the screen center portion Buttons on the touch panel In the explanation th...

Страница 43: ...hat you can watch the navigation screen Preparation Make sure Navigation is selected for AV Input page 52 To view the navigation screen and listen to the navigation guidance Press DISP on the monitor panel repeatedly page 9 The aspect ratio of the navigation screen is fixed to Full regardless of the Aspect setting page 49 IfyourNavigationSystemisequippedwiththevoiceguidancefunction When Navigation...

Страница 44: ... not supplied Preparation Make sure External is selected for External Input page 52 Press SOURCE then press EXT IN page 9 You can also use SOURCE on the monitor panel Press it repeatedly Ÿ Turn on the connected component and start playing the source Assigned title page 46 page 45 Sound mode page 45 Buttons on the touch panel In the explanation they are indicated inside ...

Страница 45: ...ation Storing your own adjustments You can store your adjustments into User1 User2 and User3 1 Repeat steps and Ÿ then in step 2 Adjust 1 then store 2 Ex When storing into User2 While playing back any source other than Bluetooth PHONE you can easily access Equalizer menu by pressing SHORT CUT on the touch panel then Move to other six sound modes ...

Страница 46: ...n also use AV MENU on the monitor panel Assign a title You can enter up to 16 characters for available characters page 63 Store Confirm the entry 2 3 Move the cursor BS Erase the character before the cursor Del Erase the character on the cursor Cap Change the letter case upper lower Change Change the character set Space Enter a space Finish the procedure Assigningtitlestothesources In the explanat...

Страница 47: ...e of the settings do not open the sub setting window but just selecting an option will change the setting The display indications may change according to change of the specifications Ex Changing the AV Input setting You can also use AV MENU on the monitor panel Ÿ Non available items will be shaded ...

Страница 48: ...immer Time Set Activates the Dimmer Time setting below Dimmer Time Set Sets the Dimmer On Off times Dimmer Level You can select the brightness for dimmer 1 bright 2 middle 3 dark Bright You can adjust brightness of the screen 15 darkest to 15 brightest Initial 00 Picture Adjust 2 You can adjust the following to make the screen clear and legible for watching the playback picture The setting will be...

Страница 49: ...s Svenska Dansk Руccĸий Português The characters you can enter for assigning the titles also change according to the language selected 63 Clock Time Set Initial 1 00AM 8 Time Format Select either 12 hour system or 24 hour system 12Hours 24Hours 8 OSD Clock When On is selected the clock time is displayed on the playback picture 8 Off On Clock Adjust 5 Off Cancels Auto The built in clock is automati...

Страница 50: ...Letterbox 4 3 PS Pan Scan Select when the aspect ratio of the external monitor is 4 3 Refer to the illustrations on the left to see how the pictures are shown on the screen OSD Position 3 Select the position of the on screen bar 25 1 Higher position 2 Lower position File Type 3 Select playback file type when a disc contains different types of files Audio Plays back audio files Still Picture Plays ...

Страница 51: ...Stereo Normally select this D Dynamic Range Compres Compression 3 You can enjoy a powerful sound at a low volume level while playing Dolby Digital software Auto Select to apply the effect to multi channel encoded software On Select to always use this function Tuner IF Band Width Auto Increases the tuner selectivity to reduce interference noises between adjacent stations Stereo effect may be lost W...

Страница 52: ...uting1 Muting2 Select either one which mutes the sounds while using the cellular phone Power LED Flash Off Cancels On When the ignition is turned off the lamp on the button flashes TouchPanel Sens Change the sensitivity of the touch panel As the number decreases sensitivity becomes higher 1 2 3 Initialize Initialize all settings you have made in AV Menu Press and hold Enter to initialize the setti...

Страница 53: ... when you change the source 12 to 12 Initial 00 You can make the adjustments separately for DVD and other discs Amplifier Gain You can change the maximum volume level of this unit Off Deactivates the built in amplifier Low VOL 00 to 30 Select this if the maximum power of the speakers is less than 50 W High VOL 00 to 50 Mode 5 Menu items Selectable settings reference page Mono Only for FM Off On 10...

Страница 54: ...r 28 for connection Once the connection is established it is registered in the unit You can connect the unit and the device by using Connect page 55 from the next time 1 Selectableonlyfor BluetoothPHONE or BluetoothAUDIO Selectadevice or NewDevice beforeoperatingthe menu 2 Onlyforthedeviceconnectedfor BluetoothPHONE 3 Selectableonlywhenthesourceis BluetoothPHONE andtheconnectedcellularphoneiscompa...

Страница 55: ...m you of the arrival of a message MIC Setting 5 Adjust microphone volume connected to the Bluetooth adapter 01 02 03 Version 6 The Bluetooth software and hardware versions are shown 4 Selectableonlyfor BluetoothPHONE 5 Onlyforthecellularphoneconnectedfor BluetoothPHONE Notselectablewhen NewDevice isselected 6 IfyouwishtoreceivemoreinformationaboutBluetooth visitthefollowingJVCwebsite http www jvc ...

Страница 56: ... around the center holder with the printed surface facing up Make sure to store discs into the cases after use To keep discs clean A dirty disc may not play correctly If a disc does become dirty wipe it with a soft cloth in a straight line from center to edge Do not use any solvent for example conventional record cleaner spray thinner benzine etc to clean discs To play new discs New discs may have...

Страница 57: ...ed within 15 seconds the disc is automatically inserted again into the loading slot to protect it from dust Playing Recordable Rewritable discs This unit can recognize a total of 5 000 files and 250 folders a maximum of 999 files per folder Use only finalized discs This unit can play back multi session discs however unclosed sessions will be skipped while playing This unit can recognize a total 25...

Страница 58: ...bps Sampling frequency 48 kHz 44 1 kHz 32 kHz for MPEG1 24 kHz 22 05 kHz 16 kHz for MPEG2 48 kHz 44 1 kHz 32 kHz 22 05 kHz for WMA 44 1 kHz for WAV This unit can show ID3 Tag Version 1 0 1 1 2 2 2 3 2 4 for MP3 This unit can also show WAV WMA Tag This unit can play back files recorded in VBR variable bit rate Files recorded in VBR have a discrepancy in elapsed time indication This unit cannot play...

Страница 59: ...another folder including music files HD Radio reception During SSM search All stations including conventional FM AM stations are searched and stored for the selected band DivX MPEG1 MPEG2 JPEG MP3 WMA WAV 1 Current folder highlighted bar 2 Current folder number total folder number 3 Folder list 4 Selected playback mode 5 Elapsed playing time of the current track not displayed for JPEG 6 Operation ...

Страница 60: ...lay correctly please update your iPod software to the latest version For details about updating your iPod visit http www apple com When you turn on this unit the iPod is charged through the adapter connected to this unit While the iPod is connected all operations from the iPod are disabled Perform all operations from this unit The text information may not be displayed correctly The text informatio...

Страница 61: ...put Playback disc Output signals Stream Dolby D PCM DVD 48 kHz 16 20 24 bits Linear PCM 48 kHz 16 bits stereo Linear PCM 96 kHz Linear PCM 48 kHz 16 bits stereo Linear PCM with Dolby Digital Dolby Digital bitstream 48 kHz 16 bits stereo Linear PCM with DTS DTS bitstream with MPEG Audio MPEG bitstream 48 kHz 16 bits stereo Linear PCM Audio CD Video CD 44 1 kHz 16 bits stereo Linear PCM 48 kHz 16 bi...

Страница 62: ...ish PS Pashto Pushto TH Thai AZ Azerbaijani GL Galician KY Kirghiz QU Quechua TI Tigrinya BA Bashkir GN Guarani LA Latin RM Rhaeto Romance TK Turkmen BE Byelorussian GU Gujarati LN Lingala RN Kirundi TL Tagalog BG Bulgarian HA Hausa LO Laothian RO Rumanian TN Setswana BH Bihari HI Hindi LT Lithuanian RW Kinyarwanda TO Tonga BI Bislama HR Croatian LV Latvian Lettish SA Sanskrit TR Turkish BN Bengal...

Страница 63: ...stered trademarks or trademarks of Microsoft Corporation in the United States and or other countries HD Radio and the HD Radio Ready logo are proprietary trademarks of iBiquity Digital Corp SIRIUS and the SIRIUS dog logo are registered trademarks of SIRIUS Satellite Radio Inc XM and its corresponding logos are registered trademarks of XM Satellite Radio Inc SAT Radio the SAT Radio logo and all rel...

Страница 64: ...ha Error Push Reset appears on the screen and the panel does not move Reset the unit page 3 No Signal appears Change the source Start the playback on the external component connected to VIDEO IN terminal Check the cords and connections Signal input is too weak The buttons on the monitor panel do not work When the monitor panel is open only volume and OPEN TILT work The other buttons do not functio...

Страница 65: ...ck is not a playable file format Skip to another file Tracks are not played back as you have intended them to play Playback order may differ from that played back using other players Elapsed playing time is not correct This sometimes occurs during playback This is caused by how the tracks are recorded Not Support appears on the screen and track skips The track is unplayable Bluetooth Bluetooth dev...

Страница 66: ... unit HD Radio reception Sound quality changes when receiving HD Radio stations Fix the reception mode either to Digital or Analog see page 39 No sound can be heard Analog is selected when receiving all digital broadcast of HD Radio station Select Digital or Auto see page 39 Digital is selected when receiving weak digital signals or receiving conventional radio broadcast Select Analog or Auto see ...

Страница 67: ...is not broadcasting at this time Select another channel or continue listening to the previous channel LOADING appears on the monitor while listening to the XM Satellite radio The unit is loading the channel information and audio Text information is temporarily unavailable Reset08 flashes on the monitor Reconnect this unit and the Satellite radio correctly and reset the unit Satellite radio does no...

Страница 68: ... TUNER Frequency Range FM with channel interval set to 100 kHz or 200 kHz 87 5 MHz to 107 9 MHz FM with channel interval set to 50 kHz 87 5 MHz to 108 0 MHz AM with channel interval set to 10 kHz 530 kHz to 1 710 kHz AM with channel interval set to 9 kHz 531 kHz to 1 602 kHz FM Tuner Usable Sensitivity 11 3 dBf 1 0 μV 75 Ω 50 dB Quieting Sensitivity 16 3 dBf 1 8 μV 75 Ω Alternate Channel Selectivi...

Страница 69: ... H D with trim plate and sleeve attached Installation Size approx 182 mm 111 mm 160 mm 7 3 16 4 3 8 6 5 16 Panel Size approx 188 mm 117 mm 10 mm 7 7 16 4 5 8 7 16 Mass approx 2 9 kg 6 4 lbs including trims and sleeve CAUTION When ejecting the monitor leave an open space for the monitor to come out If you do not the monitor may obstruct the steering wheel and gearshift lever operations and this may...

Страница 70: ...DWJEIN 2008 Victor Company of Japan Limited Having TROUBLE with operation Please reset your unit Refer to page of How to reset your unit Still having trouble USA ONLY Call 1 800 252 5722 http www jvc com We can help you ...

Страница 71: ...mplifier Gain para evitar daños en los altavoces consulte la página 53 de MANUAL DE INSTRUCCIONES Para evitar cortocircuitos cubra los terminales de los cables NO UTILIZADOS con cinta aislante La unidad estará muy caliente después del uso Tenga la precaución de no quemarse al efectuar su desmontaje FRANÇAIS Cet appareil est conçu pour fonctionner sur des sources de courant continu de 12 V à masse ...

Страница 72: ...en o se dañen Al apretar los tornillos o los pernos asegúrese de que ningún cable de conexión quede pillado Al efectuar la instalación asegúrese de no bloquear el ventilador del panel trasero a fin de mantener una ventilación correcta INSTALLATION MONTAGEDANS LE TABLEAU DE BORD L illustration suivante est un exemple d installation typique Cependant vous devez faire les ajustements correspondant à ...

Страница 73: ...automatique s il y en a une 250 mA max To the remote lead of other equipment 200 mA max Al conductor remoto del otro equipo 200 mA máx Au fil de télécommande d un autre appareil 200 mA max 1 1 2 Before checking the operation of this unit prior to installation this lead must be connected otherwise power cannot be turned on 2 Antes de comprobar el funcionamiento de esta unidad previa a de la instala...

Страница 74: ...vez alimenter l amplificateur en connectant les fils de télécommande bleu à bande blanche de cet appareil à l amplificateur Pour connecter un autre appareil en utilisant les fils de télécommande vous devez acheter des connecteurs Y séparément Déconnectez les enceintes de l appareil principal et connectez les aux amplificateurs Laissez les fils d enceintes de l appareil inutilisés Vous pouvez mettr...

Страница 75: ... Cordon audio vidéo non fourni Digital optical cable not supplied Cable óptico digital no suministrado Câble optique numérique non fourni Reverse lamp Luces de marcha atrás Feux de recul To reverse lamp A la luz de marcha atrás Aux feux de recul Reverse lamp lead 4 Conductor de la luz de marcha atrás 4 Fil des feux de recul 4 To car battery A la batería del automóvil À la batterie de la voiture 4 ...

Страница 76: ...che et droit sont elles mises ensemble à la masse Cet appareil ne fonctionne pas du tout Avez vous réinitialisé votre appareil A KT HD300 8 KS SRA100 8 KS BTA200 XMDJVC100 B 7 CD CH KS PD100 KS U57 KS U58 KS U100K Cuando conecte componentes externos consulte también los manuales suministrados con los componentes y el adaptador PRECAUCIÓN Antes de conectar los componentes externos asegúrese de que ...

Страница 77: ...iting van het apparaat vindt u in de desbetreffende handleiding INSTRUCTIONS BEDIENUNGSANLEITUNG MANUEL D INSTRUCTIONS GEBRUIKSAANWIJZING LVT1779 001A E For canceling the display demonstration see page 8 Zum Abbrechen der Displaydemonstration siehe Seite 8 Pour annuler la démonstration des affichages référez vous à la page 8 Zie bladzijde 8 voor het annuleren van de displaydemonstratie DVD RECEIVE...

Страница 78: ...ent potential negative effects on the environment and human health This symbol is only valid in the European Union Cautions on the monitor The monitor built in this unit has been produced with high precision but it may have some ineffective dots This is inevitable and is not malfunction Do not expose the monitor to direct sunlight Do not operate the touch panel using a ball point pen or similar to...

Страница 79: ...ed on the unit s chassis Keep the card in a safe place as it will help the authorities to identify your unit if stolen Contents INTRODUCTION Playable disc types 4 Basic operations Monitor panel touch panel 5 Basic operations Remote controller RM RK252 6 OPERATIONS Before operating the unit 8 Common operations 9 Listening to the radio 10 Disc operations 16 EXTERNAL DEVICES Bluetooth operations Cell...

Страница 80: ... I Ready CD Recordable Rewritable CD R RW ISO 9660 level 1 level 2 Romeo Joliet CD DA MP3 WMA WAV JPEG DivX MPEG1 MPEG2 AAC MPEG4 1 IfyouinsertaDVDVideodiscofanincorrectRegionCode Regioncodeerror appearsonthescreen 2 DVD Rrecordedinmulti borderformatisalsoplayable exceptforduallayerdiscs DVD RWduallayerdiscsarenotplayable 3 Itispossibletoplaybackfinalized R RW Videoformatonly discs RWdoublelayerdi...

Страница 81: ...tion Change the display information OPEN Open the monitor panel EJECT Eject the disc CLOSE Close the monitor panel TILT Tilt the monitor panel Exit Erase this screen Shaded icons cannot be used In the explanation buttons on the touch panel are indicated inside For details on the touch panel operations see each source operation section Display Source Menu screen Activate deactivate TA Standby Recep...

Страница 82: ...ogram screen 6 Shows the on screen bar Does not function as R03 LR03 AAA Installing the battery Insert the batteries into the remote controller by matching the polarity and correctly Caution Battery shall not be exposed to excessive heat such as sunshine fire or the like If the range or effectiveness of the remote controller decreases replace both batteries Before using the remote controller Aim t...

Страница 83: ... the preset station service directly 1 Functionsasanumberbuttononly seeo 2 Notusedforthisunit 3 FunctionswhenpressedwithSHIFT 7 Functions with other buttons see i and o 8 Changes the display information 9 For disc operations 5 DVD Selects the title DVD VR Selects the program Playlist Other discs except VCD CD Selects the folders 4 Pressbriefly reverse skip forward skip Pressandhold reverse search ...

Страница 84: ...al English indications are used for purpose of explanation You can select the indication language page 52 Turn on the power Ÿ Display AV Menu screen Display Setup menu Cancel the demonstration Select Off Set the clock settings Finish the procedure Beforeoperatingtheunit Moves to the succeeding menu page Moves to the preceding menu page Return to the previous screen ...

Страница 85: ...ternal components you have connected media you have attached and the Input settings you have made page 55 On the touch panel On the monitor panel TUNER DAB DISC DVD VCD CD CD CH iPod or EXT IN Bluetooth PHONE Bluetooth AUDIO AV IN back to the beginning You cannot select these sources if they are not ready Exit Source information screen Clock time in large numbers Navigation screen When Navigation ...

Страница 86: ... appears on the screen then press it repeatedly The ST indicator lights up when receiving an FM stereo broadcast with sufficient signal strength 3 Reception improves but stereo effect will be lost The MONO indicator lights up To restore stereo effect select Off Preset no Band Tuner Standby Reception indicators PS station name for FM RDS If no PS signal is coming in the tuned frequency appears page...

Страница 87: ...ly for FM bands Once you have activated this function selected Local it always works when searching for FM stations 1 Press AV MENU 2 Press Mode 3 Only stations with sufficient signal strength will be detected The DX indicator goes off then the LO indicator lights up FM station automatic presetting SSM Strong station Sequential Memory This function works only for FM bands You can preset six statio...

Страница 88: ...programmes being broadcast by selecting the PTY code for your favorite programmes 1 Display PTy Search menu You can also easily access PTy Search menu by pressing SHORT CUT on the touch panel then Selecting a preset station On the remote 1 2 On the unit To select directly on the touch panel To select from the Preset List 1 2 or Hold page 14 page 48 ...

Страница 89: ...Y codes PTY Search starts If there is a station broadcasting a programme of the same PTY code as you have selected that station is tuned in Available PTY codes News Current Affairs Information Sport Education Drama Cultures Science Varied Speech Pop Music Rock Music Easy Listening Light Classics M Serious Classics Other Music Weather Metr Finance Children s Progs Social Affairs Religion Phone In T...

Страница 90: ...Menu screen press Mode then press On for PTy Standby next column PTY The unit will temporarily switch to your favorite PTY programme from any source other than AM Lights up Not yet activated Tune in to another station providing the RDS signals Flashes To deactivate press Off for PTy Standby in step 3 on the next column Goes off When a DAB tuner is connected TA Standby PTY Standby Reception also wo...

Страница 91: ...on is activated To change the Network Tracking Reception setting see AF Regional page 54 When the DAB tuner is connected refer also to Tracing the same programme Alternative Frequency Reception DAB AF page 42 Automatic station selection Programme Search Usually when you select preset stations the preset station is tuned in If the signals from the FM RDS preset station are not sufficient for good r...

Страница 92: ...t cannot accept the operation you have tried to do In some cases without showing operations will not be accepted Label side Caution on volume setting Discs produce very little noise compared with other sources Lower the volume before playing a disc to avoid damaging the speakers by the sudden increase of the output level When playing back a multi channel encoded disc the multi channel signals are ...

Страница 93: ...e 1 Sampling frequency Bit rate Recorded signal channel no page 22 3 8 Start and pause playback 7 Stop playback 4 Press Select chapter Hold Reverse forward search 2 5 Select title program playlist 1 DVD VRalsoindicateseitherPRG program orPLAY playlist playback 2 Searchspeed x2 x10 Buttons on the touch panel In the explanation they are indicated inside These buttons also work when they are not show...

Страница 94: ...ck Hold Reverse forward search for DivX MPEG1 MPEG2 1 5 Press Select folder Hold Display Folder list While playing the following discs press Each time you press the button the display changes to show the different information page 9 Disc type page 22 page 22 The PBC indicator lights up when PBC is in use Total track no included on the disc Total track no included on the disc Total playing time Sou...

Страница 95: ... only when it is recorded Sound mode page 48 page 22 3 8 Start and pause playback 7 Stop playback 4 Press Select track Hold Reverse forward search 4 5 Press Select folder Hold Display Folder list 3 8 Start and pause playback 7 Stop playback 4 Press Select track Hold Reverse forward search 4 Total track no included on the disc Total playing time Total track no included on the disc Sound mode page 4...

Страница 96: ...ayback 4 Press Select track Hold Reverse forward search 5 Select folders The above buttons also work when they are not shown on the screen while watching the playback picture WhileadiscmenuisplayedbackforDVD KEY is automaticallydisplayed Onthediscmenu you canselecta menuitemdirectlybytouchingitonthescreen B For DVD VCD DivX menu operation playback 235 Select the menu items ENT Confirm the selectio...

Страница 97: ...able for Playlist playback Track Repeats current track Folder Repeats current folder Folder Randomly plays all tracks of current folder then tracks of next folders Disc All Randomly plays all tracks Folder Repeats current folder Track Repeats current track PBC not in use Disc All Randomly plays all tracks PBC not in use Track Repeats current track 1 Disc All Randomly plays all tracks Track Repeats...

Страница 98: ...isc includes folders you can display the Folder Track File Lists then start playback 1 2 3 Select a folder 1 then a track 2 Selected track starts playing Press to move to the previous next pages of the list 1 Current folder list number total folder list number 2 Current track list number total track list number of the current folder You can easily access the Track List by pressing DISP on the moni...

Страница 99: ...io Select chapter Select title when not playing Select title during playback or pause Using menu driven features 1 2 Select an item you want to start playback 3 1 Searchspeed x2 x5 x10 x20 x60 2 Slowmotionspeed 1 32 1 16 1 8 1 4 1 2 3 Searchspeed x2 x10 Operations using the remote controller RM RK252 Also functions as CLR clear Erases a misentry if pressed while holding SHIFT You can change the fo...

Страница 100: ...ct program Select playlist during playback or pause Select aspect ratio Select chapter Select program when not playing Select program playlist during playback or pause Using Original Program Playlist screens page 28 1 For Original Program For Playlist 2 Select an item you want to start playback 3 To erase the screen 1 Searchspeed x2 x5 x10 x20 x60 2 Slowmotionspeed 1 32 1 16 1 8 1 4 1 2 3 Searchsp...

Страница 101: ...arch 5 No sound can be heard Select folder Select aspect ratio Select track within the same folder Select folder While playing Reverse advance the scenes by five minutes For DivX6 Using menu driven features 1 2 Select an item you want to start playback 3 4 Searchspeed 1 2 3 5 Searchspeed 1 2 Current playback position twice 2nd press 2nd press 1st press 1st press 3rd press ...

Страница 102: ...ss To cancel PBC playback 1 2 Select the desired track To resume PBC press Stop playback Start playback pause if pressed during playback Reverse forward search 1 Forward slow motion during pause 2 No sound can be heard Reverse slow motion does not work Press Select track Hold Reverse forward search 3 No sound can be heard Select aspect ratio twice 1 Searchspeed x2 x5 x10 x20 x60 2 Slowmotionspeed ...

Страница 103: ... Select track Hold Reverse forward search 5 Select track Stop playback Start playback pause if pressed during playback Reverse forward search 4 Press Select track Hold Reverse forward search 5 Select folder Select track within the same folder Select folder 4 Searchspeed x2 x5 x10 x20 x60 5 Searchspeed x2 x10 twice ...

Страница 104: ...creens You can use Original Program or Playlist screen anytime while playing DVD VR with its data recorded 1 Display the Original Program Playlist screen 2 Select an item you want To erase the screen 1 Original Program Playlist number 2 Recording date 3 Recording source TV station the input terminal of the recording equipment etc 4 Start time of recording 5 Title of the program playlist 6 Highligh...

Страница 105: ...Repeat play 1 Random play 1 Change the audio language audio stream or audio channel Change or erase the subtitle language Change the view angle 1 page21 2 NotapplicableforDVD VR Above example is of DVD Video Items shown on the bar vary due to the disc type 1 Disc type 2 DVD Audio signal format VCD PBC 3 Playback mode 1 DVD Video C RPT Chapter repeat T RPT Title repeat DVD VR C RPT Chapter repeat P...

Страница 106: ...for each source Bluetooth PHONE and Bluetooth AUDIO Connecting a new Bluetooth device Registration Pairing methods Use either of the following items in Bluetooth menu to register and establish the connection with a device Select Bluetooth PHONE or Bluetooth AUDIO as the source to operate Bluetooth menu Open Make the unit ready to establish a new Bluetooth connection The connection is established b...

Страница 107: ... you want to connect 5 Enter the specific PIN code of the device to the unit Refer to the instructions supplied with the device to check the PIN code 6 Operate the Bluetooth device to connect while Connecting is displayed on the screen Now connection is established and you can use the device through the unit To connect a special device Special Device 1 Press AV MENU 2 Press Bluetooth 3 Press Speci...

Страница 108: ...st the microphone volume page 59 Press SOURCE then press Bluetooth PHONE page 9 You can also use SOURCE on the monitor panel Press it repeatedly Ÿ Press AV MENU Press Bluetooth Establish the connection with a device then make a call or settings using Bluetooth menu pages 58 and 59 Sound mode page 48 Status of the device Signal strength Battery remainder only when the information comes from the dev...

Страница 109: ...ce recognition system Speak the name you want to call When an SMS comes in If the cellular phone is compatible with SMS Short Message Service you can read the messages on the screen You cannot edit or send a message through the unit When Message Info is set to Auto The unit rings and the following screen is displayed to inform you of a message arrival page 59 To read the message press Yes The sour...

Страница 110: ... to Preset List You can preset the entered number by selecting a preset number page 35 Dial Calls the entered number You can easily access Dial Menu by pressing SHORT CUT on the touch panel then You can also access Dial Menu by holding SOURCE on the monitor panel You can easily activate Voice Dialing by pressing SHORT CUT on the touch panel then You can also activate Voice Dialing by holding AV ME...

Страница 111: ...u want to preset from Phonebook Redial Received Calls or Missed Calls 1 Press AV MENU 2 Press Bluetooth 3 Press Dial Menu then Ex Selecting Received Calls 2 Select a telephone number to store 3 Select a preset number Now Tom is stored into preset no 1 Display Dial Menu screen Answer the incoming call Display the Redial menu if pressed and held regardless of the current source End the call Adjust t...

Страница 112: ...an be registered 3 Status of the device Signal strength Battery remainder only when the information comes from the device The Bluetooth icon lights up when the adapter is connected Press SOURCE then press Bluetooth AUDIO page 9 You can also use SOURCE on the monitor panel Press it repeatedly Ÿ Start playback Buttons on the touch panel In the explanation they are indicated inside 2 1 1 Whenacellula...

Страница 113: ... no MP3 indicator page 38 Tag data appears only when it is recorded Select a disc to start playing If you select an MP3 disc the Track list of the current folder appears You can select a track and start playing also page 22 If you select a folder on the list you can start playing the first track of the folder To go to the other list Sound mode page 48 4 Press Select track Hold Reverse forward sear...

Страница 114: ...he current disc All Randomly plays all tracks of all loaded discs Track Repeats current track Folder Repeats all tracks of the current folder Disc Repeats all tracks of the current disc Folder Randomly plays all tracks of current folder then tracks of next folders Disc Randomly plays all tracks of the current disc All Randomly plays all tracks of all loaded discs You can use the following buttons ...

Страница 115: ...ual Search appears on the screen then press it repeatedly Press or 5 to select a service either primary or secondary to listen to ListeningtotheDABtuner Preset no Band page 42 DAB indicators Standby Reception indicators If no signal is received No DAB Signal appears WhiletuninginaservicewithDLS DynamicLabel Segment theTEXTindicatorlightsup Sound mode page 48 Buttons on the touch panel In the expla...

Страница 116: ...red in preset number 2 When surrounding sounds are noisy Some services provide Dynamic Range Control DRC signals together with their regular programme signals DRC will reinforce the low level sounds to improve your listening The DRC indicator will light up while tuning in to a service with the DRC signals 1 2 3 As the number increases the effect becomes stronger ...

Страница 117: ...your favorite service announcement type Announcement Standby Reception Indicator To activate display AV Menu screen then select Mode press On for Announce Standby below ANN The unit will temporarily switch to your favorite service from any source other than FM AM Lights up Not yet activated Tune in to another service providing the related signals Flashes To deactivate press Off for Announce Standb...

Страница 118: ...on this unit automatically tunes in to the DAB service When shipped from the factory Alternative Frequency Reception is activated To deactivate the Alternative Frequency Reception select Off for DAB AF page 54 You can easily activate and deactivate Announcement Standby Reception by pressing SHORT CUT on the touch panel then To change the announcement type for Announcement Standby Reception 1 Press...

Страница 119: ...t page 55 Press SOURCE then press iPod page 9 Playback starts automatically You can also use SOURCE on the monitor panel Press it repeatedly Ÿ Press 4 or to select a track Track no Playing time page 44 4 Press Select track Hold Reverse forward search 5 Enter player s menu Start playback pause To resume press again Sound mode page 48 Buttons on the touch panel In the explanation they are indicated ...

Страница 120: ...nning 3 Press to confirm the selection 4 Repeat steps 2 and 3 to select a track When a track is selected finally playback starts To return to the previous menu press 5 Selecting playback modes 1 2 3 Select an appropriate option Repeat One Functions the same as Repeat One All Functions the same as Repeat All Random Album Functions the same as Shuffle Albums Song Functions the same as Shuffle Songs ...

Страница 121: ...hing the playback picture If no operations are done for about five seconds the operation buttons disappear KEY does not work when the source is AV IN Touch the screen center portion You can easily access to Aspect setting menu by pressing SHORT CUT on the touch panel then Assigned title page 49 Sound mode page 48 Touch the screen center portion Buttons on the touch panel In the explanation they ar...

Страница 122: ...can watch the navigation screen Preparation Make sure Navigation is selected for AV Input page 55 To view the navigation screen and listen to the navigation guidance Press DISP on the monitor panel repeatedly page 9 The aspect ratio of the navigation screen is fixed to Full regardless of the Aspect setting page 52 IfyourNavigationSystemisequippedwiththevoiceguidancefunction When Navigation is sele...

Страница 123: ... not supplied Preparation Make sure External is selected for External Input page 55 Press SOURCE then press EXT IN page 9 You can also use SOURCE on the monitor panel Press it repeatedly Ÿ Turn on the connected component and start playing the source Assigned title page 49 page 48 Sound mode page 48 EXTERNAL DEVICES Buttons on the touch panel In the explanation they are indicated inside ...

Страница 124: ...our adjustments into User1 User2 and User3 1 Repeat steps and Ÿ then in step 2 Adjust 1 then store 2 Ex When storing into User2 While playing back any source other than Bluetooth PHONE you can easily access Equalizer menu by pressing SHORT CUT on the touch panel then Move to other six sound modes ...

Страница 125: ...ign a title You can enter up to 16 characters for available characters page 67 Store Confirm the entry 2 3 Move the cursor BS Erase the character before the cursor Del Erase the character on the cursor Cap Change the letter case upper lower Change Change the character set Space Enter a space Finish the procedure Assigningtitlestothesources In the explanation buttons on the touch panel are indicate...

Страница 126: ...tal procedures Some of the settings do not open the sub setting window but just selecting an option will change the setting The display indications may change according to change of the specifications Ex Changing the AV Input setting Ÿ Non available items will be shaded ...

Страница 127: ...ights 1 Dimmer Time Set Activates the Dimmer Time setting below Dimmer Time Set Sets the Dimmer On Off times Dimmer Level You can select the brightness for dimmer 1 bright 2 middle 3 dark Bright You can adjust brightness of the screen 15 darkest to 15 brightest Initial 00 Picture Adjust 2 You can adjust the following to make the screen clear and legible for watching the playback picture The settin...

Страница 128: ...spañol Français Deutsch Italiano Nederlands Svenska Dansk Руccĸий Português The characters you can enter for assigning the titles also change according to the language selected 67 Clock Time Set Initial 0 00 8 Time Format Select either 12 hour system or 24 hour system 12Hours 24Hours 8 OSD Clock When On is selected the clock time is displayed on the playback picture Off On Clock Adjust Select Auto...

Страница 129: ... contains different types of files Audio Plays back audio files Still Picture Plays back JPEG files Video Plays back DivX MPEG1 MPEG2 files Audio Video Plays back audio files and DivX MPEG1 MPEG2 files DivX Regist Registration 3 This unit has its own Registration Code Once you have played back a file with which the Registration Code recorded this unit s Registration Code is overwritten for copyrig...

Страница 130: ...ectivity to reduce interference noises between adjacent stations Stereo effect may be lost Wide Subject to the interference from adjacent stations but sound quality will not be degraded and the stereo effect will remain AF Regional When the received signals from the current station become weak Off Cancels not selectable when DAB AF is set to On AF Reg Regional Switches to another station broadcast...

Страница 131: ...ither one which mutes the sounds while using the car phone system Power LED Flash Off Cancels On When the ignition is turned off the lamp on the button flashes TouchPanel Sens Change the sensitivity of the touch panel As the number decreases sensitivity becomes higher 1 2 3 Initialize Initialize all settings you have made in AV Menu Press and hold Enter to initialize the settings then reset the un...

Страница 132: ... the left and right speakers Leftmost left only L6 Rightmost right only R6 Initial 0 Volume Adjust Adjust and store auto adjustment volume level for each source comparing to the FM volume level The volume level will automatically increase or decrease when you change the source 12 to 12 Initial 00 You can make the adjustments separately for DVD and other discs Amplifier Gain You can change the maxi...

Страница 133: ...N 49 Repeat 21 38 44 Random 21 38 44 D Dynamic Range Control Only for DAB Off DRC1 DRC2 DRC3 40 Announce Standby Only for DAB Off On 41 Announce Code Only for DAB Initial Transport News 42 1 Itemslistedunder Mode varyamongtheplaybacksources List For DISC Folder List and Track List page 22 For CD CH Disc List Folder List and Track List page 37 For the other playback sources you can display a list b...

Страница 134: ...Once the connection is established it is registered in the unit You can connect the unit and the device by using Connect below from the next time Connect Only for the registered devices After selecting a device from among the registered devices pages 30 and 31 establish the connection with it Disconnect Only for the device being connected Disconnect the current device before connecting another dev...

Страница 135: ...s Message Info 5 Auto The unit informs you of the arrival of a message by ringing and displaying Receiving Message To read the message page 33 Manual The unit does not inform you of the arrival of a message MIC Setting 5 Adjust microphone volume connected to the Bluetooth adapter 01 02 03 Version 6 The Bluetooth software and hardware versions are shown Initial Underlined 4 Selectableonlyfor Blueto...

Страница 136: ...disc around the center holder with the printed surface facing up Make sure to store discs into the cases after use To keep discs clean A dirty disc may not play correctly If a disc does become dirty wipe it with a soft cloth in a straight line from center to edge Do not use any solvent for example conventional record cleaner spray thinner benzine etc to clean discs To play new discs New discs may ...

Страница 137: ...ed within 15 seconds the disc is automatically inserted again into the loading slot to protect it from dust Playing Recordable Rewritable discs This unit can recognize a total of 5 000 files and 250 folders a maximum of 999 files per folder Use only finalized discs This unit can play back multi session discs however unclosed sessions will be skipped while playing This unit can recognize a total 25...

Страница 138: ...bps Sampling frequency 48 kHz 44 1 kHz 32 kHz for MPEG1 24 kHz 22 05 kHz 16 kHz for MPEG2 48 kHz 44 1 kHz 32 kHz 22 05 kHz for WMA 44 1 kHz for WAV This unit can show ID3 Tag Version 1 0 1 1 2 2 2 3 2 4 for MP3 This unit can also show WAV WMA Tag This unit can play back files recorded in VBR variable bit rate Files recorded in VBR have a discrepancy in elapsed time indication This unit cannot play...

Страница 139: ...found No available Bluetooth device is detected by Search Loading The unit is updating the phone book and or SMS Please Wait The unit is preparing to use the Bluetooth function If the message does not disappear turn off and turn on the unit then connect the device again or reset the unit Reset 08 Check the connection between the adapter and this unit Icons for phone types These icons indicate the ...

Страница 140: ... turn on this unit the iPod is charged through the adapter connected to this unit While the iPod is connected all operations from the iPod are disabled Perform all operations from this unit The text information may not be displayed correctly The text information scrolls on the screen This unit can display up to 40 characters Notice When operating an iPod some operations may not be performed correc...

Страница 141: ...put Playback disc Output signals Stream Dolby D PCM DVD 48 kHz 16 20 24 bits Linear PCM 48 kHz 16 bits stereo Linear PCM 96 kHz Linear PCM 48 kHz 16 bits stereo Linear PCM with Dolby Digital Dolby Digital bitstream 48 kHz 16 bits stereo Linear PCM with DTS DTS bitstream with MPEG Audio MPEG bitstream 48 kHz 16 bits stereo Linear PCM Audio CD Video CD 44 1 kHz 16 bits stereo Linear PCM 48 kHz 16 bi...

Страница 142: ...ish PS Pashto Pushto TH Thai AZ Azerbaijani GL Galician KY Kirghiz QU Quechua TI Tigrinya BA Bashkir GN Guarani LA Latin RM Rhaeto Romance TK Turkmen BE Byelorussian GU Gujarati LN Lingala RN Kirundi TL Tagalog BG Bulgarian HA Hausa LO Laothian RO Rumanian TN Setswana BH Bihari HI Hindi LT Lithuanian RW Kinyarwanda TO Tonga BI Bislama HR Croatian LV Latvian Lettish SA Sanskrit TR Turkish BN Bengal...

Страница 143: ...DivX Ultra Certified product Plays all versions of DivX video including DivX 6 with enhanced playback of DivX media files and the DivX Media Format Microsoft and Windows Media are either registered trademarks or trademarks of Microsoft Corporation in the United States and or other countries The Bluetooth word mark and logos are owned by the Bluetooth SIG Inc and any use of such marks by Victor Com...

Страница 144: ...se this symptom Adjust Bright page 51 Position Error Push Open Key appears on the screen The monitor panel angle has been forcibly adjusted or its adjustment has been interrupted while opening or closing Press OPEN TILT Mecha Error Push Reset appears on the screen and the panel does not move Reset the unit page 3 No Signal appears Change the source Start the playback on the external component conn...

Страница 145: ...ake is engaged Parking brake lead is not connected properly Installation Connection Manual No picture appears on the external monitor Connect the video cord correctly Select the correct input on the external monitor Eject Error or Loading Error appears on the screen Change the source by pressing SOURCE Region code error appears on the screen when you insert a DVD Video Region code is not correct p...

Страница 146: ... device name from Special Device then try to connect again pages 31 58 Echo or noise occurs Adjust the microphone unit position Phone sound quality is poor Reduce the distance between the unit and the Bluetooth cellular phone Move the car to place where you can get a better signal reception The sound is interrupted or skipped during playback of a Bluetooth audio player Reduce the distance between ...

Страница 147: ...ll Connect this unit and the DAB tuner correctly then reset the unit page 3 Antenna Power NG appears on the screen Check the cords and connections iPod The iPod does not turn on or does not work Check the connection Charge the battery Sound is distorted Deactivate the equalizer either on this unit or the iPod Disconnect appears on the screen Check the connection Playback stops The headphones are d...

Страница 148: ... Input LINE IN VIDEO IN Aerial input Output VIDEO OUT Others CD changer OE REMOTE Reverse gear signal DIGITAL OUT optical FM AM TUNER Frequency Range FM 87 5 MHz to 108 0 MHz AM MW 522 kHz to 1 620 kHz LW 144 kHz to 279 kHz FM Tuner Usable Sensitivity 11 3 dBf 1 0 μV 75 Ω 50 dB Quieting Sensitivity 16 3 dBf 1 8 μV 75 Ω Alternate Channel Selectivity 400 kHz 65 dB Frequency Response 40 Hz to 15 000 ...

Страница 149: ...erature 10 C to 60 C Allowable Operating Temperature 0 C to 40 C Dimensions W H D With trim plate and sleeve attached Installation Size approx 182 mm 111 mm 160 mm Panel Size approx 188 mm 117 mm 10 mm Mass approx 2 9 kg including trims and sleeve CAUTION When ejecting the monitor leave an open space for the monitor to come out If you do not the monitor may obstruct the steering wheel and gearshif...

Страница 150: ...undin dieses Gerät stimmt mit den gültigen europäischen Richtlinien und Normen bezüglich elektromagnetischer Verträglichkeit und elektrischer Sicherheit überein Die europäische Vertretung für die Victor Company of Japan Limited ist JVC Technology Centre Europe GmbH Firmenname geändert in JVC Technical Services Europe GmbH Postfach 10 05 52 61145 Friedberg Deutschland Cher e client e Cet appareil e...

Страница 151: ...d die Meldung Parking Brake auf dem Monitor und es erfolgt keine Bildwiedergabe Diese Warnung wird nur angezeigt wenn das Feststellbremskabel an das in das Fahrzeug eingebaute Feststellbremssystem angeschlossen ist Hinweise zu elektrischen Anschlüssen Die Sicherung mit einer der entsprechenden Nennleistung ersetzen Brennt die Sicherung häufig durch wenden Sie sich an ihren JVC Autoradiohändler Es ...

Страница 152: ...en wenden Sie sich an Ihren Fachhändler für JVC Autoradiohändler oder einen Fachhändler für die Einbausätze Wenn bezüglich des richtigen Einbaus dieses Geräts Zweifel bestehen immer einen qualifizierten Techniker um Rat fragen Vor dem Einbau des Geräts Bei der Montage dieses Gerätssollen immer die mitgelieferten Schrauben wie beschrieben verwendet werden Wenn andere Schrauben verwendet werden best...

Страница 153: ...ELECTRICAL CONNECTIONS To prevent short circuits we recommend that you disconnect the battery s negative terminal and make all electrical connections before installing the unit Be sure to ground this unit to the car s chassis again after installation ELEKTRISCHE ANSCHLÜSSE Zur Vermeidung von Kurzschlüssen empfehlen wir daß Sie den negativen Batterieanschluß abtrennen und alle elektrischen Anschlüs...

Страница 154: ...klemme im Sicherungsblock zum Anschließen an die Autobatterie Umgehen des Zündschalters konstant 12 V A une borne sous tension du porte fusible connectée à la batterie de la voiture en dérivant l interrupteur d allumage 12 V constant Naar een onder spanning staande aansluitklem in het zekeringblok die is aangesloten op de accu van de auto u passeert de ontstekingsschakelaar constant 12 V To an acc...

Страница 155: ...a de recul à la prise VIDEO IN 5 Reportez vous à å du diagramme Å de la page 3 6 Réglez AV Input sur Camera lors de l utilisation voir page 55 du MANUEL D INSTRUCTIONS 4 Alleen vereist wanneer een achteruitkijkcamera met de VIDEO IN aansluiting wordt verbonden 5 Zie å in afbeelding Å op bladzijde 3 6 Stel voor gebruik AV Input op Camera zie bladzijde 55 van de GEBRUIKSAANWIJZING Rear speakers Hint...

Страница 156: ...herausgangsleitung geerdet Sind die Anschlußklemmen der linken und rechten Lautsprecher zusammen geerdet Dieser Receiver funktioniert überhaupt nicht Haben Sie einen Reset am Receiver vorgenommen EN CAS DE DIFFICULTES Le fusible saute Les fils rouge et noir sont ils racordés correctement L appareil ne peut pas être mise sous tension Le fil jaune est elle raccordée Pas de son des enceintes Le fil d...

Страница 157: ...ки по встановленню та виконанню підключень наведені у окремій інструкції For canceling the display demonstration see page 8 Информацию об отмене демонстрации функций дисплея см на стр 8 Інформацію щодо відміни демонстрації функцій дисплею див на стор 8 INSTRUCTIONS ИНСТРУКЦИИ ПО ЭКСПЛУАТАЦИИ ІНСТРУКЦІЇ DVD RECEIVER WITH MONITOR DVD ПРИЕМНИК С МОНИТОРОМ ПРИЙМАЧ ТА ПРОГРАВАЧ DVD ДИСКІВ ІЗ МОНІТОРОМ ...

Страница 158: ...nction Do not expose the monitor to direct sunlight Do not operate the touch panel using a ball point pen or similar tool with the sharp tip Touch the buttons on the touch panel with your finger directly if you are wearing a glove take it off When the temperature is very cold or very hot Chemical changes occur inside causing malfunction Pictures may not appear clearly or may move slowly Pictures m...

Страница 159: ...the unit Contents INTRODUCTION Playable disc types 4 Basic operations Monitor panel touch panel 5 Basic operations Remote controller RM RK252 6 OPERATIONS Before operating the unit 8 Common operations 9 Listening to the radio 10 Disc operations 16 EXTERNAL DEVICES Bluetooth operations Cellular phone audio player 30 Listening to the CD changer 37 Listening to the DAB tuner 39 Listening to the iPod ...

Страница 160: ... I Ready CD Recordable Rewritable CD R RW ISO 9660 level 1 level 2 Romeo Joliet CD DA MP3 WMA WAV JPEG DivX MPEG1 MPEG2 AAC MPEG4 1 IfyouinsertaDVDVideodiscofanincorrectRegionCode Regioncodeerror appearsonthescreen 2 DVD Rrecordedinmulti borderformatisalsoplayable exceptforduallayerdiscs DVD RWduallayerdiscsarenotplayable 3 Itispossibletoplaybackfinalized R RW Videoformatonly discs RWdoublelayerdi...

Страница 161: ...tion Change the display information OPEN Open the monitor panel EJECT Eject the disc CLOSE Close the monitor panel TILT Tilt the monitor panel Exit Erase this screen Shaded icons cannot be used In the explanation buttons on the touch panel are indicated inside For details on the touch panel operations see each source operation section Display Source Menu screen Activate deactivate TA Standby Recep...

Страница 162: ...ogram screen 6 Shows the on screen bar Does not function as R03 LR03 AAA Installing the battery Insert the batteries into the remote controller by matching the polarity and correctly Caution Battery shall not be exposed to excessive heat such as sunshine fire or the like If the range or effectiveness of the remote controller decreases replace both batteries Before using the remote controller Aim t...

Страница 163: ... the preset station service directly 1 Functionsasanumberbuttononly seeo 2 Notusedforthisunit 3 FunctionswhenpressedwithSHIFT 7 Functions with other buttons see i and o 8 Changes the display information 9 For disc operations 5 DVD Selects the title DVD VR Selects the program Playlist Other discs except VCD CD Selects the folders 4 Pressbriefly reverse skip forward skip Pressandhold reverse search ...

Страница 164: ...al English indications are used for purpose of explanation You can select the indication language page 52 Turn on the power Ÿ Display AV Menu screen Display Setup menu Cancel the demonstration Select Off Set the clock settings Finish the procedure Beforeoperatingtheunit Moves to the succeeding menu page Moves to the preceding menu page Return to the previous screen ...

Страница 165: ...ternal components you have connected media you have attached and the Input settings you have made page 55 On the touch panel On the monitor panel TUNER DAB DISC DVD VCD CD CD CH iPod or EXT IN Bluetooth PHONE Bluetooth AUDIO AV IN back to the beginning You cannot select these sources if they are not ready Exit Source information screen Clock time in large numbers Navigation screen When Navigation ...

Страница 166: ...e screen then press it repeatedly The ST indicator lights up when receiving an FM stereo broadcast with sufficient signal strength 3 Reception improves but stereo effect will be lost The MONO indicator lights up To restore stereo effect select Off Preset no Band Tuner Standby Reception indicators PS station name for FM Radio Data System If no PS signal is coming in the tuned frequency appears page...

Страница 167: ...ly for FM bands Once you have activated this function selected Local it always works when searching for FM stations 1 Press AV MENU 2 Press Mode 3 Only stations with sufficient signal strength will be detected The DX indicator goes off then the LO indicator lights up FM station automatic presetting SSM Strong station Sequential Memory This function works only for FM bands You can preset six statio...

Страница 168: ...your favorite programmes being broadcast by selecting the PTY code for your favorite programmes 1 Display PTy Search menu You can also easily access PTy Search menu by pressing SHORT CUT on the touch panel then Selecting a preset station On the remote 1 2 On the unit To select directly on the touch panel To select from the Preset List 1 2 or Hold page 14 page 48 ...

Страница 169: ...Y codes PTY Search starts If there is a station broadcasting a programme of the same PTY code as you have selected that station is tuned in Available PTY codes News Current Affairs Information Sport Education Drama Cultures Science Varied Speech Pop Music Rock Music Easy Listening Light Classics M Serious Classics Other Music Weather Metr Finance Children s Progs Social Affairs Religion Phone In T...

Страница 170: ...Menu screen press Mode then press On for PTy Standby next column PTY The unit will temporarily switch to your favorite PTY programme from any source other than AM Lights up Not yet activated Tune in to another station providing the Radio Data System signals Flashes To deactivate press Off for PTy Standby in step 3 on the next column Goes off When a DAB tuner is connected TA Standby PTY Standby Rec...

Страница 171: ...on is activated To change the Network Tracking Reception setting see AF Regional page 54 When the DAB tuner is connected refer also to Tracing the same programme Alternative Frequency Reception DAB AF page 42 Automatic station selection Programme Search Usually when you select preset stations the preset station is tuned in If the signals from the FM Radio Data System preset station are not suffici...

Страница 172: ...t cannot accept the operation you have tried to do In some cases without showing operations will not be accepted Label side Caution on volume setting Discs produce very little noise compared with other sources Lower the volume before playing a disc to avoid damaging the speakers by the sudden increase of the output level When playing back a multi channel encoded disc the multi channel signals are ...

Страница 173: ...e 1 Sampling frequency Bit rate Recorded signal channel no page 22 3 8 Start and pause playback 7 Stop playback 4 Press Select chapter Hold Reverse forward search 2 5 Select title program playlist 1 DVD VRalsoindicateseitherPRG program orPLAY playlist playback 2 Searchspeed x2 x10 Buttons on the touch panel In the explanation they are indicated inside These buttons also work when they are not show...

Страница 174: ...ck Hold Reverse forward search for DivX MPEG1 MPEG2 1 5 Press Select folder Hold Display Folder list While playing the following discs press Each time you press the button the display changes to show the different information page 9 Disc type page 22 page 22 The PBC indicator lights up when PBC is in use Total track no included on the disc Total track no included on the disc Total playing time Sou...

Страница 175: ... only when it is recorded Sound mode page 48 page 22 3 8 Start and pause playback 7 Stop playback 4 Press Select track Hold Reverse forward search 4 5 Press Select folder Hold Display Folder list 3 8 Start and pause playback 7 Stop playback 4 Press Select track Hold Reverse forward search 4 Total track no included on the disc Total playing time Total track no included on the disc Sound mode page 4...

Страница 176: ...ayback 4 Press Select track Hold Reverse forward search 5 Select folders The above buttons also work when they are not shown on the screen while watching the playback picture WhileadiscmenuisplayedbackforDVD KEY is automaticallydisplayed Onthediscmenu you canselecta menuitemdirectlybytouchingitonthescreen B For DVD VCD DivX menu operation playback 235 Select the menu items ENT Confirm the selectio...

Страница 177: ...able for Playlist playback Track Repeats current track Folder Repeats current folder Folder Randomly plays all tracks of current folder then tracks of next folders Disc All Randomly plays all tracks Folder Repeats current folder Track Repeats current track PBC not in use Disc All Randomly plays all tracks PBC not in use Track Repeats current track 1 Disc All Randomly plays all tracks Track Repeats...

Страница 178: ...isc includes folders you can display the Folder Track File Lists then start playback 1 2 3 Select a folder 1 then a track 2 Selected track starts playing Press to move to the previous next pages of the list 1 Current folder list number total folder list number 2 Current track list number total track list number of the current folder You can easily access the Track List by pressing DISP on the moni...

Страница 179: ...io Select chapter Select title when not playing Select title during playback or pause Using menu driven features 1 2 Select an item you want to start playback 3 1 Searchspeed x2 x5 x10 x20 x60 2 Slowmotionspeed 1 32 1 16 1 8 1 4 1 2 3 Searchspeed x2 x10 Operations using the remote controller RM RK252 Also functions as CLR clear Erases a misentry if pressed while holding SHIFT You can change the fo...

Страница 180: ...ct program Select playlist during playback or pause Select aspect ratio Select chapter Select program when not playing Select program playlist during playback or pause Using Original Program Playlist screens page 28 1 For Original Program For Playlist 2 Select an item you want to start playback 3 To erase the screen 1 Searchspeed x2 x5 x10 x20 x60 2 Slowmotionspeed 1 32 1 16 1 8 1 4 1 2 3 Searchsp...

Страница 181: ...arch 5 No sound can be heard Select folder Select aspect ratio Select track within the same folder Select folder While playing Reverse advance the scenes by five minutes For DivX6 Using menu driven features 1 2 Select an item you want to start playback 3 4 Searchspeed 1 2 3 5 Searchspeed 1 2 Current playback position twice 2nd press 2nd press 1st press 1st press 3rd press ...

Страница 182: ...ss To cancel PBC playback 1 2 Select the desired track To resume PBC press Stop playback Start playback pause if pressed during playback Reverse forward search 1 Forward slow motion during pause 2 No sound can be heard Reverse slow motion does not work Press Select track Hold Reverse forward search 3 No sound can be heard Select aspect ratio twice 1 Searchspeed x2 x5 x10 x20 x60 2 Slowmotionspeed ...

Страница 183: ... Select track Hold Reverse forward search 5 Select track Stop playback Start playback pause if pressed during playback Reverse forward search 4 Press Select track Hold Reverse forward search 5 Select folder Select track within the same folder Select folder 4 Searchspeed x2 x5 x10 x20 x60 5 Searchspeed x2 x10 twice ...

Страница 184: ...creens You can use Original Program or Playlist screen anytime while playing DVD VR with its data recorded 1 Display the Original Program Playlist screen 2 Select an item you want To erase the screen 1 Original Program Playlist number 2 Recording date 3 Recording source TV station the input terminal of the recording equipment etc 4 Start time of recording 5 Title of the program playlist 6 Highligh...

Страница 185: ...Repeat play 1 Random play 1 Change the audio language audio stream or audio channel Change or erase the subtitle language Change the view angle 1 page21 2 NotapplicableforDVD VR Above example is of DVD Video Items shown on the bar vary due to the disc type 1 Disc type 2 DVD Audio signal format VCD PBC 3 Playback mode 1 DVD Video C RPT Chapter repeat T RPT Title repeat DVD VR C RPT Chapter repeat P...

Страница 186: ...for each source Bluetooth PHONE and Bluetooth AUDIO Connecting a new Bluetooth device Registration Pairing methods Use either of the following items in Bluetooth menu to register and establish the connection with a device Select Bluetooth PHONE or Bluetooth AUDIO as the source to operate Bluetooth menu Open Make the unit ready to establish a new Bluetooth connection The connection is established b...

Страница 187: ... you want to connect 5 Enter the specific PIN code of the device to the unit Refer to the instructions supplied with the device to check the PIN code 6 Operate the Bluetooth device to connect while Connecting is displayed on the screen Now connection is established and you can use the device through the unit To connect a special device Special Device 1 Press AV MENU 2 Press Bluetooth 3 Press Speci...

Страница 188: ...st the microphone volume page 59 Press SOURCE then press Bluetooth PHONE page 9 You can also use SOURCE on the monitor panel Press it repeatedly Ÿ Press AV MENU Press Bluetooth Establish the connection with a device then make a call or settings using Bluetooth menu pages 58 and 59 Sound mode page 48 Status of the device Signal strength Battery remainder only when the information comes from the dev...

Страница 189: ...ce recognition system Speak the name you want to call When an SMS comes in If the cellular phone is compatible with SMS Short Message Service you can read the messages on the screen You cannot edit or send a message through the unit When Message Info is set to Auto The unit rings and the following screen is displayed to inform you of a message arrival page 59 To read the message press Yes The sour...

Страница 190: ... to Preset List You can preset the entered number by selecting a preset number page 35 Dial Calls the entered number You can easily access Dial Menu by pressing SHORT CUT on the touch panel then You can also access Dial Menu by holding SOURCE on the monitor panel You can easily activate Voice Dialing by pressing SHORT CUT on the touch panel then You can also activate Voice Dialing by holding AV ME...

Страница 191: ...u want to preset from Phonebook Redial Received Calls or Missed Calls 1 Press AV MENU 2 Press Bluetooth 3 Press Dial Menu then Ex Selecting Received Calls 2 Select a telephone number to store 3 Select a preset number Now Tom is stored into preset no 1 Display Dial Menu screen Answer the incoming call Display the Redial menu if pressed and held regardless of the current source End the call Adjust t...

Страница 192: ...an be registered 3 Status of the device Signal strength Battery remainder only when the information comes from the device The Bluetooth icon lights up when the adapter is connected Press SOURCE then press Bluetooth AUDIO page 9 You can also use SOURCE on the monitor panel Press it repeatedly Ÿ Start playback Buttons on the touch panel In the explanation they are indicated inside 2 1 1 Whenacellula...

Страница 193: ... no MP3 indicator page 38 Tag data appears only when it is recorded Select a disc to start playing If you select an MP3 disc the Track list of the current folder appears You can select a track and start playing also page 22 If you select a folder on the list you can start playing the first track of the folder To go to the other list Sound mode page 48 4 Press Select track Hold Reverse forward sear...

Страница 194: ...he current disc All Randomly plays all tracks of all loaded discs Track Repeats current track Folder Repeats all tracks of the current folder Disc Repeats all tracks of the current disc Folder Randomly plays all tracks of current folder then tracks of next folders Disc Randomly plays all tracks of the current disc All Randomly plays all tracks of all loaded discs You can use the following buttons ...

Страница 195: ...ual Search appears on the screen then press it repeatedly Press or 5 to select a service either primary or secondary to listen to ListeningtotheDABtuner Preset no Band page 42 DAB indicators Standby Reception indicators If no signal is received No DAB Signal appears WhiletuninginaservicewithDLS DynamicLabel Segment theTEXTindicatorlightsup Sound mode page 48 Buttons on the touch panel In the expla...

Страница 196: ...red in preset number 2 When surrounding sounds are noisy Some services provide Dynamic Range Control DRC signals together with their regular programme signals DRC will reinforce the low level sounds to improve your listening The DRC indicator will light up while tuning in to a service with the DRC signals 1 2 3 As the number increases the effect becomes stronger ...

Страница 197: ...ily to your favorite service announcement type Announcement Standby Reception Indicator To activate display AV Menu screen then select Mode press On for Announce Standby below ANN The unit will temporarily switch to your favorite service from any source other than FM AM Lights up Not yet activated Tune in to another service providing the related signals Flashes To deactivate press Off for Announce...

Страница 198: ...dio Data System station this unit automatically tunes in to the DAB service When shipped from the factory Alternative Frequency Reception is activated To deactivate the Alternative Frequency Reception select Off for DAB AF page 54 You can easily activate and deactivate Announcement Standby Reception by pressing SHORT CUT on the touch panel then To change the announcement type for Announcement Stan...

Страница 199: ...t page 55 Press SOURCE then press iPod page 9 Playback starts automatically You can also use SOURCE on the monitor panel Press it repeatedly Ÿ Press 4 or to select a track Track no Playing time page 44 4 Press Select track Hold Reverse forward search 5 Enter player s menu Start playback pause To resume press again Sound mode page 48 Buttons on the touch panel In the explanation they are indicated ...

Страница 200: ...nning 3 Press to confirm the selection 4 Repeat steps 2 and 3 to select a track When a track is selected finally playback starts To return to the previous menu press 5 Selecting playback modes 1 2 3 Select an appropriate option Repeat One Functions the same as Repeat One All Functions the same as Repeat All Random Album Functions the same as Shuffle Albums Song Functions the same as Shuffle Songs ...

Страница 201: ...hing the playback picture If no operations are done for about five seconds the operation buttons disappear KEY does not work when the source is AV IN Touch the screen center portion You can easily access to Aspect setting menu by pressing SHORT CUT on the touch panel then Assigned title page 49 Sound mode page 48 Touch the screen center portion Buttons on the touch panel In the explanation they ar...

Страница 202: ...can watch the navigation screen Preparation Make sure Navigation is selected for AV Input page 55 To view the navigation screen and listen to the navigation guidance Press DISP on the monitor panel repeatedly page 9 The aspect ratio of the navigation screen is fixed to Full regardless of the Aspect setting page 52 IfyourNavigationSystemisequippedwiththevoiceguidancefunction When Navigation is sele...

Страница 203: ... not supplied Preparation Make sure External is selected for External Input page 55 Press SOURCE then press EXT IN page 9 You can also use SOURCE on the monitor panel Press it repeatedly Ÿ Turn on the connected component and start playing the source Assigned title page 49 page 48 Sound mode page 48 EXTERNAL DEVICES Buttons on the touch panel In the explanation they are indicated inside ...

Страница 204: ...our adjustments into User1 User2 and User3 1 Repeat steps and Ÿ then in step 2 Adjust 1 then store 2 Ex When storing into User2 While playing back any source other than Bluetooth PHONE you can easily access Equalizer menu by pressing SHORT CUT on the touch panel then Move to other six sound modes ...

Страница 205: ...ign a title You can enter up to 16 characters for available characters page 67 Store Confirm the entry 2 3 Move the cursor BS Erase the character before the cursor Del Erase the character on the cursor Cap Change the letter case upper lower Change Change the character set Space Enter a space Finish the procedure Assigningtitlestothesources In the explanation buttons on the touch panel are indicate...

Страница 206: ...tal procedures Some of the settings do not open the sub setting window but just selecting an option will change the setting The display indications may change according to change of the specifications Ex Changing the AV Input setting Ÿ Non available items will be shaded ...

Страница 207: ...ights 1 Dimmer Time Set Activates the Dimmer Time setting below Dimmer Time Set Sets the Dimmer On Off times Dimmer Level You can select the brightness for dimmer 1 bright 2 middle 3 dark Bright You can adjust brightness of the screen 15 darkest to 15 brightest Initial 00 Picture Adjust 2 You can adjust the following to make the screen clear and legible for watching the playback picture The settin...

Страница 208: ...Français Deutsch Italiano Nederlands Svenska Dansk Руccĸий Português The characters you can enter for assigning the titles also change according to the language selected 67 Clock Time Set Initial 0 00 8 Time Format Select either 12 hour system or 24 hour system 12Hours 24Hours 8 OSD Clock When On is selected the clock time is displayed on the playback picture Off On Clock Adjust Select Auto to adj...

Страница 209: ... contains different types of files Audio Plays back audio files Still Picture Plays back JPEG files Video Plays back DivX MPEG1 MPEG2 files Audio Video Plays back audio files and DivX MPEG1 MPEG2 files DivX Regist Registration 3 This unit has its own Registration Code Once you have played back a file with which the Registration Code recorded this unit s Registration Code is overwritten for copyrig...

Страница 210: ...ectivity to reduce interference noises between adjacent stations Stereo effect may be lost Wide Subject to the interference from adjacent stations but sound quality will not be degraded and the stereo effect will remain AF Regional When the received signals from the current station become weak Off Cancels not selectable when DAB AF is set to On AF Reg Regional Switches to another station broadcast...

Страница 211: ...ither one which mutes the sounds while using the car phone system Power LED Flash Off Cancels On When the ignition is turned off the lamp on the button flashes TouchPanel Sens Change the sensitivity of the touch panel As the number decreases sensitivity becomes higher 1 2 3 Initialize Initialize all settings you have made in AV Menu Press and hold Enter to initialize the settings then reset the un...

Страница 212: ... the left and right speakers Leftmost left only L6 Rightmost right only R6 Initial 0 Volume Adjust Adjust and store auto adjustment volume level for each source comparing to the FM volume level The volume level will automatically increase or decrease when you change the source 12 to 12 Initial 00 You can make the adjustments separately for DVD and other discs Amplifier Gain You can change the maxi...

Страница 213: ...N 49 Repeat 21 38 44 Random 21 38 44 D Dynamic Range Control Only for DAB Off DRC1 DRC2 DRC3 40 Announce Standby Only for DAB Off On 41 Announce Code Only for DAB Initial Transport News 42 1 Itemslistedunder Mode varyamongtheplaybacksources List For DISC Folder List and Track List page 22 For CD CH Disc List Folder List and Track List page 37 For the other playback sources you can display a list b...

Страница 214: ...Once the connection is established it is registered in the unit You can connect the unit and the device by using Connect below from the next time Connect Only for the registered devices After selecting a device from among the registered devices pages 30 and 31 establish the connection with it Disconnect Only for the device being connected Disconnect the current device before connecting another dev...

Страница 215: ...s Message Info 5 Auto The unit informs you of the arrival of a message by ringing and displaying Receiving Message To read the message page 33 Manual The unit does not inform you of the arrival of a message MIC Setting 5 Adjust microphone volume connected to the Bluetooth adapter 01 02 03 Version 6 The Bluetooth software and hardware versions are shown Initial Underlined 4 Selectableonlyfor Blueto...

Страница 216: ...disc around the center holder with the printed surface facing up Make sure to store discs into the cases after use To keep discs clean A dirty disc may not play correctly If a disc does become dirty wipe it with a soft cloth in a straight line from center to edge Do not use any solvent for example conventional record cleaner spray thinner benzine etc to clean discs To play new discs New discs may ...

Страница 217: ...ed within 15 seconds the disc is automatically inserted again into the loading slot to protect it from dust Playing Recordable Rewritable discs This unit can recognize a total of 5 000 files and 250 folders a maximum of 999 files per folder Use only finalized discs This unit can play back multi session discs however unclosed sessions will be skipped while playing This unit can recognize a total 25...

Страница 218: ...bps Sampling frequency 48 kHz 44 1 kHz 32 kHz for MPEG1 24 kHz 22 05 kHz 16 kHz for MPEG2 48 kHz 44 1 kHz 32 kHz 22 05 kHz for WMA 44 1 kHz for WAV This unit can show ID3 Tag Version 1 0 1 1 2 2 2 3 2 4 for MP3 This unit can also show WAV WMA Tag This unit can play back files recorded in VBR variable bit rate Files recorded in VBR have a discrepancy in elapsed time indication This unit cannot play...

Страница 219: ...found No available Bluetooth device is detected by Search Loading The unit is updating the phone book and or SMS Please Wait The unit is preparing to use the Bluetooth function If the message does not disappear turn off and turn on the unit then connect the device again or reset the unit Reset 08 Check the connection between the adapter and this unit Icons for phone types These icons indicate the ...

Страница 220: ... turn on this unit the iPod is charged through the adapter connected to this unit While the iPod is connected all operations from the iPod are disabled Perform all operations from this unit The text information may not be displayed correctly The text information scrolls on the screen This unit can display up to 40 characters Notice When operating an iPod some operations may not be performed correc...

Страница 221: ...put Playback disc Output signals Stream Dolby D PCM DVD 48 kHz 16 20 24 bits Linear PCM 48 kHz 16 bits stereo Linear PCM 96 kHz Linear PCM 48 kHz 16 bits stereo Linear PCM with Dolby Digital Dolby Digital bitstream 48 kHz 16 bits stereo Linear PCM with DTS DTS bitstream with MPEG Audio MPEG bitstream 48 kHz 16 bits stereo Linear PCM Audio CD Video CD 44 1 kHz 16 bits stereo Linear PCM 48 kHz 16 bi...

Страница 222: ...ish PS Pashto Pushto TH Thai AZ Azerbaijani GL Galician KY Kirghiz QU Quechua TI Tigrinya BA Bashkir GN Guarani LA Latin RM Rhaeto Romance TK Turkmen BE Byelorussian GU Gujarati LN Lingala RN Kirundi TL Tagalog BG Bulgarian HA Hausa LO Laothian RO Rumanian TN Setswana BH Bihari HI Hindi LT Lithuanian RW Kinyarwanda TO Tonga BI Bislama HR Croatian LV Latvian Lettish SA Sanskrit TR Turkish BN Bengal...

Страница 223: ... by the Bluetooth SIG Inc and any use of such marks by Victor Company of Japan Limited JVC is under license Other trademarks and trade names are those of their respective owners iPod and iTunes are trademarks of Apple Inc registered in the U S and other countries This product incorporates copyright protection technology that is protected by U S patents and other intellectual property rights Use of...

Страница 224: ...se this symptom Adjust Bright page 51 Position Error Push Open Key appears on the screen The monitor panel angle has been forcibly adjusted or its adjustment has been interrupted while opening or closing Press OPEN TILT Mecha Error Push Reset appears on the screen and the panel does not move Reset the unit page 3 No Signal appears Change the source Start the playback on the external component conn...

Страница 225: ...ake is engaged Parking brake lead is not connected properly Installation Connection Manual No picture appears on the external monitor Connect the video cord correctly Select the correct input on the external monitor Eject Error or Loading Error appears on the screen Change the source by pressing SOURCE Region code error appears on the screen when you insert a DVD Video Region code is not correct p...

Страница 226: ... device name from Special Device then try to connect again pages 31 58 Echo or noise occurs Adjust the microphone unit position Phone sound quality is poor Reduce the distance between the unit and the Bluetooth cellular phone Move the car to place where you can get a better signal reception The sound is interrupted or skipped during playback of a Bluetooth audio player Reduce the distance between ...

Страница 227: ...ll Connect this unit and the DAB tuner correctly then reset the unit page 3 Antenna Power NG appears on the screen Check the cords and connections iPod The iPod does not turn on or does not work Check the connection Charge the battery Sound is distorted Deactivate the equalizer either on this unit or the iPod Disconnect appears on the screen Check the connection Playback stops The headphones are d...

Страница 228: ... Input LINE IN VIDEO IN Aerial input Output VIDEO OUT Others CD changer OE REMOTE Reverse gear signal DIGITAL OUT optical FM AM TUNER Frequency Range FM 87 5 MHz to 108 0 MHz AM MW 522 kHz to 1 620 kHz LW 144 kHz to 279 kHz FM Tuner Usable Sensitivity 11 3 dBf 1 0 μV 75 Ω 50 dB Quieting Sensitivity 16 3 dBf 1 8 μV 75 Ω Alternate Channel Selectivity 400 kHz 65 dB Frequency Response 40 Hz to 15 000 ...

Страница 229: ...erature 10 C to 60 C Allowable Operating Temperature 0 C to 40 C Dimensions W H D With trim plate and sleeve attached Installation Size approx 182 mm 111 mm 160 mm Panel Size approx 188 mm 117 mm 10 mm Mass approx 2 9 kg including trims and sleeve CAUTION When ejecting the monitor leave an open space for the monitor to come out If you do not the monitor may obstruct the steering wheel and gearshif...

Страница 230: ...ния при эксплуатации Пожалуйста перезагрузите Ваше устройство Для получения информации о перезагрузке Вашего устройства обратитесь на соответствующую страницу Маєте ПРОБЛЕМУ з функціонуванням Повторно налаштуйте систему Див сторінку Як повторно налаштувати пристрій Bіктор Компані оф Джепен Лімітед 12 3 чоме Морійя чо Канагава ку Йокогама Канагава 221 8520 Японія ...

Страница 231: ...n of safety devices such as air bags as this may result in a fatal accident it may obstruct visibility DO NOT operate any unit while manipulating the steering wheel as this may result in a traffic accident The driver must not watch the monitor while driving It may lead to carelessness and cause an accident If you need to operate the unit while driving be sure to look around carefully or you may be...

Страница 232: ... деталі видалені з автомобіля для подальшого використання 2 Встановіть екран у приладову панель автомобіля 3 Приєднайте кронштейни до головного пристрою Використовуйте лише гвинти із пласкими голівками M5 x 8 мм що входять до комплекту поставки Якщо гвинти довші вони можуть пошкодити пристрій 4 Виконайте необхідні електричні з єднання Див стор 3 та 4 5 Встановіть головний пристрій всередину екрану...

Страница 233: ...омовців НЕ з єднуйте провідники живлення гучномовців з акумулятором Невиконання такої вимоги призведе до тяжкого ушкодження пристрою ПЕРЕД тим як з єднати провідники живлення з гучномовцями перевірте схему з єднання гучномовців вашого авто PRECAUTIONS on power supply and speaker connections DO NOT connect the speaker leads of the power cord to the car battery otherwise the unit will be seriously d...

Страница 234: ... або на антену якщо встановлена максимальний струм 200 мА To parking brake see diagram Å on page 3 К стояночному тормозу см схему Å на стр 3 До ручного гальма див ілюстрацію Å на стор 3 To car light control switch К контрольному переключателю освещения автомобиля До реле управління освітленням автомобіля 3 Before checking the operation of this unit prior to installation this lead must be connected...

Страница 235: ...до нього провід дистанційного вмикання синій із білою смужкою Для приєднання іншого обладнання за допомогою проводів дистанційного вмикання необхідно додатково придбати Y рознімання Відключіть гучномовці від цього пристрою приєднайте їх до підсилювача Залиште провідники гучномовців такими що не використовуються Можна вимкнути вбудований підсилювач і спрямувати звуковий сигнал тільки на зовнішній п...

Страница 236: ... описано ниже When connecting the external components refer also to the manuals supplied for the components and adapter CAUTION Before connecting the external components make sure that the unit is turned off You can connect the following JVC components to the CD changer jack JVC component Model name CD changer CD CH CH X1500 etc JVC DAB tuner KT DB1000 You can also connect the following components...

Страница 237: ...tion et les raccordements se référer au manuel séparé INSTRUCTIONS MANUAL DE INSTRUCCIONES MANUEL D INSTRUCTIONS LVT1779 003A EU For canceling the display demonstration see page 8 Para cancelar la demonstración en pantalla consulte la página 8 Pour annuler la démonstration des affichages référez vous à la page 8 DVD RECEIVER WITH MONITOR RECEPTOR DVD CON MONITOR RÉCEPTEUR DVD ET MONITEUR ...

Страница 238: ...nction Do not expose the monitor to direct sunlight Do not operate the touch panel using a ball point pen or similar tool with the sharp tip Touch the buttons on the touch panel with your finger directly if you are wearing a glove take it off When the temperature is very cold or very hot Chemical changes occur inside causing malfunction Pictures may not appear clearly or may move slowly Pictures m...

Страница 239: ...the unit Contents INTRODUCTION Playable disc types 4 Basic operations Monitor panel touch panel 5 Basic operations Remote controller RM RK252 6 OPERATIONS Before operating the unit 8 Common operations 9 Listening to the radio 10 Disc operations 16 EXTERNAL DEVICES Bluetooth operations Cellular phone audio player 30 Listening to the CD changer 37 Listening to the DAB tuner 39 Listening to the iPod ...

Страница 240: ... I Ready CD Recordable Rewritable CD R RW ISO 9660 level 1 level 2 Romeo Joliet CD DA MP3 WMA WAV JPEG DivX MPEG1 MPEG2 AAC MPEG4 1 IfyouinsertaDVDVideodiscofanincorrectRegionCode Regioncodeerror appearsonthescreen 2 DVD Rrecordedinmulti borderformatisalsoplayable exceptforduallayerdiscs DVD RWduallayerdiscsarenotplayable 3 Itispossibletoplaybackfinalized R RW Videoformatonly discs RWdoublelayerdi...

Страница 241: ...tion Change the display information OPEN Open the monitor panel EJECT Eject the disc CLOSE Close the monitor panel TILT Tilt the monitor panel Exit Erase this screen Shaded icons cannot be used In the explanation buttons on the touch panel are indicated inside For details on the touch panel operations see each source operation section Display Source Menu screen Activate deactivate TA Standby Recep...

Страница 242: ...ogram screen 6 Shows the on screen bar Does not function as R03 LR03 AAA Installing the battery Insert the batteries into the remote controller by matching the polarity and correctly Caution Battery shall not be exposed to excessive heat such as sunshine fire or the like If the range or effectiveness of the remote controller decreases replace both batteries Before using the remote controller Aim t...

Страница 243: ... the preset station service directly 1 Functionsasanumberbuttononly seeo 2 Notusedforthisunit 3 FunctionswhenpressedwithSHIFT 7 Functions with other buttons see i and o 8 Changes the display information 9 For disc operations 5 DVD Selects the title DVD VR Selects the program Playlist Other discs except VCD CD Selects the folders 4 Pressbriefly reverse skip forward skip Pressandhold reverse search ...

Страница 244: ...al English indications are used for purpose of explanation You can select the indication language page 52 Turn on the power Ÿ Display AV Menu screen Display Setup menu Cancel the demonstration Select Off Set the clock settings Finish the procedure Beforeoperatingtheunit Moves to the succeeding menu page Moves to the preceding menu page Return to the previous screen ...

Страница 245: ...ternal components you have connected media you have attached and the Input settings you have made page 55 On the touch panel On the monitor panel TUNER DAB DISC DVD VCD CD CD CH iPod or EXT IN Bluetooth PHONE Bluetooth AUDIO AV IN back to the beginning You cannot select these sources if they are not ready Exit Source information screen Clock time in large numbers Navigation screen When Navigation ...

Страница 246: ... appears on the screen then press it repeatedly The ST indicator lights up when receiving an FM stereo broadcast with sufficient signal strength 3 Reception improves but stereo effect will be lost The MONO indicator lights up To restore stereo effect select Off Preset no Band Tuner Standby Reception indicators PS station name for FM RDS If no PS signal is coming in the tuned frequency appears page...

Страница 247: ...ly for FM bands Once you have activated this function selected Local it always works when searching for FM stations 1 Press AV MENU 2 Press Mode 3 Only stations with sufficient signal strength will be detected The DX indicator goes off then the LO indicator lights up FM station automatic presetting SSM Strong station Sequential Memory This function works only for FM bands You can preset six statio...

Страница 248: ...programmes being broadcast by selecting the PTY code for your favorite programmes 1 Display PTy Search menu You can also easily access PTy Search menu by pressing SHORT CUT on the touch panel then Selecting a preset station On the remote 1 2 On the unit To select directly on the touch panel To select from the Preset List 1 2 or Hold page 14 page 48 ...

Страница 249: ...Y codes PTY Search starts If there is a station broadcasting a programme of the same PTY code as you have selected that station is tuned in Available PTY codes News Current Affairs Information Sport Education Drama Cultures Science Varied Speech Pop Music Rock Music Easy Listening Light Classics M Serious Classics Other Music Weather Metr Finance Children s Progs Social Affairs Religion Phone In T...

Страница 250: ...Menu screen press Mode then press On for PTy Standby next column PTY The unit will temporarily switch to your favorite PTY programme from any source other than AM Lights up Not yet activated Tune in to another station providing the RDS signals Flashes To deactivate press Off for PTy Standby in step 3 on the next column Goes off When a DAB tuner is connected TA Standby PTY Standby Reception also wo...

Страница 251: ...on is activated To change the Network Tracking Reception setting see AF Regional page 54 When the DAB tuner is connected refer also to Tracing the same programme Alternative Frequency Reception DAB AF page 42 Automatic station selection Programme Search Usually when you select preset stations the preset station is tuned in If the signals from the FM RDS preset station are not sufficient for good r...

Страница 252: ...t cannot accept the operation you have tried to do In some cases without showing operations will not be accepted Label side Caution on volume setting Discs produce very little noise compared with other sources Lower the volume before playing a disc to avoid damaging the speakers by the sudden increase of the output level When playing back a multi channel encoded disc the multi channel signals are ...

Страница 253: ...e 1 Sampling frequency Bit rate Recorded signal channel no page 22 3 8 Start and pause playback 7 Stop playback 4 Press Select chapter Hold Reverse forward search 2 5 Select title program playlist 1 DVD VRalsoindicateseitherPRG program orPLAY playlist playback 2 Searchspeed x2 x10 Buttons on the touch panel In the explanation they are indicated inside These buttons also work when they are not show...

Страница 254: ...ck Hold Reverse forward search for DivX MPEG1 MPEG2 1 5 Press Select folder Hold Display Folder list While playing the following discs press Each time you press the button the display changes to show the different information page 9 Disc type page 22 page 22 The PBC indicator lights up when PBC is in use Total track no included on the disc Total track no included on the disc Total playing time Sou...

Страница 255: ... only when it is recorded Sound mode page 48 page 22 3 8 Start and pause playback 7 Stop playback 4 Press Select track Hold Reverse forward search 4 5 Press Select folder Hold Display Folder list 3 8 Start and pause playback 7 Stop playback 4 Press Select track Hold Reverse forward search 4 Total track no included on the disc Total playing time Total track no included on the disc Sound mode page 4...

Страница 256: ...ayback 4 Press Select track Hold Reverse forward search 5 Select folders The above buttons also work when they are not shown on the screen while watching the playback picture WhileadiscmenuisplayedbackforDVD KEY is automaticallydisplayed Onthediscmenu you canselecta menuitemdirectlybytouchingitonthescreen B For DVD VCD DivX menu operation playback 235 Select the menu items ENT Confirm the selectio...

Страница 257: ...able for Playlist playback Track Repeats current track Folder Repeats current folder Folder Randomly plays all tracks of current folder then tracks of next folders Disc All Randomly plays all tracks Folder Repeats current folder Track Repeats current track PBC not in use Disc All Randomly plays all tracks PBC not in use Track Repeats current track 1 Disc All Randomly plays all tracks Track Repeats...

Страница 258: ...isc includes folders you can display the Folder Track File Lists then start playback 1 2 3 Select a folder 1 then a track 2 Selected track starts playing Press to move to the previous next pages of the list 1 Current folder list number total folder list number 2 Current track list number total track list number of the current folder You can easily access the Track List by pressing DISP on the moni...

Страница 259: ...io Select chapter Select title when not playing Select title during playback or pause Using menu driven features 1 2 Select an item you want to start playback 3 1 Searchspeed x2 x5 x10 x20 x60 2 Slowmotionspeed 1 32 1 16 1 8 1 4 1 2 3 Searchspeed x2 x10 Operations using the remote controller RM RK252 Also functions as CLR clear Erases a misentry if pressed while holding SHIFT You can change the fo...

Страница 260: ...ct program Select playlist during playback or pause Select aspect ratio Select chapter Select program when not playing Select program playlist during playback or pause Using Original Program Playlist screens page 28 1 For Original Program For Playlist 2 Select an item you want to start playback 3 To erase the screen 1 Searchspeed x2 x5 x10 x20 x60 2 Slowmotionspeed 1 32 1 16 1 8 1 4 1 2 3 Searchsp...

Страница 261: ...arch 5 No sound can be heard Select folder Select aspect ratio Select track within the same folder Select folder While playing Reverse advance the scenes by five minutes For DivX6 Using menu driven features 1 2 Select an item you want to start playback 3 4 Searchspeed 1 2 3 5 Searchspeed 1 2 Current playback position twice 2nd press 2nd press 1st press 1st press 3rd press ...

Страница 262: ...ss To cancel PBC playback 1 2 Select the desired track To resume PBC press Stop playback Start playback pause if pressed during playback Reverse forward search 1 Forward slow motion during pause 2 No sound can be heard Reverse slow motion does not work Press Select track Hold Reverse forward search 3 No sound can be heard Select aspect ratio twice 1 Searchspeed x2 x5 x10 x20 x60 2 Slowmotionspeed ...

Страница 263: ... Select track Hold Reverse forward search 5 Select track Stop playback Start playback pause if pressed during playback Reverse forward search 4 Press Select track Hold Reverse forward search 5 Select folder Select track within the same folder Select folder 4 Searchspeed x2 x5 x10 x20 x60 5 Searchspeed x2 x10 twice ...

Страница 264: ...creens You can use Original Program or Playlist screen anytime while playing DVD VR with its data recorded 1 Display the Original Program Playlist screen 2 Select an item you want To erase the screen 1 Original Program Playlist number 2 Recording date 3 Recording source TV station the input terminal of the recording equipment etc 4 Start time of recording 5 Title of the program playlist 6 Highligh...

Страница 265: ...Repeat play 1 Random play 1 Change the audio language audio stream or audio channel Change or erase the subtitle language Change the view angle 1 page21 2 NotapplicableforDVD VR Above example is of DVD Video Items shown on the bar vary due to the disc type 1 Disc type 2 DVD Audio signal format VCD PBC 3 Playback mode 1 DVD Video C RPT Chapter repeat T RPT Title repeat DVD VR C RPT Chapter repeat P...

Страница 266: ...for each source Bluetooth PHONE and Bluetooth AUDIO Connecting a new Bluetooth device Registration Pairing methods Use either of the following items in Bluetooth menu to register and establish the connection with a device Select Bluetooth PHONE or Bluetooth AUDIO as the source to operate Bluetooth menu Open Make the unit ready to establish a new Bluetooth connection The connection is established b...

Страница 267: ... you want to connect 5 Enter the specific PIN code of the device to the unit Refer to the instructions supplied with the device to check the PIN code 6 Operate the Bluetooth device to connect while Connecting is displayed on the screen Now connection is established and you can use the device through the unit To connect a special device Special Device 1 Press AV MENU 2 Press Bluetooth 3 Press Speci...

Страница 268: ...st the microphone volume page 59 Press SOURCE then press Bluetooth PHONE page 9 You can also use SOURCE on the monitor panel Press it repeatedly Ÿ Press AV MENU Press Bluetooth Establish the connection with a device then make a call or settings using Bluetooth menu pages 58 and 59 Sound mode page 48 Status of the device Signal strength Battery remainder only when the information comes from the dev...

Страница 269: ...ce recognition system Speak the name you want to call When an SMS comes in If the cellular phone is compatible with SMS Short Message Service you can read the messages on the screen You cannot edit or send a message through the unit When Message Info is set to Auto The unit rings and the following screen is displayed to inform you of a message arrival page 59 To read the message press Yes The sour...

Страница 270: ... to Preset List You can preset the entered number by selecting a preset number page 35 Dial Calls the entered number You can easily access Dial Menu by pressing SHORT CUT on the touch panel then You can also access Dial Menu by holding SOURCE on the monitor panel You can easily activate Voice Dialing by pressing SHORT CUT on the touch panel then You can also activate Voice Dialing by holding AV ME...

Страница 271: ...u want to preset from Phonebook Redial Received Calls or Missed Calls 1 Press AV MENU 2 Press Bluetooth 3 Press Dial Menu then Ex Selecting Received Calls 2 Select a telephone number to store 3 Select a preset number Now Tom is stored into preset no 1 Display Dial Menu screen Answer the incoming call Display the Redial menu if pressed and held regardless of the current source End the call Adjust t...

Страница 272: ...an be registered 3 Status of the device Signal strength Battery remainder only when the information comes from the device The Bluetooth icon lights up when the adapter is connected Press SOURCE then press Bluetooth AUDIO page 9 You can also use SOURCE on the monitor panel Press it repeatedly Ÿ Start playback Buttons on the touch panel In the explanation they are indicated inside 2 1 1 Whenacellula...

Страница 273: ... no MP3 indicator page 38 Tag data appears only when it is recorded Select a disc to start playing If you select an MP3 disc the Track list of the current folder appears You can select a track and start playing also page 22 If you select a folder on the list you can start playing the first track of the folder To go to the other list Sound mode page 48 4 Press Select track Hold Reverse forward sear...

Страница 274: ...he current disc All Randomly plays all tracks of all loaded discs Track Repeats current track Folder Repeats all tracks of the current folder Disc Repeats all tracks of the current disc Folder Randomly plays all tracks of current folder then tracks of next folders Disc Randomly plays all tracks of the current disc All Randomly plays all tracks of all loaded discs You can use the following buttons ...

Страница 275: ...ual Search appears on the screen then press it repeatedly Press or 5 to select a service either primary or secondary to listen to ListeningtotheDABtuner Preset no Band page 42 DAB indicators Standby Reception indicators If no signal is received No DAB Signal appears WhiletuninginaservicewithDLS DynamicLabel Segment theTEXTindicatorlightsup Sound mode page 48 Buttons on the touch panel In the expla...

Страница 276: ...red in preset number 2 When surrounding sounds are noisy Some services provide Dynamic Range Control DRC signals together with their regular programme signals DRC will reinforce the low level sounds to improve your listening The DRC indicator will light up while tuning in to a service with the DRC signals 1 2 3 As the number increases the effect becomes stronger ...

Страница 277: ...your favorite service announcement type Announcement Standby Reception Indicator To activate display AV Menu screen then select Mode press On for Announce Standby below ANN The unit will temporarily switch to your favorite service from any source other than FM AM Lights up Not yet activated Tune in to another service providing the related signals Flashes To deactivate press Off for Announce Standb...

Страница 278: ...on this unit automatically tunes in to the DAB service When shipped from the factory Alternative Frequency Reception is activated To deactivate the Alternative Frequency Reception select Off for DAB AF page 54 You can easily activate and deactivate Announcement Standby Reception by pressing SHORT CUT on the touch panel then To change the announcement type for Announcement Standby Reception 1 Press...

Страница 279: ...t page 55 Press SOURCE then press iPod page 9 Playback starts automatically You can also use SOURCE on the monitor panel Press it repeatedly Ÿ Press 4 or to select a track Track no Playing time page 44 4 Press Select track Hold Reverse forward search 5 Enter player s menu Start playback pause To resume press again Sound mode page 48 Buttons on the touch panel In the explanation they are indicated ...

Страница 280: ...nning 3 Press to confirm the selection 4 Repeat steps 2 and 3 to select a track When a track is selected finally playback starts To return to the previous menu press 5 Selecting playback modes 1 2 3 Select an appropriate option Repeat One Functions the same as Repeat One All Functions the same as Repeat All Random Album Functions the same as Shuffle Albums Song Functions the same as Shuffle Songs ...

Страница 281: ...hing the playback picture If no operations are done for about five seconds the operation buttons disappear KEY does not work when the source is AV IN Touch the screen center portion You can easily access to Aspect setting menu by pressing SHORT CUT on the touch panel then Assigned title page 49 Sound mode page 48 Touch the screen center portion Buttons on the touch panel In the explanation they ar...

Страница 282: ...can watch the navigation screen Preparation Make sure Navigation is selected for AV Input page 55 To view the navigation screen and listen to the navigation guidance Press DISP on the monitor panel repeatedly page 9 The aspect ratio of the navigation screen is fixed to Full regardless of the Aspect setting page 52 IfyourNavigationSystemisequippedwiththevoiceguidancefunction When Navigation is sele...

Страница 283: ... not supplied Preparation Make sure External is selected for External Input page 55 Press SOURCE then press EXT IN page 9 You can also use SOURCE on the monitor panel Press it repeatedly Ÿ Turn on the connected component and start playing the source Assigned title page 49 page 48 Sound mode page 48 EXTERNAL DEVICES Buttons on the touch panel In the explanation they are indicated inside ...

Страница 284: ...our adjustments into User1 User2 and User3 1 Repeat steps and Ÿ then in step 2 Adjust 1 then store 2 Ex When storing into User2 While playing back any source other than Bluetooth PHONE you can easily access Equalizer menu by pressing SHORT CUT on the touch panel then Move to other six sound modes ...

Страница 285: ...ign a title You can enter up to 16 characters for available characters page 67 Store Confirm the entry 2 3 Move the cursor BS Erase the character before the cursor Del Erase the character on the cursor Cap Change the letter case upper lower Change Change the character set Space Enter a space Finish the procedure Assigningtitlestothesources In the explanation buttons on the touch panel are indicate...

Страница 286: ...tal procedures Some of the settings do not open the sub setting window but just selecting an option will change the setting The display indications may change according to change of the specifications Ex Changing the AV Input setting Ÿ Non available items will be shaded ...

Страница 287: ...ights 1 Dimmer Time Set Activates the Dimmer Time setting below Dimmer Time Set Sets the Dimmer On Off times Dimmer Level You can select the brightness for dimmer 1 bright 2 middle 3 dark Bright You can adjust brightness of the screen 15 darkest to 15 brightest Initial 00 Picture Adjust 2 You can adjust the following to make the screen clear and legible for watching the playback picture The settin...

Страница 288: ...spañol Français Deutsch Italiano Nederlands Svenska Dansk Руccĸий Português The characters you can enter for assigning the titles also change according to the language selected 67 Clock Time Set Initial 0 00 8 Time Format Select either 12 hour system or 24 hour system 12Hours 24Hours 8 OSD Clock When On is selected the clock time is displayed on the playback picture Off On Clock Adjust Select Auto...

Страница 289: ... contains different types of files Audio Plays back audio files Still Picture Plays back JPEG files Video Plays back DivX MPEG1 MPEG2 files Audio Video Plays back audio files and DivX MPEG1 MPEG2 files DivX Regist Registration 3 This unit has its own Registration Code Once you have played back a file with which the Registration Code recorded this unit s Registration Code is overwritten for copyrig...

Страница 290: ...ectivity to reduce interference noises between adjacent stations Stereo effect may be lost Wide Subject to the interference from adjacent stations but sound quality will not be degraded and the stereo effect will remain AF Regional When the received signals from the current station become weak Off Cancels not selectable when DAB AF is set to On AF Reg Regional Switches to another station broadcast...

Страница 291: ...ither one which mutes the sounds while using the car phone system Power LED Flash Off Cancels On When the ignition is turned off the lamp on the button flashes TouchPanel Sens Change the sensitivity of the touch panel As the number decreases sensitivity becomes higher 1 2 3 Initialize Initialize all settings you have made in AV Menu Press and hold Enter to initialize the settings then reset the un...

Страница 292: ... the left and right speakers Leftmost left only L6 Rightmost right only R6 Initial 0 Volume Adjust Adjust and store auto adjustment volume level for each source comparing to the FM volume level The volume level will automatically increase or decrease when you change the source 12 to 12 Initial 00 You can make the adjustments separately for DVD and other discs Amplifier Gain You can change the maxi...

Страница 293: ...N 49 Repeat 21 38 44 Random 21 38 44 D Dynamic Range Control Only for DAB Off DRC1 DRC2 DRC3 40 Announce Standby Only for DAB Off On 41 Announce Code Only for DAB Initial Transport News 42 1 Itemslistedunder Mode varyamongtheplaybacksources List For DISC Folder List and Track List page 22 For CD CH Disc List Folder List and Track List page 37 For the other playback sources you can display a list b...

Страница 294: ...Once the connection is established it is registered in the unit You can connect the unit and the device by using Connect below from the next time Connect Only for the registered devices After selecting a device from among the registered devices pages 30 and 31 establish the connection with it Disconnect Only for the device being connected Disconnect the current device before connecting another dev...

Страница 295: ...s Message Info 5 Auto The unit informs you of the arrival of a message by ringing and displaying Receiving Message To read the message page 33 Manual The unit does not inform you of the arrival of a message MIC Setting 5 Adjust microphone volume connected to the Bluetooth adapter 01 02 03 Version 6 The Bluetooth software and hardware versions are shown Initial Underlined 4 Selectableonlyfor Blueto...

Страница 296: ...disc around the center holder with the printed surface facing up Make sure to store discs into the cases after use To keep discs clean A dirty disc may not play correctly If a disc does become dirty wipe it with a soft cloth in a straight line from center to edge Do not use any solvent for example conventional record cleaner spray thinner benzine etc to clean discs To play new discs New discs may ...

Страница 297: ...ed within 15 seconds the disc is automatically inserted again into the loading slot to protect it from dust Playing Recordable Rewritable discs This unit can recognize a total of 5 000 files and 250 folders a maximum of 999 files per folder Use only finalized discs This unit can play back multi session discs however unclosed sessions will be skipped while playing This unit can recognize a total 25...

Страница 298: ...bps Sampling frequency 48 kHz 44 1 kHz 32 kHz for MPEG1 24 kHz 22 05 kHz 16 kHz for MPEG2 48 kHz 44 1 kHz 32 kHz 22 05 kHz for WMA 44 1 kHz for WAV This unit can show ID3 Tag Version 1 0 1 1 2 2 2 3 2 4 for MP3 This unit can also show WAV WMA Tag This unit can play back files recorded in VBR variable bit rate Files recorded in VBR have a discrepancy in elapsed time indication This unit cannot play...

Страница 299: ...found No available Bluetooth device is detected by Search Loading The unit is updating the phone book and or SMS Please Wait The unit is preparing to use the Bluetooth function If the message does not disappear turn off and turn on the unit then connect the device again or reset the unit Reset 08 Check the connection between the adapter and this unit Icons for phone types These icons indicate the ...

Страница 300: ... turn on this unit the iPod is charged through the adapter connected to this unit While the iPod is connected all operations from the iPod are disabled Perform all operations from this unit The text information may not be displayed correctly The text information scrolls on the screen This unit can display up to 40 characters Notice When operating an iPod some operations may not be performed correc...

Страница 301: ...put Playback disc Output signals Stream Dolby D PCM DVD 48 kHz 16 20 24 bits Linear PCM 48 kHz 16 bits stereo Linear PCM 96 kHz Linear PCM 48 kHz 16 bits stereo Linear PCM with Dolby Digital Dolby Digital bitstream 48 kHz 16 bits stereo Linear PCM with DTS DTS bitstream with MPEG Audio MPEG bitstream 48 kHz 16 bits stereo Linear PCM Audio CD Video CD 44 1 kHz 16 bits stereo Linear PCM 48 kHz 16 bi...

Страница 302: ...ish PS Pashto Pushto TH Thai AZ Azerbaijani GL Galician KY Kirghiz QU Quechua TI Tigrinya BA Bashkir GN Guarani LA Latin RM Rhaeto Romance TK Turkmen BE Byelorussian GU Gujarati LN Lingala RN Kirundi TL Tagalog BG Bulgarian HA Hausa LO Laothian RO Rumanian TN Setswana BH Bihari HI Hindi LT Lithuanian RW Kinyarwanda TO Tonga BI Bislama HR Croatian LV Latvian Lettish SA Sanskrit TR Turkish BN Bengal...

Страница 303: ...DivX Ultra Certified product Plays all versions of DivX video including DivX 6 with enhanced playback of DivX media files and the DivX Media Format Microsoft and Windows Media are either registered trademarks or trademarks of Microsoft Corporation in the United States and or other countries The Bluetooth word mark and logos are owned by the Bluetooth SIG Inc and any use of such marks by Victor Com...

Страница 304: ...se this symptom Adjust Bright page 51 Position Error Push Open Key appears on the screen The monitor panel angle has been forcibly adjusted or its adjustment has been interrupted while opening or closing Press OPEN TILT Mecha Error Push Reset appears on the screen and the panel does not move Reset the unit page 3 No Signal appears Change the source Start the playback on the external component conn...

Страница 305: ...ake is engaged Parking brake lead is not connected properly Installation Connection Manual No picture appears on the external monitor Connect the video cord correctly Select the correct input on the external monitor Eject Error or Loading Error appears on the screen Change the source by pressing SOURCE Region code error appears on the screen when you insert a DVD Video Region code is not correct p...

Страница 306: ... device name from Special Device then try to connect again pages 31 58 Echo or noise occurs Adjust the microphone unit position Phone sound quality is poor Reduce the distance between the unit and the Bluetooth cellular phone Move the car to place where you can get a better signal reception The sound is interrupted or skipped during playback of a Bluetooth audio player Reduce the distance between ...

Страница 307: ...ll Connect this unit and the DAB tuner correctly then reset the unit page 3 Antenna Power NG appears on the screen Check the cords and connections iPod The iPod does not turn on or does not work Check the connection Charge the battery Sound is distorted Deactivate the equalizer either on this unit or the iPod Disconnect appears on the screen Check the connection Playback stops The headphones are d...

Страница 308: ... Input LINE IN VIDEO IN Aerial input Output VIDEO OUT Others CD changer OE REMOTE Reverse gear signal DIGITAL OUT optical FM AM TUNER Frequency Range FM 87 5 MHz to 108 0 MHz AM MW 522 kHz to 1 620 kHz LW 144 kHz to 279 kHz FM Tuner Usable Sensitivity 11 3 dBf 1 0 μV 75 Ω 50 dB Quieting Sensitivity 16 3 dBf 1 8 μV 75 Ω Alternate Channel Selectivity 400 kHz 65 dB Frequency Response 40 Hz to 15 000 ...

Страница 309: ...erature 10 C to 60 C Allowable Operating Temperature 0 C to 40 C Dimensions W H D With trim plate and sleeve attached Installation Size approx 182 mm 111 mm 160 mm Panel Size approx 188 mm 117 mm 10 mm Mass approx 2 9 kg including trims and sleeve CAUTION When ejecting the monitor leave an open space for the monitor to come out If you do not the monitor may obstruct the steering wheel and gearshif...

Страница 310: ...your unit Refer to page of How to reset your unit Tiene PROBLEMAS con la operación Por favor reinicialice su unidad Consulte la página de Cómo reposicionar su unidad Vous avez des PROBLÈMES de fonctionnement Réinitialisez votre appareil Référez vous à la page intitulée Comment réinitialiser votre appareil ...

Страница 311: ...ns as this may result in a traffic accident it may obstruct the operation of safety devices such as air bags as this may result in a fatal accident it may obstruct visibility DO NOT operate any unit while manipulating the steering wheel as this may result in a traffic accident The driver must not watch the monitor while driving It may lead to carelessness and cause an accident If you need to opera...

Страница 312: ...e future 2 Installez le manchon dans le tableau de bord de la voiture 3 Attachez les supports à l appareil principal Assurez vous d utiliser les vis à tête plate fournis M5 8 mm Vous risquez d endommager l appareil si vous utilisez des vis plus longues 4 Réalisez les connexions électriques requises Référez vous aux pages 3 et 4 5 Installez l appareil principal dans le manchon 6 Fixez la plaque d a...

Страница 313: ...au la mise à la masse de cet appareil au châssis de la voiture après l installation PRECAUTIONS sur l alimentation et la connexion des enceintes NE CONNECTEZ PAS les fils d enceintes du cordon d alimentation à la batterie sinon l appareil serait sérieusement endommagé AVANT de connecter les fils d enceintes du cordon d alimentation aux enceintes vérifiez le câblage des enceintes de votre voiture P...

Страница 314: ...u à l antenne automatique s il y en a une 200 mA max To parking brake see diagram Å on page 3 Al freno de estacionamiento véase el diagrama Å de la página 3 Au frein de stationnement voir le diagramme Å de la page 3 To car light control switch Al interruptor de control de las luces del automóvil À l interrupteur d éclairage de la voiture 3 Before checking the operation of this unit prior to instal...

Страница 315: ...élécommande bleu à bande blanche de cet appareil à l amplificateur Pour connecter un autre appareil en utilisant les fils de télécommande vous devez acheter des connecteurs Y séparément Déconnectez les enceintes de l appareil principal et connectez les aux amplificateurs Laissez les fils d enceintes de l appareil inutilisés Vous pouvez mettre hors service l amplificateur intégré et envoyer les sig...

Страница 316: ...tes en serie como se explica a continuación When connecting the external components refer also to the manuals supplied for the components and adapter CAUTION Before connecting the external components make sure that the unit is turned off You can connect the following JVC components to the CD changer jack JVC component Model name CD changer CD CH CH X1500 etc JVC DAB tuner KT DB1000 You can also co...

Страница 317: ... For installation and connections refer to the separate manual INSTRUCTIONS LVT1780 005A UT For canceling the display demonstration see page 8 DVD RECEIVER WITH MONITOR KW AVX716 KW AVX710 KW AVX716 KW AVX710 ...

Страница 318: ...ble and is not malfunction Do not expose the monitor to direct sunlight Do not operate the touch panel using a ball point pen or similar tool with the sharp tip Touch the buttons on the touch panel with your finger directly if you are wearing a glove take it off When the temperature is very cold or very hot Chemical changes occur inside causing malfunction Pictures may not appear clearly or may mo...

Страница 319: ...fore operating the unit Contents INTRODUCTION Playable disc types 4 Basic operations Monitor panel touch panel 5 Basic operations Remote controller RM RK252 6 OPERATIONS Before operating the unit 8 Common operations 9 Listening to the radio 10 Disc operations 13 EXTERNAL DEVICES Bluetooth operations Cellular phone audio player 27 Listening to the CD changer 34 Listening to the iPod 36 Using other ...

Страница 320: ... I Ready CD Recordable Rewritable CD R RW ISO 9660 level 1 level 2 Romeo Joliet CD DA MP3 WMA WAV JPEG DivX MPEG1 MPEG2 AAC MPEG4 1 IfyouinsertaDVDVideodiscofanincorrectRegionCode Regioncodeerror appearsonthescreen 2 DVD Rrecordedinmulti borderformatisalsoplayable exceptforduallayerdiscs DVD RWduallayerdiscsarenotplayable 3 Itispossibletoplaybackfinalized R RW Videoformatonly discs RWdoublelayerdi...

Страница 321: ...ach source operation section Change the display information OPEN Open the monitor panel EJECT Eject the disc CLOSE Close the monitor panel TILT Tilt the monitor panel Exit Erase this screen Shaded icons cannot be used In the explanation buttons on the touch panel are indicated inside For details on the touch panel operations see each source operation section Display Source Menu screen Display AV M...

Страница 322: ...s the disc menu VCD Resumes PBC playback DVD VR Shows the Original Program screen 6 Shows the on screen bar Does not function as R03 LR03 AAA Installing the battery Insert the batteries into the remote controller by matching the polarity and correctly Caution Battery shall not be exposed to excessive heat such as sunshine fire or the like If the range or effectiveness of the remote controller decr...

Страница 323: ...unction as SURROUND o 3 Number buttons Enters numbers TUNER Selects the preset station directly 1 Functionsasanumberbuttononly seeo 2 Notusedforthisunit 3 FunctionswhenpressedwithSHIFT 7 Functions with other buttons see i and o 8 Changes the display information 9 For disc operations 5 DVD Selects the title DVD VR Selects the program Playlist Other discs except VCD CD Selects the folders 4 Pressbri...

Страница 324: ...al English indications are used for purpose of explanation You can select the indication language page 45 Turn on the power Ÿ Display AV Menu screen Display Setup menu Cancel the demonstration Select Off Set the clock settings Finish the procedure Beforeoperatingtheunit Moves to the succeeding menu page Moves to the preceding menu page Return to the previous screen ...

Страница 325: ...external components you have connected media you have attached and the Input settings you have made page 47 On the touch panel On the monitor panel TUNER DISC DVD VCD CD CD CH iPod or EXT IN Bluetooth PHONE Bluetooth AUDIO AV IN back to the beginning You cannot select these sources if they are not ready Exit Source information screen Clock time in large numbers Navigation screen When Navigation is...

Страница 326: ... either 4 or until Manual Search appears on the screen then press it repeatedly The ST indicator lights up when receiving an FM stereo broadcast with sufficient signal strength 3 Reception improves but stereo effect will be lost The MONO indicator lights up To restore stereo effect select Off Preset no Band Tuner indicators Assigned station name page 42 If no name is assigned the frequency of the ...

Страница 327: ...and Tuning in to stations with sufficient signal strength This function works only for FM bands Once you have activated this function selected Local it always works when searching for FM stations 1 Press AV MENU You can also use AV MENU on the monitor panel 2 Press Mode 3 Only stations with sufficient signal strength will be detected The DX indicator goes off then the LO indicator lights up You ca...

Страница 328: ... panel To select from the Preset List 1 2 or Hold Manual presetting Ex Storing FM station of 92 5 MHz into preset number 4 of the FM1 band 1 Display the Preset List 2 Tune in to a station you want to preset 3 Select a preset number The station selected in step 2 is now stored in preset number 4 Hold ...

Страница 329: ...he unit cannot accept the operation you have tried to do In some cases without showing operations will not be accepted Label side Caution on volume setting Discs produce very little noise compared with other sources Lower the volume before playing a disc to avoid damaging the speakers by the sudden increase of the output level When playing back a multi channel encoded disc the multi channel signal...

Страница 330: ...ampling frequency Bit rate Recorded signal channel no page 19 3 8 Start and pause playback 7 Stop playback 4 Press Select chapter Hold Reverse forward search 2 5 Select title program playlist 1 DVD VRalsoindicateseitherPRG program orPLAY playlist playback 2 Searchspeed x2 x10 Buttons on the touch panel In the explanation they are indicated inside These buttons also work when they are not shown on ...

Страница 331: ...ct track Hold Reverse forward search for DivX MPEG1 MPEG2 1 5 Press Select folder Hold Display Folder list While playing the following discs press Each time you press the button the display changes to show the different information page 9 Disc type page 19 page 19 The PBC indicator lights up when PBC is in use Total track no included on the disc Total track no included on the disc Total playing ti...

Страница 332: ... when it is recorded Sound mode page 41 page 19 3 8 Start and pause playback 7 Stop playback 4 Press Select track Hold Reverse forward search 4 5 Press Select folder Hold Display Folder list 3 8 Start and pause playback 7 Stop playback 4 Press Select track Hold Reverse forward search 4 Total track no included on the disc Total playing time Total track no included on the disc Sound mode page 41 ...

Страница 333: ...top playback 4 Press Select track Hold Reverse forward search 5 Select folders The above buttons also work when they are not shown on the screen while watching the playback picture WhileadiscmenuisplayedbackforDVD KEY is automaticallydisplayed Onthediscmenu you canselecta menuitemdirectlybytouchingitonthescreen B For DVD VCD DivX menu operation playback 235 Select the menu items ENT Confirm the se...

Страница 334: ... program not available for Playlist playback Track Repeats current track Folder Repeats current folder Folder Randomly plays all tracks of current folder then tracks of next folders Disc All Randomly plays all tracks Folder Repeats current folder Track Repeats current track PBC not in use Disc All Randomly plays all tracks PBC not in use Track Repeats current track 1 Disc All Randomly plays all tr...

Страница 335: ...rs you can display the Folder Track File Lists then start playback 1 You can also use AV MENU on the monitor panel 2 3 Select a folder 1 then a track 2 Selected track starts playing Press to move to the previous next pages of the list 1 Current folder list number total folder list number 2 Current track list number total track list number of the current folder You can easily access the Track List ...

Страница 336: ...lect chapter Select title when not playing Select title during playback or pause Using menu driven features 1 2 Select an item you want to start playback 3 1 Searchspeed x2 x5 x10 x20 x60 2 Slowmotionspeed 1 32 1 16 1 8 1 4 1 2 3 Searchspeed x2 x10 Operations using the remote controller RM RK252 Also functions as CLR clear Erases a misentry if pressed while holding SHIFT You can change the followi...

Страница 337: ... or pause Hold Reverse forward search 6 Select program Select playlist during playback or pause Select aspect ratio Select chapter Select program when not playing Select program playlist during playback or pause Using Original Program Playlist screens page 25 1 For Original Program For Playlist 2 Select an item you want to start playback 3 To erase the screen 4 Searchspeed x2 x5 x10 x20 x60 5 Slow...

Страница 338: ...ect track Hold Reverse forward search 2 No sound can be heard Select folder Select aspect ratio Select track within the same folder Select folder While playing Reverse advance the scenes by five minutes For DivX6 Using menu driven features 1 2 Select an item you want to start playback 3 1 Searchspeed 1 2 3 2 Searchspeed 1 2 Current playback position twice 2nd press 2nd press 1st press 1st press 3r...

Страница 339: ... the menu To return to the previous menu press To cancel PBC playback 1 2 Select the desired track To resume PBC press Stop playback Start playback pause if pressed during playback Reverse forward search 3 Forward slow motion during pause 4 No sound can be heard Reverse slow motion does not work Press Select track Hold Reverse forward search 5 No sound can be heard Select aspect ratio twice 3 Sear...

Страница 340: ... x2 x5 x10 x20 x60 2 Searchspeed x2 x10 Stop playback Start playback pause if pressed during playback Reverse forward search 3 Press Select track Hold Reverse forward search 4 Select folder Select track within the same folder Select folder 3 Searchspeed x2 x5 x10 x20 x60 4 Searchspeed x2 x10 twice Also functions as CLR clear Erases a misentry if pressed while holding SHIFT ...

Страница 341: ...ist screens You can use Original Program or Playlist screen anytime while playing DVD VR with its data recorded 1 Display the Original Program Playlist screen 2 Select an item you want To erase the screen 1 Original Program Playlist number 2 Recording date 3 Recording source TV station the input terminal of the recording equipment etc 4 Start time of recording 5 Title of the program playlist 6 Hig...

Страница 342: ... play 1 Random play 1 Change the audio language audio stream or audio channel Change or erase the subtitle language Change the view angle 1 page18 2 NotapplicableforDVD VR Above example is of DVD Video Items shown on the bar vary due to the disc type 1 Disc type 2 DVD Audio signal format VCD PBC 3 Playback mode 1 DVD Video C RPT Chapter repeat T RPT Title repeat DVD VR C RPT Chapter repeat PG RPT ...

Страница 343: ...ONE and Bluetooth AUDIO Connecting a new Bluetooth device Registration Pairing methods Use either of the following items in Bluetooth menu to register and establish the connection with a device Select Bluetooth PHONE or Bluetooth AUDIO as the source to operate Bluetooth menu Open Make the unit ready to establish a new Bluetooth connection The connection is established by operating the Bluetooth de...

Страница 344: ...vice to the unit Refer to the instructions supplied with the device to check the PIN code 6 Operate the Bluetooth device to connect while Connecting is displayed on the screen Now connection is established and you can use the device through the unit To connect a special device Special Device 1 Press AV MENU on the touch panel or AV MENU on the monitor panel 2 Press Bluetooth 3 Press Special Device...

Страница 345: ...one volume page 51 Press SOURCE then press Bluetooth PHONE page 9 You can also use SOURCE on the monitor panel Press it repeatedly Ÿ Press AV MENU You can also use AV MENU on the monitor panel Press Bluetooth Establish the connection with a device then make a call or settings using Bluetooth menu pages 50 and 51 Sound mode page 41 Status of the device Signal strength Battery remainder only when th...

Страница 346: ... name you want to call When an SMS comes in If the cellular phone is compatible with SMS Short Message Service you can read the messages on the screen You cannot edit or send a message through the unit When Message Info is set to Auto The unit rings and the following screen is displayed to inform you of a message arrival page 51 To read the message press Yes The source is changed to Bluetooth PHON...

Страница 347: ...eset Goes to Preset List You can preset the entered number by selecting a preset number page 32 Dial Calls the entered number You can easily access Dial Menu by pressing SHORT CUT on the touch panel then You can also access Dial Menu by holding SOURCE on the monitor panel You can easily activate Voice Dialing by pressing SHORT CUT on the touch panel then You can also activate Voice Dialing by hold...

Страница 348: ...l Received Calls or Missed Calls 1 Press AV MENU on the touch panel or AV MENU on the monitor panel 2 Press Bluetooth 3 Press Dial Menu then Ex Selecting Received Calls 2 Select a telephone number to store 3 Select a preset number Now Tom is stored into preset no 1 Display Dial Menu screen Answer the incoming call Display the Redial menu if pressed and held regardless of the current source End the...

Страница 349: ... device can be registered 3 Status of the device Signal strength Battery remainder only when the information comes from the device The Bluetooth icon lights up when the adapter is connected Press SOURCE then press Bluetooth AUDIO page 9 You can also use SOURCE on the monitor panel Press it repeatedly Ÿ Start playback Buttons on the touch panel In the explanation they are indicated inside 2 1 1 Whe...

Страница 350: ...aying time Disc no MP3 indicator page 35 Tag data appears only when it is recorded Select a disc to start playing If you select an MP3 disc the Track list of the current folder appears You can select a track and start playing also page 19 If you select a folder on the list you can start playing the first track of the folder To go to the other list Sound mode page 41 4 Press Select track Hold Rever...

Страница 351: ...isc Randomly plays all tracks of the current disc All Randomly plays all tracks of all loaded discs Track Repeats current track Folder Repeats all tracks of the current folder Disc Repeats all tracks of the current disc Folder Randomly plays all tracks of current folder then tracks of next folders Disc Randomly plays all tracks of the current disc All Randomly plays all tracks of all loaded discs ...

Страница 352: ... Press SOURCE then press iPod page 9 Playback starts automatically You can also use SOURCE on the monitor panel Press it repeatedly Ÿ Press 4 or to select a track Track no Playing time page 37 4 Press Select track Hold Reverse forward search 5 Enter player s menu Start playback pause To resume press again Sound mode page 41 Buttons on the touch panel In the explanation they are indicated inside ...

Страница 353: ...to confirm the selection 4 Repeat steps 2 and 3 to select a track When a track is selected finally playback starts To return to the previous menu press 5 Selecting playback modes 1 You can also use AV MENU on the monitor panel 2 3 Select an appropriate option Repeat One Functions the same as Repeat One All Functions the same as Repeat All Random Album Functions the same as Shuffle Albums Song Func...

Страница 354: ... watching the playback picture If no operations are done for about five seconds the operation buttons disappear KEY does not work when the source is AV IN Touch the screen center portion You can easily access to Aspect setting menu by pressing SHORT CUT on the touch panel then Assigned title page 42 Sound mode page 41 Touch the screen center portion Buttons on the touch panel In the explanation th...

Страница 355: ...hat you can watch the navigation screen Preparation Make sure Navigation is selected for AV Input page 47 To view the navigation screen and listen to the navigation guidance Press DISP on the monitor panel repeatedly page 9 The aspect ratio of the navigation screen is fixed to Full regardless of the Aspect setting page 45 IfyourNavigationSystemisequippedwiththevoiceguidancefunction When Navigation...

Страница 356: ... not supplied Preparation Make sure External is selected for External Input page 47 Press SOURCE then press EXT IN page 9 You can also use SOURCE on the monitor panel Press it repeatedly Ÿ Turn on the connected component and start playing the source Assigned title page 42 page 41 Sound mode page 41 Buttons on the touch panel In the explanation they are indicated inside ...

Страница 357: ...ation Storing your own adjustments You can store your adjustments into User1 User2 and User3 1 Repeat steps and Ÿ then in step 2 Adjust 1 then store 2 Ex When storing into User2 While playing back any source other than Bluetooth PHONE you can easily access Equalizer menu by pressing SHORT CUT on the touch panel then Move to other six sound modes ...

Страница 358: ...n also use AV MENU on the monitor panel Assign a title You can enter up to 16 characters for available characters page 59 Store Confirm the entry 2 3 Move the cursor BS Erase the character before the cursor Del Erase the character on the cursor Cap Change the letter case upper lower Change Change the character set Space Enter a space Finish the procedure Assigningtitlestothesources In the explanat...

Страница 359: ...e of the settings do not open the sub setting window but just selecting an option will change the setting The display indications may change according to change of the specifications Ex Changing the AV Input setting You can also use AV MENU on the monitor panel Ÿ Non available items will be shaded ...

Страница 360: ...the Dimmer Time setting below Dimmer Time Set Sets the Dimmer On Off times Dimmer Level You can select the brightness for dimmer 1 bright 2 middle 3 dark Bright You can adjust brightness of the screen 15 darkest to 15 brightest Initial 00 Picture Adjust 2 You can adjust the following to make the screen clear and legible for watching the playback picture The setting will be stored one for DISC comm...

Страница 361: ...çais Deutsch Italiano Nederlands Svenska Dansk Руccĸий Português The characters you can enter for assigning the titles also change according to the language selected 59 NTSC PAL Select the color system of the external monitor connected NTSC PAL Turn off the power and turn it on again to make the new setting effective Clock Time Set Initial 1 00AM 8 Time Format Select either 12 hour system or 24 ho...

Страница 362: ...ains different types of files Audio Plays back audio files Still Picture Plays back JPEG files Video Plays back DivX MPEG1 MPEG2 files Audio Video Plays back audio files and DivX MPEG1 MPEG2 files DivX Regist Registration 1 This unit has its own Registration Code Once you have played back a file with which the Registration Code recorded this unit s Registration Code is overwritten for copyright pr...

Страница 363: ...o component is connected AV IN is skipped while selecting the source Audio Video Select when connecting an AV component such as a VCR Audio Select when connecting an audio component such as a portable audio player Camera 3 Select when connecting a rear view camera Navigation Select when connecting a Navigation System External Input 4 For connecting an external component to the CD changer jack on t...

Страница 364: ...els On When the ignition is turned off the lamp on the button flashes TouchPanel Sens Change the sensitivity of the touch panel As the number decreases sensitivity becomes higher 1 2 3 Initialize Initialize all settings you have made in AV Menu Press and hold Enter to initialize the settings then reset the unit 3 Equalizer Flat Hard Rock R B Pop Jazz Dance Country Reggae Classic User1 User2 User3 ...

Страница 365: ...ial 00 You can make the adjustments separately for DVD and other discs Amplifier Gain You can change the maximum volume level of this unit Off Deactivates the built in amplifier Low VOL 00 to 30 Select this if the maximum power of the speakers is less than 50 W High VOL 00 to 50 Mode 1 Menu items Selectable settings reference page Mono Only for FM Off On 10 DX Local Only for FM Local DX 11 SSM Onl...

Страница 366: ...blished it is registered in the unit You can connect the unit and the device by using Connect below from the next time Connect Only for the registered devices After selecting a device from among the registered devices pages 27 and 28 establish the connection with it Disconnect Only for the device being connected Disconnect the current device before connecting another device Delete Pairing Only for...

Страница 367: ...t rejects all incoming calls Message Info 5 Auto The unit informs you of the arrival of a message by ringing and displaying Receiving Message To read the message page 30 Manual The unit does not inform you of the arrival of a message MIC Setting 5 Adjust microphone volume connected to the Bluetooth adapter 01 02 03 Version 6 The Bluetooth software and hardware versions are shown 4 Selectableonlyfo...

Страница 368: ...disc around the center holder with the printed surface facing up Make sure to store discs into the cases after use To keep discs clean A dirty disc may not play correctly If a disc does become dirty wipe it with a soft cloth in a straight line from center to edge Do not use any solvent for example conventional record cleaner spray thinner benzine etc to clean discs To play new discs New discs may ...

Страница 369: ...ed within 15 seconds the disc is automatically inserted again into the loading slot to protect it from dust Playing Recordable Rewritable discs This unit can recognize a total of 5 000 files and 250 folders a maximum of 999 files per folder Use only finalized discs This unit can play back multi session discs however unclosed sessions will be skipped while playing This unit can recognize a total 25...

Страница 370: ...bps Sampling frequency 48 kHz 44 1 kHz 32 kHz for MPEG1 24 kHz 22 05 kHz 16 kHz for MPEG2 48 kHz 44 1 kHz 32 kHz 22 05 kHz for WMA 44 1 kHz for WAV This unit can show ID3 Tag Version 1 0 1 1 2 2 2 3 2 4 for MP3 This unit can also show WAV WMA Tag This unit can play back files recorded in VBR variable bit rate Files recorded in VBR have a discrepancy in elapsed time indication This unit cannot play...

Страница 371: ...found No available Bluetooth device is detected by Search Loading The unit is updating the phone book and or SMS Please Wait The unit is preparing to use the Bluetooth function If the message does not disappear turn off and turn on the unit then connect the device again or reset the unit Reset 08 Check the connection between the adapter and this unit Icons for phone types These icons indicate the ...

Страница 372: ...the adapter connected to this unit While the iPod is connected all operations from the iPod are disabled Perform all operations from this unit The text information may not be displayed correctly The text information scrolls on the screen This unit can display up to 40 characters Notice When operating an iPod some operations may not be performed correctly or as intended In this case visit the follo...

Страница 373: ...put Playback disc Output signals Stream Dolby D PCM DVD 48 kHz 16 20 24 bits Linear PCM 48 kHz 16 bits stereo Linear PCM 96 kHz Linear PCM 48 kHz 16 bits stereo Linear PCM with Dolby Digital Dolby Digital bitstream 48 kHz 16 bits stereo Linear PCM with DTS DTS bitstream with MPEG Audio MPEG bitstream 48 kHz 16 bits stereo Linear PCM Audio CD Video CD 44 1 kHz 16 bits stereo Linear PCM 48 kHz 16 bi...

Страница 374: ...ish PS Pashto Pushto TH Thai AZ Azerbaijani GL Galician KY Kirghiz QU Quechua TI Tigrinya BA Bashkir GN Guarani LA Latin RM Rhaeto Romance TK Turkmen BE Byelorussian GU Gujarati LN Lingala RN Kirundi TL Tagalog BG Bulgarian HA Hausa LO Laothian RO Rumanian TN Setswana BH Bihari HI Hindi LT Lithuanian RW Kinyarwanda TO Tonga BI Bislama HR Croatian LV Latvian Lettish SA Sanskrit TR Turkish BN Bengal...

Страница 375: ...DivX Ultra Certified product Plays all versions of DivX video including DivX 6 with enhanced playback of DivX media files and the DivX Media Format Microsoft and Windows Media are either registered trademarks or trademarks of Microsoft Corporation in the United States and or other countries The Bluetooth word mark and logos are owned by the Bluetooth SIG Inc and any use of such marks by Victor Com...

Страница 376: ...se this symptom Adjust Bright page 44 Position Error Push Open Key appears on the screen The monitor panel angle has been forcibly adjusted or its adjustment has been interrupted while opening or closing Press OPEN TILT Mecha Error Push Reset appears on the screen and the panel does not move Reset the unit page 3 No Signal appears Change the source Start the playback on the external component conn...

Страница 377: ...d Parking brake lead is not connected properly Installation Connection Manual No picture appears on the external monitor Connect the video cord correctly Select the correct input on the external monitor Eject Error or Loading Error appears on the screen Change the source by pressing SOURCE Region code error appears on the screen when you insert a DVD Video Region code is not correct page 4 DivX MP...

Страница 378: ... device name from Special Device then try to connect again pages 28 50 Echo or noise occurs Adjust the microphone unit position Phone sound quality is poor Reduce the distance between the unit and the Bluetooth cellular phone Move the car to place where you can get a better signal reception The sound is interrupted or skipped during playback of a Bluetooth audio player Reduce the distance between ...

Страница 379: ...s not work Check the connection Charge the battery Sound is distorted Deactivate the equalizer either on this unit or the iPod Disconnect appears on the screen Check the connection Playback stops The headphones are disconnected during playback Restart playback No Files appears on the screen No tracks are stored Import tracks to the iPod Reset 01 Reset 07 appears on the screen Disconnect the adapte...

Страница 380: ...osite 1 Vp p 75 Ω Other Terminals Input LINE IN VIDEO IN Antenna input Output VIDEO OUT Others CD changer Reverse gear signal DIGITAL OUT optical FM AM TUNER Frequency Range FM 87 5 MHz to 108 0 MHz AM 531 kHz to 1 602 kHz FM Tuner Usable Sensitivity 11 3 dBf 1 0 μV 75 Ω 50 dB Quieting Sensitivity 16 3 dBf 1 8 μV 75 Ω Alternate Channel Selectivity 400 kHz 65 dB Frequency Response 40 Hz to 15 000 H...

Страница 381: ...ve ground Allowable Storage Temperature 10 C to 60 C Allowable Operating Temperature 0 C to 40 C Dimensions W H D Installation Size approx 178 mm 100 mm 160 mm Panel Size approx 171 mm 97 mm 21 mm Mass approx 2 6 kg CAUTION When ejecting the monitor leave an open space for the monitor to come out If you do not the monitor may obstruct the steering wheel and gearshift lever operations and this may ...

Страница 382: ...EN CT 0208MNMMDWJEIN 2008 Victor Company of Japan Limited Having TROUBLE with operation Please reset your unit Refer to page of How to reset your unit ...

Страница 383: ...er It is recommended to connect speakers with a maximum power of more than 50 W both at the rear and at the front with an impedance of 4 Ω to 8 Ω If the maximum power is less than 50 W change Amplifier Gain setting to prevent the speakers from being damaged see page 49 of the INSTRUCTIONS To prevent short circuits cover the terminals of the UNUSED leads with insulating tape The heat sink becomes v...

Страница 384: ...acket make sure to use the supplied screws M5 x 8 mm If longer screws are used they could damage the unit ఖٍ ϯ ʹጅන ށ इçቁੀ క ڄ ᒘീ M5 x 8 mm éࠜ ཛ ڄۂ ᒘീçЉᘕᒘീ ๑ᖢʹጅé À Àµÿ µ µ Èß ËÕß π Ëπ Õß Õ ÀÈ Ÿ ÀÈ πË Ë È Ÿ Ë ÀÈ æ ÈÕ ËÕß M5 x 8 À È Ÿ Ë Ë ÿÕ ÀÈ ËÕß È 30 Select the appropriate type fitting to your audio system space ዪቱϐ ࡖڄ ᛏԦ ϯ ܓڄ ڏ é Õ Ë À æ Èπ Ë ËÕß ß If necessary restore the protruding tabs ࠜЉ çቁࡌ๘...

Страница 385: ...h constant 12 V вۘᎳീవ ۈڄ ᚙၷʪçۘᎳീవ ؠ Ծ ྐЖߟ ؠ अཔᓭ ළᘕ ݔ 12 V µµËÕ È Ë øøÈ π ºßøî Ï ËßµËÕ µ µÕ Ë πµ ˵ÈÕß È Ï ÿ 12 Ï ß Ë To an accessory terminal in the fuse block вۘᎳീవ ۈڄ ᚙၷʪ µËÕ È Ë πª Õ π ºßøî To car light control switch вԆԾԾጜ վළᘕ µ Ï ÿ ø Õß πµ Ï To cellular phone system в ྐੂޟ Ԧ µËÕ æ Ï ËÕπ Black ෨и Yellow 2 ෦и 2 À Õß 2 Red и ß Blue ᕇи øÈ Orange with white stripe ዻиઘЉΎи ঙ È Brown ሶи πÈ µ Light gre...

Страница 386: ...uilt in the car Parking brake lead light green Ծ ለ ଠႋи Õ ÕËÕπ Parking brake Ծ Õ Crimp connector қʪ Ꮓ È µËÕ À Àπ Parking brake switch inside the car Ծළᘕ тʝԾ µ Ï Õ π To metallic body or chassis of the car в ہ ᚙᝂ ԆԾ נ ᇟ µËÕ ß À À Õ Õß πµú JVC Amplifier JVC ୋ ʩወ ËÕß ß JVC 4 A Connecting an external amplifier ો ୋ ʩወ µËÕ Õ æ ø ÕÕ Ï πÕ A ྑກ ಚᑶወોሉٍิ ො ˢӖಚᑶወዘሉોᏄોгྑЗèѵ۲ ጆઆ ᘸࡍ๒ᖣê Ϛӕಙᑵ ለ Ꮓ вಙᑵ ۮ çᐓ ފ ԆԾʕ ڄ ಙᑵ...

Страница 387: ... ÈÕ ËÕß 5 Audio video cord not supplied ࡖᏁ ඁᏁྐង ԅЉ క ÕÕ Õ Õ Ë È ÀÈ æ ÈÕ ËÕß Digital optical cable not supplied ᆚтγង ԅЉ క È π ß µÕ Ë È ÀÈ æ ÈÕ ËÕß Reverse lamp ጜ ø Õ À ß To reverse lamp в Ծ ۑ ጜ µËÕ ø Õ À ß Reverse lamp lead 4 Ծ ۑ ጜ ለ 4 ø Ë ø Õ À ß 4 To car battery вԆԾྐЖ ËÕ í Õ Ë π Ï 4 Required only when connecting a rear view camera to VIDEO IN terminal 5 Refer to a in diagram A on page 4 6 Set AV ...

Страница 388: ...eries as explained below When connecting two components in series ັсᑸճࡵ έई ËÕ ËÕ µËÕ Ë πª Õ Õß Èπ Õπÿ 7 To use these components set the external input setting correctly see page 47 of the INSTRUCTIONS άइç ቁ ኌ ά ᕢಗ é ʯ ો ો έ ۯ èቂᇨۙᘖ ጆê અ ʓ JVC ά ռ CD ಗၪ é JVC έ ܔ ϐၴ CD ಗၪ CD CH CH X1500çമ ʛ ௫ཫύၲ JVC ᕢಗ ʓ άé ለ ᄔ వጤᒯ é έ ᕣಘወ ܔ ϐၴ ᕇ ᕇ ᕢಗ KS BTA200 iPod iPod ࡒᕢಗ KS PD100 ઘለཔ ڄ Ϸ ࡖᏁᆑ ለཔ ʈᕢಗ KS U57 ઘ 3 5...

Страница 389: ...allation and connections refer to the separate manual INSTRUCTIONS LVT1780 002A U For canceling the display demonstration see page 8 DVD RECEIVER WITH MONITOR KW AVX716 KW AVX710 KW AVX716 KW AVX710 KW AVX716 KW AVX710 ...

Страница 390: ...ble and is not malfunction Do not expose the monitor to direct sunlight Do not operate the touch panel using a ball point pen or similar tool with the sharp tip Touch the buttons on the touch panel with your finger directly if you are wearing a glove take it off When the temperature is very cold or very hot Chemical changes occur inside causing malfunction Pictures may not appear clearly or may mo...

Страница 391: ...fore operating the unit Contents INTRODUCTION Playable disc types 4 Basic operations Monitor panel touch panel 5 Basic operations Remote controller RM RK252 6 OPERATIONS Before operating the unit 8 Common operations 9 Listening to the radio 10 Disc operations 13 EXTERNAL DEVICES Bluetooth operations Cellular phone audio player 27 Listening to the CD changer 34 Listening to the iPod 36 Using other ...

Страница 392: ... I Ready CD Recordable Rewritable CD R RW ISO 9660 level 1 level 2 Romeo Joliet CD DA MP3 WMA WAV JPEG DivX MPEG1 MPEG2 AAC MPEG4 1 IfyouinsertaDVDVideodiscofanincorrectRegionCode Regioncodeerror appearsonthescreen 2 DVD Rrecordedinmulti borderformatisalsoplayable exceptforduallayerdiscs DVD RWduallayerdiscsarenotplayable 3 Itispossibletoplaybackfinalized R RW Videoformatonly discs RWdoublelayerdi...

Страница 393: ...ach source operation section Change the display information OPEN Open the monitor panel EJECT Eject the disc CLOSE Close the monitor panel TILT Tilt the monitor panel Exit Erase this screen Shaded icons cannot be used In the explanation buttons on the touch panel are indicated inside For details on the touch panel operations see each source operation section Display Source Menu screen Display AV M...

Страница 394: ...s the disc menu VCD Resumes PBC playback DVD VR Shows the Original Program screen 6 Shows the on screen bar Does not function as R03 LR03 AAA Installing the battery Insert the batteries into the remote controller by matching the polarity and correctly Caution Battery shall not be exposed to excessive heat such as sunshine fire or the like If the range or effectiveness of the remote controller decr...

Страница 395: ...unction as SURROUND o 3 Number buttons Enters numbers TUNER Selects the preset station directly 1 Functionsasanumberbuttononly seeo 2 Notusedforthisunit 3 FunctionswhenpressedwithSHIFT 7 Functions with other buttons see i and o 8 Changes the display information 9 For disc operations 5 DVD Selects the title DVD VR Selects the program Playlist Other discs except VCD CD Selects the folders 4 Pressbri...

Страница 396: ...al English indications are used for purpose of explanation You can select the indication language page 45 Turn on the power Ÿ Display AV Menu screen Display Setup menu Cancel the demonstration Select Off Set the clock settings Finish the procedure Beforeoperatingtheunit Moves to the succeeding menu page Moves to the preceding menu page Return to the previous screen ...

Страница 397: ...external components you have connected media you have attached and the Input settings you have made page 47 On the touch panel On the monitor panel TUNER DISC DVD VCD CD CD CH iPod or EXT IN Bluetooth PHONE Bluetooth AUDIO AV IN back to the beginning You cannot select these sources if they are not ready Exit Source information screen Clock time in large numbers Navigation screen When Navigation is...

Страница 398: ... either 4 or until Manual Search appears on the screen then press it repeatedly The ST indicator lights up when receiving an FM stereo broadcast with sufficient signal strength 3 Reception improves but stereo effect will be lost The MONO indicator lights up To restore stereo effect select Off Preset no Band Tuner indicators Assigned station name page 42 If no name is assigned the frequency of the ...

Страница 399: ...and Tuning in to stations with sufficient signal strength This function works only for FM bands Once you have activated this function selected Local it always works when searching for FM stations 1 Press AV MENU You can also use AV MENU on the monitor panel 2 Press Mode 3 Only stations with sufficient signal strength will be detected The DX indicator goes off then the LO indicator lights up You ca...

Страница 400: ... panel To select from the Preset List 1 2 or Hold Manual presetting Ex Storing FM station of 92 5 MHz into preset number 4 of the FM1 band 1 Display the Preset List 2 Tune in to a station you want to preset 3 Select a preset number The station selected in step 2 is now stored in preset number 4 Hold ...

Страница 401: ...he unit cannot accept the operation you have tried to do In some cases without showing operations will not be accepted Label side Caution on volume setting Discs produce very little noise compared with other sources Lower the volume before playing a disc to avoid damaging the speakers by the sudden increase of the output level When playing back a multi channel encoded disc the multi channel signal...

Страница 402: ...ampling frequency Bit rate Recorded signal channel no page 19 3 8 Start and pause playback 7 Stop playback 4 Press Select chapter Hold Reverse forward search 2 5 Select title program playlist 1 DVD VRalsoindicateseitherPRG program orPLAY playlist playback 2 Searchspeed x2 x10 Buttons on the touch panel In the explanation they are indicated inside These buttons also work when they are not shown on ...

Страница 403: ...ct track Hold Reverse forward search for DivX MPEG1 MPEG2 1 5 Press Select folder Hold Display Folder list While playing the following discs press Each time you press the button the display changes to show the different information page 9 Disc type page 19 page 19 The PBC indicator lights up when PBC is in use Total track no included on the disc Total track no included on the disc Total playing ti...

Страница 404: ... when it is recorded Sound mode page 41 page 19 3 8 Start and pause playback 7 Stop playback 4 Press Select track Hold Reverse forward search 4 5 Press Select folder Hold Display Folder list 3 8 Start and pause playback 7 Stop playback 4 Press Select track Hold Reverse forward search 4 Total track no included on the disc Total playing time Total track no included on the disc Sound mode page 41 ...

Страница 405: ...top playback 4 Press Select track Hold Reverse forward search 5 Select folders The above buttons also work when they are not shown on the screen while watching the playback picture WhileadiscmenuisplayedbackforDVD KEY is automaticallydisplayed Onthediscmenu you canselecta menuitemdirectlybytouchingitonthescreen B For DVD VCD DivX menu operation playback 235 Select the menu items ENT Confirm the se...

Страница 406: ... program not available for Playlist playback Track Repeats current track Folder Repeats current folder Folder Randomly plays all tracks of current folder then tracks of next folders Disc All Randomly plays all tracks Folder Repeats current folder Track Repeats current track PBC not in use Disc All Randomly plays all tracks PBC not in use Track Repeats current track 1 Disc All Randomly plays all tr...

Страница 407: ...rs you can display the Folder Track File Lists then start playback 1 You can also use AV MENU on the monitor panel 2 3 Select a folder 1 then a track 2 Selected track starts playing Press to move to the previous next pages of the list 1 Current folder list number total folder list number 2 Current track list number total track list number of the current folder You can easily access the Track List ...

Страница 408: ...lect chapter Select title when not playing Select title during playback or pause Using menu driven features 1 2 Select an item you want to start playback 3 1 Searchspeed x2 x5 x10 x20 x60 2 Slowmotionspeed 1 32 1 16 1 8 1 4 1 2 3 Searchspeed x2 x10 Operations using the remote controller RM RK252 Also functions as CLR clear Erases a misentry if pressed while holding SHIFT You can change the followi...

Страница 409: ... or pause Hold Reverse forward search 6 Select program Select playlist during playback or pause Select aspect ratio Select chapter Select program when not playing Select program playlist during playback or pause Using Original Program Playlist screens page 25 1 For Original Program For Playlist 2 Select an item you want to start playback 3 To erase the screen 4 Searchspeed x2 x5 x10 x20 x60 5 Slow...

Страница 410: ...ect track Hold Reverse forward search 2 No sound can be heard Select folder Select aspect ratio Select track within the same folder Select folder While playing Reverse advance the scenes by five minutes For DivX6 Using menu driven features 1 2 Select an item you want to start playback 3 1 Searchspeed 1 2 3 2 Searchspeed 1 2 Current playback position twice 2nd press 2nd press 1st press 1st press 3r...

Страница 411: ... the menu To return to the previous menu press To cancel PBC playback 1 2 Select the desired track To resume PBC press Stop playback Start playback pause if pressed during playback Reverse forward search 3 Forward slow motion during pause 4 No sound can be heard Reverse slow motion does not work Press Select track Hold Reverse forward search 5 No sound can be heard Select aspect ratio twice 3 Sear...

Страница 412: ... x2 x5 x10 x20 x60 2 Searchspeed x2 x10 Stop playback Start playback pause if pressed during playback Reverse forward search 3 Press Select track Hold Reverse forward search 4 Select folder Select track within the same folder Select folder 3 Searchspeed x2 x5 x10 x20 x60 4 Searchspeed x2 x10 twice Also functions as CLR clear Erases a misentry if pressed while holding SHIFT ...

Страница 413: ...ist screens You can use Original Program or Playlist screen anytime while playing DVD VR with its data recorded 1 Display the Original Program Playlist screen 2 Select an item you want To erase the screen 1 Original Program Playlist number 2 Recording date 3 Recording source TV station the input terminal of the recording equipment etc 4 Start time of recording 5 Title of the program playlist 6 Hig...

Страница 414: ... play 1 Random play 1 Change the audio language audio stream or audio channel Change or erase the subtitle language Change the view angle 1 page18 2 NotapplicableforDVD VR Above example is of DVD Video Items shown on the bar vary due to the disc type 1 Disc type 2 DVD Audio signal format VCD PBC 3 Playback mode 1 DVD Video C RPT Chapter repeat T RPT Title repeat DVD VR C RPT Chapter repeat PG RPT ...

Страница 415: ...ONE and Bluetooth AUDIO Connecting a new Bluetooth device Registration Pairing methods Use either of the following items in Bluetooth menu to register and establish the connection with a device Select Bluetooth PHONE or Bluetooth AUDIO as the source to operate Bluetooth menu Open Make the unit ready to establish a new Bluetooth connection The connection is established by operating the Bluetooth de...

Страница 416: ...vice to the unit Refer to the instructions supplied with the device to check the PIN code 6 Operate the Bluetooth device to connect while Connecting is displayed on the screen Now connection is established and you can use the device through the unit To connect a special device Special Device 1 Press AV MENU on the touch panel or AV MENU on the monitor panel 2 Press Bluetooth 3 Press Special Device...

Страница 417: ...one volume page 51 Press SOURCE then press Bluetooth PHONE page 9 You can also use SOURCE on the monitor panel Press it repeatedly Ÿ Press AV MENU You can also use AV MENU on the monitor panel Press Bluetooth Establish the connection with a device then make a call or settings using Bluetooth menu pages 50 and 51 Sound mode page 41 Status of the device Signal strength Battery remainder only when th...

Страница 418: ... name you want to call When an SMS comes in If the cellular phone is compatible with SMS Short Message Service you can read the messages on the screen You cannot edit or send a message through the unit When Message Info is set to Auto The unit rings and the following screen is displayed to inform you of a message arrival page 51 To read the message press Yes The source is changed to Bluetooth PHON...

Страница 419: ...eset Goes to Preset List You can preset the entered number by selecting a preset number page 32 Dial Calls the entered number You can easily access Dial Menu by pressing SHORT CUT on the touch panel then You can also access Dial Menu by holding SOURCE on the monitor panel You can easily activate Voice Dialing by pressing SHORT CUT on the touch panel then You can also activate Voice Dialing by hold...

Страница 420: ...l Received Calls or Missed Calls 1 Press AV MENU on the touch panel or AV MENU on the monitor panel 2 Press Bluetooth 3 Press Dial Menu then Ex Selecting Received Calls 2 Select a telephone number to store 3 Select a preset number Now Tom is stored into preset no 1 Display Dial Menu screen Answer the incoming call Display the Redial menu if pressed and held regardless of the current source End the...

Страница 421: ... device can be registered 3 Status of the device Signal strength Battery remainder only when the information comes from the device The Bluetooth icon lights up when the adapter is connected Press SOURCE then press Bluetooth AUDIO page 9 You can also use SOURCE on the monitor panel Press it repeatedly Ÿ Start playback Buttons on the touch panel In the explanation they are indicated inside 2 1 1 Whe...

Страница 422: ...aying time Disc no MP3 indicator page 35 Tag data appears only when it is recorded Select a disc to start playing If you select an MP3 disc the Track list of the current folder appears You can select a track and start playing also page 19 If you select a folder on the list you can start playing the first track of the folder To go to the other list Sound mode page 41 4 Press Select track Hold Rever...

Страница 423: ...isc Randomly plays all tracks of the current disc All Randomly plays all tracks of all loaded discs Track Repeats current track Folder Repeats all tracks of the current folder Disc Repeats all tracks of the current disc Folder Randomly plays all tracks of current folder then tracks of next folders Disc Randomly plays all tracks of the current disc All Randomly plays all tracks of all loaded discs ...

Страница 424: ... Press SOURCE then press iPod page 9 Playback starts automatically You can also use SOURCE on the monitor panel Press it repeatedly Ÿ Press 4 or to select a track Track no Playing time page 37 4 Press Select track Hold Reverse forward search 5 Enter player s menu Start playback pause To resume press again Sound mode page 41 Buttons on the touch panel In the explanation they are indicated inside ...

Страница 425: ...to confirm the selection 4 Repeat steps 2 and 3 to select a track When a track is selected finally playback starts To return to the previous menu press 5 Selecting playback modes 1 You can also use AV MENU on the monitor panel 2 3 Select an appropriate option Repeat One Functions the same as Repeat One All Functions the same as Repeat All Random Album Functions the same as Shuffle Albums Song Func...

Страница 426: ... watching the playback picture If no operations are done for about five seconds the operation buttons disappear KEY does not work when the source is AV IN Touch the screen center portion You can easily access to Aspect setting menu by pressing SHORT CUT on the touch panel then Assigned title page 42 Sound mode page 41 Touch the screen center portion Buttons on the touch panel In the explanation th...

Страница 427: ...hat you can watch the navigation screen Preparation Make sure Navigation is selected for AV Input page 47 To view the navigation screen and listen to the navigation guidance Press DISP on the monitor panel repeatedly page 9 The aspect ratio of the navigation screen is fixed to Full regardless of the Aspect setting page 45 IfyourNavigationSystemisequippedwiththevoiceguidancefunction When Navigation...

Страница 428: ... not supplied Preparation Make sure External is selected for External Input page 47 Press SOURCE then press EXT IN page 9 You can also use SOURCE on the monitor panel Press it repeatedly Ÿ Turn on the connected component and start playing the source Assigned title page 42 page 41 Sound mode page 41 Buttons on the touch panel In the explanation they are indicated inside ...

Страница 429: ...ation Storing your own adjustments You can store your adjustments into User1 User2 and User3 1 Repeat steps and Ÿ then in step 2 Adjust 1 then store 2 Ex When storing into User2 While playing back any source other than Bluetooth PHONE you can easily access Equalizer menu by pressing SHORT CUT on the touch panel then Move to other six sound modes ...

Страница 430: ...n also use AV MENU on the monitor panel Assign a title You can enter up to 16 characters for available characters page 59 Store Confirm the entry 2 3 Move the cursor BS Erase the character before the cursor Del Erase the character on the cursor Cap Change the letter case upper lower Change Change the character set Space Enter a space Finish the procedure Assigningtitlestothesources In the explanat...

Страница 431: ...e of the settings do not open the sub setting window but just selecting an option will change the setting The display indications may change according to change of the specifications Ex Changing the AV Input setting You can also use AV MENU on the monitor panel Ÿ Non available items will be shaded ...

Страница 432: ...the Dimmer Time setting below Dimmer Time Set Sets the Dimmer On Off times Dimmer Level You can select the brightness for dimmer 1 bright 2 middle 3 dark Bright You can adjust brightness of the screen 15 darkest to 15 brightest Initial 00 Picture Adjust 2 You can adjust the following to make the screen clear and legible for watching the playback picture The setting will be stored one for DISC comm...

Страница 433: ...çais Deutsch Italiano Nederlands Svenska Dansk Руccĸий Português The characters you can enter for assigning the titles also change according to the language selected 59 NTSC PAL Select the color system of the external monitor connected NTSC PAL Turn off the power and turn it on again to make the new setting effective Clock Time Set Initial 1 00AM 8 Time Format Select either 12 hour system or 24 ho...

Страница 434: ...ains different types of files Audio Plays back audio files Still Picture Plays back JPEG files Video Plays back DivX MPEG1 MPEG2 files Audio Video Plays back audio files and DivX MPEG1 MPEG2 files DivX Regist Registration 1 This unit has its own Registration Code Once you have played back a file with which the Registration Code recorded this unit s Registration Code is overwritten for copyright pr...

Страница 435: ...o component is connected AV IN is skipped while selecting the source Audio Video Select when connecting an AV component such as a VCR Audio Select when connecting an audio component such as a portable audio player Camera 3 Select when connecting a rear view camera Navigation Select when connecting a Navigation System External Input 4 For connecting an external component to the CD changer jack on t...

Страница 436: ...els On When the ignition is turned off the lamp on the button flashes TouchPanel Sens Change the sensitivity of the touch panel As the number decreases sensitivity becomes higher 1 2 3 Initialize Initialize all settings you have made in AV Menu Press and hold Enter to initialize the settings then reset the unit 3 Equalizer Flat Hard Rock R B Pop Jazz Dance Country Reggae Classic User1 User2 User3 ...

Страница 437: ...ial 00 You can make the adjustments separately for DVD and other discs Amplifier Gain You can change the maximum volume level of this unit Off Deactivates the built in amplifier Low VOL 00 to 30 Select this if the maximum power of the speakers is less than 50 W High VOL 00 to 50 Mode 1 Menu items Selectable settings reference page Mono Only for FM Off On 10 DX Local Only for FM Local DX 11 SSM Onl...

Страница 438: ...blished it is registered in the unit You can connect the unit and the device by using Connect below from the next time Connect Only for the registered devices After selecting a device from among the registered devices pages 27 and 28 establish the connection with it Disconnect Only for the device being connected Disconnect the current device before connecting another device Delete Pairing Only for...

Страница 439: ...t rejects all incoming calls Message Info 5 Auto The unit informs you of the arrival of a message by ringing and displaying Receiving Message To read the message page 30 Manual The unit does not inform you of the arrival of a message MIC Setting 5 Adjust microphone volume connected to the Bluetooth adapter 01 02 03 Version 6 The Bluetooth software and hardware versions are shown 4 Selectableonlyfo...

Страница 440: ...disc around the center holder with the printed surface facing up Make sure to store discs into the cases after use To keep discs clean A dirty disc may not play correctly If a disc does become dirty wipe it with a soft cloth in a straight line from center to edge Do not use any solvent for example conventional record cleaner spray thinner benzine etc to clean discs To play new discs New discs may ...

Страница 441: ...ed within 15 seconds the disc is automatically inserted again into the loading slot to protect it from dust Playing Recordable Rewritable discs This unit can recognize a total of 5 000 files and 250 folders a maximum of 999 files per folder Use only finalized discs This unit can play back multi session discs however unclosed sessions will be skipped while playing This unit can recognize a total 25...

Страница 442: ...bps Sampling frequency 48 kHz 44 1 kHz 32 kHz for MPEG1 24 kHz 22 05 kHz 16 kHz for MPEG2 48 kHz 44 1 kHz 32 kHz 22 05 kHz for WMA 44 1 kHz for WAV This unit can show ID3 Tag Version 1 0 1 1 2 2 2 3 2 4 for MP3 This unit can also show WAV WMA Tag This unit can play back files recorded in VBR variable bit rate Files recorded in VBR have a discrepancy in elapsed time indication This unit cannot play...

Страница 443: ...found No available Bluetooth device is detected by Search Loading The unit is updating the phone book and or SMS Please Wait The unit is preparing to use the Bluetooth function If the message does not disappear turn off and turn on the unit then connect the device again or reset the unit Reset 08 Check the connection between the adapter and this unit Icons for phone types These icons indicate the ...

Страница 444: ...the adapter connected to this unit While the iPod is connected all operations from the iPod are disabled Perform all operations from this unit The text information may not be displayed correctly The text information scrolls on the screen This unit can display up to 40 characters Notice When operating an iPod some operations may not be performed correctly or as intended In this case visit the follo...

Страница 445: ...put Playback disc Output signals Stream Dolby D PCM DVD 48 kHz 16 20 24 bits Linear PCM 48 kHz 16 bits stereo Linear PCM 96 kHz Linear PCM 48 kHz 16 bits stereo Linear PCM with Dolby Digital Dolby Digital bitstream 48 kHz 16 bits stereo Linear PCM with DTS DTS bitstream with MPEG Audio MPEG bitstream 48 kHz 16 bits stereo Linear PCM Audio CD Video CD 44 1 kHz 16 bits stereo Linear PCM 48 kHz 16 bi...

Страница 446: ...ish PS Pashto Pushto TH Thai AZ Azerbaijani GL Galician KY Kirghiz QU Quechua TI Tigrinya BA Bashkir GN Guarani LA Latin RM Rhaeto Romance TK Turkmen BE Byelorussian GU Gujarati LN Lingala RN Kirundi TL Tagalog BG Bulgarian HA Hausa LO Laothian RO Rumanian TN Setswana BH Bihari HI Hindi LT Lithuanian RW Kinyarwanda TO Tonga BI Bislama HR Croatian LV Latvian Lettish SA Sanskrit TR Turkish BN Bengal...

Страница 447: ...DivX Ultra Certified product Plays all versions of DivX video including DivX 6 with enhanced playback of DivX media files and the DivX Media Format Microsoft and Windows Media are either registered trademarks or trademarks of Microsoft Corporation in the United States and or other countries The Bluetooth word mark and logos are owned by the Bluetooth SIG Inc and any use of such marks by Victor Com...

Страница 448: ...se this symptom Adjust Bright page 44 Position Error Push Open Key appears on the screen The monitor panel angle has been forcibly adjusted or its adjustment has been interrupted while opening or closing Press OPEN TILT Mecha Error Push Reset appears on the screen and the panel does not move Reset the unit page 3 No Signal appears Change the source Start the playback on the external component conn...

Страница 449: ...d Parking brake lead is not connected properly Installation Connection Manual No picture appears on the external monitor Connect the video cord correctly Select the correct input on the external monitor Eject Error or Loading Error appears on the screen Change the source by pressing SOURCE Region code error appears on the screen when you insert a DVD Video Region code is not correct page 4 DivX MP...

Страница 450: ... device name from Special Device then try to connect again pages 28 50 Echo or noise occurs Adjust the microphone unit position Phone sound quality is poor Reduce the distance between the unit and the Bluetooth cellular phone Move the car to place where you can get a better signal reception The sound is interrupted or skipped during playback of a Bluetooth audio player Reduce the distance between ...

Страница 451: ...s not work Check the connection Charge the battery Sound is distorted Deactivate the equalizer either on this unit or the iPod Disconnect appears on the screen Check the connection Playback stops The headphones are disconnected during playback Restart playback No Files appears on the screen No tracks are stored Import tracks to the iPod Reset 01 Reset 07 appears on the screen Disconnect the adapte...

Страница 452: ...osite 1 Vp p 75 Ω Other Terminals Input LINE IN VIDEO IN Antenna input Output VIDEO OUT Others CD changer Reverse gear signal DIGITAL OUT optical FM AM TUNER Frequency Range FM 87 5 MHz to 108 0 MHz AM 531 kHz to 1 602 kHz FM Tuner Usable Sensitivity 11 3 dBf 1 0 μV 75 Ω 50 dB Quieting Sensitivity 16 3 dBf 1 8 μV 75 Ω Alternate Channel Selectivity 400 kHz 65 dB Frequency Response 40 Hz to 15 000 H...

Страница 453: ...ve ground Allowable Storage Temperature 10 C to 60 C Allowable Operating Temperature 0 C to 40 C Dimensions W H D Installation Size approx 178 mm 100 mm 160 mm Panel Size approx 171 mm 97 mm 21 mm Mass approx 2 6 kg CAUTION When ejecting the monitor leave an open space for the monitor to come out If you do not the monitor may obstruct the steering wheel and gearshift lever operations and this may ...

Страница 454: ...EN CT TH 1207MNMMDWJEIN 2008 Victor Company of Japan Limited Having TROUBLE with operation Please reset your unit Refer to page of How to reset your unit ...

Страница 455: ...er It is recommended to connect speakers with a maximum power of more than 50 W both at the rear and at the front with an impedance of 4 Ω to 8 Ω If the maximum power is less than 50 W change Amplifier Gain setting to prevent the speakers from being damaged see page 49 of the INSTRUCTIONS To prevent short circuits cover the terminals of the UNUSED leads with insulating tape The heat sink becomes v...

Страница 456: ...acket make sure to use the supplied screws M5 x 8 mm If longer screws are used they could damage the unit ఖٍ ϯ ʹጅන ށ इçቁੀ క ڄ ᒘീ M5 x 8 mm éࠜ ཛ ڄۂ ᒘീçЉᘕᒘീ ๑ᖢʹጅé À Àµÿ µ µ Èß ËÕß π Ëπ Õß Õ ÀÈ Ÿ ÀÈ πË Ë È Ÿ Ë ÀÈ æ ÈÕ ËÕß M5 x 8 À È Ÿ Ë Ë ÿÕ ÀÈ ËÕß È 30 Select the appropriate type fitting to your audio system space ዪቱϐ ࡖڄ ᛏԦ ϯ ܓڄ ڏ é Õ Ë À æ Èπ Ë ËÕß ß If necessary restore the protruding tabs ࠜЉ çቁࡌ๘...

Страница 457: ...h constant 12 V вۘᎳീవ ۈڄ ᚙၷʪçۘᎳീవ ؠ Ծ ྐЖߟ ؠ अཔᓭ ළᘕ ݔ 12 V µµËÕ È Ë øøÈ π ºßøî Ï ËßµËÕ µ µÕ Ë πµ ˵ÈÕß È Ï ÿ 12 Ï ß Ë To an accessory terminal in the fuse block вۘᎳീవ ۈڄ ᚙၷʪ µËÕ È Ë πª Õ π ºßøî To car light control switch вԆԾԾጜ վළᘕ µ Ï ÿ ø Õß πµ Ï To cellular phone system в ྐੂޟ Ԧ µËÕ æ Ï ËÕπ Black ෨и Yellow 2 ෦и 2 À Õß 2 Red и ß Blue ᕇи øÈ Orange with white stripe ዻиઘЉΎи ঙ È Brown ሶи πÈ µ Light gre...

Страница 458: ...uilt in the car Parking brake lead light green Ծ ለ ଠႋи Õ ÕËÕπ Parking brake Ծ Õ Crimp connector қʪ Ꮓ È µËÕ À Àπ Parking brake switch inside the car Ծළᘕ тʝԾ µ Ï Õ π To metallic body or chassis of the car в ہ ᚙᝂ ԆԾ נ ᇟ µËÕ ß À À Õ Õß πµú JVC Amplifier JVC ୋ ʩወ ËÕß ß JVC 4 A Connecting an external amplifier ો ୋ ʩወ µËÕ Õ æ ø ÕÕ Ï πÕ A ྑກ ಚᑶወોሉٍิ ො ˢӖಚᑶወዘሉોᏄોгྑЗèѵ۲ ጆઆ ᘸࡍ๒ᖣê Ϛӕಙᑵ ለ Ꮓ вಙᑵ ۮ çᐓ ފ ԆԾʕ ڄ ಙᑵ...

Страница 459: ... ÈÕ ËÕß 5 Audio video cord not supplied ࡖᏁ ඁᏁྐង ԅЉ క ÕÕ Õ Õ Ë È ÀÈ æ ÈÕ ËÕß Digital optical cable not supplied ᆚтγង ԅЉ క È π ß µÕ Ë È ÀÈ æ ÈÕ ËÕß Reverse lamp ጜ ø Õ À ß To reverse lamp в Ծ ۑ ጜ µËÕ ø Õ À ß Reverse lamp lead 4 Ծ ۑ ጜ ለ 4 ø Ë ø Õ À ß 4 To car battery вԆԾྐЖ ËÕ í Õ Ë π Ï 4 Required only when connecting a rear view camera to VIDEO IN terminal 5 Refer to a in diagram A on page 4 6 Set AV ...

Страница 460: ...eries as explained below When connecting two components in series ັсᑸճࡵ έई ËÕ ËÕ µËÕ Ë πª Õ Õß Èπ Õπÿ 7 To use these components set the external input setting correctly see page 47 of the INSTRUCTIONS άइç ቁ ኌ ά ᕢಗ é ʯ ો ો έ ۯ èቂᇨۙᘖ ጆê અ ʓ JVC ά ռ CD ಗၪ é JVC έ ܔ ϐၴ CD ಗၪ CD CH CH X1500çമ ʛ ௫ཫύၲ JVC ᕢಗ ʓ άé ለ ᄔ వጤᒯ é έ ᕣಘወ ܔ ϐၴ ᕇ ᕇ ᕢಗ KS BTA200 iPod iPod ࡒᕢಗ KS PD100 ઘለཔ ڄ Ϸ ࡖᏁᆑ ለཔ ʈᕢಗ KS U57 ઘ 3 5...

Страница 461: ...si dan penyambungan lihat buku pedoman terpisah INSTRUCTIONS BUKU PETUNJUK LVT1780 004A UN For canceling the display demonstration see page 8 Untuk membatalkan tampilan demonstrasi lihat halaman 8 DVD RECEIVER WITH MONITOR KW AVX716 KW AVX710 KW AVX716 KW AVX710 ALAT PENERIMA DVD DENGAN MONITOR ...

Страница 462: ...ble and is not malfunction Do not expose the monitor to direct sunlight Do not operate the touch panel using a ball point pen or similar tool with the sharp tip Touch the buttons on the touch panel with your finger directly if you are wearing a glove take it off When the temperature is very cold or very hot Chemical changes occur inside causing malfunction Pictures may not appear clearly or may mo...

Страница 463: ...fore operating the unit Contents INTRODUCTION Playable disc types 4 Basic operations Monitor panel touch panel 5 Basic operations Remote controller RM RK252 6 OPERATIONS Before operating the unit 8 Common operations 9 Listening to the radio 10 Disc operations 13 EXTERNAL DEVICES Bluetooth operations Cellular phone audio player 27 Listening to the CD changer 34 Listening to the iPod 36 Using other ...

Страница 464: ... I Ready CD Recordable Rewritable CD R RW ISO 9660 level 1 level 2 Romeo Joliet CD DA MP3 WMA WAV JPEG DivX MPEG1 MPEG2 AAC MPEG4 1 IfyouinsertaDVDVideodiscofanincorrectRegionCode Regioncodeerror appearsonthescreen 2 DVD Rrecordedinmulti borderformatisalsoplayable exceptforduallayerdiscs DVD RWduallayerdiscsarenotplayable 3 Itispossibletoplaybackfinalized R RW Videoformatonly discs RWdoublelayerdi...

Страница 465: ...ach source operation section Change the display information OPEN Open the monitor panel EJECT Eject the disc CLOSE Close the monitor panel TILT Tilt the monitor panel Exit Erase this screen Shaded icons cannot be used In the explanation buttons on the touch panel are indicated inside For details on the touch panel operations see each source operation section Display Source Menu screen Display AV M...

Страница 466: ...s the disc menu VCD Resumes PBC playback DVD VR Shows the Original Program screen 6 Shows the on screen bar Does not function as R03 LR03 AAA Installing the battery Insert the batteries into the remote controller by matching the polarity and correctly Caution Battery shall not be exposed to excessive heat such as sunshine fire or the like If the range or effectiveness of the remote controller decr...

Страница 467: ...unction as SURROUND o 3 Number buttons Enters numbers TUNER Selects the preset station directly 1 Functionsasanumberbuttononly seeo 2 Notusedforthisunit 3 FunctionswhenpressedwithSHIFT 7 Functions with other buttons see i and o 8 Changes the display information 9 For disc operations 5 DVD Selects the title DVD VR Selects the program Playlist Other discs except VCD CD Selects the folders 4 Pressbri...

Страница 468: ...al English indications are used for purpose of explanation You can select the indication language page 45 Turn on the power Ÿ Display AV Menu screen Display Setup menu Cancel the demonstration Select Off Set the clock settings Finish the procedure Beforeoperatingtheunit Moves to the succeeding menu page Moves to the preceding menu page Return to the previous screen ...

Страница 469: ...external components you have connected media you have attached and the Input settings you have made page 47 On the touch panel On the monitor panel TUNER DISC DVD VCD CD CD CH iPod or EXT IN Bluetooth PHONE Bluetooth AUDIO AV IN back to the beginning You cannot select these sources if they are not ready Exit Source information screen Clock time in large numbers Navigation screen When Navigation is...

Страница 470: ... either 4 or until Manual Search appears on the screen then press it repeatedly The ST indicator lights up when receiving an FM stereo broadcast with sufficient signal strength 3 Reception improves but stereo effect will be lost The MONO indicator lights up To restore stereo effect select Off Preset no Band Tuner indicators Assigned station name page 42 If no name is assigned the frequency of the ...

Страница 471: ...and Tuning in to stations with sufficient signal strength This function works only for FM bands Once you have activated this function selected Local it always works when searching for FM stations 1 Press AV MENU You can also use AV MENU on the monitor panel 2 Press Mode 3 Only stations with sufficient signal strength will be detected The DX indicator goes off then the LO indicator lights up You ca...

Страница 472: ... panel To select from the Preset List 1 2 or Hold Manual presetting Ex Storing FM station of 92 5 MHz into preset number 4 of the FM1 band 1 Display the Preset List 2 Tune in to a station you want to preset 3 Select a preset number The station selected in step 2 is now stored in preset number 4 Hold ...

Страница 473: ...he unit cannot accept the operation you have tried to do In some cases without showing operations will not be accepted Label side Caution on volume setting Discs produce very little noise compared with other sources Lower the volume before playing a disc to avoid damaging the speakers by the sudden increase of the output level When playing back a multi channel encoded disc the multi channel signal...

Страница 474: ...ampling frequency Bit rate Recorded signal channel no page 19 3 8 Start and pause playback 7 Stop playback 4 Press Select chapter Hold Reverse forward search 2 5 Select title program playlist 1 DVD VRalsoindicateseitherPRG program orPLAY playlist playback 2 Searchspeed x2 x10 Buttons on the touch panel In the explanation they are indicated inside These buttons also work when they are not shown on ...

Страница 475: ...ct track Hold Reverse forward search for DivX MPEG1 MPEG2 1 5 Press Select folder Hold Display Folder list While playing the following discs press Each time you press the button the display changes to show the different information page 9 Disc type page 19 page 19 The PBC indicator lights up when PBC is in use Total track no included on the disc Total track no included on the disc Total playing ti...

Страница 476: ... when it is recorded Sound mode page 41 page 19 3 8 Start and pause playback 7 Stop playback 4 Press Select track Hold Reverse forward search 4 5 Press Select folder Hold Display Folder list 3 8 Start and pause playback 7 Stop playback 4 Press Select track Hold Reverse forward search 4 Total track no included on the disc Total playing time Total track no included on the disc Sound mode page 41 ...

Страница 477: ...top playback 4 Press Select track Hold Reverse forward search 5 Select folders The above buttons also work when they are not shown on the screen while watching the playback picture WhileadiscmenuisplayedbackforDVD KEY is automaticallydisplayed Onthediscmenu you canselecta menuitemdirectlybytouchingitonthescreen B For DVD VCD DivX menu operation playback 235 Select the menu items ENT Confirm the se...

Страница 478: ... program not available for Playlist playback Track Repeats current track Folder Repeats current folder Folder Randomly plays all tracks of current folder then tracks of next folders Disc All Randomly plays all tracks Folder Repeats current folder Track Repeats current track PBC not in use Disc All Randomly plays all tracks PBC not in use Track Repeats current track 1 Disc All Randomly plays all tr...

Страница 479: ...rs you can display the Folder Track File Lists then start playback 1 You can also use AV MENU on the monitor panel 2 3 Select a folder 1 then a track 2 Selected track starts playing Press to move to the previous next pages of the list 1 Current folder list number total folder list number 2 Current track list number total track list number of the current folder You can easily access the Track List ...

Страница 480: ...lect chapter Select title when not playing Select title during playback or pause Using menu driven features 1 2 Select an item you want to start playback 3 1 Searchspeed x2 x5 x10 x20 x60 2 Slowmotionspeed 1 32 1 16 1 8 1 4 1 2 3 Searchspeed x2 x10 Operations using the remote controller RM RK252 Also functions as CLR clear Erases a misentry if pressed while holding SHIFT You can change the followi...

Страница 481: ... or pause Hold Reverse forward search 6 Select program Select playlist during playback or pause Select aspect ratio Select chapter Select program when not playing Select program playlist during playback or pause Using Original Program Playlist screens page 25 1 For Original Program For Playlist 2 Select an item you want to start playback 3 To erase the screen 4 Searchspeed x2 x5 x10 x20 x60 5 Slow...

Страница 482: ...ect track Hold Reverse forward search 2 No sound can be heard Select folder Select aspect ratio Select track within the same folder Select folder While playing Reverse advance the scenes by five minutes For DivX6 Using menu driven features 1 2 Select an item you want to start playback 3 1 Searchspeed 1 2 3 2 Searchspeed 1 2 Current playback position twice 2nd press 2nd press 1st press 1st press 3r...

Страница 483: ... the menu To return to the previous menu press To cancel PBC playback 1 2 Select the desired track To resume PBC press Stop playback Start playback pause if pressed during playback Reverse forward search 3 Forward slow motion during pause 4 No sound can be heard Reverse slow motion does not work Press Select track Hold Reverse forward search 5 No sound can be heard Select aspect ratio twice 3 Sear...

Страница 484: ... x2 x5 x10 x20 x60 2 Searchspeed x2 x10 Stop playback Start playback pause if pressed during playback Reverse forward search 3 Press Select track Hold Reverse forward search 4 Select folder Select track within the same folder Select folder 3 Searchspeed x2 x5 x10 x20 x60 4 Searchspeed x2 x10 twice Also functions as CLR clear Erases a misentry if pressed while holding SHIFT ...

Страница 485: ...ist screens You can use Original Program or Playlist screen anytime while playing DVD VR with its data recorded 1 Display the Original Program Playlist screen 2 Select an item you want To erase the screen 1 Original Program Playlist number 2 Recording date 3 Recording source TV station the input terminal of the recording equipment etc 4 Start time of recording 5 Title of the program playlist 6 Hig...

Страница 486: ... play 1 Random play 1 Change the audio language audio stream or audio channel Change or erase the subtitle language Change the view angle 1 page18 2 NotapplicableforDVD VR Above example is of DVD Video Items shown on the bar vary due to the disc type 1 Disc type 2 DVD Audio signal format VCD PBC 3 Playback mode 1 DVD Video C RPT Chapter repeat T RPT Title repeat DVD VR C RPT Chapter repeat PG RPT ...

Страница 487: ...ONE and Bluetooth AUDIO Connecting a new Bluetooth device Registration Pairing methods Use either of the following items in Bluetooth menu to register and establish the connection with a device Select Bluetooth PHONE or Bluetooth AUDIO as the source to operate Bluetooth menu Open Make the unit ready to establish a new Bluetooth connection The connection is established by operating the Bluetooth de...

Страница 488: ...vice to the unit Refer to the instructions supplied with the device to check the PIN code 6 Operate the Bluetooth device to connect while Connecting is displayed on the screen Now connection is established and you can use the device through the unit To connect a special device Special Device 1 Press AV MENU on the touch panel or AV MENU on the monitor panel 2 Press Bluetooth 3 Press Special Device...

Страница 489: ...one volume page 51 Press SOURCE then press Bluetooth PHONE page 9 You can also use SOURCE on the monitor panel Press it repeatedly Ÿ Press AV MENU You can also use AV MENU on the monitor panel Press Bluetooth Establish the connection with a device then make a call or settings using Bluetooth menu pages 50 and 51 Sound mode page 41 Status of the device Signal strength Battery remainder only when th...

Страница 490: ... name you want to call When an SMS comes in If the cellular phone is compatible with SMS Short Message Service you can read the messages on the screen You cannot edit or send a message through the unit When Message Info is set to Auto The unit rings and the following screen is displayed to inform you of a message arrival page 51 To read the message press Yes The source is changed to Bluetooth PHON...

Страница 491: ...eset Goes to Preset List You can preset the entered number by selecting a preset number page 32 Dial Calls the entered number You can easily access Dial Menu by pressing SHORT CUT on the touch panel then You can also access Dial Menu by holding SOURCE on the monitor panel You can easily activate Voice Dialing by pressing SHORT CUT on the touch panel then You can also activate Voice Dialing by hold...

Страница 492: ...l Received Calls or Missed Calls 1 Press AV MENU on the touch panel or AV MENU on the monitor panel 2 Press Bluetooth 3 Press Dial Menu then Ex Selecting Received Calls 2 Select a telephone number to store 3 Select a preset number Now Tom is stored into preset no 1 Display Dial Menu screen Answer the incoming call Display the Redial menu if pressed and held regardless of the current source End the...

Страница 493: ... device can be registered 3 Status of the device Signal strength Battery remainder only when the information comes from the device The Bluetooth icon lights up when the adapter is connected Press SOURCE then press Bluetooth AUDIO page 9 You can also use SOURCE on the monitor panel Press it repeatedly Ÿ Start playback Buttons on the touch panel In the explanation they are indicated inside 2 1 1 Whe...

Страница 494: ...aying time Disc no MP3 indicator page 35 Tag data appears only when it is recorded Select a disc to start playing If you select an MP3 disc the Track list of the current folder appears You can select a track and start playing also page 19 If you select a folder on the list you can start playing the first track of the folder To go to the other list Sound mode page 41 4 Press Select track Hold Rever...

Страница 495: ...isc Randomly plays all tracks of the current disc All Randomly plays all tracks of all loaded discs Track Repeats current track Folder Repeats all tracks of the current folder Disc Repeats all tracks of the current disc Folder Randomly plays all tracks of current folder then tracks of next folders Disc Randomly plays all tracks of the current disc All Randomly plays all tracks of all loaded discs ...

Страница 496: ... Press SOURCE then press iPod page 9 Playback starts automatically You can also use SOURCE on the monitor panel Press it repeatedly Ÿ Press 4 or to select a track Track no Playing time page 37 4 Press Select track Hold Reverse forward search 5 Enter player s menu Start playback pause To resume press again Sound mode page 41 Buttons on the touch panel In the explanation they are indicated inside ...

Страница 497: ...to confirm the selection 4 Repeat steps 2 and 3 to select a track When a track is selected finally playback starts To return to the previous menu press 5 Selecting playback modes 1 You can also use AV MENU on the monitor panel 2 3 Select an appropriate option Repeat One Functions the same as Repeat One All Functions the same as Repeat All Random Album Functions the same as Shuffle Albums Song Func...

Страница 498: ... watching the playback picture If no operations are done for about five seconds the operation buttons disappear KEY does not work when the source is AV IN Touch the screen center portion You can easily access to Aspect setting menu by pressing SHORT CUT on the touch panel then Assigned title page 42 Sound mode page 41 Touch the screen center portion Buttons on the touch panel In the explanation th...

Страница 499: ...hat you can watch the navigation screen Preparation Make sure Navigation is selected for AV Input page 47 To view the navigation screen and listen to the navigation guidance Press DISP on the monitor panel repeatedly page 9 The aspect ratio of the navigation screen is fixed to Full regardless of the Aspect setting page 45 IfyourNavigationSystemisequippedwiththevoiceguidancefunction When Navigation...

Страница 500: ... not supplied Preparation Make sure External is selected for External Input page 47 Press SOURCE then press EXT IN page 9 You can also use SOURCE on the monitor panel Press it repeatedly Ÿ Turn on the connected component and start playing the source Assigned title page 42 page 41 Sound mode page 41 Buttons on the touch panel In the explanation they are indicated inside ...

Страница 501: ...ation Storing your own adjustments You can store your adjustments into User1 User2 and User3 1 Repeat steps and Ÿ then in step 2 Adjust 1 then store 2 Ex When storing into User2 While playing back any source other than Bluetooth PHONE you can easily access Equalizer menu by pressing SHORT CUT on the touch panel then Move to other six sound modes ...

Страница 502: ...n also use AV MENU on the monitor panel Assign a title You can enter up to 16 characters for available characters page 59 Store Confirm the entry 2 3 Move the cursor BS Erase the character before the cursor Del Erase the character on the cursor Cap Change the letter case upper lower Change Change the character set Space Enter a space Finish the procedure Assigningtitlestothesources In the explanat...

Страница 503: ...e of the settings do not open the sub setting window but just selecting an option will change the setting The display indications may change according to change of the specifications Ex Changing the AV Input setting You can also use AV MENU on the monitor panel Ÿ Non available items will be shaded ...

Страница 504: ...the Dimmer Time setting below Dimmer Time Set Sets the Dimmer On Off times Dimmer Level You can select the brightness for dimmer 1 bright 2 middle 3 dark Bright You can adjust brightness of the screen 15 darkest to 15 brightest Initial 00 Picture Adjust 2 You can adjust the following to make the screen clear and legible for watching the playback picture The setting will be stored one for DISC comm...

Страница 505: ...çais Deutsch Italiano Nederlands Svenska Dansk Руccĸий Português The characters you can enter for assigning the titles also change according to the language selected 59 NTSC PAL Select the color system of the external monitor connected NTSC PAL Turn off the power and turn it on again to make the new setting effective Clock Time Set Initial 1 00AM 8 Time Format Select either 12 hour system or 24 ho...

Страница 506: ...ains different types of files Audio Plays back audio files Still Picture Plays back JPEG files Video Plays back DivX MPEG1 MPEG2 files Audio Video Plays back audio files and DivX MPEG1 MPEG2 files DivX Regist Registration 1 This unit has its own Registration Code Once you have played back a file with which the Registration Code recorded this unit s Registration Code is overwritten for copyright pr...

Страница 507: ...o component is connected AV IN is skipped while selecting the source Audio Video Select when connecting an AV component such as a VCR Audio Select when connecting an audio component such as a portable audio player Camera 3 Select when connecting a rear view camera Navigation Select when connecting a Navigation System External Input 4 For connecting an external component to the CD changer jack on t...

Страница 508: ...els On When the ignition is turned off the lamp on the button flashes TouchPanel Sens Change the sensitivity of the touch panel As the number decreases sensitivity becomes higher 1 2 3 Initialize Initialize all settings you have made in AV Menu Press and hold Enter to initialize the settings then reset the unit 3 Equalizer Flat Hard Rock R B Pop Jazz Dance Country Reggae Classic User1 User2 User3 ...

Страница 509: ...ial 00 You can make the adjustments separately for DVD and other discs Amplifier Gain You can change the maximum volume level of this unit Off Deactivates the built in amplifier Low VOL 00 to 30 Select this if the maximum power of the speakers is less than 50 W High VOL 00 to 50 Mode 1 Menu items Selectable settings reference page Mono Only for FM Off On 10 DX Local Only for FM Local DX 11 SSM Onl...

Страница 510: ...blished it is registered in the unit You can connect the unit and the device by using Connect below from the next time Connect Only for the registered devices After selecting a device from among the registered devices pages 27 and 28 establish the connection with it Disconnect Only for the device being connected Disconnect the current device before connecting another device Delete Pairing Only for...

Страница 511: ...t rejects all incoming calls Message Info 5 Auto The unit informs you of the arrival of a message by ringing and displaying Receiving Message To read the message page 30 Manual The unit does not inform you of the arrival of a message MIC Setting 5 Adjust microphone volume connected to the Bluetooth adapter 01 02 03 Version 6 The Bluetooth software and hardware versions are shown 4 Selectableonlyfo...

Страница 512: ...disc around the center holder with the printed surface facing up Make sure to store discs into the cases after use To keep discs clean A dirty disc may not play correctly If a disc does become dirty wipe it with a soft cloth in a straight line from center to edge Do not use any solvent for example conventional record cleaner spray thinner benzine etc to clean discs To play new discs New discs may ...

Страница 513: ...ed within 15 seconds the disc is automatically inserted again into the loading slot to protect it from dust Playing Recordable Rewritable discs This unit can recognize a total of 5 000 files and 250 folders a maximum of 999 files per folder Use only finalized discs This unit can play back multi session discs however unclosed sessions will be skipped while playing This unit can recognize a total 25...

Страница 514: ...bps Sampling frequency 48 kHz 44 1 kHz 32 kHz for MPEG1 24 kHz 22 05 kHz 16 kHz for MPEG2 48 kHz 44 1 kHz 32 kHz 22 05 kHz for WMA 44 1 kHz for WAV This unit can show ID3 Tag Version 1 0 1 1 2 2 2 3 2 4 for MP3 This unit can also show WAV WMA Tag This unit can play back files recorded in VBR variable bit rate Files recorded in VBR have a discrepancy in elapsed time indication This unit cannot play...

Страница 515: ...found No available Bluetooth device is detected by Search Loading The unit is updating the phone book and or SMS Please Wait The unit is preparing to use the Bluetooth function If the message does not disappear turn off and turn on the unit then connect the device again or reset the unit Reset 08 Check the connection between the adapter and this unit Icons for phone types These icons indicate the ...

Страница 516: ...the adapter connected to this unit While the iPod is connected all operations from the iPod are disabled Perform all operations from this unit The text information may not be displayed correctly The text information scrolls on the screen This unit can display up to 40 characters Notice When operating an iPod some operations may not be performed correctly or as intended In this case visit the follo...

Страница 517: ...put Playback disc Output signals Stream Dolby D PCM DVD 48 kHz 16 20 24 bits Linear PCM 48 kHz 16 bits stereo Linear PCM 96 kHz Linear PCM 48 kHz 16 bits stereo Linear PCM with Dolby Digital Dolby Digital bitstream 48 kHz 16 bits stereo Linear PCM with DTS DTS bitstream with MPEG Audio MPEG bitstream 48 kHz 16 bits stereo Linear PCM Audio CD Video CD 44 1 kHz 16 bits stereo Linear PCM 48 kHz 16 bi...

Страница 518: ...ish PS Pashto Pushto TH Thai AZ Azerbaijani GL Galician KY Kirghiz QU Quechua TI Tigrinya BA Bashkir GN Guarani LA Latin RM Rhaeto Romance TK Turkmen BE Byelorussian GU Gujarati LN Lingala RN Kirundi TL Tagalog BG Bulgarian HA Hausa LO Laothian RO Rumanian TN Setswana BH Bihari HI Hindi LT Lithuanian RW Kinyarwanda TO Tonga BI Bislama HR Croatian LV Latvian Lettish SA Sanskrit TR Turkish BN Bengal...

Страница 519: ...DivX Ultra Certified product Plays all versions of DivX video including DivX 6 with enhanced playback of DivX media files and the DivX Media Format Microsoft and Windows Media are either registered trademarks or trademarks of Microsoft Corporation in the United States and or other countries The Bluetooth word mark and logos are owned by the Bluetooth SIG Inc and any use of such marks by Victor Com...

Страница 520: ...se this symptom Adjust Bright page 44 Position Error Push Open Key appears on the screen The monitor panel angle has been forcibly adjusted or its adjustment has been interrupted while opening or closing Press OPEN TILT Mecha Error Push Reset appears on the screen and the panel does not move Reset the unit page 3 No Signal appears Change the source Start the playback on the external component conn...

Страница 521: ...d Parking brake lead is not connected properly Installation Connection Manual No picture appears on the external monitor Connect the video cord correctly Select the correct input on the external monitor Eject Error or Loading Error appears on the screen Change the source by pressing SOURCE Region code error appears on the screen when you insert a DVD Video Region code is not correct page 4 DivX MP...

Страница 522: ... device name from Special Device then try to connect again pages 28 50 Echo or noise occurs Adjust the microphone unit position Phone sound quality is poor Reduce the distance between the unit and the Bluetooth cellular phone Move the car to place where you can get a better signal reception The sound is interrupted or skipped during playback of a Bluetooth audio player Reduce the distance between ...

Страница 523: ...s not work Check the connection Charge the battery Sound is distorted Deactivate the equalizer either on this unit or the iPod Disconnect appears on the screen Check the connection Playback stops The headphones are disconnected during playback Restart playback No Files appears on the screen No tracks are stored Import tracks to the iPod Reset 01 Reset 07 appears on the screen Disconnect the adapte...

Страница 524: ...osite 1 Vp p 75 Ω Other Terminals Input LINE IN VIDEO IN Antenna input Output VIDEO OUT Others CD changer Reverse gear signal DIGITAL OUT optical FM AM TUNER Frequency Range FM 87 5 MHz to 108 0 MHz AM 531 kHz to 1 602 kHz FM Tuner Usable Sensitivity 11 3 dBf 1 0 μV 75 Ω 50 dB Quieting Sensitivity 16 3 dBf 1 8 μV 75 Ω Alternate Channel Selectivity 400 kHz 65 dB Frequency Response 40 Hz to 15 000 H...

Страница 525: ...ve ground Allowable Storage Temperature 10 C to 60 C Allowable Operating Temperature 0 C to 40 C Dimensions W H D Installation Size approx 178 mm 100 mm 160 mm Panel Size approx 171 mm 97 mm 21 mm Mass approx 2 6 kg CAUTION When ejecting the monitor leave an open space for the monitor to come out If you do not the monitor may obstruct the steering wheel and gearshift lever operations and this may ...

Страница 526: ...r Company of Japan Limited Having TROUBLE with operation Please reset your unit Refer to page of How to reset your unit Ada MASALAH dengan cara pengoperasian Setel kembali unit Anda Lihat halaman mengenai Bagaimana mereset unit anda ...

Страница 527: ...hkan unit ini ENGLISH This unit is designed to operate on 12 V DC NEGATIVE ground electrical systems If your vehicle does not have this system a voltage inverter is required which can be purchased at JVC car audio dealers WARNINGS DO NOT install any unit or wire any cable in a location where it may obstruct the steering wheel and gearshift lever operations as this may result in a traffic accident ...

Страница 528: ...ikut braket montasi Catatan Pastikan Anda menyimpan semua sekrup sekrup dan komponen yang dilepaskan dari mobil untuk penggunaan di kemudian hari 2 Pasangkan braket montasi yang dilepaskan dari mobil ke unit ini lihat di bawah 3 Lakukan koneksi listrik yang diperlukan Lihat halaman 3 dan 4 4 Pasang unit ini dengan menggunakan sekrup sekrup yang dilepaskan pada langkah 1 Berikut adalah contoh pemas...

Страница 529: ...an accessory terminal in the fuse block Ke terminal aksesori dalam blok sekring To the remote lead of other equipment 200 mA max Ke ujung jauh dari peralatan lain maksimum 200 mA To automatic antenna if any 250 mA max Ke antena otomatis jika ada maksimum 250 mA Fuse block Blok sekring To cellular phone system Ke sistem telepon selular To car light control switch Ke saklar kontrol lampu mobil Crimp...

Страница 530: ...nector not supplied for this unit Konektor Y tidak disediakan untuk unit ini To the remote lead of other equipment Ke ujung jauh dari peralatan lain Bila menghubungkan komponen eksternal rujuk juga buku petunjuk yang dibekalkan untuk komponen dan adaptor Peringatan Sebelum menyambungkan komponen eksternal pastikan bahwa unit sudah dimatikan Anda dapat menghubungkan komponen JVC berikut ini ke jack...

Страница 531: ...For installation and connections refer to the separate manual INSTRUCTIONS LVT1780 001A A For canceling the display demonstration see page 8 DVD RECEIVER WITH MONITOR KW AVX716 KW AVX710 ...

Страница 532: ...and is not malfunction Do not expose the monitor to direct sunlight Do not operate the touch panel using a ball point pen or similar tool with the sharp tip Touch the buttons on the touch panel with your finger directly if you are wearing a glove take it off When the temperature is very cold or very hot Chemical changes occur inside causing malfunction Pictures may not appear clearly or may move s...

Страница 533: ... operating the unit Contents INTRODUCTION Playable disc types 4 Basic operations Monitor panel touch panel 5 Basic operations Remote controller RM RK252 6 OPERATIONS Before operating the unit 8 Common operations 9 Listening to the radio 10 Disc operations 13 EXTERNAL DEVICES Bluetooth operations Cellular phone audio player 27 Listening to the CD changer 34 Listening to the iPod 36 Using other exte...

Страница 534: ...eady CD Recordable Rewritable CD R RW ISO 9660 level 1 level 2 Romeo Joliet CD DA MP3 WMA WAV JPEG DivX MPEG1 MPEG2 AAC MPEG4 1 IfyouinsertaDVDVideodiscofanincorrectRegionCode Regioncodeerror appearsonthescreen 2 DVD Rrecordedinmulti borderformatisalsoplayable exceptforduallayerdiscs DVD RWduallayerdiscsarenotplayable 3 Itispossibletoplaybackfinalized R RW Videoformatonly discs RWdoublelayerdiscsa...

Страница 535: ...source operation section Change the display information OPEN Open the monitor panel EJECT Eject the disc CLOSE Close the monitor panel TILT Tilt the monitor panel Exit Erase this screen Shaded icons cannot be used In the explanation buttons on the touch panel are indicated inside For details on the touch panel operations see each source operation section Display Source Menu screen Display AV Menu ...

Страница 536: ...e disc menu VCD Resumes PBC playback DVD VR Shows the Original Program screen 6 Shows the on screen bar Does not function as R03 LR03 AAA Installing the battery Insert the batteries into the remote controller by matching the polarity and correctly Caution Battery shall not be exposed to excessive heat such as sunshine fire or the like If the range or effectiveness of the remote controller decrease...

Страница 537: ...ion as SURROUND o 3 Number buttons Enters numbers TUNER Selects the preset station directly 1 Functionsasanumberbuttononly seeo 2 Notusedforthisunit 3 FunctionswhenpressedwithSHIFT 7 Functions with other buttons see i and o 8 Changes the display information 9 For disc operations 5 DVD Selects the title DVD VR Selects the program Playlist Other discs except VCD CD Selects the folders 4 Pressbriefly...

Страница 538: ...nglish indications are used for purpose of explanation You can select the indication language page 45 Turn on the power Ÿ Display AV Menu screen Display Setup menu Cancel the demonstration Select Off Set the clock settings Finish the procedure Beforeoperatingtheunit Moves to the succeeding menu page Moves to the preceding menu page Return to the previous screen ...

Страница 539: ...rnal components you have connected media you have attached and the Input settings you have made page 47 On the touch panel On the monitor panel TUNER DISC DVD VCD CD CD CH iPod or EXT IN Bluetooth PHONE Bluetooth AUDIO AV IN back to the beginning You cannot select these sources if they are not ready Exit Source information screen Clock time in large numbers Navigation screen When Navigation is sel...

Страница 540: ...her 4 or until Manual Search appears on the screen then press it repeatedly The ST indicator lights up when receiving an FM stereo broadcast with sufficient signal strength 3 Reception improves but stereo effect will be lost The MONO indicator lights up To restore stereo effect select Off Preset no Band Tuner indicators Assigned station name page 42 If no name is assigned the frequency of the stat...

Страница 541: ...Tuning in to stations with sufficient signal strength This function works only for FM bands Once you have activated this function selected Local it always works when searching for FM stations 1 Press AV MENU You can also use AV MENU on the monitor panel 2 Press Mode 3 Only stations with sufficient signal strength will be detected The DX indicator goes off then the LO indicator lights up You can al...

Страница 542: ...el To select from the Preset List 1 2 or Hold Manual presetting Ex Storing FM station of 92 5 MHz into preset number 4 of the FM1 band 1 Display the Preset List 2 Tune in to a station you want to preset 3 Select a preset number The station selected in step 2 is now stored in preset number 4 Hold ...

Страница 543: ...nit cannot accept the operation you have tried to do In some cases without showing operations will not be accepted Label side Caution on volume setting Discs produce very little noise compared with other sources Lower the volume before playing a disc to avoid damaging the speakers by the sudden increase of the output level When playing back a multi channel encoded disc the multi channel signals ar...

Страница 544: ...ing frequency Bit rate Recorded signal channel no page 19 3 8 Start and pause playback 7 Stop playback 4 Press Select chapter Hold Reverse forward search 2 5 Select title program playlist 1 DVD VRalsoindicateseitherPRG program orPLAY playlist playback 2 Searchspeed x2 x10 Buttons on the touch panel In the explanation they are indicated inside These buttons also work when they are not shown on the ...

Страница 545: ...rack Hold Reverse forward search for DivX MPEG1 MPEG2 1 5 Press Select folder Hold Display Folder list While playing the following discs press Each time you press the button the display changes to show the different information page 9 Disc type page 19 page 19 The PBC indicator lights up when PBC is in use Total track no included on the disc Total track no included on the disc Total playing time S...

Страница 546: ...n it is recorded Sound mode page 41 page 19 3 8 Start and pause playback 7 Stop playback 4 Press Select track Hold Reverse forward search 4 5 Press Select folder Hold Display Folder list 3 8 Start and pause playback 7 Stop playback 4 Press Select track Hold Reverse forward search 4 Total track no included on the disc Total playing time Total track no included on the disc Sound mode page 41 ...

Страница 547: ...playback 4 Press Select track Hold Reverse forward search 5 Select folders The above buttons also work when they are not shown on the screen while watching the playback picture WhileadiscmenuisplayedbackforDVD KEY is automaticallydisplayed Onthediscmenu you canselecta menuitemdirectlybytouchingitonthescreen B For DVD VCD DivX menu operation playback 235 Select the menu items ENT Confirm the select...

Страница 548: ...gram not available for Playlist playback Track Repeats current track Folder Repeats current folder Folder Randomly plays all tracks of current folder then tracks of next folders Disc All Randomly plays all tracks Folder Repeats current folder Track Repeats current track PBC not in use Disc All Randomly plays all tracks PBC not in use Track Repeats current track 1 Disc All Randomly plays all tracks...

Страница 549: ...ou can display the Folder Track File Lists then start playback 1 You can also use AV MENU on the monitor panel 2 3 Select a folder 1 then a track 2 Selected track starts playing Press to move to the previous next pages of the list 1 Current folder list number total folder list number 2 Current track list number total track list number of the current folder You can easily access the Track List by p...

Страница 550: ... chapter Select title when not playing Select title during playback or pause Using menu driven features 1 2 Select an item you want to start playback 3 1 Searchspeed x2 x5 x10 x20 x60 2 Slowmotionspeed 1 32 1 16 1 8 1 4 1 2 3 Searchspeed x2 x10 Operations using the remote controller RM RK252 Also functions as CLR clear Erases a misentry if pressed while holding SHIFT You can change the following i...

Страница 551: ...pause Hold Reverse forward search 6 Select program Select playlist during playback or pause Select aspect ratio Select chapter Select program when not playing Select program playlist during playback or pause Using Original Program Playlist screens page 25 1 For Original Program For Playlist 2 Select an item you want to start playback 3 To erase the screen 4 Searchspeed x2 x5 x10 x20 x60 5 Slowmoti...

Страница 552: ...track Hold Reverse forward search 2 No sound can be heard Select folder Select aspect ratio Select track within the same folder Select folder While playing Reverse advance the scenes by five minutes For DivX6 Using menu driven features 1 2 Select an item you want to start playback 3 1 Searchspeed 1 2 3 2 Searchspeed 1 2 Current playback position twice 2nd press 2nd press 1st press 1st press 3rd pr...

Страница 553: ... menu To return to the previous menu press To cancel PBC playback 1 2 Select the desired track To resume PBC press Stop playback Start playback pause if pressed during playback Reverse forward search 3 Forward slow motion during pause 4 No sound can be heard Reverse slow motion does not work Press Select track Hold Reverse forward search 5 No sound can be heard Select aspect ratio twice 3 Searchsp...

Страница 554: ...x5 x10 x20 x60 2 Searchspeed x2 x10 Stop playback Start playback pause if pressed during playback Reverse forward search 3 Press Select track Hold Reverse forward search 4 Select folder Select track within the same folder Select folder 3 Searchspeed x2 x5 x10 x20 x60 4 Searchspeed x2 x10 twice Also functions as CLR clear Erases a misentry if pressed while holding SHIFT ...

Страница 555: ...screens You can use Original Program or Playlist screen anytime while playing DVD VR with its data recorded 1 Display the Original Program Playlist screen 2 Select an item you want To erase the screen 1 Original Program Playlist number 2 Recording date 3 Recording source TV station the input terminal of the recording equipment etc 4 Start time of recording 5 Title of the program playlist 6 Highlig...

Страница 556: ...y 1 Random play 1 Change the audio language audio stream or audio channel Change or erase the subtitle language Change the view angle 1 page18 2 NotapplicableforDVD VR Above example is of DVD Video Items shown on the bar vary due to the disc type 1 Disc type 2 DVD Audio signal format VCD PBC 3 Playback mode 1 DVD Video C RPT Chapter repeat T RPT Title repeat DVD VR C RPT Chapter repeat PG RPT Prog...

Страница 557: ...and Bluetooth AUDIO Connecting a new Bluetooth device Registration Pairing methods Use either of the following items in Bluetooth menu to register and establish the connection with a device Select Bluetooth PHONE or Bluetooth AUDIO as the source to operate Bluetooth menu Open Make the unit ready to establish a new Bluetooth connection The connection is established by operating the Bluetooth device...

Страница 558: ... to the unit Refer to the instructions supplied with the device to check the PIN code 6 Operate the Bluetooth device to connect while Connecting is displayed on the screen Now connection is established and you can use the device through the unit To connect a special device Special Device 1 Press AV MENU on the touch panel or AV MENU on the monitor panel 2 Press Bluetooth 3 Press Special Device The...

Страница 559: ...volume page 51 Press SOURCE then press Bluetooth PHONE page 9 You can also use SOURCE on the monitor panel Press it repeatedly Ÿ Press AV MENU You can also use AV MENU on the monitor panel Press Bluetooth Establish the connection with a device then make a call or settings using Bluetooth menu pages 50 and 51 Sound mode page 41 Status of the device Signal strength Battery remainder only when the in...

Страница 560: ...e you want to call When an SMS comes in If the cellular phone is compatible with SMS Short Message Service you can read the messages on the screen You cannot edit or send a message through the unit When Message Info is set to Auto The unit rings and the following screen is displayed to inform you of a message arrival page 51 To read the message press Yes The source is changed to Bluetooth PHONE To...

Страница 561: ... Goes to Preset List You can preset the entered number by selecting a preset number page 32 Dial Calls the entered number You can easily access Dial Menu by pressing SHORT CUT on the touch panel then You can also access Dial Menu by holding SOURCE on the monitor panel You can easily activate Voice Dialing by pressing SHORT CUT on the touch panel then You can also activate Voice Dialing by holding ...

Страница 562: ...ceived Calls or Missed Calls 1 Press AV MENU on the touch panel or AV MENU on the monitor panel 2 Press Bluetooth 3 Press Dial Menu then Ex Selecting Received Calls 2 Select a telephone number to store 3 Select a preset number Now Tom is stored into preset no 1 Display Dial Menu screen Answer the incoming call Display the Redial menu if pressed and held regardless of the current source End the cal...

Страница 563: ...ice can be registered 3 Status of the device Signal strength Battery remainder only when the information comes from the device The Bluetooth icon lights up when the adapter is connected Press SOURCE then press Bluetooth AUDIO page 9 You can also use SOURCE on the monitor panel Press it repeatedly Ÿ Start playback Buttons on the touch panel In the explanation they are indicated inside 2 1 1 Whenace...

Страница 564: ...g time Disc no MP3 indicator page 35 Tag data appears only when it is recorded Select a disc to start playing If you select an MP3 disc the Track list of the current folder appears You can select a track and start playing also page 19 If you select a folder on the list you can start playing the first track of the folder To go to the other list Sound mode page 41 4 Press Select track Hold Reverse f...

Страница 565: ...Randomly plays all tracks of the current disc All Randomly plays all tracks of all loaded discs Track Repeats current track Folder Repeats all tracks of the current folder Disc Repeats all tracks of the current disc Folder Randomly plays all tracks of current folder then tracks of next folders Disc Randomly plays all tracks of the current disc All Randomly plays all tracks of all loaded discs You ...

Страница 566: ...ss SOURCE then press iPod page 9 Playback starts automatically You can also use SOURCE on the monitor panel Press it repeatedly Ÿ Press 4 or to select a track Track no Playing time page 37 4 Press Select track Hold Reverse forward search 5 Enter player s menu Start playback pause To resume press again Sound mode page 41 Buttons on the touch panel In the explanation they are indicated inside ...

Страница 567: ...onfirm the selection 4 Repeat steps 2 and 3 to select a track When a track is selected finally playback starts To return to the previous menu press 5 Selecting playback modes 1 You can also use AV MENU on the monitor panel 2 3 Select an appropriate option Repeat One Functions the same as Repeat One All Functions the same as Repeat All Random Album Functions the same as Shuffle Albums Song Function...

Страница 568: ...ching the playback picture If no operations are done for about five seconds the operation buttons disappear KEY does not work when the source is AV IN Touch the screen center portion You can easily access to Aspect setting menu by pressing SHORT CUT on the touch panel then Assigned title page 42 Sound mode page 41 Touch the screen center portion Buttons on the touch panel In the explanation they a...

Страница 569: ...you can watch the navigation screen Preparation Make sure Navigation is selected for AV Input page 47 To view the navigation screen and listen to the navigation guidance Press DISP on the monitor panel repeatedly page 9 The aspect ratio of the navigation screen is fixed to Full regardless of the Aspect setting page 45 IfyourNavigationSystemisequippedwiththevoiceguidancefunction When Navigation is ...

Страница 570: ... supplied Preparation Make sure External is selected for External Input page 47 Press SOURCE then press EXT IN page 9 You can also use SOURCE on the monitor panel Press it repeatedly Ÿ Turn on the connected component and start playing the source Assigned title page 42 page 41 Sound mode page 41 Buttons on the touch panel In the explanation they are indicated inside ...

Страница 571: ...n Storing your own adjustments You can store your adjustments into User1 User2 and User3 1 Repeat steps and Ÿ then in step 2 Adjust 1 then store 2 Ex When storing into User2 While playing back any source other than Bluetooth PHONE you can easily access Equalizer menu by pressing SHORT CUT on the touch panel then Move to other six sound modes ...

Страница 572: ...so use AV MENU on the monitor panel Assign a title You can enter up to 16 characters for available characters page 59 Store Confirm the entry 2 3 Move the cursor BS Erase the character before the cursor Del Erase the character on the cursor Cap Change the letter case upper lower Change Change the character set Space Enter a space Finish the procedure Assigningtitlestothesources In the explanation ...

Страница 573: ... the settings do not open the sub setting window but just selecting an option will change the setting The display indications may change according to change of the specifications Ex Changing the AV Input setting You can also use AV MENU on the monitor panel Ÿ Non available items will be shaded ...

Страница 574: ...Dimmer Time setting below Dimmer Time Set Sets the Dimmer On Off times Dimmer Level You can select the brightness for dimmer 1 bright 2 middle 3 dark Bright You can adjust brightness of the screen 15 darkest to 15 brightest Initial 00 Picture Adjust 2 You can adjust the following to make the screen clear and legible for watching the playback picture The setting will be stored one for DISC common a...

Страница 575: ... Deutsch Italiano Nederlands Svenska Dansk Руccĸий Português The characters you can enter for assigning the titles also change according to the language selected 59 NTSC PAL Select the color system of the external monitor connected NTSC PAL Turn off the power and turn it on again to make the new setting effective Clock Time Set Initial 1 00AM 8 Time Format Select either 12 hour system or 24 hour s...

Страница 576: ... different types of files Audio Plays back audio files Still Picture Plays back JPEG files Video Plays back DivX MPEG1 MPEG2 files Audio Video Plays back audio files and DivX MPEG1 MPEG2 files DivX Regist Registration 1 This unit has its own Registration Code Once you have played back a file with which the Registration Code recorded this unit s Registration Code is overwritten for copyright protec...

Страница 577: ...mponent is connected AV IN is skipped while selecting the source Audio Video Select when connecting an AV component such as a VCR Audio Select when connecting an audio component such as a portable audio player Camera 3 Select when connecting a rear view camera Navigation Select when connecting a Navigation System External Input 4 For connecting an external component to the CD changer jack on the r...

Страница 578: ...On When the ignition is turned off the lamp on the button flashes TouchPanel Sens Change the sensitivity of the touch panel As the number decreases sensitivity becomes higher 1 2 3 Initialize Initialize all settings you have made in AV Menu Press and hold Enter to initialize the settings then reset the unit 3 Equalizer Flat Hard Rock R B Pop Jazz Dance Country Reggae Classic User1 User2 User3 41 T...

Страница 579: ...00 You can make the adjustments separately for DVD and other discs Amplifier Gain You can change the maximum volume level of this unit Off Deactivates the built in amplifier Low VOL 00 to 30 Select this if the maximum power of the speakers is less than 50 W High VOL 00 to 50 Mode 1 Menu items Selectable settings reference page Mono Only for FM Off On 10 DX Local Only for FM Local DX 11 SSM Only fo...

Страница 580: ...hed it is registered in the unit You can connect the unit and the device by using Connect below from the next time Connect Only for the registered devices After selecting a device from among the registered devices pages 27 and 28 establish the connection with it Disconnect Only for the device being connected Disconnect the current device before connecting another device Delete Pairing Only for the...

Страница 581: ...jects all incoming calls Message Info 5 Auto The unit informs you of the arrival of a message by ringing and displaying Receiving Message To read the message page 30 Manual The unit does not inform you of the arrival of a message MIC Setting 5 Adjust microphone volume connected to the Bluetooth adapter 01 02 03 Version 6 The Bluetooth software and hardware versions are shown 4 Selectableonlyfor Bl...

Страница 582: ... around the center holder with the printed surface facing up Make sure to store discs into the cases after use To keep discs clean A dirty disc may not play correctly If a disc does become dirty wipe it with a soft cloth in a straight line from center to edge Do not use any solvent for example conventional record cleaner spray thinner benzine etc to clean discs To play new discs New discs may have...

Страница 583: ...ithin 15 seconds the disc is automatically inserted again into the loading slot to protect it from dust Playing Recordable Rewritable discs This unit can recognize a total of 5 000 files and 250 folders a maximum of 999 files per folder Use only finalized discs This unit can play back multi session discs however unclosed sessions will be skipped while playing This unit can recognize a total 25 cha...

Страница 584: ...Sampling frequency 48 kHz 44 1 kHz 32 kHz for MPEG1 24 kHz 22 05 kHz 16 kHz for MPEG2 48 kHz 44 1 kHz 32 kHz 22 05 kHz for WMA 44 1 kHz for WAV This unit can show ID3 Tag Version 1 0 1 1 2 2 2 3 2 4 for MP3 This unit can also show WAV WMA Tag This unit can play back files recorded in VBR variable bit rate Files recorded in VBR have a discrepancy in elapsed time indication This unit cannot play bac...

Страница 585: ...d No available Bluetooth device is detected by Search Loading The unit is updating the phone book and or SMS Please Wait The unit is preparing to use the Bluetooth function If the message does not disappear turn off and turn on the unit then connect the device again or reset the unit Reset 08 Check the connection between the adapter and this unit Icons for phone types These icons indicate the phon...

Страница 586: ...adapter connected to this unit While the iPod is connected all operations from the iPod are disabled Perform all operations from this unit The text information may not be displayed correctly The text information scrolls on the screen This unit can display up to 40 characters Notice When operating an iPod some operations may not be performed correctly or as intended In this case visit the following...

Страница 587: ...Playback disc Output signals Stream Dolby D PCM DVD 48 kHz 16 20 24 bits Linear PCM 48 kHz 16 bits stereo Linear PCM 96 kHz Linear PCM 48 kHz 16 bits stereo Linear PCM with Dolby Digital Dolby Digital bitstream 48 kHz 16 bits stereo Linear PCM with DTS DTS bitstream with MPEG Audio MPEG bitstream 48 kHz 16 bits stereo Linear PCM Audio CD Video CD 44 1 kHz 16 bits stereo Linear PCM 48 kHz 16 bits s...

Страница 588: ...PS Pashto Pushto TH Thai AZ Azerbaijani GL Galician KY Kirghiz QU Quechua TI Tigrinya BA Bashkir GN Guarani LA Latin RM Rhaeto Romance TK Turkmen BE Byelorussian GU Gujarati LN Lingala RN Kirundi TL Tagalog BG Bulgarian HA Hausa LO Laothian RO Rumanian TN Setswana BH Bihari HI Hindi LT Lithuanian RW Kinyarwanda TO Tonga BI Bislama HR Croatian LV Latvian Lettish SA Sanskrit TR Turkish BN Bengali Ba...

Страница 589: ... Ultra Certified product Plays all versions of DivX video including DivX 6 with enhanced playback of DivX media files and the DivX Media Format Microsoft and Windows Media are either registered trademarks or trademarks of Microsoft Corporation in the United States and or other countries The Bluetooth word mark and logos are owned by the Bluetooth SIG Inc and any use of such marks by Victor Company...

Страница 590: ...his symptom Adjust Bright page 44 Position Error Push Open Key appears on the screen The monitor panel angle has been forcibly adjusted or its adjustment has been interrupted while opening or closing Press OPEN TILT Mecha Error Push Reset appears on the screen and the panel does not move Reset the unit page 3 No Signal appears Change the source Start the playback on the external component connecte...

Страница 591: ...rking brake lead is not connected properly Installation Connection Manual No picture appears on the external monitor Connect the video cord correctly Select the correct input on the external monitor Eject Error or Loading Error appears on the screen Change the source by pressing SOURCE Region code error appears on the screen when you insert a DVD Video Region code is not correct page 4 DivX MPEG1 ...

Страница 592: ...ice name from Special Device then try to connect again pages 28 50 Echo or noise occurs Adjust the microphone unit position Phone sound quality is poor Reduce the distance between the unit and the Bluetooth cellular phone Move the car to place where you can get a better signal reception The sound is interrupted or skipped during playback of a Bluetooth audio player Reduce the distance between the ...

Страница 593: ...t work Check the connection Charge the battery Sound is distorted Deactivate the equalizer either on this unit or the iPod Disconnect appears on the screen Check the connection Playback stops The headphones are disconnected during playback Restart playback No Files appears on the screen No tracks are stored Import tracks to the iPod Reset 01 Reset 07 appears on the screen Disconnect the adapter fr...

Страница 594: ...e 1 Vp p 75 Ω Other Terminals Input LINE IN VIDEO IN Antenna input Output VIDEO OUT Others CD changer Reverse gear signal DIGITAL OUT optical FM AM TUNER Frequency Range FM 87 5 MHz to 108 0 MHz AM 531 kHz to 1 602 kHz FM Tuner Usable Sensitivity 11 3 dBf 1 0 μV 75 Ω 50 dB Quieting Sensitivity 16 3 dBf 1 8 μV 75 Ω Alternate Channel Selectivity 400 kHz 65 dB Frequency Response 40 Hz to 15 000 Hz St...

Страница 595: ...round Allowable Storage Temperature 10 C to 60 C Allowable Operating Temperature 0 C to 40 C Dimensions W H D Installation Size approx 178 mm 100 mm 160 mm Panel Size approx 171 mm 97 mm 21 mm Mass approx 2 6 kg CAUTION When ejecting the monitor leave an open space for the monitor to come out If you do not the monitor may obstruct the steering wheel and gearshift lever operations and this may resu...

Страница 596: ...EN 1207MNMMDWJEIN 2008 Victor Company of Japan Limited Having TROUBLE with operation Please reset your unit Refer to page of How to reset your unit ...

Страница 597: ...If other screws are used parts could become loose or damaged When tightening screws or bolts be careful not to pinch any connection cord Make sure not to block the fan on the rear to maintain proper ventilation when installing the unit 1 Remove the audio system originally installed in the car together with its mounting brackets Note Be sure to keep all the screws and parts removed from your car fo...

Страница 598: ...nect other equipment using the remote leads Y connectors need to be separately purchased Disconnect the speakers from the unit and connect them to the amplifier Leave the speaker leads of the unit unused You can switch off the built in amplifier and send the audio signals only to the external amplifier to get clear sound and to prevent internal heat built up inside the unit See page 49 of the INST...

Страница 599: ...For installation and connections refer to the separate manual INSTRUCTIONS LVT1780 012A UI For canceling the display demonstration see page 8 DVD RECEIVER WITH MONITOR KW AVX714 ...

Страница 600: ...and is not malfunction Do not expose the monitor to direct sunlight Do not operate the touch panel using a ball point pen or similar tool with the sharp tip Touch the buttons on the touch panel with your finger directly if you are wearing a glove take it off When the temperature is very cold or very hot Chemical changes occur inside causing malfunction Pictures may not appear clearly or may move s...

Страница 601: ... operating the unit Contents INTRODUCTION Playable disc types 4 Basic operations Monitor panel touch panel 5 Basic operations Remote controller RM RK252 6 OPERATIONS Before operating the unit 8 Common operations 9 Listening to the radio 10 Disc operations 13 EXTERNAL DEVICES Bluetooth operations Cellular phone audio player 27 Listening to the CD changer 34 Listening to the iPod 36 Using other exte...

Страница 602: ...eady CD Recordable Rewritable CD R RW ISO 9660 level 1 level 2 Romeo Joliet CD DA MP3 WMA WAV JPEG DivX MPEG1 MPEG2 AAC MPEG4 1 IfyouinsertaDVDVideodiscofanincorrectRegionCode Regioncodeerror appearsonthescreen 2 DVD Rrecordedinmulti borderformatisalsoplayable exceptforduallayerdiscs DVD RWduallayerdiscsarenotplayable 3 Itispossibletoplaybackfinalized R RW Videoformatonly discs RWdoublelayerdiscsa...

Страница 603: ...source operation section Change the display information OPEN Open the monitor panel EJECT Eject the disc CLOSE Close the monitor panel TILT Tilt the monitor panel Exit Erase this screen Shaded icons cannot be used In the explanation buttons on the touch panel are indicated inside For details on the touch panel operations see each source operation section Display Source Menu screen Display AV Menu ...

Страница 604: ...e disc menu VCD Resumes PBC playback DVD VR Shows the Original Program screen 6 Shows the on screen bar Does not function as R03 LR03 AAA Installing the battery Insert the batteries into the remote controller by matching the polarity and correctly Caution Battery shall not be exposed to excessive heat such as sunshine fire or the like If the range or effectiveness of the remote controller decrease...

Страница 605: ...ion as SURROUND o 3 Number buttons Enters numbers TUNER Selects the preset station directly 1 Functionsasanumberbuttononly seeo 2 Notusedforthisunit 3 FunctionswhenpressedwithSHIFT 7 Functions with other buttons see i and o 8 Changes the display information 9 For disc operations 5 DVD Selects the title DVD VR Selects the program Playlist Other discs except VCD CD Selects the folders 4 Pressbriefly...

Страница 606: ...nglish indications are used for purpose of explanation You can select the indication language page 45 Turn on the power Ÿ Display AV Menu screen Display Setup menu Cancel the demonstration Select Off Set the clock settings Finish the procedure Beforeoperatingtheunit Moves to the succeeding menu page Moves to the preceding menu page Return to the previous screen ...

Страница 607: ...rnal components you have connected media you have attached and the Input settings you have made page 47 On the touch panel On the monitor panel TUNER DISC DVD VCD CD CD CH iPod or EXT IN Bluetooth PHONE Bluetooth AUDIO AV IN back to the beginning You cannot select these sources if they are not ready Exit Source information screen Clock time in large numbers Navigation screen When Navigation is sel...

Страница 608: ...her 4 or until Manual Search appears on the screen then press it repeatedly The ST indicator lights up when receiving an FM stereo broadcast with sufficient signal strength 3 Reception improves but stereo effect will be lost The MONO indicator lights up To restore stereo effect select Off Preset no Band Tuner indicators Assigned station name page 42 If no name is assigned the frequency of the stat...

Страница 609: ...Tuning in to stations with sufficient signal strength This function works only for FM bands Once you have activated this function selected Local it always works when searching for FM stations 1 Press AV MENU You can also use AV MENU on the monitor panel 2 Press Mode 3 Only stations with sufficient signal strength will be detected The DX indicator goes off then the LO indicator lights up You can al...

Страница 610: ...el To select from the Preset List 1 2 or Hold Manual presetting Ex Storing FM station of 92 5 MHz into preset number 4 of the FM1 band 1 Display the Preset List 2 Tune in to a station you want to preset 3 Select a preset number The station selected in step 2 is now stored in preset number 4 Hold ...

Страница 611: ...nit cannot accept the operation you have tried to do In some cases without showing operations will not be accepted Label side Caution on volume setting Discs produce very little noise compared with other sources Lower the volume before playing a disc to avoid damaging the speakers by the sudden increase of the output level When playing back a multi channel encoded disc the multi channel signals ar...

Страница 612: ...ing frequency Bit rate Recorded signal channel no page 19 3 8 Start and pause playback 7 Stop playback 4 Press Select chapter Hold Reverse forward search 2 5 Select title program playlist 1 DVD VRalsoindicateseitherPRG program orPLAY playlist playback 2 Searchspeed x2 x10 Buttons on the touch panel In the explanation they are indicated inside These buttons also work when they are not shown on the ...

Страница 613: ...rack Hold Reverse forward search for DivX MPEG1 MPEG2 1 5 Press Select folder Hold Display Folder list While playing the following discs press Each time you press the button the display changes to show the different information page 9 Disc type page 19 page 19 The PBC indicator lights up when PBC is in use Total track no included on the disc Total track no included on the disc Total playing time S...

Страница 614: ...n it is recorded Sound mode page 41 page 19 3 8 Start and pause playback 7 Stop playback 4 Press Select track Hold Reverse forward search 4 5 Press Select folder Hold Display Folder list 3 8 Start and pause playback 7 Stop playback 4 Press Select track Hold Reverse forward search 4 Total track no included on the disc Total playing time Total track no included on the disc Sound mode page 41 ...

Страница 615: ...playback 4 Press Select track Hold Reverse forward search 5 Select folders The above buttons also work when they are not shown on the screen while watching the playback picture WhileadiscmenuisplayedbackforDVD KEY is automaticallydisplayed Onthediscmenu you canselecta menuitemdirectlybytouchingitonthescreen B For DVD VCD DivX menu operation playback 235 Select the menu items ENT Confirm the select...

Страница 616: ...gram not available for Playlist playback Track Repeats current track Folder Repeats current folder Folder Randomly plays all tracks of current folder then tracks of next folders Disc All Randomly plays all tracks Folder Repeats current folder Track Repeats current track PBC not in use Disc All Randomly plays all tracks PBC not in use Track Repeats current track 1 Disc All Randomly plays all tracks...

Страница 617: ...ou can display the Folder Track File Lists then start playback 1 You can also use AV MENU on the monitor panel 2 3 Select a folder 1 then a track 2 Selected track starts playing Press to move to the previous next pages of the list 1 Current folder list number total folder list number 2 Current track list number total track list number of the current folder You can easily access the Track List by p...

Страница 618: ... chapter Select title when not playing Select title during playback or pause Using menu driven features 1 2 Select an item you want to start playback 3 1 Searchspeed x2 x5 x10 x20 x60 2 Slowmotionspeed 1 32 1 16 1 8 1 4 1 2 3 Searchspeed x2 x10 Operations using the remote controller RM RK252 Also functions as CLR clear Erases a misentry if pressed while holding SHIFT You can change the following i...

Страница 619: ...pause Hold Reverse forward search 6 Select program Select playlist during playback or pause Select aspect ratio Select chapter Select program when not playing Select program playlist during playback or pause Using Original Program Playlist screens page 25 1 For Original Program For Playlist 2 Select an item you want to start playback 3 To erase the screen 4 Searchspeed x2 x5 x10 x20 x60 5 Slowmoti...

Страница 620: ...track Hold Reverse forward search 2 No sound can be heard Select folder Select aspect ratio Select track within the same folder Select folder While playing Reverse advance the scenes by five minutes For DivX6 Using menu driven features 1 2 Select an item you want to start playback 3 1 Searchspeed 1 2 3 2 Searchspeed 1 2 Current playback position twice 2nd press 2nd press 1st press 1st press 3rd pr...

Страница 621: ... menu To return to the previous menu press To cancel PBC playback 1 2 Select the desired track To resume PBC press Stop playback Start playback pause if pressed during playback Reverse forward search 3 Forward slow motion during pause 4 No sound can be heard Reverse slow motion does not work Press Select track Hold Reverse forward search 5 No sound can be heard Select aspect ratio twice 3 Searchsp...

Страница 622: ...x5 x10 x20 x60 2 Searchspeed x2 x10 Stop playback Start playback pause if pressed during playback Reverse forward search 3 Press Select track Hold Reverse forward search 4 Select folder Select track within the same folder Select folder 3 Searchspeed x2 x5 x10 x20 x60 4 Searchspeed x2 x10 twice Also functions as CLR clear Erases a misentry if pressed while holding SHIFT ...

Страница 623: ...screens You can use Original Program or Playlist screen anytime while playing DVD VR with its data recorded 1 Display the Original Program Playlist screen 2 Select an item you want To erase the screen 1 Original Program Playlist number 2 Recording date 3 Recording source TV station the input terminal of the recording equipment etc 4 Start time of recording 5 Title of the program playlist 6 Highlig...

Страница 624: ...y 1 Random play 1 Change the audio language audio stream or audio channel Change or erase the subtitle language Change the view angle 1 page18 2 NotapplicableforDVD VR Above example is of DVD Video Items shown on the bar vary due to the disc type 1 Disc type 2 DVD Audio signal format VCD PBC 3 Playback mode 1 DVD Video C RPT Chapter repeat T RPT Title repeat DVD VR C RPT Chapter repeat PG RPT Prog...

Страница 625: ...and Bluetooth AUDIO Connecting a new Bluetooth device Registration Pairing methods Use either of the following items in Bluetooth menu to register and establish the connection with a device Select Bluetooth PHONE or Bluetooth AUDIO as the source to operate Bluetooth menu Open Make the unit ready to establish a new Bluetooth connection The connection is established by operating the Bluetooth device...

Страница 626: ... to the unit Refer to the instructions supplied with the device to check the PIN code 6 Operate the Bluetooth device to connect while Connecting is displayed on the screen Now connection is established and you can use the device through the unit To connect a special device Special Device 1 Press AV MENU on the touch panel or AV MENU on the monitor panel 2 Press Bluetooth 3 Press Special Device The...

Страница 627: ...volume page 51 Press SOURCE then press Bluetooth PHONE page 9 You can also use SOURCE on the monitor panel Press it repeatedly Ÿ Press AV MENU You can also use AV MENU on the monitor panel Press Bluetooth Establish the connection with a device then make a call or settings using Bluetooth menu pages 50 and 51 Sound mode page 41 Status of the device Signal strength Battery remainder only when the in...

Страница 628: ...e you want to call When an SMS comes in If the cellular phone is compatible with SMS Short Message Service you can read the messages on the screen You cannot edit or send a message through the unit When Message Info is set to Auto The unit rings and the following screen is displayed to inform you of a message arrival page 51 To read the message press Yes The source is changed to Bluetooth PHONE To...

Страница 629: ... Goes to Preset List You can preset the entered number by selecting a preset number page 32 Dial Calls the entered number You can easily access Dial Menu by pressing SHORT CUT on the touch panel then You can also access Dial Menu by holding SOURCE on the monitor panel You can easily activate Voice Dialing by pressing SHORT CUT on the touch panel then You can also activate Voice Dialing by holding ...

Страница 630: ...ceived Calls or Missed Calls 1 Press AV MENU on the touch panel or AV MENU on the monitor panel 2 Press Bluetooth 3 Press Dial Menu then Ex Selecting Received Calls 2 Select a telephone number to store 3 Select a preset number Now Tom is stored into preset no 1 Display Dial Menu screen Answer the incoming call Display the Redial menu if pressed and held regardless of the current source End the cal...

Страница 631: ...ice can be registered 3 Status of the device Signal strength Battery remainder only when the information comes from the device The Bluetooth icon lights up when the adapter is connected Press SOURCE then press Bluetooth AUDIO page 9 You can also use SOURCE on the monitor panel Press it repeatedly Ÿ Start playback Buttons on the touch panel In the explanation they are indicated inside 2 1 1 Whenace...

Страница 632: ...g time Disc no MP3 indicator page 35 Tag data appears only when it is recorded Select a disc to start playing If you select an MP3 disc the Track list of the current folder appears You can select a track and start playing also page 19 If you select a folder on the list you can start playing the first track of the folder To go to the other list Sound mode page 41 4 Press Select track Hold Reverse f...

Страница 633: ...Randomly plays all tracks of the current disc All Randomly plays all tracks of all loaded discs Track Repeats current track Folder Repeats all tracks of the current folder Disc Repeats all tracks of the current disc Folder Randomly plays all tracks of current folder then tracks of next folders Disc Randomly plays all tracks of the current disc All Randomly plays all tracks of all loaded discs You ...

Страница 634: ...ss SOURCE then press iPod page 9 Playback starts automatically You can also use SOURCE on the monitor panel Press it repeatedly Ÿ Press 4 or to select a track Track no Playing time page 37 4 Press Select track Hold Reverse forward search 5 Enter player s menu Start playback pause To resume press again Sound mode page 41 Buttons on the touch panel In the explanation they are indicated inside ...

Страница 635: ...onfirm the selection 4 Repeat steps 2 and 3 to select a track When a track is selected finally playback starts To return to the previous menu press 5 Selecting playback modes 1 You can also use AV MENU on the monitor panel 2 3 Select an appropriate option Repeat One Functions the same as Repeat One All Functions the same as Repeat All Random Album Functions the same as Shuffle Albums Song Function...

Страница 636: ...ching the playback picture If no operations are done for about five seconds the operation buttons disappear KEY does not work when the source is AV IN Touch the screen center portion You can easily access to Aspect setting menu by pressing SHORT CUT on the touch panel then Assigned title page 42 Sound mode page 41 Touch the screen center portion Buttons on the touch panel In the explanation they a...

Страница 637: ...you can watch the navigation screen Preparation Make sure Navigation is selected for AV Input page 47 To view the navigation screen and listen to the navigation guidance Press DISP on the monitor panel repeatedly page 9 The aspect ratio of the navigation screen is fixed to Full regardless of the Aspect setting page 45 IfyourNavigationSystemisequippedwiththevoiceguidancefunction When Navigation is ...

Страница 638: ... supplied Preparation Make sure External is selected for External Input page 47 Press SOURCE then press EXT IN page 9 You can also use SOURCE on the monitor panel Press it repeatedly Ÿ Turn on the connected component and start playing the source Assigned title page 42 page 41 Sound mode page 41 Buttons on the touch panel In the explanation they are indicated inside ...

Страница 639: ...n Storing your own adjustments You can store your adjustments into User1 User2 and User3 1 Repeat steps and Ÿ then in step 2 Adjust 1 then store 2 Ex When storing into User2 While playing back any source other than Bluetooth PHONE you can easily access Equalizer menu by pressing SHORT CUT on the touch panel then Move to other six sound modes ...

Страница 640: ...so use AV MENU on the monitor panel Assign a title You can enter up to 16 characters for available characters page 59 Store Confirm the entry 2 3 Move the cursor BS Erase the character before the cursor Del Erase the character on the cursor Cap Change the letter case upper lower Change Change the character set Space Enter a space Finish the procedure Assigningtitlestothesources In the explanation ...

Страница 641: ... the settings do not open the sub setting window but just selecting an option will change the setting The display indications may change according to change of the specifications Ex Changing the AV Input setting You can also use AV MENU on the monitor panel Ÿ Non available items will be shaded ...

Страница 642: ...Dimmer Time setting below Dimmer Time Set Sets the Dimmer On Off times Dimmer Level You can select the brightness for dimmer 1 bright 2 middle 3 dark Bright You can adjust brightness of the screen 15 darkest to 15 brightest Initial 00 Picture Adjust 2 You can adjust the following to make the screen clear and legible for watching the playback picture The setting will be stored one for DISC common a...

Страница 643: ... Deutsch Italiano Nederlands Svenska Dansk Руccĸий Português The characters you can enter for assigning the titles also change according to the language selected 59 NTSC PAL Select the color system of the external monitor connected NTSC PAL Turn off the power and turn it on again to make the new setting effective Clock Time Set Initial 1 00AM 8 Time Format Select either 12 hour system or 24 hour s...

Страница 644: ... different types of files Audio Plays back audio files Still Picture Plays back JPEG files Video Plays back DivX MPEG1 MPEG2 files Audio Video Plays back audio files and DivX MPEG1 MPEG2 files DivX Regist Registration 1 This unit has its own Registration Code Once you have played back a file with which the Registration Code recorded this unit s Registration Code is overwritten for copyright protec...

Страница 645: ...mponent is connected AV IN is skipped while selecting the source Audio Video Select when connecting an AV component such as a VCR Audio Select when connecting an audio component such as a portable audio player Camera 3 Select when connecting a rear view camera Navigation Select when connecting a Navigation System External Input 4 For connecting an external component to the CD changer jack on the r...

Страница 646: ...On When the ignition is turned off the lamp on the button flashes TouchPanel Sens Change the sensitivity of the touch panel As the number decreases sensitivity becomes higher 1 2 3 Initialize Initialize all settings you have made in AV Menu Press and hold Enter to initialize the settings then reset the unit 3 Equalizer Flat Hard Rock R B Pop Jazz Dance Country Reggae Classic User1 User2 User3 41 T...

Страница 647: ...00 You can make the adjustments separately for DVD and other discs Amplifier Gain You can change the maximum volume level of this unit Off Deactivates the built in amplifier Low VOL 00 to 30 Select this if the maximum power of the speakers is less than 50 W High VOL 00 to 50 Mode 1 Menu items Selectable settings reference page Mono Only for FM Off On 10 DX Local Only for FM Local DX 11 SSM Only fo...

Страница 648: ...hed it is registered in the unit You can connect the unit and the device by using Connect below from the next time Connect Only for the registered devices After selecting a device from among the registered devices pages 27 and 28 establish the connection with it Disconnect Only for the device being connected Disconnect the current device before connecting another device Delete Pairing Only for the...

Страница 649: ...jects all incoming calls Message Info 5 Auto The unit informs you of the arrival of a message by ringing and displaying Receiving Message To read the message page 30 Manual The unit does not inform you of the arrival of a message MIC Setting 5 Adjust microphone volume connected to the Bluetooth adapter 01 02 03 Version 6 The Bluetooth software and hardware versions are shown 4 Selectableonlyfor Bl...

Страница 650: ... around the center holder with the printed surface facing up Make sure to store discs into the cases after use To keep discs clean A dirty disc may not play correctly If a disc does become dirty wipe it with a soft cloth in a straight line from center to edge Do not use any solvent for example conventional record cleaner spray thinner benzine etc to clean discs To play new discs New discs may have...

Страница 651: ...ithin 15 seconds the disc is automatically inserted again into the loading slot to protect it from dust Playing Recordable Rewritable discs This unit can recognize a total of 5 000 files and 250 folders a maximum of 999 files per folder Use only finalized discs This unit can play back multi session discs however unclosed sessions will be skipped while playing This unit can recognize a total 25 cha...

Страница 652: ...Sampling frequency 48 kHz 44 1 kHz 32 kHz for MPEG1 24 kHz 22 05 kHz 16 kHz for MPEG2 48 kHz 44 1 kHz 32 kHz 22 05 kHz for WMA 44 1 kHz for WAV This unit can show ID3 Tag Version 1 0 1 1 2 2 2 3 2 4 for MP3 This unit can also show WAV WMA Tag This unit can play back files recorded in VBR variable bit rate Files recorded in VBR have a discrepancy in elapsed time indication This unit cannot play bac...

Страница 653: ...d No available Bluetooth device is detected by Search Loading The unit is updating the phone book and or SMS Please Wait The unit is preparing to use the Bluetooth function If the message does not disappear turn off and turn on the unit then connect the device again or reset the unit Reset 08 Check the connection between the adapter and this unit Icons for phone types These icons indicate the phon...

Страница 654: ...adapter connected to this unit While the iPod is connected all operations from the iPod are disabled Perform all operations from this unit The text information may not be displayed correctly The text information scrolls on the screen This unit can display up to 40 characters Notice When operating an iPod some operations may not be performed correctly or as intended In this case visit the following...

Страница 655: ...Playback disc Output signals Stream Dolby D PCM DVD 48 kHz 16 20 24 bits Linear PCM 48 kHz 16 bits stereo Linear PCM 96 kHz Linear PCM 48 kHz 16 bits stereo Linear PCM with Dolby Digital Dolby Digital bitstream 48 kHz 16 bits stereo Linear PCM with DTS DTS bitstream with MPEG Audio MPEG bitstream 48 kHz 16 bits stereo Linear PCM Audio CD Video CD 44 1 kHz 16 bits stereo Linear PCM 48 kHz 16 bits s...

Страница 656: ...PS Pashto Pushto TH Thai AZ Azerbaijani GL Galician KY Kirghiz QU Quechua TI Tigrinya BA Bashkir GN Guarani LA Latin RM Rhaeto Romance TK Turkmen BE Byelorussian GU Gujarati LN Lingala RN Kirundi TL Tagalog BG Bulgarian HA Hausa LO Laothian RO Rumanian TN Setswana BH Bihari HI Hindi LT Lithuanian RW Kinyarwanda TO Tonga BI Bislama HR Croatian LV Latvian Lettish SA Sanskrit TR Turkish BN Bengali Ba...

Страница 657: ... Ultra Certified product Plays all versions of DivX video including DivX 6 with enhanced playback of DivX media files and the DivX Media Format Microsoft and Windows Media are either registered trademarks or trademarks of Microsoft Corporation in the United States and or other countries The Bluetooth word mark and logos are owned by the Bluetooth SIG Inc and any use of such marks by Victor Company...

Страница 658: ...his symptom Adjust Bright page 44 Position Error Push Open Key appears on the screen The monitor panel angle has been forcibly adjusted or its adjustment has been interrupted while opening or closing Press OPEN TILT Mecha Error Push Reset appears on the screen and the panel does not move Reset the unit page 3 No Signal appears Change the source Start the playback on the external component connecte...

Страница 659: ...rking brake lead is not connected properly Installation Connection Manual No picture appears on the external monitor Connect the video cord correctly Select the correct input on the external monitor Eject Error or Loading Error appears on the screen Change the source by pressing SOURCE Region code error appears on the screen when you insert a DVD Video Region code is not correct page 4 DivX MPEG1 ...

Страница 660: ...ice name from Special Device then try to connect again pages 28 50 Echo or noise occurs Adjust the microphone unit position Phone sound quality is poor Reduce the distance between the unit and the Bluetooth cellular phone Move the car to place where you can get a better signal reception The sound is interrupted or skipped during playback of a Bluetooth audio player Reduce the distance between the ...

Страница 661: ...t work Check the connection Charge the battery Sound is distorted Deactivate the equalizer either on this unit or the iPod Disconnect appears on the screen Check the connection Playback stops The headphones are disconnected during playback Restart playback No Files appears on the screen No tracks are stored Import tracks to the iPod Reset 01 Reset 07 appears on the screen Disconnect the adapter fr...

Страница 662: ...e 1 Vp p 75 Ω Other Terminals Input LINE IN VIDEO IN Antenna input Output VIDEO OUT Others CD changer Reverse gear signal DIGITAL OUT optical FM AM TUNER Frequency Range FM 87 5 MHz to 108 0 MHz AM 531 kHz to 1 602 kHz FM Tuner Usable Sensitivity 11 3 dBf 1 0 μV 75 Ω 50 dB Quieting Sensitivity 16 3 dBf 1 8 μV 75 Ω Alternate Channel Selectivity 400 kHz 65 dB Frequency Response 40 Hz to 15 000 Hz St...

Страница 663: ...round Allowable Storage Temperature 10 C to 60 C Allowable Operating Temperature 0 C to 40 C Dimensions W H D Installation Size approx 178 mm 100 mm 160 mm Panel Size approx 171 mm 97 mm 21 mm Mass approx 2 6 kg CAUTION When ejecting the monitor leave an open space for the monitor to come out If you do not the monitor may obstruct the steering wheel and gearshift lever operations and this may resu...

Страница 664: ...EN 0108MNMMDWJEIN 2008 Victor Company of Japan Limited Having TROUBLE with operation Please reset your unit Refer to page of How to reset your unit ...

Страница 665: ...er screws are used parts could become loose or damaged When tightening screws or bolts be careful not to pinch any connection cord Make sure not to block the fan on the rear to maintain proper ventilation when installing the unit 1 Remove the audio system originally installed in the car together with its mounting brackets Note Be sure to keep all the screws and parts removed from your car for futu...

Страница 666: ...nect other equipment using the remote leads Y connectors need to be separately purchased Disconnect the speakers from the unit and connect them to the amplifier Leave the speaker leads of the unit unused You can switch off the built in amplifier and send the audio signals only to the external amplifier to get clear sound and to prevent internal heat built up inside the unit See page 49 of the INST...

Отзывы: