background image

English

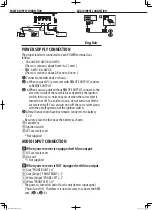
POWER SUPPLY CONNECTION

The proper lead wire connected to each POWER terminal is as 

follows.

• 

+ B and GND: AWG 8 to AWG 4 

(The cross section is about 8 mm

2

 to 21 mm

2

.)

• 

REM: AWG 18 to AWG 8 

(The cross section is about 0.8 mm

2

 to 8 mm

2

.)


Connect to metallic body or chassis.

-

a


When you use JVC car receiver with REMOTE OUTPUT, connect 

to REMOTE OUTPUT.

-

b


When you use a unit without REMOTE OUTPUT, connect to the 

accessory circuit of the car which is activated by the ignition 

switch. In this case, noise may occur when the car receiver is 

turned on or off. To avoid this noise, do not turn on or off the 

car receiver itself. You can turn on or off the car receiver along 

with the on/off operation of the ignition switch.


After all connections have been made, connect to the battery 

12 V.

Be sure to place the fuse near the battery as shown.

Car battery

Ignition switch

JVC car receiver, etc.

Not supplied

AUDIO INPUT CONNECTION

A

 When your receiver is equipped with line output.

JVC car receiver, etc.

Line out

*1 

Not supplied

B

 When your receiver is NOT equipped with line output.

a


Gray “FRONT RIGHT (+)”

b


Gray (Stripe) “FRONT RIGHT (–)”

c


White (Stripe) “FRONT LEFT (–)”

d


White “FRONT LEFT (+)”

• 

The power is turned on and off as the unit detects input signal 

(“Auto Turn-On”). Therefore it is not necessary to connect the REM 

wire. (

-a, 

-b)

POWER SUPPLY CONNECTION

AUDIO INPUT CONNECTION

B5E-0089_DR3001D.indd   3

2015/12/03   10:20

Содержание KS-DR3001D

Страница 1: ...disconnected This unit uses BTL Balanced Transformerless amplifier circuitry i e floating ground system so comply with the following Do not connect the terminals of the speakers to each other Do not connect the terminals of the speakers to the metal body or chassis Cover the unused leads with insulating tape to prevent them from short circuiting DO NOT disassemble the unit since there are no user ...

Страница 2: ...tor in a glove compartment or in insulated areas such as under a car mat that will prevent the unit from dissipating heat Under the front seat Onto the trunk floor B Install the unit When mounting this unit be sure to use the provided screws If any other screws are used there is a risk of loosening the unit or damaging the parts under the car floor Before drilling holes in the trunk to install the...

Страница 3: ...ff the car receiver itself You can turn on or off the car receiver along with the on off operation of the ignition switch After all connections have been made connect to the battery 12 V Be sure to place the fuse near the battery as shown Car battery Ignition switch JVC car receiver etc Not supplied AUDIO INPUT CONNECTION A When your receiver is equipped with line output JVC car receiver etc Line ...

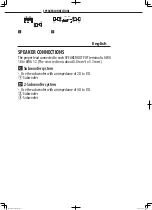
Страница 4: ...OUTPUT terminal is AWG 18 to AWG 12 The cross section is about 0 8 mm2 to 3 3 mm2 C Subwoofer system Use the subwoofer with an impedance of 2 Ω to 8 Ω Subwoofer D 2 Subwoofer system Use the subwoofer with an impedance of 4 Ω to 8 Ω Subwoofer Subwoofer B5E 0089_DR3001D indd 4 2015 12 03 10 20 ...

Страница 5: ...ed BASS BOOST controller Turning this boosts the 45 Hz frequency within the range of 0 dB to 18 dB Adjust the level while listening to the sound This controller is preset to MIN when the unit is shipped INPUT SENS input sensitivity controller Set this control according to the line output level of the center unit connected with this unit For the line output level refer to the SPECIFICATIONS in the ...

Страница 6: ...INPUT terminal Confirm the speaker wirings and the position of the CROSSOVER filter switch See SPEAKER CONNECTIONS Alternator noise is heard Keep the leads of the POWER terminals away from the RCA pin cords Keep the RCA pin cords away from other electrical cables in the car Connect the ground lead securely to a metal part of the car Make sure the speaker negative leads do not touch the car chassis...

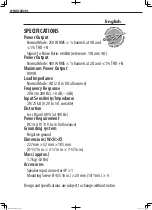
Страница 7: ... 20 Hz to 200 Hz 0 dB 3 dB Input Sensitivity Impedance 2V 21 kΩ 0 2V to 5V variable Distortion Less than 0 08 at 100 Hz Power Requirement DC 14 4V 11V to 16V allowance Grounding system Negative ground Dimensions W H D 227 mm 52 mm 185 mm 8 15 16 in 2 1 16 in 7 5 16 in Mass approx 1 7 kg 3 8 lbs Accessories Speaker input connector 4P 1 Mounting Screw Ø 4 3 16 in 20 mm 13 16 in 4 Design and specific...

Страница 8: ...authority for details in locating a recycle facility nearest to you Proper recycling and waste disposal will help conserve resources whilst preventing detrimental effects on our health and the environment Declaration of Conformity with regard to the EMC Directive Declaration of Conformity with regard to the RoHS Directive 2011 65 EU Manufacturer JVC KENWOOD Corporation 3 12 Moriya cho Kanagawa ku ...

Отзывы: