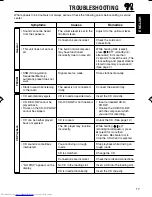
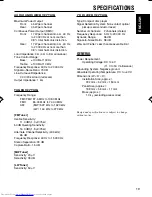
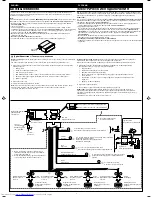
JVC KD-S747 Скачать руководство пользователя страница 23

3

Line out
(see diagram 

)

Линейный выход
(см. схему 

)

Fuse block

Блок предохранителя

To metallic body or chassis of the car

К металлическому корпусу или шасси автомобиля

To remote lead of other equipment or power aerial if any

К удаленному проводу другого оборудования или
антенны

Red

Красный

Yellow*

1

Желтый*

1

Aerial terminal

Разъем антенны

To aerial

К антенне

Rear ground terminal

Задний разъем
заземления

Black

Черный

Blue with white stripe

Синий с белой полосой

*1 : Before checking the operation of this unit prior to

installation, this lead must be connected, otherwise
power cannot be turned on.

*1 : Перед проверкой работы устройства подключите

этот провод, иначе питание не включится.

White

Белый

Gray with black stripe

Серый с черной
полосой

Green

Зеленый

Purple

Пурпурный

White with black stripe

Белый с черной
полосой

Green with black stripe

Зеленый с черной
полосой

Purple with black stripe

Пурпурный с черной
полосой

Left speaker (front)

Левый громкоговоритель
(передний)

Right speaker (front)

Правый громкоговоритель
(передний)

Left speaker (rear)

Левый громкоговоритель
(задний)

Right speaker (rear)

Правый громкоговоритель
(задний)

Gray

Серый

15 A fuse

Предохранитель 15A

ENGLISH

РУССКИЙ

To an accessory terminal in the fuse block
К вспомогательному разъему в блоке предохранителя

Ignition switch

Переключатель зажигания

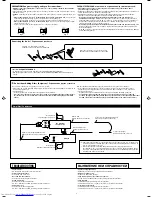
ELECTRICAL CONNECTIONS

To prevent short circuits, we recommend that you disconnect the battery’s negative terminal and make all
electrical connections before installing the unit. If you are not sure how to install this unit correctly, have it
installed by a qualified technician.

Note:

This unit is designed to operate on 

12 V DC, NEGATIVE ground electrical systems

. If your vehicle does not have

this system, a voltage inverter is required, which can be purchased at JVC IN-CAR ENTERTAINMENT dealers.

• Replace the fuse with one of the specified rating. If the fuse blows frequently, consult your JVC IN-CAR

ENTERTAINMENT dealer.

• If noise is a problem...

This unit incorporates a noise filter in the power circuit. However, with some vehicles, clicking or other
unwanted noise may occur. If this happens, connect the unit’s 

rear ground terminal

 (see connection diagram)

to the car’s chassis using shorter and thicker cords, such as copper braiding or gauge wire. If noise still
persists, consult your JVC IN-CAR ENTERTAINMENT dealer.

• Maximum input of the speakers should be more than 45 W at the rear and 45 W at the front, with an

impedance of 

 to 8 

.

Be sure to ground this unit to the car’s chassis.

• The heat sink becomes very hot after use. Be careful not to touch it when removing this unit.

ЭЛЕКТРИЧЕСКИЕ ПОДКЛЮЧЕНИЯ

Для предотвращения коротких замыканий мы рекомендуем Вам отсоединить отрицательный разъем
аккумулятора и осуществить все подключения перед установкой устройства. Если Вы не знаете точно,
как следует устанавливать это устройство, обратитесь к квалифицированному специалисту.

Примечание:

Это устройство разработано для эксплуатации на 

12 В постоянного напряжения с минусом на массе

.

Если Ваш автомобиль не имеет этой системы, требуется инвертор напряжения, который может быть
приобретен у дилера JVC IN-CAR ENTERTAINMENT.
• Заменяйте предохранитель другим предохранителем указанного класса. Если предохранитель

сгорает слишком часто, обратитесь к дилеру JVC IN-CAR ENTERTAINMENT.

• При появлении сильных помех...

Это устройство оснащено фильтром помех в цепи питания. Однако в некоторых случаях возможно
появление щелчков и других нежелательных помех. В этом случае подключите 

задний разъем

заземления

 этого устройства (см. схему подключения ниже) к шасси автомобиля при помощи более

коротких и толстых проводов. Если помехи не исчезают, обратитесь к дилеру JVC IN-CAR
ENTERTAINMENT.

• Максимальная входная мощность громкоговорителей должна быть больше 45 Вт сзади и 45 Вт

впереди при полном сопротивлении от 

4


до 8


.

Нe забудьте заземлить устройство на шасси автомобиля.

• Радиатор во время использования сильно нагревается. Старайтесь его не трогать во время удаления

устройства.

Heat sink

Радиатор

Not included with this unit.

Не входит в комплект.

*

To a live terminal in the fuse block connecting to the car battery
(bypassing the ignition switch)

К разъему фазы в блоке предохранителя
(минуя блок зажигания)

Before connecting:

 Check the wiring in the vehicle carefully. Incorrect connection may cause serious damage

to this unit.
The leads of the power cord and those of the connector from the car body may be different in color.

1

Connect the colored leads of the power cord to the car battery, speakers and power aerial (if any) in the
following sequence.

1

Black: ground

2

Yellow: to car battery (constant 12 V)

3

Red: to an accessory terminal

4

Blue with white stripe: to remote lead of other equipment or power aerial if any (200 mA max.)

5

Brown: to cellular phone system (For details, refer to the instructions of the cellular phone.)

6

Others: to speakers

2

Connect the aerial cord.

3

Finally connect the wiring harness to the unit.

Note:

 If your vehicle does not have any accessory terminal, move the fuse from the fuse position 1 (initial

position) to fuse position 2, and connect the red lead (A7) to the positive (+) battery terminal.
• The yellow lead (A4) is not used in this case.

Typical Connections / 

Типичные подключения

Перед началом подключений:

 Тщательно проверьте проводку в автомобиле. Неправильное

подключение может привести к серьезному повреждению устройства.
Жилы силового кабеля и жилы соединителя от кузова автомобиля могут быть разного цвета.

1

Подключите цветные провода кабеля питания к аккумулятору, громкоговорителям и
автономной антенне (если есть) в следующем порядке:

1

Черный: земля

2

Желтый: к аккумулятору (постоянный 12 В)

3

Красный: к вспомогательному разъему

4

Синий с белой полосой: к удаленному проводу другого оборудования или антенны
(макс. 200 мА).

5

Коричневый: к системе сотового телефона (Детали смотрите в инструкции сотового
телефона.)

6

Другие: к громкоговорителям

2

Подключите кабель антенны.

3

В последнюю очередь подключите электропроводку к устройству.

Примечание:

 Если в Вашем автомобиле никакого вспомогательного разъема не имеется,

переставьте предохранитель из положения 1 предохранителя (первоначальное положение) в
положение 2 предохранителя и подключите красный провод (А7) к положительному (+) полюсу
аккумулятора.
• Желтый провод (А4) в этом случае не используется.

Fuse position 2 / Положение 2 предохранителя

Fuse position 1 / Положение 1 предохранителя

Brown
Коричневый

To cellular phone system

К системе сотового телефона

6

2

3

4

1

3

*

*

1

A8

A7

A5

A4

5

A2

B5

B6

B4

B3

B8

B7

B2

B1

2

15

B1

B3

B5

B7

B2

B4

B6

B8

A5

A7

A2

A4

A8

B1

B3

B5

B7

B2

B4

B6

B8

A5

A7

A2

A4

A8

Instal_KD-S747[EE]_002A_f.p65

1/20/03, 7:30 PM

3

Содержание KD-S747

Страница 1: ...м в течение которого потребитель данного товара может безопасно им пользоваться при условии соблюдения инструкции по эксплуатации данного товара проводя необходимое обслуживание включающее замену расходных материалов и или соответствующее ремонтное обеспечение в специализированном сервисном центре Дополнительные косметические материалы к данному товару поставляемые вместе с ним могут храниться в т...

Страница 2: ...ION Invisible laser radiation when open and interlock failed or defeated Avoid direct exposure to beam 3 CAUTION Do not open the top cover There are no user serviceable parts inside Leave all servicing to qualified service personnel 4 CAUTION This CD player uses invisible laser radiation and is equipped with safety switches to prevent radiation emission when unloading CDs It is dangerous to defeat...

Страница 3: ...back modes 12 Prohibiting CD ejection 12 SOUND ADJUSTMENTS 13 Selecting preset sound modes C EQ custom equalizer 13 Adjusting the sound 14 OTHER MAIN FUNCTIONS 15 Selecting the level display 15 Selecting the telephone muting 15 Detaching the control panel 16 TROUBLESHOOTING 17 MAINTENANCE 18 Handling discs 18 SPECIFICATIONS 19 How to use the M MODE button If you press M MODE the unit goes into fun...

Страница 4: ...ODE button Also functions as SSM buttons when pressed together with DISP display button e MO monaural button r RPT repeat button t RND random button y Number buttons u E EQ equalizer button i CD button o control panel release button Display window LOUD loudness indicator a EQ equalizer indicator s CD in indicator d CD indicator f FM band indicators FM1 FM2 FM3 g AM band indicator h Tuner reception...

Страница 5: ...lume level press the button briefly again If you turn the control dial you can also restore the sound To turn off the power Press and hold for more than one second SEE YOU appears then the unit turns off If you turn off the power while listening to a CD CD play will start from where playback has been stopped previously next time you turn on the power CAUTION on Volume Setting CDs produce very litt...

Страница 6: ... the minute 1 Select CLOCK M minute 2 Adjust the minute 1 2 4 Finish the setting To check the current clock time or change the display mode Press DISP display repeatedly Each time you press the button the display mode changes as follows During tuner operation During CD operation During power off The power turns on and the clock time is shown for 5 seconds then the power turns off Frequency Clock E...

Страница 7: ... a station is received press the same button you have pressed for searching Note FM1 and FM2 87 5 MHz 108 0 MHz FM3 65 00 MHz 74 00 MHz Searching a station manually Manual search 1 Select the band FM1 3 AM Each time you press the button the band changes as follows Note This receiver has three FM bands FM1 FM2 FM3 You can use any one of them to listen to an FM broadcast 2 Press and hold or 4 until ...

Страница 8: ...t frequency When automatic preset is over the station stored in number button 1 will be automatically tuned in MO monaural indicator SSM appears then disappears when automatic preset is over FM1 FM2 FM3 AM 3 Tune in to a station you want while M manual is flashing If you release your finger from the button the manual mode will automatically turns off after 5 seconds If you hold down the button the...

Страница 9: ...viously preset station is erased when a new station is stored in the same preset number Preset stations are erased when the power supply to the memory circuit is interrupted for example during battery replacement If this occurs preset the stations again Tuning in to a preset station You can easily tune in to a preset station Remember that you must store stations first If you have not stored them y...

Страница 10: ...he last received station If you change the source CD play also stops without ejecting the CD Next time you select CD as the source CD play starts from where playback has been stopped previously Notes If the ejected CD is not removed for about 15 seconds the CD is automatically inserted again into the loading slot to protect it from dust CD play will not start this time You can eject the CD even wh...

Страница 11: ...CD to go back to the beginning of the current track Each time you press the button consecutively the beginning of the previous tracks is located and played back To go to a track quickly 10 and 10 buttons 1 Press M MODE to enter the functions mode while playing a CD 2 Press 10 or 10 The first time you press 10 or 10 button the track skips to the nearest higher or lower track with a track number of ...

Страница 12: ...de while playing a CD 2 Press RPT repeat while still in the functions mode so that TRK RPT appears on the display Each time you press the button track repeat play mode turns on and off alternately When track repeat play is turned on the RPT indicator lights up on the display The current track starts playing repeatedly RPT indicator Prohibiting CD ejection You can prohibit CD ejection and can lock ...

Страница 13: ...cation For Preset values BAS TRE LOUD USER Flat sound 00 00 OFF ROCK Rock or 03 01 ON disco music CLASSIC Classical 01 02 OFF music POPS Light music 04 01 OFF HIP HOP Funk or rap 02 00 ON music JAZZ Jazz music 02 03 OFF Note You can adjust each sound mode to your preference Once you make an adjustment it is automatically stored for the currently selected sound mode See Adjusting the sound on page ...

Страница 14: ...t the front R06 Rear only and rear speaker balance F06 Front only BAL Adjust the left L06 Left only and right speaker balance R06 Right only LOUD 1 Boost low and high frequencies to LOUD ON produce a well balanced sound LOUD OFF at low volume level VOL 3 Adjust the volume 00 min 50 max 1 When you adjust the bass treble or loudness the adjustment you have made is stored for the currently selected s...

Страница 15: ...he audio level indicator 4 Finish the setting Selecting the telephone muting This mode is used when a cellular phone system is connected Depending on the phone system used select either MUTING 1 or MUTING 2 whichever mutes the sounds from this unit When shipped from the factory this mode is deactivated 1 Press and hold SEL select for more than 2 seconds CLOCK H CLOCK M LEVEL or TEL appears on the ...

Страница 16: ...Lift and pull the control panel out of the unit 3 Put the detached control panel into the provided case Attaching the control panel 1 Insert the left side of the control panel into the groove on the panel holder 2 Press the right side of the control panel to fix it to the panel holder Note on cleaning the connectors If you frequently detach the control panel the connectors will deteriorate To mini...

Страница 17: ... CD Check the cords and connections Insert a CD into the loading slot Insert the CD correctly Causes The volume level is set to the minimum level Connections are incorrect The built in microcomputer may have functioned incorrectly due to noise etc Signals are too weak The aerial is not connected firmly CD is inserted upside down CD R CD RW is not finalized CD is locked The CD player may function i...

Страница 18: ...ir instructions or cautions carefully Use only finalized CD Rs or CD RWs Some CD Rs or CD RWs may not play back on this unit because of their disc characteristics and for the following reasons Discs are dirty or scratched Moisture condensation on the lens inside the unit The pickup lens inside the unit is dirty CD RWs may require a longer readout time since the reflectance of CD RWs is lower than ...

Страница 19: ...er Usable Sensitivity 11 3 dBf 1 0 µV 75 Ω 50 dB Quieting Sensitivity 16 3 dBf 1 8 µV 75 Ω Alternate Channel Selectivity 400 kHz 65 dB Frequency Response 40 Hz to 15 000 Hz Stereo Separation 30 dB Capture Ratio 1 5 dB MW Tuner Sensitivity 20 µV Selectivity 35 dB LW Tuner Sensitivity 50 µV CD PLAYER SECTION Type Compact disc player Signal Detection System Non contact optical pickup semiconductor la...

Страница 20: ...set your unit Refer to page of How to reset your unit Затруднения при эксплуатации Пожалуйста перезагрузите Ваше устройство Для получения информации о перезагрузке Вашего устройства обратитесь на соответствующую страницу 2003 VICTOR COMPANY OF JAPAN LIMITED J VC ...

Страница 21: ...сли она уже прикреплена При отправке с завода панель управления упакована в твердую коробку 2 Удалите декоративную панель 3 Удалите муфту после освобождения запоров муфты 1 Установите устройство Примечание Устанавливайте устройство таким образом чтобы не повредить предохранитель расположенный сзади 2 Вставьте два рычага между устройством и муфтой как показано на рисунке для освобождения запоров му...

Страница 22: ...езиновый чехол Parts list for installation and connection The following parts are provided with this unit After checking them please set them correctly Hard case Control panel Жесткий футляр панель управления Sleeve Муфта Trim plate Декоративную панель Power cord Кабель питания 3 2 1 Control panel Панель управления Trim plate Декоративную панель Handle Рычаг Bracket Кронштейн Bracket Кронштейн Not...

Страница 23: ...телем указанного класса Если предохранитель сгорает слишком часто обратитесь к дилеру JVC IN CAR ENTERTAINMENT При появлении сильных помех Это устройство оснащено фильтром помех в цепи питания Однако в некоторых случаях возможно появление щелчков и других нежелательных помех В этом случае подключите задний разъем заземления этого устройства см схему подключения ниже к шасси автомобиля при помощи б...

Страница 24: ... устройства Fig 2 Fig 3 Fig 1 2 Firmly attach the ground wire to the metallic body or to the chassis of the car to the place not coated with paint if coated with paint remove the paint before attaching the wire Failure to do so may cause damage to the unit 2 Плотно прикрепите заземляющий провод к металлическому кузову или шасси автомобиля в месте не покрытом краской если оно покрыто краской удалит...

Отзывы: