

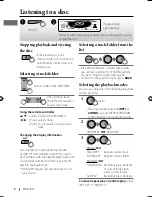
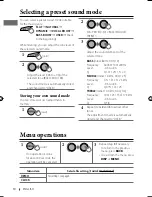


1
KD-R326/KD-R325
Installation/Connection Manual
การติดตั้ง
/
คู่มือการติดตั้ง
0910DTSMDTJEIN
EN, TH
© 2010 Victor Company of Japan, Limited
GET0675-006A
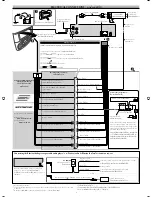
[U/UH]
Bracket /
ขาแขวน
*
Pocket /
กระเป๋า
Flat head screws (M5 × 8 mm) /
ตะปูควงหัวแบน
(M5 × 8 mm)
*
INSTALLATION /
การติดตั
้
ง
When installing the unit without using the sleeve /
เมื่อติดตั้งเครื่องโดยไม่ใช้ปลอกหุ้ม
In-dash mounting /
การติดตั้งจอแบบ
In-dash
WARNINGS /
คำเตือน
Removing the unit /
การถอดเครื่อง
Release the rear section first... /
ปล่อยส่วนหลังก่อน
...
Do the required electrical connections. /
เชื่อมต่อไฟฟ้าที่จำเป็น
Bend the appropriate tabs to hold the sleeve
firmly in place. /
บิดแถบล็อคเพื่อรองรับปลอกหุ้มให้เข้าที่อย่างแน่นหนา
Install the unit at an angle
of less than 30˚. /
ติดตั้งเครื่องในมุมน้อยกว่า
30˚
Part list /
รายการอุปกรณ์
A
Hard case /
โครงแบบหนา
(×1)
B
Control panel /
แผงควบคุม
(×1)
C
Sleeve /
ปลอกหุ้ม
(×1)
D
Trim plate /
ทริมเพลท
(×1)
E
Power cord /
สายไฟ
(×1)
F
Handles /
ที่จับ
(×2)
• You need the installation kits which corresponds to your car.
• If you have any questions or require information regarding installation kits, consult your JVC car audio
dealer or a company supplying kits.
• The unit can only be installed in a car with a 12 V DC power supply, negative ground.
• Disconnect the battery’s negative terminal and make all electrical connections before installing the unit.
• Connect speakers with a maximum power of more than 50 W (impedance of 4 Ω to 8 Ω). Otherwise,
change the <AMP GAIN> setting. (See page 12 of the INSTRUCTIONS.)
• Insulate unconnected wires with vinyl tape or other similar material. To prevent a short circuit, do not
remove the caps on the ends of the unconnected wires or the terminals.
• If the fuse blows, first make sure the wires are not touching to cause a short circuit, then replace the old
fuse with one that has the same rating.
• Install this unit in the console of your vehicle.
• Mount the unit so that the mounting angle is 30° or less.
• Be sure to ground this unit to the car's chassis again after installation.
• After the unit is installed, check whether the brake lamps, blinkers, wipers, etc. on the car are working
properly.
• Do not touch the metal part of this unit during and shortly after the use of the unit. Metal part such as the
heat sink and enclosure become hot.
•
ต้องใช้ชุดติดตั้งที่เหมาะสมกับรถของท่าน
•
หากท่านมีคำถามหรือต้องการข้อมูลเกี่ยวกับชุดติดตั้ง
โปรดปรึกษาตัวแทนจำหน่ายเครื่องเสียงติดรถยนต์
JVC
ของท่านหรือบริษัทที่จัดหาชุดอุปกรณ์ให้้
•
เครื่องสามารถติดตั้งในรถยนต์ที่มีแหล่งจ่ายไฟ
DC 12 V
และต่อกราวน์ลบเท่านั้น
•
ถอดขั้วลบของแบตเตอรี่ออก
และเชื่อมต่อไฟฟ้าทั้งหมดก่อนติดตั้งเครื่อง
•
ต่อลำโพงเข้ากับแหล่งจ่ายไฟฟ้าไม่เกิน
50 W (
ค่าความต้านทาน
4 Ω
ถึง
8 Ω)
หรือเปลี่ยนการตั้งค่า
<AMP GAIN> (
ดูหน้า
12
คำแนะนำ
)
•
หุ้มสายไฟที่ไม่ได้เชื่อมต่อด้วยเทปไวนิลหรือวัสดุอื่นที่ใกล้เคียงกันนี้
เพื่อป้องกันไม่ให้เกิดไฟลัดวงจร
อย่าถอดฝาครอบที่ปลายสายไฟหรือขั้วต่อที่ยังไม่ได้เชื่อมต่อออก
•
หากฟิวส์ขาด
ก่อนอื่นตรวจดูว่าสายไฟไม่ได้สัมผัสกันจนเป็นเหตุให้เกิดการลัดวงจร
แล้วเปลี่ยนฟิวส์เก่าด้วยฟิวส์ใหม่ที่กำลังไฟเดียวกัน
•
ติดตั้งเครื่องนี้ในแผงหน้าปั
ดของรถยนต์
•
ติดตั้งเครื่องโดยให้เครื่องทำมุม
30°
หรือน้อยกว่า
•
ตรวจสอบให้แน่ใจว่าติดตั้งเครื่องกับโครงรถก่อนการติดตั้ง
•
หลังจากติดตั้งเครื่องแล้ว
ให้ตรวจดูว่าไฟเบรก
ไฟกะพริบ
ที่ปั
ดน้ำฝน
ฯลฯ
ในรถยนต์ทำงานอย่างเหมาะสม
•
ไม่สัมผัสกับส่วนที่เป็นโลหะของตัวเครื่องในระหว่างการใช้งานและหลังจากที่ปิดเครื่องได้ไม่นาน
ชิ้นส่วนโลหะอย่างเช่นแผ่นระบายความร้อนและตัวเครื่อง
อาจร้อนจัด
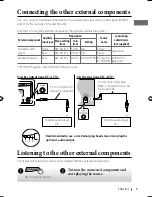
PRECAUTIONS on power supply and speaker connections
• DO NOT connect the speaker leads of the power cord to the car battery; otherwise, the unit will be
seriously damaged.
• BEFORE connecting the speaker leads of the power cord to the speakers, check the speaker wiring in
your car.
ข้อควรระวังเกี่ยวกับการเชื่อมต่อแหล่งจ่ายไฟและลำโพง
•
อย่าต่อสายลำโพงที่เป็นสายไฟกับแบตเตอรี่รถยนต์
ไม่เช่นนั้นเครื่องอาจได้รับความเสียหายร้ายแรง
•
ก่อนต่อสายลำโพงที่เป็นสายไฟกับลำโพง
ควรตรวจสอบการเดินสายลำโพงในรถของท่าน
ENGLISH /
ไทย
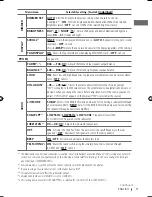
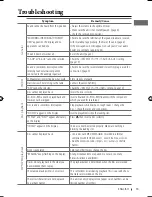
•
The fuse blows.
]
Are the red and black leads connected correctly?
•
Power cannot be turned on.
]
Is the yellow lead connected?
•
No sound from the speakers.
]
Is the speaker output lead short-circuited?
•
“MISWIRING CHK WIRING THEN RESET UNIT” appears on the display and no operation can be done.
]
Is the speaker output lead short-circuited or touches the chassis of the car/head unit? ; Have you reset
your unit?
•
Sound is distorted.
]
Is the speaker output lead grounded? ; Are the “–” terminals of L and R speakers
grounded in common?
•
Noise interfere with sounds.
]
Is the rear ground terminal connected to the car’s chassis using shorter
and thicker cords?
•
This unit becomes hot.
]
Is the speaker output lead grounded? ; Are the “–” terminals of L and R
speakers grounded in common?
•
This unit does not work at all.
]
Have you reset your unit?
TROUBLESHOOTING /
การแก้ไขปั
ญหาเบื้องต้น
•
ฟิวส์ขาด
]
ต่อสายสีแดงและสีดำถูกต้องหรือไม่
?
•
ไม่สามารถเปิดเครื่องได้
]
ต่อสายสีเหลืองแล้วหรือไม่
?
•
ไม่ได้ยินเสียงจากลำโพง
]
สายสัญญาณออกของลำโพงลัดวงจรหรือไม่
?
•
ข้อความ
“MISWIRING CHK WIRING THEN RESET UNIT”
ปรากฏขึ้นบนหน้าจอและเครื่องไม่สามารถทำงานได้
]
สายสัญญาณออกของลำโพงลัดวงจรหรือสัมผัสกับโครงรถ
/
ตัวเครื่องหลักหรือไม่
? ;
ท่านตั้งเครื่องใหม่ใช่หรือไม่
?
•
เสียงผิดเพี้ยน
]
สายสัญญาณออกของลำโพงต่อกับสายดินหรือไม่
? ;
ขั้วต่อ
“–”
ของลำโพง
L (
ซ้าย
)
และ
R (
ขวา
)
ต่อสายดินไว้ด้วยกันหรือไม่
?
•
มีเสียงรบกวน
]
ขั้วต่อสายดินด้านหลังที่ต่อกับโครงรถใช้สายที่สั้นและหนากว่าหรือไม่
?
•
เครื่องร้อน
]
สายสัญญาณออกของลำโพงต่อกับสายดินหรือไม่
?
;
ขั้วต่อ
“–”
ของลำโพง
L (
ซ้าย
)
และ
R (
ขวา
)
ต่อสายดินไว้ด้วยกันหรือไม่
?
•
เครื่องใช้งานไม่ได้เลย
]
ท่านตั้งเครื่องใหม่ใช่หรือไม่
?
*
Not supplied for this unit.
*
ไมได้จัดส่งให้สำหรับเครื่องนี้
Install_KD-R326_006A_f.indd 1
Install_KD-R326_006A_f.indd 1
9/2/10 1:37:06 AM
9/2/10 1:37:06 AM