JVC KD-LH70R Скачать руководство пользователя страница 58

4

R

L

R

L

R

L

INPUT

R

L

L

R

L

R

L

R

R

L

LINE 

REAR FRONT

*

2

OUT

R

L

R

L

R

L

INPUT

*

2

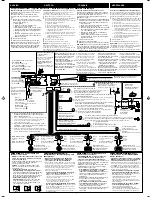
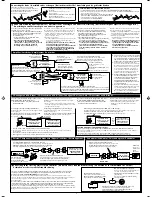
You can connect an amplifier and other equipment to
upgrade your car stereo system.
• Connect the remote lead (blue with white stripe) to

the remote lead of the other equipment so that it
can be controlled through this unit.

• For amplifier only:

– Connect this unit’s line-out terminals to the

amplifier’s line-in terminals.

Disconnect the speakers from this unit,
connect them to the amplifier. Leave the
speaker leads of this unit unused. (Cover the
terminals of these unused leads with
insulating tape, as illustrated above.)

Sie können einen Verstärker oder ein anderes Gerät
anschließen, um Ihre Autostereoanlage zu erweitern.
• Schließen Sie das Fernbedienungskabel (blau mit

weißem Streifen) an das Fernbedienungskabel des
anderen Geräts an, so daß es über dieses Gerät
gesteuert werden kann.

• Nur für den Verstärker:

– Die Anschlußklemmen am Ausgang dieses Gerät

an den Anschlußklemmen des Eingangs des
Verstärkers anschließen.

Die Lautsprecher von diesem Gerät abtrennen
und am Verstärker anschließen. Die
Lautsprecherleitungen dieses Geräts unbenutzt
lassen. (Die Anschlußklemmen dieser nicht
verwendeten Leitungen mit Isolierklebeband
umwickeln, siehe Abbidung oben.)

Vous pouvez connecter un amplificateur ou autre
appareil pour améliorer votre système autoradio.
• Connectez le fil de commande à distance (bleu

avec bande blanche) au fil de commande à
distance de l’autre appareil de façon qu’il puisse
être commandé via cet appareil.

• Pour l’amplificateur seulement:

– Raccorder les bornes de sortie ligne de cet appareil

aux bornes d’entrée ligne de l’amplificateur.

Déconnectez les enceintes de cet appareil et
connectez-les à l’amplificateur. Laissez les fils
d’enceintes de cet appareil inutilisés.
(Recouvrir les extrémités de ces fils inutilisés
avec de la bande isolante comme montré ci-
dessus.)

Het is mogelijk om uw autostereosysteem uit te breiden
met een versterker of andere apparatuur.
• Verbind de externe kabel (blauw met witte streep) met

de externe kabel van het andere apparatuur zodat deze
op afstand vanaf deze apparaat kan worden bediend.

• Alleen voor een versterker:

– Verbind de uitgang van het apparaat met de ingang

van de versterker.

Koppel de speakers van dit apparaat los en
verbind ze aan de versterker. Gebruik de
speakerdraden van dit apparaat niet. (Plak
de aansluitklemmen van deze
speakerdraden met isolatieband af zoals
hierboven is afgebeeld.)

Connections Adding Other Equipment / Anschlüsse zum Hinzufügen von anderer Ausrüstung / Raccordement pour ajouter d’autres appareils /
Aansluitingen voor het toevoegen van andere apparatuur

Amplifier / Verstärker / Amplificateur / Versterker

Twist the core wires when connecting.

Die Kerndrähte beim Anschließen verdrehen.

Torsader les âmes des fils en les raccordant.

Draai de kerndraden om elkaar heen
wanneer u ze wilt aansluiten.

CAUTION / VORSICHT / PRECAUTION / LET OP!:

• To prevent short-circuit, cover the terminals of the UNUSED leads with insulating tape.

• Zur Vermeidung eines Kurzschlusses die Anschlußklemmen der NICHT VERWENDETEN Leitungen

mit Isolierklebeband umwickeln.

• Pour éviter les court-circuits, couvrir les bornes des fils

qui ne sont PAS UTILISÉS avec de la bande isolante.

• Om kortsluiting te voorkomen, moet u de

aansluitklemmen van ONGEBRUIKTE
gekleurde draden met isolatieband bedekken.

Connecting the leads / Anschließen der Leitungen / Raccordement des fils / Aansluiting van de gekleurde draden

Signal cord
(not supplied with this unit)

Einzelleitung (nicht mit diesem Gerät mitgeliefert)

Cordon de signal (non fourni avec cet appareil)

Signaalkabel (wordt niet bij dit apparaat geleverd)

Rear speakers

Hintere Lautsprecher

Enceintes arrière

Achterspeakers

KD-LH70R

To power aerial if any

Zur Motorantenne, sofern
vorhanden

Vers l’antenne automatique, s’il y
en a une

Naar de antenne (indien aanwezig)

Y-connector (not supplied with this unit)

Y-Anschluß (nicht mit diesem Gerät mitgeliefert)

Connecteur Y (non fourni avec cet appareil)

Y-connector (wordt niet bij dit apparaat geleverd)

Blue with white stripe

Blau mit weißem Streifen

Bleu avec bande blanche

Blauw met witte streep

Remote lead

Fernbedienungsleitung

Fil d’alimentation à distance

Externe kabel

*2 : Firmly attach the ground wire to the metallic

body or to the chasis of the car—to the place
not coated with paint (if coated with paint,
remove the paint before attaching the wire).
Failure to do so may cause damage to the unit.

*2 : Verbinden Sie den Erdungsleiter mit der

Karosserie oder dem Rahmen des Fahrzeugs.
Die Kntaktstelle darf nicht lackiert sein (sollte
die Kontaktstelle lackiert sein, entfernen Sie
den Lack der Kontaktstelle, bevor Sie den
Leiter befestigen). Wenn der Erdungsleiter
nicht ordnungsgemäß angeschlossen wird,
kann dieses Gerät beschädigt werden.

*2 : Attachez solidement le fil de mise à la masse

au châssis métallique de la voiture—à un
endroit qui n’est pas recouvert de peinture
(s’il est recouvert de peinture, enlevez
d’abord la peinture avant d’attacher le fil).
L’appareil peut être endommagé si cela n’est
pas fait correctement.

*

2 : Bevestig de aardedraad goed met een metalen

onderdeel of het chassis van de auto—bevestig
op een niet-gelakt gedeelte (indien gelakt,
schuur dan af alvorens de draad te bevestigen).
Het toestel kan worden beschadigd indien de
aardedraad niet goed is aangesloten.

Sie können einen CD-Wechsler und/oder einen
DAB-Tuner (Tuner für digitalen Rundfunk) von JVC
anschließen.

Weitere Informationen über den Anschluß können
Sie der Bedienungscanleitung entnehmen, die dem
jeweiligen Gerät beiliegt.

You can connect a JVC CD changer and/or a JVC
DAB (Digital Audio Broadcasting) tuner.
• For their connections, refer to the instructions

supplied with them.

Vous pouvez connecter un changeur CD JVC et/ou
un tuner DAB (Digital Audio Broadcasting) JVC.

Pour leurs connexions, référez-vous aux modes
d’emploi qui les accompagnent.

Het is mogelijk een JVC CD-wisselaar en/of JVC
DAB-tuner (Digital Audio Broadcasting) aan te sluiten.

Zie de instructies van deze apparaten voor meer
informatie over het tot stand brengen van deze
aansluiting.

CD changer and DAB tuner / CD-Wechsler und DAB-Tuner / Changeur CD et tuner DAB / CD-wisselaar en DAB-tuner

Connecting cord supplied with your DAB tuner

Verbindungskabel, das zum Lieferumfang des DAB-
Tuners gehört

Cordon de connexion fourni avec votre tuner DAB

Verbindingskabel die met de DAB-tuner wordt
meegeleverd

Connecting cord supplied with your CD changer

Verbindungskabel, das zum Lieferumfang des
CD-Wechsler gehört

Cordon de connexion fourni avec votre changeur CD

Verbindingskabel die met de CD-wisselaar wordt
meegeleverd

JVC CD changer

CD-Wechsler von JVC

Changeur CD JVC

JVC CD-wisselaar

JVC DAB tuner

DAB-Tuner von JVC

Tuner DAB JVC

JVC DAB-tuner

• You can connect both components in series as illustrated above.

• Es ist möglich, beide Komponenten in einer Serienschaltung entsprechend der obigen Darstellung

anzuschließen.

• Vous pouvez connecter les deux appareils en série comme montré ci-dessus.

• Beide apparaten zijn volgens bovenstaande illustratie in serie aan te sluiten.

or

oder

ou

of

JVC CD changer

CD-Wechsler von JVC

Changeur CD JVC

JVC CD-wisselaar

JVC DAB tuner

DAB-Tuner von JVC

Tuner DAB JVC

JVC DAB-tuner

Connecting cord supplied with your DAB tuner or CD changer

Verbindungskabel, das zum Lieferumfang des DAB-Tuners oder CD-Wechslers gehört

Cordon de connexion fourni avec votre tuner DAB ou changeur CD

Verbindingskabel die met de DAB-tuner of CD-wisselaar wordt meegeleverd

External Component / Externe Komponente / Appareil extérieur / Extern apparaat

Signal cord (not supplied with this unit)

Einzelleitung (nicht mit diesem Gerät mitgeliefert)

Cordon de signal (non fourni avec cet appareil)

Signaalkabel (wordt niet bij dit apparaat geleverd)

CD changer jack

Buchse für CD-Wechsler

Prise du changeur CD

Aansluiting voor CD-wisselaar

External component

Externe Komponente

Appareil extérieur

Extern apparaat

Line Input Adapter KS-U57 (not supplied with this unit)

Line-Eingangsadapter KS-U57 (nicht mit diesem Gerät mitgeliefert)

Adaptateur d’entrée de ligne KS-U57 (non fourni avec cet appareil)

Line Input Adapter KS-U57 (wordt niet bij dit apparaat geleverd)

CAUTION / VORSICHT / PRECAUTION / LET OP!:

• Before connecting the CD changer and/or the DAB tuner, make sure that the unit is turned off.

• Bevor Sie den CD-Wechsler und/oder den DAB-Tuner anschließen, vergewissern Sie sich, daß das

Gerät ausgeschaltet ist.

• Avant de connecter le changeur CD et/ou le tuner DAB, s’assurer que l’unité est éteinte.

• Zorg ervoor dat de apparaat is uitgeschakeld alvorens u de en/of DAB-tuner CD-wisselaar aansluit.

KD-LH70R

KD-LH70R

KD-LH70R

Front speakers

Vordere Lautsprecher

Enceintes avant

Voorspeakers

JVC Amplifier

JVC Verstärker

JVC Amplificateur

JVC Versterker

JVC Amplifier

JVC Verstärker

JVC Amplificateur

JVC Versterker

Front speakers

Vordere Lautsprecher

Enceintes avant

Voorspeakers

You can connect another power amplifier for front speakers.

Sie können einen anderen Leistungsverstärker für die vorderen Lautsprecher anschließen.

Vous pouvez connecter un autre amplificateur de puissance pour les enceintes avant.

U kunt nog een eindversterker voor de voorspeakers aansluiten.

L

R

L

R

L

R

L

R

JVC Amplifier

JVC Verstärker

JVC Amplificateur

JVC Versterker

KD-LH70R

SUBWOOFER

Signal cord (not supplied with this unit)

Einzelleitung (nicht mit diesem Gerät mitgeliefert)

Cordon de signal (non fourni avec cet appareil)

Signaalkabel (wordt niet bij dit apparaat geleverd)

Connecting to the steering wheel remote controller / Anschluß an die Lenkradfernbedienung / Connexion de la télécommande de volant /
Verbinden met de stuurwiel-afstandsbediening

If your car is equipped with the steering wheel remote controller, you can operate this receiver using the
controller. To do it, a JVC’s OE remote adapter (not supplied) which matches with your car is required.
Consult your JVC IN-CAR ENTERTAINMENT dealer for details.

Wenn Ihr Fahrzeug mit einer Lenkradferndienung ausgestattet ist, können Sie damit diesen Receiver
steuern. Hierfür ist ein für Ihr Fahrzeug passender Radio-Lenkrad-Fernbedienungsadaption von JVC (nicht
im Lieferumfang enthalten) erforderlich. Für weitere Einzelheiten wenden Sie sich an Ihren JVC
Autoradiohändler.

Si votre voiture est munie d’une télécommande de volant, vous pouvez commander cet autoradio en utilisant
la télécommande. Pour le faire, un adaptateur pour télécommande au volant (non fourni) correspondant à
votre voiture est nécessaire. Consultez votre revendeur d’autoradio JVC pour les détails.

Indien uw auto een stuurwiel-afstandsbediening (niet bijgeleverd) heeft, kunt u deze receiver met die afstandsbediening
bedienen. Hiervoor heeft u echter een JVC adapter nodig die geschikt is voor de stuurwiel-afstandsbediening in uw auto.
Raadpleeg uw JVC car audio dealer voor details.

KD-LH70R

Steering wheel remote input

Eingang für Lenkradfernbedienung

Entrée de la télécommande de volant

Ingang stuurwiel-afstandsbediening

OE remote adapter (not supplied)

Radio-Lenkrad-Fernbedienungsadaption
(nicht im Lieferumfang enthalten)

Adaptateur pour télécommande au volant
(non fourni)

Adapter voor stuurwiel-afstandsbediening
(niet bijgeleverd)

Steering wheel remote controller (equipped in the car)

Lenkradfernbedienung (im Fahrzeug installiert)

Télécommande de volant (installée dans la voiture)

Stuurwiel-afstandsbediening (in de auto)

Subwoofer / Subwoofer / Caisson de grave / Subwoofer

Solder the core wires to connect them
securely.

Die Kerndrähte anlöten, um sie fest
anzuschließen.

Souder les âmes des fils pour les raccorder
entre eux de façon sûre.

Soldeer de kerndraden zodat ze stevig vast
zitten.

Subwoofer

Subwoofer

Caisson de
grave

Subwoofer

Instal_KD-LH70R_004A_f.p65

1/13/03, 10:55 AM

4

Содержание KD-LH70R

Страница 1: ...RECEPTEUR CD CD RECEIVER For installation and connections refer to the separate manual Für den Einbau und die Anschlüsse siehe das eigenständige Handbuch Pour l installation et les raccordements se référer au manuel séparé Bijzonderheden over de installatie en aansluiting van het apparaat vindt u in de desbetreffende handleiding SOUND VOL VOL SOURCE R F U D ATT ...

Страница 2: ... or defeated Avoid direct exposure to beam 3 CAUTION Do not open the top cover There are no user serviceable parts inside Leave all servicing to qualified service personnel 4 CAUTION This CD player uses invisible laser radiation and is equipped with safety switches to prevent radiation emission when unloading CDs It is dangerous to defeat the safety switches 5 CAUTION Use of controls adjustments o...

Страница 3: ...arked the car for a long time in hot or cold weather wait until the temperature in the car becomes normal before operating the unit How to reset your unit 2 How to use the M MODE button 2 LOCATION OF THE BUTTONS 4 Control panel 4 Remote controller 5 Preparing the remote controller 6 BASIC OPERATIONS 7 Turning on the power 7 Setting the clock 8 RADIO OPERATIONS 9 Listening to the radio 9 Storing st...

Страница 4: ...ndicator Equalization pattern indicator c Playback mode indicators RND random RPT repeat Control panel 1 standby on attenuator button 2 Control dial 3 SEL select button 4 Display window 5 5 up button 10 button 6 0 eject button 7 4 buttons 8 control panel release button 9 T TP PTY traffic programme programme type button p D DISP display button Also functions as SSM buttons when pressed together wit...

Страница 5: ...tening to the radio Selects services while listening to the DAB tuner if pressed briefly Searches for ensembles while listening to the DAB tuner if pressed for more than one second Fast forwards or reverses the track file if pressed and held while listening to a disc Skips to the beginning of the next track file or goes back to the beginning of the current or previous tracks files if pressed brief...

Страница 6: ...e children cannot reach If a child accidentally swallows the battery consult a doctor immediately Do not recharge short disassemble or heat the battery or dispose of it in a fire Doing any of these things may cause the battery to give off heat crack or start a fire Do not leave the battery with other metallic materials Doing this may cause the battery to give off heat crack or start a fire When th...

Страница 7: ...d with other sources If the volume level is adjusted for the tuner for example the speakers may be damaged by the sudden increase in the output level Therefore lower the volume before playing a disc and adjust it as required during playback Turning on the power 1 Turn on the power Note on One Touch Operation When you select a source in step 2 below the power automatically comes on You do not have ...

Страница 8: ...ust the hour 3 Set the minute 1 Select CLOCK M minute 2 Adjust the minute 4 Set the clock system 1 Select 24H 12H 2 Select 24H or 12H 5 Finish the setting Note To show the clock time on the display see page 34 To check other information during play press D DISP Each time you press the button the other information will be shown on the upper part of the display See page 34 for details Pressing D DIS...

Страница 9: ...cation will soon change to the clock time Note This receiver has three FM bands FM1 FM2 FM3 You can use any one of them to listen to an FM broadcast To search stations of higher frequencies To search stations of lower frequencies 2 Start searching a station When a station is received searching stops To stop searching before a station is received press the same button you have pressed for searching...

Страница 10: ... of higher frequencies To tune in to stations of lower frequencies MO monaural indicator Searching a station manually Manual search 1 Select the band FM1 3 AM Each time you press the button the band changes as follows Note This receiver has three FM bands FM1 FM2 FM3 You can use any one of them to listen to an FM broadcast 2 Press and hold or 4 until MANU manual starts flashing on the display 3 Tu...

Страница 11: ...r you have selected FM1 FM2 or FM3 These stations are preset in the number buttons No 1 lowest frequency to No 6 highest frequency When automatic preset is over the station stored in number button 1 will be automatically tuned in SSM appears then disappears when automatic preset is over Manual preset You can preset up to 6 stations in each band FM1 FM2 FM3 and AM manually Ex Storing FM station of ...

Страница 12: ...is interrupted for example during battery replacement If this occurs preset the stations again Tuning in to a preset station You can easily tune in to a preset station Remember that you must store stations first If you have not stored them yet see Storing stations in memory on pages 11 and 12 1 Select the band FM1 3 AM Each time you press the button the band changes as follows 2 Select the number ...

Страница 13: ... are used to make Network Tracking Reception work correctly PI Programme Identification and AF Alternative Frequency Without receiving these data correctly from the RDS station you are listening to Network Tracking Reception will not operate To use Network Tracking Reception You can select the different modes of network tracking reception to continue listening to the same programme in its finest r...

Страница 14: ...ting a traffic announcement TRAFFIC appears on the display and this unit automatically tunes in to the station The volume changes to the preset TA volume level see page 18 and the traffic announcement can be heard If the TP indicator flashes TA Standby Reception is not yet activated since the station being received does not provide the signals used for TA Standby Reception To activate TA Standby R...

Страница 15: ... the current source is FM the PTY indicator either lights up or flashes If the PTY indicator lights up PTY Standby Reception is activated If a station starts broadcasting the selected PTY programme this unit automatically tunes in to the station If the PTY indicator flashes PTY Standby Reception is not yet activated since the station being received does not provide the signals used for PTY Standby...

Страница 16: ...age 17 To store your favorite programme types 1 Press and hold T TP PTY for more than 2 seconds while listening to an FM station 2 Select one of the twenty nine PTY codes See page 19 Selected code name appears on the display 3 Press and hold the number button for more than 2 seconds to store the PTY code selected into the preset number you want Selected preset number and MEMO memory appear alterna...

Страница 17: ...unit takes some time to tune in to another station using programme search To activate programme search follow the procedure below See also Changing the general settings PSM on page 32 1 Press and hold SEL select for more than 2 seconds so that one of the PSM items appears on the display 2 Press or 4 to select P Programme SEARCH 3 Turn the control dial clockwise to select ON Now programme search is...

Страница 18: ... than 2 seconds so that one of the PSM items appears on the display 2 Press or 4 to select TA VOL volume 3 Turn the control dial to set to the desired volume You can set it from VOL 00 to VOL 50 4 Press SEL select to finish the setting Automatic clock adjustment When shipped from the factory the clock built in this unit is set to be readjusted automatically using the CT Clock Time data in the RDS ...

Страница 19: ...N Programmes dealing with any aspect of belief or faith or the nature of existence or ethics PHONE IN Programmes where people can express their views either by phone or in a public forum TRAVEL Programmes about travel destinations package tours and travel ideas and opportunities LEISURE Programmes concerned with recreational activities such as gardening cooking fishing etc JAZZ Jazz music COUNTRY ...

Страница 20: ...e inserted disc Elapsed playing time Current track When CLOCK is set to ON see page 34 the current indication will soon change to the clock time Notes When a CD is inserted upside down the CD automatically ejects if the control panel is open If the control panel is closed the source changes to the previously selected source PLEASE and EJECT appear alternately on the display When you open the contr...

Страница 21: ...utomatically ejects from the loading slot The source changes to the previously selected source If you change the source CD play also stops without ejecting the CD Next time you select CD as the source CD play starts from where playback has been stopped previously Notes If the ejected disc is not removed for about 15 seconds the disc is automatically inserted again into the loading slot to protect ...

Страница 22: ...ff alternately When disc random play is turned on the and RND indicators light up on the display A track randomly selected starts playing disc and RND indicators RPT indicator To play back tracks repeatedly Track Repeat Play You can play back the current track repeatedly 1 Press M MODE to enter the functions mode while playing a CD MODE flashes on the upper part of the display 2 Press RPT repeat w...

Страница 23: ...erformer and track title is recorded This CD Text information will be shown automatically when you play a CD Text To change the CD Text information manually select text display mode while playing a CD Text Each time you press the button the display changes as follows Notes The display shows up to 8 characters at a time and scrolls if there are more than 8 characters See also To select the scroll m...

Страница 24: ...t A playlist is a simple text file used on a PC which enables users to make their own playback order without physically rearranging the files What is MP3 MP3 is an abbreviation of Motion Picture Experts Group or MPEG Audio Layer 3 MP3 is simply a file format with a data compression ratio of 1 10 128 Kbps That means by using MP3 format one CD R or CD RW can contain 10 times as much data volume as a...

Страница 25: ...ide the folders indicate the playback order and search order of the folders on an MP3 disc Normally this unit plays back MP3 files in the folders in the recorded order Note There is no limit on the number of the hierarchy levels nested folders However up to 8 hierarchy levels is recommended for stable operations 13 12 18 19 17 23 22 24 11 10 21 20 1 2 5 6 3 4 02 04 ROOT 15 16 14 06 07 05 09 01 08 ...

Страница 26: ...ge 34 the current indication will soon change to the clock time Notes MP3 discs require a longer readout time It differs due to the complexity of the folder file configuration When playback starts folder and file names or ID3 tags will automatically appears See also page 27 If you change the source or turn the power off disc playback stops without ejecting the disc Next time you select the CD play...

Страница 27: ...ting a file or a particular portion on an MP3 disc For MP3 playback search order see page 25 To fast forward or reverse the file Note During this operation you can only hear intermittent sounds The elapsed playing time also changes intermittently on the display To skip to the next or previous files To go to a particular file quickly within the current folder 10 and 10 buttons 1 Press M MODE to ent...

Страница 28: ...or previous folder Note If the folder does not contain any MP3 files it is skipped 2 Press 10 or 10 The first time you press 10 or 10 button the file skips to the nearest higher or lower file with a file number of multiple ten ex 10th 20th 30th Then each time you press the button you can skip 10 files see How to use the 10 and 10 buttons below After the last file the first file will be selected an...

Страница 29: ...LDR RND or DISC RND appears on the display Each time you press the button the random play mode changes as follows Canceled DISC RND FLDR RND To play back files repeatedly Track Repeat Folder Repeat Play You can play back the current file or all the files in the current folder repeatedly 1 Press M MODE to enter the functions mode while playing an MP3 disc MODE flashes on the upper part of the displ...

Страница 30: ...pplied to the current source 3 Select the sound mode you want Each time you press the button the sound modes change as follows Indication For Preset values BAS TRE LOUD USER Flat sound 00 00 OFF ROCK Rock or 03 01 ON disco music CLASSIC Classical 01 02 OFF music POPS Light music 04 01 OFF HIP HOP Funk or rap 02 00 ON music JAZZ Jazz music 02 03 OFF Note You can adjust each sound mode to your prefe...

Страница 31: ...ting the sound You can adjust the sound characteristics to your preference 1 Select the item you want to adjust Each time you press the button the adjustable items change as follows Indication To do Range BAS 1 Adjust the bass 06 min 06 max TRE 1 Adjust the treble 06 min 06 max FAD 2 Adjust the front R06 Rear only and rear speaker balance F06 Front only BAL Adjust the left L06 Left only and right ...

Страница 32: ...Preferred Setting Mode control Basic Procedure 1 Press and hold SEL select for more than 2 seconds so that one of the PSM items appears on the display 2 Select the PSM item you want to adjust See page 33 3 Adjust the PSM item selected 4 Repeat steps 2 and 3 to adjust the other PSM items if necessary 5 Finish the setting Ex When you select LEVEL ...

Страница 33: ...muting BEEP Key touch tone SCROLL Scroll mode EXT IN 3 External component TAG DISP Tag display Back Advance Back Advance 0 00 8 8 34 18 15 12H 24H OFF ON ON 24H FREQ PS NAME PS NAME 13 14 AF OFF VOL 00 VOL 50 18 VOL 20 17 OFF ON OFF Indications Selectable values items Factory preset See settings page 48 AF OFF AF ON AF ON 48 VOL 12 VOL 12 VOL00 CHANGER LINE IN CHANGER TAG OFF TAG ON TAG ON OFF ON ...

Страница 34: ...u press a button When shipped from the factory the key touch tone is activated ON Activates the key touch tone OFF Deactivates the key touch tone To set the clock display CLOCK You can set the clock to be shown on the display when the unit is turned on When shipped from the factory the clock is set to be shown on the display ON Clock display is turned on OFF Clock display is turned off When OFF is...

Страница 35: ...r is selected as the external component CHANGER To use the CD changer LINE IN To use the external component other than CD changer Note For connecting the Line Input Adapter KS U57 and the external component refer to the Installation Connection Manual separate volume To turn the tag display on or off TAG DISP An MP3 file can contain file information called ID3 Tag where its album name performer tra...

Страница 36: ...rcuit is interrupted for example during battery replacement all the preset settings are erased If this occurs reset the unit see page 2 Then assign names to the sources again Assigning names to the sources You can assign names to CDs both in this unit and in the CD changer After assigning a name it will appears on the display when you select the source Sources Maximum number of characters CDs Up t...

Страница 37: ...nnectors with a cotton swab or cloth moistened with alcohol being careful not to damage the connectors Detaching the control panel You can detach the control panel when leaving the car When detaching or attaching the control panel be careful not to damage the connectors on the back of the control panel and on the panel holder Detaching the control panel Before detaching the control panel be sure t...

Страница 38: ... magazine of the CD changer or the discs are inserted upside down NO DISC will appear on the display If this happens remove the magazine and set the discs correctly If no magazine is loaded in the CD changer NO MAG appears on the display If this happens insert the magazine in the CD changer If RESET 1 RESET 8 appears on the display something is wrong with the connection between this unit and the C...

Страница 39: ...ack to the beginning of the current track file Each time you press the button consecutively the beginning of the previous tracks files is located and played back Press and hold during play to fast forward the track file When the current disc is a CD Playback starts from the first track of the current disc When CLOCK is set to ON see page 34 the current indication will soon change to the clock time...

Страница 40: ... MP3 compatible CD changer CH X1500 To go to a track file quickly 10 and 10 buttons 1 Press M MODE to enter the functions mode while playing a disc MODE flashes on the upper part of the display 2 Press 10 or 10 The first time you press 10 or 10 button the track file skips to the nearest higher or lower track file with a track file number of multiple ten ex 10th 20th 30th Then each time you press t...

Страница 41: ...discs Selecting the playback modes To play back tracks files at random Folder Random Disc Random Magazine Random Play 1 Press M MODE to enter the functions mode during play MODE flashes on the upper part of the display 2 Press RND random while MODE is still flashing on the display Each time you press the button the random play mode changes as follows For MP3 discs For CDs Note MP3 indicator also l...

Страница 42: ...r MP3 discs Ex When you select DISC RPT To play back tracks files repeatedly Track Repeat Folder Repeat Disc Repeat Play 1 Press M MODE to enter the functions mode during play MODE flashes on the upper part of the display 2 Press RPT repeat while MODE is still flashing on the display Each time you press the button the repeat play mode changes as follows For MP3 discs For CDs Note MP3 indicator als...

Страница 43: ...external input correctly See To select the external component to use EXT IN on page 35 1 Select the external component LINE IN If LINE IN does not appear on the display see page 34 and select the external input LINE IN Displayed only when one of the following sources is selected FM AM and CD Note on One Touch Operation When you press CD CD CH the power automatically comes on You do not have to pre...

Страница 44: ...T dealer Refer also to the Instructions supplied with your DAB tuner What is DAB system DAB is one of the digital radio broadcasting systems available today It can deliver CD quality sound without any annoying interference and signal distortion Furthermore it can carry text pictures and data In contrast to FM broadcast where each programme is transmitted on its own frequency DAB combines several p...

Страница 45: ...is the current source 1 Press and hold FM AM DAB to select DAB tuner as the source 2 Press FM AM DAB repeatedly to select the DAB band DAB1 DAB2 or DAB3 3 Press and hold or 4 for more than one second 4 Press or 4 repeatedly until the ensemble you want is reached If you hold down the button the frequency keeps changing until you release the button 5 Press 5 up or down to select a service either pri...

Страница 46: ...is interrupted for example during battery replacement If this occurs preset the DAB services again Press 5 up to select the next service Press down to select the previous service Selected band preset number and MEMO memory appear alternately for a while Storing DAB services in memory You can preset up to 6 DAB services in each DAB band DAB1 DAB2 and DAB3 manually Before you start Press FM AM DAB b...

Страница 47: ...2 DAB 3 D3 3 Select the number 1 6 for the preset DAB service primary you want Note If the selected primary service has some secondary services pressing the same number button repeatedly will tune in to the secondary services What you can do more with DAB Tracing the same program automatically Alternative Reception You can keep listening to the same program While receiving a DAB service When drivi...

Страница 48: ... activated Network Tracking Reception for RDS stations see page 13 is also activated automatically On the other hand Network Tracking Reception cannot be deactivated without deactivating Alternative Reception To adjust the DAB volume level You can adjust the volume level of DAB tuner and store it in memory By adjusting the volume level properly to match it to the FM sound level you will not need t...

Страница 49: ...rt a disc into the loading slot Insert the disc correctly Causes The volume level is set to the minimum level Connections are incorrect The built in microcomputer may have functioned incorrectly due to noise etc Signals are too weak The aerial is not connected firmly Disc is inserted upside down CD R CD RW is not finalized Disc is locked You are driving on rough roads Disc is scratched Connections...

Страница 50: ...e played back is not an MP3 file although it has the extension code mp3 Readout time varies due to the complexity of the folder file configuration Playback order is determined when the files are recorded This sometimes occurs during play This is caused by how the files are recorded on the disc The current folder does not contain any MP3 file The current disc does not contain any MP3 file This unit...

Страница 51: ... is in the magazine Discs are inserted upside down No magazine is loaded in the CD changer This unit is not connected to the CD changer correctly The built in microcomputer may function incorrectly due to noise etc Symptoms NO DISC appears on the display NO MAG appears on the display RESET 8 appears on the display RESET 1 RESET 7 appears on the display The CD changer does not work at all CD Change...

Страница 52: ...d their instructions or cautions carefully Use only finalized CD Rs or CD RWs Some CD Rs or CD RWs may not play back on this unit because of their disc characteristics and for the following reasons Discs are dirty or scratched Moisture condensation on the lens inside the unit The pickup lens inside the unit is dirty CD RWs may require a longer readout time since the reflectance of CD RWs is lower ...

Страница 53: ...er channel Rear 50 W per channel Continuous Power Output RMS Front 19 W per channel into 4 Ω 40 Hz to 20 000 Hz at no more than 0 8 total harmonic distortion Rear 19 W per channel into 4 Ω 40 Hz to 20 000 Hz at no more than 0 8 total harmonic distortion Load Impedance 4 Ω 4 Ω to 8 Ω allowance Tone Control Range Bass 10 dB at 100 Hz Treble 10 dB at 10 kHz Frequency Response 40 Hz to 20 000 Hz Signa...

Страница 54: ... setzen Sie Ihr Gerät zurück Siehe Seite Zurücksetzen des Geräts Vous avez des PROBLÈMES de fonctionnement Réinitialisez votre appareil Référez vous à la page intitulée Comment réinitialiser votre appareil Hebt u PROBLEMEN met de bediening Stel het apparaat terug Zie de pagina met de paragraaf Het apparaat terugstellen 2003 VICTOR COMPANY OF JAPAN LIMITED J VC ...

Страница 55: ...orps de l appareil puis passer l amortisseur en caoutchouc sur l extrémité du boulon 6 Réalisez les connexions électriques 7 Faire glisser l appareil dans le manchon jusqu à ce qu il soit verrouillé 8 Attachez la plaque d assemblage Remarque Assurez vous que la partie encastrée est en bas Sinon le panneau de commande ne pourra pas être ouvert complètement 9 Remonter le panneau de commande 1 Voorda...

Страница 56: ...worden aangeschaft bij JVC car audio dealers Vervang de zekering door een exemplaar met het aangegeven vermogen Als de zekering vaak doorslaat moet u uw JVC car audio dealer raadplegen Als u geluidsproblemen hebt De krachtschakeling van dit apparaat heeft een ingebouwd geluidsfilter In sommige voertuigen zijn tikgeluiden of andere ongewenste geluiden te horen Als dit gebeurt moet u de massaklem aa...

Страница 57: ...Streifen Vert avec bande noire Groen met zwarte streep Purple with black stripe Lila mit schwarzem Streifen Violet avec bande noire Paars met zwarte streep Left speaker front Linker Lautsprecher vorne Enceinte gauche avant Linkerspeaker voorin Right speaker front Rechter Lautsprecher vorne Enceinte droit avant Rechterspeaker voorin Left speaker rear Linker Lautsprecher hinten Enceinte gauche arriè...

Страница 58: ...angeur CD JVC et ou un tuner DAB Digital Audio Broadcasting JVC Pour leurs connexions référez vous aux modes d emploi qui les accompagnent Het is mogelijk een JVC CD wisselaar en of JVC DAB tuner Digital Audio Broadcasting aan te sluiten Zie de instructies van deze apparaten voor meer informatie over het tot stand brengen van deze aansluiting CD changer and DAB tuner CD Wechsler und DAB Tuner Chan...

Отзывы: