background image

9

ENGLISH

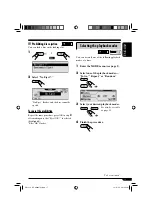
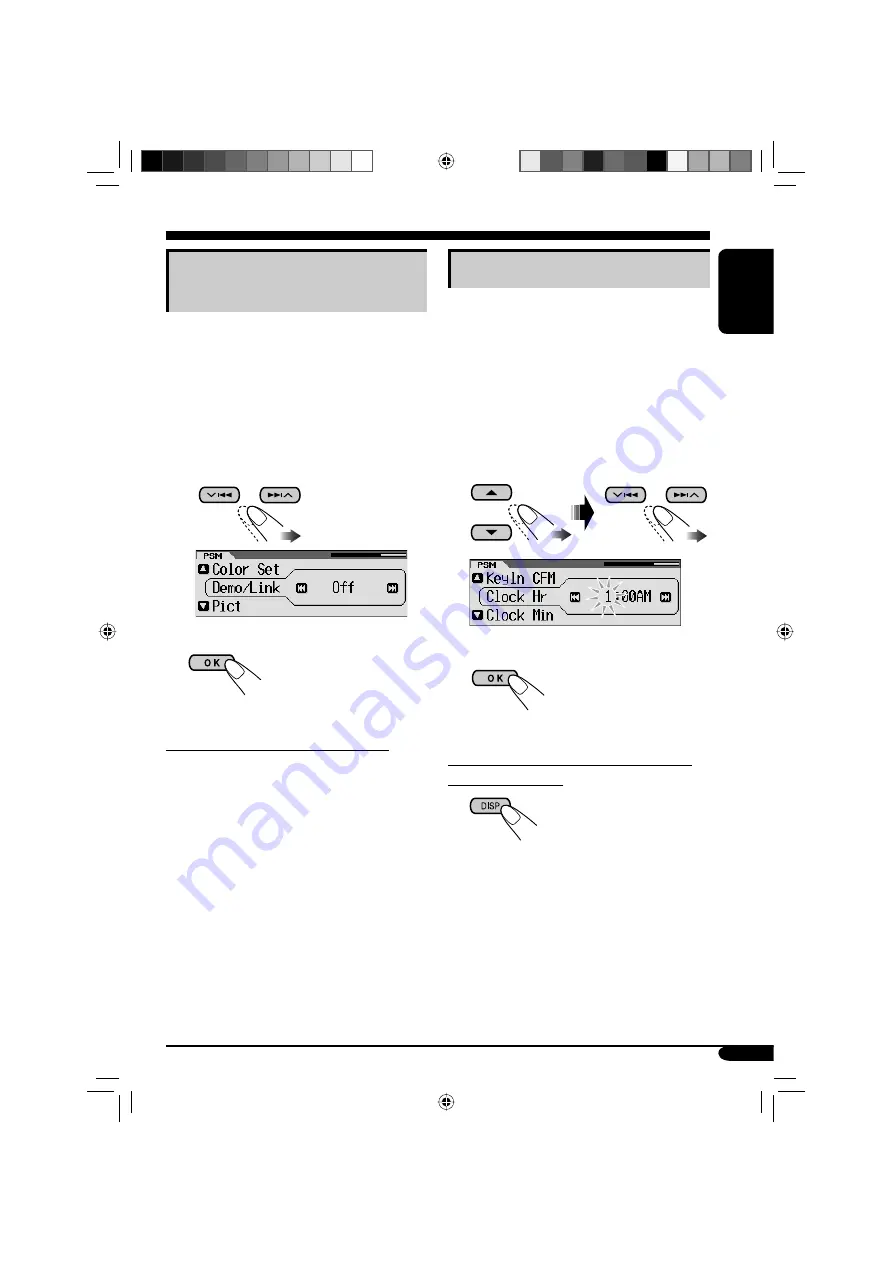
Setting the clock

1

  Enter the PSM menu (see page 5).

2

  Set the hour, minute, and clock 

system.


1

  Select “Clock Hr” (hour), then 

adjust the hour.


2

  Select “Clock Min” (minute), then 

adjust the minute.


3

  Select “24H/12H,” then select 

“24Hours” or “12Hours.”

3

  Exit from the setting.

To check the current clock time when the 
power is turned off

Canceling the display 

demonstrations

If no operations are done for about 20 seconds, 
display demonstration starts. 

[Initial: Demo]—see page 28.

1

  Enter the PSM menu (see page 5).

2

  Select “Off.”


• Make sure “Demo/Link” is shown 

on the display. If not, press 

5

 or 

.

3

  Exit from the setting.

To activate the display demonstration

In step 

2

 above, select “Demo” or 

“Image Link.” For more details, see page 28.

EN08-13_KD-AR860[J]f.indd   9

EN08-13_KD-AR860[J]f.indd   9

12/17/04   5:41:17 PM

12/17/04   5:41:17 PM

Содержание KD-AR860

Страница 1: ...n and connections refer to the separate manual Para la instalación y las conexiones refiérase al manual separado Pour l installation et les raccordements se référer au manuel séparé INSTRUCTIONS MANUAL DE INSTRUCCIONES MANUEL D INSTRUCTIONS For customer Use Enter below the Model No and Serial No which are located on the top or bottom of the cabinet Retain this information for future reference Mode...

Страница 2: ...locate the receiving antenna Increase the separation between the equipment and receiver Connect the equipment into an outlet on a circuit different from that to which the receiver is connected Consult the dealer or an experienced radio TV technician for help IMPORTANT FOR LASER PRODUCTS 1 CLASS 1 LASER PRODUCT 2 CAUTION Do not open the top cover There are no user serviceable parts inside the unit ...

Страница 3: ...s 24 Deleting the files 25 Activating the downloaded files 27 General settings PSM 28 Basic procedure 28 Selecting the dimmer mode 32 Changing the display color 33 Other main functions 35 Assigning titles to the sources 35 Changing the control panel angle 36 Detaching the control panel 36 External component operations 37 Playing an external component 37 SIRIUS radio operations 38 Listening to the ...

Страница 4: ...time The following marks are used to indicate Built in CD player operations External CD changer operations How to forcibly eject a disc If a disc cannot be recognized by the receiver or cannot be ejected ejects the disc as follows 1 2 If this does not work reset your receiver Be careful not to drop the disc when it ejects Caution on volume setting Discs produce very little noise compared with othe...

Страница 5: ...nu Ex When MODE menu is selected To go back to the MENU screen press MENU 4 Operate as instructed on the screen How to change the display pattern Ex When tuner is selected as the source Source display pattern Audio level meters Clock display pattern Graphic screen appears only after you have downloaded a file see pages 23 27 If the current source is SIRIUS see page 42 for details EN02 07_KD AR860 ...

Страница 6: ...0 eject button 8 SOURCE button 9 OK button p Reset button q down button w Remote sensor DO NOT expose the remote sensor to strong light direct sunlight or artificial lighting e MENU button r DISP display button t BACK button y control panel release button u BAND button EN02 07_KD AR860 J f indd 6 EN02 07_KD AR860 J f indd 6 12 17 04 5 39 39 PM 12 17 04 5 39 39 PM ...

Страница 7: ...wn buttons Changes the preset stations Changes the categories for SIRIUS Changes the MP3 WMA folders 4 VOL volume buttons Adjusts the volume level 5 Number buttons Selects the preset station if pressed or store a station if pressed and held Selects the preset channels while listening to SIRIUS radio or store a channel if pressed and held Selects the tracks while playing an audio CDs or CD Texts Se...

Страница 8: ...nly Adjust the volume To show the level meter see page 30 Adjust the sound as you want See pages 19 22 To drop the volume in a moment ATT To restore the sound press it again To turn off the power Getting started Basic operations EN08 13_KD AR860 J f indd 8 EN08 13_KD AR860 J f indd 8 12 17 04 5 41 15 PM 12 17 04 5 41 15 PM ...

Страница 9: ...en the power is turned off Canceling the display demonstrations If no operations are done for about 20 seconds display demonstration starts Initial Demo see page 28 1 Enter the PSM menu see page 5 2 Select Off Make sure Demo Link is shown on the display If not press 5 or 3 Exit from the setting To activate the display demonstration In step 2 above select Demo or Image Link For more details see pag...

Страница 10: ...ation frequencies Radio operations Ÿ Start searching for a station When a station is received searching stops To stop searching press the same button again Listening to the radio Clock display EN08 13_KD AR860 J f indd 10 EN08 13_KD AR860 J f indd 10 12 17 04 5 41 17 PM 12 17 04 5 41 17 PM ...

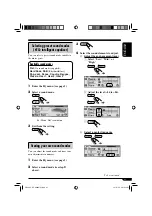
Страница 11: ...lect Off on step 3 Storing stations in memory You can preset six stations for each band FM station automatic presetting SSM Strong station Sequential Memory 1 2 Select the FM band FM1 FM3 you want to store into 3 Enter the MODE menu see page 5 4 Select SSM 5 Local FM stations with the strongest signals are searched and stored automatically in the FM band EN08 13_KD AR860 J f indd 11 EN08 13_KD AR8...

Страница 12: ...nter the MODE menu see page 5 5 Select List 6 7 Select a preset number If the current band is FM you can move to the lists of the other FM bands by pressing 4 8 Store the station Listening to a preset station 1 2 3 Perform steps 4 to 7 on left column to enter the Preset Station List 4 EN08 13_KD AR860 J f indd 12 EN08 13_KD AR860 J f indd 12 12 20 04 5 32 15 PM 12 20 04 5 32 15 PM ...

Страница 13: ... 1 Either the MP3 or WMA indicator lights up depending on the detected file 2 The album name performer with indicator and the track title with indicator will appear if ID3 Tag is set to On see page 30 3 Appear only for CD Texts and CDs if it has been assigned or recorded No Name appears for a while if no name is recorded or assigned to an audio CD To stop play and eject the disc To return the cont...

Страница 14: ...t compatible with MP3 discs so you cannot play back MP3 discs You cannot use the KD MK series CD changers with this receiver Disc text information recorded in the CD Text can be displayed when a JVC CD Text compatible CD changer is connected You cannot control and play any WMA disc in the CD changer All tracks of the inserted discs in the magazine will be played repeatedly until you change the sou...

Страница 15: ...y the Disc List see next column Holding these buttons can display the Folder List see page 16 Other main functions Selecting a disc folder track on the list 1 Enter the MODE menu see page 5 2 Select List 3 Select the list type Disc 1 Folder 2 or File 2 1 Selectable only when the source is CD CH 2 Appears only if the current disc is an MP3 or a WMA disc 1 When Disc is selected Disc List appears You...

Страница 16: ...e List appears You can move to the other lists by pressing 4 5 To start playback When using the remote controller To directly select a disc in the CD changer To directly select a track of an audio CD or a CD Text To directly select a folder of an MP3 WMA disc To select a number from 1 6 To select a number from 7 1 12 6 It is required that folders are assigned with 2 digits number at the beginning ...

Страница 17: ...ails see table on page 18 4 Finish the procedure To be continued Prohibiting disc ejection You can lock a disc in the loading slot 1 2 Select No Eject No Eject flashes and the disc cannot be ejected To cancel the prohibition Repeat the same procedure press OK in step 2 after making sure that Eject OK is selected highlighted Eject OK flashes EN14 19_KD AR860 J f indd 17 EN14 19_KD AR860 J f indd 17...

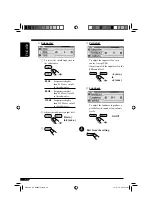
Страница 18: ...ile playing lights up Folder 1 All tracks of the current folder While playing lights up Disc 2 All tracks of the current disc While playing lights up Off Cancels Random play Ex When Disc Random is selected while playing an MP3 disc in the receiver Mode Plays at random Folder 1 All tracks of the current folder then tracks of the next folder and so on While playing lights up Disc All tracks of the c...

Страница 19: ...er the selected menu Sound adjustments Setting the basic sound selection menu SEL Adjust the selected setting item A Fad Bal 1 To adjust the speaker output balance between the front and rear speakers Front to Rear 2 To adjust the speaker output balance between the left and right speakers Left to Right 3 To be continued EN14 19_KD AR860 J f indd 19 EN14 19_KD AR860 J f indd 19 12 17 04 5 41 41 PM 1...

Страница 20: ...15 Hz are cut off to the subwoofer 2 Adjust the subwoofer output level 0 min to 8 max 3 C VolAdjust To adjust the input level of each source except FM Adjust to match the input level to the FM sound level 5 min to 5 max D Loudness To adjust the loudness to produce a well balanced sound at low volume levels On Off Exit from the setting EN20 25_KD AR860 J f indd 20 EN20 25_KD AR860 J f indd 20 12 17...

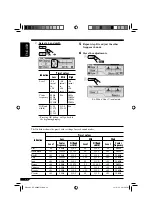
Страница 21: ...lect a sound mode Ex When Flat is selected 3 Exit from the setting Storing your own sound modes You can adjust the sound mode and store your own adjustments in memory 1 Enter the EQ menu see page 5 2 Select a sound mode see step 2 above 3 4 Select the sound elements to adjust A Adjust the enchancement level 1 Select Low Mid or High 2 Adjust the level 06 to 06 3 B Select a center frequency To be co...

Страница 22: ... 02 120Hz Q 0 5 01 Q 1 0 02 10kHz Jazz 03 80Hz Q 0 5 00 Q 1 0 03 10kHz Dance 04 60Hz Q 0 75 02 Q 1 85 01 8kHz Country 02 60Hz Q 1 0 00 Q 1 0 02 12kHz Reggae 03 60Hz Q 0 5 02 Q 1 0 02 12kHz Classic 01 80Hz Q 0 5 00 Q 1 0 03 10kHz C Select a band width Indication Preset values Low Mid High Level 06 min to 06 max 06 min to 06 max 06 min to 06 max Center frequency 60Hz 80Hz 100Hz 120Hz Fix 8kHz 10kHz ...

Страница 23: ...d a file while driving Do not turn off the ignition key of the car while downloading or deleting a file Do not detach the control panel while downloading or deleting a file If you do so the file download or deletion will not be done correctly Before starting the following procedure prepare a CD R including still images pictures and animations movies With Image Converter Wide Ver 1 2 included in th...

Страница 24: ...ning Opening screen To download delete an animation 30 frames at maximum which will be shown after the receiver is turned on Ending Ending screen To download delete an animation 30 frames at maximum which will be shown before the receiver is turned off Downloading pictures or an animation It takes a long time to download an animation For details see page 46 To activate the downloaded files see pag...

Страница 25: ... same folder repeat step 4 To download more pictures from another folder press BACK Then repeat steps 3 and 4 6 Exit from the setting Deleting the files Deleting the stored pictures and animation 1 In step on page 23 select Delete 2 Select the screen type Picture Movie Opening or Ending 3 Ex When Picture is selected 4 To delete the stored pictures 1 EN20 25_KD AR860 J f indd 25 EN20 25_KD AR860 J ...

Страница 26: ...ect All Delete 2 3 When all files are deleted the PICT menu appears again 4 Exit from the setting Deleting all the stored pictures and animation To delete all the stored pictures 1 In step on page 23 select Delete 2 Select Picture 3 4 Select All Delete 5 EN26 31_KD AR860 J f indd 26 EN26 31_KD AR860 J f indd 26 12 17 04 5 42 23 PM 12 17 04 5 42 23 PM ...

Страница 27: ...still images stored in Slide are activated and shown in sequence Go to step 6 5 Select a file 6 Finish the procedure Activating the downloaded files 1 Enter the PSM menu see page 5 2 Select PICT 3 If there is no still images or animation downloaded No Picture No Movie or No Slide will appear EN26 31_KD AR860 J f indd 27 EN26 31_KD AR860 J f indd 27 12 17 04 5 42 25 PM 12 17 04 5 42 25 PM ...

Страница 28: ...k 13 46 Off Cancels These graphics appear if no operation is done for about 20 seconds Pict Pictures You can activate the graphic screen using either movie or picture 27 Picture Initial One of your edited still images stored in Picture is activated Movie Your edited animation stored in Movie is activated Slideshow Your edited still images stored in Slide are activated and shown in sequence KeyIn C...

Страница 29: ...ht savings time Off Cancels Scroll Scroll mode The entire text information can be shown by scrolling if it cannot be shown at a time Once Initial Scrolls only once Auto Repeats scrolling in 5 seconds interval Off Cancels Holding DISP for more than one second can scroll the display regardless of the setting Dimmer Dimmer mode Auto Initial Dims the display when you turn on the headlights Off Cancels...

Страница 30: ...itial O Meter 1 O Meter 2 O Meter 3 O back to the beginning Press DISP repeatedly to show the selected level meter IF Filter Intermediate frequency filter Auto Initial Increases the tuner selectivity to reduce interference noises between the stations Stereo effect will also be lost Wide Subject to the interference noises from adjacent stations but sound quality will not be degraded and remaining t...

Страница 31: ... this receiver High PWR Initial Volume 00 Volume 50 Low PWR Volume 00 Volume 30 Select this if the maximum power of the speaker is less than 50 W to prevent them from damaging the speaker Off 4 Deactivates the built in amplifier Color Sel Color selection Initial AllSource You can select your favorite display color for each source or for all sources 33 Color Set Red Green Blue You can create your o...

Страница 32: ...when you turn on the headlights Go to step 6 Off Cancels Go to step 6 On Always dims the display Go to step 6 Time Set Set the timer for dimmer Go to step 4 4 Enter the Time Set screen 5 Adjust the dimmer time 1 Set the dimmer start time 2 Set the dimmer end time 6 Finish the procedure EN32 37_KD AR860 J f indd 32 EN32 37_KD AR860 J f indd 32 12 17 04 5 42 42 PM 12 17 04 5 42 42 PM ...

Страница 33: ...ces 2 Depends on the Ext Input setting see page 31 3 Only for KD AR860 4 Appears only when SIRIUS radio is connected 4 Select the color Every 5 O Aqua O Sky O Sea O Leaves O Grass O Apple O Rose O Amber O Honey O Violet O Grape O Pale O User 6 O back to the beginning 5 The color changes every 2 seconds 6 The user edited colors Day Color and NightColor will be applied see page 34 for details 5 Repe...

Страница 34: ...re Creating your own color User You can create your own colors Day Color and NightColor 1 Enter the PSM menu see page 5 2 Select Color Set 3 Select Day Color or NightColor Ex When Day Color is selected 4 Select the primary colors Red Green or Blue EN32 37_KD AR860 J f indd 34 EN32 37_KD AR860 J f indd 34 12 17 04 5 42 44 PM 12 17 04 5 42 44 PM ...

Страница 35: ...requencies Up to 10 characters up to 30 station frequencies including both FM and AM CDs CD CH 1 Up to 32 characters up to 30 discs External components EXT IN or LINE IN 2 Up to 8 characters 1 You cannot assign a title to a CD Text or an MP3 WMA disc 2 Only for KD AR860 1 Select the source For FM AM tuner Select a station For a CD in this receiver Insert a CD For CDs in the CD changer Select CD CH...

Страница 36: ...aching the control panel Before detaching the control panel be sure to turn off the power Attaching the control panel Changing the control panel angle The control panel changes its angle as follows When using the remote controller Caution Do not insert your finger behind the control panel EN32 37_KD AR860 J f indd 36 EN32 37_KD AR860 J f indd 36 12 17 04 5 42 45 PM 12 17 04 5 42 45 PM ...

Страница 37: ...D LH810 You can connect an external component to the CD changer jack on the rear using the Line Input Adapter KS U57 not supplied Before operating the external component select the external input correctly see page 31 For connection see Installation Connection Manual separate volume For KD AR860 LINE IN For selecting the external component connected to the LINE IN plugs EXT IN For selecting the ex...

Страница 38: ...nels Updating XX Completed appears and no sound can be heard Update takes a few minutes to complete Do not press any button or perform any operation until updating has been completed Before operating your SIRIUS radio For connection see Installation Connection Manual separate volume Refer also to the Instructions supplied with your SIRIUS radio Changes every 20 of update is completed ex 20 40 60 B...

Страница 39: ...rticular category SPORTS ENTERTAINMENT etc allows you to enjoy only the channels from the selected category Holding these buttons can display the category list see page 41 Select a channel for listening Holding these buttons changes the channels rapidly When changing the category or channel invalid and unsubscribed channels are skipped automatically EN38 45_KD AR860 J f indd 39 EN38 45_KD AR860 J ...

Страница 40: ...US you can move to the lists of the other SIRIUS bands by pressing 4 7 Store the channel You can also add skip the Preset Channel List following the procedure of Selecting your favorite from the list on pages 41 and 42 Listening to a user channel 1 2 Holding this button can directly select the Preset Channel List see step 6 on left column 3 Perform steps 3 to 6 on left column to enter the Preset C...

Страница 41: ...istening to a channel To select a channel 1 2 You can move to the other lists by pressing 4 5 Selecting your favorite from the list While displaying the channel list or preset list see page 40 and left column 1 Enter the list information mode You will hear a beep sound before proceeding 2 If no operation is done within 5 seconds list information mode is canceled Channel list Channel name Channel l...

Страница 42: ...d channel in a category select ALL category before performing the above procedure To change the display information while 3 Select an item Ex To select a favorite song You can move to the other lists by pressing 4 Skipping channels While displaying the channel list see pages 40 and 41 Ex To skip listed item 6 You cannot skip the preset channel CH184 1 2 Select a channel you want to skip You can mo...

Страница 43: ...isc by the edges Do not touch its recording surface When storing a disc into its case gently insert the disc around the center holder with the printed surface facing up Make sure to store discs into the cases after use Center holder Warped disc Sticker Sticker residue Disc Stick on label Do not use the following discs To keep discs clean A dirty disc may not play correctly If a disc does become di...

Страница 44: ...ommended General This receiver has been designed to reproduce CDs CD Texts and CD Rs Recordable CD RWs Rewritable in audio CD CD DA MP3 and WMA format When a disc has been loaded selecting CD for the playback source starts playback When a track or folder whose number is greater than 99 is selected the icon before the number goes off to show its assigned 3 digits number Inserting a disc When a disc...

Страница 45: ... kHz for WMA Disc format ISO 9660 Level 1 Level 2 Romeo Joliet Windows long file name The maximum number of characters for file folder names vary among the disc format used includes 4 extension characters mp3 or wma ISO 9660 Level 1 up to 12 characters ISO 9660 Level 2 up to 31 characters Romeo up to 128 72 characters Joliet up to 64 36 characters Windows long file name up to 128 72 characters The...

Страница 46: ...ion of 30 frames About 4 minutes for an animation of 90 frames If a disc inserted does not include any jll and jla files beeps sound when you try to operate the downloading procedure If you try to store a 31st image for picture screen Picture Full appears and you cannot start downloading Delete unwanted files before downloading If the total frame number of an animation downloaded exceeds the follo...

Страница 47: ...tations manually Static noise while listening to the radio The antenna is not connected firmly Connect the antenna firmly Disc playback CD R CD RW cannot be played back Tracks on the CD R CD RW cannot be skipped CD R CD RW is not finalized Insert a finalized CD R CD RW Finalize the CD R CD RW with the component which you used for recording Disc cannot be ejected Disc is locked Unlock the disc see ...

Страница 48: ...ip to another track or change the disc Do not add the extension code mp3 or wma to non MP3 or WMA tracks Elapsed playing time is not correct This sometimes occurs during play This is caused by how the tracks are recorded on the disc Not Support appears and track skips Tracks are not encoded in an appropriate format Copy protected WMA tracks cannot be played back Skip to the next track No Music app...

Страница 49: ...ion for Pict No Picture No Movie or No Slide is shown as the selectable item No files are downloaded yet Select an image only after downloading the appropriate files in memory CD changer No Magazine flashes on the display No magazine is loaded in the CD changer Insert the magazine No Disc flashes on the display No disc is in the magazine Insert disc into the magazine Disc is inserted upside down I...

Страница 50: ...s display No broadcast on the selected channel Select another channel or continue listening to the previous channel Skipped Channel appears when presetting a channel The channel is set to be skipped Add the channel again see page 42 No Name appears or scrolls on the display No text information for the selected channel No sound can be heard Channels Updating XX Completed appears on the display The ...

Страница 51: ...O AMPLIFIER SECTION Power Output 20 W RMS 4 Channels at 4 Ω and 1 THD N Signal to Noise Ratio 80 dBA reference 1 W into 4 Ω Load Impedance 4 Ω 4 Ω to 8 Ω allowance Equalizer Control Range Low 12 dB 60 Hz 80 Hz 100 Hz 120 Hz Mid 12 dB Fix High 12 dB 8 kHz 10 kHz 12 kHz 15 kHz Frequency Response 40 Hz to 20 000 Hz Line In Level Impedance KD AR860 1 5 V 20 kΩ load Line Out Level Impedance KD AR860 5 ...

Страница 52: ...la de lugar Aumente la separación entre el equipo y el aparato receptor Enchufe el equipo a una toma de corriente situada en un circuito distinto del aparato receptor Consulte a su distribuidor o a un técnico experto en radio televisión IMPORTANTE PARA PRODUCTOS LÁSER 1 PRODUCTO LÁSER CLASE 1 2 PRECAUCIÓN No abra la tapa superior En el interior de la unidad no hay piezas que pueda reparar el usuar...

Страница 53: ...os archivos 24 Borrando los archivos 25 Activando los archivos descargados 27 Configuraciones generales PSM 28 Procedimiento básico 28 Seleccionando el modo de atenuador de luz 32 Cambiando el color de la pantalla 33 Otras funciones principales 35 Asignación de títulos a las fuentes 35 Cambiando el ángulo del panel de control 36 Desmontaje del panel de control 36 Operaciones del componente externo...

Страница 54: ...nte Las siguientes marcas se utilizan para indicar Operaciones del reproductor de CD incorporado Operaciones del cambiador de CD externo Cómo expulsar el disco por la fuerza Si el disco no puede ser reconocido por el receptor o no puede ser expulsado expúlselo de la siguiente manera 1 2 Si esto no funciona intente reposicionar su receptor Tenga cuidado de no dejar caer el disco al ser expulsado Pr...

Страница 55: ...enú MODE Para volver a la pantalla MENU pulse MENU 4 Siga las instrucciones de la pantalla Cómo cambiar el patrón de visualización Ej Cuando se selecciona el sintonizador como fuente Patrón de visualización de la fuente Medidores de nivel de audio Patrón de visualización del reloj La pantalla gráfica aparece sólo después de descargar un archivo consulte las páginas 23 27 Si la fuente actual es SIR...

Страница 56: ... 7 Botón 0 expulsión 8 Botón SOURCE 9 Botón OK p Botón de reinicialización q Botón abajo w Sensor remoto NO exponga el sensor remoto a una luz potente luz solar directa o iluminación artificial e Botón MENU r Botón DISP visualizar t Botón BACK y Botón liberación del panel de control u Botón BAND SP02 07_KD AR860 J f indd 6 SP02 07_KD AR860 J f indd 6 12 15 04 12 03 02 PM 12 15 04 12 03 02 PM ...

Страница 57: ...reajustadas Cambia las categorías para SIRIUS Cambia las carpetas MP3 WMA 4 Botones VOL volumen Ajusta el nivel de volumen 5 Botones numéricos Selecciona la emisora preajustada si los pulsa o lo almacena si lo pulsa y mantiene pulsado Selecciona los canales preajustados mientras escucha la radio SIRIUS o almacena un canal si lo pulsa y mantiene pulsado Selecciona las pistas mientras reproduce CDs ...

Страница 58: ...en Para mostrar el medidor de nivel consulte la página 30 Ajuste el sonido según se desee Consulte las páginas 19 a 22 Para disminuir el volumen en un instante ATT Para restablecer el sonido púlselo otra vez Para apagar la unidad Procedimientos iniciales Operaciones básicas SP08 13_KD AR860 J f indd 8 SP08 13_KD AR860 J f indd 8 12 15 04 12 05 18 PM 12 15 04 12 05 18 PM ...

Страница 59: ...á apagada Cancelación de las demostraciones en pantalla Si no se efectúa ninguna operación durante unos 20 segundos se iniciará la demostración en pantalla Inicial Demo consulte la página 28 1 Acceda al menú PSM consulte la página 5 2 Seleccione Off Asegúrese de que Demo Link esté visualizado en la pantalla De lo contrario pulse 5 o 3 Salga del ajuste Para activar la demostración en pantalla En el...

Страница 60: ...eseadas Ÿ Comience la búsqueda de la emisora La búsqueda se interrumpe cuando se recibe una emisora Para detener la búsqueda presione nuevamente el mismo botón Operaciones de la radio Para escuchar la radio Indicación del reloj SP08 13_KD AR860 J f indd 10 SP08 13_KD AR860 J f indd 10 12 15 04 12 05 21 PM 12 15 04 12 05 21 PM ...

Страница 61: ...f en el paso 3 Cómo almacenar emisoras en la memoria Se pueden preajustar seis emisoras para cada banda Preajuste automático de emisoras FM SSM Memoria secuencial de las emisoras más fuertes 1 2 Seleccione la banda FM FM1 FM3 en la que desea almacenar 3 Acceda al menú MODE consulte la página 5 4 Seleccione SSM 5 Las emisoras FM locales con las señales más intensas serán exploradas y almacenadas au...

Страница 62: ... el número de preajuste 4 de la banda FM1 1 2 3 Mientras mantiene pulsado 5 aparecerá también la lista de emisoras preajustadas consulte el paso 7 de abajo 4 Acceda al menú MODE consulte la página 5 5 Seleccione List 6 7 Seleccione un número de preajuste Si la banda actual es FM podrá desplazarase a las listas de otras bandas FM pulsando 4 SP08 13_KD AR860 J f indd 12 SP08 13_KD AR860 J f indd 12 ...

Страница 63: ...a su posición anterior púlselo otra vez Indicación del reloj Número total de pistas Nombre de la pista 3 Nombre del disco 3 Número de la pista actual Número total de carpetas Número de la carpeta actual Número de la pista actual Nombre de la carpeta 2 Nombre de la pista 2 Número total de pistas Tipo de archivo 1 Indicación del reloj Tiempo de reproducción transcurrido Acerca de los discos MP3 y WM...

Страница 64: ...son compatibles con discos MP3 No podrá utilizar los cambiadores de CD de la serie KD MK con este receptor La información de texto del disco grabada en el CD Text se puede visualizar cuando se ha conectado un cambiador de CD compatible con CD Text JVC No podrá controlar ni reproducir ningún disco WMA en el cambiador de CD Todas las pistas de los discos insertados en el cargador se reproducirán rep...

Страница 65: ...iscos consulte la columna siguiente Si mantiene pulsado estos botones se podrá visualizar la lista de carpetas consulte la página 16 Otras funciones principales Selección de un disco carpeta pista de la lista 1 Acceda al menú MODE consulte la página 5 2 Seleccione List 3 Selectcione el tipo de lista Disc 1 Folder 2 o File 2 1 Se puede seleccionar sólo cuando la fuente es CD CH 2 Aparece sólo si el...

Страница 66: ...a de archivos Podrá desplazarse a otras listas pulsando 4 5 Para iniciar la reproducción Cuando utiliza el control remoto Para seleccionar directamente un disco en el cambiador de CD Para seleccionar directamente una pista de un CD de audio o un CD Text Para seleccionar directamente una carpeta de un disco MP3 WMA Para seleccionar un número del 1 6 Para seleccionar un número del 7 1 12 6 Es necesa...

Страница 67: ... detalles consulte la tabla de la página 18 4 Finalice el procedimiento Prohibición de la expulsión del disco Podrá bloquear un disco en la ranura de carga 1 2 Seleccione No Eject Parpadea No Eject y el disco no puede ser expulsado Para cancelar la prohibición Reputa el mismo procedimiento y pulse OK en el paso 2 tras comprobar que Eject OK esté seleccionado resaltado Parpadea Eject OK Continúa SP...

Страница 68: ...oduciendo Folder 1 Todas las pistas de la carpeta actual Se ilumina mientras se está reproduciendo Disc 2 Todas las pistas del disco actual Se ilumina mientras se está reproduciendo Off Se cancela Reproducción aleatoria Ej Cuando se selecciona Disc Random mientras se reproduce un disco MP3 en el receptor Modo Reproduce aleatoriamente Folder 1 Todas las pistas de la carpeta actual después las pista...

Страница 69: ...onado Ajustes del sonido Ajuste del menú de selección del sonido básico SEL Configure la opción de ajuste seleccionada A Fad Bal 1 Para ajustar el balance de salida de los altavoces entre los altavoces delanteros y traseros Delantero a Trasero 2 Para ajustar el balance de salida de los altavoces entre los altavoces izquierdos y derechos Izquierdo a Derecho 3 Continúa SP14 19_KD AR860 J f indd 19 S...

Страница 70: ...iadas al subwoofer 2 Ajusta el nivel de salida del subwoofer 0 mín a 8 máx 3 C VolAdjust Para ajustar el nivel de entrada de cada fuente excepto FM Aústelo de manera que el nivel de entrada corresponda con el nivel de sonido FM 5 mín a 5 máx D Sonoridad Para ajustar la sonoridad y producir un sonido bien equilibrado a bajos niveles de volumen On Off Salga del ajuste SP20 25_KD AR860 J f indd 20 SP...

Страница 71: ...disponibles Flat Ningún modo de sonido aplicado Hard Rock R B Rhythm Blues Pop Jazz Dance Country Reggae Classic User 1 User 2 User 3 1 Acceda al menú EQ consulte la página 5 2 Seleccione un modo de sonido Ej Cuando se selecciona Flat 3 Salga del ajuste Cómo almacenar sus propios modos de sonido Podrá ajustar el modo de sonido y guardar sus ajustes en la memoria 1 Acceda al menú EQ consulte la pág...

Страница 72: ...01 Q 1 0 03 15kHz Pop 02 120Hz Q 0 5 01 Q 1 0 02 10kHz Jazz 03 80Hz Q 0 5 00 Q 1 0 03 10kHz Dance 04 60Hz Q 0 75 02 Q 1 85 01 8kHz Country 02 60Hz Q 1 0 00 Q 1 0 02 12kHz Reggae 03 60Hz Q 0 5 02 Q 1 0 02 12kHz Classic 01 80Hz Q 0 5 00 Q 1 0 03 10kHz C Seleccione unancho de banda Indicación Valores preajustados Low Bajo Mid Mid High Alto Nivel 06 mín a 06 máx 06 mín a 06 máx 06 mín a 06 máx Frecuen...

Страница 73: ...o descargue un archivo mientras conduce No desconecte la llave de encendido del automóvil mientras está descargando o borrando un archivo No desmonte el panel de control mientras está descargando o borrando un archivo Si lo hiciese la descarga o el borrado del archivo no se efectuará correctamente Antes de iniciar el siguiente procedimiento prepare un CD R que incluya imágenes fijas fotos y animac...

Страница 74: ...talla de apertura Para descargar borrar la animación 30 fotogramas como máximo que se visualizará después de encender el receptor Ending Pantalla de cierre Para descargar borrar la animación 30 fotogramas como máximo que se visualizará antes que se apague el receptor Descargando imágenes o una animación Se tarda bastante tiempo en descargar una animación Para los detalles consulte la página 46 Par...

Страница 75: ...epita el paso 4 Para descargar más imágenes de otra carpeta pulse BACK A continuación repita los pasos 3 y 4 6 Salga del ajuste Borrando los archivos Borrando la animación y las imágenes almacenadas 1 En el paso de la página 23 seleccione Delete 2 Seleccione el tipo de pantalla Picture Movie Opening o Ending 3 Ej Cuando se selecciona Picture 4 Para borrar las imágenes almacenadas 1 SP20 25_KD AR86...

Страница 76: ...lete 2 3 Cuando se borran todos los archivos vuelve a aparecer el menú PICT 4 Salga del ajuste Para borrar todas las imágenes y animaciones almacenadas Para borrar todas las imágenes almacenadas 1 En el paso de la página 23 seleccione Delete 2 Seleccione Picture 3 4 Seleccione All Delete 5 SP26 31_KD AR860 J f indd 26 SP26 31_KD AR860 J f indd 26 12 15 04 12 17 15 PM 12 15 04 12 17 15 PM ...

Страница 77: ...e editó y almacenó en Slide se activan y muestran secuencialmente Vaya al paso 6 5 Seleccione un archivo 6 Finalice el procedimiento Activando los archivos descargados 1 Acceda al menú PSM consulte la página 5 2 Seleccione PICT 3 Si no hay imágenes fijas ni animaciones descargadas aparecerá No Picture No Movie o No Slide SP26 31_KD AR860 J f indd 27 SP26 31_KD AR860 J f indd 27 12 15 04 12 17 18 P...

Страница 78: ...una pista MP3 WMA 13 46 Off Se cancela Aparecen los gráficos si no se realiza ninguna operación durante unos 20 segundos Pict Imágenes Podrá activar la pantalla gráfica utilizando ya sea vídeo o imagen 27 Picture Inicial Se activa una de sus imágenes fijas editadas y almacenadas en Picture Movie Se activa su animación editada y almacenada en Movie Slideshow Se activan y se muestran secuencialmente...

Страница 79: ...splazamiento cuando no se pueda visualizar simultáneamente toda la información del texto Once Inctial Se desplaza una sola vez Auto El desplazamiento se repite a intervalos de 5 segundos Off Se cancela Manteniendo pulsado DISP durante más de un segundo se podrá desplazar la pantalla independientemente del ajuste Dimmer Modo atenuador de luz Auto Inicial Al encender los faros la pantalla se oscurec...

Страница 80: ...cial O Meter 1 O Meter 2 O Meter 3 O vuelta al comienzo Pulse repetidamente DISP para mostrar el medidor de nivel seleccionado IF Filter Filtro de frecuencias intermedias Auto Inicial Aumenta la selectividad del sintonizador para reducir los ruidos parásitos entre las emisoras Se pierde el efecto estereofónico Wide Se encuentra sujeto a interferencias de las emisoras adyacentes pero la calidad del...

Страница 81: ...biar el nivel máximo de volumen de este receptor High PWR Initial Volume 00 Volume 50 Low PWR Volume 00 Volume 30 Selecciónelo si la potencia máxima del altavoz es de menos de 50 W con el fin de evitar posibles daños en el altavoz Off 4 Desactiva el amplificador incorporado Color Sel Selección del color Inicial AllSource Podrá seleccionar su color de visualización favorito para cada fuente o para ...

Страница 82: ...al paso 6 Off Se cancela Vaya al paso 6 On La pantalla siempre se oscurece Vaya al paso 6 Time Set Programa el temporizador para el atenuador de luz Vaya al paso 4 4 Acceda a la pantalla Time Set ajuste del tiempo 5 Ajuste el tiempo del atenuador de luz 1 Ajuste la hora de inicio del atenuador de luz 2 Ajuste la hora de fin del atenuador de luz 6 Finalice el procedimiento SP32 37_KD AR860 J f indd...

Страница 83: ...epende del ajuste Ext Input consulte lapágina 31 3 Sólo para KD AR860 4 Aparece sólo al conectar la radio SIRIUS 4 Seleccione el color Every 5 O Aqua O Sky O Sea O Leaves O Grass O Apple O Rose O Amber O Honey O Violet O Grape O Pale O User 6 O vuelta al comienzo 5 El color cambia cada 2 segundos 6 Se aplicarán los colores editados por el usuario Day Color y NightColor para los detalles consulte l...

Страница 84: ... Usuario Podrá crear sus propios colores Day Color color de día y NightColor color de noche 1 Acceda al menú PSM consulte la página 5 2 Seleccione Color Set 3 Seleccione Day Color o NightColor Ej Cuando se selecciona Day Color 4 Seleccione el color primario Red rojo Green verde o Blue azul SP32 37_KD AR860 J f indd 34 SP32 37_KD AR860 J f indd 34 12 15 04 12 18 48 PM 12 15 04 12 18 48 PM ...

Страница 85: ...misoras Hasta 10 caracteres hasta 30 frecuencias de emisoras incluyendo FM y AM CDs CD CH 1 Hasta 32 caracteres hasta 30 discos Componentes externos EXT IN o LINE IN 2 Hasta 8 caracteres 1 No podrá asignar título a un CD Text ni a un disco MP3 WMA 2 Sólo para KD AR860 1 Seleccione la fuente Para el sintonizador FM AM Seleccione una emisora Para un CD de este receptor Inserte un CD Para los CDs del...

Страница 86: ...ol Antes de desmontar el panel de control asegúrese de desconectar la alimentación Fijación del panel de control Cambiando el ángulo del panel de control El ángulo del panel de control cambia de la siguiente manera Cuando se utiliza el control remoto Precaución No introduzca su dedo debajo del panel de control SP32 37_KD AR860 J f indd 36 SP32 37_KD AR860 J f indd 36 12 15 04 12 18 49 PM 12 15 04 ...

Страница 87: ...onectar un componente externo a la toma del cambiador de CD de la parte trasera utilizando el Adaptador de entrada de línea KS U57 no suministrado Antes de hacer funcionar el componente externo seleccione correctamente la entrada externa consulte la página 31 Para la conexión consulte el Manual de instalación conexión volumen separado Para KD AR860 LINE IN Para seleccionar el componene externo con...

Страница 88: ... La actualización tarda algunos minutos en finalizar No pulse ningún botón ni realice una operación hasta que finalice la actualización Antes de hacer funcionar su radio SIRIUS Para la conexión consulte el Manual de instalación conexión volumen separado Consulte también el Manual de instrucciones entregado con su radio SIRIUS Cambia cada vez que finaliza un 20 de actualización ej 20 40 60 Para pod...

Страница 89: ...pecífica SPORTS ENTERTAINMENT etc le permitirá escuchar solamente de los canales de la categoría seleccionada Mantenga pulsado este botón para visualizar la lista de categorías consulte la página 41 Seleccione el canal de audición Mantenga pulsado este botón para que los canales cambien rápidamente Cuando cambie de categorías o canales los canales inválidos y no suscritos se omiten automáticamente...

Страница 90: ...drá desplazarase a las listas de otras bandas SIRIUS pulsando 4 7 Almacene el canal También podrá añadir omitir la lista de canales preferidos siguiendo el procedimiento de Selección del canal preferido de la lista de las páginas 41 y 42 Cómo escuchar un canal de usuario 1 2 Si mantiene pulsado este botón podrá seleccionar directamente la lista de canales preajustados consulte el paso 6 la columna...

Страница 91: ...leccionar un canal 1 2 Podrá desplazarse a otras listas pulsando 4 5 Selección del canal preferido de la lista Mientras se visualiza la lista de canales o la lista de preajustes consulte la página 40 y la columna izquierda 1 Acceda al modo de información de lisa Se escuchará un pitido antes de continuar 2 Si no se efectúa ninguna operación dentro del lapso de 5 segundos el modo de información de l...

Страница 92: ...de la categoría seleccione la categoría ALL antes de realizar el procedimiento anterior Para cambiar la información en pantalla mientras escucha un canal 3 Seleccione una opción Ej Para seleccionar la canción preferida Podrá ir a otras listas pulsando 4 Omisión de canales Mientras se visualiza la lista de canales consulte las páginas 40 y 41 Ej Para omitir la opción 6 de la lista No podrá omitir e...

Страница 93: ...cie de grabación Cuando guarde un disco en su estuche insértelo suavemente alrededor del sujetador central con la superficie impresa hacia arriba Asegúrese de guardar los discos en sus estuches después del uso Disco alabeado Pegatina Restos de pegatina Disco Rótulo autoadhesivo No utilice los siguientes discos Para mantener los discos limpios Un disco sucio podría no reproducirse correctamente Si ...

Страница 94: ...General Este receptor ha sido diseñado para reproducir discos CDs CD Texts y CD Rs Grabables CD RWs Reescribibles en formato de audio CD CD DA MP3 y WMA Si se ha cargado un disco se empezará a reproducir en cuanto se seleccione CD como fuente de reproducción Al seleccionar una pista o carpeta que tenga un número mayor que 99 el icono que precede al número se apaga para mostrar el número de 3 dígit...

Страница 95: ...4 1 kHz 32 kHz para WMA Formato del disco ISO 9660 Level 1 Level 2 Romeo Joliet nombre de archivo largo de Windows El número máximo de caracteres para los nombres de archivo carpeta varía según el formato de disco usado incluye extensión de 4 caracteres mp3 o wma ISO 9660 Level 1 hasta 12 caracteres ISO 9660 Level 2 hasta 31 caracteres Romeo hasta 128 72 caracteres Joliet hasta 64 36 caracteres No...

Страница 96: ... fotogramas Aproximadamente 4 minutos para una animación de 90 fotogramas Si el disco insertado no incluye ningún archivo jll ni jla sonarán pitidos cuando intente realizar el procedimiento de descarga Cuando intente almacenar la imagen 31 para la pantalla de imagen aàrecerá Picture Full y no podrá iniciar la descarga Borre los archivos innecesarios antes de iniciar la descarga Si el número total ...

Страница 97: ...entras se escucha la radio La antena no está firmemente conectada Conecte firmemente la antena Reproducción del disco No se puede reproducir el CD R CD RW No se pueden saltar las pistas del CD R CD RW El CD R CD RW no está finalizado Inserte un CD R CD RW finalizado Finalice el CD R CD RW con el componente utilizado para la grabación El disco no puede ser expulsado El disco está bloqueado Desbloqu...

Страница 98: ...sta o cambie el disco No añada el código de extensión mp3 o wma a pistas que no sean MP3 o WMA El tiempo de reproducción transcurrido no escorrecto Esto sucede a veces durante la reproducción Esto depende de cómo fueron grabadas las pistas en el disco Aparece Not Support y se omite la pista Las pistas no están codificadas en el formato apropiado No se pueden reproducir pistas WMA protegidas contra...

Страница 99: ...e No Movie o No Slide se visualizan como opción seleccionable Los archivos aún no han sido descargados Seleccione una imagen sólo después de descargar los archivos apropiados en la memoria No Magazine parpadea en la pantalla No hay ningún cargador en el cambiador de CD Inserte el cargador Cambiador de CD No Disc parpadea en la pantalla No hay disco en el cargador Inserte el disco en el cargador El...

Страница 100: ...al seleccionado Seleccione otro canal o continúe escuchando el canal anterior Aparece Skipped Channel al preajustar un canal Este canal está ajustado para omitirse Vuelva a añadir el canal consulte la página 42 Aparece o se desplaza No Name en la pantalla No hay información de texto para el canal seleccionado No se escucha ningún sonido Aparece Channels Updating XX Completed Actualización de canal...

Страница 101: ...na SECCIÓN DEL AMPLIFICADOR DE AUDIO Salida de potencia 20 W RMS 4 canales a 4 Ω y 1 THD N Relación señal a ruido 80 dBA referencia 1 W en 4 Ω Impedancia de carga 4 Ω tolerancia de 4 Ω a 8 Ω Gama de control del ecualizador Baja 12 dB 60 Hz 80 Hz 100 Hz 120 Hz Mediana 12 dB Fijo Alta 12 dB 8 kHz 10 kHz 12 kHz 15 kHz Respuesta de frecuencias 40 Hz a 20 000 Hz Nivel impedancia salida línea KD AR860 1...

Страница 102: ...été mis hors service Évitez toute exposition directe au rayon Comment réinitialiser votre appareil Cette procédure réinitialise le micro ordinateur Vos ajustements préréglés sont aussi effacés Avertissement Si vous souhaitez opérer l appareil pendant que vous conduisez assurez vous de bien regarder devant vous afin de ne pas causer un accident de la circulation Attention Si la température à l inté...

Страница 103: ...fichiers 25 Mise en service des fichiers téléchargés 27 Réglages généraux PSM 28 Procédure de base 28 Sélection du mode de gradateur 32 Changement de la couleur de l affichage 33 Autres fonctions principale 35 Affectation de titres aux sources 35 Changement de l angle du panneau de commande 36 Retrait du panneau de commande 36 Utilisation d un appareil extérieur 37 Lecture d un appareil extérieur ...

Страница 104: ...rques suivantes sont utilisée pour indiquer Utilisation du lecteur CD intégré Utilisation du changeur de CD extérieur Comment forcer l éjection d un disque Si un disque ne peut pas être reconnu ou ne peut pas être éjecté par l autoradio forcez l éjection de la façon suivante 1 2 Si cela ne fonctionne pas essayez de réinitialiser l autoradio Faites attention de ne pas faire tomber le disque quand i...

Страница 105: ... choisi Pour revenir à l écran MENU appuyez sur MENU 4 Suivez les instructions qui apparaissent sur l écran Comment changer le modèle d affichage Ex Quand le tuner est choisi comme source Affichage de la source Indicateurs de niveau sonore Affichage de l horloge Graphic sreen apparaît uniquement après que vous avez transféré un fichier référez vous aux pages 23 à 27 Si la source actuelle est SIRIU...

Страница 106: ... Touche SOURCE 9 Touche OK p Bouton de réinitialisation q Touche bas w Capteur de télécommande N EXPOSEZ PAS le capteur de télécommande à une forte lumière lumière directe du soleil ou éclairage artificiel e Touche MENU r Touche DISP affichage t Touche BACK y Touche libération du panneau de commande u Touche BAND FR02 07_KD AR860 J f indd 6 FR02 07_KD AR860 J f indd 6 12 15 04 12 40 03 PM 12 15 04...

Страница 107: ...ories pour SIRIUS Change le dossier MP3 WMA 4 Tocuhes VOL volume Ajuste le niveau de volume 5 Touches numériques Appuyez sur ces touches pour choisir une station préréglée ou maintenez les pressées pour mémoriser une station Appuyez sur ces touches pressées pour choisir les canaux préréglés lors de l écoute de la radio SIRIUS ou maintenez les pressées pour mémoriser un canal Choisit les plages lor...

Страница 108: ...le volume Pour afficher le niveau sonore voir page 30 Ajustez le son comme vous le souhaitez Voir les pages 19 22 Pour couper le volume momentanément ATT Pour rétablir le son appuyez de nouveau sur la touche Pour mettre l appareil hors tension Pour commencer Opérations de base FR08 13_KD AR860 J f indd 8 FR08 13_KD AR860 J f indd 8 12 15 04 12 42 30 PM 12 15 04 12 42 30 PM ...

Страница 109: ...nulation de la démonstration des affichages Si aucune opération n est effectuée pendant environ 20 secondes la démonstration des affichages démarre Réglage initial Demo voir page 28 1 Affichez le menu PSM voir page 5 2 Choisissez Off Assurez vous que Demo Link apparaît sur l affichage Sinon appuyez sur 5 ou 3 Quittez le réglage Pour mettre en service la démonstration des affichages À l étape 2 ci ...

Страница 110: ...e Fonctionnement de la radio Ÿ Démarrez la recherche d une station Quand une station est reçue la recherche s arrête Pour arrêter la recherche appuyez de nouveau sur la même touche Écoute de la radio Affichage de l horloge FR08 13_KD AR860 J f indd 10 FR08 13_KD AR860 J f indd 10 12 15 04 12 42 32 PM 12 15 04 12 42 32 PM ...

Страница 111: ...ons Vous pouvez prérégler six stations pour chaque bande Préréglage automatique des stations FM SSM Mémorisation automatique séquentielle des stations puissantes 1 2 Choisissez la bande FM FM1 FM3 pour laquelle vous souhaitez mémoriser les stations 3 Affichez le menu MODE voir page 5 4 Choisissez SSM 5 Les stations FM locale avec les signaux les plus forts sont recherchées et mémorisées automatiqu...

Страница 112: ...Hz sur le numéro de préréglage 4 de la bande FM1 1 2 3 La liste des stations préréglées apparaît aussi en maintenant pressées 5 voir l étape 7 ci dessous 4 Affichez le menu MODE voir page 5 5 Choisissez List 6 7 Choisissez un numéro de préréglage Si la bande actuelle est FM vous pouvez afficher les listes des autres bandes FM en appuyant sur 4 FR08 13_KD AR860 J f indd 12 FR08 13_KD AR860 J f indd...

Страница 113: ...eur WMA s allume en fonction du type du fichier détecté 2 Le nom de l album interprète avec l indicateur et le titre de la plage avec l indicateur apparaissent si ID3 Tag est réglé sur On voir page 30 3 Apparaît uniquement pour les CD Text et les CD si un nom a été attribué ou enregistré No Name apparaît un instant si aucun nom n est enregistré ou n a été attribué à un CD audio Pour arrêter la lec...

Страница 114: ...es MP3 et vous ne pourrez pas les reproduire Vous ne pouvez pas utiliser les changeurs de CD de la série KD MK avec cet autoradio Les textes d information enregistrés sur les CD Text peuvent être affichés quand un changeur de CD JVC compatible CD Text est connecté Vous ne pouvez pas commander et reproduire de disque WMA dans le changeur de CD Toutes les plages des disques en place dans le magasin ...

Страница 115: ...ut afficher la liste des disques voir la colonne suivante Maintenir pressées ces touches peut afficher la liste des dossiers voir la page 16 Autres fonctions principale Sélection d un disque dossier plage sur la liste 1 Affichez le menu MODE voir page 5 2 Choisissez List 3 Choisissez le type de liste Disc 1 Folder 2 ou File 2 1 Peut être choisi uniquement quand la source est CD CH 2 Apparaît uniqu...

Страница 116: ...te des fichiers apparaît Vous pouvez passer aux autres listes en appuyant sur 4 5 Pour démarrer la lecture Lors de l utilisation de la télécommande Pour choisir directement un disque dans le changeur de CD Pour choisir directement une plage d un CD audio ou d un CD Text Pour choisir directement un dossier d un disque MP3 WMA Pour choisir un numéro compris entre 1 et 6 Pour choisir un numéro compri...

Страница 117: ...u de la page 18 4 Terminez la procédure À suivre Interdiction de l éjection du disque Vous pouvez verrouiller un disque dans la fente d insertion 1 2 Choisissez No Eject No Eject clignote et le disque ne peut pas être éjecté Pour annuler l interdiction Répétez la même procédure appuyez sur OK à l étape 2 après vous être assurez que Eject OK est choisi mis en valeur Eject OK clignote FR14 19_KD AR8...

Страница 118: ...ure s allume Folder 1 Tous les fichiers du dossier actuel Lors de la lecture s allume Disc 2 Toutes les plages du disque actuel Lors de la lecture s allume Off Annulation Lecture aléatoire Ex Quand Disc Random est choisi pendant la lecture d un disque MP3 dans l autoradio Mode Reproduit dans un ordre aléatoire Folder 1 Toutes les plages du dossier actuel puis les plages du dossier suivant etc Lors...

Страница 119: ...trer dans le menu choisi Ajustements sonores Réglage du menu de sélection du son de base SEL Ajustez le réglage choisi A Fad Bal 1 Pour ajuster la balance de sortie des enceintes entre les enceintes avant et arrière Avant à Arrière 2 Pour ajuster la balance de sortie des enceintes entre les enceintes gauche et droite Gauche à Droite 3 À suivre FR14 19_KD AR860 J f indd 19 FR14 19_KD AR860 J f indd...

Страница 120: ...s du caisson de grave 2 Ajuste le niveau de sortie du caisson de grave 0 min à 8 max 3 C VolAdjust Pour ajuster le niveau d entrée de chaque source sauf FM Ajustez ce réglage de façon que le niveau d entrée corresponde au niveau sonore FM 5 min à 5 max D Loudness Pour ajuster le loudness afin de produire un son bien équilibré aux faibles niveaux de volume On Off Quittez le réglage FR20 25_KD AR860...

Страница 121: ...ssez un mode sonore Ex Quand Flat est choisi 3 Quittez le réglage Mémorisation de vos propres modes sonores Vous pouvez ajuster un mode sonore et mémoriser votre propre ajustement 1 Affichez le menu EQ voir page 5 2 Choisissez un mode sonore voir l étape 2 ci dessus 3 4 Choisissez les éléments sonores à ajuster A Ajustez le niveau d amélioration 1 Choisissez Low Mid ou High 2 Ajustez le niveau 06 ...

Страница 122: ... 15kHz Pop 02 120Hz Q 0 5 01 Q 1 0 02 10kHz Jazz 03 80Hz Q 0 5 00 Q 1 0 03 10kHz Dance 04 60Hz Q 0 75 02 Q 1 85 01 8kHz Country 02 60Hz Q 1 0 00 Q 1 0 02 12kHz Reggae 03 60Hz Q 0 5 02 Q 1 0 02 12kHz Classic 01 80Hz Q 0 5 00 Q 1 0 03 10kHz C Choisissez une bande passante Indication Valeurs préréglées Low Mid High Niveau 06 min à 06 max 06 min à 06 max 06 min à 06 max Fréquence centrale 60Hz 80Hz 10...

Страница 123: ...onduisant Ne tournez pas la clé de contact de la voiture pendant le transfert ou la suppression d un fichier Ne détachez pas le panneau de commande lors du transfert ou de la suppression d un fichier Sinon le transfert ou la suppression du fichier ne sera pas faite correctement Avant de démarrer la procédure suivante préparez un CD R comprenant des images fixes et des animations séquences vidéo Av...

Страница 124: ... d ouverture Pour transférer supprimer une animation 30 images maximum qui apparaîtra après la mise sous tension de l autoradio Ending Écran de fermeture Pour transférer supprimer un animation 30 images maximum qui apparaîtra avant la mise hors tension de l autoradio Transfert d images ou d une animation Il faut un certain temps pour transférer une animation Pour les détails référez vous à la page...

Страница 125: ...ossier répétez l étape 4 Pour télécharger plus d images à partir d un autre dossier appuyez sur BACK Puis répétez les étapes 3 et 4 6 Quittez le réglage Suppression de fichiers Suppression des images et des animations mémorisées 1 À l étape de la page 23 choisissez Delete 2 Choisissez le type d affichage Picture Movie Opening ou Ending 3 Ex Quand Picture est choisi 4 Pour supprimer les images mémo...

Страница 126: ...te 2 3 Quand tous les fichiers sont supprimés le menu PICT apparaît de nouveau 4 Quittez le réglage Suppression de toutes les images et animations mémorisées Pour supprimer toutes les images mémorisées 1 À l étape de la page 23 choisissez Delete 2 Choisissez Picture 3 4 Choisissez All Delete 5 FR26 31_KD AR860 J f indd 26 FR26 31_KD AR860 J f indd 26 12 15 04 12 55 00 PM 12 15 04 12 55 00 PM ...

Страница 127: ...s mémorisées dans Slide sont activées et affichées les unes après les autres Allez à l étape 6 5 Choisissez un fichier 6 Terminez la procédure Mise en service des fichiers téléchargés 1 Affichez le menu PSM voir page 5 2 Choisissez PICT 3 Si aucune image ou animation n a été transférée No Picture No Movie ou No Slide apparaît FR26 31_KD AR860 J f indd 27 FR26 31_KD AR860 J f indd 27 12 15 04 12 55...

Страница 128: ...ues apparaissent si aucune opération n est effectuée pendant environ 20 secondes Pict Pictures Vous pouvez activer l écran graphique en utilisant une séquence vidéo ou une image 27 Picture Réglage initial Une de vos propres images fixes mémorisée dans Picture est activée Movie Votre propre animation mémorisée dans Movie est activée Slideshow Vous propres images fixes mémorisées dans Slide sont act...

Страница 129: ...tre en entier en défilant s il ne peut pas apparaître en une fois Once Réglage initial Défileune fois seulement Auto Défile de façon répétée par intervalle de 5 secondes Off Annulation Maintenir DISP pressée pendant plus d une seconde permet de faire défiler l affichage quel que soit ce réglage Dimmer Mode de gradateur Auto Réglage initial Assombrit l affichage quand vous allumez les feux de la vo...

Страница 130: ...e la source Réglage initial O Meter 1 O Meter 2 O Meter 3 O retour au début Appuyez répétitivement sur DISP pour afficher l indicateur de niveau choisi IF Filter Filtre de fréquence intermédiaire Auto Réglage initial Augmente la sélectivité du tuner pour réduire les interférences entre les stations L effet stéréo est aussi perdu Wide Il y a des interférences des stations adjacentes mais la qualité...

Страница 131: ...niveau de volume maximum de cet autoradio High PWR Réglage initial Volume 00 Volume 50 Low PWR Volume 00 Volume 30 Choisissez ce réglage si la puissance maximum des enceintes est inférieure à 50 W pour éviter tout dommage Off 4 Met hors service l amplificateur intégré Color Sel Sélection de la couleur Réglage initial AllSource Vous pouvez choisir votre couleur d affichage préférée pour chaque sour...

Страница 132: ...ture Allez à l étape 6 Off Annulation Allez à l étape 6 On L affichage est toujours assombri Allez à l étape 6 Time Set Réglez la minuterie pour le gradateur Allez à l étape 4 4 Affichez l écran de réglage de la minuterie 5 Ajustez l intervalle d utilisation du gradateur 1 Réglez l heure de début du gradateur 2 Réglez l heure de fin du gradateur 6 Terminez la procédure FR32 37_KD AR860 J f indd 32...

Страница 133: ...s 2 Dépend du réglage Ext Input voir page 31 3 Uniquement pour le KD AR860 4 Apparaît uniquement quand la radio SIRIUS est connectée 4 Choisissez la couleur Every 5 O Aqua O Sky O Sea O Leaves O Grass O Apple O Rose O Amber O Honey O Violet O Grape O Pale O User 6 O retour au début 5 La couleur change toutes les 2 secondes 6 La couleur définie par l utilisateur Day Color et NightColor est utilisée...

Страница 134: ...ion de votre propre couleur User Vous pouvez créer vos propres couleurs Day Color et NightColor 1 Affichez le menu PSM voir page 5 2 Choisissez Color Set 3 Choisissez Day Color ou NightColor Ex Quand Day Color est choisi 4 Choisissez la couleur primaire Red Green ou Blue FR32 37_KD AR860 J f indd 34 FR32 37_KD AR860 J f indd 34 12 15 04 12 56 20 PM 12 15 04 12 56 20 PM ...

Страница 135: ...uences des stations 10 caractères maximum pour 30 fréquences de station maximum pour FM et AM CDs CD CH 1 32 caractères maximum pour 30 des disques Appareils extérieurs EXT IN ou LINE IN 2 8 caractères maximum 1 Vous ne pouvez pas affecter un titre à un CD Text ou à un disque MP3 WMA 2 Uniquement pour le KD AR860 1 Choisissez la source Pour le tuner FM AM Choisissez une station Pour un CD dans cet...

Страница 136: ...mmande Avant de retirer le panneau de commande assurez vous de mettre l appareil hors tension Fixation du panneau de commande Changement de l angle du panneau de commande L angle du panneau de commande change de la façon suivante Lors de l utilisation de la télécommande Attention N insérez vos doigts derrière le panneau de commande FR32 37_KD AR860 J f indd 36 FR32 37_KD AR860 J f indd 36 12 15 04...

Страница 137: ...D AR860 KD LH810 Vous pouvez connecter un appareil extérieur à la prise du changeur de CD à l arrière de l appareil en utilisant l adaptateur d entrée de ligne KS U57 non fourni Avant d utiliser l appareil extérieur choisissez correctement l entrée extérieure voir page 31 Pour les connexions référez vous au Manuel d installation raccordement volume séparé Pour KD AR860 LINE IN Pour choisir l appar...

Страница 138: ...s Updating XX Completed apparaît et aucun son n est entendu La mise à jour dure plusieurs minutes N appuyez sur aucune touche ni ne réalisez aucune opération avant que la mise à jour soit terminée Avant d utiliser votre radio SIRIUS Pour les connexions référez vous au Manuel d installation raccordement volume séparé Référez vous aussi aux Manuel d instructions fournies avec votre radio SIRIUS Chan...

Страница 139: ...articulière SPORTS ENTERTAINMENT etc vous permet de profiter uniquement des canaux de la catégorie choisie Maintenir cette touche pressée permet d afficher la liste des catégories voir page 41 Choisissez le canal à écouter Maintenir cette touche pressée permet de changer les canaux rapidement Lorsqu une catégorie ou un canal est changé les canaux invalides ou non inscrits sont sautés automatiqueme...

Страница 140: ... afficher les listes des autres bandes SIRIUS en appuyant sur 4 7 Mémorisez le canal Vous pouvez aussi ajouter sauter la liste des canaux préréglés en suivant la procédure de Sélection de vos favoris à partir de la liste aux pages 41 et 42 Écoute d un canal de l utilisateur 1 2 Maintenir cette touche pressée permet de choisir directement la liste des canaux préréglés voir l étape 6 de la colonne d...

Страница 141: ...l Pour choisir un canal 1 2 Vous pouvez passer aux autres listes en appuyant sur 4 5 Sélection de votre canal préféré à partir de la liste Lors de l affichage de la liste des canaux ou de la liste des préréglages voir la page 40 et la colonne de gauche 1 Entrez en mode d affichage de liste Vous entendez un bip sonore avant l opération 2 Si aucune opération n est réalisée avant 5 secondes le mode d...

Страница 142: ...sez la catégorie ALL avant de réaliser la procédure ci dessus Pour changer l information sur l affichage lors de l écoute d un canal 3 Choisissez un élément Ex Pour choisir votre morceau préféré Vous pouvez passer aux autres listes en appuyant sur 4 Saut de canal Lorsque la liste des canaux est affichée voir pages 40 et 41 Ex Pour sauter l élément 6 choisi Vous ne pouvez pas sauter le canal prérég...

Страница 143: ... Ne touchez pas la surface enregistrée Pour remettre un disque dans sa boîte insérez le délicatement sur le support central avec la surface imprimée dirigée vers le haut Conservez les disques dans leur boîte quand vous ne les utilisez pas Support central Disque gondolé Autocollant Reste d étiquette Disque Étiquette autocollante N utilisez pas les disques suivants Pour garder les disques propres Un...

Страница 144: ... face non DVD d un disque à double face sur cet appareil n est pas recommandée Généralités Cet autoradio est conçu pour reproduire les CD CD Text et les CD R enregistrables CD RW réinscriptibles au format CD audio CD DA MP3 et WMA Si un disque est en place choisir CD comme source de lecture démarre la lecture automatiquement Si une plage ou un dossier dont le nombre est supérieur à 99 est choisie ...

Страница 145: ...8 kHz 44 1 kHz 32 kHz pour WMA Format du disque ISO 9660 Level 1 Level 2 Romeo Joliet nom de fichier long Windows Le nombre maximum de caractères pour les noms de fichier dossier vraie selon le format du disque utilisé et inclus les 4 caractères de l extension mp3 ou wma ISO 9660 Level 1 12 caractères maximum ISO 9660 Level 2 31 caractères maximum Romeo 128 72 caractères maximum Joliet 64 36 carac...

Страница 146: ...e animation de 30 images Environ 4 minutes pour une animation de 90 images Si le disque en place ne contient aucun fichier jll et jla un bip sonore retentit quand vous essayez de réaliser la procédure de transfert Si vous essayez de mémoriser une 31e image pour l écran d image Picture Full apparaît et vous ne pouvez pas démarrer le transfert Supprimez des fichiers inutiles avant le transfert Si le...

Страница 147: ...nuellement Bruit statique pendant l écoute de la radio L antenne n est pas connectée solidement Connectez l antenne solidement Lecture de disque Le CD R CD RW ne peut pas être reproduit Les plages sur les le CD R CD RW ne peuvent pas être sautées Le CD R CD RW n est pas finalisé Insérez un CD R CD RW finalisé Finalisez le CD R CD RW avec l appareil que vous avez utilisé pour l enregistrement Le di...

Страница 148: ...ez pas le code d extension mp3 ou wma à des plages non MP3 ou WMA La durée de lecture écoulée n est pascorrecte Cela se produit quelque fois pendant la lecture C est causé par la façon don t les plages ont été enregistrées sur le disque Not Support apparaît et la plage est sautée Les plages ne sont pas codées au format approprié Les plages WMA protégées contre la copie ne peuvent pas être reprodui...

Страница 149: ...e animation pour Pict No Picture No Movie ou No Slide peuvent être choisi sur l affichage Aucun fichier n a encore été transféré Choisissez une image uniquement après avoir transféré les fichiers appropriés en mémoire Changeur de CD No Magazine clignote sur l affichage Il n y a pas de magasin dans le changeur de CD Insérez le magasin No Disc clignote sur l affichage Il n y a pas de disque dans le ...

Страница 150: ...al Le canal est réglé pour être sauté Ajoutez de nouveau le canal voir page 42 No Name apparaît ou défile sur l affichage Il n y a pas de texte d information pour le canal choisi Aucun son n est entendu Channels Updating XX Completed Mise à jour des canaux terminée à XX défile sur l affichage L autoradio est en train de mettre à jour les informations des canaux et cela prend plusieurs minutes La r...

Страница 151: ... proche SECTION DE L AMPLIFICATEUR AUDIO Puissance de sortie 20 W RMS 4 canaux à 4 Ω et avec 1 THD N Rapport signal sur bruit 80 dBA référence 1 W pour 4 Ω Impédance de charge 4 Ω 4 Ω à 8 Ω admissible Plage de commande de l égaliseur Low 12 dB 60 Hz 80 Hz 100 Hz 120 Hz Mid 12 dB Fixe High 12 dB 8 kHz 10 kHz 12 kHz 15 kHz Réponse en fréquence 40 Hz à 20 000 Hz Niveau d entrée de ligne Impédance KD ...

Страница 152: ...page of How to reset your unit Still having trouble USA ONLY Call 1 800 252 5722 http www jvc com We can help you 2004 Victor Company of Japan Limited EN SP FR 1204DTSMDTJEIN Rear_KD AR860 J f indd 2 Rear_KD AR860 J f indd 2 12 17 04 5 43 49 PM 12 17 04 5 43 49 PM ...

Страница 153: ...Instructions CD RECEIVER KD AR860 KD LH810 ...

Отзывы: