background image

- 20 -

from the TV to the VCR to automatically start

and end the recording. It is not necessary to

set the timer on the VCR.

• When your VCR is not T-V LINK compatible,

you also need to set the VCR timer settings

to match the TV timer settings.

• The recording may not start and stop at ex-

actly the right times for some programmes.

It is recommended that you allow some lee-

way when setting the recording times.

• Provided that the days and times are not the

same, you can set up to ten timer settings.

• When subtitles are ON, the subtitles dis-

played with the broadcast will be recorded.

When you do not want to record the sub-

titles, you need to turn OFF the subtitles set-

tings beforehand ( See “Displaying the sub-

titles” on 

Page19

).

• During DTV timer recording, you are unable

to view  the DTV menu.

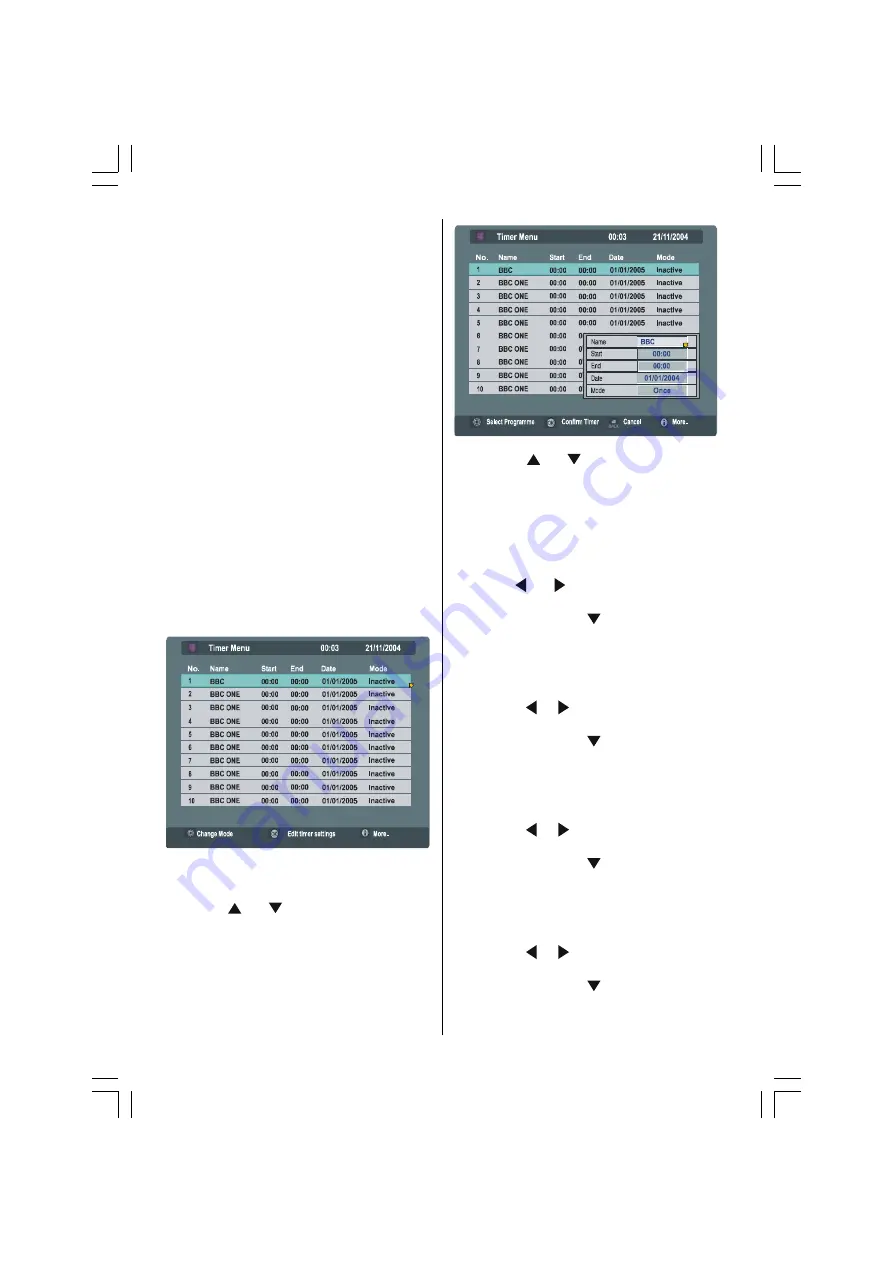
1. Choose Timers and press the OK

button.

The TIMER MENU appears.

7+5((

• When the BACK button is pressed, the previ-

ous screen is returned to.

2. Press “ ” / “ ”  buttons to choose

the timer number, and then press the OK

button.

The timer setting window appears.

e

f

7+5((

7+5((

3. Use the “ ” / “ ”  buttons, number

buttons and OK button to set the timer.

• When setting the start time and end time, in-

put 1200 for 12:00 PM, 1500 for 3:00 PM

and 0000 for 12:00 AM.

Name:

Use  the  “ ”  /  “ ”  buttons  to  choose  the

channel for which the timer is to be set.

Press the “ ” button.

Start:

Set the timer start time with the number but-

tons.
• When the “ ” / “ ” buttons are pressed, the

input position moves.

Press the “ ” button.

End:

Set the timer end time with the number but-

tons.
• When the “ ” / “ ” buttons are pressed, the

input position moves.

Press the “ ” button.

Date:

Set  the  date  for  the  timer  to  work  with  the

numbers.
• When the “ ” / “ ” buttons are pressed, the

input position moves.

Press the “ ” button.

ENG-20710W-17MB16P-1895UK-(LT-20DA7SK)-(TVAVOK)-10043997-5009XXXXX.p65

26.09.2006, 16:09

20

Содержание InteriArt LT-20DA7SK

Страница 1: ...R COMPANY OF JAPAN LIMITED 6 50081979 INSTRUCTIONS ENGLISH LT 20DA7SK INTEGRATED DIGITAL WIDE LCD PANEL TV Digital ideo roadcasting V B D V B Trade Mark of the DVB Digital Video Broadcasting Project 1991 to 1996 Number 4291 ...

Страница 2: ...ent Connections 41 Peripheral Equipment Connections 42 Antenna Connections 42 PC Input Typical Display Modes 43 Tips 44 Specifications 45 For your safety 2 Important Instruction 4 Where to install 5 Distance Recommendation 5 Important Information 6 Control Panel Buttons 7 Using the stand 8 Remote Control Buttons 9 Features 10 Getting Started 11 T V LINK 15 Basic Operations 16 Operating while watch...

Страница 3: ...er connect to a DC supply or any other power source DO ensure that the TV is not standing on the mains lead DO NOT cut off the mains plug from this equipment this incorporates a special Radio Inter ference Filter the removal of which will impair its performance Hot Moderate Climate Conditions This device is suitable for working in hot and moderate climate conditions IF IN DOUBT PLEASE CONSULTA COM...

Страница 4: ... garbage instead of recycle bin to reduce harmfull effects to the environment ABOVE ALL NEVER let anyone especially children push anything into holes slots or any other openings in the case this could result in a fatal electric shock NEVER guess or take chances with electrical equipment of any kind it is better to be safe than sorry To fully disconnect the TV switch off the mains socket and remove...

Страница 5: ...e colours of the wires in the mains lead of this appliance may not correspond with the coloured markings identifying the terminals in your plug proceed as follows The wire which is coloured blue must be connected to the terminal which is marked with the letter N or coloured black The wire which is coloured brown must be connected to the terminal which is marked with the letter L or coloured red No...

Страница 6: ... top stand are available for this television or and angled bracket which en ables the TV to be wall mounted The LCD display panels are manufactured using an extremely high level of precision tech nology however sometimes some parts of the screen may be missing picture elements or have luminous spots This is not a sign of a malfunction Make sure the TV is located in a position where it cannot be pu...

Страница 7: ...ed during normal operation or mis use of the product WARNING NEVER LEAVE A STATIONARY IMAGE ON THE SCREEN If stationary images generated by TELE TEXT CHANNEL IDENTIFICATION LOGOS COMPUTER DISPLAYS VIDEO GAMES ON SCREEN MENUS etc are left on the TV screen for any length of time they could be come permanently ingrained If you use your television to display com pletely still images or moving pictures...

Страница 8: ... of connectors and leads the back cover may not be easily fitted If the cover is left off this in no way infringes safety requirements 32 5 03 1 5 5 5 9 5 63 5 63 5 ENG 20710W 17MB16P 1895UK LT 20DA7SK TVAVOK 10043997 5009XXXXX p65 26 09 2006 16 09 7 ...

Страница 9: ... direction of the TV screen 10 backward and 5 forward Tilt the TV up and down While holding the bottom of the stand with one hand use your other hand to hold the middle of the top of the TV and slowly tilt the TV up and down ENG 20710W 17MB16P 1895UK LT 20DA7SK TVAVOK 10043997 5009XXXXX p65 26 09 2006 16 09 8 ...

Страница 10: ... Up button OK button Cursor Right button BACK Back button Volume buttons GUIDE button SUBTITLE button PC Control buttons Hyper Sound On Off button ZOOM Zoom button buttons IDTV VCR DVD Teletext Control buttons P buttons Cursor Down button Teletext button Cursor Left button TV DTV button Information Button T V Link in Program Menu Mute button ENG 20710W 17MB16P 1895UK LT 20DA7SK TVAVOK 10043997 500...

Страница 11: ...guage OSD Teletext Fastext 7 pages It is possible to connect headphone A P S Automatic programming system PLL Frequency Search All programmes can be named Forward or backward automatic tuning Sleep timer Child lock Auto Full Regular Panoramic 14 9 Zoom 16 9 Zoom 16 9 Zoom Subtitle modes Automatic sound mute when no transmission When no valid signal is detected after 5 minutes the TV switches itsel...

Страница 12: ...reduces replace the batteries with the correct type Do not combine a used old battery or a new one or mixed battery types Remove dead batteries immediately to prevent acid from leaking into the battery compartment Step 3 Removing the terminal cover There are connection terminals and a card socket behind the covers of the rear of the TV Remove the cover before connecting an antenna VCR DVD and othe...

Страница 13: ... with the screen facing downwards when you leave the handle and the stand Step 4 Connecting an aerial VCR and mains Please read the user manual of each device before connecting to ensure a correct setup It is necessary to connect aerial to watch TV Please see Peripheral Equipment Connections on page 39 for connections to other de vices DGDSWHU 5 RQQHFW WKH DHULDO WR 1 ENG 20710W 17MB16P 1895UK LT ...

Страница 14: ...pplies 100 240 V AC 50 Hz Step 5 Using the cable holder A cable holder which is used to keep the connection cables tidy is supplied Attach the cable holder to the hole on the back of the stand then gather together the connection cables and put them inside the holder 7 R 1 DGDSWHU 5 RQQHFW D YLGHR GHYLFH 9 5 7 7 ENG 20710W 17MB16P 1895UK LT 20DA7SK TVAVOK 10043997 5009XXXXX p65 26 09 2006 16 09 13 ...

Страница 15: ...below information will be displayed on the screen 1 Press the OK button to start the auto matic search 35 LVW PSW 6WDUW DXWRPDWLF VHDUFK 2 The IDTV will automatically tune to the UHF transmission channels 21 to 68 looking for digital terrestrial TV broadcasts and display ing the names of channels found This pro cess will take about five minutes To cancel searching you can press MENU button at any ...

Страница 16: ...ans a JVC video cassette recorder with the T V LINK logo or with one of the following logos For details see your VCR instruction manual Q LINK A trademark of Panasonic Corpo ration Data Logic A trademark of Metz Corpora tion Easy Link A trademark of Philips Corpora tion Megalogic A trademark of Grundig Corpo ration SMARTLINK A trademark of Sony Corpo ration Downloading data to VCR The VCR will aut...

Страница 17: ...o select the previ ous programme Switching input mode Pressing TV AV OK button will change the input mode Entering Main Menu Press MENU button to enter Main menu In the Main menu select submenu using or button and enter the sub menu using or TV AV OK or MENU button To learn the usage of the menus refer to the Menu System sections Operation with Remote Control The remote control of your TV is desig...

Страница 18: ... prompted at the bottom right of the screen OVER AIR DOWNLOAD Over Air Download OAD To ensure that your IDTV always has the most up to date information Please ensure that after use it is set to its standby mode At 3AM each day the IDTV automatically searches for any new information which may be broadcast and will download this to your IDTV automatically This operation will normally take approxi ma...

Страница 19: ...nnel 2 Press OK button The selected channel is displayed Programme Reminders You can easily set the reminder so that you will not miss the programme you want to watch 1 Press or buttons to choose the channel 2 Press the Red and Green buttons to change the time and Yellow and Blue but tons to change the date 3 Press or buttons and then or buttons to choose the programme you want to watch 4 Press th...

Страница 20: ...ition to digital teletext broadcasting at the same time as normal broadcasting there are also channels with just digital tele text broadcasting The aspect ratio when watching a channel with just digital teletext broadcasting is the same as the aspect ratio of the picture watched previously When you press the Text button while subtitles are on the subtitles are turned off When you press the Text bu...

Страница 21: ... Choose Timers and press the OK button The TIMER MENU appears 7 5 When the BACK button is pressed the previ ous screen is returned to 2 Press buttons to choose the timer number and then press the OK button The timer setting window appears e f 7 5 7 5 3 Use the buttons number buttons and OK button to set the timer When setting the start time and end time in put 1200 for 12 00 PM 1500 for 3 00 PM an...

Страница 22: ...efore you record the programme There are some T V LINK compatible re cording device that will not correctly receive the Direct Rec command from the TV If the recording device does not operate when the recording start time is reached it means VCR is not receiving the Direct Rec command from the TV In this case follow the instructions of When recording on a T V LINK incompatible VCR While the timer ...

Страница 23: ... be broadcast at the same time Choose the subtitle you want to display when watching these broadcasts 1 Press the buttons and choose Subtitle 2 Press the buttons and choose a subtitle language that appears when the SUBTITLE button is pressed Favourite Mode Enable disable the Edit PR List Favourites settings 1 Press the buttons and choose Favourite Mode 2 Press the buttons and choose ON or OFF On T...

Страница 24: ... PIN code Choose Enter PIN code to change the PIN code for the Edit PR List menu s Lock The PIN code factory setting how it is set when you purchase the television is 0000 1 Press the buttons and choose Enter PIN code and press the OK button 2 Input the current PIN code When you are making this setting for the first time input 0000 When a PIN code has already been set enter the correct PIN code Th...

Страница 25: ...he OK button The chosen channel is deleted If you do not want to delete the chosen channel choose NO and press the OK button Perform Installation see page 25 to re register a channel that you have deleted Editing a channel name 1 Press the buttons and choose Edit Name on the bar at the bottom of the screen 2 Press the buttons and choose the channel to be edited and then press the OK button The EDI...

Страница 26: ...t broadcast frequencies you wish to reinstate a channel previously deleted from the chan nel list or you want to watch new channels which have started broadcasting Display the DTV Menu and using the or buttons highlight the Installation line and press OK to display the Installation Menu The Installation menu appears You can either select Factory Settings effec tively resetting the receiver to its ...

Страница 27: ...d press OK A warning screen is displayed in case of acci dental operation UH RX VXUH RX ZDQW WR GHOHWH WKH 35 OLVW DQG UHVHW DOO VHWWLQJV HV 1R Highlight the YES button with the or key and press OK to erase all the channels and settings A message will be displayed on the screen 35 LVW PSW 6WDUW DXWRPDWLF VHDUFK 2 Press the OK button to start the automatic search When the automatic search has finis...

Страница 28: ...b menu In EXT 3 mode Main Menu appears as fol lows 0HQX 3LFWXUH 6RXQG HDWXUH QVWDOO 6RXUFH K 9 In DIGITAL TV mode DIGITAL will appear on the Main menu Install and Program do not appear Menu does not disappear automatically if it is left on the screen Press MENU button again to remove menu Picture Menu Press MENU button now you are in main menu In the Main menu select Picture using or button then e...

Страница 29: ...Maximum Note 1 At low signal level the changings on the Noise Reduction function are not effective when there is menu on the screen If the menu is removed the effect of this function is seen At normal broadcasting Noise Reduction changings are effective at once Note 2 At moving pictures while Noise Reduction is at maximum level some picture distortions may occur If Noise Reduc tion is set to mediu...

Страница 30: ... button select Balance Press button to change balance right ward Press button to change balance left ward Hyper Sound Using or button select Hyper Sound Pressing or button will turn on or off this feature Pseudo spatial effect can be turned on or off via the Hyper Sound item in the Sound menu or by remote control In Mono trans mission the left and right channels will be added at left channel and d...

Страница 31: ...can use this feature to prevent children turning the TV on off or changing programmes or adjustments etc without re mote control Using or button select Child Lock Press button to select Child Lock On or Off The Child Lock feature can be set On or Off by button When Off is selected there will be no difference in the operation of your TV When On is selected the TV can only be controlled by the remot...

Страница 32: ... search or button for back ward search If a signal is found or reaches to end of the band after searching press or buttons to continue search pro cess To stop the search process when you want press or buttons at any time Decoder EXT 2 You can use this mode to connect any de coder to your TV Press the or buttons to set it On or Off When you select Decoder EXT 2 On EXT 2 output will be chosen as TV ...

Страница 33: ...o VCR If you do not have a T V LINK compatible VCR select Cancel and press or OK button to exit the menu To give a channel name Name 1 Choose the channel you want to give a channel name 2 Press the RED button to enter the Name mode 3 Press or button to choose the position and press or button to choose each character of channel name 4 Press the RED button to store the channel name To cancel the Nam...

Страница 34: ...mber Programme Name or EXT they are displayed on the upper left of the screen The sound indicator is displayed with them too They are displayed after programme change for 3 seconds Sound Indicator The alternatives of the indicator are Mono Stereo Dual I and Dual II This indicator is displayed under the programme number in dicator on the screen 0RQR In Mono broadcast or in forced mono for stereo br...

Страница 35: ...size according to the picture aspect ratio Select the optimum one from the following ZOOM modes AUTO When a WSS Wide Screen Signalling sig nal which shows the aspect ratio of the pic ture is included in the broadcast signal or the signal from an external device the TV automatically changes the ZOOM mode to 16 9 ZOOM mode PANORAMIC or FULL mode according to the WSS signal When the AUTO mode does no...

Страница 36: ...connections Set your PC s resolution correctly before connecting to the TV See the table in page 43 for supported modes Use a D SUB cable to connect the TV s PC input to the computer s RGB output termi nal If you want to listen to the sound from the computer use an audio cable to connect the PC AUDIO IN to the computer s sound output terminal 3LQ 0LQL 6XE RQQHFWRU Tighten the screws of the Display...

Страница 37: ...ock Phase Depending on the resolution and scan fre quency that you input to the TV Set you may see a muddy or noisy picture on the screen In such a case you can use this item to get a clear picture by trial and error method Use or button to adjust the value PC Picture Menu In the Main menu select PC Picture using or button then enter the PC Picture menu by pressing or OK buttons Contrast Bright 1 ...

Страница 38: ...TAL op tions When PIP is displayed on the screen button allows you to switch sound between PC and selected PIP source No Signal and Out Of Range Detection PC mode In PC Mode as no menu is displayed in case that there is no PC input to the TV it is displayed an OSD message No input signal detected then the power lamp turns to orange and PC will switch to PC standby mode Press AV button digit button...

Страница 39: ...button once will reveal an swers on a quiz or games page Pressing button again will conceal the revealed answers To Stop Automatic Page Change The teletext page you have selected may contain more information than what is on the screen the rest of the information will be displayed after a period of time Press button to stop the automatic page change Press button again to allow the next page to be d...

Страница 40: ...ect the decoder to the VCR If not the T V LINK function may not work properly And then set the Decoder EXT 2 function for the channel to ON to unscramble a scrambled channel RGB mode If an equipment can output the RGB signals connect it to the EXT 1 or EXT 2 terminal EXT 2 S Mode If the equipment connected to your TV set supports S Video Y C output from Eurocon nector you can have a better picture...

Страница 41: ... connect to the EXT 4 terminal Connect your camera or camcorder at the back side of your TV Connect your equipment to the TV via VIDEO yellow AUDIO R red and AUDIO L white inputs You should connect the jacks to the input in the same colour Connect the decoder to the video recorder Some video recorders have a special euro connector for decoder Connect a eurocable to the euroconnector of your decode...

Страница 42: ... 1 17 11 7 7 1 3 1387 7 7 8 2 287 7 50 1 9 9 9 9 3E 3U RPSRQHQW XGLR Q 5 RPSRQHQW XGLR Q 6 9LGHR Q 9LGHR Q XGLR 5 XGLR XGLR 5 XGLR 6XEZRRIHU 2XW 5 6 27 3 21 ENG 20710W 17MB16P 1895UK LT 20DA7SK TVAVOK 10043997 5009XXXXX p65 26 09 2006 16 09 41 ...

Страница 43: ...ATELLITE RECEIVER VIDEO HEADPHONE AUDIO AntennaConnections 9 8 DQWHQQD 9 DQWHQQD 5RXQG RKP FRD LDO FDEOH 5RXQG RKP FRD LDO FDEOH ODW RKP WZLQ OHDG FDEOH 5HDU RI 79 5HDU RI 79 2XWGRRU QWHQQD RQQHFWLRQV ENG 20710W 17MB16P 1895UK LT 20DA7SK TVAVOK 10043997 5009XXXXX p65 26 09 2006 16 09 42 ...

Страница 44: ...f 30 69 KHz The following table is an illustration of some of the typical video display modes RUL RQWDO 9HUWLFDO RU N 9HU 0RGH UHTXHQF 5HVROXWLRQ The native resolution of the TFT LCD Panel is 1366 x 768 Therefore using Mode 15 is ad vised to get the best PC input display quality ENG 20710W 17MB16P 1895UK LT 20DA7SK TVAVOK 10043997 5009XXXXX p65 26 09 2006 16 09 43 ...

Страница 45: ...ontact customer services of your service provider if you are a subscriber Tips Can not turn the TV on Check that TV VCR DVD switch is set to TV position TV may go to stand by mode when you turn the TV on soon after you turn the TV off If you can turn the TV on again it is not a problem Can not turn the TV off Check that TV VCR DVD switch is set to TV position Care of the Screen Clean the screen wi...

Страница 46: ...dio L R and RGB inputs are available Video and Audio L R outputs are available T V LINK functions are available EXT 3 Terminal RCA connectors x 5 bottom of the cabinet Component video Pr Pb Y inputs and Audio L R inputs are available 625p 50Hz and 525p 60Hz signals are available EXT 4 Terminal RCA connectors x 3 side of the cabinet S VIDEO connector x 1 side of the cabinet Video input S VIDEO Y C ...

Отзывы: