background image

EN


13

Master Page: Right-Heading0

M4D3+DSC_Soft_04PhotoNavi.fm

Page 13

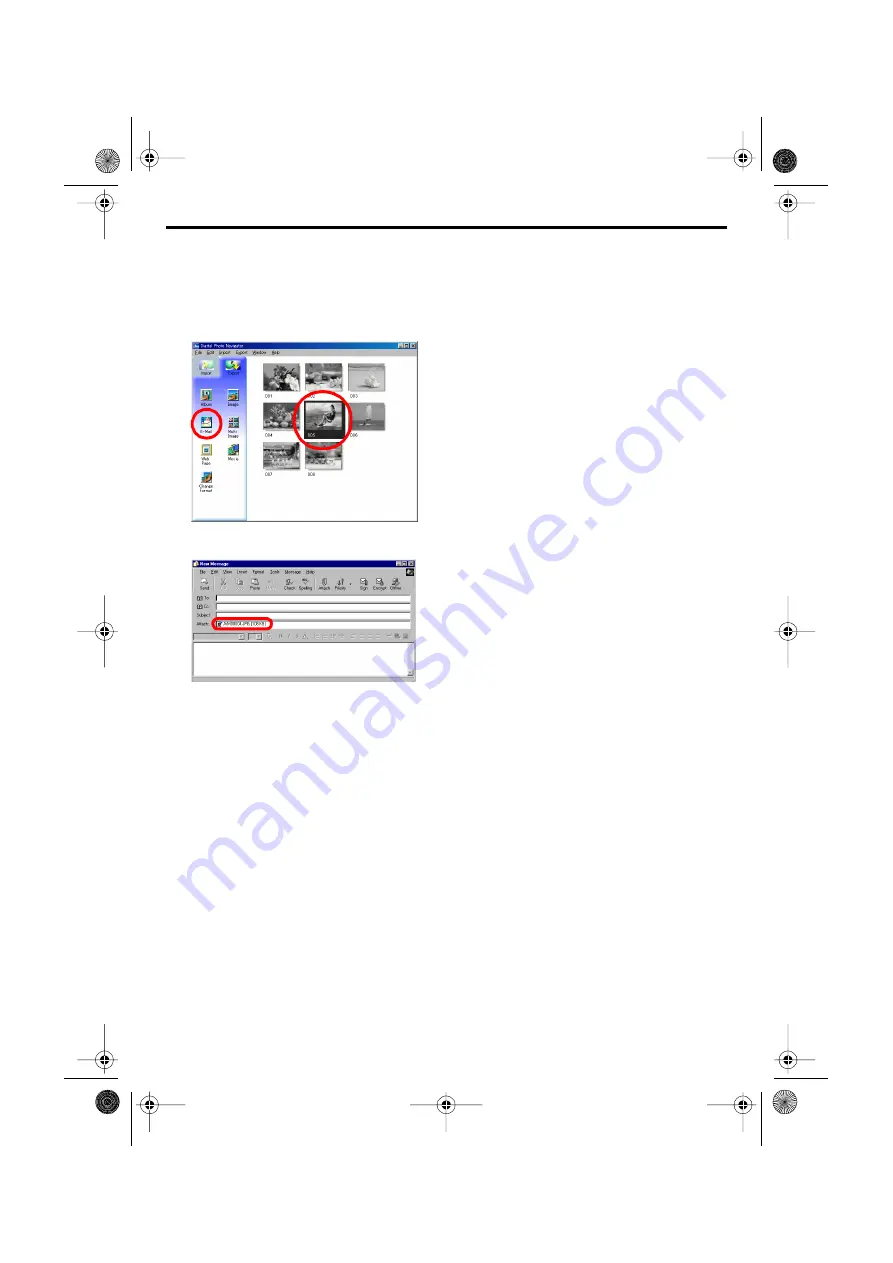
SENDING IMAGES FROM AN ALBUM IN E-MAIL

Still images in an album can be sent as an e-mail attachment.

Preparation: Before using the [E-Mail] function

If you use the Internet Explorer, be sure to use the version 5.5 or later.
When installing the Internet Explorer, select a typical set of components.

1

Click the still image that you want to send, and then click [E-Mail].

The new message window in your e-mail program appears, and the still image file is registered as an 
attachment.

NOTES:

Depending on an e-mail software, a new message window may not open when the [E-Mail] button is 
clicked.

Depending on an e-mail software, settings such as “Set as MAPI client” or “Used by MAPI application” are 
necessary.

The maximum number of messages that can be created at once is three.

M4D3+DSC_Soft.book  Page 13  Tuesday, December 16, 2003  2:08 PM

Содержание ImageMixer 1.7

Страница 1: ...LYT1282 001A Master Page Cover1 M4D3 DSC_Soft_01Cover fm Page 1 ENGLISH Digital Photo Navigator ImageMixer 1 7 INSTRUCTIONS M4D3 DSC_Soft book Page 1 Tuesday December 16 2003 2 08 PM ...

Страница 2: ...e size 16 Changing the picture quality etc 17 RETRIEVING STILL IMAGES FROM AN ALBUM 18 CREATING A LIST OF STILL IMAGES 19 CREATING A SLIDE SHOW OR AN ANIMATION 21 ImageMixer 1 7 22 IMAGEMIXER 1 7 22 Capabilities 22 Help 23 PIXELA User Support Center 23 CAPTURING VIDEO 24 Capturing video in real time 24 Capturing video from tape 27 MANAGING FILES 29 EDITING VIDEO 30 CREATING A VIDEO CD 32 Creating ...

Страница 3: ...rating procedures described in this manual Use only the provided CD ROM Never use any other CD ROM to run this software Do not attempt to modify this software Changes or modifications not approved by JVC could void user s authority to operate the equipment ATTENTION When connecting a USB cable or a DV cable to PC Only for D S C equipped models Never switch the VIDEO MEMORY DSC mode on the camcorde...

Страница 4: ... conference over the Internet 墌 pg 36 䡲 Loading files from a memory card through an adapter Only for users equipped with D S C Digital Still Camera features This section explains how to load images into the PC that does not have a USB connector 墌 pg 40 䡲 Troubleshooting The following symbols are used in this document NOTE Indicates problems that could occur while using these softwares phenomena th...

Страница 5: ...all of these problems with a PC By using a USB cable to connect a camcorder to a PC you can copy video clips from the camcorder to the PC You can then send the files to anyone as an e mail attachment Loading Still Images The Digital Photo Navigator software allows you to store and view still images in a photo album format Playing Back and Handling Images You can send still image files as an e mail...

Страница 6: ...lications virus checkers schedulers etc Turn off file and printer sharing 2 Click Import 3 Click Image The Open dialog box appears 4 Open the folder that contains the desired still images Select the folder of the still images copied to the PC and click Open The still image files appear in the window 5 Select the desired still image files and click Open The still images are added to the right hand ...

Страница 7: ...ation a message appears and asks if you want to register the association of the file extension name jia Then click Yes To exit Digital Photo Navigator refer to EXITING DIGITAL PHOTO NAVIGATOR See below EXITING DIGITAL PHOTO NAVIGATOR 1 Click the File menu and then click Exit If you have already saved an album a confirmation message appears Then go to step 2 If you have not saved an album after loa...

Страница 8: ... Export NOTES You can also open the album file by dragging and dropping it in the Digital Photo Navigator window If an album is currently open a confirmation message appears If you want to open the newly selected album instead of the one already opened click Yes If you have not saved the album already opened a confirmation message appears If you want to save the album click Yes If you do not want ...

Страница 9: ...of images in slide show fashion click the button in the Image Viewer window You can also move through the images manually in either direction by clicking the and buttons To adjust the speed of the slide show right click the Image Viewer window and then in the menu that appears click Slide show Setting Interval Time Set the length of the interval in seconds and then click OK NOTE The interval for a...

Страница 10: ...n enlargement reduction percentage indicated in the title bar of the window changes accordingly Other enlargement reduction functions In addition to adjusting the size of the image to the size of the window the display size of a still image can also be changed by the methods described below Each of these functions can be selected by right clicking the Image Viewer window Zoom Real Size Displays th...

Страница 11: ...l Images at once select them in advance You can also select all still images in the album Selecting still images continuously Click still images while holding down the Shift key If you click one still image while holding down the Shift key the images of smaller numbers are selected as well Selecting still images one by one Click still images while holding down the Ctrl key Selecting all of the sti...

Страница 12: ...d then click Copy in the Edit menu 2 Click the image that is located right after the insertion point To add the images at the end of the album click the blank space in the right hand side of the window 3 Click Paste in the Edit menu The copied still images are inserted right before the selected image NOTE You can delete copy or paste an image also by right clicking it Deleting unnecessary still im...

Страница 13: ...al set of components 1 Click the still image that you want to send and then click E Mail The new message window in your e mail program appears and the still image file is registered as an attachment NOTES Depending on an e mail software a new message window may not open when the E Mail button is clicked Depending on an e mail software settings such as Set as MAPI client or Used by MAPI application...

Страница 14: ...e still image hold down the Shift key or the Ctrl key while clicking the images To select all of the still images click Select All in the Edit menu 2 Click Web Page The Web Page dialog box appears 3 Set the following items when necessary Title This will be the title of the web page Font Color This specifies the color of the title text Back Color This specifies the background color of the web page ...

Страница 15: ...o enlarge it What Next You can also view an HTML file through the web browser by double clicking the HTML file You can upload the HTML file to your home page or save it on a CD R or some other media and distribute it Always handle HTML files and folders as a set Without its folder an HTML file cannot be viewed by a web browser NOTES For more details on how to create a home page consult your Intern...

Страница 16: ...the following items Expansion Reduction Set any desired image size in the Width and Height fields If the Keep aspect ratio check box is not selected off both Width and Height fields can be changed Generic Size Select the size from a list of generic sizes PDA Size This is an image size 160 x 160 that can be displayed on most PDAs 4 Click OK If you select more than one still image in step 1 a confir...

Страница 17: ... Correction DV This setting is not available Format You can select the file format of an image JPEG This is the format that is typically used on the Internet This format has a smaller file size BITMAP This is the standard Windows image format BMP Many applications can use this format JPEG Quality This setting is available when JPEG was selected in the Format field Moving the slider to the left mak...

Страница 18: ...u can change the image size and picture quality as desired 墌 pg 16 The Save As dialog box appears 4 Specify the location where you want to save the file enter the file name and then click Save The image file is saved If you select more than one still image in step 1 a confirmation message appears If you want to save all images with the same image format and their default name click Yes The Auto Sa...

Страница 19: ...i Image The Multi Image dialog box appears 3 Select the number of partitions Either 4 9 or 16 partitions may be selected 4 Click Back Color select the color for the overall background and then click OK 5 Change the positions of the still images as desired Deleting an image Right click the still image and then select Delete Adding an image Drag an image from the right hand side of the Digital Photo...

Страница 20: ...e the image format as desired 墌 pg 16 Then click OK At this point you can change the image size and picture quality as desired 墌 pg 16 The Save As dialog box appears 8 Specify the location where you want to save the file enter the file name and then click Save The still image list file is saved M4D3 DSC_Soft book Page 20 Tuesday December 16 2003 2 08 PM ...

Страница 21: ...imation which ever is desired For a slide show set the length of the interval in seconds For an animation set the number of displayed frames images per second 4 Set the following items when necessary Image Size Select the size of the movie file Compressor Select the type of compressor Back Color This item is used if the aspect ratio of the images is not 4 3 5 Click OK The Save As dialog box appear...

Страница 22: ...card Capturing audio from a microphone or CD ImageMixer can record audio from the PC s microphone Because the recording can be made while playing the video back at the same time it is easy to add audio that is in sync with previously recorded video ImageMixer can also add music from a CD as background music for your movie These features are not available when the camcorder and a Windows 98 PC are ...

Страница 23: ...bination with this software to hold a video conference over the Internet In order to conduct a video conference over the Internet with Windows NetMeeting or Windows Messenger you must register with MSN Messenger and Microsoft HotMail This manual only provides an overview of ImageMixer For more details refer to the help To display the help click the button located in the upper right corner of the I...

Страница 24: ...CTION GUIDE 3 Set the camcorder s VIDEO MEMORY Switch to MEMORY Only for D S C equipped models 4 Set the camcorder s Power Switch to A or M while pressing down the Lock Button located on the switch The camcorder is now on appears on the camcorder s LCD monitor If does not appear install USB Video Streaming driver Refer to Software Installation Windows and Software Installation Macintosh in SOFTWAR...

Страница 25: ...re button The capture operation begins 10 Click the Capture button again Once conversion ends the video file MPEG1 is registered in the album NOTE If the MPEG1 files cannot be converted to MPEG4 files with ImageMixer install Windows MediaTM Player version 7 or later Windows MediaTM Player can be loaded from Microsoft s web site http www microsoft com Input USB input USB Capture Video Information d...

Страница 26: ...s if the USB Video Streaming driver is not installed properly In this case refer to Updating Device Manager Windows in SOFTWARE INSTALLATION AND USB CONNECTION GUIDE On the information display panel or the file information dialog some information such as file created date may be incorrect Disconnecting the USB cable 1 Disconnect the USB cable 2 Set the camcorder s Power Switch to OFF The camcorder...

Страница 27: ...MEMORY Switch to VIDEO Only for D S C equipped models 2 Set the camcorder s Power Switch to PLAY while pressing down the Lock Button located on the switch The camcorder is now on 3 Click Start go to All Programs or Programs PIXELA ImageMixer and then click ImageMixer Ver 1 7 For Macintosh double click the ImageMixer icon on the PC ImageMixer starts up 4 Click the Input button The input mode screen...

Страница 28: ... same image appears on the PC screen 3 Click the Capture button The capture operation begins 4 Click the Capture button again Once conversion ends the video file MPEG1 is registered in the album NOTE If the MPEG1 files cannot be converted to MPEG4 files with ImageMixer install Windows MediaTM Player version 7 or later Windows MediaTM Player can be loaded from Microsoft s web site http www microsof...

Страница 29: ...mage button in step 1 of Copying video and perform steps 2 4 It is not possible to edit video keeping DV format Use other DV editing application software available If you capture video from a tape via an optional DV cable noise may appear depending on the type or the performance of the hardware In this case use the USB cable MANAGING FILES ImageMixer can group and search for files still images vid...

Страница 30: ...arranged at the bottom of the screen causes the editing window to appear The beginning ending of videos can be deleted and the volume can be adjusted The display time for still images can be adjusted Select video editing Material selection Edit Thumbnail Preview Create video Arrange thumbnails Apply scene change effects Arrange audio CONTINUED ON NEXT PAGE M4D3 DSC_Soft book Page 30 Tuesday Decemb...

Страница 31: ...t To check the results of editing click the Preview button Once editing is complete click the Create video button to save the final product Cropping editing Sound editing Cropping OK M4D3 DSC_Soft book Page 31 Tuesday December 16 2003 2 08 PM ...

Страница 32: ...o CD Follow the steps below to create a Video CD image file and then open it with ToastTM and create the Video CD Some CD R drives are incompatible For details please refer to the ImageMixer help 墌 pg 23 It is only possible to play back the created Video CD with the player which conform with Video CD standard Version 2 0 The image quality may be deteriorated when you create Video CD with video cap...

Страница 33: ...ppears 3 Insert a blank CD R disc in the CD R drive and click the Create button to create a Video CD Specify background and music Specify the menu screen style Style settings Button settings Title settings Preview Create Enter the title Move the Movie button registered video clips Enter the button name Set up Preview Create M4D3 DSC_Soft book Page 33 Tuesday December 16 2003 2 08 PM ...

Страница 34: ... 3 Set the camcorder s VIDEO MEMORY Switch to VIDEO Only for D S C equipped models 4 Set the camcorder s Power Switch to PLAY while pressing down the Lock Button located on the switch The camcorder is now on 5 On the ImageMixer screen click the Video CD Creation startup button The Video CD Creation screen appears 6 Select the drive and the speed for writing to the disc Be sure to set the writing s...

Страница 35: ...s automatically 9 Click Stop The writing process starts When the writing process ends a confirmation screen appears 10 Click Quit to exit Video CD Creation NOTE You can use a DV cable instead of a USB cable to create Video CD by clicking the Digital video camera input 1394 button before performing step 5 on page 34 However the capturing pauses every 20 minutes during the writing process with a DV ...

Страница 36: ...to A or M while pressing down the Lock Button located on the switch The camcorder is now on appears on the camcorder s LCD monitor If does not appear install USB Video Streaming driver Refer to Software Installation Windows in SOFTWARE INSTALLATION AND USB CONNECTION GUIDE NOTE The procedure is different when reading or writing a memory card Only for D S C equipped models 7 Click Start go to Setti...

Страница 37: ...y with whom you will videoconference You can now begin the videoconference if your friends respond The same environment is necessary for your friends NOTE Never turn the Power switch of a camcorder during video conference For details refer to the help for the MSN Messenger Service and NetMeeting Details on how to use NetMeeting are expected to be available on the JVC web site JVC web site http www...

Страница 38: ...dels 7 Set the camcorder s Power Switch to A or M while pressing down the Lock Button located on the switch The camcorder is now on appears on the camcorder s LCD monitor If does not appear install USB Video Streaming driver Refer to Software Installation Windows in SOFTWARE INSTALLATION AND USB CONNECTION GUIDE NOTE The procedure is different when reading or writing a memory card Only for D S C e...

Страница 39: ...clicks Agree NOTE Never turn the Power switch of a camcorder during video conference If the Image does not appear Upgrade to Windows Messenger 4 6 or later You can download the latest version of Windows Messenger from Microsoft s web site http www microsoft com Update your version of Windows XP Click Start and select Windows Update in All Programs For details refer to the Windows XP help or the Mi...

Страница 40: ...pter refer to the instructions provided with that adapter 1 Remove the memory card from the camcorder 2 Insert the memory card in the floppy disk adapter 3 Insert the floppy disk adapter into the floppy disk drive of the PC 4 Copy the necessary files from the floppy disk to the hard disk Floppy disk adapter CU VFSD50 For PCs that do not have a USB connector or which are running Windows 95 NT PC ca...

Страница 41: ...pace available in the drive in which Digital Photo Navigator is installed Still images have a mosaic appearance When a small image is loaded and enlarged it will take on a mosaic appearance 墌 pg 10 If an image is saved with a lower JPEG quality or if the format of the image is changed it will take on a mosaic appearance 墌 pg 17 The colors displayed on the PC are odd Images will not be displayed co...

Страница 42: ...B connector Cannot copy or save files Make sure that there is enough free space available in the drive where you are trying to copy or save a file Make sure that the drive where you are trying to copy or save a file is not write protected Make sure that a file with the same name does not already exist where you are trying to copy or save a file Either use a USB hub that has its own power supply or...

Страница 43: ...H ID COPYRIGHT 2004 VICTOR COMPANY OF JAPAN LTD Master Page Cover4 M4D3 DSC_Soft_07Cover4 fm Page 43 M4D3 D2 Digital Photo Navigator ImageMixer 1 7 M4D3 DSC_Soft book Page 43 Tuesday December 16 2003 2 08 PM ...

Отзывы: