JVC HR-S8009UM Скачать руководство пользователя страница 5

Page 5

July 23, 2002 11:44 am

    — 5 —

Basic Connections

A

Check contents

Make sure the package contains all of the accessories listed in 
“Specifications”(

pg. 16).

B

Situate VCR

Place the VCR on a stable, horizontal surface.

C

Connect VCR to TV

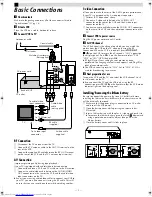
RF Connection

A

Disconnect the TV antenna from the TV.

B

Connect the TV antenna cable to the ANT. IN terminal on the 
rear of the VCR.

C

Connect the supplied RF cable between the RF OUT terminal  
on the rear of the VCR and the TV’s antenna input terminal.

AV Connection

(improves picture quality during tape playback.)
If your TV is equipped with audio/video input connectors

A

Connect the antenna, VCR and TV as shown in the illustration.

B

Connect an audio/video cable between the AUDIO/VIDEO 
OUT connectors on the rear of the VCR and the audio/video 
input connectors on the TV.

Even if you are using audio/video cables to connect your VCR to 
your TV, you must also connect it using the RF cable. This will 
ensure that you can record one show while watching another.

S-video Connection

(allows you to make the most of the S-VHS picture performance.)
If your TV is equipped with a S-video input connector

A

Perform “RF Connection” above.

B

Connect a S-video cable between the S VIDEO OUT 
connector on the rear of the VCR and the S-video input 
connector on the TV.

C

Connect an audio cable between the AUDIO OUT connectors 
on the rear of the VCR and the audio input connectors on the 
TV.

D

Connect VCR to power source

Plug the AC power cord into an AC outlet.

E

Set VCR channel

The VCR channel is the channel on which you can watch the 
picture from the VCR on the TV when only using the RF 
connection. When the VCR is turned off, press 

STOP/EJECT


(

0

) on the VCR for more than 5 seconds. “CH3” appears on 

the display panel. Press 

PR+/–

 on the Remote to select “CH3”, 

“CH4” or “CH–”(OFF), then press 

OK

.

If Plug&Play or Tuner setting has not previously been 
performed, the Language Select screen appears and Plug&Play 
takes place automatically.

The VCR channel is preset to “CH3”. Set to “CH4” if CH3 is 
used for broadcasting in your area.

F

Final preparation for use

Turn on the VCR and the TV, and select the VCR channel 3 or 4 
(or AV mode) on the TV.

If you connect the TV and the VCR only using the RF 
connection, press 

TV/VCR

 on the Remote so that the VCR mode 

indicator lights on the display panel.

Installing/Removing the lithium battery

Be sure to connect the power plug to an AC outlet first before 
installing the lithium battery; otherwise, the battery’s service life 
will be drastically shortened.

A

Make sure that the power plug is connected to an AC outlet 
and turn off the VCR power.

B

Open the battery cover while pressing the release tab as 
illustrated.

C

Insert a lithium battery with the plus (+) side up and push it in.

To remove the lithium battery, press the latch 

 downward 

using a pointed non-metallic object, then pull out the 
lithium battery.

D

Close the battery cover until it clicks in place.

S-VIDEO

RF cable
(supplied)

Back of VCR

Flat feeder

AC power cord

Audio/video 
cable
(not supplied)

To audio/video 
input connectors

Antenna or cable

Matching transformer

(not supplied)

Coaxial cable

AC outlet

To 75 

 terminal

TV

To S-video input 
connector

S-video cable 
(supplied)

S-VIDEO

+5-80(1IP3DJH7XHVGD\-XO\$0

Содержание HR-S8009UM

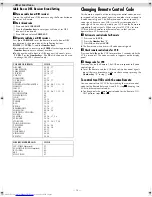
Страница 1: ... conversion plug provided depending on the type of your AC WALL outlet The rating plate and safety caution are on the rear of the unit IMPORTANT It may be unlawful to record or play back copyrighted material without the consent of the copyright owner CAUTION 䡲 When you are not using the VCR for a long period of time it is recommended that you disconnect the power cord from the AC outlet 䡲 Dangerou...

Страница 2: ...n the air will condense on the VCR when you move it from a cold place to a warm place or under extremely humid conditions just as water droplets form on the surface of a glass filled with cold liquid Moisture condensation on the head drum will cause damage to the tape In conditions where condensation may occur keep the VCR s power turned on for a few hours to let the moisture dry How to use the Re...

Страница 3: ... Cassette loading slot VIDEO AUDIO input connectors Display panel VCR mode indicator Play indicator Record indicator Timer mode indicator Channel and auxiliary input Clock time Remote sensor S VHS mode indicator S VIDEO AC power cord Lithium battery compartment ...

Страница 4: ...me counter G Tape Remaining Time H Index number I Tape position J Cassette mark K Tape speed L VCR operation mode M Timer warning display To recall an indication Number keys A Press OK All indications corresponding to the current status are displayed for 5 seconds After that the counter information and RECORD PAUSE if in the Record Pause mode are left displayed on the screen B Press OK again to cl...

Страница 5: ... VCR channel is the channel on which you can watch the picture from the VCR on the TV when only using the RF connection When the VCR is turned off press STOP EJECT 0 on the VCR for more than 5 seconds CH3 appears on the display panel Press PR on the Remote to select CH3 CH4 or CH OFF then press OK If Plug Play or Tuner setting has not previously been performed the Language Select screen appears an...

Страница 6: ... B Select language Press rt to move the highlight bar arrow to LANGUAGE then press OK or e repeatedly until the desired language is selected Press MENU to return to normal screen Clock Setting Perform clock setting only if the clock has not been set correctly by the Plug Play setting A Access Main Menu screen then Initial Set screen Press MENU on the Remote Press rt to move the highlight bar arrow...

Страница 7: ...atically If the cassette s record safety tab has been removed playback begins automatically B Start playback Press PLAY 4 The S VHS indicator lights up when you play back a tape recorded in S VHS mode or in S VHS ET mode 墌 pg 9 MAIN MENU FUNCTION SET TUNER SET INITIAL SET PRESS THEN OK PRESS MENU TO END AUTO CHANNEL SET SCANNING PRESS MENU TO END TUNER SET BAND CATV AUTO CHANNEL SET MANUAL CHANNEL...

Страница 8: ... on the display panel starts blinking slowly To stop playback press STOP 8 on the Remote or STOP EJECT 0 on the VCR NOTE Pressing PLAY 4 REW 3 FF 5 or PAUSE 9 also cancels repeat playback Locating beginning of recordings Index Search Index codes are placed on the tape at the beginning of each recording when recording on this VCR A While the tape is not running press w or e 2or 6 on the Remote to s...

Страница 9: ...n the Remote or STOP EJECT 0 on the VCR Watching one program while recording another During recording If you connect the TV and the VCR only using the RF connection 墌 pg 5 to view pictures from the VCR press TV VCR on the Remote so that VCR mode indicator goes off from the display panel The TV broadcast being recorded disappears If you are using the AV connection 墌 pg 5 to view pictures from the V...

Страница 10: ...gain makes the DAILY or WEEKLY display disappear C Press OK or PROG If PROGRAM NOT COMPLETED PROGRAM OVERLAP appears see Program overlap warning display 墌 pg 11 D Press The VCR turns off automatically and is displayed on the display panel To use the VCR while it is in timer recording standby mode Press then press 1 After you use the VCR press again to put the VCR into timer recording standby mode ...

Страница 11: ... pg 12 Changing display information Each time you press the display panel shows the channel number and the clock time alternatively You can change display in the stop recording or during rewind fast forward high speed search When SUPERIMPOSE is set to ON 墌 pg 12 and on the Remote is pressed time counter will appear on the TV screen To reset the time counter press 0000 on the Remote Timer warning d...

Страница 12: ...Minimizes picture degradation during editing recording and playback SOFT Reduces image coarseness when viewing overplayed tapes containing much noise SHARP Clearer sharper edged picture when viewing images with much flat same colored surfaces such as cartoons NOTE Select EDIT when you are editing tapes After you finish editing the tapes select AUTO 䡵 AUTO TIMER ON OFF When this function is set to ...

Страница 13: ...tal resolution of 400 lines comparing with the 230 lines of resolution of conventional VHS recordings To achieve the highest quality picture we recommended to record in S VHS mode But remember that a conventional VHS VCR without SQPB cannot play back S VHS tapes recorded in S VHS mode S VHS MODE setting does not affect recording on VHS tapes Recording on VHS tapes is always performed in VHS mode e...

Страница 14: ...and hold VCR B Press the Number key 2 C Press OK and release VCR The Remote now can transmit B code control signals B Check remote control code for VCR Press and hold 4 on the VCR for more than 5 seconds while the VCR is turned off The code currently set appears on the display panel C Change code for VCR Press any key on the Remote The VCR now responds to B code control signals To set the Remote a...

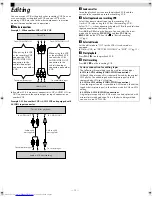
Страница 15: ...PICTURE CONTROL to EDIT 墌 pg 12 E Start playback Press PLAY 4 on the playback VCR F Start recording Press REC 7 on the recording VCR To audio video input This VCR Another VCR To AUDIO VIDEO IN To AUDIO VIDEO OUT To audio video output When using this VCR as the recording VCR connect this VCR s AUDIO VIDEO IN connectors to the audio video output connectors on another VCR When using this VCR as the p...

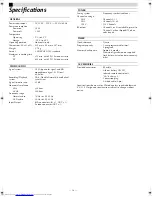
Страница 16: ...layback system DA 4 Double Azimuth head helical scan system Signal to noise ratio 45 dB Horizontal resolution VHS 230 lines S VHS 400 lines Frequency range Normal audio 70 Hz to 10 000 Hz Hi Fi audio 20 Hz to 20 000 Hz Input Output RCA connectors IN x 1 OUT x 1 S video connector OUT x 1 TUNER Tuning system Frequency synthesized tuner Channel coverage VHF Channels 2 13 UHF Channels 14 69 CATV 113 C...

Отзывы: