background image

Filename [HRJ870EU1a.fm]

Masterpage:Left

24


EN

Page 24

July 11, 2000 3:50 pm

RECORDING (cont.)

Receiving Stereo and Bilingual 
Programmes

Your recorder is equipped with a Sound-Multiplex decoder (A2) 
and a Digital stereo sound decoder (NICAM) making reception 
of stereo and bilingual broadcasts possible.
When the channel is changed, the type of broadcast being 
received will be displayed on the TV screen for a few seconds.

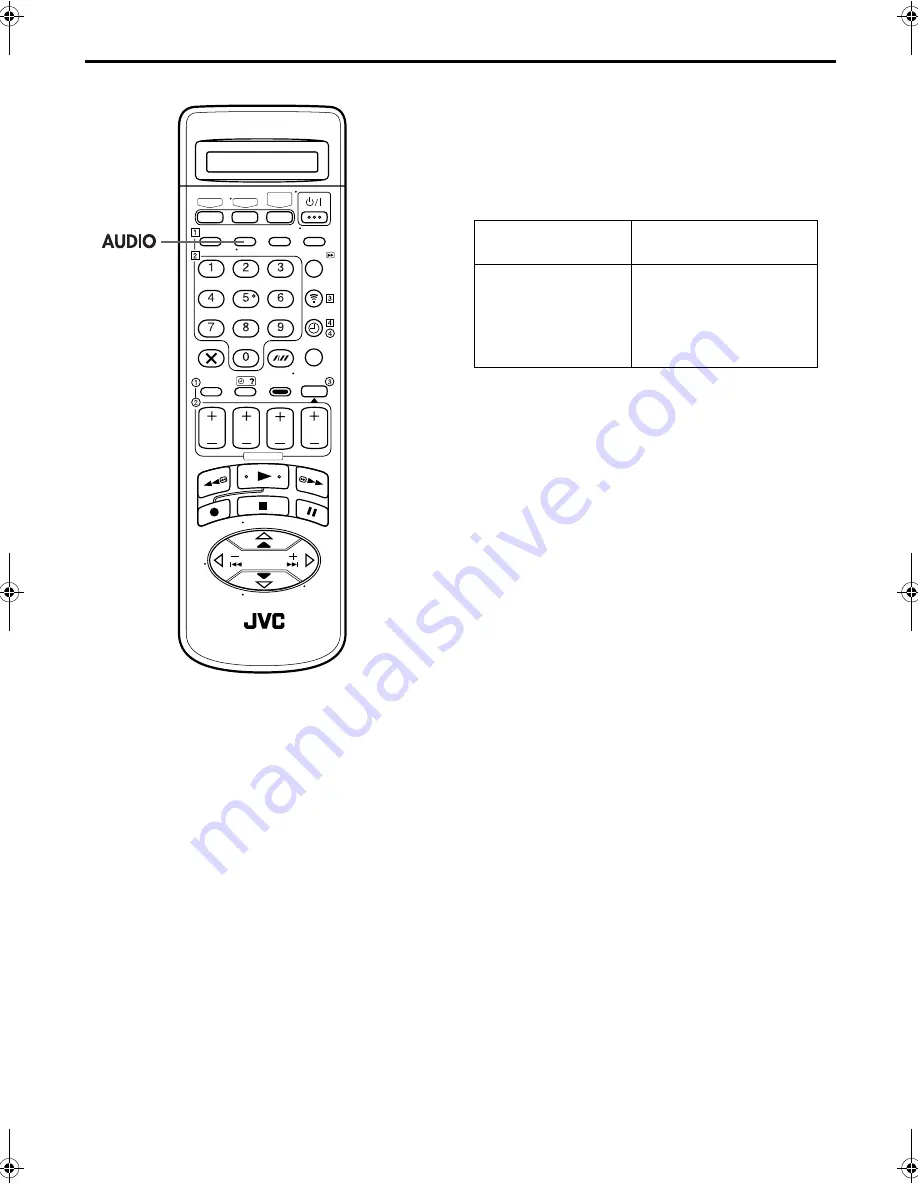
To listen to a stereo programme, press 

AUDIO

 until “

a

” and 

s

” appear on the front display panel or “HIFI L

j h

R” 

appears on the TV screen.

To listen to a bilingual programme, press 

AUDIO

 until “

a

” or 

s

” appears on the front display panel, or “HIFI L

j

” or 

“HIFI

h

R” appears on the TV screen (as required).

To listen to the standard (Regular Monaural) audio while 
receiving a NICAM broadcast, press 

AUDIO

 until “NORM” 

appears on the front display panel or the TV screen.

NOTE:

“O.S.D.” must be set to “ON” or the on-screen displays will not 
appear (

pg. 57).

To Record Stereo and Bilingual Programmes (A2)

Stereo programmes are automatically recorded in stereo on the 
Hi-Fi audio track (with the normal audio track recording mixed L 
and R channel sound).

Bilingual programmes are automatically recorded in bilingual 
on the Hi-Fi audio track. The main soundtrack will be 
recorded on the normal audio track.

To Record NICAM Stereo and Bilingual 
Programmes

The NICAM audio programme will be recorded on the Hi-Fi 
audio track, and the standard audio programme will be recorded 
on the normal audio track.

NOTES:

If the quality of stereo sound being received is poor, the 
broadcast will be received in monaural with better quality.

Before playing back a programme recorded in stereo, or a 
bilingual programme, refer to “Soundtrack Selection” on 
page 21.

Type of Broadcast Being 
Received

On-screen Display

A2 Stereo
A2 Bilingual
Regular Monaural
NICAM Stereo
NICAM Bilingual
NICAM Monaural

ST
BIL.
(none)
ST NICAM
BIL. NICAM
NICAM

HRJ870EU1a.fm  Page 24  Tuesday, July 11, 2000  3:59 PM

Содержание HR-J870EU

Страница 1: ...Programming 26 Express Timer Programming 28 Automatic Satellite Programme Recording 32 REMOTE CONTROL FUNCTIONS 33 VIDEO NAVIGATION 36 Navigation 36 Edit Title 38 Find Title 42 EDITING 45 Edit From A Camcorder 45 Synchro Editing 46 Edit To Or From Another Video Recorder 47 Audio Dubbing 48 Insert Editing 50 Information On J Terminal 52 SYSTEM CONNECTIONS 53 Connecting To A Satellite Receiver 53 Co...
Страница 2: ...n a video recorder of SECAM L standard or do not produce normal colour pictures if played back on a PAL video recorder with SECAM B system incorporated even if the TV set is SECAM compatible 3 SECAM L prerecorded cassettes or recordings made with a SECAM L video recorder produce monochrome pictures when played back with this recorder 4 This recorder cannot be used for the SECAM L standard Use a SE...

Страница 3: ...ll condense on the recorder when you move it from a cold place to a warm place or under extremely humid conditions just as water droplets form in the surface of a glass filled with cold liquid Moisture condensation on the head drum will cause damage to the tape In conditions where condensation may occur keep the recorder turned on for a few hours to let the moisture dry For Italy It is declared th...

Страница 4: ...ed Beam Receiving Window N Record 7 Button 墌 pg 22 O Pause 9 Button 墌 pg 19 P INSERT Button 墌 pg 51 Q Audio Dubbing A DUB Button 墌 pg 49 R Stop Eject 0 Button 墌 pg 18 22 REAR VIEW A Mains Power Cord 墌 pg 9 B AV1 L 1 IN OUT Connector 墌 pg 9 47 53 54 C J Terminal JLIP Joint Level Interface Protocol Connector 墌 pg 52 D SYNCHRO EDIT Connector 墌 pg 46 E ANT IN Connector 墌 pg 9 F Remote PAUSE Connector ...

Страница 5: ...ime Indicator 墌 pg 23 I Cassette Loaded Mark J VPS PDC Indicator 墌 pg 27 29 K VCR Indicator 墌 pg 23 L Counter Remain Display The counter can display up to 19 59 59 If the playback or recording time exceeds this limit the display starts to count from 0 00 00 M Mode Display L 1 L 2 F 1 or SAT When L 2 SELECT is set to SAT 墌 pg 59 SAT appears instead of L 2 PLAY FF REWVARIABLE SEARCH STILL SLOW RECOR...

Страница 6: ... 墌 pg 22 Q r t Button 墌 pg 10 TV PR Button 墌 pg 34 R CABLE SAT Button 墌 pg 35 S STANDBY ON 1 Button 墌 pg 10 T Display Button 墌 pg 23 U TV VCR Button 墌 pg 23 V 30 SEC Button 墌 pg 20 W Transmit Button 墌 pg 26 X WEEKLY Button 墌 pg 27 29 Y Timer Button 墌 pg 27 29 Z AUX Button 墌 pg 45 a MENU Button 墌 pg 14 b Auto Tracking p Button 墌 pg 21 SP LP EP Button 墌 pg 22 c OK Button 墌 pg 11 d NAVIGATION Button ...

Страница 7: ...emote control can currently operate When you first purchase the remote control or after you have just replaced the batteries VIDEO A A code is selected NOTES Even if TV is displayed on the LCD the following operations can be performed without switching the mode Basic operations for the recorder After an operation is completed TV reappears on the LCD Express timer programming and SHOWVIEW timer pro...

Страница 8: ...you where you are on the tape NOTE Depending on the type of tape being used the tape position indicator may not appear correctly H Type of Broadcast 墌 pg 24 I Current Day Month Year J Clock Display K Channel Position Number and Station Name Auxiliary Input Indicator L 1 L 2 F 1 or SAT When L 2 SELECT is set to SAT 墌 pg 59 SAT appears instead of L 2 L Timer Warning Display A warning appears on the ...

Страница 9: ...nnector AV Connection 8 To connect to a TV with AV input connectors A Connect the aerial recorder and TV as per RF Connection B Connect an optional 21 pin SCART cable between the AV1 L 1 IN OUT connector on the rear panel of the recorder and the TV s 21 pin SCART connector D Connect the recorder to mains Plug the end of the mains power cord into a mains outlet Make AV connection if your TV has a 2...

Страница 10: ...and Guide Program numbers automatically If you live in Belgium BELGIUM or Switzerland SUISSE you also need to select your language If you live in Hungary MAGYARORSZÁG Czech Republic CESKÁ REPUBLIKA Poland POLSKA Russia РОССИЯ or other countries in Eastern Europe OTHER EASTERN EUROPE set the clock manually International Telephone Country Code BELGIUM CESKÁ REPUBLIKA DANMARK DEUTSCHLAND ESPAÑA GREEC...

Страница 11: ... pg 63 INFORMATION Language Code ENGLISH DEUTSCH FRANCAIS ITALIANO CASTELLANO NEDERLANDS SVENSKA 01 02 03 04 05 06 07 NORSK SUOMI DANSK POLSKI CEcTINA MAGYAR ЯЗЫК 08 09 10 11 12 13 14 On the on screen display Press rt to move the highlight bar pointer to the language of your choice On the on screen display Press rt to move the highlight bar pointer to AUTO SET and press OK or e Auto blinks on the ...

Страница 12: ...OK The AUTO SET T V LINK display appears on the front display panel and or on the TV screen On the front display panel Press rt to select CH and press OK or e B Set the video channel Set the video channel to off manually 墌 pg 66 ATTENTION You can use this function only with a TV offering T V Link etc Be sure to use a fully wired 21 pin SCART cable Compatible with TVs offering T V Link EasyLink Meg...

Страница 13: ...Set display appears on the front display panel and or on the TV screen perform Auto Set Up on page 10 or Preset Download on page 12 again IMPORTANT To check if the Guide Program numbers have been set correctly perform the SHOWVIEW Timer Programming 墌 pg 26 In certain reception conditions station names may not be stored correctly and auto Guide Program Number Set may not work properly If the Guide ...

Страница 14: ...ENU B Access the Country Set screen C Select your country Press rt to move the highlight bar pointer to your country s name then press OK or e D Select the language E Return to the normal screen Press MENU Turn on the TV and select the video channel or AV mode Press rt to move the highlight bar pointer to AUTO CH SET then press OK or e Press rt to move the highlight bar pointer to the language of ...

Страница 15: ...ts transmitter and the satellite receiver s remote sensor is unobstructed B Attach the Satellite Controller Fix securely using the adhesive strip attached on the back of the Satellite Controller C Make connections Be sure to connect the recorder s AV2 L 2 IN DECODER connector to the satellite receiver s 21 pin SCART connector NOTE When connecting your satellite receiver refer to its instruction ma...

Страница 16: ...receiver s brand F Select the satellite receiver s channel for testing Turn on the TV and select the video channel or AV mode Press rt to move the highlight bar pointer to SAT CONTROL SET then press OK or e Press the appropriate number keys to enter the brand code from the list on page 17 then press OK If the brand code you entered is invalid the code field will be reset Enter the correct brand co...

Страница 17: ... following functions are available You can use these functions only with a TV offering T V Link etc For details refer to the instruction manual of your TV Compatible with TVs offering T V Link EasyLink Megalogic SMARTLINK Q Link DATA LOGIC or NexTView Link via fully wired 21 pin SCART cable The degree of compatibility and available functions may differ by system NexTView Link You can download the ...

Страница 18: ...BEST appears blinking in the recorder s front display panel during automatic tracking 墌 pg 25 D Stop playback Press 8 on the remote control or 0 on the recorder s front panel Then press 0 to remove the cassette Turn on the TV and select the video channel or AV mode Clean the video heads using a dry cleaning cassette TCL 2UX when Rough poor picture appears while a tape is played back The picture is...

Страница 19: ... return to still picture OR During still picture press and hold w or e Release to return to still picture NOTE Manual tracking is possible during slow motion playback 墌 pg 21 High Speed Turbo Search During playback or still turn the SHUTTLE ring all the way to the right for forward high speed search or to the left for reverse high speed search Releasing SHUTTLE ring resumes still picture playback ...

Страница 20: ...efore starting make sure the recorder is in the Stop mode Activate Index Search Press w or e 2 or 6 2 1 or 6 1 is displayed on the TV screen and search begins in the corresponding direction To access index codes 2 through 9 press w or e repeatedly until the correct index number is displayed Example To locate the beginning of B from the current position press w twice To locate the beginning of D fr...

Страница 21: ...ou can override this and adjust the tracking manually by pressing the PR buttons 1 Override automatic tracking Press p on the remote control 2 Adjust the tracking manually Press PR or 3 Return to automatic tracking Press p on the remote control NOTE When a new tape is inserted the recorder enters the automatic tracking mode automatically Soundtrack Selection Your recorder is capable of recording t...

Страница 22: ... D Start recording Press and hold 7 and press 4 on the remote control or press 7 on the recorder E Pause Resume recording Press 9 Press 4 to resume recording F Stop recording Press 8 on the remote control or 0 on the recorder Then press 0 to remove the cassette Turn on the TV and select the video channel or AV mode Recording Resume Function If there is a power outage during recording Instant Timer...

Страница 23: ...appears on the front display panel 3 Set the recording duration If you want to record for more than 30 minutes press 7 to extend the time Each press extends recording time by 30 minutes NOTE You can only perform ITR using the 7 button on the recorder s front panel Elapsed Recording Time Indication 1 Set the counter display Press until a counter reading appears on the front display panel 2 Reset th...

Страница 24: ...be set to ON or the on screen displays will not appear 墌 pg 57 To Record Stereo and Bilingual Programmes A2 Stereo programmes are automatically recorded in stereo on the Hi Fi audio track with the normal audio track recording mixed L and R channel sound Bilingual programmes are automatically recorded in bilingual on the Hi Fi audio track The main soundtrack will be recorded on the normal audio tra...

Страница 25: ...approximately 7 seconds assessing the condition of the tape then begins recording NOTES The B E S T system works for both SP and LP or EP modes only after a tape has been inserted and the Record mode is first initiated It does not work during recording The B E S T system does not work while Automatic Satellite Programme Recording is in progress 墌 pg 32 In the case of timer recordings the B E S T s...

Страница 26: ...igit number C Access the SHOWVIEW Program screen The front display panel shows the programme start time Pressing changes the display to the programme stop time then the date and channel position If the number you entered is invalid ERROR appears on the TV screen and Err appears on the front display panel Press and input a valid SHOWVIEW number If the GUIDE PROG SET screen appears see ATTENTION on ...

Страница 27: ... the button again makes the corresponding indication disappear You can programme this recorder to timer record as many as 8 programmes If you try to programme the recorder to record a ninth PROGRAM FULL appears on the TV screen and FULL appears on the front display panel To record the extra programme you must first cancel any unnecessary programmes 墌 pg 30 It is not possible to timer record a TV p...

Страница 28: ... hold STOP to move in 30 minute increments or press and release repeatedly to move 1 minute at a time E Enter the programme date Press DATE The current date appears on the TV screen The date you enter appears in its place Before performing Express Timer Programming Make sure that the recorder s built in clock is set properly Insert a cassette with the safety tab in place The recorder will come on ...

Страница 29: ...cord a satellite broadcast using Express Timer Programming A Perform Satellite Receiver Control Setting on page 15 B Perform steps 1 10 In step 6 press the number key 0 to change TV PROG to SAT The front display panel shows L2 for the channel position Then press PR to enter the channel position for the satellite broadcast In step 8 you cannot set VPS PDC to ON C Leave the satellite receiver s powe...

Страница 30: ... appropriate button START STOP DATE PR VPS PDC and or SP LP EP p You can change TV PROG to SAT for the channel position by pressing the number key 0 E Return to the normal screen display Press as many times as necessary If there are still some programmes remaining go on to step 6 F Return to the timer mode Press TIMER NOTE You can also check the programmes on the front display panel even if the re...

Страница 31: ... recorded correctly If no changes are made for approximately 1 minute the recorder will return to the normal screen C Cancel or change programme setting To cancel a programme press when the Programme screen you do not want is shown PROGRAM COMPLETED appears on the TV screen for about 5 seconds then the normal screen appears To change a programme press the appropriate button START STOP DATE PR VPS ...

Страница 32: ...ing is in progress turns off the recorder s power and disengages the Automatic Satellite Programme Recording mode If there are more than one satellite programmes you wish to record with Automatic Satellite Programme Recording it is not possible to set different tape speeds for each programme Depending on the type of satellite receiver the recorder may not record a slight portion of the beginning o...

Страница 33: ...ify your video recorder to respond to B code signals A Remove the power supply Unplug the end of the mains power cord from the mains outlet B Set the remote control code Press and hold VCR on the remote control for over 2 seconds press the number key 2 and then press OK C Re supply the power Plug the end of the mains power cord into a mains outlet D Turn on the recorder Press 1 on the remote contr...

Страница 34: ...d remote control unit is compatible with JVC televisions as well as many other models it may not work with your TV or in some instances may have limited function capability Control Your TV Using Additional Buttons Use the number keys and the p button button or button to select the TV s channel With televisions under Code 01 02 07 10 11 14 20 23 24 25 27 33 or 35 the p button corresponds to the 1 d...

Страница 35: ...de try entering another B Operate the satellite receiver First press CABLE SAT to set the remote control to satellite receiver mode then press the corresponding button 1 TV PR number keys For some brands of satellite receiver you must press p after having pressed the number keys The number keys may not function with some satellite receivers IMPORTANT Although the provided remote control unit is co...

Страница 36: ...recorded on this recorder While is blinking on the front display panel the tape will run for a few seconds to search for the tape number B Access the title screen Press NAVIGATION After pressing NAVIGATION it may take a few seconds to access the title screen while the recorder searches for the programme information If there is no cassette loaded FIND TITLE screen appears 墌 pg 42 C Select a program...

Страница 37: ...the programme information lost it is impossible to restore that information After recording a tape with this recorder write the tape number on a label and affix the label to the cassette in order to allow you to find the tape by its number Press rt to move the highlight bar pointer to CHECK MEMORY then press OK The CHECK MEMORY screen will appear Perform steps 1 to 2 of Check Memory on page 36 bef...

Страница 38: ...ideo tape library Perform steps 1 to 2 of Check Memory on page 36 before continuing Press rt to move the highlight bar pointer to FIND BLANK SPACE then press OK Press rt to move the highlight bar pointer to the tape number on which you want to record a programme then press OK The calculated blank space is based on the current tape speed SP LP or EP selected on the recorder If the selected cassette...

Страница 39: ... press e G Press 9 WXYZ once to enter W then press e H Press 7 PQRS four times to enter S then press e NOTES If you make a mistake press w e to select the character then enter the correct character If you want to delete a character press w e to select the character then press Press rt to move the highlight bar pointer to VIDEO NAVIGATION then press OK or e Press rt to move the highlight bar pointe...

Страница 40: ...e category D Return to the normal screen Press MENU Choice of Category CATEGORY r r t MOVIE r t SPORTS r t SPECIAL r t SERIES r t SHOW r t MUSIC r t CHILDREN r t NEWS r t OTHERS t Perform steps 1 to 4 of Edit Tape Title on page 39 before continuing Press rt to move the highlight bar pointer to the programme you want to edit then press OK or e The TITLE display begins blinking Press rt to select th...

Страница 41: ...mory becomes full the recorder cannot register any more information Delete any unnecessary data of tape or programme from the recorder s memory Perform steps 1 to 4 of Edit Tape Title on page 39 before continuing Press rt to move the highlight bar pointer to the tape number you want to delete then press Press rt to move the highlight bar pointer to YES then press OK or e Perform steps 1 to 4 of Ed...

Страница 42: ...want to playback in the order sorted by tape number A Access the Main Menu screen Press MENU B Access the Video Navigation screen C Access the Find Title screen Press rt to move the highlight bar pointer to VIDEO NAVIGATION then press OK or e Press rt to move the highlight bar pointer to FIND TITLE then press OK or e ...

Страница 43: ...ack begins automatically after the selected programme is located Insert the cassette whose number is displayed on the screen Playback begins automatically after the selected programme is located Perform steps 1 to 3 of Sort By Tape Number on page 42 before continuing Press rt to move the highlight bar pointer to BY DATE then press OK or e Press rt to move the highlight bar pointer to the programme...

Страница 44: ...ng Press rt to move the highlight bar pointer to BY CATEGORY then press OK or e Press rt to move the highlight bar pointer to the category you want to watch then press OK Press rt to move the highlight bar pointer to the programme you want to play back then press OK If the selected cassette has already been loaded playback begins automatically after the selected programme is located Insert the cas...

Страница 45: ...r s instruction manual for operating procedure B Set the recorder s input mode Press AUX number key 0 and or PR to select F 1 C Set the edit mode See PICTURE CONTROL on page 57 D Start the camcorder Engage the Play mode of the camcorder E Start the recorder Engage the Record mode of the recorder NOTES All necessary cables can be obtained from your dealer When you select EDIT to dub tapes in step 3...

Страница 46: ...you find the point where you want to start editing Press and hold 9 and press 7 on your recorder so that the recorder enters the Record Pause mode E Start Synchro Editing Press SYNCHRO 7 79 F Pause Synchro Editing Press SYNCHRO 7 79 again Repeat steps 4 6 as necessary NOTES The Synchro Editing function may not work with the initial part of a camcorder tape The Synchro Editing function cannot be us...

Страница 47: ...ther recorder as the recording deck refer to its instruction manual When using the AV2 L 2 IN DECODER connector set L 2 SELECT to L 2 墌 pg 59 C Set the edit mode See PICTURE CONTROL on page 57 D Start the source player Engage the Play mode of the source player E Start the recording deck Engage the Record mode of the recording deck NOTES All necessary cables can be obtained from your dealer When yo...

Страница 48: ...recorded tape with a new soundtrack ATTENTION Audio dubbing is not possible with a cassette recorded in EP mode Normal audio track Video Hi Fi audio track Pre recorded tape Audio dubbed tape CD player etc Your recorder CD player etc Mixer output Audio mixer Original sound AUDIO OUT Your recorder ...

Страница 49: ...e then press 4 to start the tape in your recorder Audio Dubbing begins at this point o blinks and u is displayed on the front display panel To stop dubbing temporarily press 9 Press 4 to resume dubbing F End Audio Dubbing Press 8 or 0 to stop the tape in your recorder and engage the audio component s Stop mode NOTES When monitoring the sound during Audio Dubbing the normal soundtrack is automatica...

Страница 50: ...hanged If you wish to change the normal audio track as well use the Audio Dubbing function simultaneously For Insert Editing use your recorder as the recording deck ATTENTION Insert editing is not possible with a cassette recorded in EP mode Source tape Recording tape Before Insert Editing Normal audio track After Insert Editing Video Hi Fi audio track Another recorder Audio Video signal Recorder ...

Страница 51: ...he tape in your recorder Insert Editing begins at this point o and u are displayed on the front display panel H End Insert Editing At counter 0 00 00 Insert Editing will stop automatically while the tape continues running in the Play mode If you wish to stop Insert Editing before the specified edit out point press 0000 AV Insert Editing If you want to replace the picture Hi Fi audio soundtrack and...

Страница 52: ... own JLIP ID number This ID number must be unique when your recorder is connected to another device via its J terminal The ID number is preset to 1 at the factory You can change this number to any number between 1 and 99 If it is necessary to change the JLIP ID number perform the following steps A Access the Main Menu screen Press MENU B Access the Initial Set screen Press rt to move the highlight...

Страница 53: ...he satellite receiver For details refer to the instruction manual of the satellite receiver and decoder IMPORTANT When you set L 2 SELECT to SAT 墌 pg 59 it is possible to view a satellite broadcast with the TV set to its AV mode even if the recorder is turned off When the recorder is in Stop mode or recording press TV VCR on the remote control to turn off the VCR indicator on the front display pan...

Страница 54: ...at is available through scrambled channels A Select the input mode Set L 2 SELECT to DECODER 墌 pg 59 B Connect the decoder Connect your recorder s AV2 L 2 IN DECODER connector to the decoder s 21 pin SCART connector using a 21 pin SCART cable C Set the tuner Perform the procedure as described in When Receiving A Scrambled Broadcast on page 63 TV receiver RF cable provided TV aerial cable AV1 L 1 I...

Страница 55: ...his recorder has a dynamic range of more than 80 dB with regards to its Hi Fi audio capability It is recommended that you check the maximum level if you are going to listen to the Hi Fi audio signals through a stereo amplifier A sudden surge in the input level to the speakers may damage them Some speakers and televisions are specially shielded to prevent television interference If both are of the ...

Страница 56: ... 59 A Access the Main Menu screen Press MENU B Access the Mode Set screen C Select the mode Press rt to move the highlight bar pointer to the item you want to change D Select the mode setting Press OK or e E Return to the normal screen Press MENU Turn on the TV and select the video channel or AV mode Press rt to move the highlight bar pointer to MODE SET then press OK or e ...

Страница 57: ...cally disengaged when the recorder is powered back on NOTE For safety when AUTO TIMER is set to OFF all other recorder functions are disabled while the Timer mode is engaged To disengage the timer press TIMER 8 O S D ON OFF When this function is set to ON various operational indicators appear on the TV screen Messages appear in the selected language 墌 pg 13 14 NOTES When you use this recorder as t...

Страница 58: ...rogramme goes beyond its originally scheduled length there may be times when the programme cannot be recorded in its entirety 8 POWER SAVE ON OFF When this function is set to ON you can reduce the power consumption while the recorder is turned off NOTES During Power Save mode the front display panel will be turned off the Just Clock function 墌 pg 68 does not work the picture may be distorted momen...

Страница 59: ...en or front display panel instead of L 2 8 COLOUR SYSTEM PAL NTSC To record PAL signals or play back a PAL or NTSC tape MESECAM To record SECAM signals or play back a MESECAM tape You can play back PAL NTSC and MESECAM tapes or record PAL and SECAM signals on this recorder Select the appropriate colour system SECAM signals will be recorded as MESECAM on this recorder MESECAM is the designation for...

Страница 60: ...C Access the Auto Channel Set screen D Select your country Press rt to move the highlight bar pointer to your country s name then press OK or e E Select the language Press rt to move the highlight bar pointer to the language of your choice Turn on the TV and select the video channel or AV mode IMPORTANT Perform the following steps only if Auto Channel Set has not been set correctly by Auto Set Up ...

Страница 61: ...ted appear on a Confirmation screen channel positions PR channels CH and station names ID 墌 pg 65 The blueback screen and the programme currently being broadcast by the blinking station appear alternately for 8 seconds each To view the next page use the rt w e button on the remote control The stations located in the selected country appear at the top of the list The Guide Program numbers will also...

Страница 62: ...SELECT is set to L 2 or SAT the DECODER setting cannot be changed 墌 pg 59 F Enter new channel information Press OK and the Confirmation screen appears Repeat steps 3 6 as necessary G Close the Confirmation screen Press MENU To change positions see Change Station Channel Position 墌 pg 63 If you wish to set station names other than the ones registered in your recorder see Set Stations B 墌 pg 64 Pres...

Страница 63: ...Manual Channel Set on page 62 C Select the position Press rt w e to select the channel position broadcasting scrambled programmes then press OK twice D Change the decoder setting Press e until OFF decoder setting begins blinking and set it to ON by pressing rt E Return to the Confirmation screen Press OK Repeat steps 3 5 as necessary F Close the Confirmation screen Press MENU Perform steps 1 and 2...

Страница 64: ... NOTE The characters available for the station name ID are A Z 0 9 f I space maximum of 4 Fine Tuning Channels Already Stored A Select the channel to fine tune Press rt w e until the channel you want to tune begins blinking B Access the Manual Channel Set screen Press OK twice The Manual Channel Set screen appears C Perform tuning Press e until begins blinking then press rt until the picture is it...

Страница 65: ...B1 ETB2 EURONEWS EUROSPORTS FEMMAN FILM FILMNET France2 France3 GALAVISION HESSEN3 INFO KANAL ITALIA1 ITALIA7 ITV JSTV KA2 KABEL1 KANAL2 LOCAL M6 MBR MCM MDR MOVIE MTV MTV3 NORD3 N TV NBC SUPER NDR NED1 NED2 NED3 NICKELODEON NRK NRK2 ODEON ORF1 ORF2 ID STATION NAME ORF3 OWL3 PREM PRO7 RAI1 RAI2 RAI3 RET4 21 RTBF RTL RTL2 RTL4 RTL5 RTP S4 SAT1 SBS SHOW SIC SKY SKYN SPRT SRTL STAR SVT1 SVT2 SWR TCC ...

Страница 66: ... TV to UHF channel 50 If the two vertical white bars appear clearly on the TV screen as shown to the right go to step 4 If the two vertical white bars do not appear clearly re set the video recorder to another vacant channel and try again NOTES If you set the video recorder to a channel which is occupied by a local station or has neighbouring channels that are occupied by local stations the pictur...

Страница 67: ...el after Auto Set Up Preset Download or Auto Channel Set has taken place Set the Guide Program number for that station manually When you wish to timer record a satellite programme with the SHOWVIEW system Set the Guide Program numbers for all satellite broadcasts received on your satellite receiver Turn on the TV and select the video channel or AV mode Example When inputting the Guide Program numb...

Страница 68: ...om a PDC signal The Just Clock option can be set ON or OFF at the Clock Set screen the default setting is OFF Press OK until the Just Clock setting begins blinking then press rt to change the setting IMPORTANT If you turn off Just Clock the accuracy of your recorder s built in clock may be reduced which could adversely effect timer recording We recommend you to keep Just Clock on In cases where th...

Страница 69: ...ng and adjustment data from channel position 1 Press rt to set the channel position to the number representing the station transmitting clock setting data then press OK or e H Start the clock operation Press MENU NOTES Just Clock when set to ON adjusts the recorder s built in clock every hour except for 23 00 0 00 1 00 and 2 00 Just Clock is not effective when the recorder s power is on the record...

Страница 70: ...d or fast forward The tape is already fully rewound or fast forwarded Check the cassette SYMPTOM POSSIBLE CAUSE CORRECTIVE ACTION 1 The playback picture does not appear while the tape is running If you are using the RF connection the TV receiver s channel selector is not set to the video channel the recorder s video channel has not been correctly set If you are using the RF connection set the TV r...

Страница 71: ... front display panel 2 Timer programming is not possible Timer recording is in progress Timer programming can t be performed while a timer recording is in progress Wait until it finishes 3 and on the front display panel won t stop blinking The timer is engaged but there s no cassette loaded Load a cassette with the record safety tab intact or cover the hole using adhesive tape 4 The cassette is au...

Страница 72: ...er s memory The TV aerial cable was not connected to the recorder when Auto Set Up was performed Turn off the recorder once and connect the TV aerial cable to the recorder properly then turn on the recorder again The recorder will try Auto Set Up again 墌 pg 10 The fully wired 21 pin SCART cable was not connected between TV and the recorder when Preset Download was performed Turn off the recorder o...

Страница 73: ...There may be index codes too close together RECORDING Q When I pause and then resume a recording the end of the recording before the pause is overlapped by the beginning of the continuation of recording Why does this happen A This is normal It reduces distortion at the pause and resume points Q Can the video recorder indefinitely remain in the Record Pause mode A No The video recorder goes to its ...

Страница 74: ...nal to noise ratio 45 dB Horizontal resolution SP LP 250 lines EP 220 lines Frequency range 70 Hz to 10 000 Hz Normal audio 20 Hz to 20 000 Hz Hi Fi audio Input Output 21 pin SCART connectors IN OUT x 1 IN DECODER x 1 RCA connectors VIDEO IN x 1 AUDIO IN x 1 AUDIO OUT x 1 TUNER TIMER TV channel storage capacity 99 positions AUX position Tuning system Frequency synthesized tuner Channel coverage VH...

Страница 75: ...ual Channel Set 62 Manual Tracking 21 Mode Set 56 N Next Function Memory 21 O O S D 57 ON SCREEN DISPLAY 8 P PICTURE CONTROL 57 PLAYBACK 18 POWER SAVE 58 Preset Download 12 R Record One Programme While Watching Another 23 RECORDING 22 Recording Resume Function 22 Repeat Playback 21 S Satellite Controller 15 Satellite Receiver Control Setting 15 Set Stations A 64 Set Stations B 64 SHOWVIEW System S...

Страница 76: ... Download 墌 pg 12 instead of the Auto Set Up If appears on the front display panel see page 13 of the instructions Once you have performed Auto Set Up even if the recorder s memory backup has expired the recorder will not perform Auto Set Up again Perform tuner setting 墌 pg 60 and or clock setting 墌 pg 68 as required 1 Press 1 recorder remote 2 Press rt remote to select the international telephone...

Отзывы: