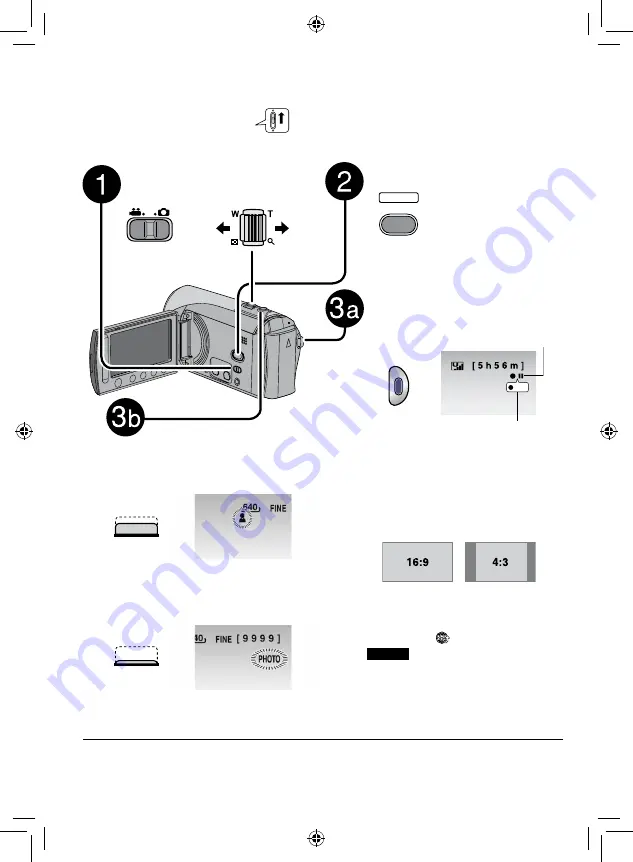
Recording Files
Preparation:
•
Insert an SD card.
•
Open lens cover.
•
Open the LCD monitor to turn on the camcorder.
Press the SELECT PLAY/REC
button to select recording mode.
PLAY/REC
SELECT
Video Recording
Press the START/STOP button to
start or stop recording.
REC
Approximate remaining time for
recording appears.
L
Don’t forget to make copies/
backup after recording! (
Z
pg. 14)
L
To change the aspect ratio of the
image (16:9/4:3)
Change the settings in [SELECT
ASPECT RATIO] from the MENU.
L
To record a video clip (approx. 10
minutes)
Before you start recording, press
UPLOAD button twice to “UPLOAD
REC ON”.
appears.
NOTES
•
A new file will be created for every 4 GB
of continuous shooting.
•
This camcorder records video in MPEG2
format compliant with SD-VIDEO format.
This camcorder is not compatible with
other digital video formats.
Slide the mode switch to select
!
(video) or
#
(still image)
mode.
RECORDING
Still Image Recording
Press and hold the SNAPSHOT
button halfway.
The
?
indicator becomes green when
the captured image is focused.
Press the SNAPSHOT button fully to
take the photo/picture.
L
To record still images continuously
Set to [CONTINUOUS SHOOTING] in
[SHUTTER MODE] from the MENU.
L
To view the video/image you just recorded
Select
A
during pause. During the preview, you can delete the video/image by selecting
*
.
L
To change the picture quality
Change the settings in [VIDEO QUALITY] or [IMAGE QUALITY] from the MENU
Zoom
out
Zoom
in
Record-standby
Recording


