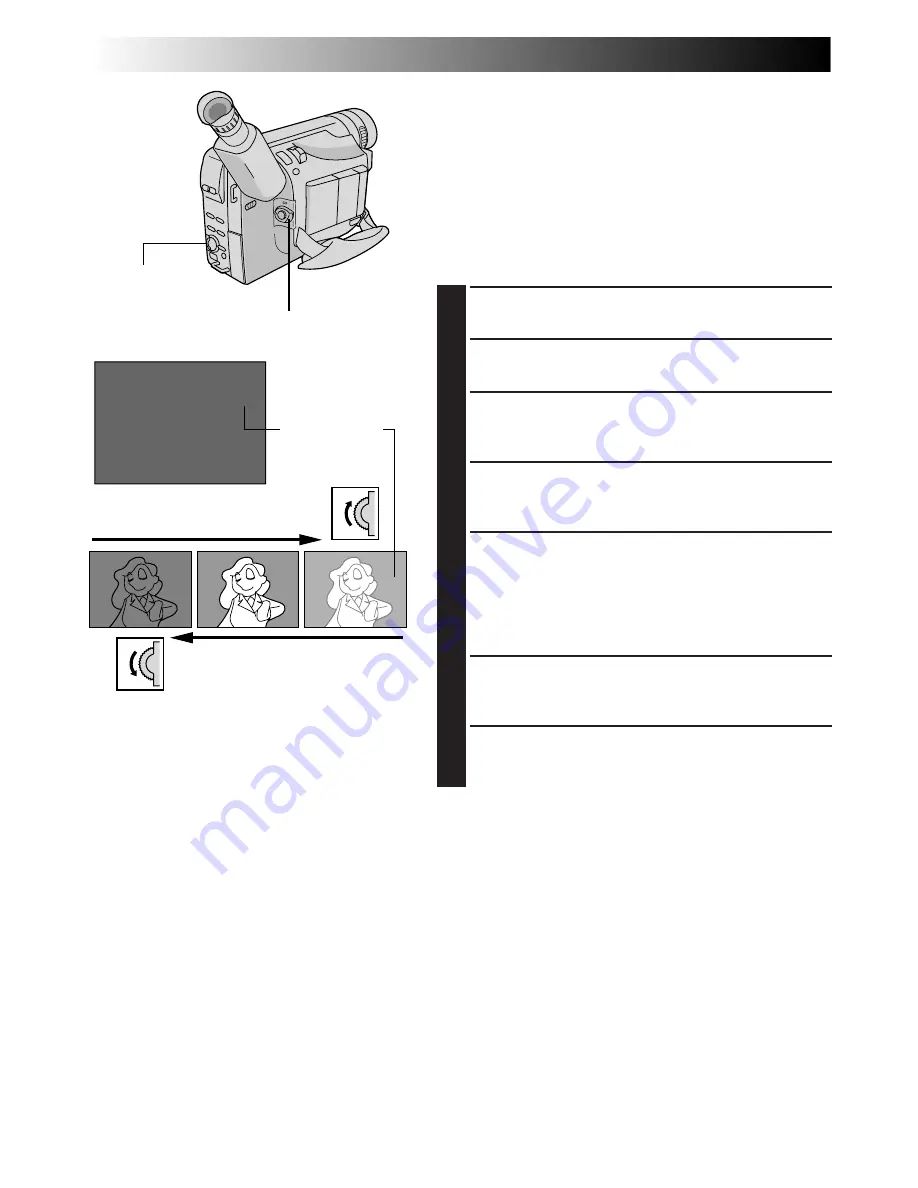
background image

30

 EN

Exposure Control

This feature automatically adjusts the iris for the best
available picture quality, but you can override it and make
the adjustment manually. Manual exposure adjustment is
recommended in the following situations:

When shooting using reverse lighting or when the
background is too bright.

When shooting on a reflective natural background such
as at the beach or when skiing.

When the background is overly dark or the subject light.

1

Set the Power Switch to “PRO.”.

2

Press the Select Wheel to display the Menu Screen.

3

Rotate the Select Wheel to move the highlight bar to
“EXPOSURE” and press it. The EXPOSURE Menu
appears.

4

Rotate the Select Wheel to move the highlight bar to
“MANU”, then press it. The Menu Screen disappears
and “00” (exposure control level counter) appears.

5

To brighten the image, rotate the Select Wheel
upward. The exposure control level counter increases
(m06).
To darken the image, rotate the Select Wheel
downward. The exposure control level counter
decreases (maximum –06).

6

Press the Select Wheel. The setting is complete. The
Menu Screen reappears with the highlight bar on
“RETURN”.

7

Press the Select Wheel. The Menu Screen disappears
and the exposure control level counter reappers to
indicate the exposure is adjusted.

NOTES:

To return to the factory setting, select “AUTO” in step 4.

To re-adjust exposure, repeat the procedure from step 2.

0 0

06

06

+

06

Manual Exposure
Screen

To brighten the image

To darken the image

Select Wheel

Power Switch

Exposure control
level counter

RECORDING 

 Advanced Features (cont.)

Содержание GR-FX11

Страница 1: ... Basic Recording 16 Basic Features 18 Advanced Features 22 PLAYBACK 33 37 Basic Playback 33 Features 34 Using The Cassette Adapter 35 Connections 36 USING THE REMOTE CONTROL UNIT 38 47 Animation And Time Lapse 40 Playback Zoom 41 Insert Editing 42 Audio Dubbing 43 Random Assemble Editing 44 TROUBLESHOOTING 48 49 INDEX 50 53 Controls Connectors And Indicators 50 Indications 52 CAUTIONS 54 56 SPECIF...

Страница 2: ...STURE Dear Customer Thank you for purchasing the JVC Compact VHS camcorder Before use please read the safety information and precautions contained in the following pages to ensure safe use of this product Cassettes marked and can be used with this camcorder However S VHS recordings are possible only with cassettes marked GR SXM46 SXM26 SX41 SX21 only Caution on Replaceable lithium battery The batt...

Страница 3: ...th water or liquids such as cosmetics or medicines flower vases potted plants cups etc on top of this unit If water or liquid is allowed to enter this equipment fire or electric shock may be caused This camcorder is designed to be used with PAL type colour television signals It cannot be used for playback with a television of a different standard However live recording and LCD monitor viewfinder p...

Страница 4: ...om Lever during the demonstration stops the demonstration temporarily If the Power Zoom Lever is not moved for more than 1 minute after that the demonstration will resume n DEMO MODE remains ON even if the camcorder power is turned off n To cancel Automatic Demonstration set the Power Switch to PRO and press MENU while the demo is in progress This takes you directly to the demo mode s Setting Menu...

Страница 5: ...provided Core Filter to the provided Audio Video cable The Core Filter reduces interference 1 Release the stoppers on both ends of the Core Filter Core Filter for provided Audio Video cable 2 Run the cable through the Core Filter leaving approx 5 cm of cable between the cable plug and the Core Filter Wind the cable around the outside of the Core Filter as shown in the illustration Wind the cable s...

Страница 6: ...oted above are for a fully discharged battery pack Charging time varies according to the ambient temperature and the status of the battery pack To avoid interference with reception do not use the AC Power Adapter Charger near a radio If you connect the camcorder s DC cord to the adapter during battery charging power is supplied to the camcorder and charging stops Since the AC Power Adapter Charger...

Страница 7: ...pective instruction booklet 1 When using GR SXM46 SXM26 FXM16 FXM161 2 When using GR SX41 SX21 FX11 when the video light is on GR SXM46 SXM26 SX41 FXM161 only NOTES Recording time is reduced significantly under the following conditions Zoom or Record Standby mode is engaged repeatedly The LCD monitor is used repeatedly GR SXM46 SXM26 FXM16 FXM161 only Before extended use it is recommended that you...

Страница 8: ... holder to remove it from the camcorder 3 Insert the battery in the holder and be sure to have the mark visible 4 Slide the holder back into the slot until you hear a click NOTES See SAFETY PRECAUTIONS Z pg 2 for information on safe handling of lithium batteries To avoid losing the battery and or battery holder place the camcorder with the grip side up as shown in the illustration when inserting r...

Страница 9: ...el to move the highlight bar to EXIT and press it then go to step 7 To set only the time without changing the date go to step 5 4 To set YEAR MONTH or DAY rotate the Select Wheel to move the highlight bar to the desired item and press it When the setting begins blinking rotate the Select Wheel until the correct setting appears and then press it The setting stops blinking Repeat for other date sett...

Страница 10: ... Wheel to move the highlight bar to TAPE LENGTH then press it The TAPE LENGTH Setting Menu appears 3 Rotate the Select Wheel to move the highlight bar to the correct tape length setting T30 30 minutes of recording time T45 45 minutes T50 50 minutes and T60 60 minutes To return to the previous setting rotate the Select Wheel to move the highlight bar to EXIT 4 Press the Select Wheel The Menu Screen...

Страница 11: ...CD monitor GR SXM46 SXM26 FXM16 FXM161 only The cassette holder can t be opened unless a power supply is attached Make sure that the tape is not slack when loading the cassette If there is any slack turn the gear on the cassette in the direction of the arrow to take up the slack Make sure the Erase Protection tab is in the position that allows recording If not slide the tab Some cassettes have rem...

Страница 12: ...he Select Wheel to move the highlight bar to S VHS then press it The S VHS Setting Menu appears 3 Rotate the Select Wheel to set to either of the parameters then press it Press the Select Wheel again The Menu Screen reappears with the highlight bar on RETURN In the S VHS ET Setting Menu ON Records with S VHS picture quality on a VHS cassette factory preset This is called Super VHS ET Expansion Tec...

Страница 13: ...tapes recorded on this camcorder be played back on this camcorder n Tapes recorded in S VHS or S VHS ET mode can be played back not only on this camcorder but also on a Super VHS VCR Tapes recorded in S VHS ET mode cannot be played back on some VCRs including some JVC VCRs n Tapes recorded in S VHS or S VHS ET mode cannot be played back correctly on a normal VHS VCR n S VHS ET does not work with S...

Страница 14: ...ck the playback picture colour may be affected Be sure to choose the correct setting before you start shooting 1 Set the Power Switch to PRO The power lamp comes on 2 Press MENU The Menu Screen appears 3 Rotate the Select Wheel to move the highlight bar to NEXT in Menu Screen 1 and press it to display Menu Screen 2 Then rotate it to move the highlight bar to VIDEO OUT and press it The VIDEO OUT Me...

Страница 15: ...camcorder To prevent damage to the unit caused by falling over do not use a small sized tripod Tripod Mounting 1 Align the screw and camera direction stud on the tripod with the camera s mounting socket and stud hole Then tighten the screw Grip Adjustment 1 Separate the Velcro strip 2 Pass your right hand through the loop and grasp the grip 3 Adjust so that your thumb and fingers can easily operat...

Страница 16: ...r Switch to CAMERA AUTO or PRO The power lamp lights and the camcorder enters the Record Standby mode PAUSE is displayed in the LCD monitor 2 Tilt the LCD monitor upward downward for best viewability and press the Recording Start Stop Button appears in the LCD monitor while recording is in progress NOTE When you use the LCD monitor outdoors in direct sunlight the LCD monitor may be difficult to se...

Страница 17: ...do not erase any of it While shooting sound is not heard from the speaker GR SXM46 SXM26 FXM16 FXM161 only Self Recording JOURNALISTIC SHOOTING GR SXM46 SXM26 FXM16 FXM161 only In some situations different shooting angles may provide more dramatic results Hold the camcorder in the desired position and tilt the LCD monitor in the most convenient direction It can rotate 270 90 downward 180 upward IN...

Страница 18: ...digital processing When using Digital Zoom the quality of image may suffer To deactivate Digital Zoom set D ZOOM to OFF in the Menu Screen Z pg 25 FEATURE Picture Stabilizer PURPOSE To compensate for unstable images caused by camera shake particularly at high magnification OPERATION Press P STABILIZER appears n To switch off the Picture Stabilizer press P STABILIZER The indicator disappears NOTES ...

Страница 19: ...Recording Start Stop Button to start recording NOTE Noise bars appear and pictures may become monochrome or darken during Retake This is normal FEATURE 5Sec Rec 5 sec Recording GR SXM26 SX21 FXM16 FXM161 FX11 only PURPOSE To record a scene for 5 seconds providing quick scene transitions like those seen in TV programmes OPERATION 1 During Record Standby press 5SEC REC 5S appears and 5Sec Rec is res...

Страница 20: ...s on the light when the camcorder senses insufficient lighting on the subject ON Always keeps the light on as long as the camcorder is turned on n The video light can only be used with the camcorder s power on n It is recommended to set the white balance Z pg 32 to when you use the video light n When not using the video light turn it off to save battery power NOTES Even if the battery indicator do...

Страница 21: ...en the camcorder re enters the Record Standby mode If you press during Recording a still image will be recorded for approx 6 seconds then the normal recording resumes NOTES After SNAPSHOT is pressed there is a momentary camera shutter type blackout together with the sound effect of a shutter closing which is recorded together with the image Snapshot is available during playback as well However the...

Страница 22: ...om the top and bottom closing over the image like a shutter or a new image pushes open the black screen vertically from the centre SLIDE Wipe A black screen moves in from the left to gradually cover the image or a new image moves in from right to left DOOR Wipe Wipes in as the two halves of a black screen open to the left and right revealing the scene or wipes out and the black screen reappears fr...

Страница 23: ...d in sepia tinted reddish brown monochrome giving the effect of an older movie Use together with Wide Z pg 25 for the authentic look of a classic Hollywood movie SPORTS High shutter speed clearly captures fast moving action ND ND EFFECT A black mist darkens the picture as when an ND filter is used Helps to counter the effects of glare on the subject FG FOG Makes the picture look misty white as whe...

Страница 24: ...ME Z pg 9 and perform each procedure from step 4 If you select JLIP ID NO rotate the Select Wheel until the desired number appears and press it Then rotate the Select Wheel to move the highlight bar to EXIT If you select any other functions rotate the Select Wheel to move the highlight bar to the desired setting To return to the previous setting place the highlight bar on EXIT 5 Press the Select W...

Страница 25: ... a subject in a dimly lit environment when it is more convenient to shoot with a less coarse picture although the subject becomes slightly dark OFF Allows you to shoot dark scenes with no picture brightness adjustment Allows you to superimpose one of eight preset titles Z pg 27 Makes the date time settings appear in the camcorder or on a connected monitor Z pg 27 ON Allows you to use the Digital Z...

Страница 26: ...ON and the Menu Screen is closed the demonstration starts Operating the Power Zoom Lever during the demonstration stops the demonstration temporarily If the Power Zoom Lever is not moved for more than 1 minute after that the demonstration will resume NOTE When a tape whose Erase Protection tab is in the position that allows recording is loaded in the camcorder demonstration is not available OFF Au...

Страница 27: ...E F A A U O A E E O X F P P R V R R D N I P P I T R D G T Y Y F E Y Y I R A N A B H M S T C G T T I O I T I H U I R L L A M R D L T T I Y R E I A A L H D S Y T E D A T I A Y M O Y S A N S S Instant Titles The camcorder has eight preset titles in memory You can superimpose one of them over the video image Instant Titles can be displayed not only in English but also in French Change the setting in T...

Страница 28: ... move the highlight bar to REC TIME and press it The REC TIME Menu appears Rotate the Select Wheel to move the highlight bar to the desired recording time then press it The Menu Screen reappears with the highlight bar on RETURN Press the Select Wheel again to close the Menu Screen 3 Press the Recording Start Stop Button after focusing on the subject The recording stops automatically after the sele...

Страница 29: ...t bar to the desired recording time then press it The Menu Screen reappears 3 Rotate the Select Wheel to move the highlight bar to INT TIME then press it The INT TIME Menu appears Rotate the Select Wheel to move the highlight bar to the desired interval time then press it The Menu Screen reappears with the highlight bar on RETURN Press the Select Wheel again to close the Menu Screen 4 Press the Re...

Страница 30: ...ve the highlight bar to MANU then press it The Menu Screen disappears and 00 exposure control level counter appears 5 To brighten the image rotate the Select Wheel upward The exposure control level counter increases maximum 06 To darken the image rotate the Select Wheel downward The exposure control level counter decreases maximum 06 6 Press the Select Wheel The setting is complete The Menu Screen...

Страница 31: ...s is locked at this point 5 To focus on a farther subject rotate the Select Wheel upward appears and blinks To focus on a nearer subject rotate the Select Wheel downward appears and blinks 6 Press the Select Wheel The setting is complete The Menu Screen reappears with the highlight bar on RETURN 7 Press the Select Wheel The Menu Screen disppears and reappears to indicate the focus is locked NOTES ...

Страница 32: ...is activated Manual White Balance Operation Perform Manual White Balance when shooting under various types of lighting 1 Follow steps 1 through 4 of the white balance adjustment and select MWB 2 Hold a sheet of plain white paper in front of the subject Adjust zoom or position yourself so that the white paper fills the screen 3 Press the Select Wheel until MWB begins blinking When the setting is co...

Страница 33: ...Y Speaker LCD Monitor Brightness Adjustment GR SXM46 SXM26 FXM16 FXM161 only Rotate the Select Wheel BRIGHT towards to brighten or towards to darken The Bright Level Indicator is displayed under the Date Time Display when you play back images recorded in Wide Mode Z pg 25 Speaker Volume Control GR SXM46 SXM26 FXM16 FXM161 only Slide the Power Zoom Lever VOL towards to turn up the volume or towards...

Страница 34: ...e TBC mode is activated TBC is displayed The TBC indicator turns green grey with a camcorder equipped with a black white viewfinder while TBC is working TBC does not work during still playback and shuttle search The TBC indicator turns white while TBC is not operative It may take a few seconds before TBC actually starts working The picture may be distorted if the TBC mode is activated or deactivat...

Страница 35: ...apter into the VCR and play the tape back as you would any other 4 Slide the latch and the compartment door opens automatically This may take around 10 seconds Do not attempt to force the adapter open Then insert your finger in the hole on the underside of the adapter as shown in the illustration at left and push up and remove the cassette NOTES During tape loading and unloading do not touch the r...

Страница 36: ...er Set to CVBS When connecting the cables open this cover Commercially available provided with GR SXM46 SXM26 SX41 SX21 only To S VIDEO IN To S Video Output Yellow to VIDEO in TV To TV or VCR B Connection to a TV or VCR equipped with a SCART connector compatible with Y C signal GR SXM46 SXM26 SX41 SX21 only Use the provided Audio Video A V cable and S Video cable Yellow not connected Set to Y C Ca...

Страница 37: ...pecially shielded do not place the speakers adjacent to the TV as interference will occur in the camcorder playback picture Set the video out select switch of the cable adapter as required Y C When connecting to a TV or VCR which accepts Y C signals and uses an S Video cable GR SXM46 SXM26 SX41 SX21 only CVBS When connecting to a TV or VCR which does not accept Y C signals and uses an audio video ...

Страница 38: ... 40 Functions the same as the Recording Start Stop Button on the camcorder Retake forward Z pg 19 Time Lapse Z pg 40 Ineffective With the camcorder s Power Switch set to PLAY Zoom in out Z pg 41 Playback start Z pg 33 Rewind Reverse Shuttle Search Z pg 33 Stop Z pg 33 Insert Editing Z pg 42 Fast Forward Forward Shuttle Search Z pg 33 Pause Z pg 33 Audio dubbing Z pg 43 Z pg 45 Z pg 44 Z pg 44 Z pg...

Страница 39: ...R SXM46 SX41 only The remote control uses two R03 AAA size batteries See General Battery Precautions Z pg 54 1 Open the battery compartment cover as illustrated 2 Insert two R03 AAA size batteries in the correct direction 3 Replace the battery compartment cover When using the remote control be sure to point it at the remote sensor The illustration shows the approximate transmitted beam effective a...

Страница 40: ...e remote control until the Recording Time indicator disappears Time Lapse 1 Set Instead of performing steps 1 through 3 on pg 29 Time Lapse press REC TIME and INT TIME on the remote control Each time REC TIME is pressed the Recording Time indicator appears changing in the following order 1 4S 1 2S 1S 5S and no indication off Each time INT TIME is pressed the Interval Time indicator appears changin...

Страница 41: ...ress the ZOOM Buttons T W on the remote control Make sure the remote control is pointed at the camcorder s remote sensor Pressing T zooms in To End Zoom press and hold W until magnification returns to normal Or press STOP and then press PLAY NOTES Zoom can also be used during still playback Due to digital image processing the quality of the image may suffer After zooming in on a still video image ...

Страница 42: ... the scene you want to replace press PLAY to view the recorded tape and press PAUSE exactly at the Edit In point where the new scene should start 5 Press and hold INSERT and without releasing INSERT press and release PAUSE The Insert Editing indicator appears and the Insert Editing mode is engaged When the scene the camcorder is aimed at appears on the screen go to the next step 6 To begin Insert ...

Страница 43: ...Audio Dub Standby mode 4 To end Audio Dubbing press STOP NOTES Do not press FF or REW during Audio Dub Standby or the edit points will not be accurate If the microphone is too close to the TV or if the TV s volume is too high whistling or howling may occur NOTES for Insert Editing and Audio Dubbing Insert Editing and Audio Dubbing may not work correctly if the tape contains blank segments To edit ...

Страница 44: ...1 Turn off the power to the VCR and point the remote towards the VCR s infrared sensor Then referring to the VCR CODE LIST on the left press and hold MBR SET and press button A and then B The code is automatically set once you release MBR SET and the VCR s power comes on 2 Make sure the VCR s power is on Then while holding VCR CTL press the button on the remote for the desired function The functio...

Страница 45: ...ty GR SXM46 SXM26 SX41 SX21 only If you use the cable adapter set the Y C CVBS video out select switch as required Y C When connecting to a VCR which accepts Y C signals and uses an S Video cable GR SXM46 SXM26 SX41 SX21 only CVBS When connecting to a VCR which does not accept Y C signals and uses an audio video cable Provided with GR SXM46 SXM26 SX41 SX21 only Also commercially available If you a...

Страница 46: ...en an in point and its corresponding out point To ensure correct operation there should be at least 15 seconds between an out point and the next in point Blank portions of a tape cannot be registered as in points or out points If it takes more than 5 minutes to search for an in point the VCR s Record Pause mode is cancelled and editing does not take place Pressing ON OFF clears all in and out poin...

Страница 47: ...diting 12 When all selected scenes have been copied the camcorder and VCR enter the Still or Pause mode Press STOP on both units To make the R A Edit counter display disappear press ON OFF When finished editing be sure to disconnect the editing cable and the audio video cable NOTES If you performed step 1 on page 45 MAKE CON NECTIONS keep the remote control pointed at the VCR during editing The on...

Страница 48: ...pg 6 The power supply has not been correctly connected Z pg 7 The battery pack has completely discharged Remove the cassette and disconnect the power source then after a few minutes try turning the power back on If it still does not come on consult your nearest JVC dealer Make sure the Erase Protection tab is in the position that allows recording If not slide the tab Some cassettes have removable ...

Страница 49: ...luminate the LCD monitor causes it to be hot Close the LCD monitor to turn it off or set the Power Switch to OFF and let the unit cool down The LCD monitor and the viewfinder are made with high precision technology However black spots or bright spots of light red green or blue may appear constantly on the LCD monitor or in the viewfinder These spots are not recorded on the tape This is not due to ...

Страница 50: ...50EN INDEX Controls Connectors And Indicators U I 3 4 5 6 y E R Y T t 7 8 0 9 1 i o q u p e r w 2 Q W ...

Страница 51: ...er Switch OFF AUTO PRO Z pg 16 33 Battery Release Switch BATTERY RELEASE Z pg 7 Close Button Z pg 11 Connectors q DC IN Connector Z pg 7 The connectors w to t are located beneath the cover w Video Output Connector Z pg 36 e Audio Output Connector Z pg 36 r S Video Output Connector GR SXM46 SXM26 SX41 SX21 only Z pg 36 t J Terminal JLIP Joint Level Interface Protocol Connector Connect the editing c...

Страница 52: ...e effect to another by pressing EFFECT then only the indicator remains at 8 3 Recording Format Indicator S S ET GR SXM46 SXM26 SX41 SX21 only Z pg 12 4 Tape Length Indicator Z pg 10 5 Zoom Indicator Bar Z pg 18 Zoom Level Indicator Approximate Zoom Ratio 6 Recording Indicator Z pg 16 9 Picture Stabilizer Indicator Z pg 18 0 Interval Time Recording Time Indicator Z pg 28 40 5 Sec Rec Mode Indicator...

Страница 53: ...t is detected on the heads during recording In this case use an optional cleaning cassette If the warning remains after cleaning consult your nearest JVC dealer The error indications E01 E06 show what type of malfunction has occured If an error indication and warning appear turn the unit off remove the power supply battery etc and wait a few minutes for them to clear When it does you can resume us...

Страница 54: ...ive heat as they can leak or explode 6 Do not dispose of the batteries in a fire 7 Remove the batteries from the unit if it is to be stored for an extended period to avoid battery leakage which can cause malfunctions CAUTIONS Battery Packs The battery packs are nickel cadmium or nickel metal hydride batteries Before using the supplied battery pack or an optional battery pack be sure to read the fo...

Страница 55: ...use allow inflammables water or metallic objects to enter the unit remove the battery pack or disconnect the power supply while the power is on leave the battery pack attached when the camcorder is not in use 2 Avoid using the unit in places subject to excessive humidity or dust in places subject to soot or steam such as near a cooking stove in places subject to excessive shock or vibration near a...

Страница 56: ...er units have been disconnected Mould may form if the lens is left dirty When using a cleaner or chemically treated cloth refer to the cautions that came with it When removing the eyepiece be sure to hold the viewfinder securely CAUTIONS cont About moisture condensation You may have observed that pouring a cold liquid into a glass will cause drops of water to form on the glass outer surface This s...

Страница 57: ...amcorder General Format S VHS GR SXM46 SXM26 SX41 SX21 only VHS PAL standard Power source DC 6 0 V Power consumption LCD monitor off viewfinder on 4 2 W GR SXM46 SXM26 FXM16 FXM161 3 7 W GR SX41 SX21 FX11 LCD monitor on viewfinder off 4 6 W GR SXM46 SXM26 FXM16 FXM161 LCD monitor on viewfinder on 5 2 W GR SXM46 SXM26 FXM16 FXM161 Video light 3 0 W GR SXM46 SXM26 FXM16 FXM161 only GR SXM46 SXM26 SX...

Страница 58: ...58EN MEMO ...

Страница 59: ...EN59 MEMO ...

Страница 60: ...COPYRIGHT 2000 VICTOR COMPANY OF JAPAN LTD EG Printed in Japan 1299MKV UN YP VICTOR COMPANY OF JAPAN LIMITED EN GR SXM46 GR SXM26 GR SX41 GR SX21 GR FXM16 GR FXM161 GR FX11 ...

Отзывы: