background image

EN 

23

4

S . LX

MAX

MAX

NORM

OFF

NOTE 

(for Fade/Wipe, Wide, Super LoLux, Instant Titles and Picture Stabiliser) 

:

When the Select Dial is turned to AUTO LOCK, the above functions will be set to the Factory settings
(Fade/Wipe-standby : “OFF”, Wide mode : off, Super LoLux : “MAX”, Instant Title : off, Picture Stabiliser:
off). Then when the Select Dial is returned to any position except AUTO LOCK, the above functions
return to the settings you selected before turning it to AUTO LOCK. However, if the function is switched
during AUTO LOCK, the selected mode will be set and will remain unchanged even when the Select
Dial is turned to any position except AUTO LOCK.
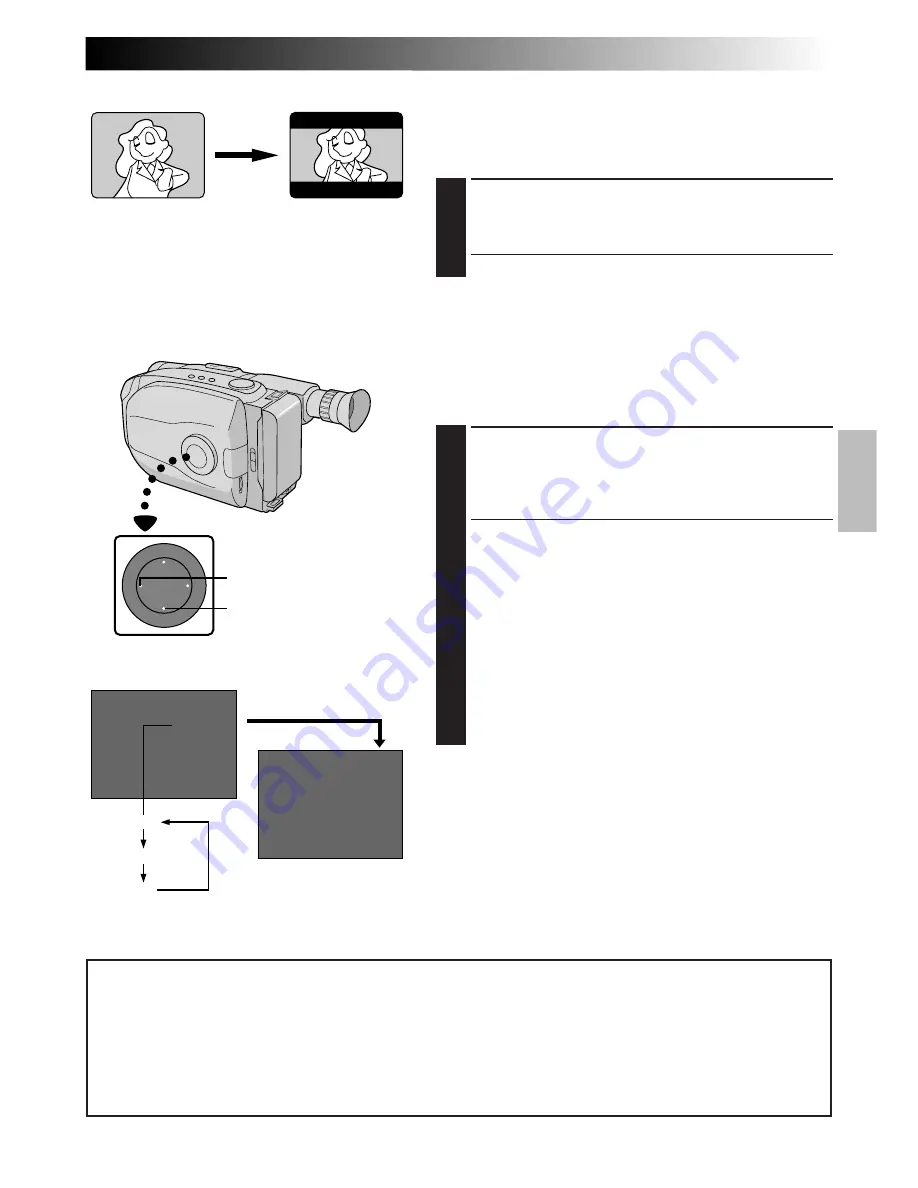
Viewfinder

Wide

This feature allows you to record black bars at the top
and bottom of the screen to produce a cinema-like
“wide-screen” effect.

ENGAGE WIDE MODE

1

Press WIDE.

•To restore normal screen, press WIDE again.

Super LoLux(Gain Up)

Bright, natural recordings can be taken even in areas with
low or poor lighting.

SELECT SUPER LOLUX MODE

1

Press SUPER LOLUX repeatedly to cycle through the
modes as shown to the left. Once the desired mode
appears, it is engaged.

•The mode’s name is displayed for approx. 2

seconds, then disappears.

MAX

: To record a subject in a dark lit environ-

ment. When it is more convenient to shoot
the subject with a brighter image even if
the picture becomes slightly coarse.

NORM : To record a subject in a dimly lit environ-

ment. When it is more convenient to shoot
with a less coarse picture although the
subject becomes slightly dark.

OFF

: Allows you to shoot dark scenes with no

picture brightness adjustment.

Viewfinder

WIDE

SUPER LOLUX

Wide mode

After 2 sec.

Содержание GR-AX680

Страница 1: ...ent 13 Tripod Mounting 13 RECORDING 14 Basic Recording 14 Basic Features 16 Advanced Features 20 PLAYBACK 36 Basic Playback 36 Features 37 Using The Cassette Adapter 39 Basic Connections 40 TAPE DUBBING 41 USING REMOTE CONTROL UNIT 42 Random Assemble Editing 44 Insert Editing 48 Audio Dubbing 49 TROUBLESHOOTING 51 CONTROLS INDICATIONS AND CONNECTORS 53 Viewfinder Indications 53 Controls 54 Connect...

Страница 2: ...ow DO NOT make any connection to the Larger Terminal coded E or Green The wires in the mains lead are coloured in accordance with the following code Blue to N Neutral or Black Brown to L Live or Red If these colours do not correspond with the terminal identifications of your plug connect as follows Blue wire to terminal coded N Neutral or coloured black Brown wire to terminal coded L Live or colou...

Страница 3: ...ls or doors on equipment DON T continue to operate the equipment if you are in any doubt about it working normally or if it is damaged in any way switch off withdraw the mains plug and consult your dealer DON T remove any fixed cover as this may expose dangerous voltages DON T leave equipment switched on when it is unattended unless it is specifically stated that it is designed for unattended oper...

Страница 4: ...m Z pg 16 Zoom in Zoom out Program Manager II Z pg 20 35 Programme AE with Special Effects Fade Wipe Wide Super LoLux Instant Titles Menu Adjustment Focus Exposure Control and so on REMEMBER The Logical Choice The only compact video cassettes that can be used with your VHS VCR PAL PROVIDED ACCESSORIES AC Power Adapter Charger AA V15EK Battery Pack BN V12U DC Cord Lithium Battery CR2025 clock opera...

Страница 5: ... tape on a VHS VCR using the Cassette Adapter Z pg 39 SUPPLY POWER INSERTING A VIDEO CASSETTE PLAYBACK SHOOTING 1 Slide EJECT to open the cassette holder 2 Insert a video cassette 3 Press PUSH to close the cassette holder For more details Z pg 11 EJECT PUSH Push in Hook on BATT RELEASE 1 Slide the LENS COVER Open Close Switch to open the lens cover 2 Set the Power Switch to CAMERA The power indica...

Страница 6: ...battery pack in until it locks in place DETACH BATTERY PACK 2 Slide BATT RELEASE and pull out the battery pack ATTENTION Before detaching the power source make sure that the camcorder s power is turned off Failure to do so can result in a camcorder malfunction REFRESH The AC power adapter features a REFRESH function that allows you to fully discharge the battery pack before recharging Perform the ...

Страница 7: ...ery pack or after detaching a discharged one from your camcorder While the AC Power Adapter Charger s power cord is disconnected from the AC outlet it is possible to discharge the battery by pressing the REFRESH switch During that time the AC Power Adapter Charger does not charge the battery When discharging is complete detach the battery from the AC Power Adapter Charger to store it Perform the R...

Страница 8: ...k battery compartment cover while pressing the release tab REMOVE BATTERY when replacing 3 Insert a pointed non metallic object between the battery and the compartment A and pull the battery out INSERT BATTERY 4 Ensure that the plus side is up and insert a CR2025 lithium battery and push it in CLOSE COVER 5 Close the compartment cover until it clicks in place NOTE See SAFETY PRECAUTIONS Z pg 2 for...

Страница 9: ...tem you want to set and then press it When the setting begins blinking rotate the MENU Jog Dial until the correct setting appears and then press it The setting stops blinking Repeat this procedure until you re satisfied with the Date settings YEAR MONTH and DAY SET TIME 4 Rotate the MENU Jog Dial to move the highlight bar to TIME and then press it When the hour setting begins blinking rotate the M...

Страница 10: ...t to return the tape length to the previous setting rotate the MENU Jog Dial to move the highlight bar to EXIT CLOSE MENU 4 Press the MENU Jog Dial The Menu Screen reappears and the highlight bar is on MENU END Then press the MENU Jog Dial again to close the Menu Screen NOTES The tape remaining time Z pg 15 is correct only if the correct tape length has been selected Once you have set the tape len...

Страница 11: ...ess a power supply is attached Make sure that the tape is not slack when loading the cassette If there is any slack turn the gear on the cassette in the direction of the arrow to take up the slack Make sure the Erase Protection tab is in the position that allows recording If not slide the tab Some cassettes have removable tabs If the tab has been removed cover the hole with adhesive tape The casse...

Страница 12: ...rate the Recording Start Stop Button and Power Zoom Button Refasten the Velcro strip Viewfinder Adjustment POSITION VIEWFINDER 1 Adjust the viewfinder manually for best viewability see illustration to the left SELECT MODE 2 Set the Power Switch to CAMERA ADJUST DIOPTRE 3 Turn the dioptre Adjustment Control until the indications in the viewfinder are clearly focused Recording Start Stop Button Powe...

Страница 13: ...cket and stud hole Then tighten the screw 2 4 3 1 2 1 Shoulder Strap Attachment ATTACH STRAP 1 Following the illustration at left thread the strap through the top of the eyelet 1 then fold it back and thread it through the keeper 2 and then through the buckle 3 Repeat the procedure to attach the other end of the strap to the other eyelet 4 making sure the strap isn t twisted ADJUST LENGTH 2 Adjust...

Страница 14: ...d and locked ENTER RECORD STANDBY MODE 2 Slide the LENS COVER Open Close Switch to open the lens cover then set the Power Switch to CAMERA The power indicator lights and the camcorder enters the Record Standby mode The scene you re aimed at appears on the viewfinder screen with the word PAUSE superimposed upon it START SHOOTING 3 Press the Recording Start Stop Button REC appears in the viewfinder ...

Страница 15: ...left in this condition for 5 minutes TAPE END also appears when a cassette whose tape is already at its end is loaded If the Record Standby mode continues for 5 minutes without performing Zoom or any other operations the camcorder s power shuts off automatically Set the Power Switch to POWER OFF and then back to CAMERA to turn the camcorder on again If the Recording Start Stop Button is pressed af...

Страница 16: ...osition except AUTO LOCK and press the MENU Jog Dial The Menu Screen appears 2 Rotate the MENU Jog Dial to move the highlight bar to ZOOM SPEED then press it The ZOOM SPEED Setting Menu appears 3 Rotate the MENU Jog Dial to move the highlight bar to the desired speed and press it twice The Menu Screen disappears and setting is completed NOTES Focusing may become unstable during Zooming In this cas...

Страница 17: ...e for the next shot NOTE Distortion may occur at start of playback This is normal FEATURE Retake PURPOSE To re record certain segments OPERATION 1 Make sure the camcorder is in the Record Standby mode 2 Press either RETAKE button to reach the start point for new recording Pressing F forwards the tape and pressing R reverses it 3 Press Recording Start Stop Button to start recording NOTE Noise may a...

Страница 18: ...tor disappears NOTES Accurate stabilisation may not be possible if hand shake is excessive or under the following conditions When shooting subjects with vertical or horizontal stripes When shooting dark or dim subjects When shooting subjects with excessive backlighting When shooting scenes with movement in various directions When shooting scenes with low contrast backgrounds Switch off the Picture...

Страница 19: ...to the left n You should have already performed the Date Time Setting procedure Z pg 9 If you haven t do so first NOTES DISPLAY The selected display can be recorded If you don t want to record the display select the Date off mode before shooting If you want to delete the display during shooting press DATE TIME To recall the display engage the Record Standby mode and press DATE TIME repeatedly unti...

Страница 20: ...ion remains The mode is activated When Auto Mode Lock or Auto Mode Release mode is selected only the mode s name is displayed Then the name disappears and the mode is activated NOTES Only one effect can be engaged at a time The screen becomes slightly reddish when the Fade Wipe Z pg 22 is used in the Sepia mode The screen becomes slightly dark in the High Speed Shutter mode Use in well lit situati...

Страница 21: ...a SEPIA Sepia The scene being shot is recorded in sepia tinted reddish brown monochrome giving the effect of an older movie Use together with Wide Z pg 23 for the authentic look of a classic Hollywood movie Dial Viewfinder Mode symbol indication Twilight TWILIGHT Twilight Dusk twilight scenery fireworks etc look more natural and dramatic The following happens when Twilight mode is selected Auto ga...

Страница 22: ... Electronic fog filter mode Z pg 21 engaged when Fader not Mosaic is used the image fades in out to a white screen Fade in Fade out Fade Wipe These effects let you make pro style scene transitions Fade or wipe in works at recording start and fade or wipe out works at recording end or when you enter Record Standby mode ENGAGE FADE OR WIPE STANDBY MODE 1 Press EFFECT to cycle through the modes as sh...

Страница 23: ...op and bottom of the screen to produce a cinema like wide screen effect ENGAGE WIDE MODE 1 Press WIDE To restore normal screen press WIDE again Super LoLux Gain Up Bright natural recordings can be taken even in areas with low or poor lighting SELECT SUPER LOLUX MODE 1 Press SUPER LOLUX repeatedly to cycle through the modes as shown to the left Once the desired mode appears it is engaged The mode s...

Страница 24: ...ters you have set using Character Generator Z pg 25 Viewfinder Title display Instant Titles The camcorder has eight preset titles in memory You can superimpose one of them above a previously stored title as shown in the illustration to the left SELECT PRESET TITLE 1 Press TITLE repeatedly to cycle through the preset titles until the desired title is displayed TITLE ...

Страница 25: ... character appears at the bottom of the screen Repeat for additional characters max 18 To select the location of the next character rotate the MENU Jog Dial to make BACK or NEXT at the bottom of the screen blink then press it repeatedly to move the blinking cursor underneath the desired location Rotate the MENU Jog Dial when you are done and the blinking cursor returns to the character grid END CH...

Страница 26: ...utomatically displayed If the setting you want can t be found in the Menu Screen place the highlight bar on MENU END then go to step 5 MAKE SETTING 3 Press the MENU Jog Dial The setting menu of the selected function appears The setting procedure depends on the function you select If you select FOCUS EXPOSURE DATE TIME or CHARACTER see respective pages FOCUS Z pg 30 31 EXPOSURE Z pg 29 DATE TIME Z ...

Страница 27: ... Depending on the zoom position the lens may go out of focus TAPE LENGTH Allows you to set the tape length depending on the tape used Z pg 10 M W B This camcorder s Automatic Colour Temperature system senses the colour temperature of the ambient lighting for automatic white balance adjustment However precise colour adjustment is not possible under the following conditions When an object is in vari...

Страница 28: ...OUR BAR OFF Does not display colour bars Normal screen is recorded ON Makes the normal screen disappear then displays colour bars By recording colour bars at the beginning or end of a tape an effect similar to professional productions can be given to your tape NOTE While the colour bars are displayed the camcorder s other functions are disabled JLIP ID NO This number is necessary when connecting t...

Страница 29: ...pears ADJUST EXPOSURE 4 To brighten the image Rotate the MENU Jog Dial upward The exposure control level counter increases maximum 06 Go to step 5 To darken the image Rotate the MENU Jog Dial downward The exposure control level counter decreases maximum 06 Go to step 5 END ADJUSTMENT OF EXPOSURE 5 Press the MENU Jog Dial The Menu Screen reappears and the highlight bar is placed on MENU END CLOSE M...

Страница 30: ...terns that are regularly repeated When the scene is affected by sunbeams or light reflecting off the surface of a body of water When shooting a scene with a high contrast background The low contrast warning appears NOTES If the lens is smeared or blurred accurate focusing is not possible Keep the lens clean wiping with a piece of soft cloth if it gets dirty When condensation occurs wipe with a sof...

Страница 31: ...step 5 To nearer subject Rotate the MENU Jog Dial downward appears and blinks Go to step 5 END ADJUSTMENT OF FOCUS 5 Press the MENU Jog Dial The Menu Screen reappears and the highlight bar is placed on MENU END CLOSE MENU 6 Press the MENU Jog Dial The Menu Screen disppears and reappears to indicate the focus is locked NOTES To return to Auto Focus select AUTO in step 3 To re adjust Manual Focus re...

Страница 32: ...ition except AUTO LOCK then press the MENU Jog Dial The Menu Screen appears ACCESS WHITE BALANCE MENU SCREEN 2 Rotate the MENU Jog Dial to move the highlight bar to M W B then press it SELECT WHITE BALANCE 3 Rotate the MENU Jog Dial to move the highlight bar to the required white balance AUTO Automatic adjustment FINE Outdoors on sunny day CLOUD Outdoors on cloudy day HALOGEN Light source is halog...

Страница 33: ...ete CLOSE MENU 4 Press the MENU Jog Dial NOTES To switch to automatic white balance adjustment set the M W B in the Menu Screen to AUTO or turn the Select Dial to AUTO LOCK Re adjust the White Balance when the lighting has changed when the camcorder has been turned off and on again or when the Select Dial s position has been changed When adjusted by putting coloured paper in front of the subject i...

Страница 34: ...REEN 1 Turn the Select Dial to any position except AUTO LOCK then press the MENU Jog Dial ACCESS INT TIME MENU SCREEN 2 Rotate the MENU Jog Dial to move the highlight bar to INT TIME then press the MENU Jog Dial SET INTERVAL TIME 3 Rotate the MENU Jog Dial to move the highlight bar to the desired time then press the MENU Jog Dial The Menu Screen reappears and the highlight bar is placed on MENU EN...

Страница 35: ...n or Time Lapse mode is deactivated Self Timer Animation and Time Lapse are cancelled when the power is shut off or when the cassette is ejected Time Lapse You can record sequentially at preset time spans Leaving the camcorder aimed at a specific subject you can record subtle changes over an extended period of time NOTE Make sure the camcorder is in the Record Standby mode and the recording mode i...

Страница 36: ...Y BACK 3 Press PLAY PAUSE The playback picture appears STOP PLAYBACK 4 Press STOP Rewind or Fast forward the tape Press REW to rewind or FF to fast forward the tape during Stop mode NOTE The camcorder shuts off automatically after about 5 minutes in Stop mode To turn on again set the Power Switch to POWER OFF then to PLAY FF REW PLAY PAUSE STOP Power Switch Tape running indicator 4 Playback 3 Fast...

Страница 37: ...CKING 1 Press the MENU Jog Dial during playback mode Keep rotating it until noise bars disappear To return to Auto Tracking press the MENU Jog Dial AT blinks When Auto Tracking finishes the indication disappears NOTES When noise bars appear during playback the camcorder enters the Auto Tracking mode and AT is displayed Manual Tracking may not work with tapes recorded on other VCRs or camcorders ME...

Страница 38: ... appear and pictures may become monochrome or darken in Shuttle Search This is normal FEATURE Counter Memory Function PURPOSE To make it easier to locate a specific tape segment OPERATION 1 Press COUNTER R M and hold for more than 1 second The counter resets to 0 00 00 2 Press COUNTER R M for less than 1 second M appears 3 After recording or playback press STOP then REW The tape automatically stop...

Страница 39: ...ad the cassette adapter into the VCR and play the tape back as you would any other REMOVE CASSETTE FROM ADAPTER 4 Slide the latch and the compartment door opens automatically This may take around 10 seconds Do not attempt to force the adapter open Then insert your finger in the hole on the underside of the adapter as shown in the illustration to the left push up and remove the cassette NOTES Durin...

Страница 40: ...those on the TV SELECT MODE 2 Set the TV to its VIDEO or AV mode as specified in its instructions Connection To A TV With NO A V Input Connectors Playback ONLY NOTE Use the optional RF V5E RF unit Refer to the RF V5E instruction manual for connection procedure NOTES It is recommended to use the AC Power Adapter Charger as the power supply instead of the battery pack To monitor the picture and soun...

Страница 41: ...t before the edit in point Once it s reached press PAUSE on the camcorder START EDITING 5 Press PLAY on the camcorder and engage the VCR s Record mode STOP EDITING TEMPORARILY 6 Engage the VCR s Record Pause mode and press PAUSE on the camcorder EDIT MORE SEGMENTS 7 Repeat steps 4 through 6 for additional editing then stop the VCR and camcorder when finished PLAY PAUSE Power Switch When connecting...

Страница 42: ... FF and REW of your VCR This remote control unit makes additional recording functions possible BUTTONS 1 PAUSE IN Connector 2 Infrared beam transmitting window 3 MBR SET Button 4 INT TIME Button 5 REC TIME Button 6 FF Button 7 REW Button 8 PAUSE Button 9 PLAY Button 0 START STOP Button VISS Button ZOOM T W Buttons VCR CTL Button A DUB Button STOP Button INSERT Button R A EDIT Buttons FUNCTIONS Wit...

Страница 43: ... TIME and REC TIME on the remote control Each time INT TIME is pressed the Interval Timer indicator appears changing in the following order 15S 30S 1MIN 5MIN and No indication off Each time REC TIME is pressed the Rec Time indicator appears changing in the following order 1 4S 1 2S 1S 5S and No indication off 2 Release Instead of using the Menu in step 5 on pg 35 press INT TIME and REC TIME on the...

Страница 44: ... Then while holding VCR CTL press the button on the remote for the desired function The functions the remote can control are PLAY STOP PAUSE FF REW and VCR REC STBY you don t need to press VCR CTL for this one You re now ready to try Random Assemble Editing IMPORTANT Although the MBR is compatible with JVC VCRs and those of many other makers it may not work with yours or may offer limited function...

Страница 45: ...g cable to the RM V700U s Pause In jack PREPARE CAMCORDER 2 Insert a recorded tape and set the Power Switch to PLAY PREPARE VCR 3 Turn the power on insert a recordable tape and engage the AUX mode refer to VCR s instructions To AUDIO and VIDEO OUT connectors To J terminal JLIP Open the cover VCR Recording deck To Pause In To Remote PAUSE If your TV VCR has the SCART connector use the cable adapter...

Страница 46: ...CORRECTIONS 5 Press CANCEL during steps 2 and 3 to erase the most recently registered point NOTES There must be at least one second between an in point and its corresponding out point To ensure correct operation there should be at least 15 seconds between an out point and the next in point Blank portions of tape cannot be registered as in points or out points If it takes more than 5 minutes to sea...

Страница 47: ...ging copied is shown with a blinking highlight END AUTOMATIC EDITING 3 When all selected scenes have been copied the camcorder and VCR enter the still or pause mode Press STOP on both units To make the R A Edit counter display disappear press ON OFF When finished editing be sure to disconnect the editing cable and the audio video cable NOTES If you performed step 1 C on page 45 MAKE CONNECTIONS ke...

Страница 48: ...the scene you want to replace press PLAY to view the recorded tape and press PAUSE exactly at the point where the new scene should start ENGAGE INSERT EDITING MODE 5 Press and hold INSERT and without releasing INSERT press and release PAUSE The Insert mode is engaged When the scene the camcorder is aimed at appears on the screen go to the next step BEGIN INSERT EDITING 6 Press START STOP When the ...

Страница 49: ... press FF or REW during Audio Dub Standby or the edit points will not be accurate If the microphone is too close to the TV or if the TV s volume is too high whistling or howling may occur NOTES for Insert Editing and Audio Dubbing Insert Editing and audio Dubbing may not work correctly if the tape contains blank segments or if the recording speed was changed during the original recording To edit d...

Страница 50: ...se switch to close the lens cover Cleaning The Camcorder CLEAN EXTERIOR 1 Wipe gently with a soft cloth CLEAN LENS 2 Blow it with a blower brush then wipe gently with lens cleaning paper CLEAN VIEWFINDER 3 1 Turn the eyepiece counterclockwise and pull it out 2 Remove dust using a blower brush 3 Align the marks re attach the eyepiece and turn it clockwise NOTES Avoid using strong cleaning agents su...

Страница 51: ...completely discharged Remove the cassette and disconnect the power source then after a few minutes try turning the power back on If it still doesn t come on consult your nearest JVC dealer Make sure the Erase Protection tab is in the position that allows recording If not slide the tab Some cassettes have removable tabs If the tab has been removed cover the hole with adhesive tape The camcorder Pow...

Страница 52: ...ng in the SP mode Z pg 10 Turn the camcorder s power off then disconnect the power source After a few minutes try turning the power on again If the error number still appears in the view finder consult your nearest JVC dealer The dioptre needs to be adjusted Z pg 12 The scene being shot is adversely affecting the operation of Auto Focus Z pg 30 If you remove the power source from the camcorder whi...

Страница 53: ...ssette Warning Tape Remaining Time Z pg 15 When no cassette is inserted the cassette warning blinks When Erase Protection tab is not in the position that allows recording the cassette warning lights Otherwise the tape remaining time is displayed and the tape remaining time warning blinks when the tape is about to reach its end When the Power Switch is set to PLAY and a tape is loaded the cassette ...

Страница 54: ...54EN 4 3 o u i 1 Q q w e r E t y W R 2 p 9 0 5 6 7 8 CONTROLS INDICATIONS AND CONNECTORS cont ...

Страница 55: ...to r are located beneath the jack cover External Microphone Input Jack Z pg 49 q J terminal JLIP Joint Level Interface Protocol Connector Connect the editing cable when performing Random Assemble Editing Z pg 44 47 It is used to connect the camcorder to a device such as a personal computer For further detail consult your nearest JVC dealer JLIP controlled editing from camcorder to VCR is not possi...

Страница 56: ... pg 11 Insert Editing pg 48 Instant Titles pg 24 M Manual Focus pg 31 MBR Code Setting pg 44 N ND Effect Mode pg 21 Nega Posi Mode pg 21 P Picture Stabilizer pg 18 Playback pg 36 Programme AE with Special Effects pg 20 21 Provided Accessories pg 4 Q Quick Review pg 17 R Random Assemble Editing pg 44 47 Recording Advanced Features pg 20 35 Recording pg 14 Recording Start Stop pg 14 15 Recording Mod...

Страница 57: ...rage 10 C to 30 C Recharging time is based on room temperature of 20 C The lower the temperature the longer recharging takes Cassettes To properly use and store your cassettes be sure to read the following cautions 1 During use make sure the cassette bears the VHS C mark be aware that recording onto prerecorded tapes automatically erases the previously recorded video and audio signals make sure th...

Страница 58: ...irt and other particles on the video heads may cause the playback picture to become blurred or interrupted Although this camcorder is equipped with a built in head cleaner which automati cally cleans the heads reducing the likelihood of dirty heads if such troubles are encountered we recom mend the use of the cleaning cassette specifically designed for JVC camcorders model number TCC 2U Please use...

Страница 59: ...IDEO OUT connector AUDIO Output 8 dBs 1 k ohm via AUDIO OUT connector External microphone input 68 dBs high impedance unbalanced with ø3 5 mm MONO AC POWER ADAPTER BATTERY CHARGER AA V15EK Power requirement AC 110 V to 240 V 50 60 Hz Power consumption 23 W Output Charge DC 8 5 V 1 3 A VTR DC 6 3 V 1 8 A Charging system Constant current peak detection timer controlled Dimensions 140 W x 42 H x 68 D...

Страница 60: ...GR AX680 COPYRIGHT 1998 VICTOR COMPANY OF JAPAN LTD EK Printed in Japan 0398MKV UN VP VICTOR COMPANY OF JAPAN LIMITED ...

Отзывы: