background image

41

s

!

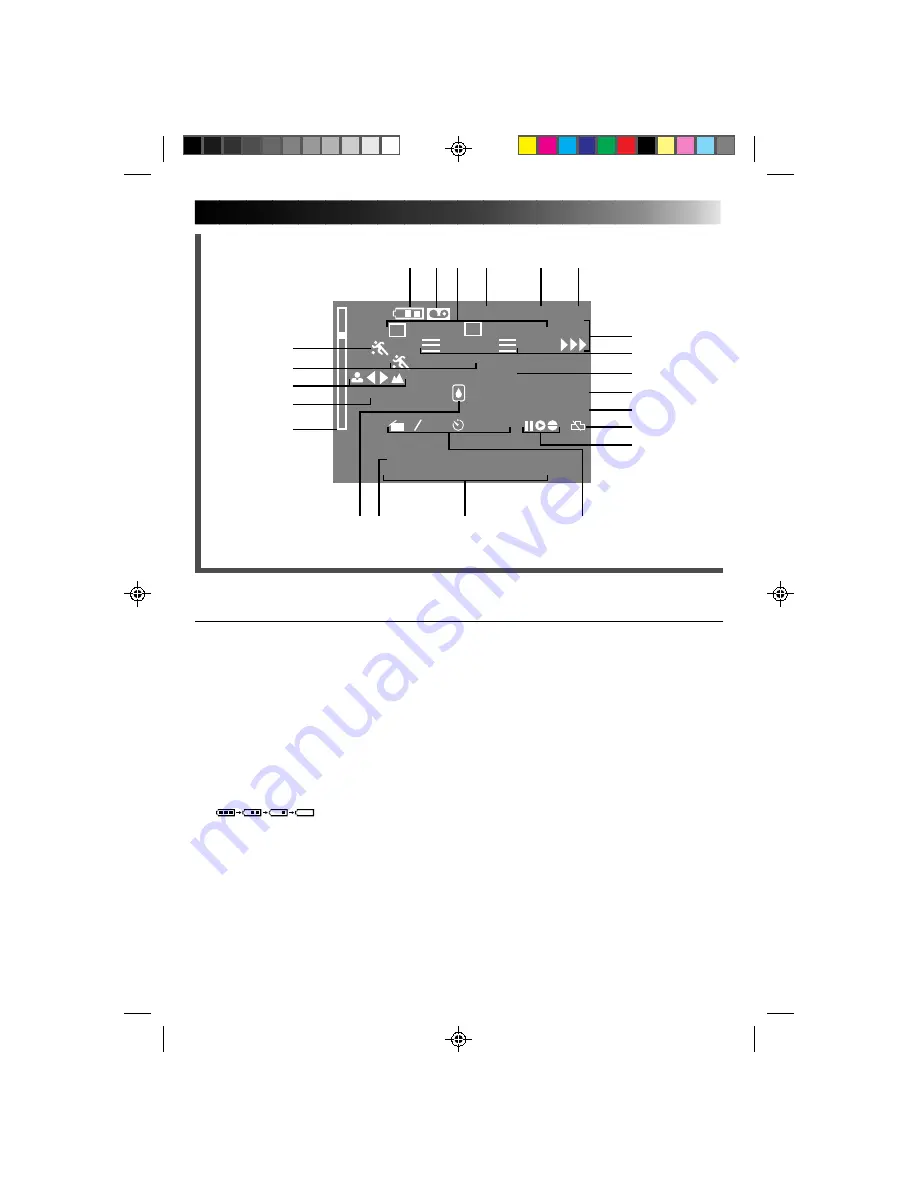
Recording Mode (SP/LP) Indicator .........

Z

 pg. 9

@

Recording Indicator .............................

Z

 pg. 12

#

Record–Standby Indicator ...................

Z

 pg. 12

$

Lens Cover Warning ............................

Z

 pg. 12

%

Index Code Marking ............................

Z

 pg. 14

^

Fade–Standby Indicator .......................

Z

 pg. 18

&

Clock Battery Warning
Appears when the clock (lithium) battery is not
in place or exhausted.
For inserting or replacing
the clock battery ...................................

Z

 pg. 8

*

Insert Editing Indicator ........................

Z

 pg. 36

Audio Dubbing Indicator ....................

Z

 pg. 37

(

Condensation Warning
When this indicator appears, all functions are
disabled. Turn the unit off for a few hours, and
when you turn it on again the indicator should
disappear.

)

Instant Title .........................................

Z

 pg. 25

q

Date/Time/Character ...........................

Z

 pg. 23

w

Interval
Time/Recording Time Indicator ...........

Z

 pg. 26

Viewfinder Indications

1

2

 PROGRAM AE Indicator ................

Z

 pg. 16

Displayed at 

2

 for approx. 3 seconds when the

PROGRAM AE select dial is switched from one
position to another. Then only the indicator
remains at 

1

.

3

Focus Indicator ...................................

Z

 pg. 20

4

White Balance Mode Indicator ............

Z

 pg. 17

5

Zoom Level Indicator ..........................

Z

 pg. 13

Exposure Indicator Bar ........................

Z

 pg. 22

6

Battery Pack Remaining Power Indicator
Changes as follows according to the battery
pack’s remaining power level:

”. When the power is

almost gone, the indicator blinks, then the unit
shuts off. Replace the battery pack with a fully
charged one ..........................................

Z

 pg. 6

7

Cassette Warning ..................................

Z

 pg. 9

Blinks when no cassette or a cassette with the
Erase Protection tab removed is loaded.

8

Intelligent Function Control
Indicator .............................................

Z

 pg. 18

9

Remaining Tape Time ..........................

Z

 pg. 12

0

Tape Length Indicator ............................

Z

 pg. 9

5


M


I


N

T

W

SP

REC

3 0

M I N

P AUSE

10


:


55

25. 12

96

1


4

S

T

30

FADER

C INEMA

LEN S  CO VER

MERRY  CHR ISTMAS

SPORTS

F

1

F

2

MWB

I NDEX

FADER

1
2
3

5

4

8

6 7

9

0

!

@
#
$
%
^
&
*

)

(

w

q

INDEX   

Viewfinder

Содержание GR-AX260

Страница 1: ...10 Tripod Mounting 10 Remote Control Unit 11 RECORDING 12 Basic Recording 12 Basic Features 13 Advanced Features 15 PLAYBACK 28 Using The Cassette Adapter 28 Basic Connections 29 Basic Playback 30 Features 31 EDITING 32 Tape Dubbing 32 Random Assemble Editing R A Edit 32 Insert Editing 36 Audio Dubbing 37 USER MAINTENANCE 38 TROUBLESHOOTING 39 INDEX 40 Controls 40 Connectors 40 Indicators 40 Other...

Страница 2: ...o the Larger Terminal coded E or Green The wires in the mains lead are coloured in accord ance with the following code Blue to N Neutral or Black Brown to L Live or Red If these colours do not correspond with the terminal identifications of your plug connect as follows Blue wire to terminal coded N Neutral or coloured black Brown wire to terminal coded L Live or coloured Red If in doubt consult a ...

Страница 3: ...be careful with glass panels or doors on equipment DON T continue to operate the equipment if you are in any doubt about it working normally or if it is damanged in any way switch off withdraw the mains plug and consult your dealer DON T remove any fixed cover as this may expose dangerous voltages DON T leave equipment switched on when it is unat tended unless it is specifically stated that it is ...

Страница 4: ...eed Hyper Zoom Z P 13 Random Assemble Editing Z P 32 35 8 8 2 2 5 5 4 4 1 1 6 6 3 3 7 7 T W T W T W T W Zoom in Zoom out MAJOR FEATURES The Logical Choice PAL The only compact video cassettes that can be used with your VHS VCR PROVIDED ACCESSORIES AC Power Adapter Charger AA V11EK Battery Pack BN V12U Cassette Adapter C P7U Editing cable Remote Control Unit RM V704U GR AX460 only Lithium Battery C...

Страница 5: ...ls Z pg 30 n Or simply play back the tape on a VHS VCR using the Cassette Adapter Z pg 28 SHOOTING 1 Slide the LENS COVER open close knob to open the lens cover 2 Set the power switch to CAMERA The power indicator will light and image will be seen in the viewfinder 3 Press the Recording Start Stop button Recording starts To stop recording temporarily momentarily press the Recording Start Stop butt...

Страница 6: ...N V22U approx 2 hrs 10 min approx 7 hrs BN V25U approx 2 hrs 40 min approx 10 hrs REFRESH indicator REFRESH switch CHG charge indicator To AC outlet Marks END indicator Hook on Push in BATT RELEASE POWER indicator REFRESH The AC power adapter features a REFRESH function that allows you to fully discharge the battery pack before recharging To discharge the battery attach the battery pack to the ada...

Страница 7: ... spare battery packs Charging times noted on page 6 are for fully discharged battery pack and discharging times are for fully charged battery pack Charging and discharging times vary according to the ambient temperature and the status of the battery pack Remember to set the charge marker after charging a battery pack or after detaching a discharged one from your camcorder Perform the REFRESH funct...

Страница 8: ... metallic object between the battery and the compartment A and pull the battery out INSERT BATTERY 4 Ensuring the plus side is up insert the supplied lithium battery and push it in CLOSE COVER 5 Close the compartment cover until it clicks in place NOTE See SAFETY PRECAUTIONS Z pg 2 for information on safe handling of lithium batteries Date Time Settings SELECT MODE 1 Set the power switch to CAMERA...

Страница 9: ...e indicator does not work with tapes other than EC30 and EC45 See Basic Recording on pg 12 for tape remaining time indicator Loading Unloading A Cassette OPEN CASSETTE HOLDER 1 Slide EJECT until holder opens Do not use force to open INSERT REMOVE CASSETTE 2 Make sure label is facing outward CLOSE CASSETTE HOLDER 3 Press PUSH and make sure the holder is closed and locked NOTES A cassette holder can...

Страница 10: ...ion at left thread the strap through the top of the eyelet 1 then fold it back and thread it through the keeper 2 and then through the buckle 3 Repeat the procedure to attach the other end of the strap to the other eyelet making sure the strap isn t twisted ADJUST LENGTH 2 Adjust as shown in the illustration at left 1 then slide both keepers snug against the eyelets to prevent slipping 2 Tripod Mo...

Страница 11: ...ed beam sensor window The transmitted beam may not be effective or may cause misoperations when the infrared beam sensor window is directly exposed to sunlight or powerful lighting Functions Buttons With the camcorder s power switch set to With the camcorder s power switch set to CAMERA PLAY 1 PAUSE IN connector Z pg 34 2 Infrared beam Transmits the beam signal transmitting window 3 MBR SET button...

Страница 12: ...nters the Record Standby mode NOTES A cassette holder can t be opened unless a power supply is attached There may be a delay after you slide EJECT until the holder opens Do not use force The tape s remaining time is displayed in the viewfinder as shown TAPE END appears when the tape recheas its end and the power goes off automatically if left in this condition for 5 minutes TAPE END also appears w...

Страница 13: ...URE Quick Review PURPOSE To check end of last recording for confirmation OPERATION 1 Press for less than 2 seconds during Record Standby mode Tape is rewound for about 2 seconds and played back automati cally then pauses in Record Standby mode for next shot NOTE Distortion may occur at start of playback This is normal FEATURE Retake PURPOSE To re record certain segments OPERATION 1 Make sure camco...

Страница 14: ...y PURPOSE To automatically stop recording when the camcorder is pointed down preventing accidental recordings of the ground your feet etc OPERATION 1 Set AUTO PAUSE to ON When the camcorder is tilted down by a large degree from its horizontal position during recording the Record Standby mode is automati cally engaged AUTO PAUSE appears in the viewfinder NOTES The Auto Pause System is also effectiv...

Страница 15: ...eo light or when you start recording with the video light turned on When the LIGHT ON AUTO OFF is set to AUTO Depending on the lighting condition the video light may not be stably turned on or off In this case switch the light on and off manually While the Sports or High Speed Shutter mode Z pg 16 is engaged the light is likely to stay on While the Twilight mode Z pg 16 is engaged the light will n...

Страница 16: ...NDER MODE SYMBOL Auto Mode Lock Locks camcorder in Full Auto mode preventing accidental misoperation button pressing during shooting CINEMA FADER FOCUS EXPOSURE DISPLAY TITLES and MWB Manual White Balance controls are disabled in this mode Auto Mode Release Re enables controls that were disabled by Auto Mode Lock Electronic Fog Filter Makes picture look misty white as when external fog filter is a...

Страница 17: ...lour temperatures ADJUST FOCUS 1 Point the camcorder at a white flat object such as a sheet of white paper and adjust focus manually Z pg 21 ADJUST WHITE BALANCE 2 Press MWB until MWB appears then press and hold MWB for more than 3 seconds MWB blinks in the viewfinder during adjustment then stops blinking but stays lit when adjustment is complete No indication Auto MWB NOTES To switch to automatic...

Страница 18: ...nt Function Control is unusable Fader This feature allows smooth fade in and fade out to black blank screen Fade in works at recording start and fade out works at recording end or when you enter Record Standby mode SELECT MODE 1 Press Function SEL until FADER appears to the right of F1 ENGAGE FADE STANDBY MODE 2 Press F1 to engage the Fade Standby mode FADER appears in the viewfinder START RECORDI...

Страница 19: ...d bottom of the screen to produce a cinema like wide screen effect SELECT MODE 1 Press Function SEL until CINEMA appears to the right of F2 ENGAGE CINEMA MODE 2 Press F2 RESTORE NORMAL SCREEN 3 Press F2 again while CINEMA appears next to F2 in the viewfinder Cinema mode ...

Страница 20: ...camcorder Engage the focus lock function to lock your subject in before recording When you want your subject to be focused and to appear in a corner of the screen First centre on the subject and focus using auto focus mode Then engage the focus lock function and move the camcorder until the subject is where you want it SELECT MODE 1 Press Function SEL until FOCUS appears to the right of F1 LOCK FO...

Страница 21: ...ndication is replaced by the focus lock indication and the adjusted focus is locked in RELEASE MANUAL FOCUS MODE 4 Press F1 The Manual Focus mode is immediately released and the focus lock indication disappears NOTES Be sure to focus the lens in the maximum telephoto position when you use the Manual Focus mode If you focus in on a certain subject in the wide angle position sharply focused images c...

Страница 22: ...tch to T The Exposure indicator bar appears in the viewfinder OR DARKEN IMAGE While holding down F2 slide the power zoom switch to W The Exposure indicator bar appears in the viewfinder When you want to return to the factory setting RESTORE INITIAL SETTING 3 Press F2 The standard setting is immediately restored and the Exposure indicator bar disappears SEL F1 F2 FOCUS EXP F1 F2 F2 F2 F1 button F2 ...

Страница 23: ... After loading a cassette After Auto Date Record mode is selected by pressing F2 In this mode the month day and year are replaced after 5 seconds with AUTO DATE NOTES Setting PROGRAM AE to LOCK always engages this mode and disables all other modes In the Auto Date Record mode if the date changes while you re shooting the date indication is recorded for about 5 seconds from that point It is not rec...

Страница 24: ... viewfinder ACCESS CHARACTER MODE SCREEN 3 Press SET A character grid appears in the view finder ENTER DESIRED CHARACTERS 4 Press or to move the cursor on the character grid to the desired character then press SET to enter The selected characters appears at the bottom of the screen When you re done press SET as many times as necessary to exit the screen The title you made appears at the bottom of ...

Страница 25: ... until TITLE appears to the right of F1 SELECT PRESET TITLE 2 Engage the Record Standby mode then press F1 to cycle through the preset titles until the desired title is displayed NOTES To delete the Instant Title during recording press F1 To recall a title engage the Record Standby mode and then press F1 to select the desired title To display a title you made in the position usually occupied by an...

Страница 26: ...ime INT TIME is pressed 15S 15 seconds 30S 30 seconds 1MIN 1 minute and 5MIN 5 minutes Pressing again releases the Self timer START DELAYED RECORDING 3 Press Recording Start Stop The tally lamp begins blinking and the blinking speed increases about 5 seconds before recording starts When recording begins the lamp stops blinking but stays lit RELEASE SELF TIMER MODE 4 To release when the tally lamp ...

Страница 27: ...e is engaged with 15S selected Fade in out cannot be performed during Animation shooting Time Lapse You can record sequentially at preset time spans Leaving the camcorder aimed at a specific subject you can record subtle changes over an extended period of time ENGAGE RECORD STANDBY MODE 1 Make sure the lens cover is open then set the power switch to CAMERA SET RECORDING SPEED 2 Set SP LP to SP Z p...

Страница 28: ...oor PLAY BACK ON CONNECTED VCR 3 Load the cassette adapter into the VCR and play the tape back as you would any other REMOVE CASSETTE FROM ADAPTER 4 Slide the latch and the compartment door opens automatically Then insert your finger in the hole on the underside of the adapter as shown in the illustration at left push up and remove the cassette NOTES During tape loading and unloading do not touch ...

Страница 29: ...ctors on the camcorder and those on the TV SELECT MODE 2 Set the TV to its VIDEO or AV mode as specified in its instructions Connection To A TV With NO A V Input Connectors Playback ONLY NOTE Use the optional RF V5E RF unit Refer to the RF V5E instruction manual for connection procedure PLAYBACK Basic Connections NOTES It is recommended to use the AC Power Adapter Charger as the power supply inste...

Страница 30: ...ower On indicator lights PLAYBACK 3 Press PLAY PAUSE The playback picture appears in the viewfinder and the connected TV STOP PLAYBACK 4 Press STOP Rewind or Fast forward the Tape Press REW to rewind or FF to fast forward the tape during stop mode NOTE The camcorder shuts off automatically after about 5 minutes in STOP mode To turn on again set the power switch to POWER OFF then to PLAY FF REW PLA...

Страница 31: ...F during playback Speed is 3 times normal in SP and 7 times normal in LP mode Reverse Search 1 Press REW during playback Speed is as noted above NOTE Noise bars appear and pictures may become monochrome in Shuttle Search This is normal FEATURE Counter Memory Function PURPOSE To make it easier to locate a specific tape segment OPERATION 1 Press COUNTER R M and hold for more than 2 seconds The count...

Страница 32: ...n the camcorder in step 5 automatically engages the VCR s Record mode When using a Remote PAUSE terminal you can access a function called Master Edit Control System Before beginning reset the camcorder s counter to M0 00 00 at an edit out point When the tape reaches this point remember there s a small margin of error during editing the camcorder and VCR pause automatically However some VCRs are no...

Страница 33: ... for the desired function The functions the remote can control are PLAY STOP PAUSE FF REW and VCR REC STBY you don t need to press VCR CTL for this one You re now ready to try Random Assemble Editing IMPORTANT Although the MBR is compatible with JVC VCRs and those of many other makers it may not work with yours or may offer limited functions NOTES If the VCR s power doesn t come on in step 1 try a...

Страница 34: ... screen REGISTER ADDITIONAL SCENES 4 Repeat steps 2 and 3 for each additional scene as many as 8 MAKE CORRECTIONS 5 Press CANCEL during steps 2 and 3 to erase the most recently registered point NOTES There must be at least one second between an in point and its corresponding out point The camcorder prerolls during R A Edit so there must be at least 15 seconds of recording material prior to any in ...

Страница 35: ...APE camcorder EDITED TAPE VCR EDIT STOP SUPPLEMENTAL INFORMATION ON THE REMOTE CONTROL Using the RM V704U remote control it is also possible to perform deck to deck Random Assemble Editing The playback deck must be an R A Edit capable JVC VCR The recording deck can be n a VCR other than JVC or n a JVC VCR which has neither a Remote PAUSE nor an R A EDIT connector How to use Connect the playback de...

Страница 36: ...amcorder is aimed at appears on the screen BEGIN INSERT EDITING 6 Press Recording Start Stop When the counter reaches 0 00 00 editing stops automatically and the camcorder enters the playback mode NOTES Insert Editing may not work correctly if a blank segment exists in the recorded tape The tape may stop slightly before or after the designated end point and noise bars may appear Neither indicates ...

Страница 37: ...art ENGAGE AUDIO DUB STANDBY MODE 2 Press and hold A DUB and press PAUSE BEGIN AUDIO DUBBING 3 Press PLAY When the counter reaches 0 00 00 Audio Dubbing stops automatically and the camcorder enters the playback mode NOTES Audio Dubbing may not work correctly if the tape contains blank segments or if the recording speed was changed during the original recording If the camcorder s mike is too close ...

Страница 38: ...loth CLEAN LENS 2 Blow it with a blower brush then wipe gently with lens cleaning paper REMOVE EYEPIECE 3 Turn the eyepiece counterclockwise and pull it out CLEAN VIEWFINDER 4 Remove dust using a blower brush RE ATTACH EYEPIECE 5 Align the marks re attach the eyepiece and turn it clockwise NOTES Avoid using strong cleaning agents such as benzine or alcohol Cleaning should be done only after the ba...

Страница 39: ...ad cleaning or replacement This is normal The camcorder is a microcomputer controlled device External noise and interference from a TV a radio etc might prevent it from functioning properly In such cases first disconnect its power supply unit battery pack AC Power Adapter Battery Charger etc and clock battery and then re connect it and proceed as usual from the beginning The tape stops during fast...

Страница 40: ...Z pg 34 REW Button Z pg 30 RETAKE R Quick Review Button Z pg 13 FF Button Z pg 30 RETAKE F Button Z pg 13 R A EDIT CANCEL Button Z pg 34 q STOP Button Z pg 30 w PLAY PAUSE Button Z pg 30 e POWER Switch Z pg 8 r Recording Start Stop Button Z pg 10 Connectors t REMOTE Jack For connection of the RM V20U wired remote control unit optional y Shoulder Strap Eyelets Z pg 10 u EDIT Jack Z pg 32 i VIDEO Ou...

Страница 41: ...or Z pg 16 Displayed at 2 for approx 3 seconds when the PROGRAM AE select dial is switched from one position to another Then only the indicator remains at 1 3 Focus Indicator Z pg 20 4 White Balance Mode Indicator Z pg 17 5 Zoom Level Indicator Z pg 13 Exposure Indicator Bar Z pg 22 6 Battery Pack Remaining Power Indicator Changes as follows according to the battery pack s remaining power level Wh...

Страница 42: ...ert Cassette pg 9 Insert Editing pg 36 Instant Titles pg 25 Intelligent Function Control pg 18 25 M Manual Focus pg 21 Master Edit Control pg 32 MBR code Setting pg 33 N ND Effect Mode pg 16 O On Screen Display pg 23 P Playback pg 30 Programme AE with Special Effects pg 16 Provided Accessories pg 4 Q Quick Review pg 13 R Random Assemble Editing pg 32 35 Recording Advanced Features pg 16 27 Recordi...

Страница 43: ...rage remove from charger or powered unit when not in use as some machines use current even when switched off 3 To prevent damage to the camcorder replace the battery pack when it begins to deliver less recording time per charge NOTE It is normal for the battery pack to be warm after charging or after use Temperature Ranges Charging 10 C to 35 C Operation 0 C to 40 C Storage 10 C to 30 C NOTES Rech...

Страница 44: ...our local JVC dealer SPECIAL NOTES ON VIDEO HEADS Dust and dirt on video heads 1 Always allow enough time for your camcorder to acclimatize to its environment before using it 2 Do not use the unit in areas of high humidity Typical areas of high humidity are given below From being used or stored in a very cold outdoor situation then immediately being used in a warm indoor situation From being used ...

Страница 45: ...alance adjustment Auto Manual adjustment VIDEO Output 1 Vp p 75 ohms unbalanced via VIDEO out connector AUDIO Output 8 dBs 1 k ohm via AUDIO out connector AC POWER ADAPTER BATTERY CHARGER AA V11EK SPECIFICATIONS Power requirement AC 110 to 240 V 50 60 HZ Power consumption 23 W Output Charge DC 8 5 V 1 3 A VTR DC 6 3 V 1 8 A Charging system Constant current peak detection timer controlled Dimension...

Страница 46: ...MEMO ...

Страница 47: ...MEMO ...

Страница 48: ...GR AX260 AX460 COPYRIGHT 1995 VICTOR COMPANY OF JAPAN LTD EK Printed in Japan 0196MSV UN VP VICTOR COMPANY OF JAPAN LIMITED ...

Отзывы: