background image

2

 Thank you for buying this JVC LCD panel television.

To make sure you understand how to use your new TV, please read this manual thoroughly before you begin.

10

10

Plane

Follow this manual regarding setup!

• 

Connect only to a 110-240 V, 50/60Hz AC outlet.


-

Make enough room for inserting and removing the power plug!

• 

Place the TV as close to the outlet as possible!

• 

The main power supply for this TV is controlled by inserting or removing the power plug.


-

Never cut or damage the power cord!

• 

If the AC plug is not the right shape, or the power cord is not long enough, use an 


-

appropriate plug adapter or extension cable. (Consult your retailer)

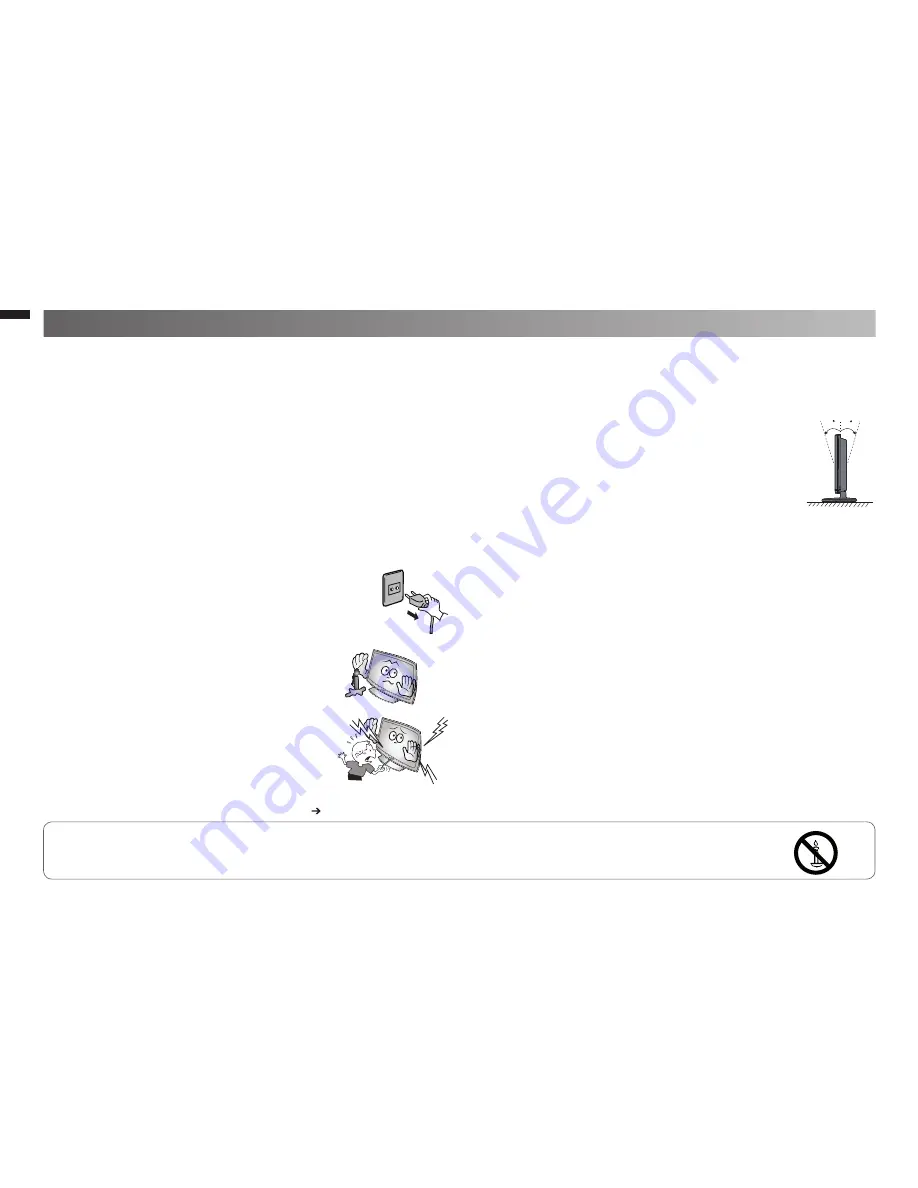
Unplug the power cord when going out!

• 

The power buttons on the remote control and the TV unit cannot completely turn off the 


-

TV. (Make appropriate arrangements for bedridden people.)

Do not allow the TV to fall!

• 

Do not rest your elbows on, or allow children to hang from the TV.


-

There is a risk that the TV will fall and cause injuries.


-

Make use of the hole on the back of the stand to prevent the TV from falling easily.


-

If the TV is damaged or behaving strangely, stop using it at once!

• 

Unplug the power cord and contact your retailer.


-

Never place anything on the TV!

• 

Placing liquid, naked 

fl

 ames, cloths, paper, etc. on the TV may cause a 

fi

 re.


-

Never expose to rain or moisture!

• 

To prevent 

fi

 re or electric shock, never allow liquids to enter the unit.


-

Never insert objects into the cabinet openings!

• 

It may cause a fatal electric shock.


-

Take care when children are near.


-

Hold the TV so as not to scratch the screen!

• 

Do not touch the screen when carrying the TV.


-

Do not carry the TV on your own!

• 

In order to prevent accidents, ensure that the TV is carried by 


-

two or more people.

Never insert the power cord by wet hand!

• 

It may cause a fatal electric shock.


-

Keep the TV set away from direct sunlight!

• 

TV set can be damaged.


-

Place the TV set in a neat and dry place. Do not place the product close to 

• 

source of steam, heat, moisture or oil. Because it may cause a 

fi

 re hazard 

or electric shock hazard!
Don’t touch an external metal part of the TV set!

• 

It may cause an electrocuted.


-

For keep a distance from potential ignition sources to the 

• 

components or part in side TV set, customer should install 
TV set with a stand within ± 10 perpendicularly degree.
Never dismantle the rear panel!

• 

It may cause an electric shock.


-

Never obstruct the ventilation holes!

• 

It may cause overheating or a 

fi

 re.


-

Handle LCD panel with care!

• 

Use a soft, dry cloth when cleaning.


-

Never try repair the TV yourself!

• 

If the problem cannot be solved in "Troubleshooting" unplug the power cord and contact 


-

your retailer.

If a television is not positioned in a suf

fi

 ciently stable location, it can be 

• 

potentially hazardous due to falling. Many injuries, particularly to children, 
can be avoided by talking simple precautions such as:

Using cabinets or stands recommended by the manufacturer of the television.


-

Only using furniture that can safely support the television.


-

Ensuring the television is not overhanging the edge of the supporting furniture.


-

Not placing the television on tall furniture (for example, cupboards or bookcases) without 


-

anchoring both the furniture and the television to a suitable support.
Not standing the television on cloth or other materials placed between the television and 


-

supporting furniture.
Educating children about the dangers of climbing on furniture to reach the television or 


-

its controls.

To prevent accidents, 

fi

 rmly attach the TV stands to the TV shelf before 

• 

using microphone.

Make sure that the subwoofer is in good condition before installing it on 

• 

the TV.

If the subwoofer has leakage current, it may damage the TV or cause electric shock.

 -

For more details on installation, usage and safety 

• 

 Consult your retailer.

WARNING:

To prevent the spread of 

fi

 re, keep candles or other open 

fl

 ames away from this 

product at all times.

Safety precautions

GGT0359-001A-H-EN.indd   2

GGT0359-001A-H-EN.indd   2

19/07/2010   14:07:53

19/07/2010   14:07:53

Содержание GGT0359-001A-H

Страница 1: ...el Summary 8 Operating the menus 9 PREPARATION Picture setting 10 Sound setting 12 Useful functions 14 Multi Media Input 16 Viewing Teletext 19 Viewing Closed Caption 19 Watching Video or DVDs 20 Technical information 20 Troubleshooting 22 CH CC List 23 Specification 24 FUNCTIONS REFERENCE Contents ENGLISH GGT0359 001A H EN indd 1 GGT0359 001A H EN indd 1 19 07 2010 14 07 47 19 07 2010 14 07 47 ...

Страница 2: ... dry place Do not place the product close to source of steam heat moisture or oil Because it may cause a fire hazard or electric shock hazard Don t touch an external metal part of the TV set It may cause an electrocuted For keep a distance from potential ignition sources to the components or part in side TV set customer should install TV set with a stand within 10 perpendicularly degree Never dism...

Страница 3: ...nge the aspect ratio Return Plus Return to the frequently viewed channel Return Return to the previously viewed channel Favourite channel setting 1 Register the favourite channel 2 Recall the favourite channel Press number button 1 4 only Press number button 1 4 only Press and hold Press WARNING Batteries shall not be exposed to excessive heat such as direct sunshine fire or the like If this symbo...

Страница 4: ...t Consult a qualified technician JVC assumes no responsibility for damage due to improper mounting 400 mm x 200 mm mount which conforms to VESA standards Installation requirements To avoid overheating ensure the unit has ample room After all the connections have been made insert the plug into an AC outlet AERIAL OR VCR DVD Player To prevent the TV from falling thread the belt through the hole on t...

Страница 5: ... Connecting HDMI devices HDMI 3 Output Input HDMI signal P 24 HDMI Setting P 20 HDMI 2 and HDMI 3 inputs do not support analogue sound Connect a DVI device to HDMI 1 P 20 Please use a High Speed HDMI TM Cable High Speed HDMITM Cables are tested to carry an HD signal up to 1080p and higher OUTPUT Subwoofer and sound signal of a TV channel you are viewing outputs from this terminal Output Subwoofer ...

Страница 6: ...t to set undesired channels to be skiped see Channel Summary P 8 See Language group for Teletext P 21 Initial Settings Show only when powering on for the first time The power on the unit can also be used The select the new Country Area after Initial Setting has completed Area 1 Asia Middle East Europe Oceania Africa Area 2 South America Philippines While the cursor is pointing to Picture menu and ...

Страница 7: ...CDEF CH 76 05 CH 12 06 CH 09 07 CH 05 08 CH 02 09 CH 15 10 CH 28 Setup OK Select a channel OK 1 Select a CH CC OK Finish OK 1 Start 2 Move OK 2 Set 2 Enter a number 0 9 button then receives the broadcast signal This function is available when select Country Area to Area 1 only You can edit the channel list or register new channel manually Channel fine tunning Yellow Blue If the picture or sound is...

Страница 8: ...nel Summary CH CC ID Skip CH 02 _ _ _ _ _ _ CH 03 _ _ _ _ _ _ CH 04 _ _ _ _ _ _ Yes CH 05 _ _ _ _ _ _ Yes CH 06 _ _ _ _ _ _ Yes CH 07 _ _ _ _ _ _ Yes CH 08 _ _ _ _ _ _ Yes CH 09 _ _ _ _ _ _ Yes CH 10 _ _ _ _ _ _ Yes CH 11 _ _ _ _ _ _ Yes Set Up This function is available when select Country Area to Area 2 only You can edit the channel list Skip Cancel ID Skip the channel Cancel the skip channel Ed...

Страница 9: ...ensor 15 Set Up Auto Program 6 Edit Manual 7 Language 6 Video 1 Setting 20 Rocket Start 15 Teletext Language 6 HDMI Setting 20 PC Setting 20 Set Country Area to Area 2 Top Menu 2nd Menu Page Picture Picture Mode 10 Backlight 10 Picture 10 Brightness 10 Detail 10 Color 10 Tint 10 White Balance 10 Features 11 Sound MTS 12 Sound Meister 12 Treble 12 Bass 12 Surround 12 Balance 12 Voice Enhancer 12 AI...

Страница 10: ...ht You can change the backlight brightness Darker Brighter Contrast You can change the contrast of the picture Lower Higher Brightness You can change the brightness of the picture Darker Brighter Sharpness You can change the sharpness of the picture Softer Sharper Colour You can change the colour of the picture Lighter Deeper Tint You can change tint only in NTSC Reddish Greenish White Balance You...

Страница 11: ...to Mode 1 or Mode 2 then Digital VNR DigiPure Picture Management and MPEG Noise Reduction cannot operate Digital VNR Reduce the amount of noise in original picture Off On DigiPure For natural looking outlines Off On Pull Down For smooth cinema film Auto Off On Colour Management For natural looking pictures Off On Picture Management Fix bright dark pictures Off On Smart Picture Make it easier to vi...

Страница 12: ... SUB1 II SUB2 Mono MTS Select the stereo and SAP broadcasted programs Stereo Stereo sound SAP Second Audio Programs Mono mono sound Sound Meister Ambience Off Dynamic Pure Living Treble Compensates high frequencies to widen the frequency band Weaker Stronger Bass Compensates low frequencies to widen the frequency band Weaker Stronger Surround Expands the stereo sound naturally Narrow Wide Balance ...

Страница 13: ...Mode 1 Only sound of music Mode 2 To sing accompanying with sound of song Karaoke function works only for stereo sound system If using Karaoke disc users must choose to remove the vocals from the player Main Volume Adjusts volume level Lower Louder Microphone Volume Adjusts volume level of microphone Lower Louder Microphone Volume is available when plug in microphone Microphone to be used with the...

Страница 14: ...ck Release Jan 2010 09 12 Su Mo Tu We Th Fr Sa 1 4 5 6 7 8 9 10 11 12 13 14 15 16 17 18 19 20 21 22 23 24 25 26 27 28 29 30 31 Sleep Timer Features Off 120 0 On Timer TV to turn on automatically from standby mode at a set channel and time Sleep Timer TV to turn off automatically to standby mode after a set time Calendar Watch calendar date and time on screen LCD TV Channel Guard Stop children from...

Страница 15: ... Eco Sensor on the screen MAX Eco Only sound is available no picture this is to save energy in such situation as when you want to listen to the news while doing other house works at the same time After choosing Eco Sensor as Max Eco picture will go off in 3 seconds When you want the picture to appear again press any button on the remote control then function will be reset back to Off After unplugg...

Страница 16: ...mended to keep a backup of your files Do not connect a mouse keyboard or the like Do not use a USB hub or extension cable Slide the SD card into the slot until it clicks into place To remove the SD card push it in until it clicks and then pull it out If you want to setting select SETTINGS Slideshow duration Select how long each picture is displayed for during slide shows 3S 5S 15S 1mins 15mins 1ho...

Страница 17: ...VIE file Supported up to 720 x 576 x 24 or 800 x 600 x 30 compressed video resolution SD mode Select a photograph to display and press or The selected photograph is displayed full screen PHOTO View picture from your USB device or SD card MUSIC Listen music from your USB device or SD card MOVIE Watch movie from your USB device or SD card TEXT View txt file from your USB device or SD card FILE Copy ...

Страница 18: ... you chose Press the left arrow button you can exit and back to previous status 1 Move the highlight bar to the file that you want to copy 2 Press right arrow button then a remark will be showed on the right of the file you selected 3 To make another copy just repeat the step of No 2 4 After file is selected press Then indication of Copy and Delete to be seen Multi Media Input continued 5 Select C...

Страница 19: ...rmation Example answer to a quiz etc Size Double the size of the displayed text Index Returns to page 100 or a previously designated page Cancel Leave the current page open while you switch to watch TV Useful when running a page search Sub page Display the number of Sub page Cancel by press this button again Closed Caption Select to view close caption or text information Off CC Text Caption Select...

Страница 20: ...change to 1 or 2 PC Setting Setting for PC input PC Setting PC Position f Phase Pixel Set Up OK 1 Adjust 2 Set OK 1 Select PC Position 2 Enter PC Position Adjust screen position Phase Sets the focus of screen Pixel Adjusts the horizontal feature of screen Connect DVI devices What is Full Native Full Full Native Connect a DVI device to HDMI using DVI HDMI conversion cable Connect analogue sound out...

Страница 21: ...ian English German French Italian Spanish Portuguese Greek Swedish Finnish Group 2 Polish Serbian Croatian Slovenian Czech Slovak Rumanian Hungarian German French Italian Swedish Finnish Group 3 Russian Bulgarian Lettish Lithuanian Estonian Ukrainian Serbian Croatian Slovenian Czech Slovak English German Group 4 Arabic Czech Slovak Hungarian English German French Italian Spanish Portuguese Swedish...

Страница 22: ...ural colour Adjust Colour and Backlight P 10 Check Colour System If Auto is selected P 11 select the specific colour system manually Noise Set to the following functions Picture Mode Standard P 10 DigiPure On P 11 Dull picture Set to the following functions Picture Mode Bright P 10 DigiPure On P 11 Poor sound Adjust the Bass and Treble If receiving a poor signal in Stereo I II switch to Mono Adjus...

Страница 23: ... E60 CH 61 US 61 W 76 E61 CH 62 US 62 W 77 E62 CH 63 US 63 W 78 E63 CH 64 US 64 W 79 E64 CH 65 US 65 W 80 E65 CH 66 US 66 W 81 E66 CH 67 US 67 W 82 E67 CH 68 US 68 W 83 E68 CH 69 US 69 W 84 E69 CC Channel US CCIR OIRT AUSTRALIA CC 01 S 1 AU 5 CC 02 S 2 CC 03 S 3 CC 04 S 4 CC 05 S 5 CC 06 S 6 AU 5A CC 07 S 7 CC 08 S 8 CC 09 S 9 CC 10 S 10 CC 11 S 11 CC 12 S 12 CC 13 S 13 CC 14 A S 14 CC 15 B S 15 C...

Страница 24: ... U 431 25 to 863 25 MHz Area 2 VHF low channel VL 55 25 to 127 25 MHz VHF high channel VH 133 25 to 361 25 MHz UHF channel U 367 25 to 801 25 MHz Receives cable channels in mid band X to Z 2 S1 to S10 super band S11 to S20 and hyper band S21 to S41 Sound multiplex systems NICAM I B G D K A2 B G D K Teletext systems FLOF Fastext WST World System Teletext Power requirements AC 110 V 240 V 50 60Hz Au...

Отзывы: