background image


[Back] [Next]

GETTING STARTED

Be sure to insert the (AA-size Alkaline) batteries before trying to capture images with your camera.

Inserting the Batteries

Notes :

l

Please ensure that the batteries are inserted in the correct way. Do not reverse the +/ - polarities.

l

The recommended battery type is AA size ALKALINE.

l

Never use manganese batteries.

l

Low temperatures (under 0°C or 32°F) will reduce the output efficiency of the batteries, thereby shortening the operation time of the 
camera.

l

The use of Flash is not recommended when the battery level is low.

l

Never mix old and new batteries.

l

Remove the batteries if the camera is not to be used for an extended period of time, to prevent leaks or corrosion.

l

Before discarding batteries, cover the positive 

 and negative   terminals with adhesive tape.

l

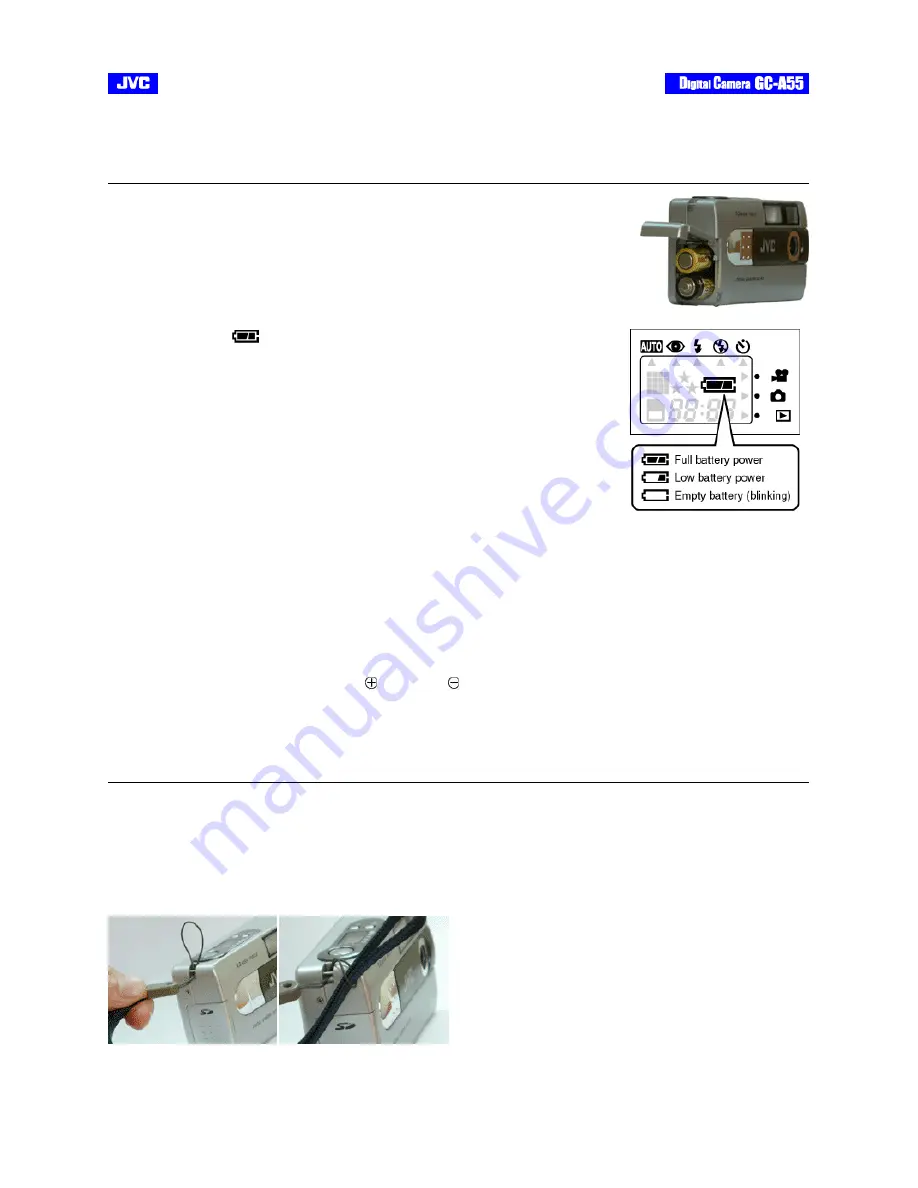
The Battery Indicator reflects the level of remaining battery power. When the indicator appears as shown above, the batteries are 
weak and need to be replaced.

l

When you use your camera as a video camera for your PC, batteries in the camera are necessary even though power is supplied 
through the USB cable.

Attaching the Hand Strap

Always use the provided hand strap when carrying the camera. Please note that the company cannot be held responsible for any 
accidental drop of the camera due to improper use of the hand strap.

To attach the strap to your camera:

1. Thread the thinner looped end of the strap through the strap holder.
2. Insert the other end of the strap through the thin loop and pull it all the way out. Ensure that the strap is securely tightened unto the 

camera.


Note :

Be careful not to bump the camera or entangle the strap.

Inserting and Removing the SD / Multimedia Card

1. Slide the Battery/Memory card compartment door (located on the right side of the camera) in the 

direction indicated by the arrow to open it.

2. Insert the AA-size batteries as indicated on the inner side of the door.
3. Close back the door and turn on the camera. 

Checking Batteries( 

:Full battery power)

The battery indicator will be displayed on the status LCD panel while the camera is on. Depending 
on the durability and usage of the batteries, the number of pictures that can be recorded varies. 
Note that power is consumed by the following operations even when not recording, reducing the 
number of images that can be recorded :

l

Extensive use of the LCD monitor in the Play/Delete mode.

l

Performing settings. 

Содержание GC-A55

Страница 1: ...ou for purchasing this JVC product Before beginning to operate this unit please read the instruction manual carefully in order to make sure that the best possible performance is obtained If you have any question consult your JVC dealer To HomePage of JVC ...

Страница 2: ...maged in any way switch off withdraw the mains plug and consult your dealer DON T remove any fixed cover as this may expose dangerous voltages DON T leave equipment switched on when it is unattended unless it is specifically stated that it is designed for unattended operation or has a standby mode Switch off using the switch on the equipment and make sure that your family know how to do this Speci...

Страница 3: ...sture ABOVE ALL NEVER let anyone especially children push anything into holes slots or any other opening in the case This could result in a fatal electrical shock NEVER guess or make changes with electrical equipment of any kind It is better to be safe than sorry ...

Страница 4: ...nterference will not occur in a particular installation If this equipment does cause harmful interference to radio or television reception which can be determined by turning the equipment off and on the user is encouraged to try to correct the interference by one or more of the following measures l Reorient or relocate the receiving antenna l Increase the separation between the equipment and recei...

Страница 5: ...AIN UNIT 1 For safe use please do NOT l open the camera s chassis due to high voltage inside l disassemble or modify the unit l allow inflammables water or metallic objects to enter the unit WARNING TO REDUCE THE RISK OF FIRE OR ELECTRIC SHOCK DO NOT EXPOSE THIS APPLIANCE TO RAIN OR MOISTURE The lightning flash with arrowhead symbol within an equilateral triangle is intended to alert the user to t...

Страница 6: ...ording playback deletion formatting etc never unload the memory card or turn off the digital camera l Store memory cards away from heaters or other heat sources out of direct sunlight where they will not be subject to unnecessary shock or vibration where they will not be exposed to strong magnetic fields such as those generated by motors transformers or magnets LCD MONITOR l To prevent damage to t...

Страница 7: ...hots before you actually start to accustom yourself to the camera l We cannot bear any responsibility for an inability to shoot record or play back material normally in the event of a problem with this camera l We shall not be liable for any incidental consequential or exemplary damage loss of profits or any demand made by any third party due to your use of this product or the provided software l ...

Страница 8: ...it you can l Take digital pictures video clips in an instant Easily capture digital images and download them to your computer l Videoconference on the Internet Keep in touch with distant family and friends See and talk with people on the Internet face to face l Send captured images with your e mail messages ...

Страница 9: ...oft and Windows are either registered trademarks or trademarks of Microsoft Corporation in the United States and or other countries l Other trademarks are the properties of their respective owners Digital Camera X 1 CD ROM with Driver Application Instructions X 1 USB Cable X 1 Video Cable X 1 Hand Strap X 1 Alkaline Battery AA Size X 2 Pouch X 1 Quick Start Guide X 1 Caution Sheet X 1 ...

Страница 10: ...USB Port l Minimum RAM 32 MB Windows XP 128 MB l 250 MB of available hard disk space l Color display 800 x 600 or better l CD ROM drive Notes l Microsoft and Windows are either registered trademarks or trademarks of Microsoft Corporation in the United States and or other countries l Other trademarks are the properties of their respective owners ...

Страница 11: ...tings Have more control over image quality by adjusting settings such as White Balance EV compensation and more Thumbnail View Display in sets of nine pictures on the LCD for easier and quicker selection Video cable Connection Composite Video out NTSC PAL Browse through the images you have captured on a television monitor in place of the LCD monitor for a better view Built in Digital Memory With a...

Страница 12: ... button Strap holder Status LCD panel RESOLUTION QUALITY button FLASH MODE button MENU button POWER button SELF TIMER UP button 2X ZOOM DOWN button LCD OK button LCD monitor MODE button Viewfinder Status indicator Self timer indicator Tripod socket Terminal cover USB port Video out Battery Memory Card compartment door ...

Страница 13: ... battery blinking 4 Built in Flash Indicator Auto Flash Red eye reduction Fill in flash Flash off 5 Time Number Indicator Number of images that can be stored Camera mode Time Display Video Clip mode PC Connection Mode 6 Self timer Indicator 7 SD card Indicator 8 Mode Indicator Video Clip mode Camera mode Play Delete mode Built in Flash Indicator Quality Indicator Resolution Indicator SD card Indic...

Страница 14: ...B cable Attaching the Hand Strap Always use the provided hand strap when carrying the camera Please note that the company cannot be held responsible for any accidental drop of the camera due to improper use of the hand strap To attach the strap to your camera 1 Thread the thinner looped end of the strap through the strap holder 2 Insert the other end of the strap through the thin loop and pull it ...

Страница 15: ... it can go with the memory card electrodes metal contacts end facing the camera 4 Close back the door firmly Removing the Memory Card 1 Turn off the camera s power by pressing the POWER button 2 Open the Battery Memory card compartment door 3 Push the memory card in as far as it can go and release The card will spring back and protrude slightly Pull it out with your fingers 4 Close back the door f...

Страница 16: ...asics Shooting Basics Play Basics Customized Shooting l Zooming l Using Flash l Using Self Timer l Setting the Image Quality Resolution Customized Shooting is not applicable to the Video Clip and Play Delete Modes Menu Settings l SETUP MENU l QUICKVIEW l WHITE BALANCE l EV COMPENSATION l SETUP MENU l WHITE BALANCE l EV COMPENSATION l SETUP MENU l SLIDE SHOW l ERASE l COPY TO CARD l DPOF ...

Страница 17: ...o or not change the value at all This is not a malfunction of the LCD panel Also upon the camera being turned on memory adjustments are made and the indicated remaining value may actually be higher than when the camera was last turned off l When you take pictures in bright locations or in clear fine weather lines may appear on the monitor This is not a malfunction l Press the shutter button down s...

Страница 18: ...s 1 Ensure that the camera is turned on 2 Select the Camera mode with the MODE button 3 Press the flash button until the desired flash mode AUTO RED EYE REDUCTION FILL IN OFF is indicated by the cursor 4 Frame your subject Then press the shutter button fully down For details see Shooting Basics Note The red eye reduction function may have little effect if the subject is not directly facing the pre...

Страница 19: ... 1280Pixels x 1024Pixels Half Resolution VGA 640Pixels x 480Pixels The number of images that can be stored The number of images approximate that can be stored in the memory card at the current image quality and resolution is reflected on the LCD panel Varying the image quality and resolution settings will affect the number of storable images The following shows the approximate number of storable i...

Страница 20: ...e available time may actually be more than when the camera was last turned off l When you take pictures in bright locations or in clear fine weather lines may appear on the monitor This is not a malfunction l Press the shutter button down steadily l When the status indicator is lit shooting replay is not possible Wait until the light goes off After shooting a video clip you would have to wait a li...

Страница 21: ...ges as follows 4 Press the buttons to go to the next or previous image video clip 5 For video clips only press the shutter button to play Press the same button to pause resume Still Image Image Info OFF LCD OK button pressed once Image Info ON LCD OK button pressed twice Thumbnail display LCD OK button pressed thrice Video Clip Image Info ON Thumbnail display LCD OK button pressed thrice Thumbnail...

Страница 22: ...monitor Using the menus you can perform various settings for your camera Procedures 1 Use the buttons to highlight the desired item 2 Press the LCD OK button to go into the setting screen 3 Select the appropriate setting with the buttons 4 Confirm the setting by pressing the LCD OK button 5 Return to the MENU screen ...

Страница 23: ...he setting each time you turn on the camera LANGUAGE Sets the display language on the LCD monitor SOUND Enables or disables the sound function ON Sounds each time the camera is operated OFF Does not sound when the camera is operated FORMAT MEDIA This function prepares the memory internal external for use by the camera When a memory card is inserted the card will be formatted In the absence of the ...

Страница 24: ...ra after the lapse of a certain time interval set by the user during which no operation is performed 1 min Power will be turned off after 1 minute 3 min Power will be turned off after 3 minutes 5 min Power will be turned off after 5 minutes 10 min Power will be turned off after 10 minutes CANCEL Disables the Auto Power Off function Note The settings for DATE TIME USB CONFIG AUTO POWER OFF LANGUAGE...

Страница 25: ...o view your images on the LCD monitor as soon as they have been taken After the preview this camera will return to the Camera mode ON Enable QUICKVIEW OFF Disable QUICKVIEW The QUICKVIEW setting will be retained even after the camera is turned off ...

Страница 26: ...s can also see the white objects as being white by averaging out the light around the object You may select from the following settings AUTO Automatically adjusts the white balance TUNGSTEN Tungsten lighting FLUORESCENT Fluorescent lighting SHADE Recording for overcast shaded twilight or evening skies DAYLIGHT Outdoors on a bright day ...

Страница 27: ...ject is too dark or too bright the camera adjusts the brightness to make the object look brighter or darker This is called EV compensation The range of the exposure compensation that the user can set is from 2 0 EV to 2 0 EV at 0 5 EV steps ...

Страница 28: ...r can set the delay time with the buttons appears Thereafter pressing the LCD OK button again will start the slide show Images hitherto captured will be displayed in sequence at intervals of the user set delay time 1 3 5 7 9 sec The delay time setting will be retained even after the camera is turned off ...

Страница 29: ...pear on the LCD monitor Pressing the LCD OK button will cause the selected still image video clip to be erased from memory To abort this action press the MENU button 2 ERASE ALL This will allow you to delete ALL recorded still images video clips in the memory at once Use the buttons to choose the YES or NO option and then press the LCD OK button to confirm Notes If no still image video clip is sto...

Страница 30: ... Back Next COPY TO CARD This function allows you to copy all captured still images video clips from the internal memory to the external memory card ...

Страница 31: ...int quantity 1 10 PRINT SIZE Select the image print size standard 3x5 4x6 5x7 8x10 PRINT INDEX If you select ON and confirm by pressing the LCD OK button you can print a photo with index and the return to the DPOF menu If OFF is selected and confirmed the camera will return to the DPOF menu PRINT ENABLE If you select ENABLE and confirm by pressing the LCD OK button the camera will save the DPOF se...

Страница 32: ...tal camera and the other end of the cable PIN plug to the VIDEO IN port of the television 2 Turn on the camera and the TV 3 Select the appropriate VIDEO MODE setting NTSC PAL from the SETUP MENU according to the TV standard you are using 4 Replay the recorded images the same way as you would replay them on the LCD monitor Note The VIDEO OUT function is highly power consumptive Hence batteries may ...

Страница 33: ... contained in the supplied CD ROM before connecting the camera to the PC for image data download For Win ME 2000 XP users however this is not necessary Proceed to connect the camera to the PC Installation Procedures 1 Place the supplied CD ROM into the CD ROM drive 2 A SETUP MENU screen will appear on the PC monitor as shown below Click on USB Mass Storage Driver install for Windows 98 98SE 3 Foll...

Страница 34: ... Double click on Removable Disk A new window with a DCIM folder icon opens If this icon is not displayed your camera has not been properly connected to the computer In this case go to Connecting the Camera to Your Computer and repeat the procedures 3 Double click on the DCIM folder icon A new window with a JVCGC folder icon opens represents a random 3 digit number Your recorded images will be in t...

Страница 35: ...stallation 4 Reboot your computer Using your camera as a USB PC camera with Microsoft Netmeeting or Windows Messenger 1 Make sure you have installed the WebCam Driver and that the USB Config item in the SETUP MENU is set to PC CAMERA 2 Make sure that your camera is turned off Then connect the USB cable to the camera and your computer s USB port 3 Put the camera on your table or on the top of your ...

Страница 36: ... charge after shooting is not yet complete Release the shutter button wait till the Status Indicator is unlit then shoot again Internal or card memory full Delete the images no longer required transfer them to your PC or insert a new memory card The card is write protected Use a new card or disable the write protection only for SD cards Possible Cause Rectifications Power is low or off Check batte...

Страница 37: ...grapher was standing in front of the camera when pressing the shutter button self timer shots Do not stand in front of the camera Press the shutter button while looking through the viewfinder Flash is off even when the lighting condition is poor As exposure time is prolonged camera movement will cause the image to be off focus Either use a tripod stand or use the flash The subject is too near Shoo...

Страница 38: ...D or Multimedia card Lens Fixed focus 2X digital zoom Focal length 9 0mm Focal Range Normal 1 2 infinity Shutter Speed 1 15 1 2000 seconds Exposure Control Auto Manual 0 5 EV step 2 0 2 0 White Balance Auto Sun Shade Fluorescent Tungsten Flash Built In Auto Fill in Flash Off Red eye reduction Self timer 10 seconds delay Software MGI Photo Suite IV SE and Photo Vista Language English French Spanish...

Отзывы: