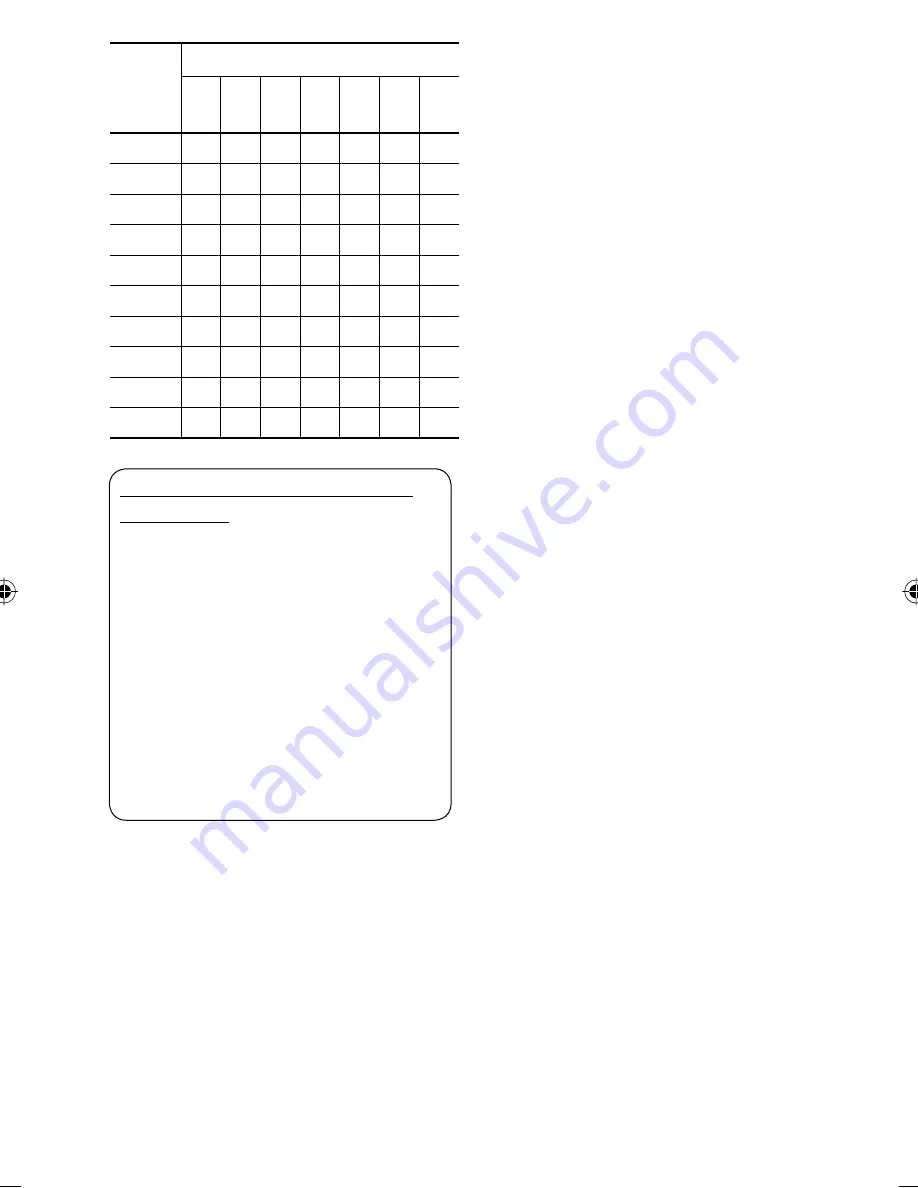
JVC Exad KD-ADV38 Скачать руководство пользователя страница 370

60

Sound 

mode

Preset equalizing values

60 Hz

150 Hz

400 Hz

1 kHz

2.5 kHz

6.3 kHz

15 kHz

Flat

00

00

00

00

00

00

00

Hard Rock

+03 +03 +01

00

00

+02 +01

R&B

+03 +02 +02

00

+01 +01 +03

Pop

00

+02

00

00

+01 +01 +02

Jazz

+03 +02 +01 +01 +01 +03 +02

Dance

+04 +02

00

–02

–01 +01 +01

Country

+02 +01

00

00

00

+01 +02

Reggae

+03

00

00

+01 +02 +02 +03

Classic

+02 +03 +01

00

00

+02

00

User 1/2/3

00

00

00

00

00

00

00

About sounds reproduced through the 
rear terminals

•  Speaker out/analog discrete output—LINE OUT 

(FRONT/REAR)/CENTER OUT/SUBWOOFER:
Multi-channel signals are emitted for a multi-
channel encoded software. (When Dual Zone is 
activated, the same signal emitted through 2nd 
AUDIO OUT plugs are emitted for the main source 
“DISC.”)

•  2nd AUDIO OUT: 2-channel signal is emitted 

when Dual Zone is activated. When playing 
a multi-channel encoded disc, multi-channel 
signals are downmixed (except for some DVD 
Audio).

•  “DVD Logo” is a trademark of DVD Format/Logo 

Licensing Corporation registered in the US, Japan and 
other countries.

•  DivX, DivX Ultra Certified, and associated logos are 

trademarks of DivX, inc. and are used under license.

•  Official DivX® Ultra Certified product
•  Plays all versions of DivX® video (including DivX® 6) 

with enhanced playback of DivX® media files and the 
DivX® Media Format

•  Microsoft and Windows Media are either registered 

trademarks or trademarks of Microsoft Corporation in 
the United States and/or other countries.

•  iPod and iTunes are trademarks of Apple Inc., 

registered in the U.S. and other countries.

KD-AVX33A.indb   60

KD-AVX33A.indb   60

07.2.21   9:33:03 AM

07.2.21   9:33:03 AM

Содержание Exad KD-ADV38

Страница 1: ...IONES MANUEL D INSTRUCTIONS LVT1658 001A J For canceling the display demonstration see page 5 Para cancelar la demonstración en pantalla consulte la página 5 Pour annuler la démonstration des affichages référez vous à la page 5 DVD CD RECEIVER RECEPTOR CON DVD CD RÉCEPTEUR DVD CD KD AVX33 KD ADV38 For customer Use Enter below the Model No and Serial No which are located on the top or bottom of the...

Страница 2: ... to qualified service personnel 3 CAUTION For U S A Visible and or invisible class II laser radiation when open Do not stare into beam For Canada Visible and or invisible class 1M laser radiation when open Do not view directly with optical instruments 4 REPRODUCTION OF LABEL CAUTION LABEL PLACED OUTSIDE THE UNIT European Union only INFORMATION For U S A This equipment has been tested and found to ...

Страница 3: ...chnology must be authorized by Macrovision and is intended for home and other limited viewing uses only unless otherwise authorized by Macrovision Reverse engineering or disassembly is prohibited Contents INTRODUCTION Playable disc type 4 Before operating the unit 5 OPERATIONS Basic operations Control panel 7 Basic operations Remote controller RM RK251 8 Listening to the radio 10 Disc operations 1...

Страница 4: ...OM CD I CD I Ready CD Recordable Rewritable CD R RW Compliant to ISO 9660 level 1 level 2 Romeo Joliet CD DA MP3 WMA WAV AAC 4 JPEG DivX MPEG1 MPEG2 MPEG4 1 IfyouinsertaDVDVideodiscofanincorrectRegionCode Regioncodeerror appearsonthemonitor 2 DVD Rrecordedinmulti borderformatisalsoplayable exceptforduallayerdiscs 3 Itispossibletoplaybackfinalized R RW Videoformatonly discs However theuseof Rdouble...

Страница 5: ...tration then activate the Demonstration screen Cancel the display demonstrations Select Off Continued on the next page AV Menu Setup Enter ENT Setup menu icon Currently selected menu Demonstration Display Clock Disc Setup 1 Disc Setup 2 Tuner On Demonstration Wall Paper Scroll Tag Display Dimmer Off On Exit ENT Setup Display Demonstration Currently selected submenu Current setting Off On Exit ENT ...

Страница 6: ...On The clock time is displayed while playing back a video source Finish the procedure Return to the Setup menu Select Clock Time Set then activate the Time Set screen Set the clock time Return to the Clock menu Select 12Hours 24Hours Activate the 12Hours 24Hours screen Clock 1 00AM Time Set 12Hours 24Hours OSD Clock Time Set Hours 1 00AM Exit ENT Time Set Minutes 3 45PM Exit ENT 12Hours 24Hours 12...

Страница 7: ...power Turn off the power Hold Attenuate the sound if the power is on Change the display information 4 TUNER Search for stations SAT Select channels DISC USB Select chapters tracks On menus Go to previous next step iPod D PLAYER Select tracks Bluetooth Audio Reverse skip forward skip 5 3 TUNER Select preset stations SAT Select categories DISC USB Select titles folders On menus Select items iPod D P...

Страница 8: ... remote control function See the Installation Connection Manual separate volume for connection Caution Do not expose batteries to heat or flame IMPORTANT If Dual Zone is activated page 26 the remote controller functions only for operating the DVD CD player Main elements and features 1 1 Turns on the power Attenuates the sound if the power is on Turns off the power if pressed and held while the pow...

Страница 9: ...3 5 Returnstothepreviousmenu Confirmstheselection 6 DVD DivX 6 Shows the disc menu VCD Resumes PBC playback page 21 DVD VR Shows the Original Program screen 7 Makes selection settings Skips back or forward by 5 minutes for DivX MPEG1 MPEG2 DISC buttons Changes discs for CD CH 8 Shows the on screen bar 9 1 Changes the display information p Display or erase AV Menu q For disc USB operations 6 Plays ...

Страница 10: ...pears on the display then press it repeatedly The ST indicator lights up when receiving an FM stereo broadcast with sufficient signal strength 4 Reception improves but stereo effect will be lost The MO indicator lights up To restore stereo effect select Off in step 4 Preset No Band page 46 Tuner indicators AV Menu Mode Enter ENT AV Menu Setup Enter ENT Mode Off Mono DX Local SSM Title Entry Mono O...

Страница 11: ...ignal strength This function works only for FM bands Once you have activated this function selected Local it always works when searching for FM stations 1 2 Mode menu icon 3 4 Only stations with sufficient signal strength will be detected The DX indicator goes off then the LO indicator lights up Mode DX Mono DX Local SSM Title Entry DX Local DX Local Exit ENT Mode Mono DX Local SSM Title Entry Sta...

Страница 12: ... 2 3 4 5 6 ENT or Manual presetting Ex Storing FM station of 92 5 MHz into preset number 4 of the FM1 band 1 2 Tune in to a station you want to preset 3 4 Select a preset number 5 The station selected in step 2 is now stored in preset number 4 Each time you hold the button you can change the FM bands Preset List can also be accessed through AV Menu List right FM1 Store 87 5 89 9 97 9 105 9 108 0 1...

Страница 13: ...on you have tried to do In some cases without showing operations will not be accepted Label side 0 Eject the disc 3 Start playback if necessary DISP Press if no playback picture appears but disc information screen pages 14 to 16 is displayed Insert the disc Playback starts automatically 7 Stop playback Caution Do not place your finger behind the control panel Caution on volume setting Discs and co...

Страница 14: ... MULTI MLP B S P AUDIO DVD G 01 02 0 45 38 RPT BONUS Surround mode 4 Press Select track Hold Reverse forward search 1 5 Select group Group no Track no Playing time BONUS indicator page 22 B S P indicator page 22 4 Press Select chapter Hold Reverse forward search 1 5 Select program no Play List no Program no or Play List no Chapter no Playing time VR PR Original program VR PL Play List 3 45PM MULTI...

Страница 15: ...BC is in use 4 Press Select track Hold Reverse forward search 1 page 46 3 45PM FRONT 2CH RPT DivX DVD T 01 C 02 0 45 38 Current Folder Name Current File Name avi For DivX MPEG Folder no Track no Playing time For JPEG Folder no File no 4 Press Select track Hold Reverse forward search for DivX MPEG 2 5 Press Select folder Hold Display Folder List ...

Страница 16: ...rack Hold Reverse forward search 1 5 Press Select folder Hold Display Folder List Audio format MP3 WMA WAV AAC 4 Press Select track Hold Reverse forward search 1 page 46 page 46 1 Searchspeed x2 x10 3 NoName appearsforconventionalCDs Tag data will be shown instead of folder file names when they are recorded and Tag Display is set to On page 49 3 45PM FLAT CD 02 0 45 38 Disc Title Artist Name Curre...

Страница 17: ... available for Playlist playback Track Plays the first 15 seconds of each track for VCD PBC not in use Track Repeats current track for VCD PBC not in use Disc All Randomly plays all tracks for VCD PBC not in use Track Plays the first 15 seconds of each track Folder Plays the first 15 seconds of the first track of each folder Track Repeats current track Folder Repeats all tracks of the current fold...

Страница 18: ... Folder List can also be accessed through AV Menu List Prohibiting disc ejection You can lock a disc in the loading slot No Eject appears To cancel the prohibition repeat the same procedure to select EJECT OK Folder List Off My Best Cinema Pops My Best2 Favorite Song Cinema2 ENT Folder List Off My Best Cinema Pops My Best2 Favorite Song Cinema2 ENT File List Off Song011 mp3 Song012 mp3 Song013 mp3...

Страница 19: ...Reverse forward search 2 No sound can be heard Slow motion 3 during pause No sound can be heard Press Select chapter during playback or pause Hold Reverse forward search 4 Select title during playback or pause Using menu driven features 1 2 Select an item you want to start playback 3 Select chapter Select title when not playing twice Select title during playback or pause Select aspect ratio Select...

Страница 20: ...res 1 2 Select an item you want to start playback 3 Stop playback Start playback Pause if pressed during playback Reverse forward search 4 No sound can be heard Slow motion 5 during pause No sound can be heard Reverse slow motion does not work Press Select chapter during playback or pause Hold Reverse forward search 6 Select program Select play list during playback or pause Select aspect ratio Sel...

Страница 21: ...use if pressed during playback Reverse forward search 4 Press Select track Hold Reverse forward search 6 Select folder Select track within the same folder twice Select folder 1 Erasesthemisentryofthenumber 2 Searchspeed 1 2 3 3 Searchspeed 1 2 4 Searchspeed x2 x5 x10 x20 x60 5 Slowmotionspeed 1 32 1 16 1 8 1 4 1 2 6 Searchspeed x2 x10 Stop playback Start playback Slide show each file is shown for ...

Страница 22: ...hows the BSP selecting icons such as or on the screen 1 Select an item you want to display 2 Enjoying surround sounds You can enjoy multi channel surround playback through the front center surround speakers After connecting the center speaker make sure to activate the center speaker otherwise no sound comes out of the center speaker page 52 All surround mode can also be used for USB MULTI For mult...

Страница 23: ...Width Adjust the center image so it may be heard only from the center speaker only form the left right front speaker as a phantom center image or various combination of these speakers As the number increases the phantom effect becomes stronger normally select 4 3 On the remote controller You cannot change the Dolby PLIIMusic settings using the remote controller Surround On Auto Through Dolby PLII ...

Страница 24: ...e a selection If a pop up menu appears For entering time numbers Move the entry position To remove the on screen bar Operations using the on screen bar DVD VCD DivX MPEG1 MPEG2 JPEG These operations are possible on the monitor using the remote controller Select a number ...

Страница 25: ...the disc T REM Remaining title time for DVD Remaining disc time for others TIME Elapsed playing time of the current chapter track 2 REM Remaining time of the current chapter track 2 6 Playback status Play Reverse forward search Reverse forward slow motion Pause Stop 7 Operation icons TIME Change time indication see 5 Time Search Specify a certain scene by entering time TITLE Title Search by its nu...

Страница 26: ... main source to listen through the speakers Press SRC source on the control panel By using the buttons on the control panel you can operate the newly selected main source without affecting Dual Zone DISC operations You cannot select USB for the main source On the remote controller 1 2 Adjust the volume through the 2nd AUDIO OUT plug 3 Operate the DVD CD player 1 JVC original headphone virtual surr...

Страница 27: ...layback mode below 3 Elapsed playing time of the current track 4 Operation status 5 Current track number total number of tracks on the disc 6 Track information 7 Track list 8 Current track highlighted bar To select a track If necessary press ENT to start playback Ex CD Text MODE REPEAT TRACK TIME 00 14 Track 6 14 Track Information Cloudy Fair Fog Hail Indian summer Rain Shower Snow Thunder Typhoon...

Страница 28: ...ecording equipment Folder 144 240 Track 144 198 Page 4 7 fol120 fol121 fol122 fol123 fol124 fol125 fol126 fol127 fol128 fol129 fol150 fol151 fol152 fol153 fol154 fol155 fol156 fol157 fol158 fol159 fol140 fol141 fol142 fol143 fol144 fol145 fol146 fol147 fol148 fol149 fol130 fol131 fol132 fol133 fol134 fol135 fol136 fol137 fol138 fol139 file0141 wma file0142 mp3 file0143 wma file0144 mp3 file0145 mp...

Страница 29: ...on discs page 17 to 25 You cannot select USB when Dual Zone is in use All tracks in the USB device will be played repeatedly until you change the source 1 ExceptforJVCD PlayerXA HD500 2 ExceptforMPEG2filesrecordedbyJVCEverio camcorder extensioncode mod 3 Start playback if necessary DISP Press if no playback picture appears but disc information screen pages 14 to 16 is displayed 4 Press Select trac...

Страница 30: ...lder then tracks of next folders USB All Randomly plays all tracks Track Repeats current track Folder Repeats current folder Folder Repeats current folder Mode Off All Off Intro Repeat Random Repeat Off Track Folder Set ENT AV Menu Mode Enter ENT AV Menu Setup Enter ENT Mode menu icon Caution Avoid using the USB device if it might hinder your safety driving Do not pull out and attach the USB devic...

Страница 31: ... a new Bluetooth connection Connection is established by operating the unit Bluetooth operations Cellularphone audioplayer Bluetooth is a short range wireless radio communication technology for the mobile device such as mobile phones portable PCs and other devices The bluetooth devices can be connected without cables and communicate each other The serial number is printed on the label placed on th...

Страница 32: ... 3 Enter the specific PIN code of the device to the unit Refer to the instructions supplied with the device to check the PIN code 4 Use the Bluetooth device to connect Now connection is established and you can use the device through the unit AV Menu Bluetooth Enter ENT AV Menu Setup Enter ENT Registering using Open 1 Select Bluetooth Phone or Bluetooth Audio 2 3 Bluetooth menu icon 4 5 Enter a PIN...

Страница 33: ... you want to connect disconnect 2 Perform steps 2 and 3 of Registering using Open on page 32 then Select Connect to connect the selected device Select Disconnect to disconnect the selected device You can set the unit to connect a Bluetooth device automatically when the unit is turned on page 57 Deleting a registered device 1 Select Bluetooth Phone or Bluetooth Audio then select a registered device...

Страница 34: ...newithaudiofunctionis connected appears You can adjust the microphone volume level page 57 Status of the device 2 Signal strength Battery remainder Adjust the volume 1 When a call comes in The source is automatically changed to Bluetooth Phone When Auto Answer is activated The unit answers the incoming calls automatically page 57 When Auto Answer is deactivated press any button except ATT or to an...

Страница 35: ... memory of the cellular phone to this unit Refer to the instruction manual supplied with your cellular phone With some cellular phones the phone book memory is transferred automatically 3 Select the name phone number you want to call When a Text message comes in If the cellular phone is compatible with Text message and Message Info is set to Auto page 57 the unit rings and Receiving Message appear...

Страница 36: ...ect a preset number The phone number selected in step 1 is now stored in preset number 4 To call a preset number On the remote On the unit 1 2 11122223333 22233336666 44455556666 09845671234 99988887777 55566668888 1 2 3 4 5 6 ENT Preset List 11122223333 22233336666 44455556666 09845671234 99988887777 55566668888 1 2 3 4 5 6 ENT Preset List 11122223333 22233336666 44455556666 11133334444 999888877...

Страница 37: ...y remainder page 46 List menu icon AV Menu Setup Enter ENT AV Menu List Enter ENT 3 Select Bluetooth Audio Ÿ Start playback See pages 31 to 33 for connecting a new device See page 33 for connecting disconnecting a registered device See page 33 for deleting a registered device When the sound is stopped or interrupted during the use of a Bluetooth device try the following remedies Turn off then turn...

Страница 38: ...ntional CDs Disc no Track no Playing time While playing an MP3 disc you can select and start playing a track in the disc using the Lists Disc List select the current disc Folder List File List then start playing a track you want 4 Press Select track Hold Reverse forward search 5 Press Select folder MP3 only Hold Display Disc List Disc List Off MP3 DISC DISC 02 DISC 03 DISC 04 DISC 05 DISC 06 ENT D...

Страница 39: ...Plays the first 15 seconds of each track Folder Plays the first 15 seconds of the first track of each folder Disc Plays the first 15 seconds of the first track of all loaded discs Track Repeats current track Folder Repeats all tracks of the current folder Disc Repeats all tracks of the current disc Folder Randomly plays all tracks of current folder then tracks of next folders Disc Randomly plays a...

Страница 40: ...ated Press Any Key to Continue appears on the monitor once subscription has been completed For XM Radio Activate your subscription after connection 1 Turn on the power 2 Select SAT for the source XMDirectTM Universal Tuner Box starts updating all the XM channels Channel 1 is tuned in automatically GCI update column below 3 Check your XM Satellite radio ID labelled on the casing of the XMDirectTM U...

Страница 41: ...e Radio Inc SAT Radio the SAT Radio logo and all related marks are trademarks of SIRIUS Satellite Radio Inc and XM Satellite Radio Inc For XM Radio Select SAT Ÿ Select the bands Select a category To select a channel from all categories including non categorised channels skip this step If you do not select a channel within 15 seconds the category selected is canceled You can select a channel from a...

Страница 42: ...XM1 Preset4 3Bch Rock XM Music Club Selecting on the lists You can select a channel using one of the following lists Preset list Category list Channel list 1 2 List menu icon 3 Select a desired list Preset List Displays your preset channels Category List Displays the categories Channel List Displays all channels within the selected category 4 Select a desired channel When selecting Category List i...

Страница 43: ...list Ô Artist Ô Album Ô Genre Ô Track Ô back to the beginning 3 Confirm the selection 4 Repeat steps 2 and 3 to select a track When a track is selected finally playback starts To return to the previous menu Selecting playback modes 1 Display AV Menu then select Mode menu icon 2 Enter Mode then select Repeat or Random 3 Select an appropriate option Repeat One Functions the same as Repeat One or Rep...

Страница 44: ... Mirror or Navigation for AV Input page 53 some status messages such as volume level change will not appear on the monitor while viewing the picture When Navigation is selected for AV Input You can use the source AV IN for listening to an audio source connected to the LINE IN plugs While selecting other source you can watch the navigation screen without changing the source To watch the navigation ...

Страница 45: ... the Line Input Adapter KS U57 not supplied or AUX Input Adapter KS U58 not supplied Preparation Make sure External Input is selected for the external input setting page 53 Select EXT IN Ÿ Turn on the connected component and start playing the source 3 45PM FLAT EXT IN EXT INPUT POWER ON Assigned title page 47 page 46 ...

Страница 46: ...tment You can store your adjustment into User1 User2 and User3 1 Repeat steps and Ÿ then in step 2 Adjust 3 Store Soundequalization Edit 60 0 Hz ENT 03 Store User Store User1 User2 User3 ENT Store AV Menu Setup Enter ENT AV Menu Equalizer Enter ENT Flat Hard Rock R B Pop Jazz Exit ENT Equalizer Equalizer menu icon Flat Hard Rock R B Pop Jazz Exit ENT Equalizer Edit 60 0 Hz ENT 03 Store POWER ON ...

Страница 47: ...Display the title entry screen 1 2 Mode menu icon 3 Ex When you select FM as the source Assign a title 1 Select a character then move the entering position To change the character set press DISP For available characters page 64 2 Repeat step 1 until you finish entering the title Finish the procedure Assigningtitlestothesources Press Change character set Hold Erase title AV Menu Setup Enter ENT AV ...

Страница 48: ... List Bluetooth Sound menu icon Sound Through Fader Balance Volume Adjust Subwoofer High Pass Filter Crossover Through On Exit ENT High Pass Filter AV Menu Setup Enter ENT AV Menu Sound Enter ENT Disc Surround Dual Zone AV Menu Setup Enter ENT Input Display Clock Disc Setup 1 Disc Setup 2 Tuner Others Setup Equalizer Sound Disc Surround Mode Bluetooth List Dual Zone The display indications may cha...

Страница 49: ...cks Dimmer Off Cancels On Activates dimmer Auto Dims the monitor when you turn on the headlights 1 Time Set Press ENT or to display the time setting screen then set the Dimmer On Off times Bright You can adjust brightness of the monitor 15 darkest to 15 brightest Initial 00 Picture Adjust 2 You can adjust the following to make the monitor clear and legible for watching the playback picture The set...

Страница 50: ...4Hours 12 Hours 24 Hours 6 OSD Clock Off On 6 Clock Adjust 5 Off Cancels Auto The built in clock is automatically adjusted using the clock time data provided via the satellite radio channel Time Zone 5 6 Select your residential area from one of the following time zones for clock adjustment Alaska Pacific Mountain Central Eastern Atlantic Newfoundland DST 5 6 Daylight Saving Time Activates this if ...

Страница 51: ... when the aspect ratio of the external monitor is 4 3 Refer to the illustrations on the left to see how the pictures are shown on the monitor OSD Position Select the position of the on screen bar 25 1 Higher position 2 Lower position File Type Select playback file type when a disc USB contains different types of files You can store this setting separately for each source DISC USB Audio Plays back ...

Страница 52: ...ated Speaker Level You can adjust the output level of the activated speakers Speaker Size above monitoring the test tone Front Lch Center Ch Front Rch Rear Rch Subwoofer 8 Rear Lch adjust the output level of each speaker in the range of 10dB to 10dB Initial 0dB Press and hold ENT to turn on and off the test tone Speaker Distance 9 You can adjust the speaker output timing Front Lch Center Ch Front ...

Страница 53: ... connecting an AV component such as a VCR Audio Select when connecting an audio component such as a digital audio player Camera 11 Select when connecting the rear view camera Camera Mirror 11 The mirror image of the rear view is displayed on the monitor The monitor on the unit only the normal rear view appears on the external monitor Navigation Select when connecting a Navigation System 44 Externa...

Страница 54: ...most rear only When using a two speaker system set the fader to the center 00 Adjust balance speaker output balance between the left and right speakers Leftmost left only Rightmost right only Volume Adjust Adjust and store auto adjustment volume level for each source comparing to the FM volume level The volume level will automatically increase or decrease when you change the source 12 to 12 Initia...

Страница 55: ...ge26 Disc Surround 17 Menu items Selectable settings reference page Surround Off Select to deactivate the surround function Surround On Select to activate the surround function 22 23 Auto Through Dolby PLIIMovie Dolby PLIIMusic When you select Dolby PLIIMusic you can adjust Panorama and Center Width 18 17 Selectableonlyfor DISC and USB 18 Thissettingtakeseffectonlywhenthecenterspeakerisactivated M...

Страница 56: ...dure to establish Bluetooth connection Select a device you want to connect After selecting the device use Open or Search page 32 for connection Once the connection is established it is registered in the unit You can connect the unit and the device by using Connect below from the next time Connect Only for the registered devices After selecting a device from among the registered devices page 33 37 ...

Страница 57: ...s automatically Reject The unit rejects all incoming calls Message Info 23 Auto The unit informs you of the arrival of a message by ringing and displaying Receiving Message To read the message press ENT page 35 Manual The unit does not inform you the arrival of a message MIC Setting 23 Adjust microphone volume connected to the unit 01 02 03 Version 24 The Bluetooth software and hardware versions a...

Страница 58: ...older of the case and lift the disc out holding it by the edges Always hold the disc by the edges Do not touch its recording surface When storing a disc into its case gently insert the disc around the center holder with the printed surface facing up Make sure to store discs into the cases after use To keep discs clean A dirty disc may not play correctly If a disc does become dirty wipe it with a s...

Страница 59: ...ewritable discs This unit can recognize a total of 5 000 files and 250 folders a maximum of 999 files per folder Use only finalized discs This unit can play back multi session discs however unclosed sessions will be skipped while playing This unit can recognize a total 25 characters for file folder names Some discs or files may not be played back due to their characteristics or recording condition...

Страница 60: ... 16 kHz for MPEG2 48 kHz 44 1 kHz 32 kHz 22 05 kHz for WMA 44 1 kHz for WAV 48 kHz 44 1 kHz for AAC This unit can show ID3 Tag Version 1 0 1 1 2 2 2 3 2 4 for MP3 This unit can also show WAV WMA AAC Tag This unit can play back files recorded in VBR variable bit rate Files recorded in VBR have a discrepancy in elapsed time indication This unit cannot play back the following files MP3 files encoded ...

Страница 61: ...l of 5 000 files and 250 folders a maximum of 999 files per folder This unit can recognize a total 25 characters for file folder names Bluetooth operations General While driving do not perform complicated operation such as dialling the numbers using phone book etc When you perform these operations stop your car in a safe place Some Bluetooth devices may not be connected to this unit depending on t...

Страница 62: ...can display up to 40 characters Notice When operating an iPod or a D player some operations may not be performed correctly or as intended In this case visit the following JVC web site For iPod users http www jvc co jp english car support ks pd100 index html For D player users http www jvc co jp english car support ks pd500 index html Menu settings If you change the Amplifier Gain setting from High...

Страница 63: ...hrough 2nd AUDIO OUT plugs are emitted for the main source DISC 2nd AUDIO OUT 2 channel signal is emitted when Dual Zone is activated When playing a multi channel encoded disc multi channel signals are downmixed except for some DVD Audio DVD Logo is a trademark of DVD Format Logo Licensing Corporation registered in the US Japan and other countries DivX DivX Ultra Certified and associated logos are...

Страница 64: ...cian LA Latin QU Quechua TI Tigrinya BA Bashkir GN Guarani LN Lingala RM Rhaeto Romance TK Turkmen BE Byelorussian GU Gujarati LO Laothian RN Kirundi TL Tagalog BG Bulgarian HA Hausa LT Lithuanian RO Rumanian TN Setswana BH Bihari HI Hindi LV Latvian Lettish RW Kinyarwanda TO Tonga BI Bislama HR Croatian MG Malagasy SA Sanskrit TR Turkish BN Bengali Bangla HU Hungarian MI Maori SD Sindhi TS Tsonga...

Страница 65: ...ponent connected to VIDEO IN plug Check the cords and connections Signal input is too weak Mecha Error Push Reset appears on the monitor and the panel does not move Reset the unit page 3 FM AM SSM automatic presetting does not work Store stations manually page 12 Static noise while listening to the radio Connect the antenna firmly Disc playback Disc can be neither recognized nor played Eject the d...

Страница 66: ...playback This is caused by how the tracks are recorded Not Support appears on the monitor and track is skipped Track is unplayable USB playback Noise is generated The track played back is not a playable file format MP3 WMA WAV AAC Skip to another file Do not add the extension code mp3 wma wav or m4a to non MP3 WMA WAV AAC tracks Tracks cannot play back as you have intended them to play Playback or...

Страница 67: ... device Move the car to place where you can get a better signal reception The sound is interrupted or skipped during playback of a Bluetooth audio device Reduce the distance between the unit and the Bluetooth audio device Disconnect the device connected for Bluetooth Phone Turn off then turn on the unit When the sound is not yet restored connect the device again New Device cannot be selected for B...

Страница 68: ...o longer available or is unauthorized Select another channel or continue listening to the previous channel No Name or appears on the monitor No text information for the selected channel Channel is Updating XX completed or UPDATING appears on the monitor and no sound can be heard The receiver is updating the channel information and it takes a few minutes to complete OFF AIR appears on the monitor w...

Страница 69: ...ing a D player Disconnect the D player from the adapter Then connect them again No Files or No Track appears on the monitor No tracks are stored Import tracks to the iPod or D player Reset 01 Reset 07 appears on the monitor Disconnect the adapter from both this unit and iPod D player Then connect them again Reset 08 appears on the monitor Check the connection between the adapter and this unit The ...

Страница 70: ... AM TUNER Frequency Range FM with channel interval set to 100 kHz or 200 kHz 87 5 MHz to 107 9 MHz FM with channel interval set to 50 kHz 87 5 MHz to 108 0 MHz AM with channel interval set to 10 kHz 530 kHz to 1 710 kHz AM with channel interval set to 9 kHz 531 kHz to 1 602 kHz FM Tuner Usable Sensitivity 11 3 dBf 1 0 μV 75 Ω 50 dB Quieting Sensitivity 16 3 dBf 1 8 μV 75 Ω Alternate Channel Select...

Страница 71: ...h 1 2 certified Output Power 4 dBm Max Power class 2 Service Area Within 10 m 10 9 yd Profile HSP Headset Profile HFP Hands Free Profile A2DP Advanced Audio Distribution Profile AVRCP Audio Video Remote Control Profile SPP Serial Port Profile OPP Object Push Profile GENERAL Power Requirement Operating Voltage DC 14 4 V 11 V to 16 V allowance Grounding System Negative ground Allowable Operating Tem...

Страница 72: ...DWJEIN 2007 Victor Company of Japan Limited Having TROUBLE with operation Please reset your unit Refer to page of How to reset your unit Still having trouble USA ONLY Call 1 800 252 5722 http www jvc com We can help you ...

Страница 73: ...ommager vos enceintes voir page 55 du MANUEL D INSTRUCTIONS Pour éviter les court circuits couvrir les bornes des fils qui ne sont PAS UTILISÉS avec de la bande isolante Le dissipateur de chaleur devient très chaud après usage Faire attention de ne pas le toucher en retirant cet appareil Heat sink Sumidero térmico Dissipateur de chaleur M Reverse gear signal extension cord Cable prolongador para l...

Страница 74: ...fan on the rear panel to maintain proper ventilation when installed You cannot install the unit on the car which has any obstacles in the space shown in Required space for installation on page 1 Caution when installing Fit the unit into the mounting sleeve by using four corners of the trim plate DO NOT press the panel shaded in the illustration INSTALLATION MONTAGE DANS LE TABLEAU DE BORD L illust...

Страница 75: ...r le diagramme Yellow 4 Amarillo 4 Jaune 4 USB cable Cable USB Câble USB see diagram véase diagrama voir le diagramme 3 Not included for this unit 3 No suministrado con esta unidad 3 Non fourni avec cet appareil 4 Before checking the operation of this unit prior to installation this lead must be connected otherwise power cannot be turned on 4 Antes de comprobar el funcionamiento de esta unidad pre...

Страница 76: ...ery A la batería del automóvil À la batterie de la voiture Purple with white stripe Púrpura con rayas blancas Violet avec bande blanche Reverse lamps Luces traseras Feux de recul B TROUBLESHOOTING The fuse blows Are the red and black leads connected correctly Power cannot be turned on Is the yellow lead connected No sound from the speakers Is the speaker output lead short circuited Sound is distor...

Страница 77: ...mmander cet autoradio en utilisant la télécommande Pour la connexion un adaptateur de télécommande exclusif non fourni correspondant à votre voiture est requis Pour en savoir plus consultez le revendeur autoradio auprès duquel vous avez acheté cet autoradio OE remote adapter not supplied Adaptador para control remoto OE no suministrado Adaptateur pour télécommande au volant non fourni Steering whe...

Страница 78: ...l XM radio satellite XM Antenna supplied with XMDirectTM Universal Tuner Box Antena suministrada con el Sintonizador universal XMDirect Antenne fournie avec le tuner universel XMDirectTM XMDirectTM Universal Tuner Box Sintonizador universal XMDirect Tuner universel XMDirectTM JVC PnP Plug and Play PnP Plug and Play JVC PnP Plug and Play JVC You can connect JVC PnP through this unit using JVC SIRIU...

Страница 79: ...tallatie en aansluiting van het apparaat vindt u in de desbetreffende handleiding INSTRUCTIONS BEDIENUNGSANLEITUNG MANUEL D INSTRUCTIONS GEBRUIKSAANWIJZING LVT1659 001A E For canceling the display demonstration see page 5 Zum Abbrechen der Displaydemonstration siehe Seite 5 Pour annuler la démonstration des affichages référez vous à la page 5 Zie bladzijde 5 voor het annuleren van de displaydemons...

Страница 80: ... Richtlinie 1999 5 EG befindet Wien Con la presente JVC dichiara che questo KD AVX33 è conforme ai requisiti essenziali ed alle altre disposizioni pertinenti stabilite dalla direttiva 1999 5 CE Français Malti Par la présente JVC déclare que l appareil KD AVX33 est conforme aux exigences essentielles et aux autres dispositions pertinentes de la directive 1999 5 CE Hawnhekk JVC jiddikjara li dan KD ...

Страница 81: ... og øvrige relevante krav i direktiv 1999 5 EF Niniejszym JVC oświadcza że KD AVX33 jest zgodny z zasadniczymi wymogami oraz pozostałymi stosownymi postanowieniami Dyrektywy 1999 5 EC Cesky Slovensko JVC tímto prohlašuje že tento KD AVX33 je ve shodě se základními požadavky a dalšími príslušnými ustanoveními směrnice 1999 5 ES JVC izjavlja da je ta KD AVX33 v skladu z bistvenimi zahtevami in ostal...

Страница 82: ...fore operation to ensure your complete understanding and to obtain the best possible performance from the unit IMPORTANT FOR LASER PRODUCTS 1 CLASS 1 LASER PRODUCT 2 CAUTION Do not open the top cover There are no user serviceable parts inside the unit leave all servicing to qualified service personnel 3 CAUTION Visible and or invisible class 1M laser radiation when open Do not view directly with o...

Страница 83: ... technology must be authorized by Macrovision and is intended for home and other limited viewing uses only unless otherwise authorized by Macrovision Reverse engineering or disassembly is prohibited Contents INTRODUCTION Playable disc type 4 Before operating the unit 5 OPERATIONS Basic operations Control panel 7 Basic operations Remote controller RM RK251 8 Listening to the radio 10 Disc operation...

Страница 84: ...OM CD I CD I Ready CD Recordable Rewritable CD R RW Compliant to ISO 9660 level 1 level 2 Romeo Joliet CD DA MP3 WMA WAV AAC 4 JPEG DivX MPEG1 MPEG2 MPEG4 1 IfyouinsertaDVDVideodiscofanincorrectRegionCode Regioncodeerror appearsonthemonitor 2 DVD Rrecordedinmulti borderformatisalsoplayable exceptforduallayerdiscs 3 Itispossibletoplaybackfinalized R RW Videoformatonly discs However theuseof Rdouble...

Страница 85: ...k in the same way if they have the same names or marks Turn on the power Ÿ Display AV Menu Enter the Setup menu Select Display Demonstration then activate the Demonstration screen Cancel the display demonstrations Select Off Continued on the next page AV Menu Setup Enter ENT Setup menu icon Currently selected menu Demonstration Display Clock Disc Setup 1 Disc Setup 2 Tuner On Demonstration Wall Pa...

Страница 86: ...tion Finish the procedure To display the clock time while playing back a video source select Clock OSD Clock On Return to the Setup menu Select Clock Time Set then activate the Time Set screen Set the clock time Return to the Clock menu Select 12Hours 24Hours Activate the 12Hours 24Hours screen Clock 0 00 Time Set 12Hours 24Hours OSD Clock Clock Adjust Time Set Hours 18 00 Exit ENT Time Set Minute...

Страница 87: ...ist accessible for the selected source Turn on the power Turn off the power Hold Attenuate the sound if the power is on Change the display information 4 TUNER DAB Search for stations ensembles DISC USB Select chapters tracks On menus Go to previous next step iPod D PLAYER Select tracks Bluetooth Audio Reverse skip forward skip 5 3 TUNER Select preset stations DAB Select services DISC USB Select ti...

Страница 88: ...ion Manual separate volume for connection Caution Do not expose batteries to heat or flame IMPORTANT If Dual Zone is activated page 28 the remote controller functions only for operating the DVD CD player Main elements and features i o a s 1 1 Turns on the power Attenuates the sound if the power is on Turns off the power if pressed and held while the power is on 2 1 Selects the source 3 1 Displays ...

Страница 89: ...esebuttonscanbeusedonlywhentheslidecoveris closed 3 5 Returnstothepreviousmenu Confirmstheselection 7 Makes selection settings Skips back or forward by 5 minutes for DivX MPEG1 MPEG2 DISC buttons Changes discs for CD CH 8 Shows the on screen bar 9 1 Changes the display information p Display or erase AV Menu q For disc USB operations 6 Plays pauses 5 DVD Selects the title group DVD VR Selects the p...

Страница 90: ... display then press it repeatedly The ST indicator lights up when receiving an FM stereo broadcast with sufficient signal strength 4 Reception improves but stereo effect will be lost The MO indicator lights up To restore stereo effect select Off in step 4 PS station name for FM RDS If no signal is coming in No Name appears Preset No Band page 48 Tuner Standby Reception indicators PTY code for FM R...

Страница 91: ...fficient signal strength will be detected The DX indicator goes off then the LO indicator lights up FM station automatic presetting SSM Strong station Sequential Memory This function works only for FM bands You can preset six stations for each band 1 Mode DX Mono DX Local SSM PTy Standby DX Local DX Local Exit ENT Mode Mono DX Local SSM PTy Standby Start ENT FM1 Store 87 5 89 9 97 9 105 9 108 0 10...

Страница 92: ...ther Metr Finance Children s Progs Social Affairs Religion Phone In Travel Touring Leisure Hobby Jazz Music Country Music National Music Oldies Music Folk Music Documentary Selecting preset stations On the remote 1 2 or On the unit or 1 Each time you hold the button you can change the FM bands 2 Preset List can also be accessed through AV Menu List 15 45 FLAT DX AF TUNER FM1 PTy Search XX X MHz Sc...

Страница 93: ... to another station providing the RDS signals Flashes Press to deactivate Goes off PTY Standby Reception Indicator Activate AV Menu then select Mode PTy Standby pages 14 57 PTY The unit will temporarily switch to your favorite PTY programme from any source other than AM Lights up Not yet activated Tune in to another station providing the RDS signals Flashes To deactivate select Off in step 4 then ...

Страница 94: ...mme Alternative Frequency Reception DAB AF page 44 Automatic station selection Programme Search Usually when you select preset stations the preset station is tuned in If the signals from the FM RDS preset station are not sufficient for good reception this unit using the AF data tunes in to another frequency broadcasting the same programme as the original preset station is broadcasting page 54 The ...

Страница 95: ...on you have tried to do In some cases without showing operations will not be accepted Label side 0 Eject the disc 3 Start playback if necessary DISP Press if no playback picture appears but disc information screen pages 16 to 18 is displayed Insert the disc Playback starts automatically 7 Stop playback Caution Do not place your finger behind the control panel Caution on volume setting Discs and co...

Страница 96: ...g time Playback mode Disc type 4 Press Select chapter Hold Reverse forward search 1 5 Select title 15 45 MULTI MLP B S P BONUS AUDIO DVD G 01 02 0 45 38 RPT Surround mode 4 Press Select track Hold Reverse forward search 1 5 Select group Group no Track no Playing time BONUS indicator page 24 B S P indicator page 24 4 Press Select chapter Hold Reverse forward search 1 5 Select program no Play List n...

Страница 97: ...BC is in use 4 Press Select track Hold Reverse forward search 1 page 48 15 45 FRONT 2CH RPT DivX DVD T 01 C 02 0 45 38 Current Folder Name Current File Name avi For DivX MPEG Folder no Track no Playing time For JPEG Folder no File no 4 Press Select track Hold Reverse forward search for DivX MPEG 2 5 Press Select folder Hold Display Folder List ...

Страница 98: ...itle only for CD Text 3 Folder no Track no Playing time 4 Press Select track Hold Reverse forward search 1 5 Press Select folder Hold Display Folder List Audio format MP3 WMA WAV AAC 4 Press Select track Hold Reverse forward search 1 page 48 page 48 1 Searchspeed x2 x10 3 NoName appearsforconventionalCDs Tag data will be shown instead of folder file names when they are recorded and Tag Display is ...

Страница 99: ... available for Playlist playback Track Plays the first 15 seconds of each track for VCD PBC not in use Track Repeats current track for VCD PBC not in use Disc All Randomly plays all tracks for VCD PBC not in use Track Plays the first 15 seconds of each track Folder Plays the first 15 seconds of the first track of each folder Track Repeats current track Folder Repeats all tracks of the current fold...

Страница 100: ... Folder List can also be accessed through AV Menu List Prohibiting disc ejection You can lock a disc in the loading slot No Eject appears To cancel the prohibition repeat the same procedure to select EJECT OK Folder List Off My Best Cinema Pops My Best2 Favorite Song Cinema2 ENT Folder List Off My Best Cinema Pops My Best2 Favorite Song Cinema2 ENT File List Off Song011 mp3 Song012 mp3 Song013 mp3...

Страница 101: ...Reverse forward search 2 No sound can be heard Slow motion 3 during pause No sound can be heard Press Select chapter during playback or pause Hold Reverse forward search 4 Select title during playback or pause Using menu driven features 1 2 Select an item you want to start playback 3 Select chapter Select title when not playing twice Select title during playback or pause Select aspect ratio Select...

Страница 102: ...rse slow motion does not work Press Select chapter during playback or pause Hold Reverse forward search 6 Select program Select play list during playback or pause Select aspect ratio Select audio channel ST stereo L left R Right Turn on off subtitle Select chapter Select program when not playing twice Select program play list during playback or pause Using Original Program Play List screens page 3...

Страница 103: ...use if pressed during playback Reverse forward search 4 Press Select track Hold Reverse forward search 6 Select folder Select track within the same folder twice Select folder 1 Erasesthemisentryofthenumber 2 Searchspeed 1 2 3 3 Searchspeed 1 2 4 Searchspeed x2 x5 x10 x20 x60 5 Slowmotionspeed 1 32 1 16 1 8 1 4 1 2 6 Searchspeed x2 x10 Stop playback Start playback Slide show each file is shown for ...

Страница 104: ...shows the BSP selecting icons such as or on the screen 1 Select an item you want to display 2 Enjoying surround sounds You can enjoy multi channel surround playback through the front center surround speakers After connecting the center speaker make sure to activate the center speaker otherwise no sound comes out of the center speaker page 53 All surround mode can also be used for USB MULTI For mul...

Страница 105: ...Width Adjust the center image so it may be heard only from the center speaker only form the left right front speaker as a phantom center image or various combination of these speakers As the number increases the phantom effect becomes stronger normally select 4 3 On the remote controller You cannot change the Dolby PL IIMusic settings using the remote controller Surround On Auto Through Dolby PLII...

Страница 106: ...e a selection If a pop up menu appears For entering time numbers Move the entry position Select a number To remove the on screen bar Operations using the on screen bar DVD VCD DivX MPEG1 MPEG2 JPEG These operations are possible on the monitor using the remote controller ...

Страница 107: ...the disc T REM Remaining title time for DVD Remaining disc time for others TIME Elapsed playing time of the current chapter track 2 REM Remaining time of the current chapter track 2 6 Playback status Play Reverse forward search Reverse forward slow motion Pause Stop 7 Operation icons TIME Change time indication see 5 Time Search Specify a certain scene by entering time TITLE Title Search by its nu...

Страница 108: ...ler 1 2 Adjust the volume through the 2nd AUDIO OUT plug 3 Operate the DVD CD player 1 JVC original headphone virtual surround system This surround will also work for the main source DISC if On Surround On is selected as the sub source This surrounddoesnotworkforDivX MPEG1 MPEG2discs 2 DisplayedbeingshadedifHeadphoneSurroundisnot applied Operations using the control screen For discs except DVD and...

Страница 109: ... p Current track highlighted To select a folder or track 1 Select Folder column or Track column on the control screen 2 Select a folder or track If necessary press ENT to start playback 1 Playback mode selection window appears when OSD is pressed below 2 Selected playback mode below 3 Elapsed playing time of the current track 4 Operation status 5 Current track number total number of tracks on the ...

Страница 110: ...laylistmay notbedisplayeddependingontherecording equipment Folder 144 240 Track 144 198 Page 4 7 fol120 fol121 fol122 fol123 fol124 fol125 fol126 fol127 fol128 fol129 fol150 fol151 fol152 fol153 fol154 fol155 fol156 fol157 fol158 fol159 fol140 fol141 fol142 fol143 fol144 fol145 fol146 fol147 fol148 fol149 fol130 fol131 fol132 fol133 fol134 fol135 fol136 fol137 fol138 fol139 file0141 wma file0142 m...

Страница 111: ...ect USB when Dual Zone is in use All tracks in the USB device will be played repeatedly until you change the source 1 ExceptforJVCD PlayerXA HD500 2 ExceptforMPEG2filesrecordedbyJVCEverio camcorder extensioncode mod 3 Start playback if necessary DISP Press if no playback picture appears but disc information screen pages 16 to 18 is displayed 4 Press Select track Hold Reverse forward search 5 Press...

Страница 112: ... Ex To select Track Repeat 1 2 3 4 When one of the playback modes is selected the corresponding indicator lights up on the information screen To cancel select All Off in step 3 or Off in step 4 Selecting playback modes File type Intro Repeat Random Track Plays the first 15 seconds of each track Folder Plays the first 15 seconds of the first track of each folder Track Repeats current track Folder R...

Страница 113: ...ode When you connect a Bluetooth device to the unit for the first time make pairing between the unit and the device Pairing allows Bluetooth devices to communicate each other To make pairing you may need to enter the PIN Personal Identification Number code of your Bluetooth device you want to connect Once the connection is established it is registered in the unit even if you reset the unit Up to f...

Страница 114: ...t 3 Enter the specific PIN code of the device to the unit Refer to the instructions supplied with the device to check the PIN code 4 Use the Bluetooth device to connect Now connection is established and you can use the device through the unit AV Menu Bluetooth Enter ENT AV Menu Setup Enter ENT Registering using Open 1 Select Bluetooth Phone or Bluetooth Audio 2 3 Bluetooth menu icon 4 5 Enter a PI...

Страница 115: ...nt to connect disconnect 2 Perform steps 2 and 3 of Registering using Open on page 34 then Select Connect to connect the selected device Select Disconnect to disconnect the selected device You can set the unit to connect a Bluetooth device automatically when the unit is turned on page 59 NEW DEVICE Dial Menu Message Open Search Special Device Deleting a registered device 1 Select Bluetooth Phone o...

Страница 116: ...ivated press any button except ATT or to answer the incoming call page 48 Connected device name 3 Name and phone number if acquired To end the call or reject an incoming call Hold any button except ATT or Answering a waiting call If your cellular phone is equipped with the call waiting function you can put the current call on hold and answer the waiting call Press any button except ATT and To rest...

Страница 117: ...ok memory of the cellular phone to this unit Refer to the instruction manual supplied with your cellular phone With some cellular phones the phone book memory is transferred automatically 3 Select the name phone number you want to call P902i Annie Redial Received Calls Phonebook Missed Calls Phone number P902i Annie Redial Received Calls Phonebook Missed Calls Phone number When an SMS comes in If ...

Страница 118: ...333 22233336666 44455556666 11133334444 99988887777 55566668888 1 2 3 4 5 6 ENT Preset Memory Jack 12312341234 09898765432 09845671234 Dial Store ENT ENT 11122223333 22233336666 44455556666 11133334444 99988887777 55566668888 1 2 3 4 5 6 ENT Preset Memory Speak the name you want to call How to enter phone number On the remote On the unit 1 To delete an unwanted digit select blank space 2 Dial Menu...

Страница 119: ... remainder page 48 List menu icon AV Menu Setup Enter ENT AV Menu List Enter ENT Select Bluetooth Audio Ÿ Start playback See pages 33 to 35 for connecting a new device See page 35 for connecting disconnecting a registered device See page 35 for deleting a registered device When the sound is stopped or interrupted during the use of a Bluetooth device try the following remedies Turn off then turn on...

Страница 120: ...tional CDs Disc no Track no Playing time While playing an MP3 disc you can select and start playing a track in the disc using the Lists Disc List select the current disc Folder List File List then start playing a track you want 4 Press Select track Hold Reverse forward search 5 Press Select folder MP3 only Hold Display Disc List Disc List Off MP3 DISC DISC 02 DISC 03 DISC 04 DISC 05 DISC 06 ENT Di...

Страница 121: ...Plays the first 15 seconds of each track Folder Plays the first 15 seconds of the first track of each folder Disc Plays the first 15 seconds of the first track of all loaded discs Track Repeats current track Folder Repeats all tracks of the current folder Disc Repeats all tracks of the current disc Folder Randomly plays all tracks of current folder then tracks of next folders Disc Randomly plays a...

Страница 122: ... label InformationchangeswhenyoupressDISP Whiletuningina servicewithDLS DynamicLabelSegment theTEXTindicator lightsup When surrounding sounds are noisy Some services provide Dynamic Range Control DRC signals together with their regular programme signals DRC will reinforce the low level sounds to improve your listening The DRC indicator will light up while tuning in a service with the DRC signals 1...

Страница 123: ...vating TA PTY StandbyReception Operations are exactly the same as explained on page 13 for FM RDS stations You cannot store PTY codes separately for the DAB tuner and for the FM tuner DAB1 Service Label No Serv FFH No Serv HRS HRH ENT 1 2 3 4 5 6 Store ENT Service Label No Serv FFH No Serv HRS HRH ENT 1 2 3 4 5 6 DAB1 Store ENT 15 45 FLAT AF ANN DRC DAB DAB1 Preset4 Bayern Bayern2 DAB1 Store ENT S...

Страница 124: ... 6 Select an announcement type for Announcement Standby Reception Tracing the same programme Alternative Frequency Reception DAB AF While receiving a DAB service When driving in an area where a service cannot be received this unit automatically tunes in to another ensemble or FM RDS station broadcasting the same programme While receiving an FM RDS station When driving in an area where a DAB servic...

Страница 125: ...list Ô Artist Ô Album Ô Genre Ô Track Ô back to the beginning 3 Confirm the selection 4 Repeat steps 2 and 3 to select a track When a track is selected finally playback starts To return to the previous menu Selecting playback modes 1 Display AV Menu then select Mode menu icon 2 Enter Mode then select Repeat or Random 3 Select an appropriate option Repeat One Functions the same as Repeat One or Rep...

Страница 126: ...a Mirror or Navigation for AV Input page 55 some status messages such as volume level change will not appear on the monitor while viewing the picture When Navigation is selected for AV Input You can use the source AV IN for listening to an audio source connected to the LINE IN plugs While selecting other source you can watch the navigation screen without changing the source To watch the navigation...

Страница 127: ... the Line Input Adapter KS U57 not supplied or AUX Input Adapter KS U58 not supplied Preparation Make sure External Input is selected for the external input setting page 55 Select EXT IN Ÿ Turn on the connected component and start playing the source 15 45 FLAT EXT IN EXT INPUT POWER ON Assigned title page 49 page 48 ...

Страница 128: ...tment You can store your adjustment into User1 User2 and User3 1 Repeat steps and Ÿ then in step 2 Adjust 3 Store Soundequalization Edit 60 0 Hz ENT 03 Store User Store User1 User2 User3 ENT Store AV Menu Setup Enter ENT AV Menu Equalizer Enter ENT Flat Hard Rock R B Pop Jazz Exit ENT Equalizer Equalizer menu icon Flat Hard Rock R B Pop Jazz Exit ENT Equalizer Edit 60 0 Hz ENT 03 Store POWER ON ...

Страница 129: ...e the character set press DISP For available characters page 65 2 Repeat step 1 until you finish entering the title The maximum number of characters is 16 Finish the procedure Assigningtitlestothesources Press Change character set Hold Erase title AV Menu Setup Enter ENT AV Menu Mode Enter ENT Mode Title Entry AV In Name MY BEST DISP Store ENT A a 0 Á á Title Entry POWER ON AV In Name AV INPUT DIS...

Страница 130: ... List Bluetooth Sound menu icon Sound Through Fader Balance Volume Adjust Subwoofer High Pass Filter Crossover Through On Exit ENT High Pass Filter AV Menu Setup Enter ENT AV Menu Sound Enter ENT Disc Surround Dual Zone AV Menu Setup Enter ENT Input Display Clock Disc Setup 1 Disc Setup 2 Tuner Others Setup Equalizer Sound Disc Surround Mode Bluetooth List Dual Zone The display indications may cha...

Страница 131: ...cks Dimmer Off Cancels On Activates dimmer Auto Dims the monitor when you turn on the headlights 1 Time Set Press ENT or to display the time setting screen then set the Dimmer On Off times Bright You can adjust brightness of the monitor 15 darkest to 15 brightest Initial 00 Picture Adjust 2 You can adjust the following to make the monitor clear and legible for watching the playback picture The set...

Страница 132: ...n Clock Time Set Initial 0 00 6 12Hours 24Hours 12 Hours 24 Hours 6 OSD Clock Off On 6 Clock Adjust Off Auto 6 Disc Setup 1 5 Menu Language Select the initial disc menu language Initial English also page 65 Audio Language Select the initial audio language Initial English also page 65 Subtitle Select the initial subtitle language or erase the subtitle Off Initial English also page 65 OSD Language S...

Страница 133: ...ith which the Registration Code recorded this unit s Registration Code is overwritten for copyright protection Disc Setup 2 D Dynamic Range Compres Compression 5 You can enjoy a powerful sound at a low volume level while playing Dolby Digital software Auto Select to apply the effect to multi channel encoded software On Select to always use this function Speaker Size 5 You can adjust the speaker si...

Страница 134: ...received signals from the current station become weak Off Cancels not selectable when DAB AF is set to On AF Regional Switches to another station broadcasting the same programme The REG indicator lights up AF Switches to another station The programme may differ from the one currently received AF indicator lights up 14 TA Volume 00 to 30 or 50 8 Initial 15 13 Program Search Off On 14 IF Band Width ...

Страница 135: ...ar Changer iPod D Player 12 CD changer iPod or D player 40 45 External Input Any other than the above 47 For connecting the DAB tuner this setting is not required It is automatically detected Others Beep Off Cancels On Activates the key touch tone Telephone Muting 13 Off Cancels Muting1 Muting2 Select either one which mutes the sounds while using the cellular phone Initialize Initialize all settin...

Страница 136: ...fer 14 Adjust the settings below in the submenu Phase Subwoofer phase Select either Normal or Reverse which reproduces a better sound Level Subwoofer output level Level 06 to 08 Initial 00 High Pass Filter Through Select when the subwoofer is not connected On Select when the subwoofer is connected Crossover Adjust the crossover frequency between the front rear speakers and the subwoofer 80Hz 120Hz...

Страница 137: ...Menu items Selectable settings reference page Mono Only for FM Off On 10 DX Local Only for FM DX Local 11 SSM Only for FM 11 PTy Standby Only for FM DAB Off News 13 43 When you activate PTY Standby Reception you can change the PTY code for PTY Standby Reception Title Entry Only for AV IN and EXT IN 49 All Off Intro Repeat Random Only for disc USB playback and iPod D player 19 32 41 45 D Dynamic Ra...

Страница 138: ...nection Select a device you want to connect After selecting the device use Open or Search page 34 for connection Once the connection is established it is registered in the unit You can connect the unit and the device by using Connect below from the next time Connect Only for the registered devices After selecting a device from among the registered devices page 35 39 establish the connection with i...

Страница 139: ...lls automatically Reject The unit rejects all incoming calls Message Info 22 Auto The unit informs you of the arrival of a message by ringing and displaying Receiving Message To read the message press ENT page 37 Manual The unit does not inform you the arrival of a message MIC Setting 22 Adjust microphone volume connected to the unit 01 02 03 Version 23 The Bluetooth software and hardware versions...

Страница 140: ...older of the case and lift the disc out holding it by the edges Always hold the disc by the edges Do not touch its recording surface When storing a disc into its case gently insert the disc around the center holder with the printed surface facing up Make sure to store discs into the cases after use To keep discs clean A dirty disc may not play correctly If a disc does become dirty wipe it with a s...

Страница 141: ...itable discs This unit can recognize a total of 5 000 files and 250 folders a maximum of 999 files per folder Use only finalized discs This unit can play back multi session discs however unclosed sessions will be skipped while playing This unit can recognize a total 25 characters for file folder names Some discs or files may not be played back due to their characteristics or recording conditions P...

Страница 142: ... 16 kHz for MPEG2 48 kHz 44 1 kHz 32 kHz 22 05 kHz for WMA 44 1 kHz for WAV 48 kHz 44 1 kHz for AAC This unit can show ID3 Tag Version 1 0 1 1 2 2 2 3 2 4 for MP3 This unit can also show WAV WMA AAC Tag This unit can play back files recorded in VBR variable bit rate Files recorded in VBR have a discrepancy in elapsed time indication This unit cannot play back the following files MP3 files encoded ...

Страница 143: ...e monitor The unit cannot recognize a USB device whose rating is other than 5 V and does not exceed 500 mA While playing from a USB device the playback order may differ from other players This unit may be unable to play back some USB devices or some files due to their characteristics or recording conditions Depending on the shape of the USB devices and connection ports some USB devices may not be ...

Страница 144: ...In this case visit the following JVC web site For iPod users http www jvc co jp english car support ks pd100 index html For D player users http www jvc co jp english car support ks pd500 index html About sounds reproduced through the rear terminals Speaker out analog discrete output LINE OUT FRONT REAR CENTER OUT SUBWOOFER Multi channel signals are emitted for a multi channel encoded software When...

Страница 145: ... BA Bashkir GN Guarani LN Lingala RM Rhaeto Romance TK Turkmen BE Byelorussian GU Gujarati LO Laothian RN Kirundi TL Tagalog BG Bulgarian HA Hausa LT Lithuanian RO Rumanian TN Setswana BH Bihari HI Hindi LV Latvian Lettish RW Kinyarwanda TO Tonga BI Bislama HR Croatian MG Malagasy SA Sanskrit TR Turkish BN Bengali Bangla HU Hungarian MI Maori SD Sindhi TS Tsonga BO Tibetan HY Armenian MK Macedonia...

Страница 146: ...t connected to VIDEO IN plug Check the cords and connections Signal input is too weak Mecha Error Push Reset appears on the monitor and the panel does not move Reset the unit page 3 FM AM SSM automatic presetting does not work Store stations manually page 11 Static noise while listening to the radio Connect the aerial firmly Disc playback Disc can be neither recognized nor played Eject the disc fo...

Страница 147: ...uring playback This is caused by how the tracks are recorded Not Support appears on the monitor and track skips The track is unplayable USB playback Noise is generated The track played back is not a playable file format MP3 WMA WAV AAC Skip to another file Do not add the extension code mp3 wma wav or m4a to non MP3 WMA WAV AAC tracks Tracks cannot play back as you have intended them to play Playba...

Страница 148: ...e Move the car to place where you can get a better signal reception The sound is interrupted or skipped during playback of a Bluetooth audio device Reduce the distance between the unit and the Bluetooth audio device Disconnect the device connected for Bluetooth phone Turn off then turn on the unit When the sound is not yet restored connect the device again New Device cannot be selected for Bluetoo...

Страница 149: ...ting cable and its connection For iPod Playback stops The headphones are disconnected during playback Restart playback No sound can be heard Error 01 appears on the monitor when connecting a D player Disconnect the D player from the adapter Then connect them again No Files or No Track appears on the monitor No tracks are stored Import tracks to the iPod or D player Reset 01 Reset 07 appears on the...

Страница 150: ...ls Input LINE IN VIDEO IN MIC IN USB input terminal Aerial input Output 2nd AUDIO OUT VIDEO OUT Others CD changer OE REMOTE FM AM TUNER Frequency Range FM 87 5 MHz to 108 0 MHz AM MW 522 kHz to 1 620 kHz LW 144 kHz to 279 kHz FM Tuner Usable Sensitivity 11 3 dBf 1 0 μV 75 Ω 50 dB Quieting Sensitivity 16 3 dBf 1 8 μV 75 Ω Alternate Channel Selectivity 400 kHz 65 dB Frequency Response 40 Hz to 15 00...

Страница 151: ...em FAT 32 16 12 Max Current Less than 500 mA 5 V BLUETOOTH Version Bluetooth 1 2 certified Output Power 4 dBm Max Power class 2 Service Area Within 10 m Profile HSP Headset Profile HFP Hands Free Profile A2DP Advanced Audio Distribution Profile AVRCP Audio Video Remote Control Profile SPP Serial Port Profile OPP Object Push Profile GENERAL Power Requirement Operating Voltage DC 14 4 V 11 V to 16 V...

Страница 152: ...0 05 52 61145 Friedberg Germany Sehr geehrter Kunde sehr geehrte Kundin dieses Gerät stimmt mit den gültigen europäischen Richtlinien und Normen bezüglich elektromagnetischer Verträglichkeit und elektrischer Sicherheit überein Die europäische Vertretung für die Victor Company of Japan Limited ist JVC Technology Centre Europe GmbH Postfach 10 05 52 61145 Friedberg Deutschland Cher e client e Cet ap...

Страница 153: ...van het stuur of de versnelling aangezien elke belemmering van de juiste werking van het stuur en de versnelling tot een ongeluk kan lijden dit een gevaar vormt voor de airbag aangezien elke belemmering van de werking van de airbag tot een dodelijk ongeluk kan lijden dit het uitzicht belemmert Bedien GEEN enkele eenheid terwijl u uw handen aan het stuur nodig hebt aangezien dit anders tot een onge...

Страница 154: ...arrière Do not block the fan Nicht das Gebläse blockieren Ne bloquez pas le ventilateur Blokkeer de ventilatie niet INSTALLATION IN DASH MOUNTING The following illustration shows a typical installation If you have any questions or require information regarding installation kits consult your JVC IN CAR ENTERTAINMENT dealer or a company supplying kits If you are not sure how to install this unit cor...

Страница 155: ...ich vor dem Einbau dieses Receivers an Ihre Auto Fachwerkstatt Vous aurrez peut être besoin de modifier le câblage du cordon d alimentation fourni comme montré sur l illustration Contactez votre revendeur automobile autorisé avant d installer l appareil U moet mogelijk de bedrading van het bijgeleverde spanningssnoer als afgebeeld veranderen Raadpleeg een erkend autogarage alvorens deze receiver t...

Страница 156: ...zum Anschließen an die Autobatterie Umgehen des Zündschalters konstant 12 V A une borne sous tension du porte fusible connectée à la batterie de la voiture en dérivant l interrupteur d allumage 12 V constant Naar een onder spanning staande aansluitklem in het zekeringblok die is aangesloten op de accu van de auto u passeert de ontstekingsschakelaar constant 12 V To an accessory terminal in the fus...

Страница 157: ...cting to the steering wheel remote controller Anschluß an die Lenkradfernbedienung Connexion de la télécommande de volant Verbinden met de stuurwiel afstandsbediening If your car is equipped with the steering wheel remote controller you can operate this unit using the controller To do it a JVC s OE remote adapter not supplied which matches with your car is required Consult your JVC IN CAR ENTERTAI...

Страница 158: ...o External Input see page 55 of the INSTRUCTIONS CD changer jack CD Wechsler Buchse Prise du changeur de CD Aansluiting voor CD wisselaar JVC DAB tuner DAB Tuner von JVC Tuner DAB JVC JVC DAB tuner JVC CD changer CD Wechsler von JVC Changeur de CD JVC JVC CD wisselaar or oder ou of or oder ou of or oder ou of or oder ou of USB device USB Gerät Périphérique USB USB apparatuur Audio cord not supplie...

Страница 159: ...підключень наведені у окремій інструкції INSTRUCTIONS ИНСТРУКЦИИ ПО ЭКСПЛУАТАЦИИ ІНСТРУКЦІЇ LVT1659 003A EE For canceling the display demonstration see page 5 Информацию об отмене демонстрации функций дисплея см на стр 5 Інформацію щодо відміни демонстрації функцій дисплею див на стор 5 DVD CD RECEIVER ПРИЕМНИК ДЛЯ ВОСПРОИЗВЕДЕНИЯ ДИСКОВ DVD И КОМПАКТ ДИСКОВ ПРИЙМАЧ З ПРОГРАВАЧЕМ DVD CD ДИСКІВ KD ...

Страница 160: ...o not expose the monitor to direct sunlight When the temperature is very cold or very hot Chemical changes occur inside causing malfunction Pictures may not appear clearly or may move slowly Pictures may not be synchronized with the sound or picture quality may decline in such environments Thank you for purchasing a JVC product Please read all instructions carefully before operation to ensure your...

Страница 161: ... technology must be authorized by Macrovision and is intended for home and other limited viewing uses only unless otherwise authorized by Macrovision Reverse engineering or disassembly is prohibited Contents INTRODUCTION Playable disc type 4 Before operating the unit 5 OPERATIONS Basic operations Control panel 7 Basic operations Remote controller RM RK251 8 Listening to the radio 10 Disc operation...

Страница 162: ...OM CD I CD I Ready CD Recordable Rewritable CD R RW Compliant to ISO 9660 level 1 level 2 Romeo Joliet CD DA MP3 WMA WAV AAC 4 JPEG DivX MPEG1 MPEG2 MPEG4 1 IfyouinsertaDVDVideodiscofanincorrectRegionCode Regioncodeerror appearsonthemonitor 2 DVD Rrecordedinmulti borderformatisalsoplayable exceptforduallayerdiscs 3 Itispossibletoplaybackfinalized R RW Videoformatonly discs However theuseof Rdouble...

Страница 163: ...k in the same way if they have the same names or marks Turn on the power Ÿ Display AV Menu Enter the Setup menu Select Display Demonstration then activate the Demonstration screen Cancel the display demonstrations Select Off Continued on the next page AV Menu Setup Enter ENT Setup menu icon Currently selected menu Demonstration Display Clock Disc Setup 1 Disc Setup 2 Tuner On Demonstration Wall Pa...

Страница 164: ...tion Finish the procedure To display the clock time while playing back a video source select Clock OSD Clock On Return to the Setup menu Select Clock Time Set then activate the Time Set screen Set the clock time Return to the Clock menu Select 12Hours 24Hours Activate the 12Hours 24Hours screen Clock 0 00 Time Set 12Hours 24Hours OSD Clock Clock Adjust Time Set Hours 18 00 Exit ENT Time Set Minute...

Страница 165: ...ist accessible for the selected source Turn on the power Turn off the power Hold Attenuate the sound if the power is on Change the display information 4 TUNER DAB Search for stations ensembles DISC USB Select chapters tracks On menus Go to previous next step iPod D PLAYER Select tracks Bluetooth Audio Reverse skip forward skip 5 3 TUNER Select preset stations DAB Select services DISC USB Select ti...

Страница 166: ...ion Manual separate volume for connection Caution Do not expose batteries to heat or flame IMPORTANT If Dual Zone is activated page 28 the remote controller functions only for operating the DVD CD player Main elements and features i o a s 1 1 Turns on the power Attenuates the sound if the power is on Turns off the power if pressed and held while the power is on 2 1 Selects the source 3 1 Displays ...

Страница 167: ...esebuttonscanbeusedonlywhentheslidecoveris closed 3 5 Returnstothepreviousmenu Confirmstheselection 7 Makes selection settings Skips back or forward by 5 minutes for DivX MPEG1 MPEG2 DISC buttons Changes discs for CD CH 8 Shows the on screen bar 9 1 Changes the display information p Display or erase AV Menu q For disc USB operations 6 Plays pauses 5 DVD Selects the title group DVD VR Selects the p...

Страница 168: ... display then press it repeatedly The ST indicator lights up when receiving an FM stereo broadcast with sufficient signal strength 4 Reception improves but stereo effect will be lost The MO indicator lights up To restore stereo effect select Off in step 4 PS station name for FM RDS If no signal is coming in No Name appears Preset No Band page 48 Tuner Standby Reception indicators PTY code for FM R...

Страница 169: ...fficient signal strength will be detected The DX indicator goes off then the LO indicator lights up FM station automatic presetting SSM Strong station Sequential Memory This function works only for FM bands You can preset six stations for each band 1 Mode DX Mono DX Local SSM PTy Standby DX Local DX Local Exit ENT Mode Mono DX Local SSM PTy Standby Start ENT FM1 Store 87 5 89 9 97 9 105 9 108 0 10...

Страница 170: ...ther Metr Finance Children s Progs Social Affairs Religion Phone In Travel Touring Leisure Hobby Jazz Music Country Music National Music Oldies Music Folk Music Documentary Selecting preset stations On the remote 1 2 or On the unit or 1 Each time you hold the button you can change the FM bands 2 Preset List can also be accessed through AV Menu List 15 45 FLAT DX AF TUNER FM1 PTy Search XX X MHz Sc...

Страница 171: ... to another station providing the RDS signals Flashes Press to deactivate Goes off PTY Standby Reception Indicator Activate AV Menu then select Mode PTy Standby pages 14 57 PTY The unit will temporarily switch to your favorite PTY programme from any source other than AM Lights up Not yet activated Tune in to another station providing the RDS signals Flashes To deactivate select Off in step 4 then ...

Страница 172: ...mme Alternative Frequency Reception DAB AF page 44 Automatic station selection Programme Search Usually when you select preset stations the preset station is tuned in If the signals from the FM RDS preset station are not sufficient for good reception this unit using the AF data tunes in to another frequency broadcasting the same programme as the original preset station is broadcasting page 54 The ...

Страница 173: ...on you have tried to do In some cases without showing operations will not be accepted Label side 0 Eject the disc 3 Start playback if necessary DISP Press if no playback picture appears but disc information screen pages 16 to 18 is displayed Insert the disc Playback starts automatically 7 Stop playback Caution Do not place your finger behind the control panel Caution on volume setting Discs and co...

Страница 174: ...g time Playback mode Disc type 4 Press Select chapter Hold Reverse forward search 1 5 Select title 15 45 MULTI MLP B S P BONUS AUDIO DVD G 01 02 0 45 38 RPT Surround mode 4 Press Select track Hold Reverse forward search 1 5 Select group Group no Track no Playing time BONUS indicator page 24 B S P indicator page 24 4 Press Select chapter Hold Reverse forward search 1 5 Select program no Play List n...

Страница 175: ...BC is in use 4 Press Select track Hold Reverse forward search 1 page 48 15 45 FRONT 2CH RPT DivX DVD T 01 C 02 0 45 38 Current Folder Name Current File Name avi For DivX MPEG Folder no Track no Playing time For JPEG Folder no File no 4 Press Select track Hold Reverse forward search for DivX MPEG 2 5 Press Select folder Hold Display Folder List ...

Страница 176: ...itle only for CD Text 3 Folder no Track no Playing time 4 Press Select track Hold Reverse forward search 1 5 Press Select folder Hold Display Folder List Audio format MP3 WMA WAV AAC 4 Press Select track Hold Reverse forward search 1 page 48 page 48 1 Searchspeed x2 x10 3 NoName appearsforconventionalCDs Tag data will be shown instead of folder file names when they are recorded and Tag Display is ...

Страница 177: ... available for Playlist playback Track Plays the first 15 seconds of each track for VCD PBC not in use Track Repeats current track for VCD PBC not in use Disc All Randomly plays all tracks for VCD PBC not in use Track Plays the first 15 seconds of each track Folder Plays the first 15 seconds of the first track of each folder Track Repeats current track Folder Repeats all tracks of the current fold...

Страница 178: ... Folder List can also be accessed through AV Menu List Prohibiting disc ejection You can lock a disc in the loading slot No Eject appears To cancel the prohibition repeat the same procedure to select EJECT OK Folder List Off My Best Cinema Pops My Best2 Favorite Song Cinema2 ENT Folder List Off My Best Cinema Pops My Best2 Favorite Song Cinema2 ENT File List Off Song011 mp3 Song012 mp3 Song013 mp3...

Страница 179: ...Reverse forward search 2 No sound can be heard Slow motion 3 during pause No sound can be heard Press Select chapter during playback or pause Hold Reverse forward search 4 Select title during playback or pause Using menu driven features 1 2 Select an item you want to start playback 3 Select chapter Select title when not playing twice Select title during playback or pause Select aspect ratio Select...

Страница 180: ...rse slow motion does not work Press Select chapter during playback or pause Hold Reverse forward search 6 Select program Select play list during playback or pause Select aspect ratio Select audio channel ST stereo L left R Right Turn on off subtitle Select chapter Select program when not playing twice Select program play list during playback or pause Using Original Program Play List screens page 3...

Страница 181: ...use if pressed during playback Reverse forward search 4 Press Select track Hold Reverse forward search 6 Select folder Select track within the same folder twice Select folder 1 Erasesthemisentryofthenumber 2 Searchspeed 1 2 3 3 Searchspeed 1 2 4 Searchspeed x2 x5 x10 x20 x60 5 Slowmotionspeed 1 32 1 16 1 8 1 4 1 2 6 Searchspeed x2 x10 Stop playback Start playback Slide show each file is shown for ...

Страница 182: ...shows the BSP selecting icons such as or on the screen 1 Select an item you want to display 2 Enjoying surround sounds You can enjoy multi channel surround playback through the front center surround speakers After connecting the center speaker make sure to activate the center speaker otherwise no sound comes out of the center speaker page 53 All surround mode can also be used for USB MULTI For mul...

Страница 183: ...Width Adjust the center image so it may be heard only from the center speaker only form the left right front speaker as a phantom center image or various combination of these speakers As the number increases the phantom effect becomes stronger normally select 4 3 On the remote controller You cannot change the Dolby PL IIMusic settings using the remote controller Surround On Auto Through Dolby PLII...

Страница 184: ...e a selection If a pop up menu appears For entering time numbers Move the entry position Select a number To remove the on screen bar Operations using the on screen bar DVD VCD DivX MPEG1 MPEG2 JPEG These operations are possible on the monitor using the remote controller ...

Страница 185: ...the disc T REM Remaining title time for DVD Remaining disc time for others TIME Elapsed playing time of the current chapter track 2 REM Remaining time of the current chapter track 2 6 Playback status Play Reverse forward search Reverse forward slow motion Pause Stop 7 Operation icons TIME Change time indication see 5 Time Search Specify a certain scene by entering time TITLE Title Search by its nu...

Страница 186: ...ler 1 2 Adjust the volume through the 2nd AUDIO OUT plug 3 Operate the DVD CD player 1 JVC original headphone virtual surround system This surround will also work for the main source DISC if On Surround On is selected as the sub source This surrounddoesnotworkforDivX MPEG1 MPEG2discs 2 DisplayedbeingshadedifHeadphoneSurroundisnot applied Operations using the control screen For discs except DVD and...

Страница 187: ... p Current track highlighted To select a folder or track 1 Select Folder column or Track column on the control screen 2 Select a folder or track If necessary press ENT to start playback 1 Playback mode selection window appears when OSD is pressed below 2 Selected playback mode below 3 Elapsed playing time of the current track 4 Operation status 5 Current track number total number of tracks on the ...

Страница 188: ...laylistmay notbedisplayeddependingontherecording equipment Folder 144 240 Track 144 198 Page 4 7 fol120 fol121 fol122 fol123 fol124 fol125 fol126 fol127 fol128 fol129 fol150 fol151 fol152 fol153 fol154 fol155 fol156 fol157 fol158 fol159 fol140 fol141 fol142 fol143 fol144 fol145 fol146 fol147 fol148 fol149 fol130 fol131 fol132 fol133 fol134 fol135 fol136 fol137 fol138 fol139 file0141 wma file0142 m...

Страница 189: ...ect USB when Dual Zone is in use All tracks in the USB device will be played repeatedly until you change the source 1 ExceptforJVCD PlayerXA HD500 2 ExceptforMPEG2filesrecordedbyJVCEverio camcorder extensioncode mod 3 Start playback if necessary DISP Press if no playback picture appears but disc information screen pages 16 to 18 is displayed 4 Press Select track Hold Reverse forward search 5 Press...

Страница 190: ... Ex To select Track Repeat 1 2 3 4 When one of the playback modes is selected the corresponding indicator lights up on the information screen To cancel select All Off in step 3 or Off in step 4 Selecting playback modes File type Intro Repeat Random Track Plays the first 15 seconds of each track Folder Plays the first 15 seconds of the first track of each folder Track Repeats current track Folder R...

Страница 191: ...ode When you connect a Bluetooth device to the unit for the first time make pairing between the unit and the device Pairing allows Bluetooth devices to communicate each other To make pairing you may need to enter the PIN Personal Identification Number code of your Bluetooth device you want to connect Once the connection is established it is registered in the unit even if you reset the unit Up to f...

Страница 192: ...t 3 Enter the specific PIN code of the device to the unit Refer to the instructions supplied with the device to check the PIN code 4 Use the Bluetooth device to connect Now connection is established and you can use the device through the unit AV Menu Bluetooth Enter ENT AV Menu Setup Enter ENT Registering using Open 1 Select Bluetooth Phone or Bluetooth Audio 2 3 Bluetooth menu icon 4 5 Enter a PI...

Страница 193: ...nt to connect disconnect 2 Perform steps 2 and 3 of Registering using Open on page 34 then Select Connect to connect the selected device Select Disconnect to disconnect the selected device You can set the unit to connect a Bluetooth device automatically when the unit is turned on page 59 NEW DEVICE Dial Menu Message Open Search Special Device Deleting a registered device 1 Select Bluetooth Phone o...

Страница 194: ...ivated press any button except ATT or to answer the incoming call page 48 Connected device name 3 Name and phone number if acquired To end the call or reject an incoming call Hold any button except ATT or Answering a waiting call If your cellular phone is equipped with the call waiting function you can put the current call on hold and answer the waiting call Press any button except ATT and To rest...

Страница 195: ...ok memory of the cellular phone to this unit Refer to the instruction manual supplied with your cellular phone With some cellular phones the phone book memory is transferred automatically 3 Select the name phone number you want to call P902i Annie Redial Received Calls Phonebook Missed Calls Phone number P902i Annie Redial Received Calls Phonebook Missed Calls Phone number When an SMS comes in If ...

Страница 196: ...333 22233336666 44455556666 11133334444 99988887777 55566668888 1 2 3 4 5 6 ENT Preset Memory Jack 12312341234 09898765432 09845671234 Dial Store ENT ENT 11122223333 22233336666 44455556666 11133334444 99988887777 55566668888 1 2 3 4 5 6 ENT Preset Memory Speak the name you want to call How to enter phone number On the remote On the unit 1 To delete an unwanted digit select blank space 2 Dial Menu...

Страница 197: ... remainder page 48 List menu icon AV Menu Setup Enter ENT AV Menu List Enter ENT Select Bluetooth Audio Ÿ Start playback See pages 33 to 35 for connecting a new device See page 35 for connecting disconnecting a registered device See page 35 for deleting a registered device When the sound is stopped or interrupted during the use of a Bluetooth device try the following remedies Turn off then turn on...

Страница 198: ...tional CDs Disc no Track no Playing time While playing an MP3 disc you can select and start playing a track in the disc using the Lists Disc List select the current disc Folder List File List then start playing a track you want 4 Press Select track Hold Reverse forward search 5 Press Select folder MP3 only Hold Display Disc List Disc List Off MP3 DISC DISC 02 DISC 03 DISC 04 DISC 05 DISC 06 ENT Di...

Страница 199: ...Plays the first 15 seconds of each track Folder Plays the first 15 seconds of the first track of each folder Disc Plays the first 15 seconds of the first track of all loaded discs Track Repeats current track Folder Repeats all tracks of the current folder Disc Repeats all tracks of the current disc Folder Randomly plays all tracks of current folder then tracks of next folders Disc Randomly plays a...

Страница 200: ... label InformationchangeswhenyoupressDISP Whiletuningina servicewithDLS DynamicLabelSegment theTEXTindicator lightsup When surrounding sounds are noisy Some services provide Dynamic Range Control DRC signals together with their regular programme signals DRC will reinforce the low level sounds to improve your listening The DRC indicator will light up while tuning in a service with the DRC signals 1...

Страница 201: ...vating TA PTY StandbyReception Operations are exactly the same as explained on page 13 for FM RDS stations You cannot store PTY codes separately for the DAB tuner and for the FM tuner DAB1 Service Label No Serv FFH No Serv HRS HRH ENT 1 2 3 4 5 6 Store ENT Service Label No Serv FFH No Serv HRS HRH ENT 1 2 3 4 5 6 DAB1 Store ENT 15 45 FLAT AF ANN DRC DAB DAB1 Preset4 Bayern Bayern2 DAB1 Store ENT S...

Страница 202: ... 6 Select an announcement type for Announcement Standby Reception Tracing the same programme Alternative Frequency Reception DAB AF While receiving a DAB service When driving in an area where a service cannot be received this unit automatically tunes in to another ensemble or FM RDS station broadcasting the same programme While receiving an FM RDS station When driving in an area where a DAB servic...

Страница 203: ...list Ô Artist Ô Album Ô Genre Ô Track Ô back to the beginning 3 Confirm the selection 4 Repeat steps 2 and 3 to select a track When a track is selected finally playback starts To return to the previous menu Selecting playback modes 1 Display AV Menu then select Mode menu icon 2 Enter Mode then select Repeat or Random 3 Select an appropriate option Repeat One Functions the same as Repeat One or Rep...

Страница 204: ...a Mirror or Navigation for AV Input page 55 some status messages such as volume level change will not appear on the monitor while viewing the picture When Navigation is selected for AV Input You can use the source AV IN for listening to an audio source connected to the LINE IN plugs While selecting other source you can watch the navigation screen without changing the source To watch the navigation...

Страница 205: ... the Line Input Adapter KS U57 not supplied or AUX Input Adapter KS U58 not supplied Preparation Make sure External Input is selected for the external input setting page 55 Select EXT IN Ÿ Turn on the connected component and start playing the source 15 45 FLAT EXT IN EXT INPUT POWER ON Assigned title page 49 page 48 ...

Страница 206: ...tment You can store your adjustment into User1 User2 and User3 1 Repeat steps and Ÿ then in step 2 Adjust 3 Store Soundequalization Edit 60 0 Hz ENT 03 Store User Store User1 User2 User3 ENT Store AV Menu Setup Enter ENT AV Menu Equalizer Enter ENT Flat Hard Rock R B Pop Jazz Exit ENT Equalizer Equalizer menu icon Flat Hard Rock R B Pop Jazz Exit ENT Equalizer Edit 60 0 Hz ENT 03 Store POWER ON ...

Страница 207: ...o change the character set press DISP For available characters page 65 2 Repeat step 1 until you finish entering the title The maximum number of characters is 16 Finish the procedure Assigningtitlestothesources Press Change character set Hold Erase title AV Menu Setup Enter ENT AV Menu Mode Enter ENT Mode Title Entry AV In Name MY BEST DISP Store ENT A a 0 Title Entry POWER ON AV In Name AV INPUT ...

Страница 208: ... List Bluetooth Sound menu icon Sound Through Fader Balance Volume Adjust Subwoofer High Pass Filter Crossover Through On Exit ENT High Pass Filter AV Menu Setup Enter ENT AV Menu Sound Enter ENT Disc Surround Dual Zone AV Menu Setup Enter ENT Input Display Clock Disc Setup 1 Disc Setup 2 Tuner Others Setup Equalizer Sound Disc Surround Mode Bluetooth List Dual Zone The display indications may cha...

Страница 209: ...cks Dimmer Off Cancels On Activates dimmer Auto Dims the monitor when you turn on the headlights 1 Time Set Press ENT or to display the time setting screen then set the Dimmer On Off times Bright You can adjust brightness of the monitor 15 darkest to 15 brightest Initial 00 Picture Adjust 2 You can adjust the following to make the monitor clear and legible for watching the playback picture The set...

Страница 210: ...n Clock Time Set Initial 0 00 6 12Hours 24Hours 12 Hours 24 Hours 6 OSD Clock Off On 6 Clock Adjust Off Auto 6 Disc Setup 1 5 Menu Language Select the initial disc menu language Initial Russian also page 65 Audio Language Select the initial audio language Initial Russian also page 65 Subtitle Select the initial subtitle language or erase the subtitle Off Initial Russian also page 65 OSD Language S...

Страница 211: ...ith which the Registration Code recorded this unit s Registration Code is overwritten for copyright protection Disc Setup 2 D Dynamic Range Compres Compression 5 You can enjoy a powerful sound at a low volume level while playing Dolby Digital software Auto Select to apply the effect to multi channel encoded software On Select to always use this function Speaker Size 5 You can adjust the speaker si...

Страница 212: ...received signals from the current station become weak Off Cancels not selectable when DAB AF is set to On AF Regional Switches to another station broadcasting the same programme The REG indicator lights up AF Switches to another station The programme may differ from the one currently received AF indicator lights up 14 TA Volume 00 to 30 or 50 8 Initial 15 13 Program Search Off On 14 IF Band Width ...

Страница 213: ...ar Changer iPod D Player 12 CD changer iPod or D player 40 45 External Input Any other than the above 47 For connecting the DAB tuner this setting is not required It is automatically detected Others Beep Off Cancels On Activates the key touch tone Telephone Muting 13 Off Cancels Muting1 Muting2 Select either one which mutes the sounds while using the cellular phone Initialize Initialize all settin...

Страница 214: ...fer 14 Adjust the settings below in the submenu Phase Subwoofer phase Select either Normal or Reverse which reproduces a better sound Level Subwoofer output level Level 06 to 08 Initial 00 High Pass Filter Through Select when the subwoofer is not connected On Select when the subwoofer is connected Crossover Adjust the crossover frequency between the front rear speakers and the subwoofer 80Hz 120Hz...

Страница 215: ...Menu items Selectable settings reference page Mono Only for FM Off On 10 DX Local Only for FM DX Local 11 SSM Only for FM 11 PTy Standby Only for FM DAB Off News 13 43 When you activate PTY Standby Reception you can change the PTY code for PTY Standby Reception Title Entry Only for AV IN and EXT IN 49 All Off Intro Repeat Random Only for disc USB playback and iPod D player 19 32 41 45 D Dynamic Ra...

Страница 216: ...nection Select a device you want to connect After selecting the device use Open or Search page 34 for connection Once the connection is established it is registered in the unit You can connect the unit and the device by using Connect below from the next time Connect Only for the registered devices After selecting a device from among the registered devices page 35 39 establish the connection with i...

Страница 217: ...lls automatically Reject The unit rejects all incoming calls Message Info 22 Auto The unit informs you of the arrival of a message by ringing and displaying Receiving Message To read the message press ENT page 37 Manual The unit does not inform you the arrival of a message MIC Setting 22 Adjust microphone volume connected to the unit 01 02 03 Version 23 The Bluetooth software and hardware versions...

Страница 218: ...older of the case and lift the disc out holding it by the edges Always hold the disc by the edges Do not touch its recording surface When storing a disc into its case gently insert the disc around the center holder with the printed surface facing up Make sure to store discs into the cases after use To keep discs clean A dirty disc may not play correctly If a disc does become dirty wipe it with a s...

Страница 219: ...itable discs This unit can recognize a total of 5 000 files and 250 folders a maximum of 999 files per folder Use only finalized discs This unit can play back multi session discs however unclosed sessions will be skipped while playing This unit can recognize a total 25 characters for file folder names Some discs or files may not be played back due to their characteristics or recording conditions P...

Страница 220: ... 16 kHz for MPEG2 48 kHz 44 1 kHz 32 kHz 22 05 kHz for WMA 44 1 kHz for WAV 48 kHz 44 1 kHz for AAC This unit can show ID3 Tag Version 1 0 1 1 2 2 2 3 2 4 for MP3 This unit can also show WAV WMA AAC Tag This unit can play back files recorded in VBR variable bit rate Files recorded in VBR have a discrepancy in elapsed time indication This unit cannot play back the following files MP3 files encoded ...

Страница 221: ...e monitor The unit cannot recognize a USB device whose rating is other than 5 V and does not exceed 500 mA While playing from a USB device the playback order may differ from other players This unit may be unable to play back some USB devices or some files due to their characteristics or recording conditions Depending on the shape of the USB devices and connection ports some USB devices may not be ...

Страница 222: ...In this case visit the following JVC web site For iPod users http www jvc co jp english car support ks pd100 index html For D player users http www jvc co jp english car support ks pd500 index html About sounds reproduced through the rear terminals Speaker out analog discrete output LINE OUT FRONT REAR CENTER OUT SUBWOOFER Multi channel signals are emitted for a multi channel encoded software When...

Страница 223: ... BA Bashkir GN Guarani LN Lingala RM Rhaeto Romance TK Turkmen BE Byelorussian GU Gujarati LO Laothian RN Kirundi TL Tagalog BG Bulgarian HA Hausa LT Lithuanian RO Rumanian TN Setswana BH Bihari HI Hindi LV Latvian Lettish RW Kinyarwanda TO Tonga BI Bislama HR Croatian MG Malagasy SA Sanskrit TR Turkish BN Bengali Bangla HU Hungarian MI Maori SD Sindhi TS Tsonga BO Tibetan HY Armenian MK Macedonia...

Страница 224: ...t connected to VIDEO IN plug Check the cords and connections Signal input is too weak Mecha Error Push Reset appears on the monitor and the panel does not move Reset the unit page 3 FM AM SSM automatic presetting does not work Store stations manually page 11 Static noise while listening to the radio Connect the aerial firmly Disc playback Disc can be neither recognized nor played Eject the disc fo...

Страница 225: ...uring playback This is caused by how the tracks are recorded Not Support appears on the monitor and track skips The track is unplayable USB playback Noise is generated The track played back is not a playable file format MP3 WMA WAV AAC Skip to another file Do not add the extension code mp3 wma wav or m4a to non MP3 WMA WAV AAC tracks Tracks cannot play back as you have intended them to play Playba...

Страница 226: ...e Move the car to place where you can get a better signal reception The sound is interrupted or skipped during playback of a Bluetooth audio device Reduce the distance between the unit and the Bluetooth audio device Disconnect the device connected for Bluetooth phone Turn off then turn on the unit When the sound is not yet restored connect the device again New Device cannot be selected for Bluetoo...

Страница 227: ...ting cable and its connection For iPod Playback stops The headphones are disconnected during playback Restart playback No sound can be heard Error 01 appears on the monitor when connecting a D player Disconnect the D player from the adapter Then connect them again No Files or No Track appears on the monitor No tracks are stored Import tracks to the iPod or D player Reset 01 Reset 07 appears on the...

Страница 228: ...ls Input LINE IN VIDEO IN MIC IN USB input terminal Aerial input Output 2nd AUDIO OUT VIDEO OUT Others CD changer OE REMOTE FM AM TUNER Frequency Range FM 87 5 MHz to 108 0 MHz AM MW 522 kHz to 1 620 kHz LW 144 kHz to 279 kHz FM Tuner Usable Sensitivity 11 3 dBf 1 0 μV 75 Ω 50 dB Quieting Sensitivity 16 3 dBf 1 8 μV 75 Ω Alternate Channel Selectivity 400 kHz 65 dB Frequency Response 40 Hz to 15 00...

Страница 229: ...em FAT 32 16 12 Max Current Less than 500 mA 5 V BLUETOOTH Version Bluetooth 1 2 certified Output Power 4 dBm Max Power class 2 Service Area Within 10 m Profile HSP Headset Profile HFP Hands Free Profile A2DP Advanced Audio Distribution Profile AVRCP Audio Video Remote Control Profile SPP Serial Port Profile OPP Object Push Profile GENERAL Power Requirement Operating Voltage DC 14 4 V 11 V to 16 V...

Страница 230: ...агрузите Ваше устройство Для получения информации о перезагрузке Вашего устройства обратитесь на соответствующую страницу Маєте ПРОБЛЕМУ з функціонуванням Повторно налаштуйте систему Див сторінку Як повторно налаштувати пристрій 2007 Victor Company of Japan Limited Bіктор Компані оф Джепен Лімітед 12 3 чоме Морійя чо Канагава ку Йокогама Канагава 221 8520 Японія ...

Страница 231: ...ощность динамиков менее 50 Вт перейдите в режим Amplifier Gain чтобы предотвратить их повреждение cм ИНСТРУКЦИИ ПО ЭКСПЛУАТАЦИИ на стр 56 Для предотвращения ороткого замыкания заклейте НЕИСПОЛЬЗУЕМЫЕ концы изолирующей лентой Радиатор во время использования сильно нагревается Старайтесь его не трогать во время удаления устройства ПОПЕРЕДЖЕННЯ НЕ встановлюйте даний пристрій і не приєднуйте жодних пр...

Страница 232: ...е два рычажка затем потяните их как показано на рисунке чтобы вынуть устройство Вставте дві ручки а потім потягніть їх на себе згідно з ілюстрацією щоби витягти пристрій Видалення пристрою Перед видаленням пристрою ослабте кріплення тильної частини Do not block the fan Не закрывайте вентилятор Не блокуйте вентилятор INSTALLATION IN DASH MOUNTING The following illustration shows a typical installat...

Страница 233: ...king coil Удушье катушки Дросельна котушка You may need to modify the wiring of the supplied power cord as illustrated Contact your authorized car dealer before installing this unit Возможно потребуется изменить схему соединений для прилагаемого шнура питания как показано на рисунке Перед установкой приемника обратитесь к авторизованному агенту по продажам автомобильных систем Вам можливо прийдеть...

Страница 234: ... Левый громкоговоритель задний Лівий гучномовець задній Right speaker rear Правый громкоговоритель задний Правий гучномовець задній Purple Пурпурный Пурпурний Purple with black stripe Пурпурный с черной полосой Пурпурний з чорною смужкою Green Зеленый Зелений Green with black stripe Зеленый с черной полосой Зелений з чорною смужкою Gray Серый Сірий Gray with black stripe Серый с черной полосой Сір...

Страница 235: ...арактеристик стереосистеми до неї можна підключити підсилювачі Підключіть провідник зовнішнього пристрою синій з білою смужкою до провідника зовнішнього пристрою іншого обладнання Таким чином ним можна буде керувати з цього пристрою Тільки для підсилювача Після підключення центрального гучномовця переконайтеся що він активований інакше звук з цього гучномовця буде відсутній див стор 53 ІНСТРУКЦІЇ ...

Страница 236: ... Адаптер для подключения радиотрансляционной линии KS U57 продается отдельно 9 Адаптер лінійного вводу KS U57 придбаний окремо 10 Aux Input Adapter KS U58 separately purchased 10 Адаптер для подключения внешних устройств AUX KS U58 продается отдельно 10 Адаптер AUX лінійного вводу зовнішнього пристрою KS U58 придбаний окремо Apple iPod Apple iPod Програвач Apple iPod JVC D player Проигрыватель JVC...

Страница 237: ...ENGLISH For installation and connections refer to the separate manual INSTRUCTIONS LVT1708 002A U For canceling the display demonstration see page 5 DVD CD RECEIVER KD AVX33 ...

Страница 238: ...ly or may move slowly Pictures may not be synchronized with the sound or picture quality may decline in such environments For safety Do not raise the volume level too much as this will block outside sounds making driving dangerous Stop the car before performing any complicated operations Temperature inside the car If you have parked the car for a long time in hot or cold weather wait until the tem...

Страница 239: ...everse engineering or disassembly is prohibited Contents INTRODUCTION Playable disc type 4 Before operating the unit 5 OPERATIONS Basic operations Control panel 7 Basic operations Remote controller RM RK251 8 Listening to the radio 10 Disc operations 13 Dual Zone operations 26 USB operations 29 Bluetooth operations Cellular phone audio player 31 EXTERNAL DEVICES Listening to the CD changer 38 List...

Страница 240: ...OM CD I CD I Ready CD Recordable Rewritable CD R RW Compliant to ISO 9660 level 1 level 2 Romeo Joliet CD DA MP3 WMA WAV AAC 4 JPEG DivX MPEG1 MPEG2 MPEG4 1 IfyouinsertaDVDVideodiscofanincorrectRegionCode Regioncodeerror appearsonthemonitor 2 DVD Rrecordedinmulti borderformatisalsoplayable exceptforduallayerdiscs 3 Itispossibletoplaybackfinalized R RW Videoformatonly discs However theuseof Rdouble...

Страница 241: ...tration then activate the Demonstration screen Cancel the display demonstrations Select Off Continued on the next page AV Menu Setup Enter ENT Setup menu icon Currently selected menu Demonstration Display Clock Disc Setup 1 Disc Setup 2 Tuner On Demonstration Wall Paper Scroll Tag Display Dimmer Off On Exit ENT Setup Display Demonstration Currently selected submenu Current setting Off On Exit ENT ...

Страница 242: ...On The clock time is displayed while playing back a video source Finish the procedure Return to the Setup menu Select Clock Time Set then activate the Time Set screen Set the clock time Return to the Clock menu Select 12Hours 24Hours Activate the 12Hours 24Hours screen Clock 1 00AM Time Set 12Hours 24Hours OSD Clock Time Set Hours 1 00AM Exit ENT Time Set Minutes 3 45PM Exit ENT 12Hours 24Hours 12...

Страница 243: ...Turn on the power Turn off the power Hold Attenuate the sound if the power is on Change the display information 4 TUNER Search for stations DISC USB Select chapters tracks On menus Go to previous next step iPod D PLAYER Select tracks Bluetooth Audio Reverse skip forward skip 5 3 TUNER Select preset stations DISC USB Select titles folders On menus Select items iPod D PLAYER Enter player s menu paus...

Страница 244: ...ht or artificial lighting Caution Do not expose batteries to heat or flame IMPORTANT If Dual Zone is activated page 26 the remote controller functions only for operating the DVD CD player Main elements and features 1 1 Turns on the power Attenuates the sound if the power is on Turns off the power if pressed and held while the power is on 2 1 Selects the source 3 1 Displays Dial Menu Displays Redia...

Страница 245: ...be used 2 Thesebuttonscanbeusedonlywhentheslidecoveris closed 3 5 Returnstothepreviousmenu Confirmstheselection 6 DVD DivX 6 Shows the disc menu VCD Resumes PBC playback page 21 DVD VR Shows the Original Program screen 7 Makes selection settings Skips back or forward by 5 minutes for DivX MPEG1 MPEG2 DISC buttons Changes discs for CD CH 8 Shows the on screen bar 9 1 Changes the display information...

Страница 246: ...pears on the display then press it repeatedly The ST indicator lights up when receiving an FM stereo broadcast with sufficient signal strength 4 Reception improves but stereo effect will be lost The MO indicator lights up To restore stereo effect select Off in step 4 Preset No Band page 43 Tuner indicators AV Menu Mode Enter ENT AV Menu Setup Enter ENT Mode Off Mono DX Local SSM Title Entry Mono O...

Страница 247: ...ignal strength This function works only for FM bands Once you have activated this function selected Local it always works when searching for FM stations 1 2 Mode menu icon 3 4 Only stations with sufficient signal strength will be detected The DX indicator goes off then the LO indicator lights up Mode DX Mono DX Local SSM Title Entry DX Local DX Local Exit ENT Mode Mono DX Local SSM Title Entry Sta...

Страница 248: ... 2 3 4 5 6 ENT or Manual presetting Ex Storing FM station of 92 5 MHz into preset number 4 of the FM1 band 1 2 Tune in to a station you want to preset 3 4 Select a preset number 5 The station selected in step 2 is now stored in preset number 4 Each time you hold the button you can change the FM bands Preset List can also be accessed through AV Menu List right FM1 Store 87 5 89 9 97 9 105 9 108 0 1...

Страница 249: ...t the operation you have tried to do In some cases without showing operations will not be accepted Label side 0 Eject the disc 3 Start playback if necessary DISP Press if no playback picture appears but disc information screen pages 14 to 16 is displayed Insert the disc Playback starts automatically 7 Stop playback Caution Do not place your finger behind the control panel Caution on volume setting...

Страница 250: ... MULTI MLP B S P AUDIO DVD G 01 02 0 45 38 RPT BONUS Surround mode 4 Press Select track Hold Reverse forward search 1 5 Select group Group no Track no Playing time BONUS indicator page 22 B S P indicator page 22 4 Press Select chapter Hold Reverse forward search 1 5 Select program no Play List no Program no or Play List no Chapter no Playing time VR PR Original program VR PL Play List 3 45PM MULTI...

Страница 251: ...BC is in use 4 Press Select track Hold Reverse forward search 1 page 43 3 45PM FRONT 2CH RPT DivX DVD T 01 C 02 0 45 38 Current Folder Name Current File Name avi For DivX MPEG Folder no Track no Playing time For JPEG Folder no File no 4 Press Select track Hold Reverse forward search for DivX MPEG 2 5 Press Select folder Hold Display Folder List ...

Страница 252: ...rack Hold Reverse forward search 1 5 Press Select folder Hold Display Folder List Audio format MP3 WMA WAV AAC 4 Press Select track Hold Reverse forward search 1 page 43 page 43 1 Searchspeed x2 x10 3 NoName appearsforconventionalCDs Tag data will be shown instead of folder file names when they are recorded and Tag Display is set to On page 46 3 45PM FLAT CD 02 0 45 38 Disc Title Artist Name Curre...

Страница 253: ... available for Playlist playback Track Plays the first 15 seconds of each track for VCD PBC not in use Track Repeats current track for VCD PBC not in use Disc All Randomly plays all tracks for VCD PBC not in use Track Plays the first 15 seconds of each track Folder Plays the first 15 seconds of the first track of each folder Track Repeats current track Folder Repeats all tracks of the current fold...

Страница 254: ... Folder List can also be accessed through AV Menu List Prohibiting disc ejection You can lock a disc in the loading slot No Eject appears To cancel the prohibition repeat the same procedure to select EJECT OK Folder List Off My Best Cinema Pops My Best2 Favorite Song Cinema2 ENT Folder List Off My Best Cinema Pops My Best2 Favorite Song Cinema2 ENT File List Off Song011 mp3 Song012 mp3 Song013 mp3...

Страница 255: ...Reverse forward search 2 No sound can be heard Slow motion 3 during pause No sound can be heard Press Select chapter during playback or pause Hold Reverse forward search 4 Select title during playback or pause Using menu driven features 1 2 Select an item you want to start playback 3 Select chapter Select title when not playing twice Select title during playback or pause Select aspect ratio Select...

Страница 256: ...res 1 2 Select an item you want to start playback 3 Stop playback Start playback Pause if pressed during playback Reverse forward search 4 No sound can be heard Slow motion 5 during pause No sound can be heard Reverse slow motion does not work Press Select chapter during playback or pause Hold Reverse forward search 6 Select program Select play list during playback or pause Select aspect ratio Sel...

Страница 257: ...use if pressed during playback Reverse forward search 4 Press Select track Hold Reverse forward search 6 Select folder Select track within the same folder twice Select folder 1 Erasesthemisentryofthenumber 2 Searchspeed 1 2 3 3 Searchspeed 1 2 4 Searchspeed x2 x5 x10 x20 x60 5 Slowmotionspeed 1 32 1 16 1 8 1 4 1 2 6 Searchspeed x2 x10 Stop playback Start playback Slide show each file is shown for ...

Страница 258: ...hows the BSP selecting icons such as or on the screen 1 Select an item you want to display 2 Enjoying surround sounds You can enjoy multi channel surround playback through the front center surround speakers After connecting the center speaker make sure to activate the center speaker otherwise no sound comes out of the center speaker page 49 All surround mode can also be used for USB MULTI For mult...

Страница 259: ...Width Adjust the center image so it may be heard only from the center speaker only form the left right front speaker as a phantom center image or various combination of these speakers As the number increases the phantom effect becomes stronger normally select 4 3 On the remote controller You cannot change the Dolby PLIIMusic settings using the remote controller Surround On Auto Through Dolby PLII ...

Страница 260: ...e a selection If a pop up menu appears For entering time numbers Move the entry position To remove the on screen bar Operations using the on screen bar DVD VCD DivX MPEG1 MPEG2 JPEG These operations are possible on the monitor using the remote controller Select a number ...

Страница 261: ...the disc T REM Remaining title time for DVD Remaining disc time for others TIME Elapsed playing time of the current chapter track 2 REM Remaining time of the current chapter track 2 6 Playback status Play Reverse forward search Reverse forward slow motion Pause Stop 7 Operation icons TIME Change time indication see 5 Time Search Specify a certain scene by entering time TITLE Title Search by its nu...

Страница 262: ... main source to listen through the speakers Press SRC source on the control panel By using the buttons on the control panel you can operate the newly selected main source without affecting Dual Zone DISC operations You cannot select USB for the main source On the remote controller 1 2 Adjust the volume through the 2nd AUDIO OUT plug 3 Operate the DVD CD player 1 JVC original headphone virtual surr...

Страница 263: ...layback mode below 3 Elapsed playing time of the current track 4 Operation status 5 Current track number total number of tracks on the disc 6 Track information 7 Track list 8 Current track highlighted bar To select a track If necessary press ENT to start playback Ex CD Text MODE REPEAT TRACK TIME 00 14 Track 6 14 Track Information Cloudy Fair Fog Hail Indian summer Rain Shower Snow Thunder Typhoon...

Страница 264: ...ecording equipment Folder 144 240 Track 144 198 Page 4 7 fol120 fol121 fol122 fol123 fol124 fol125 fol126 fol127 fol128 fol129 fol150 fol151 fol152 fol153 fol154 fol155 fol156 fol157 fol158 fol159 fol140 fol141 fol142 fol143 fol144 fol145 fol146 fol147 fol148 fol149 fol130 fol131 fol132 fol133 fol134 fol135 fol136 fol137 fol138 fol139 file0141 wma file0142 mp3 file0143 wma file0144 mp3 file0145 mp...

Страница 265: ...on discs page 17 to 25 You cannot select USB when Dual Zone is in use All tracks in the USB device will be played repeatedly until you change the source 1 ExceptforJVCD PlayerXA HD500 2 ExceptforMPEG2filesrecordedbyJVCEverio camcorder extensioncode mod 3 Start playback if necessary DISP Press if no playback picture appears but disc information screen pages 14 to 16 is displayed 4 Press Select trac...

Страница 266: ...lder then tracks of next folders USB All Randomly plays all tracks Track Repeats current track Folder Repeats current folder Folder Repeats current folder Mode Off All Off Intro Repeat Random Repeat Off Track Folder Set ENT AV Menu Mode Enter ENT AV Menu Setup Enter ENT Mode menu icon Caution Avoid using the USB device if it might hinder your safety driving Do not pull out and attach the USB devic...

Страница 267: ...blish a new Bluetooth connection Connection is established by operating the unit Bluetooth operations Cellularphone audioplayer Bluetooth is a short range wireless radio communication technology for the mobile device such as mobile phones portable PCs and other devices The bluetooth devices can be connected without cables and communicate each other The serial number is printed on the label placed ...

Страница 268: ... 3 Enter the specific PIN code of the device to the unit Refer to the instructions supplied with the device to check the PIN code 4 Use the Bluetooth device to connect Now connection is established and you can use the device through the unit AV Menu Bluetooth Enter ENT AV Menu Setup Enter ENT Registering using Open 1 Select Bluetooth Phone or Bluetooth Audio 2 3 Bluetooth menu icon 4 5 Enter a PIN...

Страница 269: ... you want to connect disconnect 2 Perform steps 2 and 3 of Registering using Open on page 32 then Select Connect to connect the selected device Select Disconnect to disconnect the selected device You can set the unit to connect a Bluetooth device automatically when the unit is turned on page 54 Deleting a registered device 1 Select Bluetooth Phone or Bluetooth Audio then select a registered device...

Страница 270: ...newithaudiofunctionis connected appears You can adjust the microphone volume level page 54 Status of the device 2 Signal strength Battery remainder Adjust the volume 1 When a call comes in The source is automatically changed to Bluetooth Phone When Auto Answer is activated The unit answers the incoming calls automatically page 54 When Auto Answer is deactivated press any button except ATT or to an...

Страница 271: ...mory of the cellular phone to this unit Refer to the instruction manual supplied with your cellular phone With some cellular phones the phone book memory is transferred automatically 3 Select the name phone number you want to call When an SMS comes in If the cellular phone is compatible with SMS Short Message Service and Message Info is set to Auto page 54 the unit rings and Receiving Message appe...

Страница 272: ...ect a preset number The phone number selected in step 1 is now stored in preset number 4 To call a preset number On the remote On the unit 1 2 11122223333 22233336666 44455556666 09845671234 99988887777 55566668888 1 2 3 4 5 6 ENT Preset List 11122223333 22233336666 44455556666 09845671234 99988887777 55566668888 1 2 3 4 5 6 ENT Preset List 11122223333 22233336666 44455556666 11133334444 999888877...

Страница 273: ...y remainder page 43 List menu icon AV Menu Setup Enter ENT AV Menu List Enter ENT 3 Select Bluetooth Audio Ÿ Start playback See pages 31 to 33 for connecting a new device See page 33 for connecting disconnecting a registered device See page 33 for deleting a registered device When the sound is stopped or interrupted during the use of a Bluetooth device try the following remedies Turn off then turn...

Страница 274: ...ntional CDs Disc no Track no Playing time While playing an MP3 disc you can select and start playing a track in the disc using the Lists Disc List select the current disc Folder List File List then start playing a track you want 4 Press Select track Hold Reverse forward search 5 Press Select folder MP3 only Hold Display Disc List Disc List Off MP3 DISC DISC 02 DISC 03 DISC 04 DISC 05 DISC 06 ENT D...

Страница 275: ...Plays the first 15 seconds of each track Folder Plays the first 15 seconds of the first track of each folder Disc Plays the first 15 seconds of the first track of all loaded discs Track Repeats current track Folder Repeats all tracks of the current folder Disc Repeats all tracks of the current disc Folder Randomly plays all tracks of current folder then tracks of next folders Disc Randomly plays a...

Страница 276: ...rtist Ô Album Ô Genre Ô Track Ô back to the beginning 3 Confirm the selection 4 Repeat steps 2 and 3 to select a track When a track is selected finally playback starts To return to the previous menu Selecting playback modes 1 Display AV Menu then select Mode menu icon 2 Enter Mode then select Repeat or Random 3 Select an appropriate option Repeat One Functions the same as Repeat One or Repeat Mode...

Страница 277: ...ct Camera Mirror or Navigation for AV Input page 50 some status messages such as volume level change will not appear on the monitor while viewing the picture When Navigation is selected for AV Input You can use the source AV IN for listening to an audio source connected to the LINE IN plugs While selecting other source you can watch the navigation screen without changing the source To watch the na...

Страница 278: ... Input Adapter KS U57 not supplied or AUX Input Adapter KS U58 not supplied Preparation Make sure External Input is selected for the external input setting page 50 Select EXT IN Ÿ Turn on the connected component and start playing the source 3 45PM FLAT EXT IN EXT INPUT POWER ON Assigned title page 44 page 43 ...

Страница 279: ...adjustment You can store your adjustment into User1 User2 and User3 1 Repeat steps and Ÿ then in step 2 Adjust 3 Store Soundequalization Edit 60 0 Hz ENT 03 Store User Store User1 User2 User3 ENT Store AV Menu Setup Enter ENT AV Menu Equalizer Enter ENT Flat Hard Rock R B Pop Jazz Exit ENT Equalizer Equalizer menu icon Flat Hard Rock R B Pop Jazz Exit ENT Equalizer Edit 60 0 Hz ENT 03 Store POWER ...

Страница 280: ...ay the title entry screen 1 2 Mode menu icon 3 Ex When you select FM as the source Assign a title 1 Select a character then move the entering position To change the character set press DISP For available characters page 61 2 Repeat step 1 until you finish entering the title Finish the procedure Assigningtitlestothesources Press Change character set Hold Erase title AV Menu Setup Enter ENT AV Menu ...

Страница 281: ... Mode List Bluetooth Sound menu icon Sound Through Fader Balance Volume Adjust Subwoofer High Pass Filter Crossover Through On Exit ENT High Pass Filter AV Menu Setup Enter ENT AV Menu Sound Enter ENT Disc Surround Dual Zone AV Menu Setup Enter ENT Input Display Clock Disc Setup 1 Disc Setup 2 Tuner Others Setup Equalizer Sound Disc Surround Mode Bluetooth List Dual Zone The display indications ma...

Страница 282: ...V AAC tracks Dimmer Off Cancels On Activates dimmer Auto Dims the monitor when you turn on the headlights 1 Time Set Press ENT or to display the time setting screen then set the Dimmer On Off times Bright You can adjust brightness of the monitor 15 darkest to 15 brightest Initial 00 Picture Adjust 2 You can adjust the following to make the monitor clear and legible for watching the playback pictur...

Страница 283: ... 3 original pictures NTSC PAL This setting is valid only to the external monitor connected Select the color system of the external monitor NTSC PAL Turn off the power and turn it on again to make the new setting effective Language 4 Select the indication language shown on the monitor English Spanish French German Italian Dutch Swedish Danish Russian Clock Time Set Initial 1 00AM 6 12Hours 24Hours ...

Страница 284: ...Scan Select when the aspect ratio of the external monitor is 4 3 Refer to the illustrations on the left to see how the pictures are shown on the monitor OSD Position Select the position of the on screen bar 25 1 Higher position 2 Lower position File Type Select playback file type when a disc USB contains different types of files You can store this setting separately for each source DISC USB Audio ...

Страница 285: ...peaker Level You can adjust the output level of the activated speakers Speaker Size above monitoring the test tone Front Lch Center Ch Front Rch Rear Rch Subwoofer 6 Rear Lch adjust the output level of each speaker in the range of 10dB to 10dB Initial 0dB Press and hold ENT to turn on and off the test tone Speaker Distance 7 You can adjust the speaker output timing Front Lch Center Ch Front Rch Re...

Страница 286: ...ears on the external monitor Navigation Select when connecting a Navigation System 41 External Input 9 For connecting an external component to the CD changer jack on the rear Changer iPod D Player 10 CD changer iPod or D player 38 40 External Input Any other than the above 42 Others Beep Off Cancels On Activates the key touch tone Telephone Muting 11 Off Cancels Muting1 Muting2 Select either one w...

Страница 287: ...bwoofer 12 Adjust the settings below in the submenu Phase Subwoofer phase Select either Normal or Reverse which reproduces a better sound Level Subwoofer output level Level 06 to 08 Initial 00 High Pass Filter Through Select when the subwoofer is not connected On Select when the subwoofer is connected Crossover Adjust the crossover frequency between the front rear speakers and the subwoofer 80Hz 1...

Страница 288: ... Width 15 14 Selectableonlyfor DISC and USB 15 Thissettingtakeseffectonlywhenthecenterspeakerisactivated Mode 16 Menu items Selectable settings reference page Mono Only for FM Off On 10 DX Local Only for FM DX Local 11 SSM Only for FM 11 Title Entry Only for FM AM stations AV IN and EXT IN 44 All Off Intro Repeat Random Only for disc USB playback and iPod D player 17 30 39 40 16 Itemslistedunder M...

Страница 289: ...elect a device you want to connect After selecting the device use Open or Search page 32 for connection Once the connection is established it is registered in the unit You can connect the unit and the device by using Connect below from the next time Connect Only for the registered devices After selecting a device from among the registered devices page 33 37 establish the connection with it Disconn...

Страница 290: ...omatically Reject The unit rejects all incoming calls Message Info 20 Auto The unit informs you of the arrival of a message by ringing and displaying Receiving Message To read the message press ENT page 35 Manual The unit does not inform you the arrival of a message MIC Setting 20 Adjust microphone volume connected to the unit 01 02 03 Version 21 The Bluetooth software and hardware versions are sh...

Страница 291: ...ter holder of the case and lift the disc out holding it by the edges Always hold the disc by the edges Do not touch its recording surface When storing a disc into its case gently insert the disc around the center holder with the printed surface facing up Make sure to store discs into the cases after use To keep discs clean A dirty disc may not play correctly If a disc does become dirty wipe it wit...

Страница 292: ...st Disc playback starts Changing the source If you change the source playback also stops without ejecting the disc Next time you select DISC for the playback source disc play starts from where it stopped previously Playing Recordable Rewritable discs This unit can recognize a total of 5 000 files and 250 folders a maximum of 999 files per folder Use only finalized discs This unit can play back mul...

Страница 293: ...back Playing DivX files This unit can play back DivX files with the extension code divx div avi regardless of the letter case upper lower This unit supports the DivX files whose resolution is 720 x 576 pixels or less This unit supports DivX 6 x 5 x 4 x and 3 11 Audio stream should conform to MP3 or Dolby Digital The file encoded in the interlaced scanning mode may not be played back correctly The ...

Страница 294: ...his device Check the device appears on the monitor The unit cannot recognize a USB device whose rating is other than 5 V and does not exceed 500 mA While playing from a USB device the playback order may differ from other players This unit may be unable to play back some USB devices or some files due to their characteristics or recording conditions Depending on the shape of the USB devices and conn...

Страница 295: ... 4 3 Pan Scan is selected the screen size may become 4 3 Letterbox for some discs Bluetooth operations General While driving do not perform complicated operation such as dialling the numbers using phone book etc When you perform these operations stop your car in a safe place Some Bluetooth devices may not be connected to this unit depending on the Bluetooth version of the device This unit may not ...

Страница 296: ...h 2nd AUDIO OUT plugs are emitted for the main source DISC 2nd AUDIO OUT 2 channel signal is emitted when Dual Zone is activated When playing a multi channel encoded disc multi channel signals are downmixed except for some DVD Audio DVD Logo is a trademark of DVD Format Logo Licensing Corporation registered in the US Japan and other countries DivX DivX Ultra Certified and associated logos are trad...

Страница 297: ...L Galician LA Latin QU Quechua TI Tigrinya BA Bashkir GN Guarani LN Lingala RM Rhaeto Romance TK Turkmen BE Byelorussian GU Gujarati LO Laothian RN Kirundi TL Tagalog BG Bulgarian HA Hausa LT Lithuanian RO Rumanian TN Setswana BH Bihari HI Hindi LV Latvian Lettish RW Kinyarwanda TO Tonga BI Bislama HR Croatian MG Malagasy SA Sanskrit TR Turkish BN Bengali Bangla HU Hungarian MI Maori SD Sindhi TS ...

Страница 298: ...t connected to VIDEO IN plug Check the cords and connections Signal input is too weak Mecha Error Push Reset appears on the monitor and the panel does not move Reset the unit page 3 FM AM SSM automatic presetting does not work Store stations manually page 12 Static noise while listening to the radio Connect the antenna firmly Disc playback Disc can be neither recognized nor played Eject the disc f...

Страница 299: ...ing playback This is caused by how the tracks are recorded Not Support appears on the monitor and track is skipped Track is unplayable USB playback Noise is generated The track played back is not a playable file format MP3 WMA WAV AAC Skip to another file Do not add the extension code mp3 wma wav or m4a to non MP3 WMA WAV AAC tracks Tracks cannot play back as you have intended them to play Playbac...

Страница 300: ...e Move the car to place where you can get a better signal reception The sound is interrupted or skipped during playback of a Bluetooth audio device Reduce the distance between the unit and the Bluetooth audio device Disconnect the device connected for Bluetooth Phone Turn off then turn on the unit When the sound is not yet restored connect the device again New Device cannot be selected for Bluetoo...

Страница 301: ...ing a D player Disconnect the D player from the adapter Then connect them again No Files or No Track appears on the monitor No tracks are stored Import tracks to the iPod or D player Reset 01 Reset 07 appears on the monitor Disconnect the adapter from both this unit and iPod D player Then connect them again Reset 08 appears on the monitor Check the connection between the adapter and this unit The ...

Страница 302: ...mposite 1 Vp p 75 Ω Other Terminals Input LINE IN VIDEO IN MIC IN USB input terminal Antenna input Output 2nd AUDIO OUT VIDEO OUT Others CD changer FM AM TUNER Frequency Range FM 87 5 MHz to 108 0 MHz AM 531 kHz to 1 602 kHz FM Tuner Usable Sensitivity 11 3 dBf 1 0 μV 75 Ω 50 dB Quieting Sensitivity 16 3 dBf 1 8 μV 75 Ω Alternate Channel Selectivity 400 kHz 65 dB Frequency Response 40 Hz to 15 000...

Страница 303: ...em FAT 32 16 12 Max Current Less than 500 mA 5 V BLUETOOTH Version Bluetooth 1 2 certified Output Power 4 dBm Max Power class 2 Service Area Within 10 m Profile HSP Headset Profile HFP Hands Free Profile A2DP Advanced Audio Distribution Profile AVRCP Audio Video Remote Control Profile SPP Serial Port Profile OPP Object Push Profile GENERAL Power Requirement Operating Voltage DC 14 4 V 11 V to 16 V...

Страница 304: ...EN CT TH 0207MNMMDWJEIN 2007 Victor Company of Japan Limited Having TROUBLE with operation Please reset your unit Refer to page of How to reset your unit ...

Страница 305: ... ಞᇊ ºËπ ÈÕπ M Reverse gear signal extension cord Ծዥ ྐۂע ۑ ង µËÕ Ï Õ À ß Required space for installation ϰ ᄕ ڐ æ Èπ Ë Ë ß ËµÈÕß È π µ µ Èß Control panel վࡒ ػ ÀπÈ ªí 5 mm 5 mm K Microphone ఐџࡘ øπ L Microphone clip ఐџࡘқ ª øπ Installing the remote controller ϰ ჳેወ µ µ Èß ï µ Õπ H Remote controller Holder ჲ ށ µ Õπ Ë Trim plate is detached on this illustration for explanation Џ ڄ ྟखʵூ ਛ ᙼé π Ÿªπ È ªÁπ Õ...

Страница 306: ... ʈ ᆥç ძᗌϙનղ ώ ղ ӕ ç ʹጅᎲ é Ë π ß 2 Õ π ß π ËÕß À Èæ π ß æ π Èπ ÀÈ ËÕπ ÿ ª Õ ÕÕ π Ë ËÕ Ê ß π ß Èß Õß Õ πÕÕ π Do not block the fan ʿ ۇ ᗉࡘ é Õ Ë ß ß Õ Õßæ INSTALLATION IN DASH MOUNTING The following illustration shows a typical installation If you have any questions or require information regarding installation kits consult your JVC car audio dealer or a company supplying kits If you are not sure how ...

Страница 307: ...nna if any 250 mA max вбੂ ለ ࠜЉ ఛʨ 250 mA Õ øøÈ Õ µ π µ À π Ÿß 250 mA Fuse block ۘᎳീవ ºßøî Black ෨и Red и ß Blue ᕇи πÈ ß π Blue with white stripe ᕇиઘЉΎи ঙ πÈ ß π Orange with white stripe ዻиઘЉΎи ঙ È Brown ሶи πÈ µ Light green ଠႋи ÕËÕπ To car light control switch вԆԾԾጜ վළᘕ µ Ï ÿ ø Õß πµ Ï To cellular phone system в ྐੂޟ Ԧ µËÕ æ Ï ËÕπ To the remote lead of other equipment 200 mA max в ɾ ࡖށ ᛏ క ڄ ჲ ለ ఛʨ ...

Страница 308: ...ING The fuse blows Are the red and black leads connected correctly Power cannot be turned on Is the yellow lead connected No sound from the speakers Is the speaker output lead short circuited Sound is distorted Is the speaker output lead grounded Are the terminals of L and R speakers grounded in common Noise interfere with sounds Is the rear ground terminal connected to the car s chassis using sho...

Страница 309: ... Ë È ÀÈ æ ÈÕ ËÕß 7 KV MR9010 9 INCH WIDESCREEN MONITOR not supplied 9 ʭᅛܳ Ε ԅЉ క Õ È ß 9 π È Ë È ÀÈ æ ÈÕ ËÕß Video cord not supplied ඁᏁྐង ԅЉ క Õ Ë È ÀÈ æ ÈÕ ËÕß 7 To listen to disc playback sound while in Dual Zone operations see page 26 of INSTRUCTIONS 7 ࠜ Ϛᕻࡌੇ ዬѕЂ γၪᆑ ڄ ᑵࡖ ቁ ኌ 26 ࡗ ݣڄ Ε é 7 ËÕµÈÕß ø ß ºËπ Ï Õ ŸË π À ß π Dual Zone ÿÀπÈ 26 Õß ŸË Õ Èß π Camcorder rear view camera etc ྰጅçࠌඁຖߟጅçമമé È...

Страница 310: ... JVC CD changer JVC CD ಘၫወ ËÕß Ëπ JVC CD or À Õ CD changer jack CD ಗၪ ËÕß µËÕ Õß ËÕß Ëπ CD 8 Line Input Adapter KS U57 separately purchased 8 ྐཔ ʈቱ KS U57 ᒯක 8 Õ ª µÕ Ï È KS U57 Õ ÀπË 9 Aux Input Adapter KS U58 separately purchased 9 Aux ʈቱ KS U58 ᒯක 9 Õ a µÕ Ï a ß È Õÿa Ï πÕ KS U58 Õ ÀπË Hold the connector top tightly 1 then pull it out 2 ӟႌ ʕ 1 ç અ 2 é È π π Õß È µËÕ ÀÈ πËπ 1 π Èπ ß ßÕÕ 2 To dis...

Страница 311: ...For installation and connections refer to the separate manual INSTRUCTIONS LVT1708 001A A For canceling the display demonstration see page 5 DVD CD RECEIVER KD AVX33 ...

Страница 312: ...r may move slowly Pictures may not be synchronized with the sound or picture quality may decline in such environments For safety Do not raise the volume level too much as this will block outside sounds making driving dangerous Stop the car before performing any complicated operations Temperature inside the car If you have parked the car for a long time in hot or cold weather wait until the tempera...

Страница 313: ...se engineering or disassembly is prohibited Contents INTRODUCTION Playable disc type 4 Before operating the unit 5 OPERATIONS Basic operations Control panel 7 Basic operations Remote controller RM RK251 8 Listening to the radio 10 Disc operations 13 Dual Zone operations 26 USB operations 29 Bluetooth operations Cellular phone audio player 31 EXTERNAL DEVICES Listening to the CD changer 38 Listenin...

Страница 314: ...D I CD I Ready CD Recordable Rewritable CD R RW Compliant to ISO 9660 level 1 level 2 Romeo Joliet CD DA MP3 WMA WAV AAC 4 JPEG DivX MPEG1 MPEG2 MPEG4 1 IfyouinsertaDVDVideodiscofanincorrectRegionCode Regioncodeerror appearsonthemonitor 2 DVD Rrecordedinmulti borderformatisalsoplayable exceptforduallayerdiscs 3 Itispossibletoplaybackfinalized R RW Videoformatonly discs However theuseof Rdoublelaye...

Страница 315: ...ion then activate the Demonstration screen Cancel the display demonstrations Select Off Continued on the next page AV Menu Setup Enter ENT Setup menu icon Currently selected menu Demonstration Display Clock Disc Setup 1 Disc Setup 2 Tuner On Demonstration Wall Paper Scroll Tag Display Dimmer Off On Exit ENT Setup Display Demonstration Currently selected submenu Current setting Off On Exit ENT Demo...

Страница 316: ...he clock time is displayed while playing back a video source Finish the procedure Return to the Setup menu Select Clock Time Set then activate the Time Set screen Set the clock time Return to the Clock menu Select 12Hours 24Hours Activate the 12Hours 24Hours screen Clock 1 00AM Time Set 12Hours 24Hours OSD Clock Time Set Hours 1 00AM Exit ENT Time Set Minutes 3 45PM Exit ENT 12Hours 24Hours 12 Hou...

Страница 317: ... on the power Turn off the power Hold Attenuate the sound if the power is on Change the display information 4 TUNER Search for stations DISC USB Select chapters tracks On menus Go to previous next step iPod D PLAYER Select tracks Bluetooth Audio Reverse skip forward skip 5 3 TUNER Select preset stations DISC USB Select titles folders On menus Select items iPod D PLAYER Enter player s menu pause or...

Страница 318: ...r artificial lighting Caution Do not expose batteries to heat or flame IMPORTANT If Dual Zone is activated page 26 the remote controller functions only for operating the DVD CD player Main elements and features 1 1 Turns on the power Attenuates the sound if the power is on Turns off the power if pressed and held while the power is on 2 1 Selects the source 3 1 Displays Dial Menu Displays Redial li...

Страница 319: ...sed 2 Thesebuttonscanbeusedonlywhentheslidecoveris closed 3 5 Returnstothepreviousmenu Confirmstheselection 6 DVD DivX 6 Shows the disc menu VCD Resumes PBC playback page 21 DVD VR Shows the Original Program screen 7 Makes selection settings Skips back or forward by 5 minutes for DivX MPEG1 MPEG2 DISC buttons Changes discs for CD CH 8 Shows the on screen bar 9 1 Changes the display information p D...

Страница 320: ...s on the display then press it repeatedly The ST indicator lights up when receiving an FM stereo broadcast with sufficient signal strength 4 Reception improves but stereo effect will be lost The MO indicator lights up To restore stereo effect select Off in step 4 Preset No Band page 43 Tuner indicators AV Menu Mode Enter ENT AV Menu Setup Enter ENT Mode Off Mono DX Local SSM Title Entry Mono Off O...

Страница 321: ...l strength This function works only for FM bands Once you have activated this function selected Local it always works when searching for FM stations 1 2 Mode menu icon 3 4 Only stations with sufficient signal strength will be detected The DX indicator goes off then the LO indicator lights up Mode DX Mono DX Local SSM Title Entry DX Local DX Local Exit ENT Mode Mono DX Local SSM Title Entry Start E...

Страница 322: ... 4 5 6 ENT or Manual presetting Ex Storing FM station of 92 5 MHz into preset number 4 of the FM1 band 1 2 Tune in to a station you want to preset 3 4 Select a preset number 5 The station selected in step 2 is now stored in preset number 4 Each time you hold the button you can change the FM bands Preset List can also be accessed through AV Menu List right FM1 Store 87 5 89 9 97 9 105 9 108 0 107 9...

Страница 323: ...e operation you have tried to do In some cases without showing operations will not be accepted Label side 0 Eject the disc 3 Start playback if necessary DISP Press if no playback picture appears but disc information screen pages 14 to 16 is displayed Insert the disc Playback starts automatically 7 Stop playback Caution Do not place your finger behind the control panel Caution on volume setting Dis...

Страница 324: ...TI MLP B S P AUDIO DVD G 01 02 0 45 38 RPT BONUS Surround mode 4 Press Select track Hold Reverse forward search 1 5 Select group Group no Track no Playing time BONUS indicator page 22 B S P indicator page 22 4 Press Select chapter Hold Reverse forward search 1 5 Select program no Play List no Program no or Play List no Chapter no Playing time VR PR Original program VR PL Play List 3 45PM MULTI CHA...

Страница 325: ...s in use 4 Press Select track Hold Reverse forward search 1 page 43 3 45PM FRONT 2CH RPT DivX DVD T 01 C 02 0 45 38 Current Folder Name Current File Name avi For DivX MPEG Folder no Track no Playing time For JPEG Folder no File no 4 Press Select track Hold Reverse forward search for DivX MPEG 2 5 Press Select folder Hold Display Folder List ...

Страница 326: ... Hold Reverse forward search 1 5 Press Select folder Hold Display Folder List Audio format MP3 WMA WAV AAC 4 Press Select track Hold Reverse forward search 1 page 43 page 43 1 Searchspeed x2 x10 3 NoName appearsforconventionalCDs Tag data will be shown instead of folder file names when they are recorded and Tag Display is set to On page 46 3 45PM FLAT CD 02 0 45 38 Disc Title Artist Name Current T...

Страница 327: ...ilable for Playlist playback Track Plays the first 15 seconds of each track for VCD PBC not in use Track Repeats current track for VCD PBC not in use Disc All Randomly plays all tracks for VCD PBC not in use Track Plays the first 15 seconds of each track Folder Plays the first 15 seconds of the first track of each folder Track Repeats current track Folder Repeats all tracks of the current folder F...

Страница 328: ...der List can also be accessed through AV Menu List Prohibiting disc ejection You can lock a disc in the loading slot No Eject appears To cancel the prohibition repeat the same procedure to select EJECT OK Folder List Off My Best Cinema Pops My Best2 Favorite Song Cinema2 ENT Folder List Off My Best Cinema Pops My Best2 Favorite Song Cinema2 ENT File List Off Song011 mp3 Song012 mp3 Song013 mp3 Son...

Страница 329: ...rse forward search 2 No sound can be heard Slow motion 3 during pause No sound can be heard Press Select chapter during playback or pause Hold Reverse forward search 4 Select title during playback or pause Using menu driven features 1 2 Select an item you want to start playback 3 Select chapter Select title when not playing twice Select title during playback or pause Select aspect ratio Select aud...

Страница 330: ...1 2 Select an item you want to start playback 3 Stop playback Start playback Pause if pressed during playback Reverse forward search 4 No sound can be heard Slow motion 5 during pause No sound can be heard Reverse slow motion does not work Press Select chapter during playback or pause Hold Reverse forward search 6 Select program Select play list during playback or pause Select aspect ratio Select ...

Страница 331: ...if pressed during playback Reverse forward search 4 Press Select track Hold Reverse forward search 6 Select folder Select track within the same folder twice Select folder 1 Erasesthemisentryofthenumber 2 Searchspeed 1 2 3 3 Searchspeed 1 2 4 Searchspeed x2 x5 x10 x20 x60 5 Slowmotionspeed 1 32 1 16 1 8 1 4 1 2 6 Searchspeed x2 x10 Stop playback Start playback Slide show each file is shown for a fe...

Страница 332: ... the BSP selecting icons such as or on the screen 1 Select an item you want to display 2 Enjoying surround sounds You can enjoy multi channel surround playback through the front center surround speakers After connecting the center speaker make sure to activate the center speaker otherwise no sound comes out of the center speaker page 49 All surround mode can also be used for USB MULTI For multi ch...

Страница 333: ...h Adjust the center image so it may be heard only from the center speaker only form the left right front speaker as a phantom center image or various combination of these speakers As the number increases the phantom effect becomes stronger normally select 4 3 On the remote controller You cannot change the Dolby PLIIMusic settings using the remote controller Surround On Auto Through Dolby PLII Movi...

Страница 334: ...selection If a pop up menu appears For entering time numbers Move the entry position To remove the on screen bar Operations using the on screen bar DVD VCD DivX MPEG1 MPEG2 JPEG These operations are possible on the monitor using the remote controller Select a number ...

Страница 335: ...disc T REM Remaining title time for DVD Remaining disc time for others TIME Elapsed playing time of the current chapter track 2 REM Remaining time of the current chapter track 2 6 Playback status Play Reverse forward search Reverse forward slow motion Pause Stop 7 Operation icons TIME Change time indication see 5 Time Search Specify a certain scene by entering time TITLE Title Search by its number...

Страница 336: ...n source to listen through the speakers Press SRC source on the control panel By using the buttons on the control panel you can operate the newly selected main source without affecting Dual Zone DISC operations You cannot select USB for the main source On the remote controller 1 2 Adjust the volume through the 2nd AUDIO OUT plug 3 Operate the DVD CD player 1 JVC original headphone virtual surround...

Страница 337: ...ack mode below 3 Elapsed playing time of the current track 4 Operation status 5 Current track number total number of tracks on the disc 6 Track information 7 Track list 8 Current track highlighted bar To select a track If necessary press ENT to start playback Ex CD Text MODE REPEAT TRACK TIME 00 14 Track 6 14 Track Information Cloudy Fair Fog Hail Indian summer Rain Shower Snow Thunder Typhoon Win...

Страница 338: ...ding equipment Folder 144 240 Track 144 198 Page 4 7 fol120 fol121 fol122 fol123 fol124 fol125 fol126 fol127 fol128 fol129 fol150 fol151 fol152 fol153 fol154 fol155 fol156 fol157 fol158 fol159 fol140 fol141 fol142 fol143 fol144 fol145 fol146 fol147 fol148 fol149 fol130 fol131 fol132 fol133 fol134 fol135 fol136 fol137 fol138 fol139 file0141 wma file0142 mp3 file0143 wma file0144 mp3 file0145 mp3 fi...

Страница 339: ...iscs page 17 to 25 You cannot select USB when Dual Zone is in use All tracks in the USB device will be played repeatedly until you change the source 1 ExceptforJVCD PlayerXA HD500 2 ExceptforMPEG2filesrecordedbyJVCEverio camcorder extensioncode mod 3 Start playback if necessary DISP Press if no playback picture appears but disc information screen pages 14 to 16 is displayed 4 Press Select track Ho...

Страница 340: ... then tracks of next folders USB All Randomly plays all tracks Track Repeats current track Folder Repeats current folder Folder Repeats current folder Mode Off All Off Intro Repeat Random Repeat Off Track Folder Set ENT AV Menu Mode Enter ENT AV Menu Setup Enter ENT Mode menu icon Caution Avoid using the USB device if it might hinder your safety driving Do not pull out and attach the USB device re...

Страница 341: ...h a new Bluetooth connection Connection is established by operating the unit Bluetooth operations Cellularphone audioplayer Bluetooth is a short range wireless radio communication technology for the mobile device such as mobile phones portable PCs and other devices The bluetooth devices can be connected without cables and communicate each other The serial number is printed on the label placed on t...

Страница 342: ...nter the specific PIN code of the device to the unit Refer to the instructions supplied with the device to check the PIN code 4 Use the Bluetooth device to connect Now connection is established and you can use the device through the unit AV Menu Bluetooth Enter ENT AV Menu Setup Enter ENT Registering using Open 1 Select Bluetooth Phone or Bluetooth Audio 2 3 Bluetooth menu icon 4 5 Enter a PIN Per...

Страница 343: ... want to connect disconnect 2 Perform steps 2 and 3 of Registering using Open on page 32 then Select Connect to connect the selected device Select Disconnect to disconnect the selected device You can set the unit to connect a Bluetooth device automatically when the unit is turned on page 54 Deleting a registered device 1 Select Bluetooth Phone or Bluetooth Audio then select a registered device you...

Страница 344: ...thaudiofunctionis connected appears You can adjust the microphone volume level page 54 Status of the device 2 Signal strength Battery remainder Adjust the volume 1 When a call comes in The source is automatically changed to Bluetooth Phone When Auto Answer is activated The unit answers the incoming calls automatically page 54 When Auto Answer is deactivated press any button except ATT or to answer...

Страница 345: ... of the cellular phone to this unit Refer to the instruction manual supplied with your cellular phone With some cellular phones the phone book memory is transferred automatically 3 Select the name phone number you want to call When an SMS comes in If the cellular phone is compatible with SMS Short Message Service and Message Info is set to Auto page 54 the unit rings and Receiving Message appears ...

Страница 346: ...a preset number The phone number selected in step 1 is now stored in preset number 4 To call a preset number On the remote On the unit 1 2 11122223333 22233336666 44455556666 09845671234 99988887777 55566668888 1 2 3 4 5 6 ENT Preset List 11122223333 22233336666 44455556666 09845671234 99988887777 55566668888 1 2 3 4 5 6 ENT Preset List 11122223333 22233336666 44455556666 11133334444 99988887777 5...

Страница 347: ...mainder page 43 List menu icon AV Menu Setup Enter ENT AV Menu List Enter ENT 3 Select Bluetooth Audio Ÿ Start playback See pages 31 to 33 for connecting a new device See page 33 for connecting disconnecting a registered device See page 33 for deleting a registered device When the sound is stopped or interrupted during the use of a Bluetooth device try the following remedies Turn off then turn on ...

Страница 348: ...nal CDs Disc no Track no Playing time While playing an MP3 disc you can select and start playing a track in the disc using the Lists Disc List select the current disc Folder List File List then start playing a track you want 4 Press Select track Hold Reverse forward search 5 Press Select folder MP3 only Hold Display Disc List Disc List Off MP3 DISC DISC 02 DISC 03 DISC 04 DISC 05 DISC 06 ENT Disc ...

Страница 349: ...s the first 15 seconds of each track Folder Plays the first 15 seconds of the first track of each folder Disc Plays the first 15 seconds of the first track of all loaded discs Track Repeats current track Folder Repeats all tracks of the current folder Disc Repeats all tracks of the current disc Folder Randomly plays all tracks of current folder then tracks of next folders Disc Randomly plays all t...

Страница 350: ...t Ô Album Ô Genre Ô Track Ô back to the beginning 3 Confirm the selection 4 Repeat steps 2 and 3 to select a track When a track is selected finally playback starts To return to the previous menu Selecting playback modes 1 Display AV Menu then select Mode menu icon 2 Enter Mode then select Repeat or Random 3 Select an appropriate option Repeat One Functions the same as Repeat One or Repeat Mode One...

Страница 351: ...amera Mirror or Navigation for AV Input page 50 some status messages such as volume level change will not appear on the monitor while viewing the picture When Navigation is selected for AV Input You can use the source AV IN for listening to an audio source connected to the LINE IN plugs While selecting other source you can watch the navigation screen without changing the source To watch the naviga...

Страница 352: ...ut Adapter KS U57 not supplied or AUX Input Adapter KS U58 not supplied Preparation Make sure External Input is selected for the external input setting page 50 Select EXT IN Ÿ Turn on the connected component and start playing the source 3 45PM FLAT EXT IN EXT INPUT POWER ON Assigned title page 44 page 43 ...

Страница 353: ...stment You can store your adjustment into User1 User2 and User3 1 Repeat steps and Ÿ then in step 2 Adjust 3 Store Soundequalization Edit 60 0 Hz ENT 03 Store User Store User1 User2 User3 ENT Store AV Menu Setup Enter ENT AV Menu Equalizer Enter ENT Flat Hard Rock R B Pop Jazz Exit ENT Equalizer Equalizer menu icon Flat Hard Rock R B Pop Jazz Exit ENT Equalizer Edit 60 0 Hz ENT 03 Store POWER ON ...

Страница 354: ...he title entry screen 1 2 Mode menu icon 3 Ex When you select FM as the source Assign a title 1 Select a character then move the entering position To change the character set press DISP For available characters page 61 2 Repeat step 1 until you finish entering the title Finish the procedure Assigningtitlestothesources Press Change character set Hold Erase title AV Menu Setup Enter ENT AV Menu Mode...

Страница 355: ...e List Bluetooth Sound menu icon Sound Through Fader Balance Volume Adjust Subwoofer High Pass Filter Crossover Through On Exit ENT High Pass Filter AV Menu Setup Enter ENT AV Menu Sound Enter ENT Disc Surround Dual Zone AV Menu Setup Enter ENT Input Display Clock Disc Setup 1 Disc Setup 2 Tuner Others Setup Equalizer Sound Disc Surround Mode Bluetooth List Dual Zone The display indications may ch...

Страница 356: ...C tracks Dimmer Off Cancels On Activates dimmer Auto Dims the monitor when you turn on the headlights 1 Time Set Press ENT or to display the time setting screen then set the Dimmer On Off times Bright You can adjust brightness of the monitor 15 darkest to 15 brightest Initial 00 Picture Adjust 2 You can adjust the following to make the monitor clear and legible for watching the playback picture Th...

Страница 357: ...riginal pictures NTSC PAL This setting is valid only to the external monitor connected Select the color system of the external monitor NTSC PAL Turn off the power and turn it on again to make the new setting effective Language 4 Select the indication language shown on the monitor English Spanish French German Italian Dutch Swedish Danish Russian Clock Time Set Initial 1 00AM 6 12Hours 24Hours 12 H...

Страница 358: ... Select when the aspect ratio of the external monitor is 4 3 Refer to the illustrations on the left to see how the pictures are shown on the monitor OSD Position Select the position of the on screen bar 25 1 Higher position 2 Lower position File Type Select playback file type when a disc USB contains different types of files You can store this setting separately for each source DISC USB Audio Play...

Страница 359: ...er Level You can adjust the output level of the activated speakers Speaker Size above monitoring the test tone Front Lch Center Ch Front Rch Rear Rch Subwoofer 6 Rear Lch adjust the output level of each speaker in the range of 10dB to 10dB Initial 0dB Press and hold ENT to turn on and off the test tone Speaker Distance 7 You can adjust the speaker output timing Front Lch Center Ch Front Rch Rear R...

Страница 360: ... on the external monitor Navigation Select when connecting a Navigation System 41 External Input 9 For connecting an external component to the CD changer jack on the rear Changer iPod D Player 10 CD changer iPod or D player 38 40 External Input Any other than the above 42 Others Beep Off Cancels On Activates the key touch tone Telephone Muting 11 Off Cancels Muting1 Muting2 Select either one which...

Страница 361: ...fer 12 Adjust the settings below in the submenu Phase Subwoofer phase Select either Normal or Reverse which reproduces a better sound Level Subwoofer output level Level 06 to 08 Initial 00 High Pass Filter Through Select when the subwoofer is not connected On Select when the subwoofer is connected Crossover Adjust the crossover frequency between the front rear speakers and the subwoofer 80Hz 120Hz...

Страница 362: ...th 15 14 Selectableonlyfor DISC and USB 15 Thissettingtakeseffectonlywhenthecenterspeakerisactivated Mode 16 Menu items Selectable settings reference page Mono Only for FM Off On 10 DX Local Only for FM DX Local 11 SSM Only for FM 11 Title Entry Only for FM AM stations AV IN and EXT IN 44 All Off Intro Repeat Random Only for disc USB playback and iPod D player 17 30 39 40 16 Itemslistedunder Mode ...

Страница 363: ...t a device you want to connect After selecting the device use Open or Search page 32 for connection Once the connection is established it is registered in the unit You can connect the unit and the device by using Connect below from the next time Connect Only for the registered devices After selecting a device from among the registered devices page 33 37 establish the connection with it Disconnect ...

Страница 364: ...ically Reject The unit rejects all incoming calls Message Info 20 Auto The unit informs you of the arrival of a message by ringing and displaying Receiving Message To read the message press ENT page 35 Manual The unit does not inform you the arrival of a message MIC Setting 20 Adjust microphone volume connected to the unit 01 02 03 Version 21 The Bluetooth software and hardware versions are shown ...

Страница 365: ...holder of the case and lift the disc out holding it by the edges Always hold the disc by the edges Do not touch its recording surface When storing a disc into its case gently insert the disc around the center holder with the printed surface facing up Make sure to store discs into the cases after use To keep discs clean A dirty disc may not play correctly If a disc does become dirty wipe it with a ...

Страница 366: ...isc playback starts Changing the source If you change the source playback also stops without ejecting the disc Next time you select DISC for the playback source disc play starts from where it stopped previously Playing Recordable Rewritable discs This unit can recognize a total of 5 000 files and 250 folders a maximum of 999 files per folder Use only finalized discs This unit can play back multi s...

Страница 367: ... Playing DivX files This unit can play back DivX files with the extension code divx div avi regardless of the letter case upper lower This unit supports the DivX files whose resolution is 720 x 576 pixels or less This unit supports DivX 6 x 5 x 4 x and 3 11 Audio stream should conform to MP3 or Dolby Digital The file encoded in the interlaced scanning mode may not be played back correctly The maxi...

Страница 368: ...device Check the device appears on the monitor The unit cannot recognize a USB device whose rating is other than 5 V and does not exceed 500 mA While playing from a USB device the playback order may differ from other players This unit may be unable to play back some USB devices or some files due to their characteristics or recording conditions Depending on the shape of the USB devices and connecti...

Страница 369: ... Pan Scan is selected the screen size may become 4 3 Letterbox for some discs Bluetooth operations General While driving do not perform complicated operation such as dialling the numbers using phone book etc When you perform these operations stop your car in a safe place Some Bluetooth devices may not be connected to this unit depending on the Bluetooth version of the device This unit may not work...

Страница 370: ...d AUDIO OUT plugs are emitted for the main source DISC 2nd AUDIO OUT 2 channel signal is emitted when Dual Zone is activated When playing a multi channel encoded disc multi channel signals are downmixed except for some DVD Audio DVD Logo is a trademark of DVD Format Logo Licensing Corporation registered in the US Japan and other countries DivX DivX Ultra Certified and associated logos are trademar...

Страница 371: ...lician LA Latin QU Quechua TI Tigrinya BA Bashkir GN Guarani LN Lingala RM Rhaeto Romance TK Turkmen BE Byelorussian GU Gujarati LO Laothian RN Kirundi TL Tagalog BG Bulgarian HA Hausa LT Lithuanian RO Rumanian TN Setswana BH Bihari HI Hindi LV Latvian Lettish RW Kinyarwanda TO Tonga BI Bislama HR Croatian MG Malagasy SA Sanskrit TR Turkish BN Bengali Bangla HU Hungarian MI Maori SD Sindhi TS Tson...

Страница 372: ...nnected to VIDEO IN plug Check the cords and connections Signal input is too weak Mecha Error Push Reset appears on the monitor and the panel does not move Reset the unit page 3 FM AM SSM automatic presetting does not work Store stations manually page 12 Static noise while listening to the radio Connect the antenna firmly Disc playback Disc can be neither recognized nor played Eject the disc forci...

Страница 373: ...playback This is caused by how the tracks are recorded Not Support appears on the monitor and track is skipped Track is unplayable USB playback Noise is generated The track played back is not a playable file format MP3 WMA WAV AAC Skip to another file Do not add the extension code mp3 wma wav or m4a to non MP3 WMA WAV AAC tracks Tracks cannot play back as you have intended them to play Playback or...

Страница 374: ...ve the car to place where you can get a better signal reception The sound is interrupted or skipped during playback of a Bluetooth audio device Reduce the distance between the unit and the Bluetooth audio device Disconnect the device connected for Bluetooth Phone Turn off then turn on the unit When the sound is not yet restored connect the device again New Device cannot be selected for Bluetooth A...

Страница 375: ...a D player Disconnect the D player from the adapter Then connect them again No Files or No Track appears on the monitor No tracks are stored Import tracks to the iPod or D player Reset 01 Reset 07 appears on the monitor Disconnect the adapter from both this unit and iPod D player Then connect them again Reset 08 appears on the monitor Check the connection between the adapter and this unit The iPod...

Страница 376: ...ite 1 Vp p 75 Ω Other Terminals Input LINE IN VIDEO IN MIC IN USB input terminal Antenna input Output 2nd AUDIO OUT VIDEO OUT Others CD changer FM AM TUNER Frequency Range FM 87 5 MHz to 108 0 MHz AM 531 kHz to 1 602 kHz FM Tuner Usable Sensitivity 11 3 dBf 1 0 μV 75 Ω 50 dB Quieting Sensitivity 16 3 dBf 1 8 μV 75 Ω Alternate Channel Selectivity 400 kHz 65 dB Frequency Response 40 Hz to 15 000 Hz ...

Страница 377: ...AT 32 16 12 Max Current Less than 500 mA 5 V BLUETOOTH Version Bluetooth 1 2 certified Output Power 4 dBm Max Power class 2 Service Area Within 10 m Profile HSP Headset Profile HFP Hands Free Profile A2DP Advanced Audio Distribution Profile AVRCP Audio Video Remote Control Profile SPP Serial Port Profile OPP Object Push Profile GENERAL Power Requirement Operating Voltage DC 14 4 V 11 V to 16 V all...

Страница 378: ...EN 0207MNMMDWJEIN 2007 Victor Company of Japan Limited Having TROUBLE with operation Please reset your unit Refer to page of How to reset your unit ...

Страница 379: ...UCTIONS To prevent short circuit cover the terminals of the UNUSED leads with insulating tape The heat sink becomes very hot after use Be careful not to touch it when removing this unit Q Rubber cushion G Crimp connectors N Washer ø5 o Lock nut M5 R Mounting bolt M5 x 20 mm P Handles I Batteries 1 When you stand the unit be careful not to damage the fuse on the rear Do the required electrical conn...

Страница 380: ...r section Insert the two handles then pull them as illustrated so that the unit can be removed 30 Flat type screws M5 x 8 mm 2 Connecting the Mic unit or Adjust the microphone angle Microphone Microphone clip J Double sided adhesive tape C Secure the microphone cord using cord cramps not supplied if necessary 1 2 Connect the parking brake lead to the parking brake system built in the car Parking b...

Страница 381: ... block connecting to the car battery bypassing the ignition switch constant 12 V To an accessory terminal in the fuse block To automatic antenna if any 250 mA max Fuse block Black Red Blue Blue with white stripe Orange with white stripe Brown Light green To car light control switch To cellular phone system To the remote lead of other equipment 200 mA max Ignition switch White with black stripe Whi...

Страница 382: ...mplifier Rear speakers Front speakers Subwoofer You can connect external components in series as shown in the diagram below All the components adapters or signal cords need to be purchased separately CAUTION Before connecting the external components make sure that the unit is turned off To use JVC CD changer Apple iPod or JVC D player set External Input to Changer iPod D Player see page 50 of the ...

Отзывы: