background image

EN33

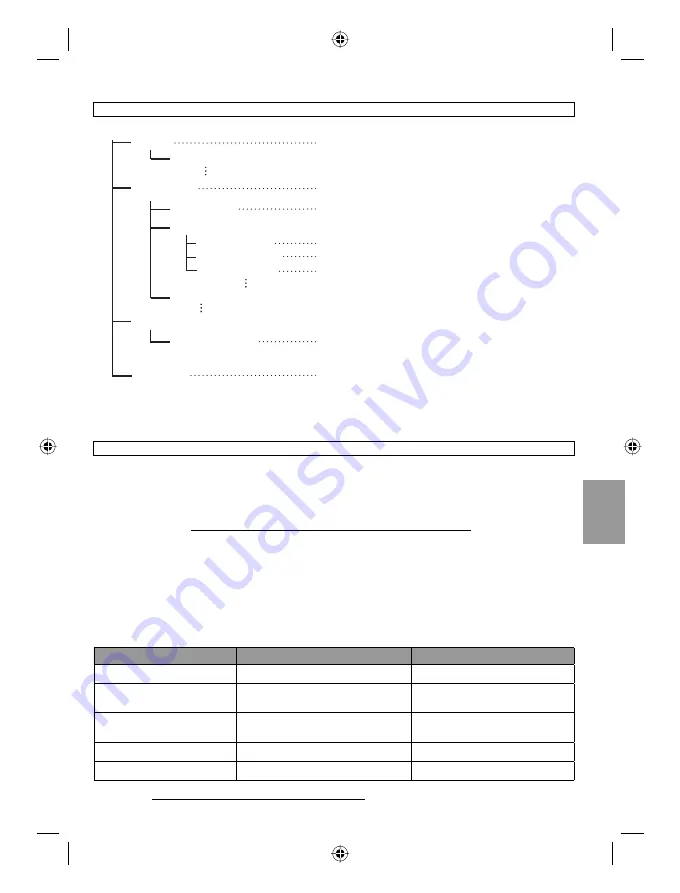
COPYING

[XXXJVCSO]

[DCIM]

[SD_VIDEO]

[EXTMOV]

[PRIVATE]

[MGR_INFO]

[PRGXXX]

[PRGXXX]

[PRGXXX.PGI]
[MOVXXX.MOD]
[MOVXXX.MOI]

[MOV_XXX.MOD]

* Information such as the date and time of recording, recorded with the video file.

Recording medium

X = number

Management information*

Contains the video file folders.

Contains the still image folders.

Management information* for the media as a 
whole

Video file

Management information* for the video files

Contains management information files of event 
and/or DVD creation information for the files taken 
with the camcorder.

Video file which management information is 
corrupted.

Use of this software is authorized according to the terms of the software licence.

JVC

When contacting the nearest JVC office or agency in your country (refer to the JVC Worldwide 
Service Network at http://www.jvc-victor.co.jp/english/worldmap/index-e.html) about this 
software, please have the following information ready.

 Product Name, Model, Problem, Error Message.

 PC, (Manufacturer, Model (Desktop/Laptop), CPU, OS, Memory (MB), Available Hard Disk 

Space (GB)).

Please note that it may take some time to respond to your questions, depending on their subject matter. 
JVC cannot answer questions regarding basic operation of your PC, or questions regarding specifications or 
performance of the OS, other applications or drivers.

Pixela

Region

Language

Phone #

USA and Canada

English

+1-800-458-4029 (toll-free)

Europe (UK, Germany, 

France and Spain

English/Germany/France/Spanish

+800-1532-4865 (toll-free)

Other Countries in Europe

English/Germany/France/Spanish/

Italian/Dutch

+44-1489-564-764

Asia (Philippines)

English

+63-2-438-0090

China

Chinese

+86-21-5385-3786

Homepage:

 http://www.pixela.co.jp/oem/jvc/mediabrowser/e/

Please check our website for latest information and downloading.

    Folder Structure and Extensions

  Customer Support Information

GZ-MS130BU_US_IB_ENB.indb   33

GZ-MS130BU_US_IB_ENB.indb   33

4/28/2008   11:44:25 AM

4/28/2008   11:44:25 AM

Содержание Everio GZ-MS130

Страница 1: ...guridad y las precauciones contenidas en las paginas 2 y 3 para garantizar un uso seguro de este producto Para futuras consultas Escriba a continuación el número de modelo ubicado en la parte inferior de la videocámara y el número de serie ubicado en el compartimiento de la batería de la videocámara Número de modelo Número de serie Please read the instruction manual prior to connecting or operatin...

Страница 2: ...n a shelf make sure that it has sufficient space on all sides to allow for ventilation 10 cm 3 15 16 or more on both sides on top and at the rear Do not block the ventilation holes If the ventilation holes are blocked by a newspaper or cloth etc the heat may not be able to get out No naked flame sources such as lighted candles should be placed on the apparatus When discarding batteries environment...

Страница 3: ...lled or objects have fallen into the apparatus the apparatus has been exposed to rain or moisture does not operate normally or has been dropped Remember that this camcorder is intended for private consumer use only Any commercial use without proper permission is prohibited Even if you record an event such as a show performance or exhibition for personal enjoyment it is strongly recommended that yo...

Страница 4: ...N Be sure to use JVC battery packs If you use any other battery packs besides JVC battery packs safety and performance can not be guaranteed Grip Adjustment Adjust the strap and fasten Charge the battery before recording Turn off the camcorder and attach the battery pack Power charge lamp Blinks Charging goes out Charging finished Do not remove the AC adapter the battery pack or the SD card when t...

Страница 5: ... Select ON if daylight saving time is effective LCD monitor SET SET DATE TIME YES NO Slide your finger up and down on the sensor Then touch OK SET QUIT CLOCK SETTING AREA SETTING SET FOR DAYLIGHT SAVING TIME CLOCK ADJUST SET THE CITY DATE AND TIME AREA SETTING SET QUIT NOV 1 2009 04 55PM R SET QUIT SET FOR DAYLIGHT SAVING TIME SET DAYLIGHT SAVING TIME NOV 1 2009 04 55PM OFF DAYLIGHT SAVING TIME DS...

Страница 6: ...ding The mode changes when you press the button 0 04 01 4 h 59 m M The auto recording indicator appears 4 h 59 m 0 04 01 REC Remaining space on built in memory or SD card Video Quality Record standby Recording DC Press the START STOP button to start recording and press it again to stop PLAY REC GZ MS130BU_US_IB_ENB indb 6 GZ MS130BU_US_IB_ENB indb 6 4 28 2008 11 44 03 AM 4 28 2008 11 44 03 AM ...

Страница 7: ...a created DVD disc pg 28 To edit files on your computer pg 29 LTo perform operations such as forward search or reverse search pg 22 LTo view files on TV pg 25 It is recommended to copy your important recorded data to a DVD or other recording media for storage JVC will not be responsible for any lost data LASER TOUCH OPERATION VIDEO PLAYBACK DIGEST 1 2 NOV 01 2009 04 55PM LASER TOUCH OPERATION PLAY...

Страница 8: ...e to Manual Recording Mode 24 Backlight Compensation 24 Manual Setting Menu 24 USING WITH TV Viewing Files on TV 25 Connection with TV 25 Playback Operation 25 EDITING Managing Files 26 Capture a Still Image from a Video 26 Deleting Files 26 COPYING Copying Files 27 Using a DVD Burner 27 Creating a DVD using a PC 29 Dubbing Files to a VCR DVD Recorder 34 Using with a Portable Media Player 35 Turni...

Страница 9: ...ith the JVC battery and not with other batteries JVC cannot guarantee safety or performance of this product when it is operated by other batteries If the camcorder is subjected to electrostatic discharge turn off the power before using it again If a malfunction occurs stop using the camcorder immediately and contact www jvc com or by phone at 1 800 252 5722 Recorded data may be erased while the ca...

Страница 10: ...x DC NOTE The LCD monitor can rotate 270 Be careful not to cover 4 5 7 and 8 during shooting GETTING STARTED GZ MS130BU_US_IB_ENB indb 10 GZ MS130BU_US_IB_ENB indb 10 4 28 2008 11 44 07 AM 4 28 2008 11 44 07 AM ...

Страница 11: ... 9 Stud Hole Tripod Mounting Socket pg 17 Battery Release Button BATT pg 15 Remote Control Q Infrared Beam Transmitting Window R ZOOM T W Buttons Zoom in out S Up Button T Skip Backward Button U Left Button V Back Button W PLAYLIST Button X START STOP Button Y S SHOT SNAPSHOT Button Z INFO Button a Skip Forward Button b PLAY PAUSE SET Button c Right Button d Next Button e Down Button f INDEX Butto...

Страница 12: ...Control A battery is included inside the remote control at the time of purchase Remove the insulation sheet before use To Reinsert the Battery Pull out the battery holder by pressing the lock tab Beam Effective Area NOTE The transmitted beam may not be effective or may cause incorrect operation when the remote sensor is directly exposed to sunlight or powerful lighting Accessories Release the stop...

Страница 13: ...ator 2 Shutter Speed During Video Recording Only REC 0 0 4 0 1 4h59m PHOTO LIB Mode Indicator EXPORT Mode Indicator pg 35 Counter Upload Mode Indicator pg 36 Video Quality B ULTRA FINE C FINE D NORMAL E ECONOMY Remaining Time MREC Appears during recording MQ Appears during record standby mode Digital Image Stabilizer DIS Indicator Appears when DIS is set to OFF Auto switch record media Shooting In...

Страница 14: ...ch J Reverse Search G Forward Slow Motion E Reverse Slow Motion The number on the left shows speed Battery Indicator Date Time pg 16 Volume Level Indicator During Still Image Playback SD 101 0098 NOV 1 2009 4 55 PM Mode Indicator older File Number Slide Show Playback Indicator Battery Indicator Date Time pg 16 Indications on LCD Monitor Continued GZ MS130BU_US_IB_ENB indb 14 GZ MS130BU_US_IB_ENB i...

Страница 15: ...d the monitor backlight is set to STANDARD mode Battery pack Charging time Recording time BN VF808U Provided 1 hr 50 min 2 hr 45 min BN VF815U 2 hr 40 min 5 hr 25 min BN VF823U 3 hr 40 min 8 hr 10 min LTo detach the battery pack NOTE You can also use the camcorder with just the AC adapter The actual recording time may shorten depending on the recording environment such as when recording scenes wit...

Страница 16: ...vates the function SET FOR DAYLIGHT SAVING TIME SET DAYLIGHT SAVING TIME NOV 1 2009 04 55PM OFF DAYLIGHT SAVING TIME DST SET QUIT 8 Set the date and time Select the item by using the touch sensor and select to set CLOCK SETTING DATE TIME GMT 9 00 NOV 1 2009 4 55 PM SAVE QUIT 9 Select SAVE To reset the setting select QUIT Setting the clock to local time when traveling After performing steps 1 4 5 S...

Страница 17: ...uage on the display can be changed 1 Open the LCD monitor to turn on the camcorder 2 Touch MENU 3 Select DISPLAY SETTINGS CONFIGURE ON SCREEN DISPLAY VIDEO WIND CUT AUTO SWITCH REC MEDIA DISPLAY SETTINGS BASIC SETTINGS SET QUIT 4 Select LANGUAGE ON SCREEN DISPLAY LANGUAGE DISPLAY SETTINGS LANGUAGE CLOCK ADJUST DATE DISPLAY STYLE MONITOR BRIGHT SET QUIT 5 Select the desired language LTo return to t...

Страница 18: ...card cover LTo remove an SD card Push the SD card once After the card comes out a little pull it out Clipped Edge NOTE Insert and remove the SD card only while the power is turned off Otherwise data on the card may be corrupted Do not touch the terminal on the reverse side of the label R Change the recording medium The camcorder is programmed to record on the BUILT IN MEMORY flash when it is shipp...

Страница 19: ... VIDEO QUALITY LTo change the aspect ratio of the image 16 9 4 3 Change the settings in SELECT ASPECT RATIO Slide the mode switch to select video mode NOTE The video recording mode is automatically selected when you turn off the camcorder and then on again If the camcorder is not operated for 5 minutes while the power is on it turns itself off automatically to conserve power After recording video ...

Страница 20: ...S Digital Image Stabilizer does not function during still image recording If the camcorder is not operated for 5 minutes while the power is on it turns itself off automatically to conserve power LTo view the last recorded image Select A after shooting Selecting during playback deletes that image LTo change the picture quality Change the settings in IMAGE QUALITY LTo record still images continuousl...

Страница 21: ...hecking the Remaining Battery Power Preparation Attach the battery pack Press the PLAY REC button to select recording mode For mode Press the INFO button three times or INFO and then select For mode Press INFO DIRECT DVD INFO min BATTERY CONDITION MAX TIME 100 50 0 QUIT LTo return to the normal screen Select QUIT or press INFO NOTE The recordable time display should only be used as a guide It is d...

Страница 22: ...file L Return to the index screen J Reverse search during playback E Frame by frame playback in reverse direction during pause F Playback Q Pause K Forward search during playback G Frame by frame playback in forward direction during pause Slow playback starts when you keep touching the sensor button under E G for a while LSpeaker volume VIDEO PLAYBACK DIGEST 1 2 NOV 1 2009 04 55PM Turn down the vo...

Страница 23: ...a still image Select LTo change the number of thumbnails 6 thumbnails 20 thumbnails Move the zoom lever to T or W LOperations during Still Image Playback On screen buttons P Change playback order of slide show in reverse direction F Change playback order of slide show in forward direction L Return to the index screen N Display the previous file F Start the slide show Q End the slide show O Display...

Страница 24: ...tor is turned upside down is not displayed Change the setting when the LCD monitor is in the normal position Manual Setting Menu In the manual recording mode 1 Touch MENU 2 Select MANUAL SETTING VIDEO USE DETAIL SETTINGS BASED SET QUIT MANUAL SETTING LIGHT VIDEO QUALITY REGISTER EVENT 3 Select the desired menu VIDEO SCENE SELECT FOCUS THE BRIGHTNESS OF THE ADJUST BRIGHTNESS SHUTTER SPEED SET QUIT ...

Страница 25: ...ection with TV is completed 1 Turn on the camcorder and the TV 2 Set the TV to its VIDEO mode 3 Only when connecting the camcorder to the VCR DVD recorder Turn on the VCR DVD recorder and set the VCR DVD recorder to its AUX input mode 4 Start playback on the camcorder p 22 23 Viewing Files on TV AV Input Connector AC Adapter DC Connector AV Connector To AC Outlet AV Cable GZ MS130BU_US_IB_ENB indb...

Страница 26: ...e image can be elongated in the horizontal or vertical directions depending on the quality of the source video file The continuous shooting function cannot be used to capture images You cannot capture video during playback Deleting Files Protected files cannot be deleted To delete them release the protection first Once files are deleted they cannot be restored Check files before deleting Preparati...

Страница 27: ...e used but they need to be formatted before recording Formatting a disc deletes all content recorded on the disc up until that time Dual layer discs cannot be used Regarding finalization after copying The disc is automatically finalized so that it can be played on other devices After finalizing the disc is a play only disc so no more files can be added Connection with a DVD Burner Preparation Turn...

Страница 28: ...EATE appears change the disc Remaining files are copied on the second disc To cancel copying select STOP Copying Video Files that Have Never Been Copied Files that have never been copied to the DVD discs are automatically selected and copied 1 Open the LCD monitor to turn on the camcorder 2 Press the DIRECT DVD DIRECT DVD INFO 3 Select EXECUTE EXECUTE RETURN SET QUIT UNSAVED SCENES READY TO CREATE...

Страница 29: ...Hz or higher RAM At least 512 MB LTo check the PC specification Right click on Computer or My Computer in the Start menu and select Properties NOTE Make sure your PC has a recordable DVD drive If your system does not meet the requirements it is recommended to copy files using the DVD burner p 27 Macintosh users may use the software included with their Macintosh iMovie 08 iPhoto to copy files to th...

Страница 30: ...wser starts on the PC 3 Click All volume in camcorder and click Next 4 Click Start Backup starts LTo disconnect the camcorder from the PC 1 Right click the icon Safely Remove Hardware on the task bar and select Safely remove USB Mass Storage Device 2 Follow the on screen instructions and make sure that the device can be safely removed 3 Disconnect the USB cable and close the LCD monitor NOTE It ta...

Страница 31: ...on the PC 1 Double click icon and open the calendar 2 Select Movies only 3 Click 4 Input the name of the new user list and click OK 5 Double click the recording date The files recorded on the day are displayed 6 Drag the file and drop into the user list To add other files into the user list repeat steps 5 and 6 GZ MS130BU_US_IB_ENB indb 31 GZ MS130BU_US_IB_ENB indb 31 4 28 2008 11 44 24 AM 4 28 20...

Страница 32: ...he bottom and click Next 4 Input the disc name select the top menu style and click Next 5 Click Start NOTE For detail on operating Everio MediaBrowser click Help and refer to MediaBrowser Help Adobe Reader must be installed to read MediaBrowser Help Adobe Reader can be loaded from Adobe s web site http www adobe com For assistance in operating the provided software refer to the support information...

Страница 33: ... this software please have the following information ready Product Name Model Problem Error Message PC Manufacturer Model Desktop Laptop CPU OS Memory MB Available Hard Disk Space GB Please note that it may take some time to respond to your questions depending on their subject matter JVC cannot answer questions regarding basic operation of your PC or questions regarding specifications or performan...

Страница 34: ...3 Select the desired playlist 4 Select YES A black screen is displayed for 5 seconds at the first and the last scene 4 At the point you want to start dubbing start recording on the VCR DVD recorder Refer to the VCR DVD recorder s instruction manual LTo stop dubbing Stop recording on the VCR DVD recorder LTo hide the date or icons on the screen Change the settings in DISPLAY ON TV VCR DVD Recorder ...

Страница 35: ...ORT 2 Select the file and select LIB LIB DONE CHECK EXPORT SETTINGS 1 3 SD LIB LIB To check the content of the file select CHECK ON Transferring the Files to PC Preparation Install iTunes on a PC http www apple com itunes 1 Connect the camcorder to the PC with the USB cable 2 Select EXPORT TO LIBRARY SET QUIT CREATE DVD UPLOAD BACK UP EXPORT TO LIBRARY USB MENU EASY VIDEO REGISTRATION LIB All the ...

Страница 36: ...oad mode turns off each time recording is finished Uploading Files to Websites ON Uploading Files For detalis on uploading files refer to the operation guide of MediaBrowser in the CD ROM 1 Connect the camcorder to the PC with the USB cable 2 Select UPLOAD SET QUIT PLAYBACK ON PC CREATE DVD UPLOAD EXPORT TO LIBRARY USB MENU EASY UPLOAD TO VIDEO LCannot upload the file to YouTube You need your YouT...

Страница 37: ...video file the image stops momentarily or the sound is interrupted at junctions between scenes LCD monitor momentarily become red or black when sunlight is recorded Black spots or red green or blue spots appear on the LCD monitor The LCD monitor contains 99 99 effective pixels but 0 01 of fewer pixels may be ineffective Troubleshooting Trouble Action Power No power is supplied Connect the AC adapt...

Страница 38: ...ry pack charging Check the remaining battery pack charge When the battery pack is fully charged the lamp does not flash When recharging in either a hot or cold environment ensure that battery is being charged within the permitted temperature range If the battery pack is being recharged outside the permitted temperature range recharging may stop to protect the battery pack Cannot upload the file to...

Страница 39: ... all data and then perform formatting All data is deleted MEMORY CARD ERROR Turn off the camcorder and turn it on again Remove and re insert the SD card MultiMediaCard cannot be used Remove any dirt from the SD card terminals Insert the SD card before switching the power on If the problem persists backup all data and then perform formatting All data is deleted CANNOT TAKE MORE STILL IMAGES AT THE ...

Страница 40: ...ED Light Within 1 5 m 4 9 ft recommended shooting distance LFor video Audio Format SD VIDEO Recording Playback format Video MPEG 2 Audio Dolby Digital 2 ch Signal format NTSC standard Recording mode video ULTRA FINE 720 x 480 pixels 8 5 Mbps VBR FINE 720 x 480 pixels 5 5 Mbps VBR NORMAL 720 x 480 pixels 4 2 Mbps VBR ECONOMY 352 x 240 pixels 1 5 Mbps VBR Recording mode audio ULTRA FINE 48 kHz 384 k...

Страница 41: ...0 FINE 1450 2920 5930 9999 9999 9999 9999 9999 640 x 480 STANDARD 2080 4180 8480 9999 9999 9999 9999 9999 4 3 832 x 624 FINE 970 1950 3950 7590 9999 9999 9999 9999 832 x 624 STANDARD 1450 2920 5930 9999 9999 9999 9999 9999 16 9 640 x 360 FINE 1820 3660 7420 9999 9999 9999 9999 9999 640 x 360 STANDARD 2420 4880 9890 9999 9999 9999 9999 9999 The recordable time and the number of still images are app...

Страница 42: ...ol dry place Extended exposure to high temperatures will increase natural discharge and shorten service life fully charge and then fully discharge the battery every 6 months when storing the battery pack over a long period time remove from charger or powered unit when not in use as some machines use current even when switched off ATTENTION The battery you have purchased is recyclable Please call 1...

Страница 43: ... camcorder drops you may be injured and the camcorder may be damaged When a child uses the unit there must be parental guidance Declaration of Conformity Model Number GZ MS130U Trade Name JVC Responsible party JVC AMERICAS CORP Address 1700 Valley Road Wayne N J 07470 Telephone Number 973 317 5000 This device complies with Part 15 of FCC Rules Operation is subject to the following two conditions 1...

Страница 44: ...Setting 17 LCD Monitor 13 42 LED Light 21 M Manual Recording 24 Menu Settings 37 N Number of Images 41 O On screen Recording Control 19 On screen Zoom Control 21 P Portable Media Player 35 Q Quick Review 19 20 R Recordable Time 41 Recording Medium 42 Remaining Battery Power 21 Remaining Recording Time 21 Remote Control 10 11 S SD Card 18 Speaker Volume 22 U Uploding Files 36 USB Cable 27 30 V View...

Страница 45: ...Memo GZ MS130BU_US_IB_SPB indb 1 GZ MS130BU_US_IB_SPB indb 1 5 2 2008 1 43 51 PM 5 2 2008 1 43 51 PM ...

Страница 46: ...ción están bloqueados por un periódico o paño etc el calor no podrá salir No deberá ser colocada en el aparato ninguna fuente de llama sin protección tales como velas encendidas Cuando descarte las pilas deberá considerar los problemas ambientales y respetar estrictamente las normas locales o leyes vigentes para la eliminación de estas pilas La unidad no deberá ser expuesta a goteos ni salpicadura...

Страница 47: ...n está dañado si ocurrió derrame de líquidos o caída de objetos dentro del aparato si el aparato fue expuesto a la lluvia o humedad si no funciona normalmente o sufrió caídas Recuerde que esta videocámara debe usarse únicamente con fines privados Está prohibido cualquier uso comercial sin la autorización correspondiente Aunque grabe acontecimientos tales como espectáculos o exhibiciones para su di...

Страница 48: ...úrese de utilizar baterías de JVC Si se utilizan baterías no pertenecientes a la marca JVC no se podrá garantizar la seguridad ni el rendimiento Ajuste de la correa de mano Ajuste la correa y aprietela Cargue la batería antes de grabar Apague la videocamara y coloque la batería Luz de alimentacion carga Parpadea carga en curso Se apaga carga terminada No retire el adaptador de ca ni la batería o l...

Страница 49: ...videocámara U Seleccione ON si entra en vigor el horario de verano Pantalla LCD AJUSTE AJUSTE FECHA HORA SÍ NO Deslice el dedo hacia arriba y hacia abajo sobre el sensor A continuación toque OK AJUSTE SALIR CONF RELOJ CONF ÁREA CONF PARA HORARIO DE VERANO CONF LA HORA CIUDAD Y HORA AJUS RELOJ SALIR CONF ÁREA AJUSTE NOV 1 2009 04 55PM AJUSTE SALIR CONF PARA HORARIO DE VERANO HORARIO DE VERANO CONF ...

Страница 50: ...bación El modo cambiará cuando pulse el botón 0 04 01 4 h 59 m M Se mostrará el indicador de grabación automática 4 h 59 m 0 04 01 REC Espacio restante en la memoria integrada o en la tarjeta SD Calidad de vídeo Grabación modo de espera Grabación DC Pulse el botón START STOP para iniciar la grabación y púlselo de nuevo para detenerla PLAY REC GZ MS130BU_US_IB_SPB indb 6 GZ MS130BU_US_IB_SPB indb 6...

Страница 51: ...D creado pág 28 Para editar archivos en el ordenador pág 29 LPara llevar a cabo operaciones como la búsqueda hacia delante o hacia atrás pág 22 LPara visualizar archivos en el televisor pág 25 LASER TOUCH OPERATION REPRODUCCIÓN VÍDEO DIGEST 1 2 NOV 01 2009 04 55PM OPERACIÓN TÁCTIL PLAY REC Seleccione F Toque OK Es recomendable que efectúe una copia de sus datos grabados importantes en un DVD u otr...

Страница 52: ... Compensación de contraluz 24 Ajuste manual en el menú 24 USO CON EL TELEVISOR Visualización de archivos en un televisor 25 Conexión con el televisor 25 Operación de reproducción 25 EDICIÓN Gestión de archivos 26 Captura de una imagen fija de un video 26 Eliminación de archivos 26 COPIA Copia de archivos 27 Utilización de una grabadora de DVD 27 Copia de archivos en una grabadora de video DVD 34 U...

Страница 53: ...le que se utilice la videocámara para realizar una demostración de su funcionamiento en el establecimiento de venta el modo de demostración se encuentra activado de manera predeterminada Para desactivar el modo de demostración ajuste MODO DEMO en OFF Cuando utilice una tarjeta SD Las operaciones se confirman en las siguientes tarjetas SD SD o Tarjeta SDHC compatible con Clase 4 o superior Tarjeta ...

Страница 54: ...ndice DC NOTA La pantalla LCD puede girar 270 Procure no tapar 4 5 7 y 8 durante la filmación GETTING STARTED GZ MS130BU_US_IB_SPB indb 10 GZ MS130BU_US_IB_SPB indb 10 5 2 2008 1 44 00 PM 5 2 2008 1 44 00 PM ...

Страница 55: ... estéreo 9 Orificio para perno Zócalo de fijación del trípode p 17 Botón de liberación de la batería BATT p 15 Mando a distancia Q Ventana de transmisión de rayos infrarrojos R Botones ZOOM T W ampliación reducción S Botón Arriba T Botón de saltar hacia atrás U Botón Izquierda V Botón Atrás W Botón PLAYLIST X Botón START STOP Y Botón S SHOT SNAPSHOT Z Botón INFO a Botón de saltar hacia delante b B...

Страница 56: ...se suministra con una pila en su interior en el momento de efectuar la compra Elimine la lámina de aislamiento antes de utilizarlo Libere la traba 3 cm Cable USB gírelo una vez Adaptador de CA gírelo dos veces Área efectiva de la transmisión por infrarrojos NOTA Es posible que la transmisión por infrarrojos no resulte efectiva o que funcione incorrectamente si se expone el sensor remoto directamen...

Страница 57: ...medición 2 Velocidad de obturación Sólo durante la grabación de vídeo REC 0 0 4 0 1 4h59m PHOTO LIB Indicador de modo Indicador del modo de exportación p 35 Contador Indicador de modo de carga p 36 Calidad de vídeo B ULTRAFINA C FINA D NORMAL E ECONÓMICA Tiempo restante MREC Aparece durante la grabación MQ Aparece durante el modo de espera de grabación Indicador de Estabilizador de imagen digital ...

Страница 58: ...a hacia atrás G Cámara lenta hacia adelante E Cámara lenta hacia atrás El número de la izquierda indica la velocidad Indicador de batería Fecha hora p 16 Indicador de nivel de volumen Durante la reproducción de imágenes fijas SD 101 0098 NOV 1 2009 4 55 PM Indicador de modo Número de carpeta o archivo Indicador de reproducción automática de las imágenes Indicador de batería Fecha hora p 16 Indicac...

Страница 59: ...luminoso se encuentra apagado y la luz de fondo del monitor se encuentra ajustada en el modo ESTÁNDAR Batería Tiempo de carga Tiempo de grabación BN VF808U suministrada 1 hr 50 min 2 hr 45 min BN VF815U 2 hr 40 min 5 hr 25 min BN VF823U 3 hr 40 min 8 hr 10 min LPara extraer la batería NOTA La videocámara también puede usarse sólo con el adaptador de CA Es posible que el tiempo de grabación real se...

Страница 60: ...a función CONF PARA HORARIO DE VERANO CONF HORARIO DE VERANO NOV 1 2009 04 55PM OFF HORARIO DE VERANO AJUSTE SALIR 8 Ajuste la fecha y la hora Seleccione el elemento mediante el sensor táctil y seleccione para efectuar el ajuste CONF RELOJ FECHA HORA GMT 9 00 NOV 1 2009 8 54 PM GUARD SALIR 9 Seleccione GUARD Para restaurar el ajuste seleccione SALIR Ajuste del reloj en la hora local durante viajes...

Страница 61: ...uste del idioma El idioma en el que se muestra la información de la pantalla puede cambiarse 1 Abra la pantalla de LCD para encender la videocámara 2 Toque MENÚ 3 Seleccione CONFIG PANTALLA CONFIGURE PARÁ VIS EN VÍDEO SIN VIENTO CAMB AUTO MEDIO GRAB CONFIG PANTALLA CONFIG BÁSICA AJUSTE SALIR 4 Seleccione LANGUAGE EL IDIOMA DE PANT CONFIG PANTALLA LANGUAGE AJUS RELOJ ESTILO INDIC FECHA BRILLO DEL M...

Страница 62: ...rmemente la tarjeta por su lado recortado 3 Cierre la tapa de la tarjeta de memoria SD LPara extraer la tarjeta de memoria SD Presione la tarjeta de memoria SD una vez Cuando la tarjeta se expulse parcialmente extráigala Borde recortado NOTA La tarjeta de memoria SD sólo puede insertarse y extraerse con la cámara apagada De lo contrario los datos de la tarjeta podrían dañarse No toque el terminal ...

Страница 63: ...deo Pulse SNAPSHOT LPara cambiar la calidad de la imagen Cambie los ajustes en CALIDAD DE VÍDEO LPara cambiar la relación de aspecto de la imagen 16 9 4 3 Cambie los ajustes en SELECC REL ASPECTO Deslice el interruptor de modo para seleccionar el modo video NOTA El modo de grabación de vídeo se selecciona automáticamente al apagar y volver a encender la videocámara Si no se realiza ninguna operaci...

Страница 64: ... no funciona durante la grabación de imágenes fijas Si no se realiza ninguna operación durante 5 minutos cuando la videocámara está encendida ésta se apaga automáticamente para ahorrar energía LPara visualizar la última imagen grabada Seleccione A tras tomar la fotografía Si selecciona durante la reproducción se elimina la imagen LPara cambiar la calidad de la imagen Cambie los ajustes en CALIDAD ...

Страница 65: ...esactivar esta función Comprobación de la carga restante de la batería Preparativos Conecte la batería Pulse el boton PLAY REC para seleccel modo de grabacion En el modo Pulse el botón INFO tres veces o INFO y a continuación seleccione En el modo Pulse INFO DIRECT DVD INFO min ESTADO DE LA BATERÍA TIEMPO MÁX 100 50 0 SALIR LPara volver a la pantalla normal Seleccione SALIR o pulse INFO NOTA La vis...

Страница 66: ... archivo L Volver a la pantalla de índice J Búsqueda hacia atrás durante la reproducción E Reproducción fotograma a fotograma hacia atrás durante la pausa F Reproducción Q Pausa K Búsqueda hacia adelante durante la reproducción G Reproducción fotograma a fotograma hacia adelante durante la pausa La reproducción en cámara lenta se inicia al tocar de forma continua el botón del sensor que hay debajo...

Страница 67: ...ione LPara cambiar el número de miniaturas 6 miniaturas 20 miniaturas Mueva la palanca del zoom hacia la posición T o W LOperaciones que se pueden efectuar durante la reproducción de imágenes fijas Botones en pantalla P Permite cambiar el orden de reproducción de las presentaciones de diapositivas a la dirección inversa F Cambiar el orden de reproducción de la reproducción automática hacia adelant...

Страница 68: ... de nuevo NOTA Si se coloca el monitor LCD al revés no se visualizará Cambie el ajuste cuando el monitor LCD se encuentre en posición normal Ajuste manual en el menú En el modo de grabación manual 1 Toque MENU 2 Seleccione AJUSTE MANUAL VÍDEO USE CONFIG DETALLADA BASADA AJUSTE SALIR AJUSTE MANUAL ILUMINACIÓN CALIDAD DE VÍDEO REGISTRAR EVENTO 3 Seleccione el menú que desee VÍDEO SELECC ESCENA FOCUS...

Страница 69: ... Una vez completada la conexión con el televisor 1 Encienda la videocámara y el televisor 2 Ajuste el televisor en el modo de vídeo 3 Sólo cuando se conecta la videocámara a la grabadora de vídeo o de DVD Encienda la videograbadora o la grabadora de DVD y ajústelas en el modo de entrada AUX 4 Inicie la reproducción en la videocámara p 22 23 Visualización de archivos en el televisor Conector de ent...

Страница 70: ...argar en sentido horizontal o vertical dependiendo de la calidad del archivo de vídeo de origen La función de toma de imágenes continua no puede utilizarse para capturar imágenes No es posible capturar vídeo durante la reproducción Eliminación de archivos Los archivos protegidos no se pueden eliminar Para eliminarlos primero debe anular la protección Una vez eliminados los archivos no se pueden re...

Страница 71: ...ecesario formatearlos antes de efectuar la grabación Al formatear un disco se elimina todo el contenido grabado en este hasta el momento No es posible utilizar discos de doble capa Acerca de la finalización una vez finalizada la copia Los discos se finalizan automáticamente para poder ser reproducidos en otros dispositivos Una vez efectuada la finalización el disco pasará a ser de solo reproducció...

Страница 72: ...NDONAR LA CREACIÓN cambie el disco Los archivos restantes se copiarán en el segundo disco Para cancelar la copia seleccione CANCELAR Copia de archivos de vídeo que nunca se hayan copiado Los archivos que nunca se hayan copiado en un disco DVD se seleccionan y copian automáticamente 1 Abra la pantalla de LCD para encender la videocámara 2 Pulse el botón DIRECT DVD DIRECT DVD INFO 3 Seleccione EJECU...

Страница 73: ...ificaciones del PC Haga clic con el botón secundario del ratón en Equipo o Mi PC en el menú Inicio y seleccione Propiedades NOTA Asegúrese de que su ordenador disponga de una unidad de DVD con capacidad de grabación Si el sistema no cumple los requisitos es recomendable copiar los archivos mediante la grabadora de DVD p 27 Los usuarios de Macintosh podrán utilizar el software incluido con su orden...

Страница 74: ...clic en Todo el volumen en la videocamara y en Proximo 4 Haga clic en Comienzo Se iniciará la copia de seguridad LPara desconectar la videocámara del ordenador 1 Haga clic con el botón derecho del ratón Quitar hardware de forma segura en la barra de herramientas y seleccione Safely remove USB Mass Storage Device 2 Siga las instrucciones en pantalla y asegúrese de que el dispositivo pueda desconect...

Страница 75: ...rativos Realice la copia de seguridad en el ordenador 1 Haga doble clic en el icono y abra el calendario 2 Seleccione Solo filmes 3 Haga clic en 4 Introduzca el nombre de la nueva lista de usuarios y haga clic en Aceptar 5 Haga doble clic en la fecha de grabación Se visualizarán los archivos grabados en el día seleccionado 6 Arrastre el archivo y suéltelo en la lista de usuarios Para añadir otros ...

Страница 76: ... y haga clic en Proximo 4 Escriba el nombre del disco seleccione el estilo del menu superior y haga clic en Proximo 5 Haga clic en Comienzo NOTA Para obtener informacion detallada sobre el funcionamiento de Everio MediaBrowser haga clic en Ayuda y consulte Ayuda de MediaBrowser Adobe Reader debe estar instalado para poder leer Ayuda de MediaBrowser Adobe Reader puede cargarse desde el sitio web de...

Страница 77: ...s internacional JVC en http www jvc victor co jp english worldmap index e html para hacer consultas sobre este software tenga a mano la siguiente información Nombre del producto modelo problema mensaje de error PC fabricante modelo sobremesa portátil CPU sistema operativo memoria MB espacio disponible en el disco duro GB Tenga en cuenta que puede tardar un poco responder a sus preguntas según cuál...

Страница 78: ...one la lista de reproducción que desee 4 Seleccione SÍ Se visualizará una pantalla en negro durante 5 segundos en la primera y en la última escena 4 En el punto donde desee iniciar la copia inicie la grabación en la grabadora de vídeo o de DVD Consulte el manual de instrucciones de la grabadora de vídeo o de DVD LPara detener la copia Detenga la grabación en la videograbadora o en la grabadora de ...

Страница 79: ...LAY REC para seleccionar el modo de reproducción 1 Pulse EXPORT EXPORT ON 2 Seleccione el archivo y a continuación LIB LIB SALIR CHECK CONF EXPORT 1 3 SD LIB LIB Para comprobar el contenido del archivo seleccione CHECK 3 Seleccione SALIR L Para cancelar el ajuste de la exportación Seleccione el archivo y pulse LIB de nuevo L Para salir de la pantalla 1 Seleccione SALIR 2 Seleccione SÍ Transferenci...

Страница 80: ...D NOTA El modo de carga se desactivará cada vez que se finalice la grabación Carga de archivos a sitios web ON Carga de archivos Para obtener más información acerca de la carga de archivos consulte el manual de instrucciones del software MediaBrowser contenido en el CD ROM 1 Conecte la videocámara al ordenador mediante un cable USB 2 Seleccione CARGAR AJUSTE SALIR REPRODUCIR EN PC CREAR DVD CARGAR...

Страница 81: ...apso prolongado La batería se calienta durante la carga Cuando se reproduce un archivo de vídeo la imagen se detiene momentáneamente o el sonido se interrumpe en las uniones entre escenas El monitor LCD se visualiza momentáneamente de color rojo o negro cuando se graba la luz del sol Aparecen unos puntos negros rojos verdes o azules en el monitor LCD El monitor LCD contiene el 99 99 de píxeles efe...

Страница 82: ...icador no parpadea durante la carga de la batería Compruebe la carga restante de la batería Cuando la batería está completamente cargada el indicador deja de parpadear Cuando efectúe la carga en un ambiente cálido o frío asegúrese de que la batería se esté cargando dentro del intervalo de temperatura permitido En caso de que la carga se esté efectuando fuera del intervalo de temperatura recomendad...

Страница 83: ... todos los datos y a continuación formatee la unidad se borrarán todos los datos ERROR EN TARJETA DE MEMORIA Apague la videocámara y vuelva a conectarla Extraiga y vuelva a insertar la tarjeta SD No se pueden utilizar tarjetas MultiMedia Card Limpie la suciedad de los terminales de la tarjeta SD Introduzca la tarjeta SD antes de activar la alimentación Si el problema persiste realice una copia de ...

Страница 84: ...edida diagonal de 2 7 Luz LED Dentro de 1 5 m distancia de filmación recomendada LPara vídeo audio Formato SD VIDEO Formato de grabación reproducción Vídeo MPEG 2 Audio Dolby Digital 2 canales Formato de señal NTSC estándar Modo de grabación vídeo ULTRAFINA 720 x 480 píxeles 8 5 Mbps VBR FINA 720 x 480 píxeles 5 5 Mbps VBR NORMAL 720 x 480 píxeles 4 2 Mbps VBR ECONÓMICA 352 x 240 píxeles 1 5 Mbps ...

Страница 85: ...B 16 GB 32 GB 4 3 640 x 480 FINA 1450 2920 5930 9999 9999 9999 9999 9999 640 x 480 ESTÁNDAR 2080 4180 8480 9999 9999 9999 9999 9999 4 3 832 x 624 FINA 970 1950 3950 7590 9999 9999 9999 9999 832 x 624 ESTÁNDAR 1450 2920 5930 9999 9999 9999 9999 9999 16 9 640 x 360 FINA 1820 3660 7420 9999 9999 9999 9999 9999 640 x 360 ESTÁNDAR 2420 4880 9890 9999 9999 9999 9999 9999 El tiempo de grabación y el núme...

Страница 86: ...pleta guárdela en lugar fresco y seco La exposición prolongada a temperaturas elevadas aumentará la descarga natural y reducirá el periodo de vida útil se debe cargar totalmente y luego descargar totalmente la batería cada seis meses cuando se guarde durante un periodo de tiempo prolongado cuando no se utilice se debe retirar del cargador o dispositivo eléctrico ya que algunas máquinas utilizan co...

Страница 87: ...mara con ésta dentro Para evitar que la unidad se caiga Ajuste bien la correa de mano Si utiliza la videocámara con un trípode fije la videocámara en el trípode de forma segura Si la videocámara se cae usted puede herirse y la videocámara puede dañarse Si un niño utiliza la unidad un adulto deberá guiarle Declaración de conformidad Número de modelo GZ MS130U Nombre comercial JVC Parte responsable ...

Страница 88: ...televisor 25 Volumen del altavoz 22 Y YouTube 36 Z Zoom 21 A Adaptador de CA 15 42 Ajuste de la fecha hora 16 Ajuste del idioma 17 Ajuste del reloj 16 B Batería 15 42 C Cable USB 27 30 Carga de archivos 36 Carga restante de la batería 21 CD ROM 12 29 Compensación de contraluz 24 Conexión AV 25 34 Configuraciones de menús 37 Control de grabación en pantalla 19 Control de zoom en pantalla 21 Copia d...

Отзывы: