background image

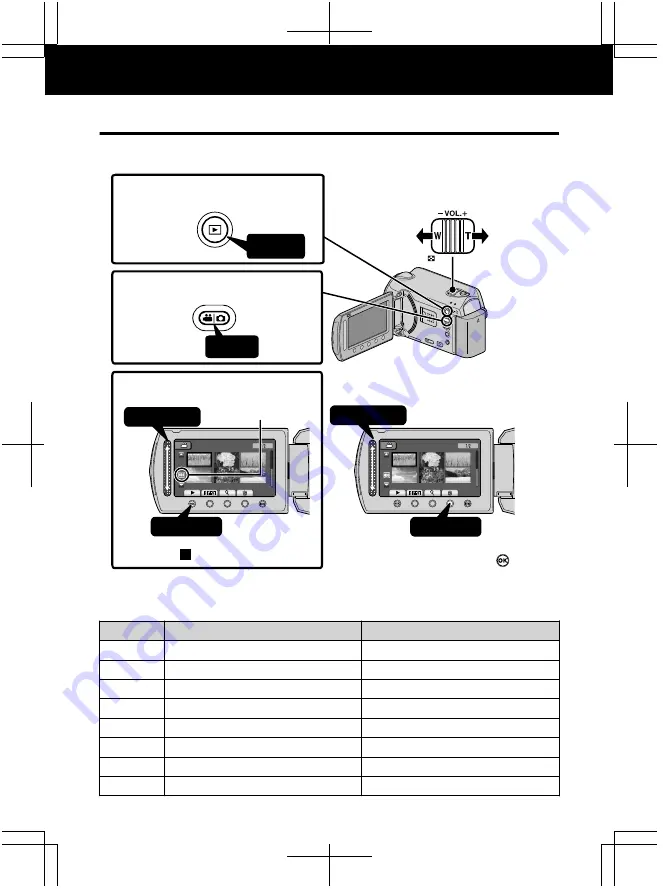
Playing Back/Deleting Files on this Unit

Select and play back the recorded videos or still images from an index screen
(thumbnail display). The contents of the media selected in media settings ( P.13) are
displayed on the index screen.

AV

NOV

.

01

.

2009 04

:

55PM

NOV

.

01

.

2009 04

:

55PM

01

.

01

.

2010 16

:

55

01

.

01

.

2010 16

:

55

VIDEO PLAYBACK

VIDEO PLAYBACK

1

2

1

2

Select

Touch

Select

Touch

Press

Press

3

 Play back a file

.

1

 Select the playback

m

ode

.

Volu

m

e ad

j

ust

m

ent

dur

i

ng v

i

deo playback

Turn up
the volume

Turn down
the volume

2

 Select v

i

deo or st

i

ll

im

age

m

ode

.

To delete unwanted files

Touch

 to stop.

Select “YES” when the confirmation
message appears and touch 

.

Media being
played back

To capture a still image during playback

Pause the playback and press the SNAPSHOT button.

Usable operation buttons during playback

Display

During video playback

During still image playback

 / 

Playback/pause

Start/pause slideshow

Stop (returns to thumbnail display)

Stop (returns to thumbnail display)

Advances to the next video

Advances to the next still image

Returns to the beginning of the scene

Returns to the previous still image

!

Forward search

-

"

Reverse search

-

$

Forward slow-motion

-

%

Reverse slow-motion

-

Playback

14

For more information, refer to the Detailed User Guide
http://manual.jvc.co.jp/index.html/

Содержание Everio GZ-HD500SEK

Страница 1: ...use of this product Some features explained in this manual only apply to the specific camera model identified This product comes with a Basic User Guide this manual and a Detailed User Guide Detailed User Guide Explains the ways of shooting in various situations and the useful features Access the following website on your PC http manual jvc co jp index html Getting Started Recording Playback Copyi...

Страница 2: ...t be exposed to excessive heat such as direct sunlight fire or the Iike CAUTION The mains plug shall remain readily operable Remove the mains plug immediately if this unit functions abnormally a shelf make sure that it has sufficient space on all sides to allow for ventilation 10 cm or more on both sides on top and at the rear Do not block the ventilation holes If the ventilation holes are blocked...

Страница 3: ...OVE ALL NEVER let anyone especially children push anything into holes slots or any other opening in the case this could result in a fatal electrical shock NEVER guess or take chances with electrical equipment of any kind it is better to be safe than sorry Fire or injury may result if batteries NOT approved by JVC are used Only use the batteries specified on page 19 Please do not pull or bend the A...

Страница 4: ...e on your PC to find out more about the advanced operations Access the following address on your PC http manual jvc co jp index html Verifying the Accessories AC Adapter AP V30M Power Cord Battery Pack BN VG114E USB Cable Type A Mini Type B AV Cable Basic User Guide this manual Core Filter CD ROM Remote Control RM V760 Lithium Battery Pre installed in the remote control Component Cable Lens Cap GZ...

Страница 5: ...odes P UPLOAD EXPORT Upload Export to iTunes Button Recording Takes videos in YouTube or iTunes format Playback Changes the video to YouTube or iTunes format Q Power Information Button Recording Displays the remaining time as well as the battery power during continuous recording Playback Displays file information Press and hold to turn the power on off while the LCD monitor is opened R AV Terminal...

Страница 6: ...battery packs If you use any other battery packs besides JVC battery packs safety and performance cannot be guaranteed Charging time Approx 2 h 30 m using supplied battery pack The charging time is when the unit is used at 25 C If the battery pack is charged outside the room temperature range of 10 C 35 C charging may take a longer time or it may not start The recordable and playable time may also...

Страница 7: ...ces interference Connect the end of the cable with the core filter to this unit Release the stopper To be connected to this unit Wind twice 3 cm Attaching the Lens Cap GZ HD500 GZ HD510 Damage may occur to the lens if this unit is stored without the lens cap attached CAUTION Please be careful not to lose the lens cap For more information refer to the Detailed User Guide http manual jvc co jp index...

Страница 8: ...e the cursor 4 After setting the date and time touch 5 Select the region where you live and touch The city name and time difference is displayed GMT 1 1 2010 10 00 CLOCK AREA SETTING SAVE QUIT NOTE Touch the slider and buttons around the screen with your fingers The slider and buttons do not function if you touch them with your fingernails or with gloves on The displays on the screen do not work e...

Страница 9: ...s steps 3 5 on the previous page To change the display language The language on the display can be changed Display the menu Touch Select DISPLAY SETTINGS and touch VIDEO DISPLAY SETTINGS CLOCK ADJUST BASIC SETTINGS CONNECTION SETTINGS SET QUIT 9 0 76 Select LANGUAGE and touch DISPLAY SETTINGS LANGUAGE DATE DISPLAY STYLE MONITOR BRIGHTNESS LCD BACKLIGHT FOCUS ASSIST COLOR SET QUIT Select the desire...

Страница 10: ... mode changes between auto and manual with every touch 4Start recording Press again to stop Wide angle Telephoto Zooming For remove the lens cap Indications during video recording Remaining Recording Time Video Quality Record Standby Scene Counter Battery Indicator Recording in Progress Recording Media SD Card Hard Disk NOTE GZ HD500 GZ HD5 0 1 10 For more information refer to the Detailed User Gu...

Страница 11: ...hooting a subject of little movement with the unit on a tripod Complete stabilization may not be possible if camera shake is excessive Still Image Recording AV Press halfway Press fully Press Lights up during still image recording 1 Select still image mode 3 Take a still image 2 Set the focus on the subject Lights up in green when focused Indications during still image recording 1920 SD Card Hard ...

Страница 12: ...ase Turn off the power of this unit before inserting or removing a card To remove the microSD card Push the card inward once then pull it out straight AV Base NOTE Operations are confirmed on the following microSD cards Manufacturer Panasonic TOSHIBA SanDisk ATP Video Class 4 or higher compatible microSDHC card 4 GB to 8 GB Still Image microSD card 256 MB to 2 GB microSDHC card 4 GB to 8 GB Using ...

Страница 13: ...QUIT HDD To use microSD cards that have been used on other devices Format initialize the card using FORMAT SD CARD from media settings All data on the card will be deleted when it is formatted Copy all files on the card to a PC before formatting Touch to display the menu Select MEDIA SETTINGS with the slider and touch Select FORMAT SD CARD and touch MEDIA SETTINGS REC MEDIA FOR VIDEO REC MEDIA FOR...

Страница 14: ...l image mode To delete unwanted files Touch to stop Select YES when the confirmation message appears and touch Media being played back To capture a still image during playback Pause the playback and press the SNAPSHOT button Usable operation buttons during playback Display During video playback During still image playback Playback pause Start pause slideshow Stop returns to thumbnail display Stop r...

Страница 15: ...able Optional To connect using the COMPONENT AV connector If you are using an HDTV you can play back in HD quality by connecting to the COMPONENT terminal AV AV Y CB PB CR PR Green Blue Red Component Video Input Video Input To COMPONENT Terminal TV Video Input Audio Input L Audio Input R White Yellow Red To AV Terminal AV Cable Provided Component Cable Provided for GZ HD620 only Do not connect the...

Страница 16: ...ar on the TV properly Disconnect the cable and connect again Restart this unit by turning off and on The colour of images looks strange When the video was recorded with x v Color set to ON set the x v Colour setting of the TV to on Adjust the TV s screen accordingly NOTE Please contact the TV manufacturer on questions or problems with setting the TV to the correct mode We recommend using the Categ...

Страница 17: ... the playback mode Turn on this unit AV Press 3 Prepare to record Preparation on TV and VCR DVD recorder Switch to a compatible external input Insert compatible blank DVD or VHS to dub Preparation on this unit Set VIDEO OUTPUT in the connection settings menu to the aspect ratio 4 3 or 16 9 of the connecting TV To include the date during dubbing set DISPLAY ON TV in the CONNECTION SETTINGS menu to ...

Страница 18: ...e please have the following information ready Product Name Model Serial Number Problem Error Message PC Manufacturer Model Desktop Laptop CPU OS Memory MB GB Available Hard Disk Space GB Please note that it may take some time to respond to your questions depending on their subject matter JVC cannot answer questions regarding basic operation of your PC or questions regarding specifications or perfor...

Страница 19: ...0 4360 8700 9999 640 480 FINE 1710 3330 6680 9999 9999 9999 640 480 STANDARD 3090 5990 9999 9999 9999 9999 Up to 9999 still images may be recorded on the HDD regardless of image size and quality Approximate Recording Time Using Battery Battery Pack Approximate Charging Time Actual Recording Time Continuous Recording Time BN VG114E 2 h 30 m 45 m 1 h 20 m BN VG121E 3 h 30 m 1 h 10 m 2 h 5 m The abov...

Страница 20: ...wer Close the LCD monitor Remove the AC adapter and battery pack from this unit reattach them and turn on the power again Troubleshooting Trouble Action Page Power POWER CHARGE lamp starts blinking when the monitor is closed The battery pack is being charged 6 Recording Recording snapshot cannot be performed Check the mode 5 Set to the recording mode with the button 14 Recording stops by itself Tu...

Страница 21: ...ck charging Check the remaining battery power When the battery pack is fully charged the lamp does not flash 10 When charging in either a hot or cold environment ensure that battery is being charged within the permitted temperature range Otherwise charging may stop to protect the battery pack 6 The slider and operation buttons do not work Remove any gloves Touch the slider and buttons with your fi...

Страница 22: ...B Turn off and on this unit again HDMI CEC functions do not work properly and the TV does not work in conjunction with this unit Some TVs may operate differently depending on the specifications even if they are HDMI CEC compliant Therefore the HDMI CEC function of this unit cannot be guaranteed to operate in combination with all TVs In such cases set HDMI CONTROL to OFF 22 For more information ref...

Страница 23: ...a video recording is stopped with the actual recording time displayed at 0 00 00 17 and below the video cannot be saved HDD ERROR Turn off and on this unit again Format the HDD by executing FORMAT HDD in the media settings menu All data is deleted MEMORY CARD ERROR Turn off and on this unit again Remove the AC adapter and battery pack then remove and re insert the microSD card Remove any dirt from...

Страница 24: ...o not bend or drop the recording medium or subject it to strong pressure jolts or vibrations Do not splash the recording medium with water Do not use replace or store the recording medium in locations that are exposed to strong static electricity or electrical noise Do not turn off this unit s power or remove the battery or AC adapter during shooting playback or when otherwise accessing the record...

Страница 25: ...b below the symbol for batteries indicates that this battery contains lead European Union These symbols indicate that the electrical and electronic equipment and the battery with this symbol should not be disposed of as general household waste at its end of life Instead the products should be handed over to the applicable collection points for the recycling of electrical and electronic equipment a...

Страница 26: ...ge 4 3 870 000 to 1 040 000 pixels 16 9 1 160 000 to 1 380 000 pixels 4 3 560 000 to 820 000 pixels 16 9 750 000 to 1 090 000 pixels Lens F1 8 4 7 f 3 0 mm to 90 0 mm 35 mm conversion 43 7 mm to 1311 mm F1 8 3 5 f 3 0 mm to 60 0 mm 35 mm conversion 46 4 mm to 928 mm Zoom Video Optical zoom Up to 30x Digital zoom Up to 200x Optical zoom Up to 20x Digital zoom Up to 200x Zoom Still image Optical zoo...

Страница 27: ...rd and AC plug Mass Approx 112 g When using the AC adapter overseas please prepare a commercially available converter plug for the country or region of visit The specifications and appearance of this product are subject to changes for further improvement without prior notice For more information refer to the Detailed User Guide http manual jvc co jp index html 27 Getting Started Recording Playback...

Страница 28: ...7 D Date Time Setting 8 Deleting Files 14 F Format SD Card 13 L Language Setting 9 LCD Monitor 24 M Menu Settings 18 N Number of Images 19 R Recordable Time 19 Recording Media for Image 13 S SD Card 12 19 V Viewing Files on TV 15 Z Zoom 10 1209MZR SW MD EK 2009 Victor Company of Japan Limited ...

Отзывы: