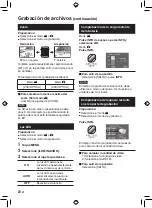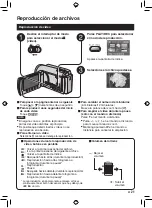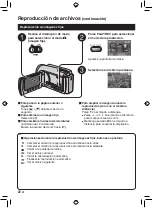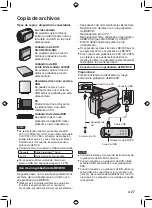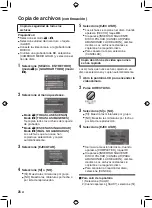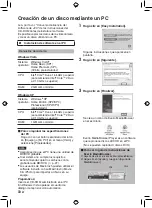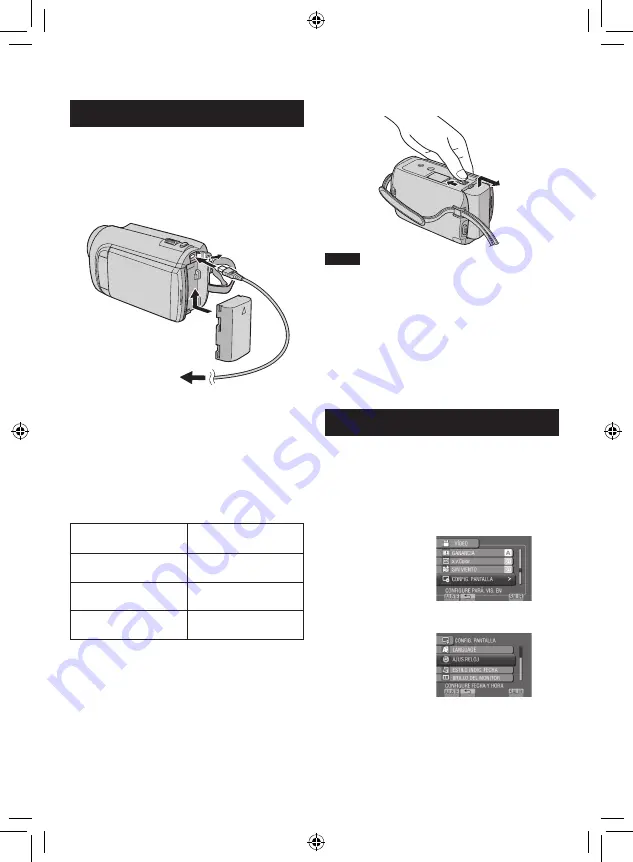
background image

1

SP

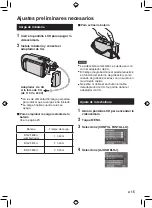
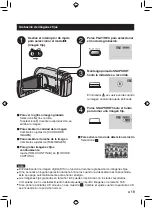
Ajustes preliminares necesarios

Carga de la batería

1

  Cierre la pantalla LCD para apagar la 

videocámara.

2

  Instale la batería y conecte el 

adaptador de CA.

 La luz de alimentación/carga parpadea 

para indicar que la carga se ha iniciado.

 La carga finaliza cuando la luz se 

apaga.

Para comprobar la carga restante de la 

batería

Vea la página 20.

Batería

Tiempo de carga

BN-VF808U 

(suministrada)

1 h 50 m

BN-VF815U

2 h 40 m

BN-VF823U

3 h 40 m

Para extraer la batería

NOTA

 La videocámara también se puede usar con 

sólo el adaptador de CA.

 El tiempo de grabación real puede reducirse 

en función del entorno de grabación, como 

cuando se graban escenas con un sujeto en 

movimiento rápido.

 No estire ni doble el enchufe o el cable 

del adaptador de CA. Se podría dañar el 

adaptador de CA.

Ajuste de la fecha/hora

1

  Abra la pantalla LCD para encender la 

videocámara.

2

  Toque MENU.

3

  Seleccione [CONFIG. PANTALLA].

4

  Seleccione [AJUS.RELOJ].

Adaptador  de  CA

A la toma de CA

(de 110 V a 240 V)

Содержание Everio GZ-HD300

Страница 1: ...ce Enter the Model No located on the bottom of the camcorder and Serial No located on the battery pack mount of the camcorder below Model No Serial No Apreciado cliente Muchas gracias por haber adquirido esta cámara con disco duro integrado Antes de usarla lea la información de seguridad y las precauciones contenidas en las páginas 2 y 3 para garantizar un uso seguro de este producto Para futuras ...

Страница 2: ...ent is installed in a cabinet or on a shelf make sure that it has sufficient space on all sides to allow for ventilation 10 cm 3 15 16 or more on both sides on top and at the rear Do not block the ventilation holes If the ventilation holes are blocked by a newspaper or cloth etc the heat may not be able to get out No naked flame sources such as lighted candles should be placed on the apparatus Whe...

Страница 3: ...ture does not operate normally or has been dropped Remember that this camcorder is intended for private consumer use only Any commercial use without proper permission is prohibited Even if you record an event such as a show performance or exhibition for personal enjoyment it is strongly recommended that you obtain permission beforehand Trademarks AVCHD and the AVCHD logo are trademarks of Panasoni...

Страница 4: ...tment Adjust the strap and fasten Fasten the strap when you grip the camcorder When carrying the camcorder please be careful not to drop it Grip Strap Fasten Power charge lamp blinks Charging goes out Charging finished Battery Pack AC Adapter To AC Outlet 110V to 240V Open the cover The battery pack is not charged at the time of purchase Access lamp blinks Accessing files Do not remove the AC adap...

Страница 5: ... for at least 2 seconds Touch the sensors with your finger The sensors do not function if you touch them with your finger nail or with gloves on S Select CLOCK SETTING T Select the city closest to the area where you use the camcorder U Select ON if daylight saving time is effective V Set the date and time Slide your finger up and down on the sensor Then touch OK Touch sensor Sets the date and time...

Страница 6: ...S Start recording Press the START STOP button to start recording and press it again to stop Remaining space on the hard disk Video Quality Record standby Recording Q Slide the mode switch to select video mode R Select recording mode The mode changes when you press the button The auto recording indicator appears ...

Страница 7: ...p 24 CAUTION Do not forget to make copies after recording To copy files onto discs Z p 27 To dub files to a VCR DVD recorder Z p 29 To edit files on your computer Z p 30 Q Select playback mode The mode changes when you press the button R Select the desired file Index screen S Select F Touch OK Playback screen ...

Страница 8: ...22 Manual Recording 23 Changing to Manual Recording Mode 23 Manual Setting in Menu 23 USING WITH TV Viewing Files on TV 24 Connection with TV 24 Playback Operation 25 EDITING Managing Files 26 Capturing a Still Image from a Video 26 Deleting Files 26 COPYING Copying Files 27 Using a BD DVD Burner 27 Dubbing Files to a VCR DVD Recorder 29 PC OPERATION Creating a Disc Using a PC 30 Using with a Port...

Страница 9: ...again If a malfunction occurs stop using the camcorder immediately and contact www jvc com or by phone at 1 800 252 5722 Recorded data may be erased while the camcorder is being repaired or inspected Back up all data before requesting repairs or inspections Because camcorders may be used for demonstration in a shop the demonstration mode is set to on by default To deactivate the demonstration mode...

Страница 10: ...10 EN Index NOTE Be careful not to cover 3 4 5 and 6 during shooting The LCD monitor can rotate 270 GETTING STARTED ...

Страница 11: ...he screw and then rotate the camcorder clockwise to mount it to the tripod NOTE Do not use a tripod on unsteady or unlevel surfaces It could tip over causing serious damage to the camcorder Camcorder Power Button HDMI Mini Connector Z p 24 Component Connector Z p 24 DISPLAY Button Z p 13 Speaker Ventilation hole Zoom Lever Z p 20 Speaker Volume Control SNAPSHOT Button Z p 19 Touch Sensor OK Button...

Страница 12: ...Focus Adjustment Indicator 1 Backlight Compensation Indicator 2 Brightness Control Indicator Photometry Area Control Indicator 3 Shutter Speed During Video Recording Only Mode Indicator EXPORT Mode Indicator Z p 35 Counter Upload Mode Indicator Z p 36 Video Quality Remaining Time MREC Appears during recording MQ Appears during record standby mode Digital Image Stabilizer DIS Indicator Appears when...

Страница 13: ... shows speed Battery Indicator Date Time Z p 15 Volume Level Indicator x v Color Output with 1080p During Still Image Playback 4 55 PM NOV 1 2009 Mode Indicator Quick Review Indicator Z p 19 Folder File Number Slide Show Playback Indicator Battery Indicator Date Time Z p 15 Output with 1080p Switching indication modes on LCD monitor Each time you touch DISPLAY indications on LCD monitor switch as ...

Страница 14: ...t operation when the remote sensor is directly exposed to sunlight or powerful lighting Pull out the battery holder by pressing the lock tab Effective distance Max 5 m 16 ft Remote Sensor Lock Tab Lithium Battery CR2025 AP V20U BN VF808U AC Adapter Battery Pack Component Cable AV Cable RM V751U CR2025 USB Cable Remote Control Lithium Battery Pre installed in the remote control CD ROM NOTE Make sur...

Страница 15: ... time BN VF808U Provided 1 h 50 m BN VF815U 2 h 40 m BN VF823U 3 h 40 m To detach the battery pack NOTE You can also use the camcorder with just the AC adapter The actual recording time may shorten depending on the recording environment such as when recording scenes with fast moving subject Please do not pull or bend the AC adapter plug and cable This may damage the AC adapter Date Time Setting 1 ...

Страница 16: ...4 Z p 15 5 Select AREA SETTING 6 Select the city closest to the area you are traveling To return to the previous screen Select To quit the screen Select QUIT Language Setting The language on the display can be changed 1 Open the LCD monitor to turn on the camcorder 2 Touch MENU 3 Select DISPLAY SETTINGS 4 Select LANGUAGE 5 Select the desired language To return to the previous screen Select To quit...

Страница 17: ...MediaCards are not supported Video data may not be recorded onto the microSD cards on which video data have already been recorded using the devices from other manufacturers Insert a microSD card Preparation Close the LCD monitor to turn off the camcorder 1 Open the microSD card cover 2 Firmly insert the card with its clipped edge first 3 Close the microSD card cover To remove a microSD card Push t...

Страница 18: ...he mode switch to select video mode NOTE The video recording mode is automatically selected when you turn off the camcorder and then turn on again If the camcorder is not operated for 5 minutes while the power is on it turns itself off automatically to conserve power Do not move or shake the camcorder suddenly during recording If you do so the driving sound hum of the hard disk may be recorded If ...

Страница 19: ... The sides of still images recorded in 16 9 size may be cut off when printed Check whether 16 9 size prints can be printed at your local print store If the LCD monitor is turned upside down is not displayed Change the setting when the LCD monitor is in the normal position Still Image Recording To view the last recorded image Select A after shooting Selecting during playback deletes that image To c...

Страница 20: ... Select LIGHT 3 Select the desired setting ON The LED light remains on regardless of the surrounding conditions AUTO The LED light turns on automatically when shooting in insufficient light conditions OFF Deactivates this function Checking the Remaining Battery Power mode Press INFO twice or INFO and then select mode Press INFO To quit the screen Select QUIT or press INFO NOTE The recordable time ...

Страница 21: ...d To change the number of thumbnails 6 thumbnails 12 thumbnails Move the zoom lever to W To zoom in the video during pause Remote Control Only Press T on the remote control Press on the remote control to move the zoom area Press and hold W on the remote control to cancel zoom in Operations during Video Playback On screen buttons N Return to the first scene of the file O Go to the first scene of th...

Страница 22: ...m in the image during playback Remote Control Only Press T on the remote control Press on the remote control to move the zoom area Press and hold W on the remote control to cancel zoom in Still Image Playback Operations during Still Image Playback On screen buttons P Change playback order of slide show in reverse direction F Change playback order of slide show in forward direction L Return to the ...

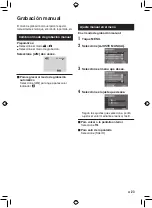
Страница 23: ... return to the auto recording mode Select A M so that the indicator appears Manual Setting in Menu In the manual recording mode 1 Touch MENU 2 Select MANUAL SETTING 3 Select the desired menu 4 Select the desired setting Depending on the kind of settings you select you can set the value by using the touch sensor To return to the previous screen Select To quit the screen Select QUIT Manual Recording...

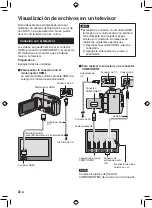
Страница 24: ...MI cable the image or sound may not appear on the TV properly depending on the TV connected In such cases perform the following operations 1 Disconnect the HDMI cable and connect it again 2 Turn off and on the camcorder again To connect using the COMPONENT connector COMPONENT NOTE Change the settings in COMPONENT OUTPUT according to the connection Viewing Files on TV USING WITH TV HDMI Mini Connec...

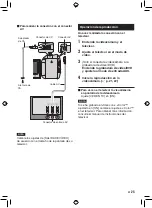
Страница 25: ... connecting the camcorder to the VCR DVD recorder Turn on the VCR DVD recorder and set the VCR DVD recorder to its AUX input mode 4 Start playback on the camcorder Z p 21 22 To display camcorder s on screen display on TV Set DISPLAY ON TV to ON NOTE When the video was recorded with x v Color set to ON change the x v Color setting on TV For details refer to the TV s instruction manual AV Cable DC C...

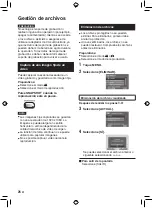
Страница 26: ...ack mode Press SNAPSHOT when playback is paused NOTE Captured still images are stored at a resolution of 1920 x 1080 The image can be elongated in the horizontal or vertical directions depending on the quality of the source video file The continuous shooting function cannot be used to capture images You cannot capture video during playback Deleting Files Protected files cannot be deleted To delete...

Страница 27: ...nnot be used Using a BD DVD Burner The files in the camcorder can be backed up to a disc using a BD DVD burner Use one of the following methods to view the disc If you try to play back the disc with incompatible player the disc may not be ejected Playback the disc using the camcorder Playback the disc using a BD DVD burner Playback on a PC Playback the disc using a BD DVD player that supports BD M...

Страница 28: ...he disc When COMPLETED appears touch OK When INSERT NEXT DISC PRESS STOP TO EXIT CREATE appears change the disc Remaining files are copied on the second disc To cancel copying select STOP Copying Video Files that Have Never Been Copied Files that have never been copied to the discs are automatically selected and copied 1 Open the LCD monitor to turn on the camcorder 2 Press DIRECT DISC 3 Select YE...

Страница 29: ...played for 5 seconds at the first and the last scene 4 At the point you want to start dubbing start recording on the VCR DVD recorder Refer to the VCR DVD recorder s instruction manual To stop dubbing Stop recording on the VCR DVD recorder To hide the date or icons on the screen Change the settings in DISPLAY ON TV Switching indication modes on LCD monitor Each time you touch DISPLAY indications o...

Страница 30: ... or My Computer in the Start menu and select Properties NOTE Make sure your PC has a recordable BD DVD drive If your system does not meet the requirements it is recommended to copy files using the BD DVD burner Z p 27 Macintosh users may use the software included with their Macintosh iMovie 08 iPhoto to import files to their computer Preparation Load the provided CD ROM into the PC In Windows Vist...

Страница 31: ...r starts on the PC 3 Click All volume in camcorder and click Next 4 Click Start Backup starts To disconnect the camcorder from the PC 1 Right click the icon Safely Remove Hardware on the task bar and select Safely remove USB Mass Storage Device 2 Follow the on screen instructions and make sure that the device can be safely removed 3 Disconnect the USB cable and close the LCD monitor NOTE It takes ...

Страница 32: ...r list Preparation Make backup on the PC 1 Double click the icon and open the calendar 2 Select Movies only 3 Click 4 Input the name of the new user list and click OK 5 Click the recording date The files recorded on the day are displayed 6 Drag the file and drop into the user list To add other files into the user list repeat steps 5 and 6 Creating a Disc Using a PC Continued ...

Страница 33: ...t the bottom and click Next 5 Input the disc name select the top menu style and click Next 6 Click Start NOTE When copying video recorded in UXP recording mode to create an AVCHD disc the video needs to be converted to XP recording mode before copying Therefore it may take longer time than copying video recorded in other modes Use Everio MediaBrowser Player to playback the disc Refer to the help o...

Страница 34: ...t it may take some time to respond to your questions depending on their subject matter JVC cannot answer questions regarding basic operation of your PC or questions regarding specifications or performance of the OS other applications or drivers Pixela Region Language Phone USA and Canada English 1 800 458 4029 toll free Europe UK Germany France and Spain English German French Spanish 800 1532 4865...

Страница 35: ...t the playback mode 1 Press EXPORT 2 Select the file and set To check the content of the file select CHECK 3 Select DONE To cancel the export setting Select the file and select again To quit the screen 1 Select DONE 2 Select YES To confirm the export setting Press EXPORT on the index screen Transferring the Files to PC Preparation Install iTunes on a PC http www apple com itunes 1 Connect the camc...

Страница 36: ...the LCD monitor NOTE The upload mode turns off each time recording is finished Uploading Files to Websites Uploading Files For details on uploading files refer to the operation guide of MediaBrowser in the CD ROM 1 Connect the camcorder to the PC with the USB cable 2 Select UPLOAD If you cannot upload the file to YouTube You need your YouTube account to upload files to YouTube Create your account ...

Страница 37: ... is difficult to see The LCD monitor may be difficult to see if used in bright areas such as under direct sunlight Before requesting service consult the following chart If the solutions indicated in the chart do not solve the problem consult your nearest JVC dealer or JVC service center for instructions Refer also to the FAQ of new products on JVC s website The following phenomena are not malfunct...

Страница 38: ...rder it takes time for the camcorder to respond It is recommended that you copy all files from the camcorder onto your computer and erase the files from the camcorder The lamp does not flash during battery pack charging Check the remaining battery pack charge When the battery pack is fully charged the lamp does not flash When recharging in either a hot or cold environment ensure that battery is be...

Страница 39: ...nsert the microSD card MultiMediaCard cannot be used Remove any dirt from the microSD card terminals Insert the microSD card before switching the power on Turn off the camcorder and turn it on again CANNOT TAKE MORE STILL IMAGES AT THE MOMENT Stop video recording and then record a still image If an microSD card is removed or inserted during video recording a still image cannot be recorded DROP DET...

Страница 40: ...utput 1 0 V p p 75 W Audio output 300 mV rms 1 kW HDMI HDMI V 1 3 with x v Color Component output Y Pb Pr component output Y 1 0 V p p 75 W Pb Pr 700 mV p p 75 W USB Mini USB type A and type B USB 2 0 compliant AC Adapter Power requirement AC 110 V to 240 V 50 Hz 60 Hz Output DC 11 V 1 A Remote Control Power supply DC 3 V Battery life Approx 1 year depending on the frequency of use Operating dista...

Страница 41: ... size Quality microSD Card 512 MB 1 GB 2 GB 4 GB 8 GB 16 9 1920 x 1080 FINE 510 1040 2100 4200 8420 1920 x 1080 STANDARD 800 1630 3210 6410 9999 4 3 1440 x 1080 FINE 680 1370 2770 5540 9999 1440 x 1080 STANDARD 1060 2160 4360 8700 9999 640 x 480 FINE 3320 6720 9999 9999 9999 640 x 480 STANDARD 5980 9999 9999 9999 9999 h hour m minute Required charging recording time approx Battery pack Charging ti...

Страница 42: ...er a long period of time remove from charger or powered unit when not in use as some machines use current even when switched off ATTENTION The product you have purchased is powered by a rechargeable battery that is recyclable Please call 1 800 8 BATTERY for information on how to recycle this battery Recording Medium Be sure to follow the guidelines below to prevent corruption or damage to your rec...

Страница 43: ...beach To prevent the unit from dropping Fasten the grip belt securely When using the camcorder with a tripod attach the camcorder to the tripod securely If the camcorder drops you may be injured and the camcorder may be damaged When a child uses the unit there must be parental guidance Declaration of Conformity Model Number GZ HD320U 300U Trade Name JVC Responsible party JVC AMERICAS CORP Address ...

Страница 44: ...isk 42 HDMI 24 I iTunes 35 L Language Setting 16 LCD Monitor 12 42 LED Light 20 M Manual Recording 23 Menu Settings 37 microSD Card 17 N Number of Images 41 O On screen recording control 18 On screen zoom control 20 P Playback Zoom 21 22 Portable Media Player 35 Q Quick Review 18 19 R Recordable Time 41 Recording Medium 42 Remaining Battery Power 20 Remaining Recording Time 20 Remote Control 11 14...

Страница 45: ...MEMO ...

Страница 46: ...orificios de ventilación están bloqueados por un periódico o paño etc el calor no podrá salir No deberá ser colocada en el aparato ninguna fuente de llama sin protección tales como velas encendidas Cuando descarte las pilas deberá considerar los problemas ambientales y respetar estrictamente las normas locales o leyes vigentes para la eliminación de estas pilas La unidad no deberá ser expuesta a g...

Страница 47: ...ato si el aparato fue expuesto a la lluvia o humedad si no funciona normalmente o sufrió caídas Recuerde que esta cámara debe usarse únicamente para fines privados Está prohibido cualquier uso comercial sin la autorización correspondiente Aunque grabe acontecimientos tales como espectáculos o exhibiciones para su disfrute personal se recomienda que obtenga una autorización previa Marcas comerciale...

Страница 48: ...a correa y apriétela Fije la correa mientras sostiene la videocámara Cuando lleve la videocámara procure que no se le caiga Correa de sujeción Apretar Luz de alimentación carga Parpadea carga en curso Se apaga carga terminada Batería Adaptador de CA A la toma de CA de 110 V a 240 V Abrir la cubierta La videocámara se suministra con la batería descargada Luz de acceso Parpadea acceso a los archivos...

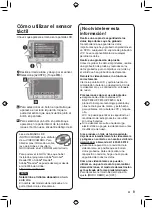
Страница 49: ...ante al menos 2 segundos Toque los sensores con el dedo Los sensores no funcionan si los toca con la uña o con guantes puestos S Seleccione CONF RELOJ T Seleccione la ciudad más cercana a la zona donde vaya a usar la videocámara U Seleccione ON si el horario de verano está activado V Ajuste la fecha y la hora Deslice el dedo arriba y abajo por el sensor A continuación toque OK Sensor táctil Ajusta...

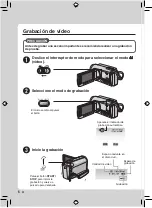
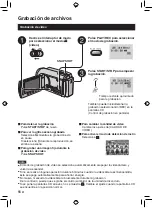
Страница 50: ...ulse el botón START STOP para iniciar la grabación y vuelva a pulsarlo para detenerla Espacio restante en el disco duro Calidad de vídeo Espera de grabación Grabación Q Deslice el interruptor de modo para seleccionar el modo vídeo R Seleccione el modo de grabación El modo cambia al pulsar el botón Aparece el indicador de grabación automática ...

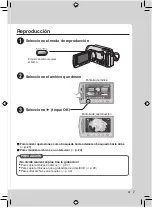
Страница 51: ...RECAUCIÓN No olvide realizar copias tras la grabación Para copiar archivos en discos Z p 27 Para copiar archivos en una grabadora de vídeo DVD Z p 29 Para editar archivos en el equipo Z p 30 Q Seleccione el modo de reproducción El modo cambia al pulsar el botón R Seleccione el archivo que desee Pantalla de índice S Seleccione F toque OK Pantalla de reproducción ...

Страница 52: ...al 23 Ajuste manual en el menú 23 USO CON EL TELEVISOR Visualización de archivos en un televisor 24 Conexión con el televisor 24 Operación de reproducción 25 EDICIÓN Gestión de archivos 26 Captura de una imagen fija de un vídeo 26 Eliminación de archivos 26 COPIA Copia de archivos 27 Uso de una grabadora de BD DVD 27 Copia de archivos en una grabadora de vídeo DVD 29 FUNCIONAMIENTO DE PC Creación ...

Страница 53: ...ocámara y póngase en contacto con nosotros visitando www jvc com o llamando al 1 800 252 5722 Durante la reparación o la revisión de la videocámara es posible que se borren datos grabados Antes de realizar una reparación o revisión haga una copia de seguridad de todos los datos Como las videocámaras se pueden utilizar en un punto de venta para realizar demostraciones el modo de demostración está a...

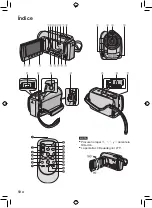
Страница 54: ...10 SP Índice NOTA Procure no tapar 3 4 5 y 6 durante la filmación La pantalla LCD puede girar 270 PREPARATIVOS ...

Страница 55: ...de fijación con el tornillo a continuación gire la videocámara a la derecha para montarla en el trípode NOTA No utilice el trípode en superficies inestables o desniveladas La videocámara podría caer y sufrir una avería grave Videocámara Botón de alimentación Miniconector HDMI Z p 24 Conector componente Z p 24 Botón DISPLAY Z p 13 Altavoz Orificio de ventilación Palanca del zoom Z p 20 Control de v...

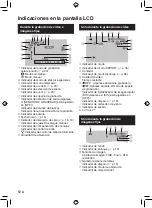
Страница 56: ...enfoque manual 1 Indicador de compensación de contraluz 2 Indicador de control de brillo Indicador de control de área de fotometría 3 Velocidad de obturación Sólo durante la grabación de vídeo Indicador de modo Indicador del modo EXPORT Z p 35 Contador Indicador de modo de carga Z p 36 Calidad de vídeo Tiempo restante MREC Aparece durante la grabación MQ Aparece durante el modo de espera de grabac...

Страница 57: ...velocidad Indicador de batería Fecha hora Z p 15 Indicador de nivel de volumen x v Color Salida con 1080p Durante la reproducción de imágenes fijas 4 55 PM NOV 1 2009 Indicador de modo Indicador de revisión rápida Z p 19 Número de carpeta o archivo Indicador de reproducción automática de las imágenes Indicador de batería Fecha hora Z p 15 Salida con 1080p Cambio de modo de indicación en la pantall...

Страница 58: ...ecto si el sensor remoto está expuesto a la luz directa del sol o a un foco de luz muy potente Presione la pestaña de cierre para extraer el soporte de la pila Distancia efectiva Máx 5 m Sensor remoto Pestaña de cierre Pila de litio CR2025 AP V20U BN VF808U Adaptador de CA Batería Cable componente Cable AV RM V751U CR2025 Cable USB Mando a distancia Pila de litio Preinstalada en el mando a distanc...

Страница 59: ...inistrada 1 h 50 m BN VF815U 2 h 40 m BN VF823U 3 h 40 m Para extraer la batería NOTA La videocámara también se puede usar con sólo el adaptador de CA El tiempo de grabación real puede reducirse en función del entorno de grabación como cuando se graban escenas con un sujeto en movimiento rápido No estire ni doble el enchufe o el cable del adaptador de CA Se podría dañar el adaptador de CA Ajuste d...

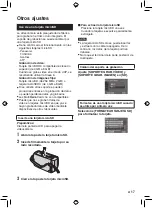
Страница 60: ...s pasos 1 4 Z p 15 5 Seleccione CONF ÁREA 6 Seleccione la ciudad más cercana a la zona del viaje Para volver a la pantalla anterior Seleccione Para salir de la pantalla Seleccione SALIR Ajuste del idioma El idioma en el que se muestra la información de la pantalla puede cambiarse 1 Abra la pantalla LCD para encender la videocámara 2 Toque MENU 3 Seleccione CONFIG PANTALLA 4 Seleccione LANGUAGE 5 S...

Страница 61: ...patibles Puede que no se graben datos de vídeo en tarjetas microSD en que ya se hayan grabado datos de vídeo mediante dispositivos de otros fabricantes Inserte una tarjeta microSD Preparativos Cierre la pantalla LCD para apagar la videocámara 1 Abra la tapa de la tarjeta microSD 2 Inserte firmemente la tarjeta por su lado recortado 3 Cierre la tapa de la tarjeta microSD Para extraer la tarjeta mic...

Страница 62: ...eslice el interruptor de modo para seleccionar el modo vídeo NOTA El modo de grabación de vídeo se selecciona automáticamente al apagar la videocámara y volverla a encender Si no se realiza ninguna operación durante 5 minutos cuando la videocámara está encendida ésta se apaga automáticamente para ahorrar energía No mueva ni sacuda la videocámara bruscamente durante la grabación De lo contrario pue...

Страница 63: ...rrar energía Las imágenes fijas grabadas en tamaño 16 9 pueden imprimirse con los lados recortados Compruebe si en su establecimiento habitual pueden imprimir imágenes de tamaño 16 9 Si se pone la pantalla LCD al revés no se muestra Cambie el ajuste cuando la pantalla LCD se encuentre en la posición normal Grabación de imágenes fijas Para ver la última imagen grabada Seleccione A tras la toma Si s...

Страница 64: ...3 Seleccione el ajuste que desee ON La luz LED permanece encendida independientemente de las condiciones del entorno AUTO La luz LED se enciende automáticamente cuando la luminosidad es insuficiente OFF Desactiva esta función Comprobación de la carga restante de la batería Modo Pulse INFO dos veces o pulse INFO y seleccione Modo Pulse INFO Para salir de la pantalla Seleccione SALIR o pulse INFO NO...

Страница 65: ... palanca del zoom hacia W Para ampliar el vídeo durante la pausa sólo con el mando a distancia Pulse T en el mando a distancia Pulse en el mando a distancia para mover el área de zoom Mantenga pulsado W en el mando a distancia para cancelar la ampliación Bajar el volumen Subir el volumen Volumen del altavoz Operaciones durante la reproducción de vídeo botones en pantalla N Volver a la primera esce...

Страница 66: ...te la reproducción sólo con el mando a distancia Pulse T en el mando a distancia Pulse en el mando a distancia para mover el área de zoom Mantenga pulsado W en el mando a distancia para cancelar la ampliación Reproducción de imágenes fijas Operaciones durante la reproducción de imágenes fijas botones en pantalla P Cambiar el orden de la reproducción automática hacia atrás F Cambiar el orden de la ...

Страница 67: ...regresar al modo de grabación automático Seleccione A M para que aparezca el indicador Ajuste manual en el menú En el modo de grabación manual 1 Toque MENU 2 Seleccione AJUSTE MANUAL 3 Seleccione el menú que desee 4 Seleccione el ajuste que desee Según los ajustes que seleccione podrá ajustar el valor mediante el sensor táctil Para volver a la pantalla anterior Seleccione Para salir de la pantalla...

Страница 68: ...n color de tipo NTSC o de alta definición No se puede usar con un televisor de otra norma Conexión con el televisor Los vídeos se pueden emitir por el conector HDMI el conector COMPONENT o el conector AV Seleccione el conector que se adecue mejor a su televisor Preparativos Apague todas las unidades Para realizar la conexión con el miniconector HDMI Le recomendamos utilizar el cable HDMI de catego...

Страница 69: ...videocámara a la grabadora de vídeo DVD Encienda la grabadora de vídeo DVD y ajústela al modo de entrada AUX 4 Inicie la reproducción en la videocámara Z p 21 22 Para ver en el televisor la visualización en pantalla de la videocámara Ajuste VER EN TV en ON NOTA Si se ha grabado el vídeo con x v Color ajustado en ON cambie el ajuste x v Color en el televisor Para obtener más información consulte el...

Страница 70: ...ión esté en pausa NOTA Las imágenes fijas capturadas se guardan con una resolución de 1920 x 1080 La imagen se puede alargar en sentido horizontal o vertical dependiendo de la calidad del archivo de vídeo de origen La función de toma continua no se puede utilizar para capturar imágenes No es posible capturar vídeo durante la reproducción Eliminación de archivos Los archivos protegidos no se pueden...

Страница 71: ...uede hacer una copia de seguridad de los archivos de la videocámara en un disco con una grabadora de BD DVD Utilice uno de los siguientes métodos para ver el disco Si intenta reproducir un disco con un reproductor incompatible es posible que el disco no pueda extraerse Reproducción del disco mediante la videocámara Reproducción del disco con una grabadora de BD DVD Reproducción en un PC Reproduzca...

Страница 72: ...n el disco Cuando aparezca HECHO toque OK Si aparece INSERTAR SIGUIENTE DISCO PULSAR CANCELAR PARA ABANDONAR LA CREACIÓN cambie de disco Los archivos restantes se copiarán en el segundo disco Para cancelar la copia seleccione CANCELAR Copia de archivos de vídeo que nunca se han copiado Los archivos que nunca se han copiado en un disco se seleccionan y copian automáticamente 1 Abra la pantalla LCD ...

Страница 73: ...iones de la grabadora de vídeo DVD Para detener la copia Detenga la grabación en la grabadora de vídeo DVD Para ocultar la fecha o los iconos de la pantalla Cambie los ajustes de VER EN TV Copia de archivos en una grabadora de vídeo DVD Preparativos Cree una lista de reproducción Apague todas las unidades Para realizar la conexión con los conectores AV copia analógica Cable AV Conector de CC Adapt...

Страница 74: ... el menú Inicio y seleccione Propiedades NOTA Asegúrese de que el PC tiene una unidad de BD DVD grabable Si el sistema no cumple los requisitos se recomienda copiar los archivos con la grabadora de BD DVD Z p 27 Los usuarios de Macintosh pueden utilizar el software incluido con su Macintosh iMovie 08 iPhoto para importar archivos en su equipo Preparativos Inserte el CD ROM suministrado en el PC En...

Страница 75: ...en la videocamara y en Proximo 4 Haga clic en Comienzo Se inicia la copia de seguridad Para desconectar la videocámara del PC 1 Haga clic con el botón secundario del ratón en el icono Quitar hardware con seguridad en la barra de tareas y seleccione Extracción segura de Dispositivo de almacenamiento masivo USB 2 Siga las instrucciones en pantalla y asegúrese de que el dispositivo se pueda quitar de...

Страница 76: ...e una copia de seguridad en el PC 1 Haga doble clic en el icono y abra el calendario 2 Seleccione Solo filmes 3 Haga clic en 4 Escriba el nombre de la nueva lista personalizada y haga clic en Aceptar 5 Haga clic en la fecha de grabación Se muestran los archivos grabados en esa fecha 6 Arrastre y suelte los archivos en la lista personalizada Para agregar más archivos a la lista personalizada repita...

Страница 77: ...ic en Proximo 5 Escriba el nombre del disco seleccione el estilo del menú superior y haga clic en Proximo 6 Haga clic en Comienzo NOTA A la hora de copiar vídeo grabado en modo de grabación UXP para crear un disco AVCHD es necesario convertir el vídeo al modo de grabación XP antes de copiarlo Por tanto su copia puede tardar más tiempo que si se tratara de vídeo grabado en otros modos Use Everio Me...

Страница 78: ...a en cuenta que puede tardar un poco responder a sus preguntas según cuál sea el asunto JVC no puede responder a preguntas relativas al funcionamiento básico del PC o a las especificaciones o el rendimiento del sistema operativo otras aplicaciones o controladores Pixela Región Idioma Nº de teléfono EE UU y Canadá Inglés 1 800 458 4029 gratuito Europa Reino Unido Alemania Francia y España Inglés al...

Страница 79: ...s Seleccione el modo Seleccione el modo de reproducción 1 Pulse EXPORT 2 Seleccione el archivo y elija Para comprobar el contenido del archivo seleccione CHECK 3 Seleccione SALIR Para cancelar el ajuste de exportación Seleccione el archivo y seleccione de nuevo Para salir de la pantalla 1 Seleccione SALIR 2 Seleccione SÍ Para confirmar el ajuste de exportación Pulse EXPORT en la pantalla de índice...

Страница 80: ...NOTA El modo de carga se desactiva cada vez que termina la grabación Carga de archivos a sitios Web Carga de archivos Para obtener más información sobre cómo cargar archivos consulte la guía de funcionamiento de MediaBrowser que aparece en el CD ROM 1 Conecte la videocámara al PC con el cable USB 2 Seleccione CARGAR Si no puede cargar el archivo en YouTube Necesita tener una cuenta en YouTube para...

Страница 81: ... de la pantalla LCD si la cámara se utiliza en lugares muy iluminados como por ejemplo bajo la luz solar directa Antes de solicitar asistencia técnica consulte la siguiente tabla Si las soluciones indicadas en la tabla no ayudan a solucionar el problema póngase en contacto con el distribuidor JVC o servicio técnico JVC más cercano para obtener ayuda También puede consultar el apartado de preguntas...

Страница 82: ...le que copie todos los archivos de la videocámara al ordenador y que una vez completada esta operación borre los archivos de la videocámara La luz no parpadea durante la carga de la batería Compruebe la carga restante de la batería Si la batería ya está totalmente cargada la luz no parpadea Si realiza una carga en un entorno con unas condiciones de temperatura elevada o baja asegúrese de que la ba...

Страница 83: ...ertarla No se pueden utilizar tarjetas MultiMediaCard Elimine la suciedad de los terminales de la tarjeta microSD Inserte la tarjeta microSD antes de encender la videocámara Apague la videocámara y vuélvala a encender NO SE PUEDEN TOMAR MÁS FOTOS DE MOMENTO Detenga la grabación de vídeo y grabe una imagen fija Si se retira o inserta una tarjeta microSD durante la grabación de vídeo no se podrá gra...

Страница 84: ...a de audio 300 mV rms 1 kW HDMI HDMI V 1 3 con x v Color Salida componente Salida componente Y Pb Pr Y 1 0 V p p 75 W Pb Pr 700 mV p p 75 W USB Mini USB tipo A y B compatible con USB 2 0 Adaptador de CA Requisito de alimentación eléctrica CA 110 V a 240 V 50 Hz 60 Hz Salida CC 11 V 1 A Mando a distancia Fuente de alimentación eléctrica CC 3 V Duración de la pila 1 año aproximadamente dependiendo d...

Страница 85: ... de grabación Tamaño de imagen Calidad Tarjeta microSD 512 MB 1 GB 2 GB 4 GB 8 GB 16 9 1920 x 1080 FINA 510 1040 2100 4200 8420 1920 x 1080 ESTÁNDAR 800 1630 3210 6410 9999 4 3 1440 x 1080 FINA 680 1370 2770 5540 9999 1440 x 1080 ESTÁNDAR 1060 2160 4360 8700 9999 640 x 480 FINA 3320 6720 9999 9999 9999 640 x 480 ESTÁNDAR 5980 9999 9999 9999 9999 h hora m minuto Tiempo de carga grabación necesario ...

Страница 86: ...scargar totalmente la batería cada seis meses cuando se guarde durante un periodo de tiempo prolongado cuando no se utilice se debe retirar del cargador o dispositivo eléctrico ya que algunas máquinas utilizan corriente incluso estando apagadas ATENCIÓN La batería que ha adquirido es reciclable Por favor comunicarse al 1 800 8 BATTERY para información sobre como reciclar dicha batería Soporte de g...

Страница 87: ... utilice la correa de mano balancear demasiado la bolsa de la cámara con la cámara dentro deje la cámara en áreas donde haya polvo o arena como en la playa Para evitar que la unidad se caiga Ajuste bien la correa de mano Si utiliza la cámara con un trípode fije bien la cámara en el trípode Si se le cae la cámara puede herirse usted y dañarse la cámara Si un niño utiliza la unidad un adulto deberá ...

Страница 88: ...ridad en BD DVD 27 D Detección de cara 18 19 Disco duro 42 E Eliminación de archivos 26 G Grabación manual 23 Grabadora de BD DVD 27 H HDMI 24 I iTunes 35 L Luz LED 20 M Mando a distancia 11 14 Modo de exportación a biblioteca 35 N Número de imágenes 41 P Pantalla LCD 12 42 R Reproducción de copia 29 Reproducción de extracto 21 Reproductor multimedia portátil 35 Revisión rápida 18 19 S Soporte de ...

Отзывы: