background image

10

EN

Before you start

Functional overview (cont’d)

Using a remote control

Keep in mind the following when using the remote
control:
• Make sure that there is no obstacle between the

remote control and the remote sensor of the unit.

• Remote operation may become unreliable if

strong sunlight or fluorescent light is on the
remote sensor of the unit.

• Remote control for different devices can inter-

fere with each other. Avoid using remote control
for other equipment located close to the unit.

• Replace the batteries when you notice a fall-off

of the operating range of the remote control.

• The maximum operable ranges from the unit are

as follows.

Beeline:

approx. 23 feet (7m)

Either side of the center:

approx.

16

feet (5m) within 30°

Above:

approx.

16

feet (5m) within 

1

Below:

approx.

1

0 feet (3m) within 30°

Installing batteries in the remote control

Install two “AA” size batteries (supplied), matching
their polarity to those indicated inside battery com-
partment of the remote control.

2

1

3

Note:

Incorrect use of batteries can result in hazards such
as leakage and bursting. Please follow the instruction
below:
• Do not mix new and old batteries together.
• Do not use different kinds of batteries together.

Although they may look similar, different batteries
may have different voltages.

• Make sure that the plus and minus ends of each

battery match the indications in the battery com-
partment.

• Remove batteries from equipment that is not going

to be used for a month or more.

• When disposing used batteries, please comply with

governmental regulations or public rules for envi-
ronmental protection that apply in your country
or area.

• Do not recharge, short-circuit, heat, burn or disas-

semble batteries.

CH

Remote

control

Within about 
23feet (7m)

30˚

30˚

MEN

U/LIS

T

NU

PRO

G

CLEA

R

AUDIO

REPE

AT

ON S

CREEN

OPE

N/

CLO

SE

SET U

P

ZOO

M

PR

NTER

SHO

WVIE

W/

VIDE

O Plus

+

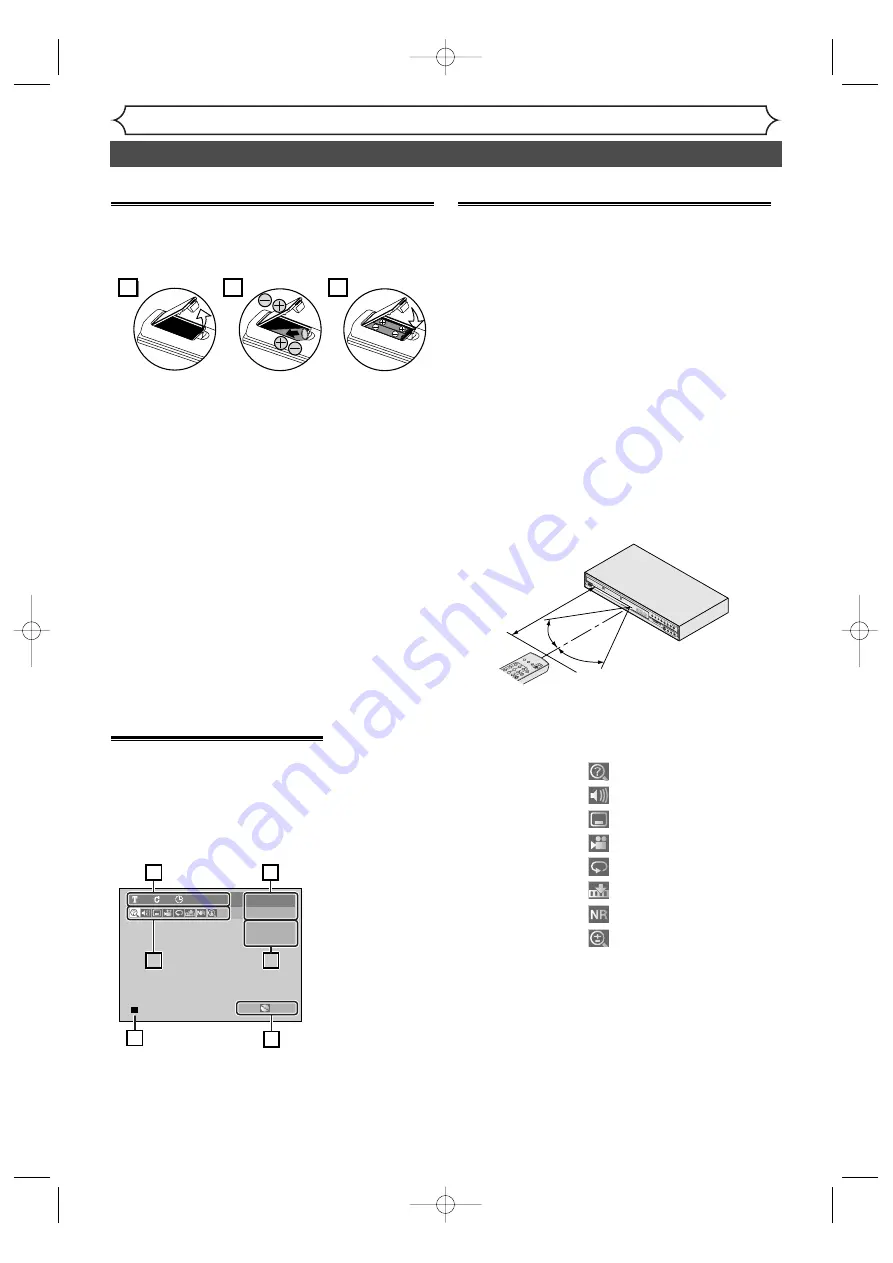
DISPLAY menu

Press 

[ON SCREEN]

to call up

the display menu.This menu will
give you the information on the
disc. Some operations are avail-
able while disc is played back.

1

.

Indicates a disc type and a
format mode.

Note:

In some descriptions on

this manual, only one disc type
is indicated as an example.

2

.

Indicates a current channel
number and an audio status of
the program.

3

.

Indicates a recording mode
and possible recording time
left.

4

.

Indicates a title number, chap-
ter number and the time
elapsed of disc play.

5

.

Each icon means:

6

.

Indicates current disc status.

: Search

: Audio

: Subtitle

: Angle (except VR mode)

: Repeat

: Marker

: Noise Reduction

: Zoom

DVD-RW

1

1

0:00:00

XP

1:01

CH 8

Stereo

Video mode

1

4

5

2

5

2

3

6

3

Note:

• This is an example screen only for explanation. Displayed items will change depending on the actual mode.
• DISPLAY function is not available when no disc is inserted.

Code: JVC C

E6751CD_EN1.qxd  05.7.19  5:27 PM  Page 10

Содержание DR-M70SU

Страница 1: ...N I CH S VIDEO VIDEO L AUDIO R MONO REC SPEED VCR Plus and PlusCode are registered trademarks of Gemstar Development Corporation TheVCR Plus system is manufactured under license from Gemstar Development Corporation For Customer Use Read carefully the information located at the back of this unit and enter below the Serial No Retain this information for future reference Model No Serial No Printed in...

Страница 2: ...de la classe B est conforme à la norme NMB 003 du Canada FCC WARNING This equipment may generate or use radio frequency energy Changes or modifications to this equipment may cause harmful interference unless the modifications are expressly approved in the instruc tion manual The user could lose the authority to operate this equipment if an unauthorized change or modi fication is made CAUTION TO PR...

Страница 3: ...nce receptacles and the point where they exit from the appliance 13 Outdoor Antenna Grounding If an outside antenna or cable system is connected to the product be sure the antenna or cable system is grounded so as to provide some protection against voltage surges and built up static charges Article 810 of the National Electrical Code ANSI NFPA No 70 provides information with regard to proper groun...

Страница 4: ... Avoid the Hazards of Electrical Shock and Fire Do not handle the power cord with wet hands Do not pull on the power cord when disconnecting it from AC wall outlet Grasp it by the plug If by accident water is spilled on this unit unplug the power cord immediately and take the unit to our Authorized Service Center for servicing Notice for progressive scan outputs Consumers should note that not all ...

Страница 5: ...clean it with a cleaning cloth Wipe the disc from the center out Do not wipe in a circular motion Do not use solvents such as benzine thinner commercially available cleaners detergent abrasive cleaning agents or antistatic spray intended for analogue records CLEANINGTHE DISC LENS If this unit still does not perform properly although you refer to the relevant sections and to TROU BLESHOOTING in thi...

Страница 6: ...ions 85 Warranty 87 Before you start 2 Precautions 2 Table of contents 6 Features 7 Functional overview 8 Installing batteries in the remote control 10 Using a remote control 10 DISPLAY menu 10 Setting DISC CD menu 11 Connections 13 Connection to a TV 13 Connection to a cable box or satellite box 14 Connection to an Audio System 15 Getting started 16 Easy DVD recording 16 Channel setting 18 Gettin...

Страница 7: ...to watch using title chapter or time search functions Start Playback from Original and Playlist VR mode You can play back titles from either the Original list or the Playlist JPEG Picture Viewer Editing Deleting titles You can delete titles which you do not need anymore Making your own Playlist VR mode With the Original remains as it is you can edit titles on Various playlist as you prefer Putting...

Страница 8: ...eceive signals from your remote control so that you can control the unit from a distance Rear Panel 1 TV ANTENNA IN jack Use to connect an antenna 2 VIDEO IN jack LINE1 Use to connect external equipment with a standard video cable 3 VIDEO OUT jack Use to connect a TV monitor AV receiver or other equipment with a standard video cable 4 AC Power Cord Connect to a standard AC outlet to supply power t...

Страница 9: ...ton During playback press to skip to the previous chapter or track Or when playback is paused press to play back in reverse step by step 11 SLOW REW E button During playback press to play back in fast reverse Or when playback is paused press to play back in slow reverse 12 PLAY B button Press to start or resume playback 13 REC I button Press once to start a recording Press repeatedly to start a On...

Страница 10: ...lus and minus ends of each battery match the indications in the battery com partment Remove batteries from equipment that is not going to be used for a month or more When disposing used batteries please comply with governmental regulations or public rules for envi ronmental protection that apply in your country or area Do not recharge short circuit heat burn or disas semble batteries CH Remote con...

Страница 11: ...e a new DVD R disc or a finalized DVD R disc is inserted into the unit you cannot select Disc CD Playback Mode is available only when an Audio CD disc Video CD or a CD RW R disc with JPEG files is inserted into the unit 1 Title List Playlist Original Turns on a title list playlist or Original which shows the record ed titles on the disc 2 Format DVD RW only Allows you to erase all of the recorded ...

Страница 12: ...disc is on the disc tray Appears when a DVD RW disc is on the disc tray 3 Recording speed Indicates the recording speed of the disc 4 Title Track and Chapter mark Appears when indicating a title track number Appears when indicating a chapter number 5 Displays the following Played back time remaining time Current title chapter track number Recording time Clock Channel number Remaining time for a on...

Страница 13: ...of TV or Cable TV signal or Cable TV signal Connect Connect Connect Connect Disconnect Antenna Antenna Back of this unit Back of TV 3 2 1 4 5 Plug in the AC power cord of this unit 6 Note Connect this unit directly to the TV If the A V cables are connected to a VCR pictures may be distorted due to the copy protection system After you have completed connections Switch the input selector on your TV ...

Страница 14: ...em Installer This reminder is provided to call the Cable TV system installer s attention to Article 820 40 of the National Electrical Code which provides guidelines for proper grounding in particular specifying that the cable ground shall be connected to the grounding system of the building as close to the point of cable entry as possible ANTENNA AUDIO IN VIDEO IN L R AUDIO OUT VIDEO OUT L1 IN IN ...

Страница 15: ...e recorded as digital sound by an MD or DAT deck By connecting this unit to the DTS decoder you can enjoy 5 1 channel Surround System which reproduces the original sound as truthfully as possible 5 1 channel Surround System is devel oped by the Digital Theater System Inc Playing back a DVD using incorrect settings may generate noise distortion and may also damage the speakers To complete these set...

Страница 16: ...hat disc Formatting is only neces sary to prepare disc pre viously recorded on for recording Details are on pages 28 29 When you format a disc the entire contents on that disc will be erased The unit automatically starts initializing when a brand new disc is inserted DVD disc types DVD RW VR DVD RW Video You want to Record TV programs Reuse by deleting unwanted contents Edit recorded contents Edit...

Страница 17: ...ylist VR mode You can edit the contents on a Playlist without changing the original recordings A Playlist does not take up much disc space What Original or Playlist is for Throughout this manual you will find Original and Playlist to refer to the original content and the edited version Original content refers to what s originally recorded on the disc Playlist content refers to the edited version o...

Страница 18: ...ile one of the functions on the unit is in the recording OTR or Timer Recording mode If the auto presetting is cancelled during preset ting some of the channels not yet preset may not be received The selection will depend on how you receive the TV chan nels To cancel the auto preset ting during scanning Press RETURN or SET UP to cancel To select a channel You can select a channel by directly enter...

Страница 19: ...it Manual Preset CH 2 Add Delete Adding deleting channels The channels you no longer receive or seldom watch can be deleted from the memory You can also add channels manually into memory 1 Press SET UP Easy Setting Menu or Advanced Setting Menu will appear 2 Using K L select Channel Press ENTER Channel menu will appear 3 Using K L select Manual Preset Press ENTER Manual Preset menu will appear 4 S...

Страница 20: ... channel number Now compare the channel numbers you have writ ten in the Guide Channel and TV Channel columns You must set all of these channel numbers that don t match using the following procedure before you pro gram the automatic timer recording using the VCR Plus system This setting only needs to be set once but must be done again if you have moved to a different area and channel numbers have ...

Страница 21: ...wish to set is not on the screen press B to change the displayed page until you reach the correct page 2 Using B select an external input L or CATV TV channel CH 3 Using the Number buttons or K L enter a TV channel number then press ENTER The channel number is assigned The channel number is assigned Repeat 1 3 above to assign more channels 6 Press SET UP to exit OPEN CLOSE SET UP STANDBY ON REPEAT...

Страница 22: ... The default is set as Stereo 5 Using K L select Stereo or SAP Press ENTER Stereo Outputs main audio SAP Secondary Audio Program Outputs sub audio Refer to the item in Glossary on page 83 for more information 6 Press SET UP to exit TV Audio Select SAP Stereo Notes on TV channel audio If you want to record a TV program available in second audio or stereo on a DVD RW R you have to select either Ster...

Страница 23: ...menu will appear 4 Using K L select Auto Clock Setting Press ENTER Option window will appear The default setting is Auto Auto Clock Setting OFF Manual Auto 5 If you do not know the PBS channel number in your area Using K L select Auto Press ENTER The setting will be activated If you know the PBS channel number in your area Using K L select Manual Press ENTER Using the Number buttons or K L enter t...

Страница 24: ...ng K L enter the time hour minute Press B to move the cur sor 6 Press K L to select AM or PM Press ENTER Clock menu will appear then the settings will be activated Although seconds are not dis played they will be counted from zero 7 Press SET UP to exit Clock Setting JUL 23 2005 SAT 4 14 PM Note Your clock setting will be lost if either there is a power fail ure or this unit has been unplugged for...

Страница 25: ... Using K L select TV Aspect Press ENTER Option window will appear Refer to the Note on this page 5 Using K L select a desired option Press ENTER 6 Press SET UP to exit TV Aspect 4 3 Pan Scan 16 9 Wide 4 3 Letter Box Note If you have a standard TV Select 4 3 Letter Box for full length picture with black bars on the top and bottom of the screen Select 4 3 Pan Scan for a full height picture with both...

Страница 26: ...D is press allowed recording time will be displayed Recording speed XP SP LP EP SLP SEP Recording time 18 min 36 min 72 min 108 min 144 min 180 min Video Sound Quality Disc Size 8cm Disc XP SP LP EP SLP SEP 60 min 120 min 240 min 360 min 480 min 600 min 12 cm Disc Disc type Disc format Video mode VR mode Video mode Functions Playback limited recording limited editing Playback recording Original Pl...

Страница 27: ...A title menu is created automatically Undo finalizing is possible Refer to page 40 Additional recording or editing is possible if you undo finalize Refer to page 40 After DVD RW VR mode is finalized A title menu is not created Undo finalizing is possible Refer to page 40 Additional recording or editing is possible even without undo finalizing Disc type format Copy free Copy once Copy prohibited Re...

Страница 28: ...lt is set as Video mode 4 Using K L select Video mode or VR mode Press ENTER The recording format will be set 5 Press SET UP to exit DVD RW Recording Format VR mode Video mode Video mode DVD Player Compatibility mode VR mode Editing possibility mode Recording Auto Chapter 10 minutes Timer Programming Recording Audio Select XP Dolby Digital DVD RW Recording Format Video mode Auto Finalize DVD RW DV...

Страница 29: ...L select Disc Press ENTER Disc menu will appear 3 Using K L select Format Press ENTER Confirmation window will appear 4 Using K L select Yes Press ENTER Final confirmation window will appear 5 Using K L select Yes Press ENTER Formatting will start 6 Formatting is complete 100 will be indicated This operation may take a while to be completed Formatting 100 Formatting 90 Format No Yes Are you sure Y...

Страница 30: ...elect PCM or Dolby Digital using K L then press ENTER PCM Records PCM audio for the best quality sound Dolby Digital Records Dolby Digital audio for good quality sound 6 Press SET UP to exit PCM Dolby Digital Recording Audio Select XP PCM Dolby Digital Recording Audio Select XP DVD RW Recording Format Timer Programming Recording Audio Select XP Auto Finalize Auto Chapter VR mode Dolby Digital 10 m...

Страница 31: ...When a DVD RW disc is loaded You can choose Video mode or VR mode from the Setting menu Video mode has been selected as the default Refer to Choosing the recording format of a blank disc on page 28 When a DVD R disc is loaded DVD R discs will always be inVideo mode 4 Using CH or the Number buttons select a desired channel to record 5 Press REC I to start record ing I mark will be displayed for 5 s...

Страница 32: ... recording the recorder automatically goes into standby 1 Turn on the unit and load a recordable disc Make sure that the TV input is set on the unit 2 Using REC SPEED select a recording speed Refer to Recording speed on page 26 3 Make sure that the recording format is set to the desired mode Refer to Formatting a disc on pages 28 29 When a DVD RW disc is loaded You can choose Video mode or VR mode...

Страница 33: ...ed Timer Programming 2 3 1 JAN 01 12 57AM 1 57AM CH 8 Auto Date Start End CH Speed Timer Programming 2 3 4 1 JAN 01 12 57AM 1 57AM CH 8 Date Start End CH Speed Timer Programming 2 3 1 JAN 01 12 57AM L1 Date Start End CH Speed Daily MON SAT JAN 01 JAN 31 MON FRI SAT FRI SUN Timer Programming 2 3 1 JAN 01 L1 Date Start End CH Speed Timer Programming 2 3 4 1 Date Start End CH Speed Recording Auto Cha...

Страница 34: ...andby mode Timer Programming 2 3 4 1 Date Start End CH Speed Checking canceling or correcting the timer programming information Note Press PROG VCR Plus twice to confirm the timer programming When the Timer Recording is in progress that program will be highlighted in red In this case you cannot select any other program for correction or add any new programs You cannot select any pro grams for corr...

Страница 35: ...ghted in gray of the asterisked line in the timer programming list Once the timer programming list with error indication is dis played the program line s with error will be cleared only after the programs are can celed and reset to the timer standby mode The current recording pro gram will be highlighted in red Error number will appear An OTR is completed and there is no other timer recordings in ...

Страница 36: ...ake these operations available cancel the Timer Recording or timer standby first indicator disappears To cancel the timer standby mode press STANDBY ON y y I When the Start and the End time are the same the length of the recording will be set for 24 hours When the disc reaches at the end during the Timer Recording the unit turns itself off When the programmed Start and End time are earlier than th...

Страница 37: ...gram setting will be stored 5 Press PROG VCR Plus to exit 6 Press STANDBY ON y y I The unit will be set in the timer standby mode Timer Programming 2 3 4 5 6 7 8 1 JAN 01 12 57AM 1 57AM CH 8 XP Date Start End CH Speed VCR Plus Please enter a PlusCode No DVD RW DVD RW VR DVD RW DVD RW Video DVD R DVD R Note Press to erase the latest number entered incorrectly at step 2 Press CLEAR to erase all numb...

Страница 38: ...o use S VIDEO IN select S Video In If you want to use VIDEO IN Composite select Video In Select Video L2 Front Video In L1 Rear S Video In L1 Rear S Video In Video In or Settings for an external source 1 Press SET UP to display Easy Setting Menu or Advanced Setting Menu If Advanced Setting Menu is displayed proceed to step 3 2 Using K L select Advanced Setting Menu Press ENTER 3 Using K L select S...

Страница 39: ...To cancel the disc protect When you insert a disc protected in this unit Disc Protect ON OFF will appear To cancel the protection setting for the disc select Disc Protect ON OFF at step 3 then select Yes No Yes Disc Protect ON OFF STANDBY ON I CH S VIDEO VIDEO L AUDIO R MONO REC SPEED 5 6 8 4 2 4 8 5 6 2 3 2 3 4 1 OPEN CLOSE SET UP STANDBY ON REPEAT ZOOM CH RETURN MENU LIST TOP MENU CLEAR AUDIO VC...

Страница 40: ...ion Details are on pages 26 27 1 Press SET UP Easy Setting Menu or Advanced Setting Menu will appear 2 Using K L select Disc Press ENTER Disc menu will appear 3 Using K L select Finalize Press ENTER Confirmation window will appear 4 Using K L select Yes Press ENTER Finalizing will start 5 Finalizing is complete This operation may take a while to be completed To cancel finalizing DVD RW only To can...

Страница 41: ...ar 4 Using K L select Disc Full or End of Timer Rec Press ENTER Option window will appear Example Disc Full Example End of Timer Rec 5 Using K L select ON Press ENTER Your setting will be activated 6 Press SET UP to exit Auto Finalize End of Timer Rec OFF ON Auto Finalize Disc Full OFF ON Auto Finalize End of Timer Rec OFF Disc Full OFF DVD R DVD R DVD RW DVD RW Video Auto finalize Note Auto Final...

Страница 42: ...ther regions Look for the symbols below on your DVDs If these region symbols are not on your DVD you cannot play back the DVD on this unit The number inside the globe refers to region of the world A DVD labeled for a specific region can only be played back on the unit with the same region code Hint for DVD playback The contents of DVD disc are generally divided into titles Titles may be further su...

Страница 43: ...Y ON y y I When you are playing back a DVD turn on the TV and be sure to select the input to which the unit is con nected 2 Press OPEN CLOSE A The disc tray will open 3 Insert your disc with its label facing up Align the disc to the disc tray guide 4 Press OPEN CLOSE A to close the disc tray 5 Press TOP MENU to dis play the title menu You can change Original or Playlist of VR mode using MENU LIST ...

Страница 44: ...ER NAME 6 1 FILE NAME 1 2 FILE NAME 2 1 2 JPEG JPEG JPEG Basic playback cont d 1 Press STANDBY ON y y I When you are playing back a DVD or an audio CD turn on the TV and be sure to select the input to which the unit is connected 2 Press OPEN CLOSE A to open the disc tray The disc tray will open 3 Insert your disc with its label facing up Align the disc to the disc tray guide 4 Press PLAY B to star...

Страница 45: ...Title menu Cursor K L B buttons Moves the cursor on the screen ENTER button Selects the currently highlighted menu option Number buttons Selects a numbered menu option some discs only Press ENTER after 3 Press MENU LIST to exit the disc menu DVD V DVD V 1 When PBC Video CD only in the Disc menu is ON and the display menu is not displayed theVideo CD main menu will appear when inserting a disc or p...

Страница 46: ...ar If the feature is not available may appear on the TV screen 2 Using the K L B select a title to play Press ENTER Playback will begin at the title you selected TOP MENU button Displays the Title menu of a DVD disc Cursor K L B buttons Moves the cursor on the screen ENTER button Selects the current highlighted menu option Number buttons Selects a numbered menu option some discs only Press ENTER a...

Страница 47: ... x20 Normal speed playback x1 5 x20 x5 x40 x40 SLOW SLOW SLOW SLOW SLOW SLOW SLOW SLOW SLOW SLOW SLOW SLOW CD CD CD VCD VCD VCD DVD R DVD R DVD RW DVD RW DVD R DVD R DVD RW DVD RW VR DVD RW DVD RW Video DVD V DVD V Skipping TV commercials during playback You can skip TV commercials by pressing in order to enjoy the recorded programs without interruption 1 During playback press Normal playback will...

Страница 48: ...1 8 x1 16 x1 2 x1 4 SLOW SLOW SLOW SLOW SLOW SLOW SLOW SLOW SLOW SLOW SLOW SLOW VCD VCD VCD DVD R DVD R DVD RW DVD RW DVD R DVD R DVD RW DVD RW VR DVD RW DVD RW Video DVD V DVD V Note Forward reverse speed will be indicated with icons as follows Forward Approx Speed x1 16 x1 8 x1 2 Reverse Approx Speed x1 16 x1 8 x1 4 Slow reverse playback is not available on Video CDs 1 REPEAT ZOOM CH RETURN MENU...

Страница 49: ...ON SCREEN ABC DEF JKL GHI MNO TUV PQRS WXYZ 1 4 7 2 5 8 0 3 6 9 ENTER 4 3 2 1 Note Playback image may freeze momen tarily during the Follow Playback However this does not affect the recording The x1 5 fast forward is not available You cannot change the recording time length during the Follow Playback Wait for a moment will be dis played on the screen if you press PLAY B within 1 minute of the star...

Страница 50: ...umber next to will be highlighted Title Enter a desired title number to search using K L or the Number buttons then press ENTER Selected title will start playback Chapter To move to for chapter press B Enter a desired chapter num ber to search using K L or the Number buttons then press ENTER Selected chapter will start play back 3 Press STOP C once to stop playback The resume message will appear S...

Страница 51: ...rt Chapter To move to for chapter press B Using K L or the Number buttons enter a desired chapter number to search Press ENTER Chapter search will start DVD Video 1 1 0 00 00 DVD R DVD R DVD RW DVD RW DVD R DVD R DVD RW DVD RW VR DVD RW DVD RW Video DVD V DVD V Note In search mode display total numbers of each search contents title chapter time are shown as a denominator 001 028 00 00 00 02 18 33 ...

Страница 52: ...reen for CD 2 Using B select icon Press ENTER The number next to will be highlighted To move to the clock icon press B When time search is not available 0 00 00 0 00 00 forVideo CD and Audio CD is dis played instead of time count 3 Using K L or the Number buttons enter a desired time to search Press ENTER Time search will start Audio CD 1 0 00 00 DVD Video 1 1 0 00 00 CD CD CD VCD VCD VCD without ...

Страница 53: ... B DVD Audio CD and Video CD only Track The current track will be played back repeatedly Audio CD Video CD and JPEG only Group The current group will be played back repeatedly JPEG only Track All Group OFF JPEG 1 0 15 25 Track All A B OFF Video CD 1 0 15 25 Track All A B OFF Audio CD 1 0 00 00 Title Chapter A B OFF DVD Video 1 1 0 00 00 DVD Video 1 1 0 00 00 JPEG JPEG JPEG CD CD CD VCD VCD VCD wit...

Страница 54: ... playback sequence in your desired order 1 Press SET UP Easy Setting Menu or Advanced Setting Menu will appear 2 Using K L select CD Playback Mode Press ENTER CD Playback Mode menu will appear 3 Using K L select Program Play Press ENTER Program play list will appear 4 Using K L or the Number buttons select a desired track Press ENTER or B A cursor will move to the next 5 Press PLAY B to start pro ...

Страница 55: ...titles will disappear OFF 1 English 2 Japanese DVD Video 1 1 0 00 00 DVD Video 1 1 0 00 00 DVD RW DVD RW VR DVD V DVD V You can select a desired audio and video format Selections depend on the contents of the disc you are playing back 1 OPEN CLOSE SET UP STANDBY ON REPEAT ZOOM CH RETURN MENU LIST TOP MENU CLEAR AUDIO VCR Plus PROG ON SCREEN ABC DEF JKL GHI MNO TUV PQRS WXYZ 1 4 7 2 5 8 0 3 6 9 ENT...

Страница 56: ...ains multi angle scenes 1 During playback press ON SCREEN Display menu will appear Angle icon appears when different camera angles are available 2 Using B select icon Press ENTER Angle will change each time you press ENTER DVD Video 1 1 0 00 00 DVD V DVD V Visual Noise Reduction 1 During playback press ON SCREEN Display menu will appear 2 Using B select icon Press ENTER Noise Reduction menu will a...

Страница 57: ... For discs in VR mode you can use either Original menu or Playlist menu which is created from the original for editing Editing original titles The following items are available for editing of the original titles Deleting titles Refer to page 61 Setting titles to protect Refer to page 62 Releasing titles from protecting Refer to page 63 Editing playlists You can create a playlist from original titl...

Страница 58: ...c is inserted into the unit 4 Using K L select Title Delete Press ENTER Confirmation window will appear 5 Using K L select Yes Press ENTER Title will be deleted 6 After this operation is com pleted press SET UP to exit Writing the data on the disc will start momentarily This operation may take a while to be completed Title List JAN 1 1 00AM CH12 XP 4 5 1 2 3 Title List Title Delete No Yes JAN 1 1 ...

Страница 59: ... C 1 2 3 JAN 1 1 00AM CH12 XP 0 00 59 6 DVD R DVD R DVD RW DVD RW Video Putting names on titles Press ABC DEF GHI JKL MNO PQRS TUV WXYZ space abc def ghi jkl mno pqrs tuv wxyz space space _ 2 3 4 5 6 7 8 9 0 1 ABC abc Select 123 Step1 Step2 Follow the list below press the Number buttons repeatedly until the desired letter appears Select a desired character set using K L then press ENTER Guide to e...

Страница 60: ...ress ENTER Confirmation window will appear 3 Using K L select Yes Press ENTER Chapter markers will be added If you select OFF at step 2 all the chapter markers will be erased 4 After this operation is com pleted press SET UP to exit Writing the data on the disc will start momentarily This operation may take a while to be completed Title List Chapter Mark 5 minutes No Yes JAN 1 1 00AM CH12 XP 1 27 ...

Страница 61: ...n is com pleted press SET UP to exit Writing the data on the disc will start momentarily This operation may take a while to be completed Original Title Delete No Yes JAN 1 1 00AM CH12 XP Wait for a moment 3 Original Title Delete No Yes JAN 1 1 00AM CH12 XP 0 00 59 3 Original Protect Title Delete JAN 1 1 00AM CH12 XP 0 00 59 3 Original JAN 1 1 00AM CH12 XP 4 5 6 1 2 3 Disc Original Format Finalize ...

Страница 62: ...ll start momentarily To protect a whole disc DVD RW VR mode Only Select Disc Protect from Disc menu then select Yes Refer to Setting a disc to pro tect on page 39 This operation may take a while to be completed Original Protect OFF ON JAN 1 1 00AM CH12 XP 3 Wait for a moment Original Protect OFF ON JAN 1 1 00AM CH12 XP 0 00 59 3 DVD RW DVD RW VR Setting titles to protect OPEN CLOSE SET UP STANDBY ...

Страница 63: ... 1 Follow steps 1 to 3 on page 61 to display the Original menu A icon is shown on the protected titles Protect is already highlighted Press ENTER Confirmation window will appear 2 Confirm the indication ON OFF Press ENTER The key icon will disappear from the title in the Original list 3 After this operation is com pleted press SET UP to exit Writing the data on the disc will start momentarily This...

Страница 64: ...the data on the disc will start momentarily This operation may take a while to be completed Playlist Title Delete No Yes JAN 1 1 00AM CH12 XP Wait for a moment 3 Playlist Title Delete No Yes JAN 1 1 00AM CH12 XP 0 00 59 3 Playlist Scene Delete Title Delete Edit Title Name Chapter Mark Index Picture Title Dividing Title Combining JAN 1 1 00AM CH12 XP 0 00 59 6 Playlist JAN 1 1 00AM CH12 XP 4 5 6 1 ...

Страница 65: ... FWD D PLAY B and PAUSE F again to move to the end point and press ENTER The cursor will move to Preview The bar at the bottom of the screen indicates the total and the elapsed time of the title The area selected for deletion will be indicat ed in red during the preview Press ENTER again to start the preview You can check the result of the delation by preview 3 Using K L select Delete Press ENTER ...

Страница 66: ...M CH12 XP 0 00 59 3 DVD RW DVD RW VR Putting names on titles Press ABC DEF GHI JKL MNO PQRS TUV WXYZ space abc def ghi jkl mno pqrs tuv wxyz space space _ 2 3 4 5 6 7 8 9 0 1 ABC abc Select 123 Step1 Step2 Follow the list below press the Number buttons repeatedly until the desired letter appears Select a desired character set using K L then press ENTER Guide to edit title name A B C a b c 1 2 3 To...

Страница 67: ... be added at the point you have decided Add When you select Delete at step 2 the chapter marker you have selected will be deleted Delete 4 After this operation is com pleted press SET UP to exit Writing the data on the disc will start momentarily This operation may take a while to be completed Chapter 2 2 Playlist Chapter Mark Delete No Yes JAN 1 1 00AM CH12 XP Wait for a moment 3 Chapter 2 2 Play...

Страница 68: ...ture you want to select as thumbnail Then press ENTER Confirmation window will appear 2 Using K L select Yes Press ENTER A picture for thumbnail will be set 3 After this operation is com pleted press SET UP to exit Writing the data on the disc will start momentarily This operation may take a while to be completed Playlist Index Picture No Yes JAN 1 1 00AM CH12 XP Wait for a moment 3 Playlist Index...

Страница 69: ...cene of each title 3 After this operation is com pleted press SET UP to exit Writing the data on the disc will start momentarily This operation may take a while to be completed Playlist Title Dividing No Yes JAN 1 1 00AM CH12 XP Wait for a moment 3 Playlist Title Dividing No Yes JAN 1 1 00AM CH12 XP 0 00 59 3 F DVD RW DVD RW VR Note If a disc contains the maxi mum number of recordings 99 you canno...

Страница 70: ...may take a while to be completed Yes No Playlist Title Combining 1 3 Wait for a moment 2 1 2 Yes No Playlist Title Combining 2 3 1 2 1 Playlist Title Combining JAN 1 1 00AM CH12 XP 2 3 1 1 DVD RW DVD RW VR Note If the number of chapter markers in the combined title exceeds 999 the combination will be rejected If one of two titles in the original is deleted the com bined new title will be delet ed ...

Страница 71: ...needed 1 Follow steps 1 to 2 on page 64 to display the Playlist Add New Title Delete Playlist menu will appear next to the last title Using K L B select Delete Playlist Press ENTER Confirmation window will appear 2 Using B select Yes Press ENTER A Playlist will be deleted 3 After this operation is com pleted press SET UP to exit Writing the data on the disc will start momentarily This operation ma...

Страница 72: ...tput sound during fast forward playback Set the parental level for DVD disc playback Set and change the password Audio Language Subtitle Language OSD Language Screen Saver Digital Out Dynamic Range Control Fast Forward with Audio Parental Lock Change password English French Spanish Original English French OFF English French OFF 5 minutes 10 minutes Set the brightness of front display FL Dimmer Aut...

Страница 73: ...spect 4 3 Letter Box Subtitle Language OFF Digital Out Fast Forward with Audio ON Dynamic Range Control ON Disc Menu Language English Audio Language Original Progressive OFF Disc Menu Language French Spanish Other English Audio Language English French Spanish Other Original Disc Menu Language Default English Set the language for Disc Menu Using K L select a lan guage Press ENTER Your setting will ...

Страница 74: ...ress ENTER Advanced Setting Menu will appear 3 Using K L select Display Press ENTER Option window will appear 4 Using K L select a desired item Press ENTER Press STOP C if you are playing back a disc Playback Parental Lock All TV Aspect 4 3 Letter Box Digital Out Fast Forward with Audio ON Dynamic Range Control ON Disc Menu Language English Audio Language Original Subtitle Language OFF Progressive...

Страница 75: ...cont d 1 Press SET UP Easy Setting Menu or Advanced Setting Menu will appear If Advanced Setting Menu is displayed proceed to step 3 Press STOP C if you are playing back a disc Choose the appropriate Audio settings for your equipment Audio setting Instructions continue on the next page Display FL Dimmer Auto Screen Saver 10 minutes OSD Language English FL Dimmer Bright Dark Auto Using K L select a...

Страница 76: ...rt the Dolby Digital into PCM 2 channel When your amplifier decoder is NOT com patible with Dolby Digital set to PCM Stream Outputs Dolby Digital signals When your amplifier decoder is compati ble with Dolby Digital set to Stream B A Audio setting cont d Note When playing back a DVD RW disc recorded in VR mode If the audio on a disc is recorded in Dolby Digital format set Dolby Digital to PCM so t...

Страница 77: ...or Parental lock level 1 Press SET UP Easy Setting Menu or Advanced Setting Menu will appear If Advanced Setting Menu is displayed proceed to step 3 2 Using K L select Advanced Setting Menu Press ENTER Advanced Setting Menu will appear 3 Using K L select Playback Press ENTER Option window will appear 4 Using K L select Parental Lock Press ENTER Press STOP C if you are playing a disc Some DVD Video...

Страница 78: ...the current password B Settings for Parental lock level cont d Playback Parental Lock All Disc Menu Language English TV Aspect 4 3 Letter Box Subtitle Language OFF Digital Out Audio Language Original Fast Forward with Audio ON Dynamic Range Control ON Progressive OFF Parental Lock 8 7 6 5 4 3 2 1 All Parental Lock Default All Set the Parental Lock level Using K L change the parental level Press EN...

Страница 79: ...ception does not fill the screen Try to set the channels with Auto Preset in the Setting menu page 18 Select a channel of any TV program using CH The playback picture or TV program from the equipment connected through the unit is distorted If the playback picture output from a DVD player VCR or tuner goes through the unit before reaching your TV the copy protection signal applied to some programs ...

Страница 80: ...on signals that restricts copying The timer setting overlapped with another setting that was set later or has priority The subtitle language cannot be changed or turned off Multilingual subtitle are not recorded on the DVD Video The DVD Video prohibits changing of the subtitles Try changing the subtitles using the DVD Video s menu The disc does not start playback from the beginning Resume playback...

Страница 81: ...tandardized disc which bears the marks on page 42 Insert the disc with the labeled side facing up Recording Error This disc is protected and not recordable Can not record on this disc Cause Error message Solution The region of the DVD Video disc does not match the ones on the unit The current selected parental level in the Setting Menu prohibits playback The recording function encountered a copy p...

Страница 82: ...ll even if the recording area still has enough space When recordings are performed repeatedly onto an unstable disc this area may become full Every time you insert a disc for recording the disc s working area will be taken up And if you repeat this frequently it will be used up sooner and you may not be able to record full 99 titles You are trying to record onto the disc already finalized Delete u...

Страница 83: ...eater System Inc Finalize To make recorded contents on DVD discs possible to be played back on DVD players With this unit it is possible to finalize DVD RW DVD R discs PCM Pulse Code Modulation PCM is a format that converts audio into digital data It is mainly used for Audio CDs and DAT This unit can play back sounds as real istic as possible by converting even compressed Dolby Digital and MPEG au...

Страница 84: ...nghalese 6555 Siswat 6565 Slovak 6557 Slovenian 6558 Somali 6561 Spanish 5165 Sundanese 6567 Swahili 6569 Swedish 6568 Tagalog 6658 Tajik 6653 Tamil 6647 Tatar 6666 Telugu 6651 Thai 6654 Tibetan 4861 Tigrinya 6655 Tonga 6661 Tsonga 6665 Turkish 6664 Turkmen 6657 Twi 6669 Ukrainian 6757 Urdu 6764 Uzbek 6772 Vietnamese 6855 Volapuk 6861 Welsh 4971 Wolof 6961 Xhosa 7054 Yiddish 5655 Yoruba 7161 Zulu ...

Страница 85: ...mpling frequency Compression format 13 5MHz MPEG 48kHz Dolby Digital Video input Input level Jacks Video output Output level Jack Component video output Output level Jacks S Video input Y Iuminance Input level C color Input level Jacks Audio input During audio input Jacks Audio output During audio output Jacks S Video output Y Iuminance Output level C color Output level Jack VHF UHF antenna input ...

Страница 86: ...86 EN Others Memo E6751CD_EN1 qxd 05 7 19 5 28 PM Page 86 ...

Страница 87: ...EN 87 Recording Disc Playback Editing Before you start Connections Getting started Changing the Setting menu Others E6751CD_EN1 qxd 05 7 19 5 28 PM Page 87 ...

Страница 88: ...N I CH S VIDEO VIDEO L AUDIO R MONO REC SPEED VCR Plus and PlusCode are registered trademarks of Gemstar Development Corporation TheVCR Plus system is manufactured under license from Gemstar Development Corporation For Customer Use Read carefully the information located at the back of this unit and enter below the Serial No Retain this information for future reference Model No Serial No Printed in...

Отзывы: