background image

GETTING STARTED

10 

EN

MasterPage: Left

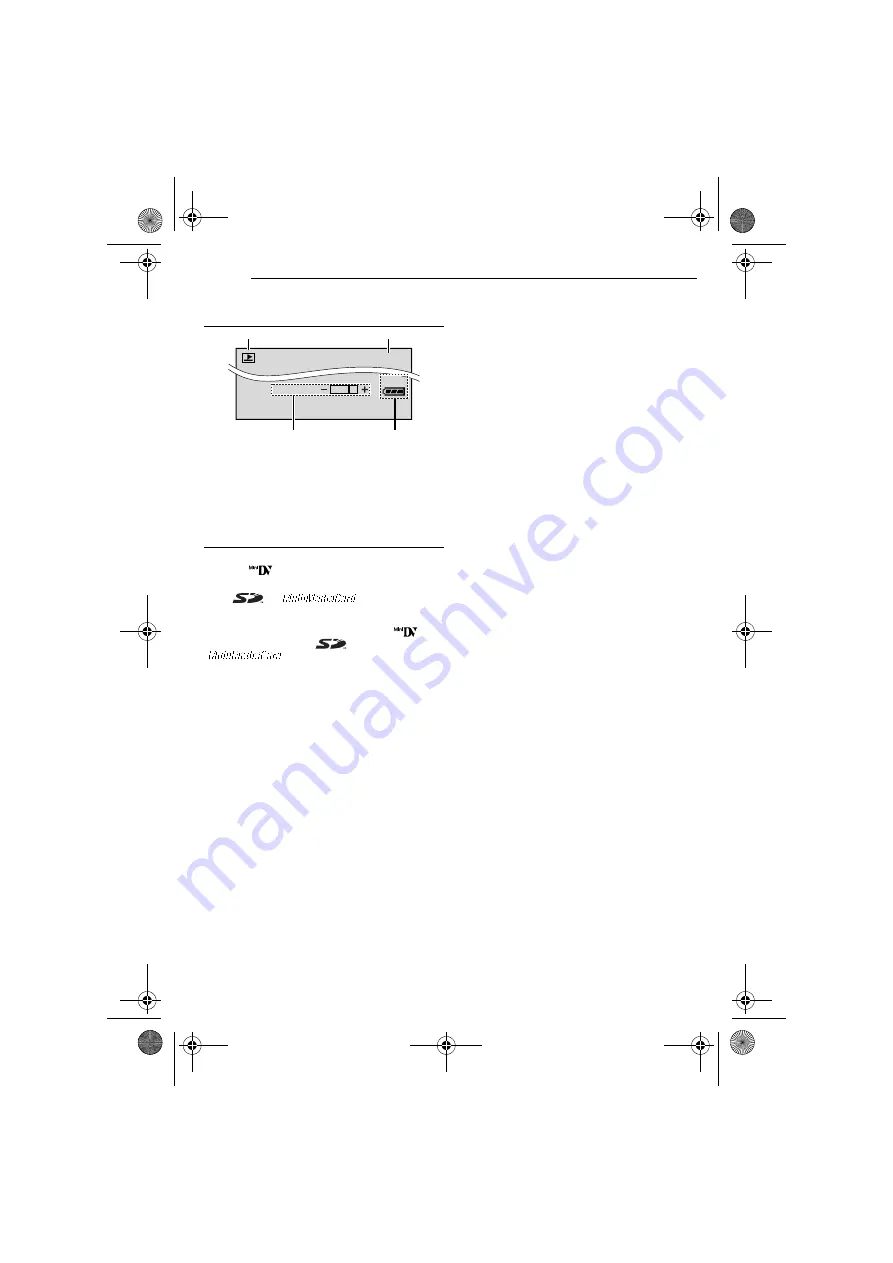
During D.S.C. Playback (GR-DF470/450 
only)

a

Operation Mode Indicator (

pg. 30)

B

Folder/File Number (

pg. 30)

C

Battery Remaining Power Indicator 
(

pg. 58)

D

Brightness Control Indicator (LCD monitor/
Viewfinder) (

pg. 17)

Before Using This Camcorder

Make sure you only use cassettes with the Mini 
DV mark 

.

Make sure you only use memory cards

*

 with the 

mark  

or 

.

This camcorder is designed exclusively for the 
digital video cassette, SD Memory Card and 
MultiMediaCard. Only cassettes marked “

” and 

memory cards marked “

” or 

” can be used with this unit.

* Memory cards can be used with GR-DF470 and 

GR-DF450 only.

Remember that this camcorder is not 
compatible with other digital video formats.

Remember that this camcorder is intended for 
private consumer use only.

Any commercial use without proper permission is 
prohibited. (Even if you record an event such as a 
show, performance or exhibition for personal 
enjoyment, it is strongly recommended that you 
obtain permission beforehand.)

Before recording important video, be sure to 
make a trial recording. 

Play back your trial recording to make sure the 
video and audio have been recorded properly.

We recommend cleaning your video heads 
before use.

If you haven’t used your camcorder for a while, the 
heads may be dirty. We recommend periodically 
cleaning the video heads with a cleaning cassette 
(optional).

Be sure to store your cassette tapes and 
camcorder in the proper environment.

Video heads can become dirty more easily if your 
cassette tapes and camcorder are stored in a dusty 
area. Cassette tapes should be removed from the 
camcorder and stored in cassette cases. Store the 
camcorder in a bag or other container.

Use SP (Standard) mode for important video 
recordings.

LP (Long Play) mode lets you record 50% more 
video than SP (Standard) mode, but you may 
experience mosaic-like noise during playback 
depending on the tape characteristics and the 
usage environment. 
So, for important recordings, we recommend using 
SP mode.

It is recommended that you use JVC brand 
cassette tapes.

Your camcorder is compatible with all brands of 
commercially available cassette tapes complying 
with the MiniDV standard, but JVC brand cassette 
tapes are designed and optimized to maximize the 
performance of your camcorder.

Also read “CAUTIONS” on pages 62 – 65.

Microsoft

®

 and Windows

®

 are either registered 

trademarks or trademarks of Microsoft 
Corporation in the United States and/or other 
countries.

Macintosh is a registered trademark of Apple 
Computer, Inc.

QuickTime is a registered trademark of Apple 
Computer, Inc.

BR I GHT

1

100-0013

2

3

4

50m

GR-DF470-450US.book  Page 10  Thursday, February 24, 2005  11:26 AM

Содержание DF450 - Camcorder - 680 KP

Страница 1: ...GITAL VIDEO CAMERA The camcorder illustrations appearing in this instruction manual are of the GR DF470 The D S C Digital Still Camera features are available on GR DF470 and GR DF450 GETTING STARTED 6 VIDEO RECORDING PLAYBACK 19 27 ADVANCED FEATURES 36 REFERENCES 56 67 DIGITAL STILL CAMERA D S C RECORDING PLAYBACK GR DF470 450 only For Customer Use Enter below the Model No and Serial No which is l...

Страница 2: ...ht 墌 pg 45 You can also select a spot metering area so that more precise exposure compensation is available 墌 pg 45 Spot Exposure Control Navigation Function The Navigation Function helps you check tape contents by making thumbnail images on a memory card 墌 pg 48 E Mail Clip Recording You can record video clips on the memory card as files which can be sent via e mail 墌 pg 31 GR DF470 450 only Majo...

Страница 3: ...ttery promptly Keep away from children Do not disassemble and do not dispose of in fire CAUTION RISK OF ELECTRIC SHOCK DO NOT OPEN CAUTION TO REDUCE THE RISK OF ELECTRIC SHOCK DO NOT REMOVE COVER OR BACK NO USER SERVICEABLE PARTS INSIDE REFER SERVICING TO QUALIFIED SERVICE PERSONNEL The lightning flash with arrowhead symbol within an equilateral triangle is intended to alert the user to the presen...

Страница 4: ...y not be able to get out No naked flame sources such as lighted candles should be placed on the apparatus When discarding batteries environmental problems must be considered and the local rules or laws governing the disposal of these batteries must be followed strictly The apparatus shall not be exposed to dripping or splashing Do not use this equipment in a bathroom or places with water Also do n...

Страница 5: ... Index Playback Of Files 30 Viewing File Information 30 Removing On Screen Display 30 ADDITIONAL FEATURES FOR D S C GR DF470 450 only 31 E Mail Clip Recording 31 Dubbing Still Images Recorded On A Tape To A Memory Card 32 Resetting The File Name 32 Protecting Files 32 Deleting Files 33 Setting Print Information DPOF Setting 34 Initializing A Memory Card 35 ADVANCED FEATURES 36 MENUS FOR DETAILED A...

Страница 6: ...6 EN MasterPage Left GETTING STARTED Index L K S X W V U P Q R a Z l k Y b c d e hi g f O T o n m M N j 1 C 9 J G D E F B 8 GR DF470 450US book Page 6 Thursday February 24 2005 11 26 AM ...

Страница 7: ... covers S S Video Input Output Connector S 墌 pg 23 51 T Microphone connector MIC 墌 pg 54 U USB Universal Serial Bus Connector 墌 pg 53 V Digital Video i Link Connector DV IN OUT 墌 pg 52 53 i Link i Link refers to the IEEE1394 1995 industry specification and extensions thereof The logo is used for products compliant with the i Link standard W Audio Video Input Output Connector AV 墌 pg 23 51 X DC Inp...

Страница 8: ...nnected 墌 pg 39 AUDIO LEV GR DF470 450 only During D S C Recording Only GR DF470 450 only a Image Size 1024 1024 x 768 or 640 640 x 480 墌 pg 40 B Interval Shooting Icon 墌 pg 28 Focus Icon 墌 pg 27 C Shooting Icon Appears and blinks during shooting D Card Icon Appears during shooting Blinks in white when a memory card is not loaded Blinks in yellow while the camcorder is reading the data in the memo...

Страница 9: ... 墌 pg 40 B Blank Search Indicator 墌 pg 22 C Live Slow Indicator 墌 pg 42 Snapshot Indicator 墌 pg 43 D Tape Speed 墌 pg 37 E 4 Playback 5 Fast Forward Shuttle Search 3 Rewind Shuttle Search 9 Pause 9 U Forward Frame By Frame Playback Slow Motion Y 9 Reverse Frame By Frame Playback Slow Motion D Audio Dubbing 9D Audio Dubbing Pause Appear while a tape is running F Sound Input For Audio Dubbing 墌 pg 54...

Страница 10: ... t used your camcorder for a while the heads may be dirty We recommend periodically cleaning the video heads with a cleaning cassette optional Be sure to store your cassette tapes and camcorder in the proper environment Video heads can become dirty more easily if your cassette tapes and camcorder are stored in a dusty area Cassette tapes should be removed from the camcorder and stored in cassette ...

Страница 11: ...A lithium battery is pre installed in the Remote Control Unit at time of shipment with insulation sheet To use the Remote Control Unit remove the insulation sheet GR DF470 only NOTES In order to maintain optimum performance of the camcorder provided cables may be equipped with one or more core filter If a cable has only one core filter the end that is closest to the filter should be connected to t...

Страница 12: ...e 3 Slide the strap guide fully towards the eyelet How To Use The Audio Extension Cable When using an optional external microphone connect to the provided Audio extension cable with a core filter attached then connect the Audio extension cable to the camcorder The core filter reduces interference 墌 pg 13 2 1 3 Strap guide Buckle Eyelet Audio extension cable provided Core filter Open the cover Ster...

Страница 13: ...ower Do not use provided power supply units with other equipment Charging The Battery Pack 1 Set the Power Switch to OFF 2 With the arrow on the battery pack pointing right push the battery pack slightly against the battery pack mount a 3 Slide the battery pack to the right until it locks in place b 4 Connect the AC Adapter to the camcorder 5 Plug the AC Adapter into an AC outlet The POWER CHARGE ...

Страница 14: ...ached to the camcorder Using The Battery Pack Perform steps 2 3 in Charging The Battery Pack Maximum continuous recording time Provided NOTES Recording time is reduced significantly under the following conditions Zoom or Record Standby mode is engaged repeatedly The LCD monitor is used repeatedly The playback mode is engaged repeatedly The LED Light is used Before extended use it is recommended th...

Страница 15: ...rder by opening closing the LCD monitor or pulling out pushing in the viewfinder INFORMATION The following explanations in this manual supposes the use of LCD monitor in your operation If you want to use the viewfinder close the LCD monitor and pull out the viewfinder fully Operation Mode Power Switch Position A Full Auto Recording Allows you to record using NO special effects or manual adjustment...

Страница 16: ...trip 2 Pass your right hand through the loop and grasp the grip 3 Adjust your thumb and fingers through the grip to easily operate the Recording Start Stop Button Power Switch and Power Zoom Lever Be sure to fasten the velcro strip to your preference 1 Set the Power Switch to A or M while pressing down the Lock Button located on the switch 2 Make sure the LCD monitor is closed and locked Pull out ...

Страница 17: ...lder opens automatically Do not touch internal components 2 Insert or remove a tape and press PUSH HERE to close the cassette holder Be sure to press only the section labeled PUSH HERE to close the cassette holder touching other parts may cause your finger to get caught in the cassette holder resulting in injury or product damage Once the cassette holder is closed it recedes automatically Wait unt...

Страница 18: ... pull it out Do not touch the terminal on the reverse side of the label 4 Close the card cover To protect valuable files available only for SD Memory Card Slide the write erase protection tab on the side of the memory card in the direction of LOCK This prevents the memory card from being recorded over To record on this memory card slide the tab back to the position opposite to LOCK before loading ...

Страница 19: ...ion is left between recorded scenes on the tape the time code is interrupted and errors may occur when editing the tape To avoid this refer to Recording From The Middle Of A Tape 墌 pg 21 To turn the beep sounds off 墌 pg 36 38 Tape Remaining Time Approximate tape remaining time appears on the display h m means the camcorder is calculating the remaining time When the remaining time reaches 2 minutes...

Страница 20: ...processing and is therefore called Digital Zoom During Digital zoom the quality of image may suffer Digital zoom cannot be used when the VIDEO MEMORY Switch is set to MEMORY GR DF470 450 only Macro shooting as close as approx 5 cm 2 to the subject is possible when the Power Zoom Lever is set all the way to W Also see TELE MACRO in MANUAL Menu on page 38 When shooting a subject close to the lens zo...

Страница 21: ...g When a tape is removed and re inserted during shooting When shooting using a partially recorded tape When shooting on a blank portion located partway through the tape When shooting again after shooting a scene then opening closing the cassette holder cover NOTES The time code cannot be reset During fast forwarding and rewinding the time code indication does not move smoothly The time code is dis...

Страница 22: ...ack press 5 for forward search or 3 for reverse search 2 To resume normal playback press 4 9 During playback press and hold 5 or 3 The search continues as long as you hold the button Once you release the button normal playback resumes A slight mosaic effect appears on the display during Shuttle Search This is not a malfunction ATTENTION During Shuttle Search parts of the picture may not be clearly...

Страница 23: ...o use the YTU94146A S Video cable Consult the JVC Service Center described on the sheet included in the package for details on its availability Make sure to connect the end with a core filter to the camcorder The core filter reduces interference 1 Make sure all units are turned off 2 Connect the camcorder to a TV or VCR as shown in the illustration If using a VCR go to step 3 If not go to step 4 3...

Страница 24: ...y pushing the lock tab 2 Insert the battery in the holder and be sure to have the mark visible 3 Slide the holder back in until you hear a click Beam Effective Area indoor use When using the remote control be sure to point it at the remote sensor The transmitted beam s approximate effective distance for indoor use is 5 m 16 ft NOTE The transmitted beam may not be effective or may cause incorrect o...

Страница 25: ...witch set to PLAY GR DF470 450 only Slow Motion Playback During normal video playback press SLOW YI or IU more than approx 2 seconds After approx 10 minutes normal playback resumes To pause Slow Motion playback press PAUSE 9 To stop Slow Motion playback press PLAY U NOTES You can also engage Slow Motion Playback from Still Playback by pressing SLOW YI or IU more than approx 2 seconds During Slow M...

Страница 26: ...ck Special Effects Allows you to add creative effects to the video playback image CLASSIC FILM Gives recorded scenes a strobe effect MONOTONE Like classic black and white films your footage is shot in B W Used together with the Cinema mode it enhances the classic film effect SEPIA Recorded scenes have a brownish tint like old photos Combine this with the Cinema mode for a classic look STROBE Your ...

Страница 27: ...de with no frame To delete unwanted still images refer to Deleting Files 墌 pg 33 When you do not want to hear the shutter sound set BEEP to OFF 墌 pg 36 38 NOTE If shooting is not performed for approx 5 minutes when the Power Switch is set to A or M and power is supplied from the battery pack the camcorder shuts off automatically to save power To perform shooting again push back and pull out the vi...

Страница 28: ... step 2 has passed 5 Press SNAPSHOT to stop Interval Shooting To cancel Interval Shooting mode Set INT SHOT to OFF in step 1 NOTES It is recommended to use the AC Adapter as the power supply instead of the battery pack 墌 pg 15 To distinguish between still images taken in Interval Shooting mode and other still images it is recommended that you reset the file names before shooting 墌 pg 32 Interval S...

Страница 29: ... the remote control 墌 pg 25 You can run through all the images stored in memory card automatically 1 Perform steps 1 3 in Normal Playback Of Images 2 Press 4 9 to start Auto Playback If you press during Auto Playback files are displayed in descending order If you press during Auto Playback files are displayed in ascending order 3 To end Auto Playback press 8 You can view video clips 墌 pg 31 stored...

Страница 30: ... CLIP only PROTECT When set to ON the file is protected from accidental erasure 墌 pg 32 Press the INFO Button again to close the Information Screen NOTE With images shot with other devices or processed on a PC QUALITY will be displayed 1 Perform steps 1 3 in Normal Playback Of Images 墌 pg 29 2 Press MENU The Menu Screen appears 3 Press or to select DISPLAY and press SET The Sub Menu appears 4 Pres...

Страница 31: ...3 Set the VIDEO MEMORY Switch to VIDEO 4 Set the Power Switch to PLAY while pressing down the Lock Button located on the switch 5 Press 4 9 to start video playback 6 Press E MAIL to engage the E Mail Clip Record Standby mode E CLIP appears To cancel E Mail Clip Recording press E MAIL again or press 8 to stop video playback 7 At the point you want to start dubbing press the Recording Start Stop But...

Страница 32: ...JVCGR will be made and the file name of the next shot starts from DVC00001 NOTE If the file name reaches DVC09999 a new folder such as 101JVCGR will be made and the file name will start again from DVC00001 The Protect mode helps prevent the accidental erasure of files 1 To protect the file for images display its playback screen 墌 pg 29 for video clips display its playback screen 墌 pg 29 2 Press ME...

Страница 33: ...ct DELETE and press SET The Sub Menu appears To delete the currently displayed file 4 Press or to select CURRENT and press SET The DELETE screen appears 5 Press or to select the desired file 6 Press or to select EXECUTE and press SET To cancel deletion select RETURN Repeat steps 5 and 6 for all files you want to delete NOTE If the mark appears the selected file is protected and cannot be deleted T...

Страница 34: ...nd press SET The normal playback screen appears To cancel selection select RETURN To Print By Selecting Still Images And Number Of Prints 1 Perform steps 1 3 in To Print All Still Images One Print For Each 2 Press or to select CURRENT and press SET The DPOF screen appears 3 Press or to select the desired file 4 Press or to select the number indication 00 and press SET 5 Select the number of prints...

Страница 35: ...those which have been protected are cleared 1 Set the VIDEO MEMORY Switch to MEMORY 2 Set the Power Switch to PLAY while pressing down the Lock Button located on the switch 3 Press MENU The Menu Screen appears 4 Press or to select FORMAT and press SET The FORMAT screen appears 5 Press or to select EXECUTE and press SET The memory card is initialized When initialization is finished NO IMAGES STORED...

Страница 36: ...DISPLAY 墌 pg 39 o DSC 墌 pg 40 t VIDEO 墌 pg 40 n VIDEO DISPLAY 墌 pg 41 1 Press or to select the desired function and press SET The Sub Menu appears Example m CAMERA Menu 2 Press or to select the desired parameter 3 Press SET Selection is complete Repeat the procedure if you wish to set other function menus 4 Press SET The Menu Screen returns Repeat the procedure if you wish to set other function me...

Страница 37: ... Digital Zoom By digitally processing and magnifying images zooming is possible beyond 15X the optical zoom limit to a maximum of 700X digital magnification Available only when the VIDEO MEMORY Switch is set to VIDEO GR DF470 450 only FULL Snapshot mode with no frame NEGA Nega mode PIN UP Pin Up mode FRAME Snapshot mode with frame SLOW Live Slow mode For details on the procedure refer to Live Slow...

Страница 38: ...ratio becomes 16 9 When using this mode refer to your wide screen TV s instruction manual During playback recording on 4 3 TVs LCD monitor viewfinder black bands are inserted at the top and bottom of the screen and the image appears like a letter boxed 16 9 movie SQUEEZE For playback on TVs with an aspect ratio of 16 9 Naturally expands the image to fit the screen without distortion The indicator ...

Страница 39: ...eset CAMERA DISPLAY The n CAMERA DISPLAY settings are effective even when the Power Switch is set to A However the menu settings can be changed only when the Power Switch is set to M The n CAMERA DISPLAY settings except BRIGHT LANGUAGE and AUDIO LEV are effective only for shooting Factory preset 墌 pg 17 Brightness Adjustment Of The Display LCD Keeps the camcorder s display except the date time and...

Страница 40: ...AP SLOW selection in CAMERA Menu is also applicable to memory card recording OFF Disables the function ON Enables interval shooting 墌 pg 28 15SEC 30SEC 1MIN 2MIN 5MIN 10MIN 30MIN 60MIN Allows you to select the shooting interval for interval shooting 墌 pg 28 VIDEO Factory preset SOUND MODE and NARRATION During tape playback the camcorder detects the sound mode in which the recording was made and pl...

Страница 41: ...tting is linked with s SYSTEM which appears when the Power Switch is set to M 墌 pg 36 The parameters are the same as in the description on page 38 VIDEO DISPLAY The n VIDEO DISPLAY settings are effective only for video playback except BRIGHT LANGUAGE and AUDIO LEV The parameters except OFF in ON SCREEN settings are the same as in the description CAMERA DISPLAY on page 39 Factory preset 墌 pg 17 Bri...

Страница 42: ...RY Switch to VIDEO 2 Set SNAP SLOW to SLOW 墌 pg 36 37 The Live Slow indicator appears 3 Press SLOW during recording or playback The moving pictures are divided into four frames They are recorded or played back for 1 5 seconds and then normal recording or playback resumes Record a vacation or an important event in 5 second clips to keep the action moving This function is available only for video re...

Страница 43: ...he camcorder into focus To prevent this use of a tripod is recommended This feature lets you record still images that look like photographs onto a tape 1 Set the VIDEO MEMORY Switch to VIDEO 2 Set the Power Switch to M 3 Set SNAP SLOW to the desired mode 墌 pg 36 37 The Snapshot indicator appears 4 Press SNAPSHOT There is the sound effect of a shutter closing The O indication appears and a still im...

Страница 44: ...ams or light reflecting off the surface of a body of water When shooting a scene with a high contrast background The following low contrast warnings appear blinking and Manual exposure control is recommended in the following situations When shooting using reverse lighting or when the background is too bright When shooting on a reflective natural background such as at the beach or when skiing When ...

Страница 45: ...ple operation backlight compensation feature brightens the dark subject portion by increasing the exposure 1 Set the Power Switch to M 2 Press BACK LIGHT so that the Backlight Compensation indicator appears To cancel Backlight Compensation Press BACK LIGHT twice so that the indicator disappears NOTE Using Backlight Compensation may cause the light around the subject to become too bright and the su...

Страница 46: ...lance manually when shooting under various types of lighting 1 Set the Power Switch to M 2 Hold a sheet of plain white paper in front of the subject Adjust zoom or position yourself so that the white paper fills the screen 3 Select MWB in u W BALANCE menu 墌 pg 36 then press and hold SET until begins blinking When the setting is completed stops blinking 4 Press SET twice The Menu Screen closes and ...

Страница 47: ...WINDOW The scene starts in the center of a black screen and wipes in toward the corners or comes in from the corners gradually wiping out to the center WIPE SLIDE Wipe in from right to left or wipe out from left to right WIPE DOOR Wipe in as the two halves of a black screen open to the left and right revealing the scene or wipe out and the black screen reappears from left and right to cover the sc...

Страница 48: ...cally adjusts the focus from approx 10 m 32 ft to infinity From less than 10 m 32 ft adjust the focus manually SEPIA Recorded scenes have a brownish tint like old photos Combine this with the Cinema mode for a classic look MONOTONE Like classic black and white films your footage is shot in B W Used together with the Cinema mode it enhances the classic film effect CLASSIC FILM Gives recorded scenes...

Страница 49: ...et the Power Switch to PLAY 2 Press 4 9 to start video playback 3 Press STORE at the desired point The indicator appears briefly and the image of the point where STORE is pressed is stored in the memory card as a thumbnail image To delete thumbnail images 1 Set the Power Switch to PLAY 2 Press MENU The Menu Screen appears 3 Press SET to select t The VIDEO Menu appears 4 Press or to select NAVI DEL...

Страница 50: ...en the following messages appear UNABLE TO USE NAVIGATION THIS MEMORY CARD IS NOT COMPATIBLE If you change the memory card while shooting on one tape two memory cards will share the tape s thumbnail images We recommend that you use one memory card for one tape Navigation Search does not work if the current position is at a blank portion on the tape Also do not leave a blank portion partway through...

Страница 51: ... on the connected TV Date time Set DATE TIME to AUTO ON or OFF 墌 pg 36 41 Or press DISPLAY on the remote control to turn on off the date indication Time code Set TIME CODE to OFF or ON 墌 pg 36 41 Indications other than date time and time code Set ON SCREEN to OFF LCD or LCD TV 墌 pg 36 41 To use this camcorder as a recorder 1 Following the illustrations connect the camcorder and the VCR s output co...

Страница 52: ...ff the power and make connections again If Playback Zoom 墌 pg 26 or Playback Special Effects 墌 pg 26 is attempted or SNAPSHOT is pressed during playback only the original playback image recorded on the tape is output from the DV IN OUT connector When using a DV cable be sure to use the optional JVC VC VDV204U DV cable To use this camcorder as a recorder 1 Make sure all units are turned off 2 Conne...

Страница 53: ...of the battery pack 墌 pg 15 Never connect the USB cable and the DV cable simultaneously to the camcorder Connect only the cable you wish to use to the camcorder When using a DV cable be sure to use the optional JVC VC VDV206U or VC VDV204U DV cable depending on the type of DV connector 4 or 6 pins on the PC If the PC connected to the camcorder via the USB cable is not powered the camcorder does no...

Страница 54: ...layback move the camcorder s microphone away from the TV or turn down the TV s volume If you change from 12 BIT to 16 BIT in mid recording and then use the tape for Audio Dubbing it is not effective from the point where 16 BIT recording began During Audio Dubbing when the tape moves to scenes recorded in the LP mode scenes recorded in 16 BIT audio or a blank portion Audio Dubbing stops Audio dubbi...

Страница 55: ...ted then press PAUSE 9 3 Press and hold INSERT I on the remote control then press PAUSE 9 The 9I indicator and the Time Code min sec appear and the camcorder enters Insert Pause mode 4 Press START STOP to begin editing To pause editing press START STOP Press it again to resume editing 5 When the time code reaches Edit Out point time code from step 1 press START STOP then STOP 8 to end Insert Editi...

Страница 56: ...k 墌 pg 23 The cassette holder cover is open HClose the cassette holder cover 墌 pg 17 HClean the video heads with an optional cleaning cassette 墌 pg 64 Advanced features Focus is set to the Manual mode HSet Focus to the Auto mode 墌 pg 44 The lens is dirty or covered with condensation HClean the lens and check the focus again 墌 pg 61 The 5 Second mode is set to Anim in MANUAL Menu HSet 5S to 5S in M...

Страница 57: ...ording with DIS activated 墌 pg 36 38 this can be avoided The DV cable was plugged unplugged with power turned on HTurn the camcorder s power off and on again then operate it In places subject to low temperature images become dark due to the characteristics of the LCD monitor This is not a malfunction HAdjust the brightness and angle of the LCD monitor 墌 pg 17 19 When the LCD monitor s fluorescent ...

Страница 58: ...d 墌 pg 17 Appears when the erase protection tab is set to SAVE while the Power Switch is set to A or M and the VIDEO MEMORY Switch is set to VIDEO 墌 pg 15 Appears if dirt is detected on the heads during recording Use an optional cleaning cassette 墌 pg 63 Appears if condensation occurs When this indication is displayed wait more than 1 hour until condensation disappears Appears if a tape is not loa...

Страница 59: ...e this camcorder is being used as a recorder Appears in the following cases when dubbing from a tape to a memory card when no memory card is loaded when the memory card s memory is full when the memory card is not formatted when a write protected SD Memory Card is loaded 墌 pg 32 Appears if there is no memory card loaded when you attempt to record on a memory card or access data on a memory card Ap...

Страница 60: ...s for the indication to clear When it does you can resume using the camcorder If the indication remains consult your nearest JVC dealer The error indications 03 or 04 show what type of malfunction has occured When an error indication appears the camcorder turns off automatically Eject the cassette once and re insert it then check if the indication clears When it does you can resume using the camco...

Страница 61: ...he monitor Close the LCD monitor To clean the lens Blow it with a blower brush then wipe gently with lens cleaning paper NOTES Avoid using strong cleaning agents such as benzine or alcohol Cleaning should be done only after the battery pack has been removed or other power units have been disconnected Mold may form if the lens is left dirty When using a cleaner or chemically treated cloth refer to ...

Страница 62: ...ack over a long period time remove from charger or powered unit when not in use as some machines use current even when switched off NOTES It is normal for the battery pack to be warm after charging or after use Temperature Range Specifications Charging 10 C to 35 C 50 F to 95 F Operation 0 C to 40 C 32 F to 104 F Storage 20 C to 50 C 4 F to 122 F The lower the temperature the longer recharging tak...

Страница 63: ...odify the unit short circuit the terminals of the battery pack Keep it away from metallic objects when not in use allow inflammables water or metallic objects to enter the unit remove the battery pack or disconnect the power supply while the power is on leave the battery pack attached when the camcorder is not in use Avoid using the unit in places subject to excessive humidity or dust in places su...

Страница 64: ...ront or back surface If the CD ROM gets dirty gently wipe it with a soft cloth outward from the center hole Do not use conventional disc cleaners or cleaning spray Do not bend the CD ROM or touch its mirror surface Do not store your CD ROM in a dusty hot or humid environment Keep it away from direct sunlight Serious malfunctioning About moisture condensation You have observed that pouring a cold l...

Страница 65: ... a residential installation This equipment generates uses and can radiate radio frequency energy and if not installed and used in accordance with the instructions may cause harmful interference to radio communications However there is no guarantee that interference will not occur in a particular installation If this equipment does cause harmful interference to radio or television reception which c...

Страница 66: ... channel 12 BIT 48 kHz 2 channel 16 BIT Cassette Mini DV cassette Tape speed SP 18 8 mm s LP 12 5 mm s Maximum recording time using 80 min cassette SP 80 min LP 120 min Storage media SD Memory Card MultiMediaCard Compression system JPEG compatible File size Still image 2 modes 1024 x 768 pixels 640 x 480 pixels Moving image 1 mode 160 x 120 pixels Picture quality 2 modes FINE STANDARD Approximate ...

Страница 67: ... Live Slow 42 Loading A Cassette 17 Loading A Memory Card 18 M Manual Focus 44 Memory Card 18 63 Motor Drive Mode 43 N Navigation 37 48 Night Alive 43 P Picture Quality 40 Playback Sound 40 Playback Special Effects 26 Power Linked Operation 15 Program AE With Special Effects 47 Q Quick Review 21 R Recording Capacity Memory Card 27 31 Tape 19 Recording Media Selection 40 Remote Control 24 Resetting...

Страница 68: ...MasterPage BackCover EN US Printed in Malaysia 0205FOH ID VM 2005 Victor Company of Japan Limited Back cover GR DF470 GR DF450 GR DF430 GR DF470 450US book Page 68 Thursday February 24 2005 11 26 AM ...

Отзывы: