JVC CU-VD3 AA Скачать руководство пользователя страница 5

EN

CS

CT

KO

PE

AR

5

Safety Precautions for the Burner

Be sure to observe the following precautions. Failing to 
do so may result in electric shock, fire, injury, or 
malfunction.

Do not disassemble, dismantle, or modify the 
equipment. Requests for repair and inspection should 
be made to the dealer.

Do not insert metal or combustible objects or pour 
water or other liquids inside the burner.

Turn off the power when connecting equipment.

Remove the plug when the burner will not be used for 
a prolonged time or prior to cleaning (electricity flows 
through the equipment even when the power is off).

Do not block the ventilation holes of the burner.

Do not use where there is condensation. Suddenly 
carrying the burner from a cold location to a hot 
location may result in the formation of drops, which 
may cause a malfunction or failure.

Do not cause the burner to vibrate when discs are in.

Safety Precautions for Accessories

When using the AC adapter, the power cord, and the 
USB cable, be sure to observe the following 
precautions. Failing to do so may result in electric 
shock, fire, injury, or malfunction.

Do not insert or remove the plug when your hands 

are wet.

Fully insert the plug into the outlet.

Keep dust and metal objects away from the plug.

Do not damage the cord.

Place the cord where it will not trip someone up.

Do not use when thunder can be heard.

Do not dismantle.

Do not use for any product other than this one.

Do not play the provided CD-ROM with an audio 
player. Doing so may damage the circuits or speakers.

Safety Precautions for Discs

Do not use the following discs.

Cracked discs

Deeply scratched discs

Installation

Do not install in any of the following locations.

Humid location

Location of 60 °C or above 

Location subject to direct sunlight

Location where overheating is likely

Dusty or smoky locations

Locations subject to oily smoke or steam such as a 
kitchen counter or beside a humidifier

Unstable location

Bathroom

Dusty places

Slanted location

Cleaning Procedure

IMPORTANT:

Be sure to unplug the burner before beginning 
cleaning.

Do not use liquid or aerosol cleaners.

Ensure that no moisture or liquid comes into contact 
with the drive during cleaning.

Exterior of the Burner:

Wipe dirt off with a dry cloth.
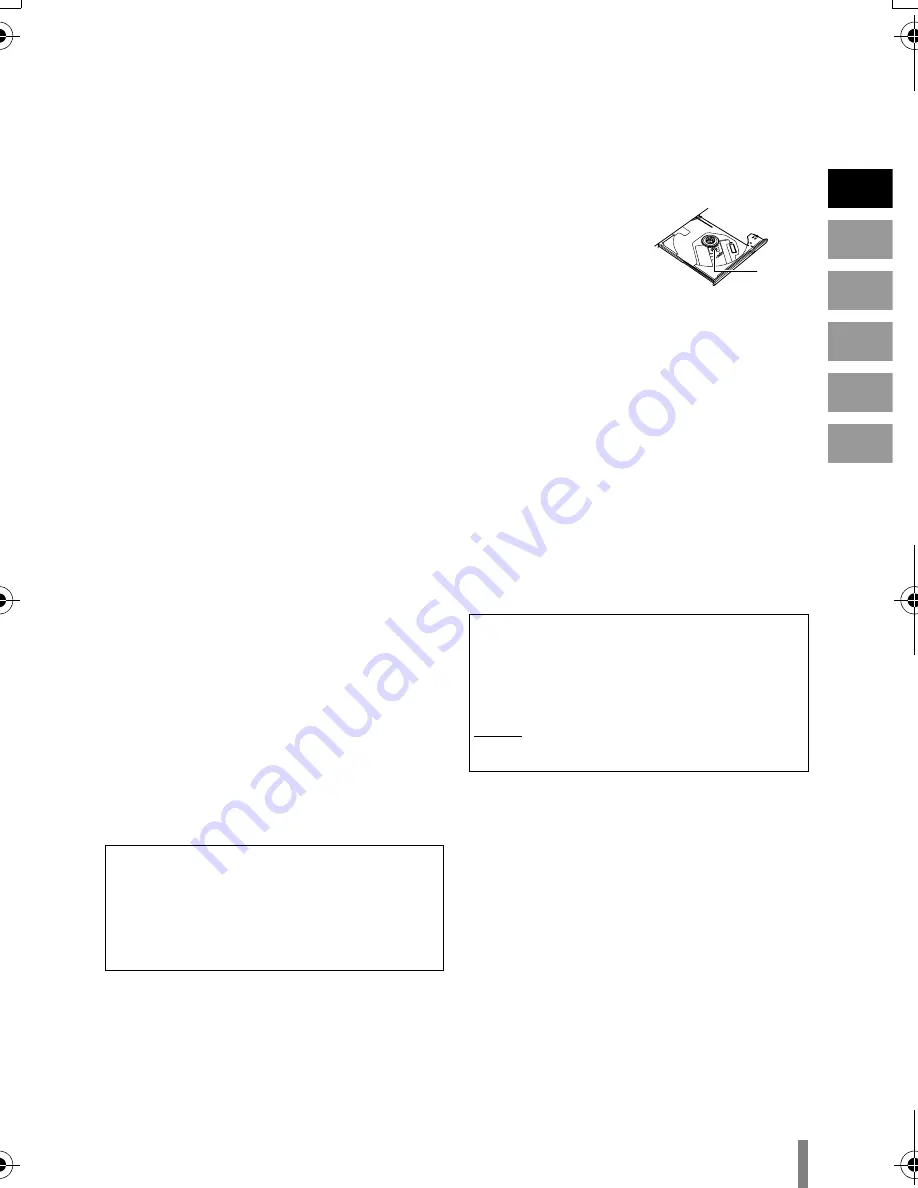
Disc Tray:

Wipe off dirt with a soft dry 
cloth.
Do not touch the lens. 
To clean the lens, use 
commercially available lens 
cleaning blower for cameras. 
Using a lens cleaning disc will 
cause malfunction.

Disc:

Gently wipe from the inner edge to the outer edge with 
a soft cloth.

Storage:

Make sure that discs are kept in their cases. If discs are 
piled on top of one another without their protective 
cases, they can be damaged. Do not put discs in a 
location where they may be exposed to direct sunlight, 
or in a place where the humidity or temperature is high. 
Avoid leaving discs in your car!

Region Codes

Region codes are numbers for restricting DVD video 
playback. The world is separated into six regions and 
each region is identified by a number. If the number for 
a disc does not match the number for the player, the 
disc cannot be played on the player.

Disclaimer

JVC accepts no liability whatsoever for loss of data 
resulting from inappropriate connections or handling.

Copyrights

Duplicating copyright protected material, for other than 
personal use, without the permission of the copyright 
holder is prohibited by copyright law.

Registered Trademarks and 

Trademarks

Windows

®

 is either registered trademark or trademark 

of Microsoft Corporation in the United States and/or 
other countries.

Macintosh and Mac OS are trademarks of Apple 
Computer, Inc., registered in the United States and 
other countries.

Pentium is a registered trademark of Intel Corporation 
in the United States.

Other company and product names mentioned herein 
are registered trademarks and/or trademarks of their 
respective holders.

ATTENTION:

On placing the unit:

Some TVs or other appliances generate strong 
magnetic fields. Do not place such appliances on top 
of the unit as it may cause picture disturbance.

When moving the product:

Remove the power cord and all connecting cables.

Changing the region codes

You can change the region code to play a DVD that 
has a different code. (The code cannot be changed for 
some playback software.) When you insert the disc, 
the Caution screen appears on the PC. Follow the on-
screen instructions to change the code.
The region code for the burner can be changed 

5 times

 only. The code set the fifth time becomes the 

final code, so be sure to set a frequently used code. 
Take sufficient care when changing the code.

Lens

CU-VD3A_TW_EN.book  Page 5  Monday, November 26, 2007  1:15 PM

Содержание CU-VD3 AA

Страница 1: ...ENGLISH CU VD3 AA AG AC TW KR DVD Burner INSTRUCTIONS DVD DVD DVD DVD DVD ...

Страница 2: ...can be used only when the burner is connected to a high definition Everio camera Caution USB cable Power input To DC jack To DC jack The power lamp lights in green CU VD3 Everio camera Use the AC adapter to power on the Everio camera USB extension cable for Everio Use if necessary To power supply outlet To power supply outlet Important z The USB cable cannot be connected to the Everio dock supplie...

Страница 3: ...k copied images A P 8 1 Press the eject button 2 Pull out completely 3 Insert firmly into place Turn the Everio off and on again if the following display remains unchanged Pay attention to the followings zDo not touch the recording side zDo not place any objects on top Recording and playback may not function properly if the disc is scratched or dirty zDo not topple zDo not subject to mechanical sh...

Страница 4: ...1 LASER PRODUCT REPRODUCTION OF LABELS WARNING LABEL INSIDE OF THE UNIT This unit applies to the standard IEC60825 1 2001 for laser products The socket outlet shall be installed near the equipment and shall be easily accessible CAUTION ATTENTION VORSICHT ADVARSEL ADVARSEL VARNING VARO CLASS 3B VISIBLE AND INVISIBLE LASER RADIATION WHEN OPEN AVOID EXPOSURE TO THE BEAM CLASSE 3B RAYONNEMENT LASER VI...

Страница 5: ...g Exterior of the Burner Wipe dirt off with a dry cloth Disc Tray Wipe off dirt with a soft dry cloth Do not touch the lens To clean the lens use commercially available lens cleaning blower for cameras Using a lens cleaning disc will cause malfunction Disc Gently wipe from the inner edge to the outer edge with a soft cloth Storage Make sure that discs are kept in their cases If discs are piled on ...

Страница 6: ...2Go 5 5 Lite 15 CyberLink Power2Go 5 5 Lite Contact Information 17 zTroubleshooting 18 zSpecifications 20 Accessories If there are any items missing please consult your authorised dealer AC adapter AP V3U Power cord USB extension cable for Everio USB extension cable for PC Instruction manual this manual other printed material Stand DVD R blank disc x 1 CD ROM data writing software x 1 z Use the AC...

Страница 7: ...USB extension cable o Horizontal orientation Take note of the top and bottom of the burner and place it in the horizontal orientation Do not place any objects on top of the burner o Vertical orientation Face the feet side towards the left and fix securely on the stand Taking out the USB Cable Placing the Burner Low side High side Back Feet Arrow Front ...

Страница 8: ...AYBACK and press Playback begins automatically To stop select o using the touch sensor z When opening closing the disc tray or during copying playback the access lamp lights or blinks in orange USB cable To USB jack AV cable supplied with Everio To Audio Video input terminals To AV jack Use the AC adapter to power on the Everio camera Access lamp Everio LCD monitor screen Select with touch sensor ...

Страница 9: ...following procedures refer to the instruction manual of your Everio camera z For some Everio cameras still images cannot be copied Connect CU VD3 to the Everio camera according to the procedures on P 2f3 and turn on the Everio camera Caution Preparations DIRECT DVD Select with touch sensor UNSAVED SCENES READY TO CREATE DVD R EXECUTE RETURN QUIT Everio LCD monitor screen CREATING NOW ELAPSED 3 min...

Страница 10: ...r some Everio cameras still images cannot be copied Connect CU VD3 to the Everio camera according to the procedures on P 2f3 The screen in step A appears when the Everio camera is turned on Caution Preparations CREATE TOGETHER SELECT AND CREATE CREATE DUPLICATE PLAYBACK SELECT AND CREATE CREATE DVD Everio LCD monitor screen CREATE BY DATE CREATE BY EVENT CREATE BY PLAYLIST SELECT FROM SCENES CREAT...

Страница 11: ...d copying starts To cancel select STOP and press G When COMPLETED appears press to complete copying ALL READY TO CREATE DVD R EXECUTE RETURN QUIT CREATING NOW ELAPSED 3 min STOP 30 Do not turn off the power or remove the USB cable while the CREATING NOW screen is displayed COMPLETED OK ...

Страница 12: ...ill images cannot be copied Register images to events beforehand For details refer to the instruction manual of the Everio camera Connect CU VD3 to the Everio camera according to the procedures on P 2f3 The screen in step A appears when the Everio camera is turned on Caution Preparations CREATE TOGETHER SELECT AND CREATE CREATE DUPLICATE PLAYBACK SELECT AND CREATE CREATE DVD Everio LCD monitor scr...

Страница 13: ...rts To cancel select STOP and press G When COMPLETED appears press to complete copying ALL DVD1 DVD2 DVD3 DVD CREATION LIST QUIT CHECK ALL READY TO CREATE DVD R EXECUTE RETURN QUIT CREATING NOW ELAPSED 3 min STOP 30 Do not turn off the power or remove the USB cable while the CREATING NOW screen is displayed COMPLETED OK ...

Страница 14: ... the desired folder names however do not use EVERIO_V or EVERIO_S as the folder name Use half width alphanumeric characters when entering the folder or file names You can enter up to 40 half width characters 2 Set the file system of the data tab in the Power2Go setup menu to UDF1 5 3 Copy files such as MPEG JPEG and TPD into the folder For details on how to copy refer to the Power2Go User s guide ...

Страница 15: ...ofessional pre installed Windows Vista Home Basic 32 bit edition pre installed Windows Vista Home Premium 32 bit edition pre installed o Connector USB 2 0 connector o CPU Intel Pentium III at least 800 MHz Intel Pentium 4 at least 2 GHz recommended o RAM At least 128 MB at least 256 MB recommended o Free hard disk space At least 50 MB for installation At least 5 GB recommended for creating DVDs o ...

Страница 16: ...ation screen appears E Enter the User Name and Company Name and then click Next F Follow the on screen instructions Installation starts The InstallShield Wizard Complete screen appears G Click Finish The computer will restart and installation is completed If the screen on the right does not appear proceed to step H ...

Страница 17: ...he Readme CyberLink Power2Go 5 5 Lite Contact Information For information on CyberLink Power2Go 5 5 Lite or other products use the following contact information o Telephone fax support Location Language Office hours Mon to Fri Phone Fax Taiwan Mandarin 9 00 am to 6 00 pm 886 2 8667 1298 ext 333 886 2 8667 1300 ...

Страница 18: ... about 1 cm pull out the disc tray manually and take out the disc Reading fails z Insert the disc with the label facing up z Make sure the disc tray is not dirty z Make sure the writing surface of the disc is not damaged z Make sure the special shaped discs are not used z Make sure the audio CD complies with the CD DA standard Copy control CDs cannot be played z For CD R or CD RW make sure it is n...

Страница 19: ... the camera and dub the DVD discs with the DVD recorder Refer to the instruction manual of the Everio camera Trouble Action PC Cannot play back z If the packet writing software DLA Direct Letter Access has been installed on the PC the disc may not be played back properly due to incompatibility In this case consult the DLA software developer or check out DLA related websites for solutions z Confirm...

Страница 20: ...V3U Power supply AC110 V to 240 V 50 Hz 60 Hz Input capacity 0 26 A Output DC 5 2 V 2 A Operating temperature 0 C to 40 C Dimensions mm W x H x D 49 x 28 x 79 Excluding power cord Weight Approx 136 g Recommended discs DVD R JVC TDK Verbatim SONY DVD R DL 1 JVC Verbatim DVD RW 2 JVC When connected to an Everio camera Interface USB 2 0 Interface cable USB extension cable for Everio Compatible discs ...

Страница 21: ...ws XP Professional Windows Vista Home Basic Windows Vista Home Premium Macintosh is not supported Data buffer capacity 2 MB Data transfer rate for USB2 0 Writing DVD R Maximum 8x DVD R DL Maximum 4x DVD RW Maximum 4x Reading DVD R Maximum 8x DVD RW Maximum 8x DVD ROM Maximum 8x DVD R DL Maximum 8x CD R Maximum 24x 1 CD RW Maximum 24x 1 CD ROM Maximum 24x 2 Compatible discs 8 cm discs cannot be use...

Страница 22: ... 2007 Victor Company of Japan Limited Printed in Malaysia 1107MNH SW VM ...

Отзывы: