background image

Introduction

63

(Continued)

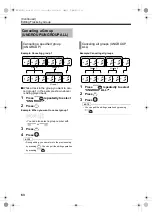
Editing Tracks by Group

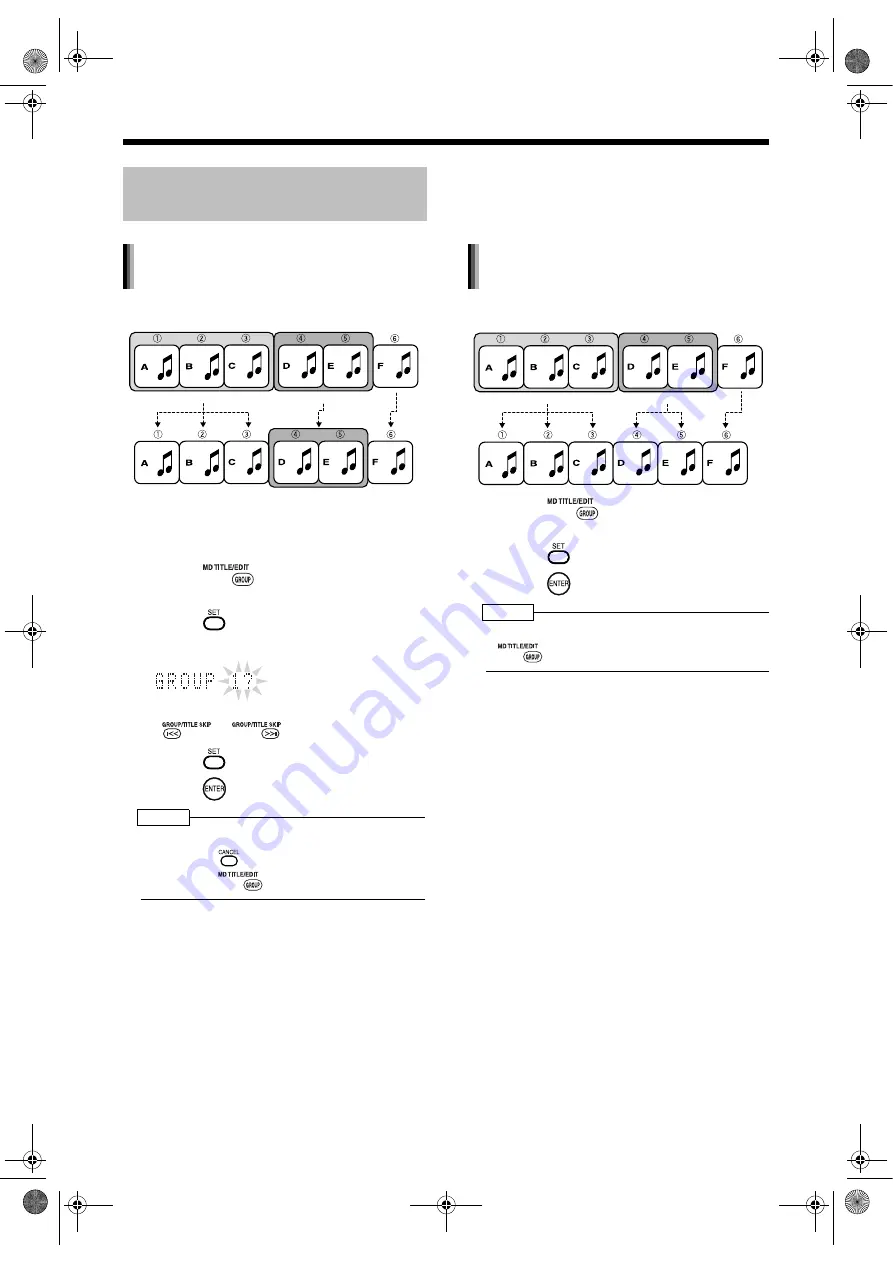
Example: Canceling group 1

While a track in the group you want to can-

cel (group 1 in the example shown above) 

is being played back

1

Press 

 repeatedly to select 

"UNGROUP?".

2

Press .

Example: When you want to cancel group 1

• You can also select a group number with  

 or 

.

3

Press .

4

Press .

NOTE

• During editing, you can return to the previous step 

by pressing 

. You can quit the editing operation 

by pressing 

.

Example: Canceling all groups

1

Press 

 repeatedly to select 

"UNGROUP ALL?".

2

Press .

3

Press .

NOTE

• You can quit the editing operation by pressing 

.

Canceling a Group 

(UNGROUP/UNGROUP ALL)

Canceling a specified group 

(UNGROUP)

Group 1

Group 2

Group 1

Canceling all groups (UNGROUP 

ALL) 

Group 1

Group 2

NX-DV3[UJ].book  63 ページ  2004年12月28日 火曜日 午後2時37分

Содержание CA-NXDV3

Страница 1: ...COMPACT COMPONENT MD SYSTEM NX DV3 Consists of CA NXDV3 and SP NXDV3 INSTRUCTIONS LVT1256 002A UJ NX DV3 UJ 01 fm Page 1 Tuesday December 28 2004 11 05 AM ...

Страница 2: ...newspaper or cloth etc the heat may not be able to get out Do not place any naked flame sources such as lighted candles on the apparatus When discarding batteries environmental problems must be considered and local rules or laws governing the disposal of these batteries must be followed strictly Do not expose this apparatus to rain moisture dripping or splashing and that no objects filled with liq...

Страница 3: ... in the areas shown by the dimensions below Bottom Place on the level surface Maintain adequate air path for ventilation by placing on a stand with a height of 10 cm or more In addition maintain the best possible air circulation 15cm 15cm 10cm 15cm 1cm 1cm 10cm Wall or obstructions Front Main unit Main unit Front view Side view NX DV3 UJ 02 fm Page 2 Tuesday December 28 2004 11 26 AM ...

Страница 4: ...of the Display Window DIMMER 21 Listening to Radio Broadcasts 22 Setting the AM Tuner Spacing 22 Selecting a Radio Station 22 Storing Radio Stations Preset 23 Tuning in to a Preset Radio Station 23 Changing the Display in the Display Window 23 Basic Operations of the DVD Player 24 Playback 24 Changing the Display in the Display Window 26 Playing Back from a Position 10 Seconds Before One Touch Rep...

Страница 5: ... 53 Changing the Display in the Display Window during Recording 53 Recording Sound from Radio or Other Equipment 53 Quitting Recording 54 Giving Editing Titles 55 Things You Should Know about Editing 55 Giving Editing Titles 55 Entering Titles 56 Available Characters 56 Editing Tracks 57 Dividing a Track into Two Tracks DIVIDE 57 Joining Tracks JOIN 58 Moving a Track MOVE 58 Erasing a Track ERASE ...

Страница 6: ...is very dirty wipe it with a cloth dampened with a small amount of a neutral detergent and then wipe it with a soft dry cloth CAUTION Do not wipe the operation panel with thinners ben zenes or other chemical agents Do not spray insecticides onto the operation panel These may cause discoloration and damage to the surface When using headphones keep the volume at a moderate level so as not to over st...

Страница 7: ...icture data JPEG file is recorded However playback is impossible in some cases due to the disc characteristics recording condition scratches or dirt on the disc or dirt or condensation on the lens Before using a CD R CD RW carefully read the cautions regarding the disc This product does not support playback or CD text display of sound files such as MP3s To play back a CD RW on this product erase a...

Страница 8: ...ion of a digital camera data goes beyond the DCF standard so the image may not be dis played If data has been processed edited and restored with PC image editing software the data may not be displayed This product cannot play back animations such as MOTION JPEG or still pictures TIFF etc other than JPEG and image data with sound The resolution of 640 x 480 pixels is recom mended for JPEG files If ...

Страница 9: ...an NTSC such as PAL is converted into NTSC mode before playback NOTE Some discs may not be played properly for exam ple the picture movement may not be smooth or the aspect ratio ratio of length and width may be changed About the Color System NX DV3 UJ book 6 ページ 2004年12月28日 火曜日 午後2時37分 ...
Страница 10: ...use benzene thinner or other organic solvents including disinfectants These may cause deformation or discoloring If water gets inside the system Turn the system off and disconnect the power cord plug from the wall outlet then call the store where you made your purchase Using the system in this condition may cause fire or electrical shock When condensation or water drops adhere to the lens In any o...

Страница 11: ...tting the Speaker Position page 10 Stand Screw About Front Surround Function Instead of the traditional 5 1 channel playback system we have introduced a virtual surround system that uti lizes four speakers situated in the front The mechanism is based on an original JVC technique in which two center speakers separated by the aver age distance between two human ears deal with the center signals and ...

Страница 12: ...tside Left speaker SP NXDV3F Right speaker SP NXDV3F Surround speaker SP NX DV3S Surround speaker SP NX DV3S Center unit CA NXDV3 TV stand not supplied Listening Point Place the surround speakers close to the front speaker With this setting select F2 in Setting the Speaker Position page 10 When placing the unit vertically When placing the unit horizontally Label Left speaker SP NXDV3F Right speake...

Страница 13: ... nothing appears in the display window press to select DISPLAY ON page 21 and then set the speaker position Information on Speaker Display in the display window Sub Woofer When the sub woofer is set to OFF page 40 or when headphones are being used the light is off The light is on when the left front speaker signal is being input The light is on when the center speaker signal is being input The lig...

Страница 14: ...speakers do not produce any sound The numbers refer to the pages in which the parts are explained 69 65 68 52 22 20 31 32 31 24 45 48 52 54 10 39 10 39 37 26 27 45 69 24 24 39 10 20 22 20 24 69 20 45 20 45 69 52 52 45 51 54 28 31 38 46 47 53 54 61 64 22 27 46 53 58 59 66 Remote control sensor 18 20 50 54 20 22 20 45 47 54 20 24 27 33 34 38 52 32 34 NX DV3 UJ 03 fm 11 ページ 2005年1月24日 月曜日 午前10時43分 ...

Страница 15: ...rol or subject it to excessive shock The numbers refer to the pages in which the parts are explained Opening the cover 26 20 20 20 20 22 54 20 45 47 54 27 28 46 20 13 19 19 22 27 46 53 55 57 58 60 61 66 68 20 30 19 25 29 31 35 37 40 41 56 26 28 30 30 31 20 40 20 40 21 35 36 40 13 19 23 28 33 35 36 46 47 56 52 52 69 65 52 51 52 54 19 66 68 48 19 23 48 54 55 57 68 19 33 47 55 66 68 19 23 26 46 50 53...

Страница 16: ...ntrol by pointing it towards the TV 1 Make sure to slide the remote control mode selector to the TV side in advance NOTE When the batteries are replaced perform the man ufacturer s code setting again This page is for when operating your TV using the remote control of this product Operating the TV Using the Remote Control Setting the manufacturer s code Manufacturer Code Manufacturer Code JVC 01 Sa...

Страница 17: ...necessary parts before connecting the power plug Connecting the Antennas Connecting the AM antenna Insert the tab into the slot Main unit rear view When insulation covers the tips of the antenna cord twist and pull off the insulation Black White Vinyl covered wire 3 5 m not supplied Twist together vinyl covered wire and the AM loop antenna cord Stretch out the vinyl covered wire horizontally prefe...

Страница 18: ...he TV and the speakers NOTE Improper speaker cord connection spoils the stereo effect and sound quality The impedance of speakers connected to this product must be within the range of 4 Ω to 16 Ω Cooling fan is built into the main unit for emitting generated heat The internal cooling fan auto matically rotates and stops To ensure sufficient cooling leave a space of more than 1 cm between the main ...

Страница 19: ...io equipment to this product Other audio equipment Audio cord not supplied Main unit rear view Connecting with digital equipment AV amplifier with a built in decoder not supplied To an optical digital input terminal Optical digital cable not supplied Optical digital cable not supplied MD player or CS tuner not supplied To an optical digital output terminal Main unit rear view NX DV3 UJ book 16 ページ...

Страница 20: ... one of either the S video cord or the compo nent video cord If both cords are used pictures may not be played back properly NOTE In order to enjoy pictures with the progressive mode page 31 the TV is required to have progressive video input If the component video input jacks of your TV are BNC type use a plug adapter not supplied to convert the plugs Connect all necessary parts before connecting ...

Страница 21: ...ng such as preset channels and sound adjustment may be erased in a few days in the following cases When you disconnect the power plug When a power failure occurs Connecting the Sub woofer Equipment Amplifier built in sub woofer To an audio input terminal Main unit rear view Audio cord not supplied If an audio cord comes with the amplifier built in sub woofer you can use the cord Connecting the Pow...

Страница 22: ...an use the number buttons to specify the hour Refer to Using the number buttons shown below 3 Press To return to step 2 press 4 Set the minute in the same manner as steps 2 and 3 Press five times to display the clock and then adjust the clock starting from step 2 Press repeatedly NOTE The time display on the main unit is a 24 hour clock The clock will gain or lose approximately 1 minute per month ...

Страница 23: ...asily under stand the dialog of DVD videos even with the vol ume turned down Press Each time you press Clear Voice func tion toggles between ON and OFF While Clear Voice function is activated is displayed in the display window NOTE This function cannot be used when the sound source is radio This function is effective when the center chan nel signal exists with surround sound or when the sound is s...

Страница 24: ...in unit is turned off the display toggles between DISPLAY OFF and DISPLAY ON For the locations of remote control buttons refer to page 19 Changing the Brightness of the Display Window DIMMER The display window becomes dark Cancels the brightness adjustment initial setting NX DV3 UJ book 21 ページ 2004年12月28日 火曜日 午後2時37分 ...
Страница 25: ...will be erased 1 Press repeatedly to select FM or AM Example Display while an FM radio broadcast is received 2 Press or repeatedly to select a radio station frequency You can also select a radio station using the automatic tuning When the main unit has received an FM stereo broadcast ST lights up NOTE If an FM stereo broadcast is difficult to hear because of noise you may be able to hear more easi...

Страница 26: ...mber to which another radio station has previously been stored the newly set radio station replaces the pre viously stored radio station While an FM or AM broadcast is being received 1 Set the remote control mode selector to AUDIO 2 Use the number buttons to select the preset number of the radio sta tion to which you want to tune in Refer to Using the number buttons page 19 Press Each time you pre...

Страница 27: ...DEO Display while a DVD VIDEO is being played back Display while the DVD VIDEO is stopped While resume function page 27 is on While resume function page 27 is off Continued on next page How to read this manual Operations are described by mainly using the remote control buttons If there are the same marks on the main unit the buttons on the main unit can also be used The following marks tell you fo...

Страница 28: ...ck PBC indicator is displayed while PBC is acti vated Display while the VCD SVCD is stopped 1 PBC will appear when the disc is PBC compatible NOTE The menu may appear in the display window after DVD playback starts In such a case select the desired menu item by using the following buttons on the remote control Select a menu item with or and then press Select a menu item with the number buttons Ope...

Страница 29: ...tion you have attempted Play page 24 Pause page 27 Fast reverse Fast forward search page 27 Slow motion playback reverse forward directions page 28 Changing the Display in the Display Window Playing Back from a Position 10 Seconds Before One Touch Replay PBC Playback control PBC is a signal recorded in a VCD version 2 0 for controlling VCD playback You can operate software that has interactive or ...

Страница 30: ...nd the stored information will be cleared Resume function is set to on as the initial preset You can set the function to off page 43 While a disc is being played back Press To resume normal playback press Playback cannot be paused by pressing on the main unit during JPEG disc slide show While a disc is paused Press Each time you press picture will be advanced frame by frame You cannot operate this...

Страница 31: ...o listen to Refer to Using the number buttons page 19 NOTE You can operate a VCD or SVCD while the disc is stopped or played back with PBC off You can operate a DVD AUDIO CD MP3 WMA or JPEG while the disc is either played back or stopped This operation may not be carried out for some discs While a disc is stopped or being played back 1 Set the remote control mode selector to AUDIO 2 Press or A men...

Страница 32: ... select 1 2 only While a disc containing two or more subti tles is being played back 1 Press Example TV screen 2 Press to select a subtitle 3 Wait for a few seconds or press NOTE You can also operate this function by using the menu bar page 35 For an SVCD each time you press in step 1 the subtitle type and ON OFF will be changed For a language code such as AA refer to Lan guage Codes page 43 The m...

Страница 33: ...or paused 1 Press Example TV screen 2 Press to select VFP mode NORMAL For normal playback You cannot adjust the image quality Go to step 7 CINEMA Suitable when viewing a movie in a dim room You cannot adjust the image quality Go to step 7 USER1 USER2 You can adjust the image quality Go to step 3 3 Press to select an item you want to adjust Setting items GAMMA Controls the brightness of neutral tin...

Страница 34: ...stopped 1 Hold down for two or more seconds 2 Press or to select PROGRESSIVE or INTERLACE 3 Press It returns to sound source display When the progressive mode is selected the display window shows PROGRESSIVE There are some DVD AUDIO discs with a special group called bonus group recorded This operation can be carried out when BONUS is lit in the display window on the main unit While a disc is being...

Страница 35: ... few seconds or press NOTE You can operate this function on the menu bar page 35 You can program a maximum of 99 chapters or tracks You can program the same chapter or track more than once While a disc is stopped 1 Set the remote control mode selector to AUDIO 2 Press to select PROGRAM Display for DVD VIDEO DVD AUDIO MP3 WMA CD VCD SVCD Example For DVD VIDEO Continued on next page For the location...

Страница 36: ... 99 chap ters or tracks MEMORY FULL appears 4 Press NOTE You can set tracks from either a disc or MD in a program playback setting While playback is stopped press or repeatedly During this operation you can add a track as the last in the program step 3 or erase the last track To erase the last track press While playback is stopped press repeatedly to display an item other than PROGRAM This operati...

Страница 37: ...tion can be carried out during playback without the PBC function page 26 You can also operate this function on the menu bar page 35 For details on A B repeat repeat playback of a designated part refer to page 36 For the locations of remote control buttons refer to page 29 Random Playback Canceling random playback Repeat Playback Repeat types Display on the TV screen Display in the display window o...

Страница 38: ...h time is pressed the display will be changed DVD VIDEO DVD AUDIO TOTAL Elapsed playing time of current title group T REM Remaining time of current title group TIME Elapsed playing time of current chapter track REM Remaining time of current chapter track CD VCD SVCD TIME Elapsed playing time of current track REM Remaining time of current track TOTAL Elapsed playing time of disc T REM Remaining tim...

Страница 39: ...using the number buttons Example When you want to play back a disc from the position of 0 hour 23 minutes 45 seconds press the buttons in the order You can skip entering minutes and seconds If you enter wrong numbers press to delete the numbers and then enter the numbers again 6 Press To delete the menu bar press NOTE You may not be able to operate this function depending on the disc This function...

Страница 40: ... to be played page 41 1 Insert a disc Example TV screen Example Display window 2 Press to select a group 3 Press to move to the track list Pressing returns to the group list Playback Elapsed playing time of the selected track only for MP3 WMA Tag information of the selected track only for MP3 WMA Group list Track list Tracks con tained in the selected group This indicator lights up during program ...

Страница 41: ...s and lower case letters can be mixed MP3 file MP3 mp3 WMA file WMA wma JPEG file JPEG JPG jpeg jpg Use only single byte alphanumeric characters for file names and group names Notes for creating CD R RW discs Disc format should be ISO 9660 Packet Write Method UDF format should not be used Make sure that the disc is finalized Slide show playback For a JPEG disc when you press in step 5 files are co...

Страница 42: ...d when listening to headphones About Surround Mode When a multi chan nel signal is input with AUTO SUR ROUND setting this unit automati cally determines the correct format and turns the surround mode ON When a 2ch signal is input the unit automatically turns off the surround mode Selecting the Surround Mode Normally this mode should be turned on Select this mode when watching movies or using sound...

Страница 43: ...en an equipment such as a BS digital tuner is connected to Digital 1 or 2 It is helpful in the following situations When the sound is not audible at the beginning of the playback When noise is heard when selecting a chapter AUTO PCM Normally this mode should be selected DTS This mode should be selected when the sound is DTS Other sounds than DTS are not heard It allows you to return to source soun...

Страница 44: ... ratio of your wide TV is fixed to 16 9 when playing back a DVD VIDEO recorded at 4 3 this product automatically adjusts the screen width of the output signal Select this item when the aspect ratio of your TV is conventional 4 3 While viewing a wide screen picture the black bars appear on the top and bottom of the screen 4 3 PS pan scan Select this item when the aspect ratio of your TV is conventi...

Страница 45: ...n DISTANCE If the distance from the listening point to each speaker varies this allows you to set the distance between the listening point and each speaker Improved surrounding effect can be obtained by adjusting the sound output timing from the speakers FRONT SPEAKER This allows you to adjust the distance from the listening point to the front speakers The initial setting is 3 meters and is adjust...

Страница 46: ...rikaans MN Mongolian AM Ameharic MO Moldavian AR Arabic MR Marathi AS Assamese MS Malay MAY AY Aymara MT Maltese AZ Azerbaijani MY Burmese BA Bashkir NA Nauru BE Byelorussian NE Nepali BG Bulgarian NL Dutch BH Bihari NO Norwegian BI Bislama OC Occitan BN Bengali Bangla OM Afan Oromo BO Tibetan OR Oriya BR Breton PA Panjabi CA Catalan PL Polish CO Corsican PS Pashto Pushto CS Czech PT Portuguese CY...

Страница 47: ...44 Country Area Codes NX DV3 UJ book 44 ページ 2004年12月28日 火曜日 午後2時37分 ...

Страница 48: ...to the track the track title appears first Group number appears next When the track being played back does not belong to a group GR appears CAUTION Do not insert another MD while the MD indicator is lighting up or flashing Forcibly inserting an MD may damage the main unit Display while the MD is stopped When the MD title the disc title has been set to the MD the MD title appears first Long titles ...

Страница 49: ...tons or to select the track you want to listen to Refer to Using the number buttons page 19 1 Set the remote control mode selector to AUDIO 2 Press the number buttons or to select the track you want to listen to Refer to Using the number buttons page 19 Changing the Display in the Display Window Fast Reverse Fast Forward Search Display while an MD is being played back page 45 Track title display G...

Страница 50: ...k is stopped Programmed tracks are erased one by one from the last track Holding down erases all programmed tracks When you try to program the 33rd track MEM ORY FULL appears in the display window to indicate that 33 or more tracks cannot be pro grammed When total time for program playback reaches 2 hours 31 minutes for an MD appears 4 Press NOTE You can set tracks for program playback either from...

Страница 51: ...xample Each time you press the display toggles as follows NOTE Ejecting the MD or turning off the main unit also cancels repeat playback This function allows you to search titles for tracks or groups in an MD While a disc is stopped 1 Set the remote control mode selector to AUDIO 2 Press repeatedly to select the search type 3 Press Example For the locations of remote control buttons refer to page ...

Страница 52: ...ears and the title search starts When the title is found playback of the track starts When playback finishes the next title search automatically starts NOTE A space is treated as a character However when no character exists after the space the space is ignored Capital letters and small letters are distinguished When no corresponding titles are found NOT FOUND appears Press or Press The title searc...

Страница 53: ...ions page 19 Press Each time you press the display tog gles as follows AUX To listen to sound from other equipment connected to the AUX terminals on the main unit AUX DIGITAL1 To listen to sound from other equipment connected to the DIGITAL 1 terminal on the main unit AUX DIGITAL2 To listen to sound from other equipment connected to the DIGITAL 2 terminal on the main unit Changing the Display in t...

Страница 54: ...lay toggles as follows You can record up to 254 tracks to an MD If you try to record 255 or more tracks DISC FULL appears When you use a partially recorded MD this product searches for the blank portion and records the new tracks to that portion Unlike cassette tape recording you cannot record over old tracks on an MD Changing in sound volume and quality on this product during recording does not a...

Страница 55: ... both high speed recording and normal speed recording You cannot listen to the sound during 5 high speed recording 6 Press Example Display while CD is recorded When HCMS CANNOT COPY appears refer to pages 71 and 73 NOTE The recorded sound level is automatically adjusted The CD rotates at high speed during x5 high speed recording Therefore depending on the condition of the CD the sound may be recor...

Страница 56: ...select 5 SPEED and proceed to step 6 CANNOT REC 1 REC ONLY appears in the display window and record ing does not start Press Each time you press the display tog gles as follows NOTE The recorded sound level is automatically adjusted Sound synchronized recording is employed for recording sound from other equipment AUX With sound synchronized recording this product automatically identifies sound sig...

Страница 57: ...sing With this method even when sound from the connected equipment pauses for 30 or more seconds the main unit does not auto matically quit recording Press Press Each time you press the display tog gles as follows For the locations of remote control buttons refer to page 51 Sound source Operation Radio broadcast Select the radio station whose broad cast you want to record page 22 Sound from other ...

Страница 58: ...de For editing an MD disc title or track titles Press to display the title editing mode To edit a disc title press repeatedly to display DISC TITLE You can also display DISC TITLE by pressing while the disc is stopped You can also select track number with or For editing group titles Press twice to display the group title editing mode You can also select a group number with or 3 Press The display i...

Страница 59: ...ore recording finishes the entered titles are not stored During group recording you can enter titles for the group Example To enter F 1 Press repeatedly to select A as the character type 2 Press repeatedly to display F Several characters are assigned to one button Press the button repeatedly until the desired character is displayed For the available characters refer to Available Characters on the ...

Страница 60: ...ave to be adjusted proceed to step 5 When you want to adjust the dividing point proceed to step 4 4 Press or You can adjust the dividing point within the range of 128 to 128 position approxi mately 8 to 8 seconds in SP mode 5 Press 6 Press NOTE During editing you can return to the previous step by pressing You can quit the editing operation by pressing You cannot divide a track in an MD containing...

Страница 61: ...k you want to move track 2 in the example shown above is being played back 1 Press repeatedly to select MOVE 2 Press You can also select a track number with or the number buttons Refer to Using the number buttons page 19 3 Press 4 Press or to select the track number to which you want to move the specified track Track 5 is selected in the example shown above You can also select a track number with ...

Страница 62: ... to 15 tracks to be erased with or the number buttons and Refer to Using the number buttons page 19 4 Press 5 Confirm that you no longer need the tracks and then press NOTE During editing you can return to the previous step by pressing You can quit the editing operation by pressing CAUTION Once you erase a track you cannot retrieve it Before erasing a track confirm that you no longer need it 1 Pre...

Страница 63: ...want to specify as the last in the group Track number 3 is selected in the example shown on the left You can also select a track number with the number buttons Refer to Using the number buttons page 19 5 Press 6 Press NOTE During editing you can return to the previous step by pressing You can quit the editing operation by pressing If you select a track in another group GROUP TRACK appears and you ...

Страница 64: ...not proceed to the next step Example Dividing group 1 into two groups While the track which you want to specify as the first in the second group track 4 in the example shown above is being played back 1 Press repeatedly to select DIVIDE GR 2 Press You can also select a track number with or the number buttons Refer to Using the number buttons page 19 You can also select a group number with or 3 Pre...

Страница 65: ...have titles the title of the first group remains as the title of the joined group Example Moving group 2 While a track in the group you want to move group 2 in the example shown above is being played back 1 Press repeatedly to select MOVE GROUP 2 Press You can also select a group number with or 3 Press 4 Press or to select the group number to which you want to move the specified group Group 1 is s...

Страница 66: ... a group number with or 3 Press 4 Press NOTE During editing you can return to the previous step by pressing You can quit the editing operation by pressing Example Canceling all groups 1 Press repeatedly to select UNGROUP ALL 2 Press 3 Press NOTE You can quit the editing operation by pressing Canceling a Group UNGROUP UNGROUP ALL Canceling a specified group UNGROUP Group 1 Group 2 Group 1 Canceling...

Страница 67: ...hown above is being played back 1 Press repeatedly to select ERASE GROUP 2 Press You can also select a group number with or 3 Press 4 Confirm that you no longer need the tracks and then press NOTE During editing you can return to the previous step by pressing You can quit the editing operation by pressing For the locations of remote control buttons refer to page 55 Erasing a Group ERASE GROUP Grou...

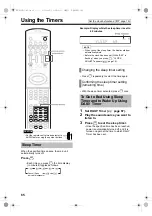
Страница 68: ...00 is flashing when you press CLOCK ADJUST appears page 19 Press repeatedly to select the time again With the sleep timer activated press once 1 Set DAILY Timer page 67 2 Play the sound source you want to listen to 3 Press to set the sleep timer Once the specified time has been reached power is automatically turned off and it is turned on again at the time to which DAILY Timer has been set Set the...

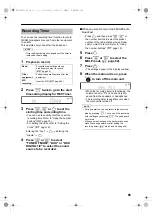
Страница 69: ...ct the preset number of the radio station whose broad cast you want to record Refer to Using the number buttons page 19 5 Press 6 Press or to select the MDLP mode page 52 7 Press The settings appear in the display window 8 When the main unit is on press to turn off the main unit While the recording timer is functioning the volume is set to 0 and no sound is pro duced from the speakers or headphone...

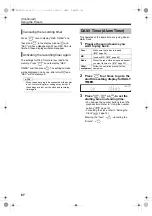
Страница 70: ...ain This operates at the same time every day like an alarm clock 1 Prepare the sound source you want to play back 2 Press four times to go to the start time setting display for DAILY TIMER 3 Press or to set the starting time and ending time You can use the number buttons to set the playback time Refer to Using the number buttons page 19 For setting the clock refer to Setting the Clock page 19 Ente...

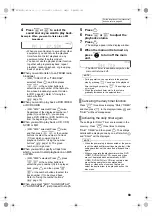
Страница 71: ...o select the track number T to be played back Refer to Using the number buttons page 19 When you select AUX AUX DIGITAL1 or AUX DIGITAL2 just proceed to step5 5 Press 6 Press or to adjust the playback volume 7 Press The settings appear in the display window 8 When the main unit is turned on press to turn off the main unit The DAILY timer is available only when the main unit is turned off NOTE Duri...

Страница 72: ...equipment When no sound is produced auto standby starts the countdown the A STANDBY indicator flashes When no operation is carried out within 3 minutes the main unit automatically turns off A STANDBY starts to flash 20 seconds before the main unit is to turn off Press once again NOTE Leaving the volume at 0 is not the same as produc ing no sound and therefore does not start the auto standby functi...

Страница 73: ...D 3 When connecting to the VIDEO 3 input terminal of the TV DVD 1 You can enjoy sound or video simply by starting playback on the main unit You do not have to select the input setting for the TV or turn on the TV beforehand 1 Turn on the main power to the TV 2 Insert a disc into the main unit 3 Press on the main unit The following operation is performed automatically The TV set will be turned on T...

Страница 74: ... recordable time as printed on the MD remains Regardless of remaining recordable time MDs have a limit on the number of recordable tracks You cannot record 255 or more tracks to an MD You can record up to 254 tracks to an MD DISC FULL appears even though the track numbers and recordable time have not reached the limit Repeated partial erasure and recording creates many blanks on an MD When you rec...

Страница 75: ... cabinet is very dirty dampen the cloth with a neutral detergent diluted with water wring out the cloth well and then wipe the cabi net with the dampened cloth followed by a soft dry cloth Do not wipe the cabinet with thinners or ben zenes Wiping it with these agents may cause discoloration of the cabinet or removal of the paint Do not spray insecticides or other highly volatile agents onto the ca...

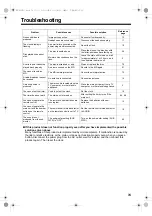
Страница 76: ... already belonging to another group Select tracks that do not belong to any groups page 60 LOAD ERROR The MD is not properly loaded Insert the MD properly MD NO DISC No MD is loaded PLAYBACK DISC You are trying to edit or record to an MD which is designed only for playback Replace the MD with a recordable MD SCMS CANNOT COPY You are trying to make a digital audio duplica tion of a CD R or CD RW Op...

Страница 77: ...ate the main unit 3 A certain point cannot be played back properly The disc is scratched or dirty Clean or replace the disc 72 An error occurred on the MD Record to the MD again 51 You cannot record an MD The MD is write protected Cancel the write protection 72 A radio broadcast cannot be received No antenna is connected Connect an antenna 14 A whirring noise is produced The main unit is located c...

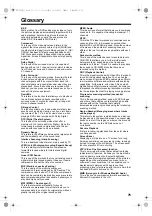
Страница 78: ...format are recorded on a single CD can I play both of them A In that case because the tracks have been recorded with data CD format the tracks on the audio CD cannot be played back You can play back only the MP3 WMA format tracks Q Dolby digital discs sometimes contain two types of surround sounds 5 1 channel surround and Dolby surround What is the difference A Both are surround sound standards de...

Страница 79: ...yer 3 This is the international standard for sound information compression format that allows you to compress data to one tenth its original size without greatly impairing the original sound quality MPEG Audio This is a surround format that allows you to compress sound data It is capable of handling a maximum 7 1 channels NTSC This is the TV video format used in countries such as Japan and the U S...

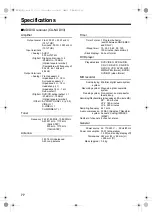
Страница 80: ... Loop antenna Timer Timer Format 1 Program behavior switch between ONCE REC and DAILY Sleep timer 10 20 30 60 90 120 150 minutes Auto dimmer Clock display 24 hour format DVD player Playable discs DVD VIDEO DVD AUDIO CD VCD SVCD CD R CD RW CD VCD SVCD MP3 WMA JPEG format DVD R DVD RW video format MD recorder Audio playing MiniDisc digital audio system system Recording system Magneto optical overwri...

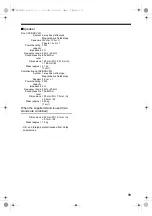
Страница 81: ... unit Center surround SP NXDV3S System 1 way bass reflex type Magnetically shielded type Speaker 5 5 cm 1 Powerhandling 30 W capacity Impedance 4 Ω Frequency range 85 Hz 20 kHz Sound pressure 78 dB W m level Dimensions 120 mm W 70 mm H 93 mm D Mass approx 0 45 kg 1 unit When the supplied stand is used two stands are combined Dimensions 242 mm W 81 mm H 97 mm D Mass approx 1 3 kg U S and foreign pa...

Страница 82: ...0105KMMMODJEM NX DV3 COMPACT COMPONENT MD SYSTEM 2005 Victor Company of Japan Limited EN c NX DV3 UJ BackCov fm Page 42 Tuesday December 28 2004 11 06 AM ...

Отзывы: