background image

6

Getting Started

English

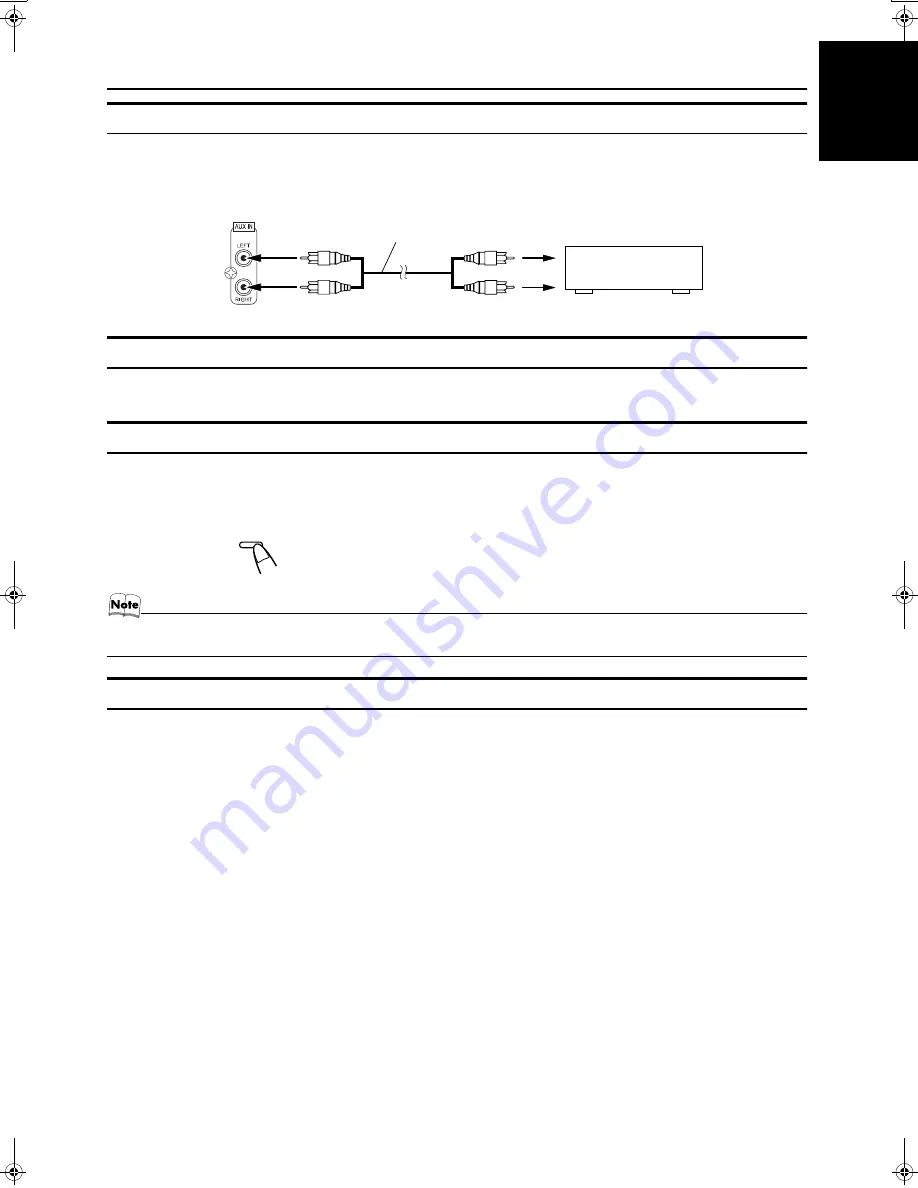
Connecting External Equipment

Connect a signal cord (not supplied) between the System’s AUX-IN terminals and the output terminals of the external MD recorder, tape
deck, etc.
You can then listen to the external source through the System.

Connecting to the Wall Outlet

Plug the AC power cord into the wall outlet.
Now, your System is at your command!

DEMO Mode

When the System is connected to the wall outlet, a DEMO mode displaying some of the system’s features automatically starts.

To turn the DEMO display off,

 press any of the operation buttons. The DEMO display automatically stops.

To turn the DEMO display on,

 press the DEMO button on the Unit for more than 2 seconds.

• While the System is turned on, the DEMO display will automatically starts if no operation is made for 2 minutes. To cancel

this auto DEMO display function, press the CANCEL button on the Unit during DEMO display.

COMPU Play

JVC’s COMPU PLAY feature lets you control the most frequently used System functions with a single touch.
With One Touch Operation you can play a CD, a tape, turn on the radio, or listen to an external equipment with a single press of the play
button for that function. One Touch Operation turns the power on for you, then starts the function you have specified. If the System is not
ready (no CD or tape in place), the System still powers on so you can insert a CD or tape.
How One Touch Operation works in each case is explained in the section dealing with that function.
The COMPU PLAY buttons are:

On the Unit

CD 

6

 button

FM/AM button
TAPE 

3

 button

AUX button
CD1, CD2 and CD 3 buttons
CD Open/Close 

0

 button

On the Remote Control

CD 

6

 button

FM/AM button
TAPE 

3

 button

AUX button
CD1, CD2 and CD 3 buttons

Signal cord (not supplied)

Pin-plug x 2

Pin-plug x 2

MD recorder, tape deck, etc. (not supplied)

CANCEL

DEMO

(For 2 seconds)

MX-KA7(JW)_Eng.book  Page 6  Wednesday, April 16, 2003  9:55 AM

Содержание CA-MXKA7

Страница 1: ... COMPONENTES COMPACTOS MX KA7 Consists of CA MXKA7 and SP MXKA7 Consiste de CA MXKA7 y SP MXKA7 FM MODE FM AM AUX SLEEP STANDBY ON CD1 CD2 CD3 SOUND MODE ACTIVE BASS EX SOUND TURBO FADE MUTING VOLUME PROGRAM RANDOM REPEAT TAPE A B TAPE CD RM SMXKA6J REMOTE CONTROL CA MXKA7 SP MXKA7 SP MXKA7 ...

Страница 2: ...PRODUCCIÓN DE ETIQUETAS 1 CLASSIFICATION LABEL PLACED ON EXTERIOR SURFACE 1 ETIQUETA DE CLASIFICACION PROVISTA SOBRE LA SUPER FICIE EXTERIOR 2 WARNING LABEL PLACED INSIDE THE UNIT 2 ETIQUETA DE ADVERTENCIA PEGADA EN EL INTERIOR DE LA UNIDAD CLASS 1 LASER PRODUCT DANGER 1 Invisible laser radiation when open and interlock failed or defeated Avoid direct exposure to beam CAUTION 1 Do not open the top...

Страница 3: ...by a newspaper or cloth etc the heat may not be able to get out 2 Do not place any naked flame sources such as lighted candles on the apparatus 3 When discarding batteries environmental problems must be con sidered and local rules or laws governing the disposal of these batteries must be followed strictly 4 Do not expose this apparatus to rain moisture dripping or splash ing and that no objects fi...

Страница 4: ...nd Sleep Timer You can connect various external units such as an MD recorder The CD Player can play back a CD R and CD RW How This Manual Is Organized Basic information that is the same for many different functions e g setting the volume is given in the section Basic Operations and not repeated under each function The names of buttons controls and display messages are written in all capital letter...

Страница 5: ... Entering the Number with the Remote Control Numeric Keys 8 Using the Tuner 9 Tuning In a Station 9 Presetting Stations 10 To Change the FM Reception Mode 10 Using the CD Player 11 To Load CDs 12 To Unload CDs 12 Basics of Using the CD Player Normal Play 13 Programming the Playing Order of the Tracks 14 Random Play 15 Repeating Tracks 15 Tray Lock Function 15 Using the Cassette Deck Listening to a...

Страница 6: ... CAUTION Handle batteries properly To avoid battery leakage or explosion Remove batteries when the Remote Control will not be used for a long time When you need to replace the batteries replace both batteries at the same time with new ones Do not use an old battery with a new one Do not use different types of batteries together Using the Remote Control The Remote Control makes it easy to use many ...

Страница 7: ...75 Ohm Antenna Cable not Supplied If reception is poor connect the outside antenna Before attaching a 75 ohm coaxial lead the kind with a round wire going to an outdoor antenna disconnect the supplied FM Wire Antenna Extend the supplied FM Wire Antenna horizontally Strip vinyl shield from cut line twist wire core FM wire antenna supplied Outdoor FM antenna cable not supplied ...

Страница 8: ...he red and black cords of the right side speaker to the red and black terminals marked RIGHT on the System Connect the red and black cords of the left side speaker to the red and black terminals marked LEFT on the System 3 Close each of the terminals CAUTIONS A TV may display irregular colors if located near the speakers If this happens set the speakers away from the TV Use speakers with the corre...

Страница 9: ...this auto DEMO display function press the CANCEL button on the Unit during DEMO display COMPU Play JVC s COMPU PLAY feature lets you control the most frequently used System functions with a single touch With One Touch Operation you can play a CD a tape turn on the radio or listen to an external equipment with a single press of the play button for that function One Touch Operation turns the power o...

Страница 10: ...it counterclockwise to decrease the volume Press the VOLUME button on the Remote Control to increase the volume or press the VOLUME button on the Remote Control to decrease the volume You can set the volume level to MIN 1 31 or MAX CAUTION DO NOT turn on the System and or start playing any source without first setting the VOLUME control to minimum as a sudden blast of sound could damage your heari...

Страница 11: ...ting the Sound Mode SOUND MODE You can select one of 3 SEA Sound Effect Amplifier modes You can use this effect only for playback On the Unit To get the effect press one of the Sound Mode buttons ROCK POP or CLASSIC The selected Sound Mode name ROCK POP or CLASSIC appears on the display The SOUND MODE indicator also lights up on the display To cancel the effect press the currently selected mode bu...

Страница 12: ... until you find the station you want OR Auto Tuning Using the Unit only If you hold down the 22 or button on the Unit for 1 second or more and then release it the frequency changes down or up automatically until a station is found OR Preset Tuning Possible only after presetting sta tions Preset tuning using the Unit Select the preset number you want using the 4 or button Example Press the button u...

Страница 13: ...quency display 6 Repeat above steps 2 to 5 for each station you want to store in memory with a preset number To change the preset stations repeat the same steps as above In step 4 you can select the preset number using the nu meric keys on the Remote Control See Entering the Number with the Remote Control on page 8 CAUTION Even if the System is unplugged or if the power failure occurs the preset s...

Страница 14: ...AT PROGRAM RANDOM Program indicator Normal Play Can continuously play all the tracks on all the CDs Program Play Can play all the programmed tracks on all the CDs in the programmed order Random Play Can play all the tracks on all the CDs in ran dom order Repeat Play Can repeat all the tracks on all the CDs the tracks on one of the CDs or just one of tracks on one CD Disc Number indicator Lights al...

Страница 15: ...ay and the disc may be damaged or the unit may be damaged when the tray is opened or it may be difficult to remove the disc from the unit When you use an 8 cm 3 CD place it on the inner circle of the tray You can load CDs while listening to the other source or while listening to the CD being played back When power is turned off with the tray opened the tray is auto matically closed If the CD canno...

Страница 16: ...playback While playing back a CD e g CD1 you can remove or change the other CDs e g CD2 and CD3 by pressing the CD Open Close 0 button After removing or changing press the same button to close the tray To Select a Track During playback using the 4 or button Briefly press the 4 or button to select the track you want to play By pressing the button you can skip to the next track or skip back to the p...

Страница 17: ...he programmed contents while the CD player is stopped press the 4 or button on the Remote Control To delete all the tracks in the program while the CD Player is stopped press the 7 button To Modify the Program while the CD Player is stopped press the CANCEL button the last track in the program is deleted To add new tracks to the end of the program repeat above steps 3 and 4 If you try to program a...

Страница 18: ...EAT 1DISC REPEAT 1 Blank display back to the beginning To stop playing press the 7 button Changing the source to the other e g Tuner will also stop playing To exit Repeat mode press the REPEAT button until the Re peat indicator on the display goes out Repeat mode remains in effect during the following Play Mode changing Tray Lock Function In order to safely keep the CD in the CD Player the tray ca...

Страница 19: ...the deck press the TAPE A B button Each time you press the button Deck A or Deck B is alternately selected 4 Press the TAPE 3 button The Tape indicator 3 blinks on the display and the tape is played back The Cassette Deck automatically stops when one side of the tape has finished playing To stop playing press the 7 button To remove the tape stop the tape and press the 0 EJECT part to open the Cass...

Страница 20: ...g the recording level Two small tabs on the back of the cassette tape one for side A and one for side B can be removed to prevent accidental erasure or recording To record on a cassette with the tabs removed you must cover the holes with adhesive tape first Type I tape can be used for recording At the start and end of cassette tapes there is leader tape which cannot be recorded onto Thus when reco...

Страница 21: ...on that you want to make recording and then press the 7 button If you want to record specific tracks only you need to pro gram the tracks beforehand See page 14 If you want to record one CD only you need to load one CD only 2 Insert a blank or erasable tape into the Deck B and wind past the tape leader 3 Press the CD REC START button on the Unit CD REC appears on the display and the REC indicator ...

Страница 22: ...m See page 6 1 Set the volume level to the minimum posi tion 2 Press the AUX button AUX IN appears on the display 3 Start playing the external equipment 4 Adjust the volume level to the level you want listen to 5 Apply the following sound effects if you wish ACTIVE BASS EX See page 8 SOUND TURBO See page 8 Sound Mode See page 8 To exit AUX mode select other source e g Tuner For operation of the ex...

Страница 23: ... blinking press the CLOCK TIMER button repeatedly until clock set ting display appears on the display In the clock setting dis play the hour digits of the current clock blink on the display If the clock is already set the display changes as follows each time you press the CLOCK TIMER button TIMER ON TIME REC ON TIME Clock setting display Canceled back to the beginning 2 Press the 4 or button to se...

Страница 24: ...me appears on the display and the hour digits blink 3 Setting the ON time Example AM 10 15 1 Press the or 4 button to set the hour you want the System to come on then press the SET button The minute digits of the ON time blink on the display Pressing the button moves the time forwards and press ing the 4 button moves it backwards Holding down the button moves the time rapidly 2 Press the or 4 butt...

Страница 25: ...epeated every day When the timer ON time comes and the System automatically turns on The music source you have set is played The Timer indicator blinks and DAILY indicator lights during timer operation When the timer OFF time comes OFF blinks on the display just before the OFF time and the System automatically turns off Then the Timer indicator and DAILY indicator remain lit on the display If the ...

Страница 26: ...nd OK successively appear on the display The REC indicator stops blinking and remains lit 6 Press the STANDBY ON button to turn off the System if necessary To confirm change the timer setting repeat the setting pro cedure from the beginning When the timer ON time comes When the timer ON time comes the System automatically turns on The station you have set is played The Timer indica tor blinks duri...

Страница 27: ...icator goes out on the display Turning off the System also cancels the SLEEP Timer When the SLEEP button is used without setting the clock CLOCK ADJUST appears on the display You need to set the clock beforehand Timer Priority Since each timer can be set independently you may wonder what happens if the settings overlap Here are the priorities for each timer The REC Timer always has priority This m...

Страница 28: ... shape octagonal etc can damage the System Remove the CD from its case by holding it at the edges while pressing the case s center hole lightly Do not touch the shiny surface of the CD or bend the CD Put the CD back in its case after use to prevent warping Be careful not to scratch the surface of the CD when placing it back in the case Avoid exposure to direct sunlight tem perature extremes and mo...

Страница 29: ...Unable to operate the Remote Control The path between the Remote Con trol and the sensor on the Unit is blocked The batteries have lost their charge Remove the obstruction Replace the batteries Operations are disabled The built in microprocessor has mal functioned due to external electrical in terference Unplug the System then plug it back in Specifications Amplifier Output Power 150 W per channel...

Страница 30: ...VICTOR COMPANY OF JAPAN LIMITED EN SP 0403NYMCREBET 2003 VICTOR COMPANY OF JAPAN LIMITED ...

Отзывы: