background image


25


4 Select the repeat mode you want. 


* During Program Play or Random Play, “STEP” 

appears.


5 Finish the setting.


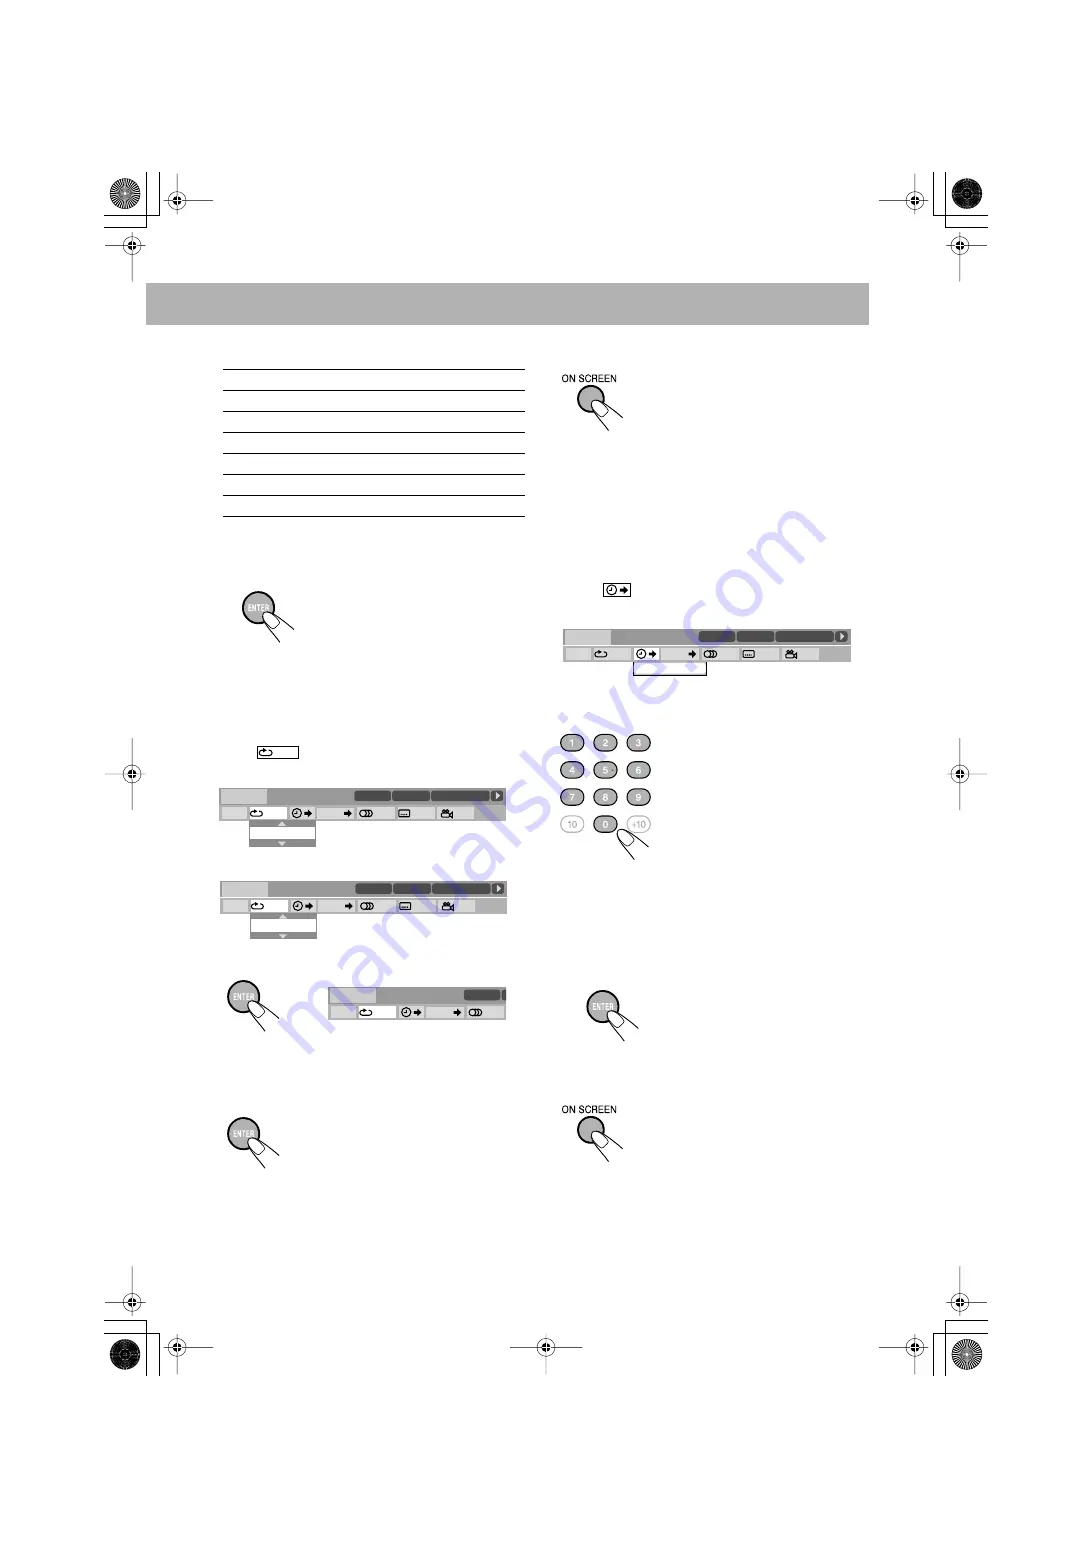
A-B Repeat


1 While playing, display the on-screen bar with the pull-

down menu.

2 Select .

3 Display the pop-up window.

4 Select “A-B”.

5 Select the start point (A).


• Before pressing ENTER, you can search for the end 

point using 

¡


.


6 Select the end point (B).

To cancel A-B Repeat,


 repeat steps 


1


 to 


3


, and select “OFF” 

in step 


4


.


To erase the on-screen bar


Time Search


You can move to a particular point by specifying the elapsed 
playing time from the beginning.


1 While playing (without PBC for SVCD/VCD), display 

the on-screen bar with the pull-down menu.


• Time Search can be used before starting playback, 

except for DVD.


2 Select .

3 Display the pop-up window.

4 Enter the time.


You can specify the time in hours/minutes/seconds.


It is always required to enter the hour digit (even “0” 
hour), but it is not required to enter trailing zeros (the 
last two digits in the examples above).


To correct a misentry, 


press cursor 

2


 to erase the last 

entry.


5 Finish the setting.

To erase the on-screen bar

ALL


Repeats the disc (except for DVD).


A-B


Repeats a desired portion (see below).


TITLE


Repeats the current title.


GROUP


Repeats the current group.


CHAPTER


Repeats the current chapter.


TRACK*


Repeats the current track.


OFF


Cancels Repeat Play.

Pop-up window goes off.

A-B Repeat starts. The selected 
portion plays repeatedly.

OFF

1/3

1/3

1/3

TIME

TITLE


14

TOTAL

 1:25:58

CHAP


23

DVD-VIDEO

TITLE  2

TIME

OFF

CHAP.

1

/

3

1

/

  3

1

/

1

TOTAL   

1:01:58

CHAP  3

8.5Mbps

OFF

OFF

1/3

1/3

1/3

TIME

TITLE


14

TOTAL

 1:25:58

CHAP


23

DVD-VIDEO

TITLE  2

TIME

OFF

CHAP.

1

/

3

1

/

  3

1

/

1

TOTAL   

1:01:58

CHAP  3

8.5Mbps

A–B

OFF

1/3

TIME

TITLE


14

CH

DVD-VIDEO

TITLE  2

TIME

A-

CHAP.

1

/

3

C

8.5Mbps


Examples:


To move to a point of 1 (hours): 
02 (minutes): 00 (seconds), press 
1, 0, 2, 0, then 0.

To move to a point of 54 
(minutes): 00 (seconds), press 0, 
5, 4, 0, then 0.

The System starts playing from 
the specified time.

TIME   _ : _ _ : _ _

OFF

1/3

1/3

1/3

TIME

TITLE


14

TOTAL

 1:25:58

CHAP


23

DVD-VIDEO

TITLE  2

TIME

OFF

CHAP.

1

/

3

1

/

  3

1

/

1

TOTAL   

1:01:58

CHAP  3

8.5Mbps

Onscreen.fm Page 25 Wednesday, January26, 2005 4:46 PM

Содержание CA-MXJE3

Страница 1: ... SP XJE5 and SP XSJE5 MX JE3 Consists of CA MXJE3 and SP MXJE3 MX JE31 Consists of CA MXJE31 and SP MXJE31 INSTRUCTIONS GVT0145 001B US UN UG UX ACTIVE BASS EXTENSION For MX JE5 For MX JE3 JE31 JE5JE3JE31 Cover U fm Page 1 Tuesday January25 2005 2 57 PM ...

Страница 2: ... as lighted candles on the apparatus When discarding batteries environmental problems must be considered and local rules or laws governing the disposal of these batteries must be followed strictly Do not expose this apparatus to rain moisture dripping or splashing and that no objects filled with liquids such as vases shall be placed on the apparatus IMPORTANT FOR LASER PRODUCTS 1 CLASS 1 LASER PRO...

Страница 3: ...nts 13 Adjusting the Volume 13 Reinforcing the Bass Sound 13 Selecting the Sound Modes 14 Creating Your Own Sound Modes User Mode 14 Creating 3 dimensional Sound Field 3D Phonic 15 Presetting Automatic DVD Video Sound Increase Level 15 Changing the Scanning Mode MX JE5 only 15 Changing the Picture Tone 15 Changing the Display Brightness 16 Setting the Clock 16 Turning Off the Power Automatically 1...

Страница 4: ...GITAL OUT are trademarks of Digital Theater Systems Inc How to Read This Manual Button and control operations are explained as listed in the table below Some related tips and notes are explained later in the sections Learning More about This System and Troubleshooting but not in the same section explaining the operations indicates that the content has some information MX JE5 only MX JE5 only DVD L...

Страница 5: ...R 110V 127V 220V 230V 240V From AM FM antenna See page 4 ŸFrom the digital input of digital audio component such as CD recorder etc See page 4 From the video input of TV monitor See page 4 From front speakers See page 5 From surround speakers MX JE5 only See page 5 From a wall outlet Plug the AC power cord only after all connections are complete Before plugging in confirm the position the voltage ...

Страница 6: ...nitor To select progressive scanning mode use COMPONENT jacks MX JE5 only Connect the VIDEO jack S VIDEO jack or COMPONENT jacks MX JE5 only whichever you want to use To set the video output selector You can select the video output to match it to the color system of your TV Extend it so that you can obtain the best reception AM loop antenna supplied FM antenna supplied Turn it until the best recep...

Страница 7: ...5 When connecting the speaker cords match the polarity of the speaker terminals to and to Use only speakers with the same speaker impedance as indicated by the speaker terminals on the rear of the unit MAIN SPEAKERS CAUTION SPEAKERS IMPEDANCE 6Ω 16Ω SURROUND SPEAKERS CAUTION SPEAKERS IMPEDANCE 16Ω 32Ω CAUTION SPEAKERS IMPEDANCE 6Ω 16Ω SPEAKERS From right front main speaker From left front main spe...

Страница 8: ...er according to federal state and local regulations When using the remote control Point the top of the remote control toward the remote sensor as directly as possible If you operate it from a diagonal position the operating range approx 5 m may be shorter DO NOT plug in before setting the voltage selector on the rear of the unit and all connection procedures are complete Voltage mark Voltage mark ...

Страница 9: ...Lights when the progressive scanning mode is selected a B S P indicator MX JE5 only Lights when browsable still picture on DVD Audio is available see page 18 s Karaoke operation indicators MIC lights when the mic mixing mode is activated see page 30 ECHO lights when the echo effect is activated see page 31 V MASKING lights when the Vocal Masking mode is activated see page 31 d DVD LEVEL 1 2 3 indi...

Страница 10: ...in unit if they have the same or similar name and marks 3 1 2 1 3 1 FM MODE 7 8 SHIFT TOP MENU MENU 2 3 2 5 ENTER TITLE GROUP SKIP 4 REV MODE RETURN 10 Keys The STANDBY lamp on the main unit lights in red A small amount of power is always consumed even while on standby For private listening Connect a pair of headphones to the PHONES jack on the main unit The sound will no longer come out of the sp...

Страница 11: ... stations 1 Tune in to a station you want to preset 2 Select a preset number 3 Store the station To tune in to a Preset Station 1 Select the band FM or AM 2 Select a preset number for the station you store The MONO indicator lights on the display Reception will improve though stereo effect is lost monaural reception mode To restore the stereo effect press the button again the MONO indicator goes o...

Страница 12: ...en you stop playback To stop completely while Resume is activated press 7 twice To cancel Resume see RESUME on page 37 To select a title group While playing a disc To select a chapter track While playing a disc To locate a particular portion While playing a disc except MP3 WMA No sound comes out while searching on DVD Video SVCD VCD To return to normal playback press DVD CD 3 To start To pause To ...

Страница 13: ... select items by entering the number using the 10 keys 7 For SVCD VCD with PBC While playing a disc with PBC PBC appears on the display When disc menu appears on the TV screen select an item on the menu Playback of the selected item starts To cancel PBC You can also cancel PBC function by pressing the number button to select a track To reactivate PBC press 7 then press 4 Examples To select number ...

Страница 14: ...deck A finishes playing the tape in deck B starts playing After the reverse 2 side of the tape in deck B finishes playing the tape in the deck A rewinds and then starts playing In Relay Play the reverse side of the tape in deck A does not play To start To stop To rewind tape INFO Push Insert Close Tape is reversed and playback repeats until you stop it Tape is not reversed When the current side of...

Страница 15: ... level To reinforce the Heavy Sound SOUND TURBO MX JE3 MX JE31 only You can boost the low and high frequency sound A B CANCEL DEMO VOLUME DVD LEVEL ACTIVE BASS EXTENSION 3D PHONIC 4 SOUND MODE CLOCK TIMER SET DISPLAY RHYTHM AX MX JE5 SOUND TURBO MX JE3 JE31 Main unit Remote Control DVD LEVEL 3D PHONIC SOUND MODE ACTIVE BASS LEVEL VFP RHYTHM AX MX JE5 SOUND TURBO MX JE3 JE31 FADE MUTING VOLUME SLEE...

Страница 16: ...t the level of the other tone 4 Finish the SEA pattern setting 4 Select one of the User Modes 5 Store the setting Surround Modes MULTI MX JE5 only Outputs the same sound from the surround speakers as the sound output from the main speakers DANCE Increases resonance and bass HALL Adds depth and brilliance to the sound STADIUM Adds clarity and spreads the sound as in an outdoor stadium SEA Sound Eff...

Страница 17: ...nd store your own taste To select a preset picture tone 1 While playing display VFP setting screen 2 Select a preset picture tone To adjust the picture tone 1 Select USER1 or USER2 Follow steps 1 and 2 explained above 2 Select a parameter you want to adjust 3D ACTION Suitable for action movies and sports programs 3D DRAMA Creates natural and warm sound Enjoy movies in a relaxed mood 3D THEATER Enj...

Страница 18: ...time when the System is turned on Turning Off the Power Automatically With Sleep Timer you can fall asleep listening to music 1 Specify the time in minutes 2 Wait until the set time goes off To check the time remaining until the shut off time GAMMA Adjust if the neutral color is bright or dark 3 to 3 BRIGHTNESS Adjust if the picture is bright or dark as a whole 8 to 8 CONTRAST Adjust if the far an...

Страница 19: ...e audio track using the on screen bar see page 23 While playing a DVD Video While playing an SVCD or VCD SVCD can have 4 audio channels Karaoke SVCD usually uses these 4 channels to record two 2 channel recordings ST1 ST2 Remote Control SLOW 7 8 DVD CD 3 SUB TITLE 3 2 5 ENTER SHIFT ANGLE PAGE MX JE5 only ZOOM AUDIO 10 Keys ST1 ST2 ST To listen to normal stereo 2 channel playback L1 L2 L To listen ...

Страница 20: ...e view angle using the on screen bar see page 23 While playing back Selecting Browsable Still Pictures MX JE5 only For DVD Audio only While playing back a track linked to browsable still pictures B S P you can select the still picture turn the page to be shown on the TV screen If a track is linked to browsable still pictures B S P they are usually shown in turn automatically during playback You ca...

Страница 21: ...ey number entry press 7 Special Picture Playback Still picture playback Frame by frame playback 1 While playing 2 Advance the still picture frame by frame To resume normal playback press DVD CD 3 Slow motion playback 1 While playing 2 Select slow motion speed Not available for SVCD VCD To resume normal playback press DVD CD 3 Zoom 1 While playing back As the number increases magnification also inc...

Страница 22: ...step 2 until you finish what you want to program 4 Start playback A B DVD CD 3 4 OPEN CLOSE 0 7 8 Main unit Remote Control 4 7 8 REPEAT DVD CD 3 CANCEL SHIFT PLAY MODE 5 10 keys To enter the numbers Examples To enter number 5 press 5 To enter number 15 press 10 then 5 To enter number 30 press 10 10 then 10 Playback starts in the order you have programmed Remote ONLY INFO PROGRAM USE NUMERIC KEYS T...

Страница 23: ... track To pause To stop To release press DVD CD 3 To erase the last step To erase the entire program You can also use 7 button on the unit To add steps in the program Repeat step 2 on page 20 Remote ONLY in the programmed order in the reverse order holding then 2 sec PROGRAM RANDOM Canceled Playback starts in a random order Random Play ends when all chapters tracks are played To skip To pause To s...

Страница 24: ...no one can eject the loaded disc This is possible while the System is on standby While the disc tray is closed To cancel the prohibition repeat the same procedure UNLOCKED appears on the display CHAP Repeats the current chapter TITLE Repeats the current title TRACK Repeats the current track GROUP Repeats the current group ALL Repeats all tracks or all programmed tracks STEP Repeats the current tra...

Страница 25: ...04 58 TRACK 3 1 3 VCD CD 10 keys 1 Disc type 2 Playback information Indication Meanings Mbps Current transfer rate Megabits per second Current title Current chapter Current group Current track Time indications 3 Playback conditions Indication Meanings Playback Forward Reverse search Forward Reverse slow motion Pause Stop 4 Operation icons on the pull down menu Indication Meanings Select to change ...

Страница 26: ...down menu Repeat play can be selected before starting playback except for DVD Video 2 Select 3 Display the pop up window Pop up window goes off Remote ONLY INFO Goes off OFF 1 3 1 3 1 3 TIME DVD VIDEO TITLE 2 TOTAL 1 01 58 CHAP 3 8 5Mbps TITLE 14 TOTAL1 25 58 CHAP 23 DVD VIDEO TITLE 2 TIME OFF CHAP 1 3 1 3 1 1 TOTAL 1 01 58 CHAP 3 8 5Mbps OFF 1 3 1 3 1 3 TIME TITLE 14 TOTAL1 25 58 CHAP 23 DVD VIDE...

Страница 27: ...es above To correct a misentry press cursor 2 to erase the last entry 5 Finish the setting To erase the on screen bar ALL Repeats the disc except for DVD A B Repeats a desired portion see below TITLE Repeats the current title GROUP Repeats the current group CHAPTER Repeats the current chapter TRACK Repeats the current track OFF Cancels Repeat Play Pop up window goes off A B Repeat starts The selec...

Страница 28: ...lect chapter track 30 press 3 then 0 The System starts playing the searched chapter or track CHAP TRACK OFF 1 3 1 3 1 3 TIME TITLE 14 TOTAL1 25 58 CHAP 23 DVD VIDEO TITLE 2 TIME OFF CHAP 1 3 1 3 1 1 TOTAL 1 01 58 CHAP 3 8 5Mbps CHAPTER _ CONTROL screen Ex When the MP3 disc is loaded 1 Current group number total group number 2 Current group 3 Group list 4 Current track 5 Track information ID3 Tag V...

Страница 29: ...HIFT press ZOOM repeatedly until ZOOM OFF appears on the TV Move the highlight bar to a desired item If you move the highlight bar while playing back an MP3 WMA disc the selected track starts playback automatically For MP3 WMA Playback starts with the selected track Pressing DVD CD 3 also starts playback For JPEG The selected track still picture is displayed until you change it Slide show playback...

Страница 30: ... STOP REVERSE MODE DUBBING TAPE B2 3 DVD CD 3 0 PUSH OPEN PUSH OPEN 0 Main unit IMPORTANT It may be unlawful to record or play back copyrighted material without the consent of the copyright owner To record on both sides When using Reverse Mode start recording in the forward 3 direction To record on only one side INFO Main Unit ONLY Push Insert Close B TAPE Tape direction indicator Reverse mode ind...

Страница 31: ...Mode settings on the display See step 2 of Recording on a Tape on page 28 For recording desired tracks on discs You can program tracks to record with your preferred order Select Program Play and make a program see page 20 without starting playback 3 Start recording When either disc play or recording ends both disc player and the cassette deck stop at the same time To record without creating a 4 se...

Страница 32: ... playing a Karaoke disc 5 Select the desired audio channel when using a Karaoke SVCD VCD See page 17 6 Sing into the microphone A B 7 MIC LEVEL MIC 2 MIC 1 VOLUME 7 5 SHIFT ECHO MIC MIX KEY RESERVE VOLUME V MASKING AUDIO CANCEL Remote control Main unit Source buttons Source buttons 10 keys IMPORTANT Always set MIC LEVEL to MIN when connecting or disconnecting the microphone MIC LEVEL adjustment is...

Страница 33: ... and or MIC 2 jacks 3 Insert and start playing a stereo disc 4 Activate Vocal Masking Mode 5 Sing into the microphone s 6 Adjust the MIC LEVEL and VOLUME To cancel from the Vocal Masking Mode select OFF in step 4 or change the source to play Microphone Mixing You can enjoy microphone mixing by using two microphones 1 Turn MIC LEVEL to MIN 2 Connect the microphone s not supplied to the MIC 1 and or...

Страница 34: ...ate Karaoke Program Play PROGRAM indicator flashes during this mode 3 Select songs you want for Karaoke Program Play For DVD Video MP3 WMA 1 Press the number buttons to select a title DVD Video or group MP3 WMA 2 Repeat step 1 to select a chapter DVD Video or track MP3 WMA For SVCD VCD CD Press the number buttons to select a track 4 Activate the Mic Mixing Mode 5 Start playback MIC MIX MIC OFF hol...

Страница 35: ...n appears To modify the program While the Karaoke reserve screen is shown on the TV To erase the unwanted step To erase the entire program To add steps in the program Repeat step 3 holding then holding then 2 sec MX JE5JE3JE31 book Page 33 Monday December27 2004 3 13 PM ...

Страница 36: ...aily Timers Select the playback source TUNER FM TUNER AM DISC TAPE A TAPE B or AUX For Recording Timer Select the playback source TUNER FM or TUNER AM 4 Select a preset station for TUNER FM and TUNER AM or select a group and track number for DISC 5 For Daily Timers Select the volume level You can select the volume level VOLUME 5 VOLUME 10 VOLUME 15 and VOLUME If you select VOLUME the volume is set...

Страница 37: ... off manually see the next column When the on time comes The System turns on tunes in to the specified station or starts playing the specified source and sets the volume level to the preset level When the off time comes The System stops playback and turns off standby The timer setting remains in memory until you change it How Recording Timer actually works When Recording Timer has been set Timer i...

Страница 38: ...TV when you play back DVD Video discs recorded for wide screen televisions When you use a multi color system TV you can change the color system of the System automatically by selecting MULTI options as the monitor type 16 9 16 9MULTI Wide television screen For a wide screen 16 9 TV 4 3 LB 4 3MULTI LB Letter Box conversion For a conventional 4 3 TV Displays a wide screen picture to fit the width of...

Страница 39: ...a lower volume clear OTHERS menu Item Contents RESUME You can select the Resume ON The System resumes playback from the position where playback has been stopped if the disc is still in the disc tray OFF Resume is deactivated ON SCREEN GUIDE Activate or deactivate the on screen guide ON To activate the on screen guide OFF To deactivate the on screen guide PARENTAL LOCK Select this item then press E...

Страница 40: ... To operate the TV TV VIDEO TV POWER SHIFT TV VOLUME TV CHANNEL Remote control To turn on or off the TV To select the input mode either TV or VIDEO To adjust TV volume To select the TV channel holding then holding then holding then MX JE5JE3JE31 book Page 38 Monday December27 2004 3 13 PM ...

Страница 41: ...nly When playing back a DVD Audio disc recorded in MLP Meridian Lossless Packing a lossless audio compression system that can completely recreate the PCM signals the signals are recognized as the linear PCM signals however no indicator lights up in the display window For MP3 WMA playback MP3 discs are required a longer readout time than regular CDs It depends on the complexity of the group file co...

Страница 42: ... sound you are actually listening to without affecting the recording level There is leader tape which cannot be recorded onto at the start and the end of cassette tapes Thus when recording discs or radio broadcasts wind the leader tape first to ensure that the recording will be made without any music part lost If no cassette is inserted NO TAPE appears on the display If a protected tape has been i...

Страница 43: ...information for zoom in always appear on the display regardless of this setting Maintenance To get the best performance of the System keep your discs tapes and mechanism clean Handling discs Remove the disc from its case by holding it at the edge while pressing the center hole lightly Do not touch the shiny surface of the disc or bend the disc Put the disc back in its case after use to prevent war...

Страница 44: ... System can only show ID3 Tag Version 1 MP3 groups and tracks are not played back as you expect The playing order is determined when the disc was recorded It depends on the writing application MP3 WMA or JPEG files are not played back The inserted disc may include both type of tracks MP3 WMA files and JPEG files In this case you can only play back the files selected by the FILE TYPE setting see pa...

Страница 45: ...AU Australia ET Ethiopia KH Cambodia NO Norway TJ Tajikistan AW Aruba FI Finland KI Kiribati NP Nepal TK Tokelau AZ Azerbaijan FJ Fiji KM Comoros NR Nauru TM Turkmenistan BA Bosnia and Herzegovina FK Falkland Islands Malvinas KN Saint Kitts and Nevis NU Niue TN Tunisia BB Barbados KP Korea Democratic People s Republic of NZ New Zealand TO Tonga BD Bangladesh FM Micronesia Federated States of OM Om...

Страница 46: ...ass approx 8 3 kg MX JE5 8 0 kg MX JE3 JE31 Supplied Accessories FM antenna 1 AM loop antenna 1 Composite video cord 1 Remote control 1 Batteries 2 AC plug adaptor 1 except for middle east If any item is missing consult your dealer immediately Speakers Type 3 Way 3 Speaker Bass Reflex Type Magnetically Shielded type Speakers Woofer 15 cm cone x 1 Midrange 5 cm cone x 1 Tweeter 2 cm dome x 1 Power ...

Страница 47: ...reo linear PCM 48 96 192 kHz 16 20 24 bits linear PCM DVD AUDIO 48 kHz 16 bits stereo linear PCM 44 1 88 2 176 4 kHz 16 20 24 bits linear PCM DVD AUDIO 44 1 kHz 16 bits stereo linear PCM DTS DVD VIDEO DVD AUDIO DTS bit stream 48 kHz 16 bits stereo linear PCM DOLBY DIGITAL DVD VIDEO DVD AUDIO DOLBY DIGITAL bit stream 48 kHz 16 bits stereo linear PCM CD VCD SVCD 44 1 kHz 16 bits stereo linear PCM 48...

Страница 48: ... SLOW f 19 SOUND MODE g 14 SOUND TURBO h 13 STANDBY ON r 8 SUB TITLE 1 18 TAPE A 3 4 12 TAPE B 23 4 12 TITLE GROUP SKIP 8 10 TOP MENU 2 11 TV CHANNEL o 38 TV POWER t 38 TV VOLUME k 38 TV VIDEO o 38 V MASKING 1 31 VFP 1 15 VOLUME k 13 31 32 ZOOM 1 19 27 Button Page 1 8 9 35 1 7 9 10 12 14 4 9 11 14 16 21 7 9 9 10 11 12 21 22 28 29 32 33 8 10 19 21 27 0 OPEN CLOSE 10 22 0 PUSH OPEN 12 28 PHONES jack...

Страница 49: ...LAY MIC 1 MIC 2 PUSH OPEN 0 0 PUSH OPEN MAX C O M P A C T C O M P O N E N T S Y S T E M M X J E 5 DISC SYNCHRO RECORDING FULL LOGIC CONTROL A B AUX FM AM DVD CD TAPE A TAPE B CD R RW PLAYBACK START DISC REC DUBBING START STOP REC ACTIVE BASS EXTENSION D I G I T A L 1 _ 2 3 4 5 6 7 8 9 0 6 5 8 1 r t y u i o a s d f g h j k l 2 3 4 e w q p 9 7 Remote control Main unit MX JE5JE3JE31 book Page 47 Mond...

Страница 50: ... V VOLTAGE SELECTOR When your mains AC line voltage is 127 V 1204AIMMDWJEM EN 2004 Victor Company of Japan Limited MX JE5 MX JE3 MX JE31 COMPACT COMPONENT SYSTEM Mains AC Line Instruction not applicable for Europe U S A Canada Australia and U K CAUTION for mains AC line BEFORE PLUGGING IN do check that your mains AC line voltage corresponds with the position of the voltage selector switch provided...

Отзывы: