background image

5:

INSTALL

4

Press the 

ï

ï

ï

ï

 button to change the 

programme number (PR) of a TV channel 
to a new programme number (PR)

,'

,'

,'

,'

1

Press the 

ë

ë

ë

ë

 buttons to choose a TV 

channel

Every time you press the 

ë

ë

ë

ë

 buttons, the programme 

number (PR) changes, and the picture of the TV channel 
stored in the programme number (PR) appears on the 
screen.

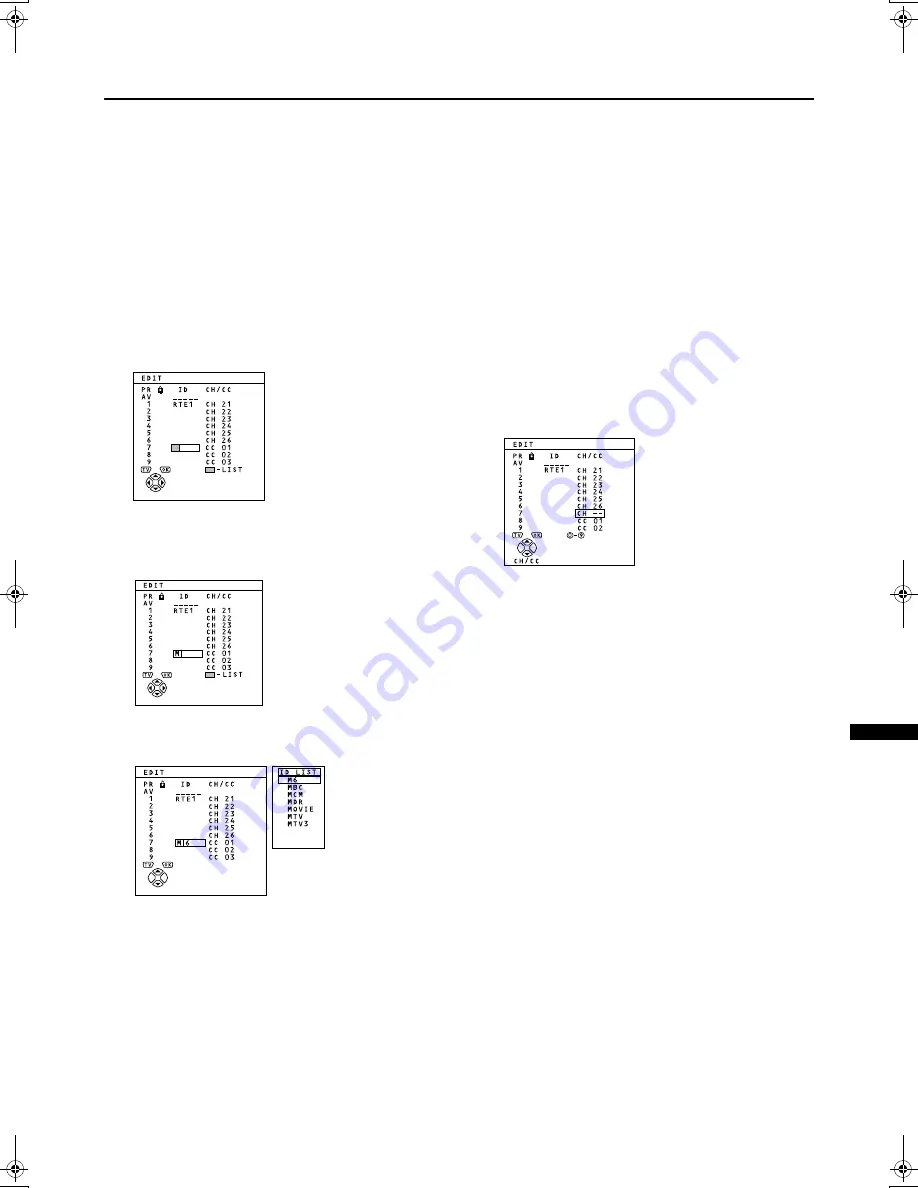
2

Press the red button to start the ID 
function

3

Press the 

ë

ë

ë

ë

 buttons to choose the first 

character of a channel name (ID) you want 
to give the TV channel

4

Press the blue button to display the ID LIST 
(channel name list)

5

Press the 

ë

ë

ë

ë

 buttons to choose the 

channel name (ID)

To cancel the ID function:

Press the 

9

9

9

9

 (Information) button.

6

Press the 

3

3

3

3

 button to give a channel 

name (ID) to a TV channel

You can give your own unique channel name (ID) to 
the TV channel. When you have finished step 3, do 
not go to step 4. Press the 

ì

ì

ì

ì

 buttons to move the 

cursor, and press the 

ë

ë

ë

ë

 buttons to choose each 

character of the channel name (ID). Then press the 

3

3

3

3

 button to register the channel name (ID) to the TV 

channel.

,16(57

,16(57

,16(57

,16(57

Preparation:

You need to find the CH/CC number for the TV channel. 
Find the  CH/CC number from the “CH/CC NUMBER” table 
on page 28 based on the channel number of the TV 
channel.

1

Press the 

ë

ë

ë

ë

 buttons to choose a 

Programme number (PR) for which you will 
register a new TV channel

2

Press the green button and start the 
INSERT function

To cancel the INSERT function:

Press the 

9

9

9

9

 (Information) button.

3

Press the 

ë

ë

ë

ë

 buttons to choose “CC” or 

“CH” according to the CH/CC number of 
the TV channel. 

To cancel the INSERT function:

Press the 

9

9

9

9

 (Information) button.

4

Press the Number button to enter the re-
maining CH/CC number.

The TV shifts to registration mode. 
When the registration is completed, the picture of the TV
channel appears on the screen.

The CH/CC number is a number given to each 
broadcast frequency that carries a TV channel. If the 
TV cannot detect the TV channel corresponding to 
the broadcast frequency indicated by the CH/CC 
number, a “no-signal” picture  appears.

AV28S2EI.book  Page 27  Wednesday, December 20, 2000  4:37 PM

Содержание AV32S2EI

Страница 1: ... Euroconnector 21 pin SCART Video input Audio L R inputs and RGB inputs are available TV broadcast outputs Video and Audio L R are available EXT 2 terminal Euroconnector 21 pin SCART Video input S VIDEO Y C input and Audio L R inputs are available Video and Audio L R outputs are available T V LINK functions are available EXT 3 terminal Euroconnector 21 pin SCART Video input S VIDEO Y C input and A...

Страница 2: ...use this TV set for a long period of time be sure to disconnect the power plug from the AC outlet DUQLQJ DUQLQJ DUQLQJ DUQLQJ DO NOT cut off the mains plug from this equipment If the plug fitted is not suitable for the power points in your home or the cable is too short to reach a power point then obtain an appropriate safety approved extension lead or adaptor or consult your dealer If nonetheless...

Страница 3: ...lt in electrical shock Never leave this equipment operating unattended unless otherwise specifically stated that it is designed to do so or in standby mode Only use the designated power switch to turn off the power and ensure that all potential users are instructed how to do so Make special arrangements for infirm or handicapped persons Never watch TV while operating a motor vehicle It is illegal ...

Страница 4: ...must have a T V LINK compatible VCR connected by a SCART cable C to the EXT 2 terminal on the TV For details about T V LINK functions see T V LINK functions on page 7 3XWWLQJ EDWWHULHV LQWR WKH UHPRWH FRQWURO 3XWWLQJ EDWWHULHV LQWR WKH UHPRWH FRQWURO 3XWWLQJ EDWWHULHV LQWR WKH UHPRWH FRQWURO 3XWWLQJ EDWWHULHV LQWR WKH UHPRWH FRQWURO Use two AAA R03 dry cell batteries Insert the batteries holding f...

Страница 5: ... the power lamp stays red and does not change to green your TV is in the standby mode Press the standby button on the remote control to turn your TV on If the JVC logo does not appear this is because your TV has already been turned on for the first time use the LANGUAGE and AUTO PROGRAM functions to make the initial settings For details see INSTALL on page 25 2 Press the 3 3 3 3 button The LANGUAG...

Страница 6: ... If you have a T V LINK compatible VCR connected Follow the operating procedure Downloading data to a VCR on page 30 to transmit the programme number PR data 8 Now the initial settings are complete and you can watch the TV Note When your TV can detect the TV channel name from the TV channel broadcast signal it automatically registers the TV channel name ID to the Programme number PR in which the T...

Страница 7: ... when recording images from an external device connected to the TV for example a camcorder when recording a TV channel after it has been unscrambled on a decoder when recording a TV channel by using the TV s output because the VCR s own tuner cannot properly receive that channel You cannot carry out Direct Rec using your TV s control Generally the VCR cannot record a TV channel that it cannot rece...

Страница 8: ...GH Press the standby button the 4 4 4 4 button the ë ë ë ë buttons or the number buttons The power lamp goes from red to green and your TV will be turned on To turn the TV off Press the standby button again The power lamp changes from green to red and the TV goes into standby mode KRRVH D 79 FKDQQHO KRRVH D 79 FKDQQHO KRRVH D 79 FKDQQHO KRRVH D 79 FKDQQHO Choose the programme number PR that the TV...

Страница 9: ...EXT terminal Use the PR LIST 1 Press the 9 9 9 9 information button to display the PR LIST 2 Press the ì ì ì ì and ë ë ë ë buttons to choose an EXT terminal Then press the 3 3 3 3 button The EXT terminals are listed after programme number PR 99 You can choose two types of video input signal S VIDEO Y C signal and regular video composite signal For details see K S VIDEO input on page 21 If you do n...

Страница 10: ...on from standby mode 2 Press the P B B B B buttons to choose a programme number PR or an EXT terminal 3 Press the D D D D volume button and the C C C C buttons to change the volume 1 Press the D D D D volume button The volume level indicator appears 2 Press the C C C C buttons while the volume level indicator is on screen R L S P E X T 4 R AUDIO OUT L EXT 1 EXT 2 EXT 3 R L S P E X T 4 ...

Страница 11: ...deal one from the following ZOOM modes AUTO For any picture format except normal picture 4 3 aspect ratio the picture will be automatically displayed in the ideal screen size For normal picture 4 3 Aspect Ratio you can choose a ZOOM mode from the 4 3 AUTO ASPECT menu For details see 4 3 AUTO ASPECT on page 18 AUTO may not work properly with poor signal quality In this case choose the best ZOOM mod...

Страница 12: ...uttons to choose a ZOOM mode Then press the 3 3 3 3 button The picture expands and the chosen ZOOM mode is displayed in about 5 seconds You can pre set a ZOOM mode for the normal picture See 4 3 AUTO ASPECT on page 18 GMXVWLQJ WKH YLVLEOH DUHD RI WKH GMXVWLQJ WKH YLVLEOH DUHD RI WKH GMXVWLQJ WKH YLVLEOH DUHD RI WKH GMXVWLQJ WKH YLVLEOH DUHD RI WKH SLFWXUH SLFWXUH SLFWXUH SLFWXUH If subtitles or th...

Страница 13: ...EXWWRQV The colour buttons are used for the teletext operations or the menu operations For details see Teletext control buttons and VCR DVD switch on page 14 or Using the TV s menus on page 16 0 2 EXWWRQ 2 EXWWRQ 2 EXWWRQ 2 EXWWRQ The 3 3 3 3 button is used to operate menus For details see Using the TV s menus on page 16 ë ë ë ë XWWRQV XWWRQV XWWRQV XWWRQV You can choose a programme number PR or a...

Страница 14: ...etext broadcasts contact your local dealer or the teletext station In Text mode the ZOOM mode is fixed to FULL You cannot operate menus when viewing a teletext programme 8VLQJ WKH LVW 0RGH 8VLQJ WKH LVW 0RGH 8VLQJ WKH LVW 0RGH 8VLQJ WKH LVW 0RGH You can store the numbers of your favourite teletext pages in memory and call them up quickly using the colour buttons To store the page numbers 1 Press t...

Страница 15: ... You can display the hidden text Each time you press the ø ø ø ø button text is hidden or revealed 6L H 6L H 6L H 6L H You can double the height of the teletext display Press the button QGH QGH QGH QGH You can return to the index page instantly Press the ú ú ú ú button FLOF Fastext WST World Standard Text Returns to page 100 or a previously specified page List mode Returns to the page number displ...

Страница 16: ...layed 2 Press the ë buttons to choose a menu title and press the 3 button The menu appears 3 Follow the menus according to the function you want to use For more details see the descriptions of each menu and its functions on the following pages The display appearing at the bottom of a menu shows you a button on the remote control that you can use when you operate a chosen function 4 Press the 3 but...

Страница 17: ...ngs changed are stored in the TINT mode 1 Press the ë buttons to choose an item 2 Press the ì buttons to change the setting You can change the HUE setting picture hue only when the colour system is NTSC 3 58 or NTSC 4 43 See Specifications on the back cover To return to the default settings in each TINT mode Press the blue button This returns the picture settings in the TINT mode you have chosen t...

Страница 18: ...5 6 67 0 2 285 6 67 0 The colour system is chosen automatically However if the picture is not clear or no colour appears choose the colour system manually 1 Press the ë buttons to choose COLOUR SYSTEM Then press the 3 button The sub menu of the COLOUR SYSTEM function appears 2 Press the ì buttons to choose the appropriate colour system PAL PAL system NTSC 3 58 NTSC 3 58 MHz system NTSC 4 43 NTSC 4...

Страница 19: ...ake the picture tilt If this happens you can correct the picture tilt 1 Press the ë buttons to choose PICTURE TILT Then press the 3 button The sub menu of the PICTURE TILT function appears 2 Press the ë buttons until the picture becomes level 3 Press the 3 button to complete the setting The menu disappears ...

Страница 20: ...isappears 63 5 63 5 63 5 63 5 You can turn off the sound from the TV speakers but you should only do this if you have connected an audio system to the TV instead of the TV speakers When you are using this function see Turning the TV s speakers off on page 31 When there is no sound from the TV speaker If the SPEAKER function is set to OFF there is no sound from the TV speaker Press the ë buttons to...

Страница 21: ...K K S VIDEO input setting Press the yellow button and turn off the K K K K S VIDEO input mark The regular video signal composite signal pictures are resumed 3 Press the 3 button to complete the setting The menu disappears The EXT 1 terminal does not support S VIDEO signal Y C signal and you cannot set K K K K S VIDEO input in the EXT 1 terminal Setting K K K K S VIDEO input changes the head charac...

Страница 22: ...r EXT terminal or TV The arrow in the menu represents a signal flow The left side of the arrow shows a signal source output from the EXT 2 terminal EXT 1 EXT 3 EXT 4 The output signal of the device connected to an EXT terminal passes through the TV and is output from the EXT 2 terminal TV The picture and sound of the TV channel you are currently viewing are output from the EXT 2 terminal 3 Press t...

Страница 23: ...a blue screen and mute the sound if the signal is weak or absent or when there is no input from an external device 1 Press the ë buttons to choose BLUE BACK 2 Press the ì buttons to choose ON To cancel the BLUE BACK function Press the ì buttons to choose OFF 3 Press the 3 button to complete the setting The menu disappears 2 2 2 2 When there is a TV channel you do not want your children to watch yo...

Страница 24: ...n After confirming the ID number press the 4 button to exit the menu Even if you reset the lock temporarily it does not mean that the CHILD LOCK function set for the TV channel is cancelled The next time anyone tries to view the TV channel it will be locked again When you want to cancel the CHILD LOCK function you must perform the operation To set the CHILD LOCK function again To stop it being eas...

Страница 25: ...DIT MANUAL on page 26 When not using the EDIT MANUAL function If you do not need to use the EDIT MANUAL function go to the next step 4 Press the 3 3 3 3 button to display the T V LINK menu 5 Operate the T V LINK menu according to the type of video cassette recorder VCR you have connected to the EXT 2 terminal If you do not have a T V LINK compatible VCR connected Press the 4 button to leave the T ...

Страница 26: ...ome of the TV channels will change Using the MANUAL function for a TV channel for which the CHILD LOCK function has been set cancels the CHILD LOCK function for that channel Using the MANUAL function for a TV channel for which the DECODER EXT 2 function has been set to ON returns the setting of the DECODER EXT 2 function for that channel to OFF When a TV channel has already been registered in PR 9...

Страница 27: ...tons to choose each character of the channel name ID Then press the 3 3 3 3button to register the channel name ID to the TV channel 16 57 16 57 16 57 16 57 Preparation You need to find the CH CC number for the TV channel Find the CH CC number from the CH CC NUMBER table on page 28 based on the channel number of the TV channel 1 Press the ë ë ë ë buttons to choose a Programme number PR for which yo...

Страница 28: ...210 E10 IR H ITALY H CH 11 CH 211 E11 IR J ITALY H 1 CH 12 CH 212 E12 ITALY H 2 CH 21 CH 221 E21 CH 22 CH 222 E22 CH 23 CH 223 E23 CH 24 CH 224 E24 CH 25 CH 225 E25 CH 26 CH 226 E26 CH 27 CH 227 E27 CH 28 CH 228 E28 CH 29 CH 229 E29 CH 30 CH 230 E30 CH 31 CH 231 E31 CH 32 CH 232 E32 CH 33 CH 233 E33 CH 34 CH 234 E34 CH 35 CH 235 E35 CH 36 CH 236 E36 CH 37 CH 237 E37 CH 38 CH 238 E38 CH 39 CH 239 E...

Страница 29: ...N 2 Press the 3 3 3 3 button to complete the setting The DEMO function is set to ON and the demonstration will start To stop the demonstration Press one of the buttons on the remote control When the DEMO function is set to ON Each time the TV is turned on the demonstration starts automatically If you do not want that to happen cancel the DEMO function 1 Display the DEMO menu again 2 Press the ë ë ...

Страница 30: ...nnected to a T V LINK compatible VCR which in turn is connected to the EXT 2 terminal use the DECODER EXT 2 function to unscramble the scrambled TV channels 1 Turn on the decoder power 2 Display the scrambled TV channel on the TV Even if the decoder is working a scrambled picture appears 3 Press the 3 3 3 3 button to display the MENU The MENU main menu appears 4 Press the ë ë ë ë buttons to choose...

Страница 31: ...s the 3 3 3 3 button to display the SOUND SETTING menu The SOUND SETTING menu appears 3 Press the ë ë ë ë buttons to choose speaker Then press the ì ì ì ì buttons to choose OFF The sound from the TV speakers is cut 4 Press the 3 3 3 3 button to complete the settings The menu disappears You can use the ì ì ì ì buttons of the TV remote control and the D volume button at the front panel of your TV se...

Страница 32: ...ECIFICATIONS on the back cover give the details of the EXT terminals If you are connecting equipment not listed in the following connection diagram see the table to choose the best EXT terminal Connecting cables are not supplied 1 VCR composite signal 2 VCR composite signal S VIDEO signal 3 T V LINK compatible VCR composite signal S VIDEO signal 4 Decoder 5 DVD player composite signal S VIDEO sign...

Страница 33: ...IURP WKH 705 WHUPLQDO WKH 705 WHUPLQDO WKH 705 WHUPLQDO WKH 705 WHUPLQDO You can change over the output of the video sound signal from the EXT 2 terminal This is useful when you want to dub the video sound from another device onto the VCR connected to the EXT 2 terminal For details on how to do this see DUBBING on page 22 79 RXWSXW IURP WKH 704 WHUPLQDO 79 RXWSXW IURP WKH 704 WHUPLQDO 79 RXWSXW IU...

Страница 34: ...r lamp pages 5 and 8 6 D D D D Volume button page 10 3 Main power button pages 5 and 8 7 EXT 4 terminal pages 21 and 32 4 Headphone jack mini jack page 32 8 AUDIO OUT terminal page 33 EXT 2 terminal pages 4 7 21 and 32 9 Aerial socket page 4 EXT 3 terminal pages 21 and 32 0 EXT 1 terminal pages 4 21 and 32 R L S P E X T 4 R AUDIO OUT L EXT 1 EXT 2 EXT 3 R L S P E X T 4 R AUDIO OUT L EXT 1 EXT 2 EX...

Страница 35: ...text is not recommended because it may not record correctly When a white and bright still image such as a white dress is displayed on the screen the white part may look as if it is coloured This is unavoidable due to the nature of the picture tube itself and not due to a TV failure When the picture disappears from the screen the unnatural colours will also disappear 3RRU VRXQG 3RRU VRXQG 3RRU VRXQ...

Отзывы: