background image

8

Setting up your TV

AV-32/28R47SK / LCT1569-001A-U / ENGLISH

Connecting the power cord to 

the AC outlet

Caution

• Operate only from the power source specified 

(AC 220 – 240 V, 50 Hz) on the unit.

Putting the batteries into the 

remote control

Use two AA/R6 dry cell batteries.

Insert the batteries from the 

-

 end, making 

sure the 

+

 and 

-

 polarities are correct.

• Follow the warnings printed on the 

batteries.

• Battery life is about six months to one 

year, depending on how much you use the 
remote control.

• The batteries we supply are only for 

setting up and testing your TV, please 

replace them as soon as you need to.

• If the remote control does not work 

properly, replace the batteries.

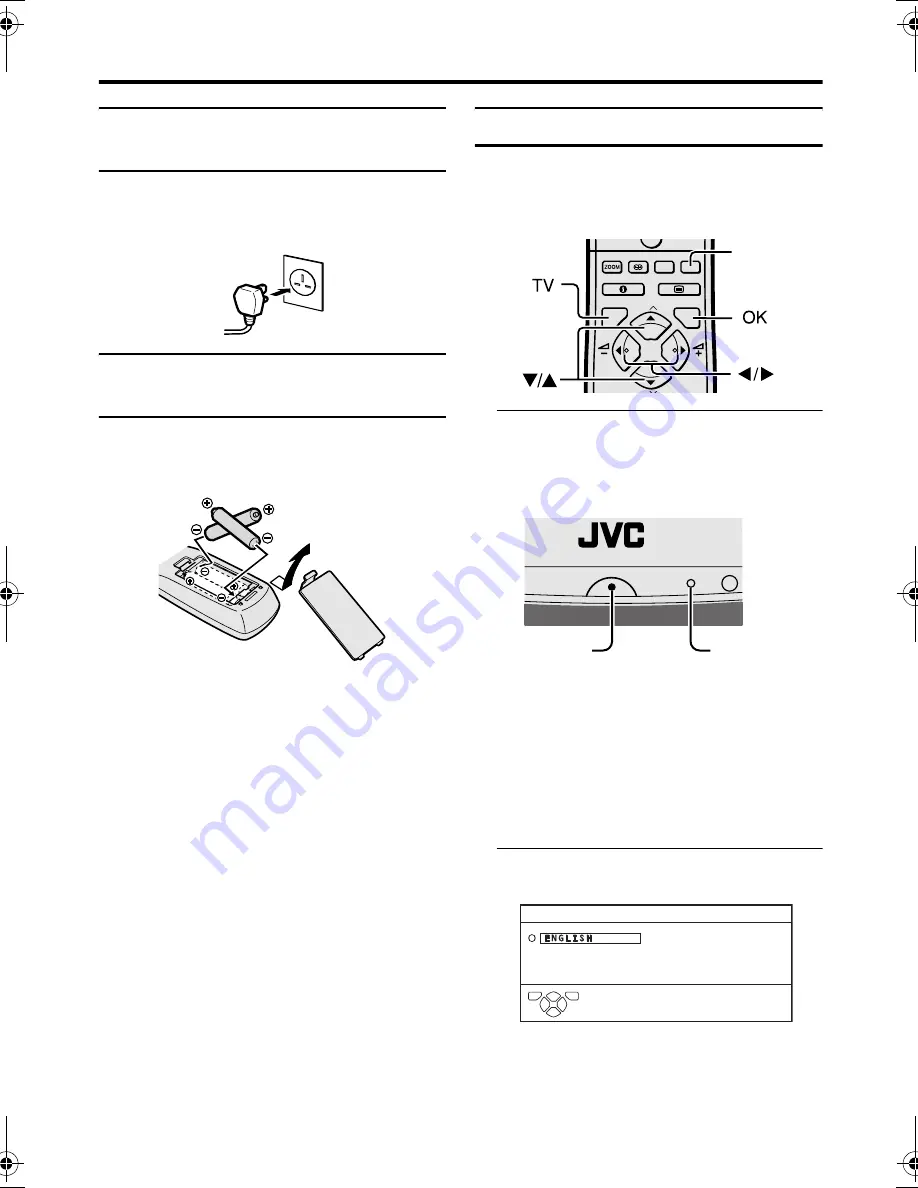
Initial settings

When the TV is first turned on, it goes into 
the initial settings mode, and you will see the 

JVC logo. Follow the instructions on the 
screen display to make the initial settings.

1 Press the main power button on the 

TV

The power lamp lights red and the JVC 
logo appears.

• If the JVC logo does not appear this is 

because your TV has already been 
turned on for the first time: 
use the “LANGUAGE” and “AUTO 

PROGRAM” functions to make the 
initial settings. For details, see “SET 
UP menu” on page 29.

2 Press the 

a

 button

The LANGUAGE menu appears.

• To receive SKY 1 you need a satellite 

tuner. You must have the satellite tuner 
set to SKY 1 before starting the AUTO 

PROGRAM function which follows.

0

P

AV

TV

OK

MENU

P

Blue button

Power lamp

Main power

button

D0002-EK

LANGUAGE

TV

OK

AV-32&28R47SK_Eng.book  Page 8  Thursday, February 26, 2004  2:41 PM

Содержание AV-28R47

Страница 1: ...COLOUR TELEVISION INSTRUCTIONS AV 32R47SK AV 28R47SK ...

Страница 2: ...care must be taken to ensure optimal results and operational safety Before attempting to use this equipment read the operating instructions thoroughly Ensure that all electrical connections including the mains plug extension leads etc have been made in accordance with the manufacturer s instructions If ever in doubt about the installation operation or safety of this equipment consult your dealer H...

Страница 3: ...3 How to move the TV When moving the TV make sure that it is held by two people as shown in the illustration Be careful not to trap your hands when putting the TV down 1 2 3 ...

Страница 4: ... electric shock may be caused DO NOT place any naked flame sources such as lighted candles on the TV WARNING TO PREVENT FIRE OR SHOCK HAZARD DO NOT EXPOSE THIS APPLIANCE TO RAIN OR MOISTURE CAUTION Operate only from the power source specified AC 220 240 V 50 Hz on the unit Avoid damaging the AC plug and power cord When you are not using this unit for a long period of time it is recommended that yo...

Страница 5: ...on 15 Surround function Dolby Pro Logic II 16 Return to TV channel instantly 18 Operating a JVC brand VCR or DVD player 18 Teletext function 19 Basic operation 19 Using the List Mode 19 Hold 20 Sub page 20 Reveal 20 Size 20 Index 20 Cancel 21 Using the TV s menu 22 Basic operation 22 PICTURE menu 23 PICTURE MODE 23 CONTRAST 23 BRIGHT 23 SHARP 23 COLOUR 23 HUE 23 COLOUR TEMP 23 FEATURES 24 SOUND me...

Страница 6: ...ing C For details see your VCR instruction manual To connect more equipment please see Connecting external equipment on page 37 To connect additional audio equipment see Connecting speakers or an amplifier on page 38 If you connect a decoder to a T V LINK compatible VCR set the DECODER EXT 2 function to ON For details see DECODER EXT 2 on page 33 Otherwise you will not be able to watch scrambled c...

Страница 7: ...e woofer connector do so while pushing the lever Placing the woofer unit The woofer unit can be used either standing up or lying down Place the woofer unit within the range of the connection cable It is recommended that the woofer unit be placed with the speaker facing forwards Do not place the woofer unit on top of the TV When the TV is used on a TV stand or table do not place the woofer unit und...

Страница 8: ...y replace the batteries Initial settings When the TV is first turned on it goes into the initial settings mode and you will see the JVC logo Follow the instructions on the screen display to make the initial settings 1 Press the main power button on the TV The power lamp lights red and the JVC logo appears If the JVC logo does not appear this is because your TV has already been turned on for the fi...

Страница 9: ...e VCR connected to the EXT 2 terminal Follow Downloading the data to VCR on page 10 to transmit the Programme number PR data Now the initial settings are complete and you can watch the TV BBC1 BBC2 ITV Channel 4 and Channel 5 are automatically set to the programme numbers PR1 to PR5 If the TV doesn t receive one of these TV channels that programme number PR will not be set Programme number PR6 is ...

Страница 10: ...Check the following three items Then press the 2 button to retry data transmission Has a T V LINK compatible VCR been connected to the EXT 2 terminal Has the VCR power been turned on Does the SCART cable that is connected to the EXT 2 terminal to T V LINK compatible VCR have all its proper connections T V LINK functions When you have a T V LINK compatible VCR connected to the EXT 2 Terminal on the...

Страница 11: ...hat you are watching on the TV For details read the manual for your VCR Use your VCR controls VCR IS RECORDING is displayed In the following situations the VCR will stop recording if the TV is turned off if the TV channel or input is changed or if the menu is displayed on the TV when recording images from an external device connected to the TV for example a camcorder when recording a TV channel af...

Страница 12: ...again The power lamp goes off Caution The main power button on the TV does not fully isolate the TV from the AC supply If you are not going to use the TV for a long period be sure to disconnect the AC plug from the AC socket Turn the TV on from standby mode Press the P p buttons to turn the TV on from standby mode When the TV is turned on the power lamp dims slightly Choose a TV channel Press the ...

Страница 13: ...Colour buttons 0 a button 6 buttons VCR DVD Teletext control button VCR P DVD switch g text button Turn the TV on or off from standby mode Press the standby button to turn the TV on or off When the TV is turned on the power lamp dims slightly The power can be turned on by pressing the b button 6 buttons or number buttons 1 4 7 2 5 8 0 3 6 9 P AV TV OK MENU P TV F T L ...

Страница 14: ...cally change over the input according to a special signal output from an external device The EXT 4 terminal does not support this function To return to a TV channel Press the b button the 6 buttons or the number buttons To use the programme number PR 0 AV When the TV and VCR are connected only by the aerial cable choosing the programme number PR 0 AV allows you to view images from the VCR Set the ...

Страница 15: ... the screen size according to the picture aspect ratio Choose the optimum one from the following ZOOM modes AUTO When a WSS Wide Screen Signalling signal which shows the aspect ratio of the picture is included in the broadcast signal or the signal from an external device the TV automatically changes the ZOOM mode to 16 9 ZOOM mode or FULL mode according to the WSS signal If a WSS signal is not inc...

Страница 16: ...visible area of the picture If subtitles or the top or bottom of the picture are cut off you can adjust the visible area of the picture manually 1 Press the c button The ZOOM menu appears 2 Press the a button to display the ZOOM mode indicator The indicator appears 3 While it is displayed press the 6 buttons to change the position of the picture You cannot adjust the visible area in REGULAR or FUL...

Страница 17: ...de can also be chosen and set from the SOUND menu see page 26 Manufactured under license from Dolby Laboratories Dolby Pro Logic and the double D symbol are trademarks of Dolby Laboratories Surround settings Dolby Pro Logic II Set DOLBY PRO LOGIC II MUSIC or DOLBY PRO LOGIC II MOVIE 1 Press the i surround button The SURROUND MODE menu appears 2 Press the 6 buttons and choose DOLBY PRO LOGIC II MUS...

Страница 18: ...r in turn Set the balance of each speaker while listening to the test tone Stopping the test tone Press the blue button again Return to TV channel instantly You can return to a TV channel instantly Press the b button The TV returns to the TV mode and a TV channel appears Operating a JVC brand VCR or DVD player These buttons will operate a JVC brand VCR or DVD player Pressing a button that looks th...

Страница 19: ...r the teletext station The ZOOM function will not work in the TV and text mode or Text mode You cannot operate menus when viewing a teletext programme Using the List Mode You can store the numbers of your favourite teletext pages in memory and call them up quickly using the colour buttons To store the page numbers 1 Press B button to go into the List mode The page numbers you have stored are displ...

Страница 20: ...can hold any sub page or view it at any time 1 Press the D Sub page button to operate the sub page function 2 Press the number buttons to enter a sub page number Example 3rd sub page press o o o and 3 To cancel the sub page function Press the D Sub page button again Reveal Some teletext pages include hidden text such as answers to a quiz You can display the hidden text Each time you press the E Re...

Страница 21: ...ter a page number or press a colour button The TV searches for a teletext page 2 Press H Cancel button The TV programme appears 3 Press H Cancel button to return to a teletext page when the page number is on the screen The TV mode cannot be resumed by pressing the H Cancel button To return to the TV mode press b ...

Страница 22: ...ion For details of the functions in the menus see the following pages 4 Press the 5 buttons to choose the setting of that function If you want to operate a function which appears only with its name follow the descriptions of that function on the following pages The display appearing at the bottom of a menu shows you a button on the remote control that you can use when you operate a chosen function...

Страница 23: ...per HUE You can adjust the picture tint 2 reddish 3 greenish You can change the HUE setting picture hue when the colour system is NTSC 3 58 or NTSC 4 43 COLOUR TEMP You can select one of three COLOUR TEMP modes three tones of white to adjust the white balance of the picture Since white is the colour which is used as a reference for all the other colours changing the COLOUR TEMP mode affects the ap...

Страница 24: ...as possible irrespective of the state of the picture When you set the mode to AUTO but still notice some noise change the mode to MAX However this may reduce the sharpness of the picture COLOUR SYSTEM The colour system is chosen automatically However if the picture is not clear or no colour appears choose the colour system manually 1 Choose COLOUR SYSTEM Then press the a or 3 button The sub menu o...

Страница 25: ...three ZOOM modes REGULAR PANORAMIC or 14 9 ZOOM as the ZOOM mode for the normal picture 4 3 aspect ratio 1 Choose 4 3 AUTO ASPECT then press the a button 2 Press the 6 buttons to choose a ZOOM mode D0017 EN 4 3 AUTO ASPECT PANORAMIC REGULAR 14 9 ZOOM TV OK ...

Страница 26: ...olume level up SURROUND MODE Choose and set the surround mode 1 Choose the SURROUND MODE and then press the a or 3 button The SURROUND MODE menu appears 2 Press the 6 buttons and choose the surround mode For details of the surround mode see Surround function Dolby Pro Logic II on page 16 When the DOLBY PRO LOGIC II MUSIC or DOLBY PRO LOGIC II MOVIE is chosen the surround settings can be set see Su...

Страница 27: ...time to OFF BLUE BACK You can set the TV to automatically change to a blue screen and mute the sound if the signal is weak or absent or when there is no input from an external device ON This function is turned on OFF This function is turned off CHILD LOCK When there is a TV channel you do not want your children to watch you can use the CHILD LOCK function to lock out the TV channel Even when a chi...

Страница 28: ...on to display ID NO ID No input screen 3 Press the number buttons to enter the ID number The lock is temporarily released so you can view the TV channel If you have forgotten the ID number Perform step 1 of To set the CHILD LOCK function After confirming the ID number press the b button to exit the menu Even if you reset the lock temporarily it does not mean that the CHILD LOCK function set for th...

Страница 29: ...a TV channel INSERT This function adds a new TV channel in the current programme numbers PR list by using the CH number You cannot use the INSERT function if you do not know the channel number of a TV channel Use the MANUAL function to register a TV channel in the programme number PR DELETE This function deletes a TV channel you do not want to list MANUAL This function manually stores a new TV cha...

Страница 30: ...ns to choose a TV channel Every time you press the 6 buttons the programme number PR changes and the picture of the TV channel stored in the programme number PR appears on the screen 2 Press the 3 button to start the MOVE function 3 Press the 6 buttons to choose a new programme number PR To cancel the MOVE function Press the h Information button 4 Press the 2 button to change the programme number ...

Страница 31: ...tton to register the channel name ID to the TV channel Before performing INSERT or MANUAL operation A CH number unique to this TV and corresponding to the Channel number of a TV channel is required Find the corresponding CH number from the table CH NUMBER on page 32 based on the Channel number of the TV channel INSERT 1 Press the 6 buttons to choose a programme number PR for which you will registe...

Страница 32: ...s poor Press the blue or yellow button to fine tune the TV channel 5 Press the a button and register the TV channel to a Programme number PR The normal EDIT menu is resumed CH NUMBER When you want to use the INSERT function on page 31 find the CH number corresponding to the channel number of the TV channel from this table If you want to know a particular TV channel s channel menu look in TV listin...

Страница 33: ...You can send the programme numbers data to a VCR with the T V LINK function 6 Turn on the VCR and then press the a button to transmit the data to VCR The T V LINK menu disappears once the data transmission ends 7 If you have another TV channel capable of being unscrambled with a Decoder repeat steps 2 to 6 If the DECODER EXT 2 function has been set to ON but the TV channel cannot be unscrambled ch...

Страница 34: ... 6 buttons to choose an EXT terminal 2 Press the yellow button and set the y S VIDEO input Then press the a button An y S VIDEO input mark is displayed You can view an S VIDEO signal Y C signal instead of the regular video signal composite signal To cancel the y S VIDEO input setting Press the yellow button and turn off y S VIDEO input mark The regular video signal composite signal pictures are re...

Страница 35: ...ess the 5 buttons to choose the arrow from the menu 2 Press the 6 buttons to choose an EXT terminal or TV Then press the a button The arrow in the menu represents a signal flow The left side of the arrow shows a signal source output from the EXT 2 terminal EXT 1 EXT 3 EXT 4 The output signal of the device connected to an EXT terminal passes through the TV and is output from the EXT 2 terminal TV T...

Страница 36: ...cture tilt or make unnatural colours appear in the corner of the screen If this happens you can correct it 1 Choose PICTURE TILT then press the a or 3 button The sub menu of the PICTURE TILT function appears 2 Press the 6 buttons until the picture becomes level Then press the a button D0018 EN PICTURE TILT TV OK ...

Страница 37: ...ive the details of the EXT terminals If you are connecting equipment not listed in the following connection diagram see the table to choose the best EXT terminal Connecting cables are not supplied 1 VCR composite signal 2 VCR composite signal S VIDEO signal 3 T V LINK compatible VCR composite signal S VIDEO signal 4 Decoder 5 DVD player composite signal S VIDEO signal 6 DVD player composite signal...

Страница 38: ...XT 2 terminal This is useful when you want to dub the video sound from another device onto the VCR connected to the EXT 2 terminal For details on how to do this see DUBBING on page 35 TV output from the EXT 1 terminal The video sound signal of a TV channel you are viewing is always output from the EXT 1 terminal Changing over a programme number PR also changes over the TV output from the EXT 1 ter...

Страница 39: ...unction Dolby Pro Logic II on page 16 You cannot cut the sound from the front speaker even if you connect headphones to the TV External surround speakers You can connect external surround speakers to the TV so that you can use the DOLBY PRO LOGIC II MUSIC or DOLBY PRO LOGIC II MOVIE on page 17 Before using the DOLBY PRO LOGIC II MUSIC or DOLBY PRO LOGIC II MOVIE however follow Surround settings Do...

Страница 40: ...on EDIT MANUAL on page 29 to use the MANUAL function to try to change the SYSTEM setting Poor picture If noise snow totally blocks out the picture there may be a problem with the aerial or aerial cable Check the following to try to solve the problem Have the TV and aerial been connected properly Has the aerial cable been damaged Is the aerial pointing in the right direction Is the aerial itself fa...

Страница 41: ...s When the SLEEP TIMER function operates the TV is automatically turned off If the TV suddenly turns off try to press the standby button to turn on the TV once again If the TV goes back to normal there is no problem When the TV is receiving a wide screen signal WSS or a signal from an external device affecting the screen size the ZOOM mode automatically changes When you want to resume the previous...

Страница 42: ...al 2 16 cm 4 cm oval 1 Subwoofer 13 cm round 1 EXT 1 terminal Euroconnector 21 pin SCART Video input Audio L R inputs and RGB inputs are available TV broadcast outputs Video and Audio L R are available EXT 2 terminal Euroconnector 21 pin SCART Video input S VIDEO Y C input Audio L R inputs and RGB inputs are available Video and Audio L R outputs are available T V LINK functions are available EXT 3...

Страница 43: ......

Страница 44: ... 2004 VICTOR COMPANY OF JAPAN LIMITED LCT1569 001A U 0204 T CR JMUK ...

Отзывы: