JVC AV-28R370 Скачать руководство пользователя страница 17

Teletext function

17


Hold

You can hold a teletext page on the screen for 
as long as you want, even while several other 

teletext pages are being received.

Press the 

N

 button

To cancel the Hold function:

Press the 

N

 button again.

Sub-page

Some teletext pages include sub-pages that 
are automatically displayed.
You can hold any sub-page, or view it at any 

time.

1 Press the 

O

 button to 

operate the sub-page function

2 Press the Number buttons to enter 

a sub-page number

Example:

• 3rd sub-page 

 press 

o

o

o

 and 

3

.

To cancel the sub-page function:

Press the 

O

 button again.

• You can also choose a sub-page by 

pressing the red or green button.

Reveal

Some teletext pages include hidden text 
(such as the answers to a quiz).

You can display the hidden text.

Each time you press the 

Q


button, text is hidden or revealed
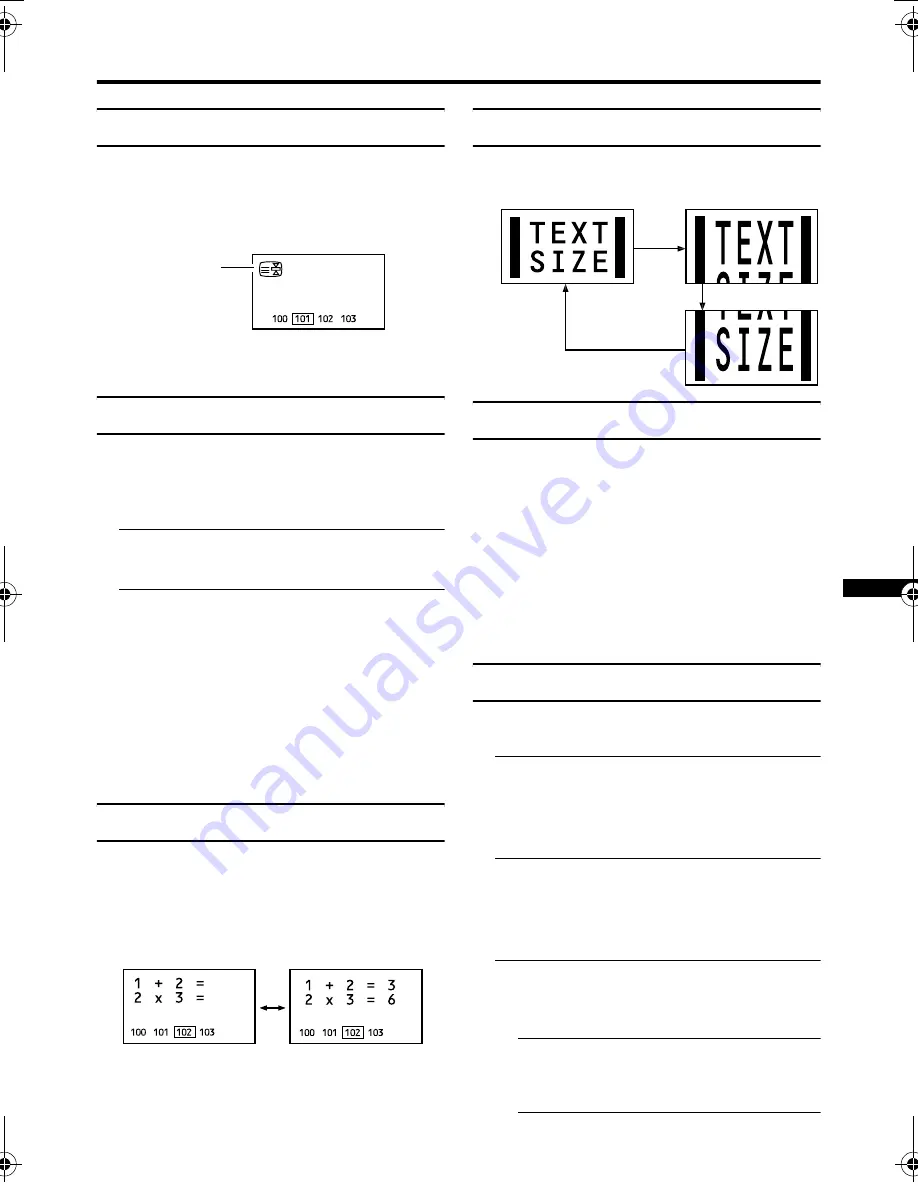
Size

You can double the height of the teletext display.

Press the 

R

 button.

Index

You can return to the index page instantly.

Press the 

T

 button

FLOF (Fastext)/TOP/WST (World 

Standard Text):

Returns to page 100 or a previously specified 
page.

List mode:

Returns to the page number displayed in the 
lower left area of the screen.

Cancel

You can search for a teletext page while 
watching TV.

1 Press the number button to enter a 

page number, or press a colour 

button

The TV searches for a teletext page.

2 Press the 

S

 button.

The TV programme appears. When the TV 
finds the teletext page, its page number 
appears in the upper left of the screen.

3 Press the 

S

 button to return 

to a teletext page when the page 

number is on the screen

• The TV mode cannot be resumed by 

pressing the 

S

 button. To 

return to the TV mode press 

b

.

'#"#%(&"

AV-32&28R370KE.fm  Page 17  Thursday, February 6, 2003  10:38 AM

Содержание AV-28R370

Страница 1: ...CART Video input Audio L R inputs and RGB inputs are available TV broadcast outputs Video and Audio L R are available EXT 2 terminal Euroconnector 21 pin SCART Video input S VIDEO Y C input and Audio L R inputs are available Video and Audio L R outputs are available T V LINK functions are available EXT 3 terminal Euroconnector 21 pin SCART Video input S VIDEO Y C input and Audio L R inputs are ava...

Страница 2: ... cabinet openings If water or liquid is allowed to enter this equipment fire or electric shock may be caused DO NOT place any naked flame sources such as lighted candles on the TV WARNING TO PREVENT FIRE OR SHOCK HAZARD DO NOT EXPOSE THIS APPLIANCE TO RAIN OR MOISTURE CAUTION Operate only from the power source specified AC 220 240 V 50 Hz on the unit Avoid damaging the AC plug and power cord When ...

Страница 3: ...ver If in doubt consult a competent electrician How to replace the fuse Open the fuse compartment with a blade screwdriver and replace the fuse Guidelines for safe operation This equipment has been designed and manufactured to comply with international safety standards However as with any electrical appliance care must be taken to ensure optimal results and operational safety Before attempting to ...

Страница 4: ...llow anyone especially children to insert anything into an opening in the case Doing so may result in a fatal electrical shock Never guess or take chances with electrical equipment of any kind It is better to be safe than sorry Caution The woofer unit is mounted on the TV Always move the TV and woofer unit together when removing the TV from the box or when moving the woofer unit If the TV is tilte...

Страница 5: ...l preparation on page 39 To connect external speakers and an audio system please see Connecting speakers or an amplifier on page 40 If you connect a decoder to a T V LINK compatible VCR set the DECODER EXT 2 function to ON For details see Using the DECODER EXT 2 function on page 35 Otherwise you will not be able to watch scrambled channels Rear Panel 1 WOOFER terminal page 39 2 AUDIO OUT terminal ...

Страница 6: ... the TV is first turned on it goes into the initial setting mode and you will see the JVC logo Follow the instructions on the screen display to make the initial settings 1 Press the Main power button on the TV The Power lamp lights red for power on then green for TV on and the JVC logo appears If the power lamp stays red and does not change to green your TV is in the standby mode Press the standby...

Страница 7: ... PROGRAM function Press the b button After the TV channels have been registered in the programme numbers PR the EDIT menu appears If you want to you can now edit the programme numbers PR using the EDIT MANUAL function For details see EDIT MANUAL on page 30 If you do not want to edit programme numbers PR go to the next step 5 Press the a button to display the T V LINK menu 6 If you do not have a T ...

Страница 8: ... uses the following features To use T V LINK functions A T V LINK compatible VCR means a JVC video cassette recorder with the T V LINK logo or with one of the following logos However these VCRs may support some or all of the features described earlier For details see your VCR instruction manual Q LINK a trademark of Panasonic Corporation Data Logic a trademark of Metz Corporation Easy Link a trade...

Страница 9: ...ut because the VCR s own tuner cannot properly receive that channel You cannot carry out Direct Rec using your TV s control Generally the VCR cannot record a TV channel that it cannot receive properly on its own tuner even if you can view that TV channel on the TV However some VCRs can record a TV channel by using the TV s output if that channel can be viewed on the TV For details see your VCR ins...

Страница 10: ...r button again The power lamp goes off Caution The main power button on the TV does not fully isolate the TV from the AC supply If you are not going to use the TV for a long period of time be sure to disconnect the AC plug from the AC socket Turn the TV on from standby mode Press the P p buttons to turn the TV on from standby mode Choose a TV channel Press the P p buttons to choose a programme num...

Страница 11: ...om standby mode Press the standby button to turn the TV on or off When the TV is turned on the power lamp changes from red to green The power can be turned on by pressing the b button 6 buttons or Number buttons Choose a TV channel Use the number buttons Enter the programme number PR of the channel using the number buttons Example PR6 press 6 PR12 press 1 and 2 Use the 6 buttons Press the 6 button...

Страница 12: ...as you press the q buttons Muting the sound Press the l muting button to turn off the sound Pressing the l muting button again restores the previous volume level Watch images from external equipment Use the o button Press the o button to choose an EXT terminal Use the 6 buttons Press the 6 buttons to choose an EXT terminal Use the PR LIST 1 Press the h Information button to display the PR LIST 2 P...

Страница 13: ...ture 4 3 Aspect Ratio you can choose a ZOOM mode from the 4 3 AUTO ASPECT menu For details see 4 3 AUTO ASPECT on page 21 AUTO may not work properly with poor signal quality In this case choose the best ZOOM mode manually This TV supports WSS wide screen signals When broadcasts with WSS are received with the ZOOM mode set at AUTO WSS the most suitable ZOOM mode is automatically chosen according to...

Страница 14: ...adjust the visible area of the picture manually 1 Press the c button The ZOOM menu appears 2 Press the a button to display the ZOOM mode indicator The indicator appears 3 While it is displayed press the 6 6 6 6 buttons to change the height of the picture You cannot adjust the visible area in REGULAR or FULL mode PRO LOGIC 3D PHONIC function You can turn the PRO LOGIC 3D PHONIC function on or off o...

Страница 15: ... These buttons will operate a JVC brand VCR or DVD player Pressing a button that looks the same as the device s original remote control button has the same effect as the original remote control 1 Set the VCR P DVD switch to the VCR or DVD position VCR When you are using a VCR set the switch to the VCR position DVD When you are using a DVD player set the switch to the DVD position P Text When you a...

Страница 16: ...ed to FULL You cannot operate menus when viewing a teletext programme Using the List Mode You can store the numbers of your favourite teletext pages in memory and call them up quickly using the colour buttons To store the page numbers 1 Press the M button to go into the List mode The page numbers you have stored are displayed at the bottom of the screen 2 Press a colour button to choose a position...

Страница 17: ...quiz You can display the hidden text Each time you press the Q button text is hidden or revealed Size You can double the height of the teletext display Press the R button Index You can return to the index page instantly Press the T button FLOF Fastext TOP WST World Standard Text Returns to page 100 or a previously specified page List mode Returns to the page number displayed in the lower left area...

Страница 18: ...nged to the FULL mode This is not a malfunction When the menu disappears the ZOOM mode will return to the previously set ZOOM mode 2 Press the 6 buttons to choose a menu title and press the a button The menu appears To return to the previous menu Press the h information button To exit a menu instantly Press the b button 3 Press the 6 buttons to choose a function For details of the functions in the...

Страница 19: ... the picture settings of each TINT mode as you like CONTRAST You can adjust the picture contrast 2 lower 3 higher BRIGHT You can adjust the picture brightness 2 darker 3 brighter SHARP You can adjust the picture sharpness 2 softer 3 sharper COLOUR You can adjust the picture colour 2 lighter 3 deeper HUE You can adjust the picture tint 2 reddish 3 greenish You can change the HUE setting picture hue...

Страница 20: ...change the mode to MAX However this may reduce the sharpness of the picture COLOUR SYSTEM The colour system is chosen automatically However if the picture is not clear or no colour appears choose the colour system manually 1 Choose COLOUR SYSTEM then press the a button 2 Press the 5 buttons to chose the appropriate colour system Then press the a button PAL PAL system NTSC 3 58 NTSC 3 58 MHz system...

Страница 21: ...s the a button SOUND SETTING STEREO I II When you are viewing a bilingual broadcast programme you can choose the sound from Bilingual I Sub I or Bilingual II Sub II If you have poor reception on a stereo broadcast you can change from stereo to mono sound so that you can hear the broadcast more clearly and easily The sound mode you can choose differs depending on the TV programme This function does...

Страница 22: ...hen the DOLBY PRO LOGIC function or PRO LOGIC 3D PHONIC function is operating the SPEAKER item does not appears Digital surround Connecting the headphones to the TV automatically changes to the HEADPHONE SURROUND function which corresponds to the current DIGITAL SURROUND function However the PRO LOGIC 3D PHONIC function and DOLBY PRO LOGIC function are changed over to the 3D HEADPHONE function as ...

Страница 23: ... an amplifier on page 40 When an audio system is not connected to your TV please be sure to leave the TV SPEAKER setting to L C R If you don t a normal sound will not come from the TV speakers If the TV SPEAKER is not set to L C R press the 6 buttons to choose TV SPEAKER and press the 5 buttons to choose L C R again DOLBY PRO LOGIC You can enjoy Dolby Surround Pro Logic sound if you add surround s...

Страница 24: ...the headphones to your TV If the headphones are not connected to the TV the DIGITAL SURROUND function becomes active instead of the HEADPHONE SURROUND function Disconnecting the headphones from the TV automatically changes to the DIGITAL SURROUND function corresponding to the current HEADPHONE SURROUND function However the 3D HEADPHONE function is changed over to either the PRO LOGIC 3D PHONIC fun...

Страница 25: ...n does not work properly for Dolby Surround encoded programmes EXT SETTING y S VIDEO input You can connect a device such as an S VHS VCR to enjoy the high quality picture of the S VIDEO signal Y C signal Preparation First read the device s instruction manual and Additional preparation on page 39 to connect the device to the TV properly Second follow the device s instruction manual to set the devic...

Страница 26: ...pear on the screen together with its name 1 Choose an EXT terminal 2 Press the blue button to display the name list LIST 3 Press the 6 buttons to choose a name Then press the a button The LIST disappears and the name is assigned to the EXT terminal You cannot choose an EXT terminal name that is not on the name list LIST To erase a name assigned to the EXT terminal Choose a blank space 4 Press the ...

Страница 27: ... 1 Choose SLEEP TIMER then press the a button A Sub menu of the SLEEP TIMER function appears 2 Press the 5 buttons to set the period of time Then press the a button You can set the period of time a maximum of 120 minutes 2 hours in 10 minute steps One minute before the SLEEP TIMER function turns off the TV GOOD NIGHT appears The SLEEP TIMER function cannot be used to turn off the TV s main power W...

Страница 28: ... choose a number 2 Press the 5 buttons to move the cursor 3 Press the a button The Sub menu of CHILD LOCK appears 4 Press the 6 buttons to choose a TV channel Every time you press the 6 buttons the Programme number PR changes and the picture of the TV channel registered in the Programme number PR is displayed on the screen 5 Press the blue button and set the CHILD LOCK function Then press the a bu...

Страница 29: ...R which in turn is connected to the EXT 2 terminal To use this function see Using the DECODER EXT 2 function on page 35 Caution If you have not connected a decoder with a T V LINK compatible VCR to the EXT 2 terminal setting this function to ON by mistake causes the picture sound of a TV channel you are currently viewing to disappear INSTALL LANGUAGE You can choose the language you want to use for...

Страница 30: ...ed to set this using the manual function In some areas you may get TV reception from more than one transmitter for example different ITV regions In this case each TV channel could be set twice If this happens the first set of channels will have the stronger signal If you want to delete the second set of channels you will have to do it manually see page 33 EDIT MANUAL The EDIT MANUAL functions are ...

Страница 31: ...function to register a TV channel in the programme number PR DELETE This function deletes a TV channel you do not want to list MANUAL This function manually stores a new TV channel in a programme number PR 3 Press the a button to complete the settings The T V LINK menu appears 4 If you do not have a T V LINK compatible VCR connected Press the b button to exit the T V LINK menu The T V LINK menu di...

Страница 32: ...o cancel the ID function Press the h Information button 6 Press the a button to give a channel name ID to a TV channel You can give your own unique channel name ID to the TV channel When you have finished step 3 do not go to step 4 Press the 5 buttons to move the cursor and press the 6 buttons to choose each character of the channel name ID Then press the a button to register the channel name ID t...

Страница 33: ...red in the programme number PR appears on the screen 2 Press the yellow button to delete the TV channel The TV channel is deleted from the programme numbers PR list MANUAL 1 Press the 6 buttons to choose a programme number PR for a new TV channel 2 Press the blue button to activate the MANUAL function To cancel the MANUAL function Press the h Information button 3 Press the green or red button to s...

Страница 34: ...is set to ON Each time the TV is turned on the demonstration starts automatically If you do not want that to happen cancel the DEMO function 1 Display the DEMO menu again 2 Press the 6 buttons to choose OFF 3 Press the a button to cancel the DEMO function CH Channel CH 21 E21 CH 22 E22 CH 23 E23 CH 24 E24 CH 25 E25 CH 26 E26 CH 27 E27 CH 28 E28 CH 29 E29 CH 30 E30 CH 31 E31 CH 32 E32 CH 33 E33 CH ...

Страница 35: ...VCR been connected to the EXT 2 terminal Has the VCR power been turned on Does the SCART cable that connects the EXT 2 terminal to the T V LINK compatible VCR have all its proper connections Using the DECODER EXT 2 function If you have a decoder connected to a T V LINK compatible VCR which in turn is connected to the EXT 2 terminal use the DECODER EXT 2 function to unscramble the scrambled TV chan...

Страница 36: ...he TV speakers as the centre speakers for the PRO LOGIC 3D PHONIC function When connecting surround speakers Follow Setting the DOLBY PRO LOGIC function When connecting both an audio system front speakers and an amplifier and surround speakers Follow Turning the TV s speakers off and Setting the DOLBY PRO LOGIC function The 5 buttons of the TV remote control and the r volume buttons at the front p...

Страница 37: ...e sound of the TV speakers 5 Press the a button to complete the settings The menu disappears Use the amplifier volume to control and set the volume of the front speakers to fit in with the TV speakers Setting the DOLBY PRO LOGIC function Set the items in the sub menu of the DOLBY PRO LOGIC function properly and use the test signal to control the volume of the speakers so that you can listen to the...

Страница 38: ... the amplifier volume until the volume from the front speaker is roughly equal to that from the TV speakers or surround speakers 6 Press the 5 buttons to adjust the sound volumes of the speakers so that you can listen to the sounds at the same volume when you are sitting where you would normally sit to watch the TV LEFT CENTRE RIGHT SURROUND LEFT and RIGHT stands for the left and right of the fron...

Страница 39: ...necting equipment not listed in the following connection diagram see the table to choose the best EXT terminal Connecting cables are not supplied 1 VCR composite signal 2 VCR composite signal S VIDEO signal 3 T V LINK compatible VCR composite signal S VIDEO signal 4 Decoder 5 DVD player composite signal S VIDEO signal 6 DVD player composite signal RGB signal 7 TV game composite signal RGB signal 8...

Страница 40: ...inal Changing over a programme number PR also changes over the TV output from the EXT 1 terminal The video sound signal from an EXT terminal cannot be output Teletext programmes cannot be output Connecting speakers or an amplifier See the audio equipment diagram and connect the audio equipment to the TV Before connecting anything Read the manuals that came with the amplifier and speakers Turn the ...

Страница 41: ...ift the woofer and remove it Fitting the woofer unit Fit the woofer unit in the reverse order to that described in Removing the woofer unit Align the projection on the base of the woofer unit with the hole in the top of the TV and insert the connector into the WOOFER terminal Cautions when fitting the woofer unit Check that the woofer unit is fitted correctly on the top of the TV Do not use excess...

Страница 42: ...he description SPEAKER on page 22 to check the SPEAKER function setting Poor picture If noise snow totally block out the picture there may be a problem with the aerial or aerial cable Check the following to try to solve the problem Have the TV and aerial been connected properly Has the aerial cable been damaged Is the aerial pointing in the right direction Is the aerial itself faulty If the TV or ...

Страница 43: ...TIMER function operates the TV is automatically turned off If the TV is turned off suddenly try to press the standby button to turn on the TV once again If the TV goes back to normal there is no problem When the TV is receiving a wide screen signal WSS or a signal from an external device affecting the screen size the ZOOM mode automatically changes When you want to resume the previous ZOOM mode pr...

Страница 44: ... TELEVISEUR COULEUR MANUEL D INSTRUCTIONS KLEURENTELEVISIE GEBRUIKSAANWIJZING TELEVISOR A COLOR MANUAL DE INSTRUCCIONES TELEVISORE A COLORI ISTRUZIONI TELEVISOR A CORES INSTRUÇÕES AV 32T35SPE AV 28T35SPE ENGLISH DEUTSCH FRANÇAIS NEDERLANDS CASTELLANO ITALIANO PORTUGUÊS ...

Страница 45: ......

Страница 46: ...OT place any naked flame sources such as lighted candles on the TV CONTENTS Setting up your TV 2 TV buttons and functions 7 Remote control buttons and functions 9 Teletext function 14 Using the TV s menu 17 Additional menu operations 33 Additional preparation 35 CH CC numbers 37 Troubleshooting 39 Specifications 42 WARNING TO PREVENT FIRE OR SHOCK HAZARD DO NOT EXPOSE THIS APPLIANCE TO RAIN OR MOI...

Страница 47: ... C For details refer to your VCR instruction manual To connect additional external devices please see Additional preparation on page 35 To connect speakers and amplifier please see Connecting Speakers Amplifier on page 36 When a decoder is connected to a T V LINK compatible VCR set the DECODER EXT 2 function to ON For details see Using the DECODER EXT 2 function on page 34 Otherwise you will not b...

Страница 48: ...s not work properly replace the batteries Initial settings When the TV is first turned on it enters the initial setting mode and the JVC logo is displayed Follow the instructions on the on screen display to make the initial settings 1 Press the Main power button on the TV The Power lamp lights red for power on then green for TV on and the JVC logo is displayed If the power lamp stays red and does ...

Страница 49: ...ted 5 Press the blue button to start the AUTO PROGRAM function The AUTO PROGRAM menu appears and received TV channels are automatically registered in the Programme numbers PR To cancel the AUTO PROGRAM function Press the b button After the TV channels have been registered in the Programme numbers PR the EDIT menu appears You can proceed to edit the Programme numbers PR using the EDIT MANUAL functi...

Страница 50: ...l is not registered in Programme number PR 0 AV When you want to register a TV channel to PR 0 AV manually set it using the MANUAL function For details see EDIT MANUAL on page 28 T V LINK FUNCTIONS When a T V LINK compatible VCR is connected to the EXT 2 Terminal on the TV it is easier to set up the VCR and to view videos T V LINK uses the following features To use T V LINK functions A T V LINK co...

Страница 51: ...V channel or input is switched or if the menu is displayed on the TV When recording images from an external device connected to the TV When recording a TV channel after it has been unscrambled on a decoder When recording a TV channel by using the TV s output because that TV channel cannot be properly received on the VCR s tuner Operation via the TV is not possible Generally the VCR cannot record a...

Страница 52: ...button on the TV The Power lamp lights red and your TV is in the standby mode If the Power lamp lights green the TV is already on To turn the Main power off Press the Main power button again The Power lamp goes off Caution The main power button on the TV does not fully isolate the TV from the AC supply If you are not going to use this TV for a long period of time be sure to disconnect the AC plug ...

Страница 53: ...turn the TV on from standby mode Choose a TV channel Press the P p p p p buttons to choose a programme number PR or an EXT terminal Adjust the volume 1 Press the r r r r Volume button The volume level indicator appears 2 Press the q q q q buttons while the volume level indicator is displayed ...

Страница 54: ...tandby mode Press the standby button to turn the TV on or off When the TV is turned on the power lamp changes from red to green The power can be turned on by pressing the b button 6 buttons or Number buttons Choose a TV channel Use the number buttons Enter the programme number PR of the channel using the number buttons Example PR6 press 6 PR12 press 1 and 2 Use the 6 6 6 6 buttons Press the 6 6 6 ...

Страница 55: ... on page 24 If the picture is tilted correct it See PICTURE TILT Only for AV 32T35SPE on page 20 Adjust the volume Press the 5 5 5 5 buttons to adjust the volume The Volume indicator appears and the volume changes as you press the q buttons Muting the sound Press the l l l l muting button to turn off the sound Pressing the l muting button again restores the previous volume level Watch images from ...

Страница 56: ...RF channel is sent as the RF signal from the VCR Also refer to your VCR instruction manual ZOOM function You can change the screen size according to the picture aspect ratio Choose the optimum one from the following ZOOM modes AUTO WSS For any picture format except Normal Picture 4 3 Aspect Ratio the picture will be automatically displayed in the optimum screen size For Normal Picture 4 3 Aspect R...

Страница 57: ...ress the a a a a button The picture expands and the chosen ZOOM mode is displayed in about 5 seconds You can pre set a ZOOM mode for the normal picture See 4 3 AUTO ASPECT on page 20 Adjusting the visible area of the picture If subtitles or the top or bottom of the picture are cut off adjust the visible area of the picture manually 1 Press the c c c c button The ZOOM menu appears 2 Press the a a a...

Страница 58: ...s Operating a JVC brand VCR or DVD player You can operate a JVC brand VCR or DVD player Pressing the button having the same appearance as the original remote control button of a device makes the function work in the same way as the original remote control 1 Set the VCR P P P P DVD Switch to the VCR or DVD position VCR When you are operating the VCR set the switch to the VCR position DVD When you a...

Страница 59: ... operations are possible when viewing a teletext programme Language display depends on the country which was set on the COUNTRY menu If characters on a Teletext programme do not appear properly change the COUNTRY Setting to other country s For detail Changing the COUNTRY setting on page 33 Using the List Mode You can store the numbers of your favourite teletext pages in memory and call them up qui...

Страница 60: ...ages that are automatically displayed You can hold any sub page or view it at any time 1 Press the D D D D Sub page button to operate the Sub page function 2 Press the Number buttons to enter a sub page number Example 3rd sub page press 0 0 0 and 3 To cancel the Sub page function Press the D Sub page button again You can also choose a sub page by pressing the red or green button Reveal Some telete...

Страница 61: ...tching TV 1 Press the Number button to enter a page number or press a Colour button The TV searches for a teletext page 2 Press H H H H Cancel button The TV programme appears When the TV finds the teletext page its page number appears in the upper left of the screen 3 Press H H H H Cancel button to return to a teletext page when the page number is on the screen The TV mode cannot be resumed even b...

Страница 62: ...title and press the a a a a button The menu appears To return to the previous menu Press the h information button To exit a menu instantly Press the b button 3 Press the 6 6 6 6 buttons to choose a function For details of the functions in the menus see the following pages 4 Press the 5 5 5 5 buttons to choose the setting of that function If you want to operate a function which appears only with it...

Страница 63: ...nge the picture settings of each TINT mode as you like CONTRAST You can adjust the picture contrast 2 lower 3 higher BRIGHT You can adjust the picture brightness 2 darker 3 brighter SHARP You can adjust the picture sharpness 2 softer 3 sharper COLOUR You can adjust the picture colour 2 lighter 3 deeper HUE You can adjust the picture tint 2 reddish 3 greenish You can change the HUE setting picture ...

Страница 64: ...may reduce the sharpness of the picture COLOUR SYSTEM The colour system is chosen automatically However if the picture is not clear or no colour appears choose the colour system manually 1 Choose COLOUR SYSTEM then press the a a a a button 2 Press the 5 5 5 5 buttons to chose the appropriate colour system Then press the a a a a button PAL PAL system SECAM SECAM system NTSC 3 58 NTSC 3 58 MHz syste...

Страница 65: ...n you are viewing a bilingual broadcast programme you can choose the sound from Bilingual I Sub I or Bilingual II Sub II When the stereo broadcasting is received poorly you can change from stereo to mono sound so that you can hear the broadcast more clearly and easily The sound mode you can choose differs depending on the TV programme This function does not work in the EXT modes And this function ...

Страница 66: ...ee HYPER SOUND function on page 12 SPEAKER You can turn off the sound from the TV speakers but you should only do this if an audio system is connected to the TV as a substitute for the TV speakers ON The TV speakers issue sound OFF The TV speakers does not issue sound The 5 buttons of the TV remote control and the r volume buttons at the front panel of your TV set can be used to control the volume...

Страница 67: ...n and set the y y y y S VIDEO input Then press the a a a a button An y S VIDEO input mark is displayed You can view an S VIDEO signal Y C signal instead of the regular video signal composite signal To cancel the y y y y S VIDEO input setting Press the yellow button and turn off y S VIDEO input mark The regular video signal composite signal pictures are resumed The EXT 1 terminal does not support S...

Страница 68: ...rom a TV channel you are currently viewing to output it to the EXT 2 terminal 1 Press the 5 5 5 5 buttons to choose the arrow from the menu 2 Press the 6 6 6 6 buttons to choose an EXT terminal or TV Then press the a a a a button The arrow in the menu represents a signal flow The left side of the arrow denotes a signal source output from the EXT 2 terminal EXT 1 EXT 3 EXT 4 The output signal of th...

Страница 69: ...he SLEEP TIMER function Press the 2 button to set a period of time to OFF BLUE BACK You can set the TV to automatically change to a blue screen and mute the sound if the signal is weak or absent or when there is no input from an external device ON This function is turned on OFF This function is turned off CHILD LOCK When there is a TV channel you wish your children not to watch you can use the CHI...

Страница 70: ...LD LOCK appears You cannot view the TV channel 2 Press the h h h h Information button to display ID NO ID NO input screen 3 Press the Number buttons to enter the ID number The lock is temporarily released so you can view the TV channel If you have forgotten the ID number Perform step 1 of To set the CHILD LOCK function After confirming the ID number press the b button to exit the menu Even if you ...

Страница 71: ... T V LINK compatible VCR connected to the EXT 2 terminal setting this function to ON by mistake causes the picture sound of a TV channel you are currently viewing not to be issued INSTALL LANGUAGE You can choose the language you want to use for the on screen display from the language list in a menu 1 Choose LANGUAGE then press the a a a a button A sub menu of the LANGUAGE function appears 2 Press ...

Страница 72: ...ramme numbers PR using the EDIT MANUAL function For details see EDIT MANUAL on page 28 If you do not need to use the EDIT MANUAL function go to the next step 4 Press the a a a a button to display the T V LINK menu 5 If you do not have a T V LINK compatible VCR connected Press the b button to exit the T V LINK menu If you have a T V LINK compatible VCR connected to the EXT 2 terminal Follow the ope...

Страница 73: ...pears in the Programme numbers PR list An EXT terminal number does not appear in the Programme numbers PR list The CH CC number is a number unique to the TV and corresponding to the Channel number of a TV channel For the relationship of a Channel number and a CH CC number see CH CC numbers on page 37 2 Follow the operation description of a function you want to use and operate the function MOVE Thi...

Страница 74: ...unction 3 Press the 6 6 6 6 buttons to choose a new Programme number PR To cancel the MOVE function Press the h Information button 4 Press the 2 2 2 2 button to change the Programme number PR of a TV channel to a new Programme number PR ID 1 Press the 6 6 6 6 buttons to choose a TV channel Every time you press the 6 buttons the Programme number PR is changed over and the picture of the TV channel ...

Страница 75: ... from a table CH CC numbers on page 37 based on the Channel number of the TV channel When the COUNTRY setting is not FRANCE use a two digit CH CC number When the COUNTRY setting is FRANCE use a three digit CH CC number Only when you add a TV channel SECAM L system from a French station be sure to set COUNTRY to FRANCE If the COUNTRY setting is not FRANCE follow the description Changing the COUNTRY...

Страница 76: ...follow the description Changing the COUNTRY setting on page 33 to change the COUNTRY setting to FRANCE then start the MANUAL function 1 Press the 6 6 6 6 buttons to choose a Programme number PR to which you want to register a new TV channel 2 Press the blue button to activate the MANUAL function At the right side following the CH CC number the SYSTEM broadcasting system of the TV channel appears T...

Страница 77: ... a Programme number PR The normal EDIT menu is resumed DEMO The DEMO function automatically demonstrates some of the TV functions Choose ON or OFF Then press the a a a a button The DEMO function is set to ON and the demonstration will start To stop the demonstration Press one of the buttons on the remote control When the DEMO function is set to ON Each time the TV is turned on the demonstration st...

Страница 78: ...e following three items are correct then press the a button to retry data transmission Has the T V LINK compatible VCR been connected to the EXT 2 terminal Has the VCR power been turned on Does the SCART cable that is connected to the EXT 2 terminal to T V LINK compatible VCR have all proper connections Changing the COUNTRY setting After the AUTO PROGRAM function is completed you can change the co...

Страница 79: ...ton The FEATURES menu appears 5 Press the 6 6 6 6 buttons to choose DECODER EXT 2 Then press the 5 5 5 5 buttons to choose ON An unscrambled picture appears To cancel the DECODER EXT 2 function Press the 5 buttons to choose OFF 6 Press the a a a a button to complete the setting The T V LINK menu appears 7 Follow the operating procedure Downloading the data to VCR on page 33 to transmit the Program...

Страница 80: ...nals If you are connecting a device not listed in the following connection diagram see the table to choose the best EXT terminal Note that connecting cables are not supplied 1 VCR composite signal 2 VCR composite signal S VIDEO signal 3 T V LINK compatible VCR composite signal S VIDEO signal 4 Decoder 5 DVD player composite signal S VIDEO signal 6 DVD player composite signal RGB signal 7 TV game c...

Страница 81: ...ily change over the output of the video sound signal from the EXT 2 terminal It is useful when you want to dub the video sound from another device on the VCR connected to the EXT 2 terminal For details on how to do this operation see DUBBING on page 23 TV output from the EXT 1 terminal The output of video sound signal of a TV channel you are currently viewing is always output from the EXT 1 termin...

Страница 82: ...CC 218 S18 CC 19 CC 219 S19 CC 20 CC 220 S20 CC 21 CC 221 S21 CC 22 CC 222 S22 CC 23 CC 223 S23 CC 24 CC 224 S24 CC 25 CC 225 S25 CC 26 CC 226 S26 CC 27 CC 227 S27 CC 28 CC 228 S28 CC 29 CC 229 S29 CC 30 CC 230 S30 CC Channel CC 31 CC 231 S31 CC 32 CC 232 S32 CC 33 CC 233 S33 CC 34 CC 234 S34 CC 35 CC 235 S35 CC 36 CC 236 S36 CC 37 CC 237 S37 CC 38 CC 238 S38 CC 39 CC 239 S39 CC 40 CC 240 S40 CC 4...

Страница 83: ...mber Find the CH CC number CC110 to CC161 corresponding to the TV channel SECAM L system from a French cable TV station based on the broadcast frequency of the TV channel When you do not know the broadcast frequency please contact the cable TV station The CH CC numbers of CH102 CH169 and CC110 CC161 correspond to the TV channels being broadcast by a SECAM L system The other CH CC numbers correspon...

Страница 84: ...on setting to OFF Have you connected the headphones to the TV Connecting the headphones to the TV causes sounds not to be issued from the TV speakers Have you set the SPEAKER function to OFF Follow the description SPEAKER on page 21 to confirm the SPEAKER function setting to try to solve the problem If the SYSTEM setting for a TV channel is incorrect it may prevent the sound from being issued Foll...

Страница 85: ...es to try to solve the problem Have you attempted to use the remote control at the sides or rear of the TV or at a location more than seven meters apart from the TV location Operate the remote control in the front of your TV or a location less than seven meters from your TV to try to solve the problem When you are viewing a teletext programme you cannot operate the menus Press the b button to retu...

Страница 86: ... sound does not show any abnormality If you hear crackling sounds frequently while you are viewing the TV other causes may be assumed For precautionary purposes request your service technician to inspect it Touching the screen may cause you feel a slight electric shock due to its static electricity It is an unavoidable phenomenon due to the construction of the picture tube It is not a problem with...

Страница 87: ...80 W Average 120 W Standby 3 W Picture tube size Viewable area 76 cm measured diagonally Viewable area 66 cm measured diagonally Audio output Rated Power output 10 W 10 W Speakers 13 cm 6 5 cm oval 2 EXT 1 terminal Euroconnector 21 pin SCART Video input Audio L R inputs and RGB inputs are available TV broadcast outputs Video and Audio L R are available EXT 2 terminal Euroconnector 21 pin SCART Vid...

Страница 88: ... Contents Setting up your TV 5 TV buttons and functions 10 Remote control buttons and functions 11 Teletext function 16 Using the TV s menu 18 Additional menu operations 32 Additional preparation 34 Troubleshooting 36 Specifications 38 AV 32T67SKE AV 28T67SKE LCT1353 001A U_Cover fm Page 1 Wednesday February 5 2003 2 07 PM ...

Страница 89: ... cabinet openings If water or liquid is allowed to enter this equipment fire or electric shock may be caused DO NOT place any naked flame sources such as lighted candles on the TV WARNING TO PREVENT FIRE OR SHOCK HAZARD DO NOT EXPOSE THIS APPLIANCE TO RAIN OR MOISTURE CAUTION Operate only from the power source specified AC 220 240 V 50 Hz on the unit Avoid damaging the AC plug and power cord When ...

Страница 90: ...ver If in doubt consult a competent electrician How to replace the fuse Open the fuse compartment with a blade screwdriver and replace the fuse Guidelines for safe operation This equipment has been designed and manufactured to comply with international safety standards However as with any electrical appliance care must be taken to ensure optimal results and operational safety Before attempting to ...

Страница 91: ...anufacturer s approved stand or legs use only the fixtures provided and follow the installation instructions Never allow this equipment to be exposed to rain or moisture Never allow anyone especially children to insert anything into an opening in the case Doing so may result in a fatal electrical shock Never guess or take chances with electrical equipment of any kind It is better to be safe than s...

Страница 92: ...a video using the VCR without doing C For details see your VCR instruction manual To connect more equipment please see Additional preparation on page 34 To connect external speakers and an audio system please see Connecting speakers amplifier on page 35 If you connect a decoder to a T V LINK compatible VCR set the DECODER EXT 2 function to ON For details see Using the DECODER EXT 2 function on pag...

Страница 93: ...oes not work properly replace the batteries Initial settings When the TV is first turned on it goes into the initial setting mode and you will see the JVC logo Follow the instructions on the screen display to make the initial settings 1 Press the Main power button on the TV The Power lamp lights red for power on then green for TV on and the JVC logo appears If the power lamp stays red and does not...

Страница 94: ... PROGRAM function Press the b button After the TV channels have been registered in the programme numbers PR the EDIT menu appears If you want to you can now edit the programme numbers PR using the EDIT MANUAL function For details see EDIT MANUAL on page 27 If you do not want to edit programme numbers PR go to the next step 5 Press the a button to display the T V LINK menu 6 If you do not have a T ...

Страница 95: ...rk of Panasonic Corporation Data Logic a trademark of Metz Corporation Easy Link a trademark of Phillips Corporation Megalogic a trademark of Grundig Corporation SMARTLINK a trademark of Sony Corporation Pre set download The VCR will automatically download the registered data on the TV channels from the TV This means you do not need to set up the program channels on your VCR manually The preset do...

Страница 96: ...ut because the VCR s own tuner cannot properly receive that channel You cannot carry out Direct Rec using your TV s control Generally the VCR cannot record a TV channel that it cannot receive properly on its own tuner even if you can view that TV channel on the TV However some VCRs can record a TV channel by using the TV s output if that channel can be viewed on the TV For details see your VCR ins...

Страница 97: ...e main power button again The power lamp goes off Caution The main power button on the TV does not fully isolate the TV from the AC supply If you are not going to use the TV for a long period of time be sure to disconnect the AC plug from the AC socket Turn the TV on from standby mode Press the P p buttons to turn the TV on from standby mode Choose a TV channel Press the P p buttons to choose a pr...

Страница 98: ...f from standby mode Press the standby button to turn the TV on or off When the TV is turned on the power lamp changes from red to green The power can be turned on by pressing the b button 6 buttons or Number buttons Choose a TV channel Use the number buttons Enter the programme number PR of the channel using the number buttons Example PR6 press 6 PR12 press 1 and 2 Use the 6 buttons Press the 6 bu...

Страница 99: ...as you press the q buttons Muting the sound Press the l muting button to turn off the sound Pressing the l muting button again restores the previous volume level Watch images from external equipment Use the o button Press the o button to choose an EXT terminal Use the 6 buttons Press the 6 buttons to choose an EXT terminal Use the PR LIST 1 Press the h Information button to display the PR LIST 2 P...

Страница 100: ...ture 4 3 Aspect Ratio you can choose a ZOOM mode from the 4 3 AUTO ASPECT menu For details see 4 3 AUTO ASPECT on page 21 AUTO may not work properly with poor signal quality In this case choose the best ZOOM mode manually This TV supports WSS wide screen signals When broadcasts with WSS are received with the ZOOM mode set at AUTO WSS the most suitable ZOOM mode is automatically chosen according to...

Страница 101: ...ECT on page 21 Adjusting the visible area of the picture If subtitles or the top or bottom of the picture are cut off you can adjust the visible area of the picture manually 1 Press the c button The ZOOM menu appears 2 Press the a button to display the ZOOM mode indicator The indicator appears 3 While it is displayed press the 6 6 6 6 buttons to change the height of the picture You cannot adjust t...

Страница 102: ... These buttons will operate a JVC brand VCR or DVD player Pressing a button that looks the same as the device s original remote control button has the same effect as the original remote control 1 Set the VCR P DVD switch to the VCR or DVD position VCR When you are using a VCR set the switch to the VCR position DVD When you are using a DVD player set the switch to the DVD position P Text When you a...

Страница 103: ...ixed to FULL You cannot operate menus when viewing a teletext programme Using the List Mode You can store the numbers of your favourite teletext pages in memory and call them up quickly using the colour buttons To store the page numbers 1 Press the M button to go into the List mode The page numbers you have stored are displayed at the bottom of the screen 2 Press a colour button to choose a positi...

Страница 104: ...quiz You can display the hidden text Each time you press the Q button text is hidden or revealed Size You can double the height of the teletext display Press the R button Index You can return to the index page instantly Press the T button FLOF Fastext TOP WST World Standard Text Returns to page 100 or a previously specified page List mode Returns to the page number displayed in the lower left area...

Страница 105: ... title and press the a button The menu appears To return to the previous menu Press the h information button To exit a menu instantly Press the b button 3 Press the 6 buttons to choose a function For details of the functions in the menus see the following pages 4 Press the 5 buttons to choose the setting of that function If you want to operate a function which appears only with its name follow the...

Страница 106: ...nge the picture settings of each TINT mode as you like CONTRAST You can adjust the picture contrast 2 lower 3 higher BRIGHT You can adjust the picture brightness 2 darker 3 brighter SHARP You can adjust the picture sharpness 2 softer 3 sharper COLOUR You can adjust the picture colour 2 lighter 3 deeper HUE You can adjust the picture tint 2 reddish 3 greenish You can change the HUE setting picture ...

Страница 107: ...change the mode to MAX However this may reduce the sharpness of the picture COLOUR SYSTEM The colour system is chosen automatically However if the picture is not clear or no colour appears choose the colour system manually 1 Choose COLOUR SYSTEM then press the a button 2 Press the 5 buttons to chose the appropriate colour system Then press the a button PAL PAL system NTSC 3 58 NTSC 3 58 MHz system...

Страница 108: ...s the a button SOUND SETTING STEREO I II When you are viewing a bilingual broadcast programme you can choose the sound from Bilingual I Sub I or Bilingual II Sub II If you have poor reception on a stereo broadcast you can change from stereo to mono sound so that you can hear the broadcast more clearly and easily The sound mode you can choose differs depending on the TV programme This function does...

Страница 109: ...e 5 buttons of the TV remote control and the r volume buttons at the front panel of your TV set can be used to control the volume of each speaker simultaneously Setting the volume of the amplifier too high may damage the front speakers EXT SETTING y S VIDEO input You can connect a device such as an S VHS VCR to enjoy the high quality picture of the S VIDEO signal Y C signal Preparation First read ...

Страница 110: ...he device instruction manual carefully again to check for the device settings LIST You can store a name for each of the devices connected to each EXT terminal Giving a name to an EXT terminal makes the EXT terminal number appear on the screen together with its name 1 Choose an EXT terminal 2 Press the blue button to display the name list LIST 3 Press the 6 buttons to choose a name Then press the a...

Страница 111: ...nto a VCR connected to the EXT 2 terminal The RGB signals from TV games cannot be output Teletext programmes cannot be output FEATURES SLEEP TIMER You can set the TV to automatically turn off after a specified period of time 1 Choose SLEEP TIMER then press the a button A Sub menu of the SLEEP TIMER function appears 2 Press the 5 buttons to set the period of time Then press the a button You can set...

Страница 112: ... choose a number 2 Press the 5 buttons to move the cursor 3 Press the a button The Sub menu of CHILD LOCK appears 4 Press the 6 buttons to choose a TV channel Every time you press the 6 buttons the Programme number PR changes and the picture of the TV channel registered in the Programme number PR is displayed on the screen 5 Press the blue button and set the CHILD LOCK function Then press the a bu...

Страница 113: ...R which in turn is connected to the EXT 2 terminal To use this function see Using the DECODER EXT 2 function on page 32 Caution If you have not connected a decoder with a T V LINK compatible VCR to the EXT 2 terminal setting this function to ON by mistake causes the picture sound of a TV channel you are currently viewing to disappear INSTALL LANGUAGE You can choose the language you want to use for...

Страница 114: ...ed to set this using the manual function In some areas you may get TV reception from more than one transmitter for example different ITV regions In this case each TV channel could be set twice If this happens the first set of channels will have the stronger signal If you want to delete the second set of channels you will have to do it manually see page 30 EDIT MANUAL The EDIT MANUAL functions are ...

Страница 115: ...do not know a channel number of a TV channel Use the MANUAL function to register a TV channel in the programme number PR DELETE This function deletes a TV channel you do not want to list MANUAL This function manually stores a new TV channel in a programme number PR 3 Press the a button to complete the settings The T V LINK menu appears 4 If you do not have a T V LINK compatible VCR connected Press...

Страница 116: ...Press the blue button to display the ID LIST channel name list 5 Press the 6 buttons to choose the channel name ID To cancel the ID function Press the h Information button 6 Press the a button to give a channel name ID to a TV channel You can give your own unique channel name ID to the TV channel When you have finished step 3 do not go to step 4 Press the 5 buttons to move the cursor and press the...

Страница 117: ...on to delete the TV channel The TV channel is deleted from the programme numbers PR list MANUAL 1 Press the 6 buttons to choose a programme number PR for a new TV channel 2 Press the blue button to activate the MANUAL function To cancel the MANUAL function Press the h Information button 3 Press the green or red button to search for a TV channel Scanning stops when the TV finds a TV channel Then th...

Страница 118: ...unction 1 Display the DEMO menu again 2 Press the 6 buttons to choose OFF 3 Press the a button to cancel the DEMO function CH Channel CH 21 E21 CH 22 E22 CH 23 E23 CH 24 E24 CH 25 E25 CH 26 E26 CH 27 E27 CH 28 E28 CH 29 E29 CH 30 E30 CH 31 E31 CH 32 E32 CH 33 E33 CH 34 E34 CH 35 E35 CH 36 E36 CH 37 E37 CH 38 E38 CH 39 E39 CH 40 E40 CH 41 E41 CH 42 E42 CH 43 E43 CH 44 E44 CH 45 E45 CH 46 E46 CH 47 ...

Страница 119: ...VCR been connected to the EXT 2 terminal Has the VCR power been turned on Does the SCART cable that connects the EXT 2 terminal to the T V LINK compatible VCR have all its proper connections Using the DECODER EXT 2 function If you have a decoder connected to a T V LINK compatible VCR which in turn is connected to the EXT 2 terminal use the DECODER EXT 2 function to unscramble the scrambled TV chan...

Страница 120: ...R EXT 2 function has been set to ON but the TV channel cannot be unscrambled check the following Has the decoder been connected to the VCR properly according to the VCR and decoder instruction manuals Has the decoder power been turned on Can the TV channel be unscrambled with a decoder Do you need to change the VCR settings in order to connect the decoder Confirm that the VCR is set properly by re...

Страница 121: ...ls If you are connecting equipment not listed in the following connection diagram see the table to choose the best EXT terminal Connecting cables are not supplied 1 VCR composite signal 2 VCR composite signal S VIDEO signal 3 T V LINK compatible VCR composite signal S VIDEO signal 4 Decoder 5 DVD player composite signal S VIDEO signal 6 DVD player composite signal RGB signal 7 TV game composite si...

Страница 122: ...change over the output of the video sound signal from the EXT 2 terminal This is useful when you want to dub the video sound from another device onto the VCR connected to the EXT 2 terminal For details on how to do this see DUBBING on page 23 TV output from the EXT 1 terminal The video sound signal of a TV channel you are viewing is always output from the EXT 1 terminal Changing over a programme n...

Страница 123: ...he description SPEAKER on page 22 to check the SPEAKER function setting Poor picture If noise snow totally block out the picture there may be a problem with the aerial or aerial cable Check the following to try to solve the problem Have the TV and aerial been connected properly Has the aerial cable been damaged Is the aerial pointing in the right direction Is the aerial itself faulty If the TV or ...

Страница 124: ...TIMER function operates the TV is automatically turned off If the TV is turned off suddenly try to press the standby button to turn on the TV once again If the TV goes back to normal there is no problem When the TV is receiving a wide screen signal WSS or a signal from an external device affecting the screen size the ZOOM mode automatically changes When you want to resume the previous ZOOM mode pr...

Страница 125: ...y Viewable area 66 cm measured diagonally Audio output Rated Power output 10 W 10 W Speakers 13 cm 6 5 cm oval 2 EXT 1 terminal Euroconnector 21 pin SCART Video input Audio L R inputs and RGB inputs are available TV broadcast outputs Video and Audio L R are available EXT 2 terminal Euroconnector 21 pin SCART Video input S VIDEO Y C input and Audio L R inputs are available Video and Audio L R outpu...

Страница 126: ...39 ...

Отзывы: