background image

ENGLISH   

- 7 -

This function does not happen if your TV’s main power

is turned off. Set your TV’s main power to on (standby

mode).

Operating with the onset buttons

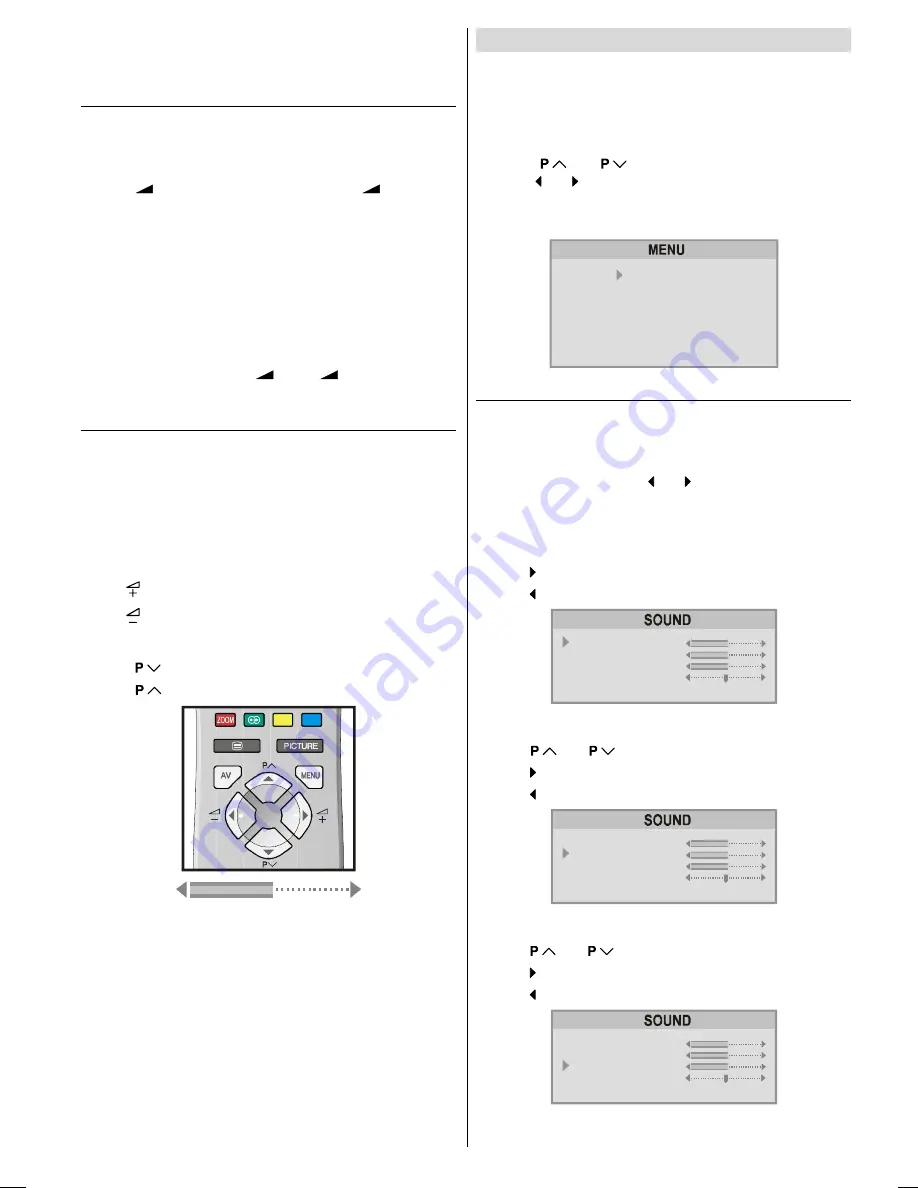
Volume setting and programme selection can be made using

the buttons on the right side of the TV.

Volume Setting:

• Press “

 -

” button to decrease volume or “

 +

” button to

increase volume, so a volume level scale will be displayed

on the screen.

Programme Selecting:

• Press “

P/Ch+

” button to select next programme or “

P/Ch-

”

button to select the previous programme.

Entering Main Menu:

•  Press  “

MENU

”  button  to  enter  main  menu.  In  the  main

menu select submenu using “

P/Ch+

” or 

P/Ch-

” button and

enter the submenu using “

 +

” or “

 -

” button. To learn

the usage of the menus, refer to “

Menu System

” on 

page 7

.

Operating with Remote Control

The remote control handset of your TV is designed to control

all the functions of the model you selected. The functions will

be described  in accordance with the menu system of your

TV.
Functions which you can use out of menu system are de-

scribed below.

Volume Setting:

Press


“ ” button to increase volume.

Press “ ”  button  to decrease volume.

Programme Selecting  (Previous or next programme):

• Press “

” button to select the previous programme.

• Press “

“ button to select the next programme.

Programme Selecting (direct access):

Press digit buttons on the remote control handset to select

programmes between 0 and 9. TV will switch to the selected

program after a short delay.
• For a two digit program number enter the second digit after

pressing the first digit within 2 seconds.

Menu  System

Your TV  has  been  designed  with  a  menu  system.  Display

“MENU”

 (main menu) and enter one of five menus 

(SOUND,

PICTURE, FEATURE, INSTALL 

and 

PROGRAM)

.

1-

 Press 

“MENU”

 button to display 

“MENU”

 (main menu).

The menu titles will be displayed in the main menu.

2-

 Press “

“ or “

” button to select a menu title, then

press “ ” or “ ” button to enter the menu.

• To exit a menu, press 

“PICTURE”

 button.

• To go to the previous menu, press 

“MENU”

 button.

6281'
3,&785(
)($785(
,167$//
352*5$0

Sound Menu

To change sound settings:

• Press “

MENU

” button,  now you are in main menu. In the

main menu, 

SOUND

 will be the first selected option. Enter

the sound menu pressing “ ” or “ ” button.

Setting Volume:

As you enter the sound menu, Volume will be the first select-

ed option.
• Press “ ” button to increase volume.
• Press “ ” button to decrease volume.

92/80(

%$66

75(%/(

%$/$1&(

+<3(56281'

21

Setting Bass Level:

• Using “

“ or “

” button select Bass.

• Press “ ” button to increase bass level.
• Press “ ” button to decrease bass level.

92/80(

%$66

75(%/(

%$/$1&(

+<3(56281'

21

Setting Treble Level:

• Using “

“ or “

” button select Treble.

• Press “ ” button to increase treble level.
• Press “ ” button to decrease treble level.

92/80(

%$66

75(%/(

%$/$1&(

+<3(56281'

21

ENG-2835-AK45-1512UK-16-9-BSI-(AV-28GT1&BJF&SJF).p65

30.05.2003, 15:25

7

Содержание AV-28GT1BJF, AV-28GT1SJF

Страница 1: ...7703 VICTOR COMPANY OF JAPAN LIMITED 0503 JVC N LIMITED COLOUR TELEVISION INSTRUCTIONS ENGLISH AV 28GT1BJF AV 28GT1SJF Ak 45 Ingiltere COVER PAGE ENG 2835 AK45 1512UK 16 9 BSI AV 28GT1 BJF SJF 50037703 cdr ...

Страница 2: ... outlet and the point where they exit from the receiver 3 Moisture and Water Do not use this equipment in a humid and damp place avoid the bathroom the sink in the kitchen and near the washing machine Do not expose this equipment to rain or water and do not place objects filled with liquids on it as this may be dangerous 4 Cleaning Before cleaning unplug the receiver from the main supply outlet Do...

Страница 3: ...afety standards However as with any electrical appliance care must be tak en to ensure optimal results and operational safety Before attempting to use this equipment read the operating instructions thoroughly Ensure that all electrical connections including the mains plug extension leads etc have been made in accordance with the manufacturer s instructions If ever in doubt about the installation o...

Страница 4: ...eletext Button ZOOM Zoom Picture Size Change Red Button Hyper Sound Green Button Mute CAUTION RISK OF ELECTRIC SHOCK The lightning flash with arrowhead symbol within an equilateral triangle is intended to alert the user to the presence of uninsulated dangerous voltage within the product s enclosure that may be of sufficient magnitude to constitute a risk of electric shock of persons The exclamatio...

Страница 5: ...ENGLISH 4 Control Panel Buttons Antenna Connections 3 K 5 6 9 6 0HQX 3URJUDP 9ROXPH XGLR QSXW 7HUPLQDO 9LGHR QSXW 7HUPLQDO HDGSKRQH 5217 9 21752 3 1 877216 3RZHU 7 ...

Страница 6: ...page 15 See the instruction manuals provided with the external de vices too Inserting batteries in the remote control handset Remove the battery cover located on the back of the hand set by gently pulling upwards from the indicated part Insert two AA R6 or equivalent type batteries inside Replace the battery cover NOTE Remove batteries from remote control handset when it is not to be used for a lo...

Страница 7: ...orporation SMARTLINK a trademark of Sony Corporation Downloading data to VCR The VCR will automatically download the registered data on the TV channels from the TV This means you do not need to set up the programme channels on your VCR manually The T V LINK menu will be displayed when you press the button while PROGRAM menu is displayed or when ever the INSTALL menu operations are performed Press ...

Страница 8: ...t the next programme Programme Selecting direct access Press digit buttons on the remote control handset to select programmes between 0 and 9 TV will switch to the selected program after a short delay For a two digit program number enter the second digit after pressing the first digit within 2 seconds Menu System Your TV has been designed with a menu system Display MENU main menu and enter one of ...

Страница 9: ... ad justments switches themselves to the factory settings Setting Brightness You can change Brightness only when Picture Mode is se lected MANUAL Using or button select Brightness Press button to increase Brightness Press button to decrease Brightness Setting Contrast You can change Contrast only when Picture Mode is select ed MANUAL Using or button select Contrast Press button to increase Contras...

Страница 10: ...icture ap pear unnatural The top and bottom of the picture are slightly cut off 14 9 ZOOM This zooms up the wide picture 14 9 aspect ratio to the up per and lower limits of the screen 16 9 ZOOM This zooms up the wide picture 16 9 aspect ratio to the full screen 16 9ZOOM S This zooms up the wide picture 16 9 aspect ratio with subti tles to the full screen FULL This uniformly stretches the left and ...

Страница 11: ...1 8 7 287387 8 5281 2 2 1 6 79 2 Blue Background During No Signal The BLUE BACKGROUND feature can be set by or button to either ON or OFF Install Installation Menu You can store a channel manually or modify the current set tings of a channel for example fine tuning a channel You can also changing the colour system or change the DECODER EXT 2 setting Press MENU button to display the main menu Press...

Страница 12: ...mpatible VCR connected to the EXT 2 terminal follow the operating procedure Down loading the data to VCR on page 6 to transmit the Programme table data to the VCR Using the Decoder EXT 2 function If you have a decoder connected to a T V LINK compatible VCR which in turn is connected to the EXT 2 terminal use DECODER EXT2 to unscramble the scrambled TV chan nels 1 Exit the menu 2 Turn on the decode...

Страница 13: ...e BLUE button To start AUTO PROGRAM AUTOSTORE AUTO PROGRAM Automatically programmes the received channels in your TV s programme numbers 1 Press the BLUE button to enter the AUTOSTORE mode A warning message appears To cancel the AUTOSTORE mode press the PIC TURE button 2 Press or button to choose the COUNTRY then press or button the choose country you are now located 3 Press or button to choose th...

Страница 14: ...n the screen Set the VCR DVD switch to the Text position To select a page of Teletext Press the appropriate digit buttons for the required Teletext page number The selected page number is displayed at the top left corner of the screen The Teletext page counter searches until the selected page number is located so that the desired page is displayed on the screen Press button to move the Teletext sc...

Страница 15: ...INK function will not work properly When connecting a T V LINK compatible VCR to the EXT 1 terminal be sure to connect the decoder to the VCR If not the T V LINK function may not work properly And then set the DECODER EXT 2 function for the channel to ON to un scramble a scrambled channel For details see Using the Decoder EXT 2 function on page 11 RGB mode If an equipment can output the RGB signal...

Страница 16: ...CART Video input Audio L R inputs and RGB inputs are available TV broadcast outputs Video and Audio L R are available EXT 2 EXT 2 terminal Euroconnector 21 pin SCART Video input S VIDEO Y C input and Audio L R inputs are available Video and Audio L R outputs are available See Setting External Source Output on page 10 T V LINK functions are available See T V LINK compatible VCR on page 14 EXT 3 EXT...

Страница 17: ...t your TV is not receiving any trans mission Have you pressed the correct keys on the remote control Try once more Sound Sound is coming from only one of the speakers Is the bal ance set to one direction extreme See SOUND menu Remote Control Your TV no longer responds to the remote control Perhaps the batteries are exhausted If so you can still use the local buttons at the right side of your TV Ha...

Отзывы: