background image

7

Setting up your TV (continued)

5 Making the initial settings

Set up your TV by pressing MENU/OK button or waiting for 15 seconds, then operate the TV by
following the steps as below:


7


• Press the red button to cancel the SETUP

TOUR RESTART function.
If you want to make initial settings again
when the next time you turn on the TV,
press the MENU/OK button to activate the
SETUP TOUR RESTART function.

EDIT

PR  

CH/CC

  7  

CH 

09 

  8  

CH 

11

  9 CH 

13 

 10  
 11 
 12  
 13  

3

• Proceed to edit the channel list (PR list).

For details, see page 12.

LANGUAGE

ENGLISH

ÀÒÉÒä·Â

• Press 

5

/

 button to select your desired

language.


• TV will start searching for the channels.

To stop AUTO PROGRAM, press MENU/OK
button.

• If the JVC logo does not appear, use LANGUAGE and AUTO PROGRAM functions to

make the initial settings.
Those functions are located in the INSTALL menu.

• If the JVC logo appears, although you had made the initial settings, press the TV/VIDEO

button to exit from initial settings.

 GGT0031-001A-H_E_P02-15

10/13/04, 11:56

7

Содержание AV-14F114

Страница 1: ...nd basic functions 3 TV buttons and functions 5 Setting up your TV 6 Basic setting for picture 8 Advanced setting for picture 9 Advanced setting for sound 9 Favorite channel and video setting 10 Customized setting 11 TV channel presetting 12 Additional preparation 14 Troubleshooting 14 Specifications 15 INSTRUCTIONS ...

Страница 2: ...gent on it 7 If you are not going to use this TV for a long period of time be sure to disconnect the AC plug from the AC socket 8 The apparatus shall not be exposed to dripping or splashing and that no objects filled with liquids such as vases shall be placed on the apparatus 15 cm 10 cm 15 cm 10 cm Knowing your TV s functions Main features Function Description Bilingual I II You can listen to the...

Страница 3: ...l using the PR list 1 Press the DISPLAY button once to display the PR list 2 Press 5 2 3 button to choose a channel then press the MENU OK button You can confirm the favorite channels in the PR list The channels set to favorite channels are indicated with coloured mark On the other hand you can use this button to return to the previous menu 9 0 9 Select the programme number For two digits programm...

Страница 4: ...evel Display the sub menu Press 5 buttons 3 to choose a function of a function Then press MENU OK button 2 to display the sub menu The following chart shows locations of functions in menus In this manual location of a function is described as follows MENU Top menu 2nd menu MENU Top menu 2nd menu 3rd menu Note Some functions have the 4th menus as the sub menus To exit the menu the on screen display...

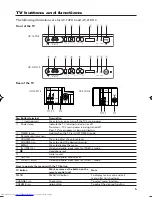
Страница 5: ...e volume level 6 CHANNELM Press to select the desired channel 7 MENU Press to display the menu 8 IN VIDEO 2 Video and audio input jacks for VIDEO 2 mode 9 Headphone jack 0 Aerial socket OUTPUT Video and audio output jacks VIDEO 1 INPUT Video and audio input jacks for VIDEO 1 mode How to operate the menus with the TV button Work as same as the button on the TV button remote control unit Note MENU M...

Страница 6: ...f the equipment including the TV before connecting 1 Connecting the aerial To install rod aerial Install into the top rear aerial holder Once installed it cannot be removed VIDEO AUDIO VIDEO 1 INPUT OUTPUT VIDEO AUDIO VIDEO 1 INPUT OUTPUT ...

Страница 7: ...ETUP TOUR RESTART function EDIT PR CH CC 7 CH 09 8 CH 11 9 CH 13 10 11 12 13 3 Proceed to edit the channel list PR list For details see page 12 LANGUAGE ENGLISH ÀÒÉÒä Â Press 5 button to select your desired language TV will start searching for the channels To stop AUTO PROGRAM press MENU OK button If the JVC logo does not appear use LANGUAGE and AUTO PROGRAM functions to make the initial settings ...

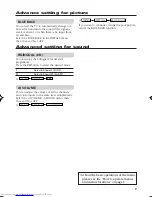
Страница 8: ...n the PICTURE SETTING menu CONTRAST BRIGHT SHARP COLOUR TINT TINT can only be adjusted in NTSC system To operate this function with a menu MENU PICTURE PICTURE MODE To return the USER setting to the default press the blue button when the PICTURE SETTING menu appears Adjusting the picture USER You can adjust the desired picture setting when selecting USER in PICTURE MODE 1 Select the USER in PICTUR...

Страница 9: ...level automatically Select the AI VOLUME in SOUND menu then choose ON or OFF MENU SOUND AI VOLUME MENU INSTALL BLUE BACK If you wish to continue viewing the poor picture cancel the BLUE BACK function BLUE BACK You can set the TV to automatically change to a blue screen and mute the sound if the signal is weak or absent or when there is no input from an antenna Select the BLUE BACK in the INSTALL m...

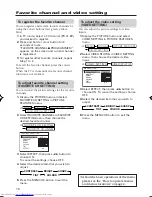
Страница 10: ...n FAVORITE CH SETTING menu then choose the desired favorite channel FAVORITE CHANNEL FAVORITE CH SETTING 3 Select EFFECT then press 2 3 button to choose ON To cancel the settings choose OFF 4 Select the desired item that you wish to adjust CONTRAST BRIGHT SHARP TINT COLOUR 5 Press the MENU OK button to exit the menu To adjust the video setting VIDEO SETTING You can adjust the picture settings for ...

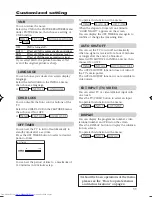
Страница 11: ...f time to a maximum of 120 minutes in 10 minutes step To operate this function with a menu MENU FEATURES OFF TIMER When the elapsed of time left one minute GOOD NIGHT appears on the screen You can display the OFF TIMER menu again to confirm or change the remaining time AUTO SHUTOFF You can set the TV to turn off automatically when no signal is received for about 15 minutes or longer after the end ...

Страница 12: ... 09 8 CH 11 9 CH 13 10 11 12 13 3 3 Choose the channel which you want to register 4 Press the blue button to activate the MANUAL function The sound system of the channel appears at the right of the CH CC number 5 Press the green or red button to search for the TV channel Searching stops when a channel is found and displayed 6 Repeat step 5 until your desired TV channel appears If the reception Pre...

Страница 13: ... 23 W 38 E23 CH 24 US 24 W 39 E24 CH 25 US 25 W 40 E25 CH 26 US 26 W 41 E26 CH 27 US 27 W 42 E27 CH 28 US 28 W 43 E28 CH 29 US 29 W 44 E29 CH 30 US 30 W 45 E30 CH 31 US 31 W 46 E31 CH 32 US 32 W 47 E32 CH 33 US 33 W 48 E33 CH 34 US 34 W 49 E34 CH 35 US 35 W 50 E35 CH US CCIR OIRT AUSTRALIA CH 36 US 36 W 51 E36 CH 37 US 37 W 52 E37 CH 38 US 38 W 53 E38 CH 39 US 39 W 54 E39 CH 40 US 40 W 55 E40 CH 4...

Страница 14: ...Refer to COLOUR SYSTEM on page 8 Adjust the COLOUR or BRIGHT setting Refer to Adjusting the picture USER on page 8 Inevitable phenomenon due to the nature of the picture tube This is not a malfunction This is due to the condition of the video signal whereby the image was not recorded properly This is not a malfunction Cannot operate the remote control Cannot operate the menus Cannot operate the fr...

Страница 15: ... AVG 57 W AVG 48 W Screen size measured diagonally Picture tube 546 9 mm Picture tube 368 4 mm Visible area 508 0 mm Visible area 335 4 mm Audio output Rated power output 3W 3W Speakers 5 x 12 cm x 2 5 x 9 cm x 2 External input output VIDEO 1 VIDEO input AUDIO input VIDEO 2 VIDEO input AUDIO input OUTPUT VIDEO output AUDIO output Headphone jack stereo mini jack 3 5 mm diameter sound is monaural Di...

Страница 16: ...1004 NIC JMT 2004 Victor Company of Japan Limited ...

Отзывы: