background image

27

Français   |

Suite page suivante...

Avant l'installation

Avant d'installer cet appareil, veuillez prendre les 

mesures de précaution suivantes.

#

AVERTISSEMENTS

•  Si vous branchez le câble d'allumage (rouge) et le 

câble de la batterie (jaune) au châssis de la voiture 
(masse), il peut y avoir un court-circuit entraînant, à 
son tour, un incendie. Il faut toujours brancher ces 
câbles à la source d'alimentation fonctionnant via le 
boîtier de fusibles.

•  Ne débranchez pas le fusible du câble d'allumage 

(rouge) ni du câble de la batterie (jaune). 
L'alimentation électrique doit être connectée aux 
câbles via le fusible.

#

ATTENTION

•  Installez cet appareil dans la console du véhicule. 

Ne touchez pas les éléments métalliques de cet 
appareil pendant et juste après l'utilisation de 
l'appareil. Les éléments métalliques tels que le 
dissipateur thermique et le coffret sont très chauds.


REMARQUE

•  Le montage et le câblage de ce produit requièrent 

expérience et savoir-faire. Pour des questions de 
sécurité, les travaux de montage et de câblage 
doivent être effectués par des professionnels.

•  Veillez à brancher l'appareil à une alimentation 

électrique négative de 12 Vcc avec mise à la terre.

•  N'installez pas l'appareil dans un endroit directement 

exposé aux rayons du soleil, à une chaleur excessive 
ou à l'humidité. Évitez également les endroits trop 
poussiéreux ou susceptibles d'être éclaboussés par 
de l'eau.

•  N'utilisez pas vos propres vis. N'utilisez que les vis 

fournies. L'utilisation de vis non appropriées risque 
d'endommager l'appareil.

•  Si l'allumage de votre véhicule ne possède pas 

de position ACC, branchez les câbles d'allumage 
à une source d'alimentation que la clé de contact 
peut allumer ou éteindre. Si vous branchez le câble 
d'allumage à une source d'alimentation à tension 
constante comme les câbles de la batterie, il se peut 
que la batterie se décharge.

•  Si la console est dotée d'un couvercle, veillez à 

installer l'appareil de sorte que la façade ne heurte 
pas le couvercle quand elle s'ouvre ou se ferme.

•  Si le fusible saute, vérifiez d'abord que les câbles ne 

se touchent pas afin d'éviter tout court-circuit, puis 
remplacez l'ancien fusible par un nouveau fusible de 
même puissance.

•  Isolez les câbles non connectés avec un ruban vinyl, 

ou tout autre matériau similaire. Pour éviter tout 
court-circuit, ne retirez pas les capuchons placés aux 
extrémités des câbles non connectés ou des bornes.

Bluetooth

Utilisation d'un appareil audio 

Bluetooth en lecture

Appuyez sur le bouton <

>.

Appuyez sur [BT Audio].


Ñ

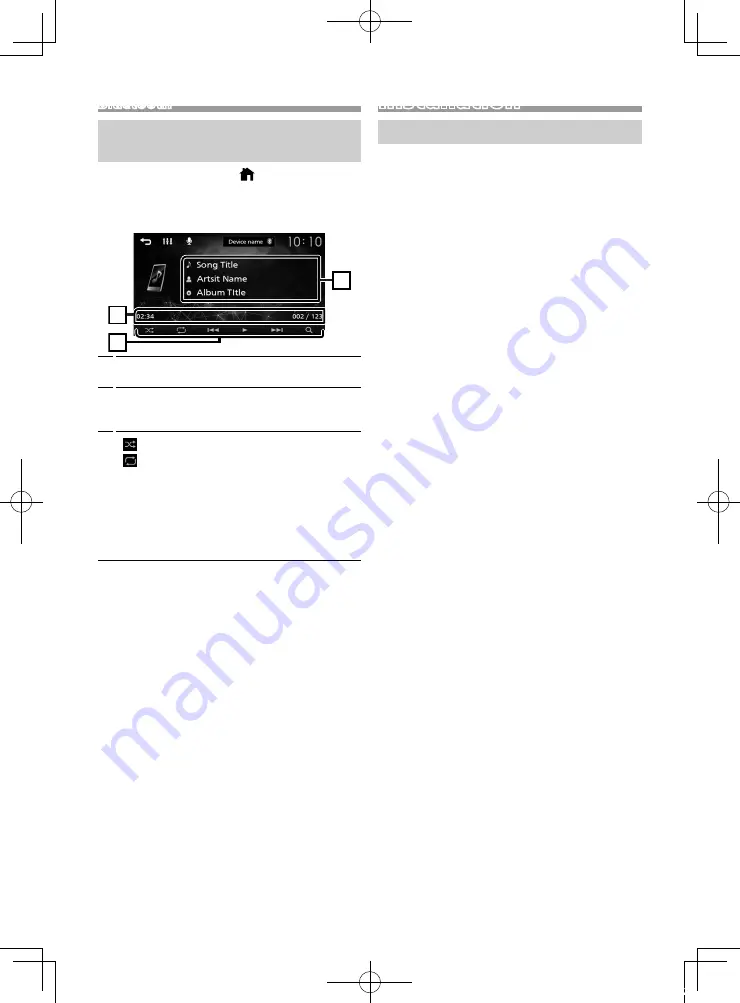
Écran de commande de source

1

3

2

1

Affiche les informations concernant le fichier en 
cours.

2

Temps de lecture/Numéro de fichier

Barre du temps de lecture : 

Pour confirmer la 

position actuelle de lecture.

3


] :

 Sélectionne le mode de lecture aléatoire.


] :

 Sélectionne le mode de lecture répétée. 

[

U

], [

H

] :

 Lit ou marque une pause.

[

E

],


[

F

] :

 Recherche le contenu précédent/

suivant.  
Touchez et maintenez enfoncé pour effectuer 
une avance ou un retour rapide.

[

1

] :

 Recherche le fichier. 

(p.27)


REMARQUE

•  Certains indicateurs de fonctionnement et 

d'affichage peuvent différer en fonction de leur 
disponibilité sur l'appareil connecté.


Ñ

Sélectionner un contenu dans la liste

Touchez [ 

1

 ].

Touchez l'élément de votre choix.

Le contenu d'une catégorie est affiché lorsque 
vous touchez celle-ci.

Touchez l'élément de votre choix dans la liste 
des contenus.

La lecture commence.

•  Toucher [

6

] pour aller au niveau hiérarchique 

supérieur.


REMARQUE

•  Touchez [

6

] pour faire apparaître l'écran de 

contrôle source en haut de page.

Installation

!B5K-0672-02_E_QSG_21KWM.indb   27

2021/08/11   12:23

Содержание KW-M27DBT

Страница 1: ...du nom du modèle Reportez vous à la section Retrait de la plaque de garniture p 29 Anzeigeposition der Modellbezeichnung Siehe Entfernen der Ziertafel S 45 Model naam indicatie positie Zie Verwijderen van de afwerkingsplaat P 61 Posizione di indicazione del nome del modello Fare riferimento a Rimozione della piastra di taglio P 77 Posición de la indicación del nombre del modelo Consulte Retirada d...

Страница 2: ... Data System or Radio Broadcast Data System feature won t work where the service is not supported by any broadcasting station Ñ Ñ Protecting the monitor To protect the monitor from damage do not operate the monitor using a ballpoint pen or similar tool with the sharp tip Ñ Ñ Cleaning the Unit If the front panel of this unit is stained wipe it with a dry soft cloth such as a silicon cloth If the fr...

Страница 3: ...s ON Guidelines SETUP If you select ON for Parking Guidelines you can adjust the parking guidelines System Reset Touch System Reset and then touch YES to set all the settings to the initial default settings Bluetooth Displays the Bluetooth Settings screen Screen Dimmer Select the dimmer mode High Default Mid Low Demo Select the demonstration mode Default is ON Information Displays the software ver...

Страница 4: ... to factory settings when this button is pressed Common operations Ñ Ñ Turning on the power 1 Press the button Ñ Ñ Turning off the power 1 Press and hold the button HOME screen 1 Press the button HOME screen appears 2 8 5 3 6 4 7 1 1 Clock display 2 Switches to the Tuner broadcast P 6 3 USB Plays files on a USB device P 7 iPod Plays an iPod iPhone P 8 When iPod iPhone is connected Mirroring Displa...

Страница 5: ...Select a stored service 1 Touch 1 5 Digital Radio Setup 1 Touch 2 Set each item as follows Service List Displays the Service List screen Touch and then touch Yes to find the latest service list TI Switches to the traffic information automatically when the traffic bulletin starts ON OFF Default PTY Searches for a program by program type Priority If the same service is provided by Radio Data System ...

Страница 6: ...u want to preset 2 Touch and hold 1 6 in which you want to store the station Ñ Ñ Recalling the preset station 1 Touch 1 6 Tuner Setup 1 Touch 2 Set each item as follows Auto Store Automatically searches and stores the 6 stations with the strongest signals for the selected band Auto Store appears Local Seek Tunes in only to the stations with sufficient signal strength LOC indicator lights up ON OFF...

Страница 7: ...ack mode Selects Repeat playback mode U H Plays or pauses E F Searches the previous next content Touch and hold to fast forward or fast backward 1 Searches file P 7 Ñ Ñ For Video playback 1 When the operation buttons are not displayed on the screen touch the display 6 7 6 You can adjust image quality in video screen INITIALIZE To clear the adjustment 7 U H Plays or pauses E F Searches the previous...

Страница 8: ...ne 6 Plus NOTE If you start playback after connecting the iPod the music that has been played by the iPod is played first Cap the USB terminal whenever not using Playback operations Ñ Ñ Control the music you are listening to on the source control screen 1 4 3 2 1 Artwork Shown if the track contains artwork 2 Displays the information of the current file 3 Playing time File number Play time bar For ...

Страница 9: ...w camera P 14 Ñ Ñ Displaying the picture from the rear view camera The rear view screen is displayed when you shift the gear to the reverse R position To erase the caution message touch the screen You can adjust various settings such as audio balance or subwoofer level 1 Press the EQ button 2 See the below for each operation method Controlling General Audio 1 Press the EQ button 2 Touch Fader Bala...

Страница 10: ...g desired keys on the screen Touch 6 to close the window Switches the speaking voice output between smartphone cell phone and speaker Adjust the receiver volume Press the or button Make a phone call 1 Press the button 2 Touch Phone 3 See the table below for each operation method Call by entering a phone number 1 Enter a phone number with number keys 2 Touch Û Make a call Touch to delete the last e...

Страница 11: ...ce with a constant voltage supply such as with battery wires the battery may be drained If the console has a lid make sure to install the unit so that the front panel will not hit the lid when closing and opening If the fuse blows first make sure the wires aren t touching to cause a short circuit then replace the old fuse with one with the same rating Insulate unconnected wires with vinyl tape or ...

Страница 12: ...alling the unit to the vehicle Otherwise scars damage or failure may result Reception may drop if there are metal objects near the Bluetooth antenna Bluetooth antenna unit Ñ Ñ Supplied accessories for installation 1 x1 2 x2 3 x1 4 3 m x1 5 2 m x1 Ñ Ñ Installation procedure 1 To prevent a short circuit remove the key from the ignition and disconnect the terminal of the battery 2 Make the proper inp...

Страница 13: ...ry Ñ Ñ Removing the trim plate 1 Use the extraction key accessory 3 to lever out the four tabs two on the left part two on the right part 3 2 Pull the trim plate forward Ñ Ñ Removing the unit 1 Remove the trim plate by referring to step 1 in Removing the trim plate 2 Insert the extraction key accessory 2 deeply into the slot as shown The protrusion at the tip of the extraction key must face toward...

Страница 14: ...eel remote control feature you need an exclusive remote adapter not supplied matched to your car Connect to vehicle s reverse lamp harness when using the optional rear view camera Light Blue Yellow Steering remote control wire Fuse 15A Subwoofer Preout Cap Cap FM AM antenna input FM AM antenna Connector A Connector B USB device 2 USB terminal 1 0 8 m ISO Connector FRONT OUT REAR OUT VIDEO OUT VIDE...

Страница 15: ... the unit check the following condition Make sure that the pin assignment of the connector matches with the JVC unit Take extra notice of the power wire In case battery wire and ignition wire are not corresponding then change them accordingly In case the car does not have an ignition wire use a commercially available interface 1 USB maximum power supply current DC 5 V 1 0 A 2 Sold separately 3 Opt...

Страница 16: ...he Bluetooth SIG Inc and any use of such marks by JVCKENWOOD Corporation is under license Other trademarks and trade names are those of their respective owners Use of the Made for Apple badge means that an accessory has been designed to connect specifically to the Apple product s identified in the badge and has been certified by the developer to meet Apple performance standards Apple is not respon...

Страница 17: ...g disclaimer Redistributions in binary form must reproduce the above copyright notice this list of conditions and the following disclaimer in the documentation and or other materials provided with the distribution Neither the name of the Xiph org Foundation nor the names of its contributors may be used to endorse or promote products derived from this software without specific prior written permiss...

Страница 18: ...on Les fonctions Radio Data System ou Radio Broadcast Data System sont inopérantes dans les zones où le service n est pris en charge par aucune station de radiodiffusion Ñ Ñ Protection du moniteur Ne touchez pas le moniteur avec un stylo à bille ou tout autre outil pointu Cela pourrait l endommager Ñ Ñ Nettoyage de l appareil Si la façade de l appareil est tachée essuyez la avec un chiffon doux et...

Страница 19: ... défaut est ON Guidelines SETUP Si vous sélectionnez ON pour Parking Guidelines vous pouvez ajuster les instructions de parking System Reset Touchez System Reset puis touchez YES pour ramener tous les réglages aux réglages initiaux par défaut Bluetooth Affiche l écran de réglages du Bluetooth Screen Dimmer Sélectionner le mode gradateur High par défaut Mid Low Demo Sélectionner le mode démonstrati...

Страница 20: ...ce bouton pour que l appareil retrouve les réglages d usine Opérations courantes Ñ Ñ Allumer le courant 1 Appuyez sur le bouton Ñ Ñ Éteindre le courant 1 Appuyez et maintenez enfoncé le bouton Écran d ACCUEIL 1 Appuyez sur le bouton L écran d ACCUEIL apparaît 2 8 5 3 6 4 7 1 1 Affichage de l horloge 2 Passe à l émission de radio p 22 3 USB Joue les fichiers d un périphérique USB p 23 iPod Joue dep...

Страница 21: ...r 1 5 Configuration de la radio numérique 1 Touchez 2 Réglez chaque option comme suit Service List Affiche l écran de liste des services Touchez le puis touchez Yes pour rechercher la liste de services la plus récente TI Passe automatiquement aux informations de circulation routière à l instant ou un bulletin d infos trafic débute ON OFF par défaut PTY Recherche un programme par type de programme ...

Страница 22: ...cher et maintenir 1 6 dans lequel vous voulez mémoriser la station Ñ Ñ Rappel de la station prédéfinie 1 Toucher 1 6 Configuration du syntoniseur 1 Touchez 2 Réglez chaque option comme suit Auto Store Recherche et mémorise automatiquement les 6 stations avec les signaux les plus puissants pour la bande sélectionnée Auto Store Mémoriser Automatiquement apparaît Local Seek Recherche uniquement les s...

Страница 23: ...arque une pause E F Recherche le contenu précédent suivant Touchez et maintenez enfoncé pour effectuer une avance ou un retour rapide 1 Recherche le fichier p 23 Ñ Ñ Pour la lecture de vidéo 1 Lorsque les touches de fonctionnement ne sont pas affichées à l écran toucher l écran 6 7 6 Vous pouvez régler la qualité d image dans l écran vidéo INITIALIZE Pour effacer le réglage 7 U H Lit ou marque une...

Страница 24: ...que qui a été lue par l iPod est jouée en premier Fermer le port USB quand il n est pas utilisé Options de lecture Ñ Ñ L écran de commande de la source vous permet de gérer la musique que vous écoutez 1 4 3 2 1 Illustration Affiché si la piste contient un visuel 2 Affiche les informations concernant le fichier en cours 3 Temps de lecture Numéro de fichier Barre du temps de lecture Pour confirmer l...

Страница 25: ...recul L écran de vue arrière est affiché lorsque vous changez de vitesse pour la position de marche arrière R Pour enlever le message de mise en garde toucher l écran Vous pouvez agir sur les différents paramètres comme la balance audio ou le niveau du caisson de graves par exemple 1 Appuyez sur le bouton EQ 2 Veuillez consulter ce qui suit pour chaque méthode de fonctionnement Contrôle de l audio...

Страница 26: ...le l émission de la voix entre le smartphone téléphone portable et le haut parleur Régler le volume de réception Appuyez sur le bouton ou Passer un appel 1 Appuyez sur le bouton 2 Appuyez sur Phone 3 Veuillez consulter le tableau ci dessous pour chaque méthode de fonctionnement Appel par entrée d un numéro de téléphone 1 Utilisez les touches numériques pour entrer un numéro de téléphone 2 Touchez ...

Страница 27: ...r ou éteindre Si vous branchez le câble d allumage à une source d alimentation à tension constante comme les câbles de la batterie il se peut que la batterie se décharge Si la console est dotée d un couvercle veillez à installer l appareil de sorte que la façade ne heurte pas le couvercle quand elle s ouvre ou se ferme Si le fusible saute vérifiez d abord que les câbles ne se touchent pas afin d é...

Страница 28: ...ive sur la surface du panneau lors de l installation de l appareil dans le véhicule Cela risque de rayer la surface de l endommager ou d entraîner une défaillance Il se peut que la réception soit mauvaise si des objets métalliques se trouvent à proximité de l antenne Bluetooth Antenne Bluetooth Ñ Ñ Accessoires fournis pour l installation 1 x1 2 x2 3 x1 4 3 m x1 5 2 m x1 Ñ Ñ Procédure d installatio...

Страница 29: ... accessoire 3 pour sortir les quatre languettes deux sur la partie gauche deux sur la partie droite en effectuant un mouvement de levier 3 2 Tirer la plaque de garniture vers l avant Ñ Ñ Retrait de l appareil 1 Retirez la plaque de garniture en vous référant à l étape 1 dans Retrait de la plaque de garniture 2 Insérez la clé d extraction accessoire 2 profondément dans l emplacement comme illustré ...

Страница 30: ...in d un adaptateur de télécommande spécial non fourni qui correspond à votre véhicule Connexion au faisceau du feu de marche arrière du véhicule lors de l utilisation de la vue arrière de la caméra Bleu ciel Jaune Câble de la télécommande au volant Fusible 15 A Sortie Preout caisson de basse Capuchon Capuchon Entrée de l antenne FM AM Antenne FM AM Connecteur A Connecteur B Périphérique USB 2 Born...

Страница 31: ...ier les conditions suivantes Veiller à ce que l affectation des broches du connecteur corresponde à l unité JVC Prendre un avis supplémentaire pour le câble d alimentation Si les câbles d alimentation et de contact ne correspondent pas les changer en conséquence Si le véhicule ne dispose pas d un câble de démarrage utiliser une interface disponible dans le commerce 1 Tension d alimentation maximum...

Страница 32: ... Bluetooth Fréquence 2 402 2 480 GHz Puissance de sortie 8 dBm AVE classe de puissance 1 Ñ Ñ Général Impédance d enceinte 4 8 Ω Tension de fonctionnement batterie de voiture 12 V CC Copyrights La marque du mot et les logos Bluetooth sont des marques déposées de Bluetooth SIG Inc et toute utilisation de ces marques par JVCKENWOOD est faite sous licence Les autres marques déposées et appellations co...

Страница 33: ...DAMAGE libogg Copyright c 2002 Xiph org Foundation Redistribution and use in source and binary forms with or without modification are permitted provided that the following conditions are met Redistributions of source code must retain the above copyright notice this list of conditions and the following disclaimer Redistributions in binary form must reproduce the above copyright notice this list of ...

Страница 34: ...ata System bzw Radio Broadcast Data System funktioniert nur in Regionen mit Sendern die diese Dienste unterstützen Ñ Ñ Schutz des Monitors Um den Monitor vor Beschädigungen zu schützen sollten Sie Ihn nicht mit einem Kugelschreiber oder einem ähnlichen spitzen Gegenstand bedienen Ñ Ñ Gerät reinigen Ist das Frontpanel des Geräts verschmutzt reinigen Sie es mit einem weichen trockenen Tuch z B mit e...

Страница 35: ...es SETUP Sie können die Einpark Hilfslinien anpassen wenn Sie ON für Parking Guidelines ausgewählt haben System Reset Berühren Sie System Reset und berühren Sie dann YES um alle Einstellungen auf die anfänglichen Standardeinstellungen zurückzusetzen Bluetooth Zeigt den Bildschirm für die Bluetootheinstellungen an Screen Dimmer Wählen Sie den Helligkeitsmodus aus High Werkseinstellung Mid Low Demo ...

Страница 36: ...erät nicht richtig funktioniert wird das Gerät auf die Werkseinstellungen zurückgesetzt sobald diese Taste gedrückt wird Allgemeine Funktionen Ñ Ñ Das Gerät einschalten 1 Drücken Sie die Taste Ñ Ñ Das Gerät ausschalten 1 Halten Sie die Taste gedrückt HOME Bildschirm 1 Drücken Sie die Taste Der HOME Bildschirm erscheint 2 8 5 3 6 4 7 1 1 Uhranzeige 2 Schaltet auf Radio um S 38 3 USB Gibt die Dateie...

Страница 37: ...5 Digitalradio Einrichtung 1 Berühren Sie 2 Jedes Element wie folgt einstellen Service List Zeigt den Servicelisten Bildschirm an Berühren und dann Yes berühren um die aktuellste Serviceliste zu finden TI Wechselt automatisch zu den Verkehrsnachrichten sobald die Verkehrsmeldung startet ON EIN OFF AUS Werkseinstellung PTY Sucht nach einem Programm nach der Programmsparte Priority Falls der gleiche...

Страница 38: ...en Sie voreinstellen möchten 2 Berühren und halten Sie fest 1 6 wo Sie den Sender speichern möchten Ñ Ñ Abrufen des gespeicherten Senders 1 Berühren Sie 1 6 Radiosetup 1 Berühren Sie 2 Jedes Element wie folgt einstellen Auto Store Sucht und speichert die 6 Sender mit den stärksten Signalen automatisch für das ausgewählte Band Auto Store erscheint Local Seek Stellt nur Sender mit ausreichender Sign...

Страница 39: ...edergabe oder Pause E F Sucht den vorigen nächsten Inhalt Für schnellen Vorlauf oder schnellen Rücklauf anhaltend drücken 1 Sucht die Datei S 39 Ñ Ñ Für die Videowiedergabe 1 Wenn die Bedientasten nicht auf dem Bildschirm angezeigt werden berühren Sie das Display 6 7 6 Sie können die Bildqualität auf dem Videobildschirm anpassen INITIALIZE Um die Anpassung zu löschen 7 U H Wiedergabe oder Pause E ...

Страница 40: ...abe nach Anschluss des iPods wird zuerst die Musik wiedergegeben die vom iPod abgespielt wurde Setzen Sie den Deckel auf den USB Anschluss auf wenn er nicht verwendet wird Wiedergabefunktionen Ñ Ñ Steuern Sie die Wiedergabe der Musik am Quellensteuerungsbildschirm 1 4 3 2 1 Illustration wird angezeigt wenn der Titel eine Illustration enthält 2 Zeigt die Information zur aktuellen Datei an 3 Wiederg...

Страница 41: ...kfahrkamera S 46 Ñ Ñ Anzeige des Bildes von der Rückfahrkamera Der Rückansichtsbildschirm wird angezeigt wenn Sie in den Rückwärtsgang R schalten Berühren Sie den Bildschirm um die Warnmeldung zu löschen Sie können unterschiedliche Einstellungen wie die Audiobalance oder den Subwooferpegel einstellen 1 Drücken Sie die EQ Taste 2 Nachfolgend finden Sie die jeweilige Betriebsmethode Allgemeine Audio...

Страница 42: ... Fenster zu schließen Wechselt die ausgegebene Gesprächsstimme zwischen Smartphone Mobiltelefon und Lautsprecher um Hörerlautstärke einstellen Drücken Sie die oder Taste Telefonanrufe tätigen 1 Drücken Sie die Taste 2 Berühren Sie Phone 3 Siehe nachfolgende Tabelle für jeweilige Betriebsmethode Anruf durch Eingabe einer Telefonnummer 1 Geben Sie eine Telefonnummer mittels Zifferntasten ein 2 Berüh...

Страница 43: ... hat dann schließen Sie die Zündkabel an eine Stromquelle an die mit dem Zündschlüssel ein und ausgeschaltet werden kann Wenn Sie das Zündkabel an eine Stromquelle mit konstanten Stromversorgung anschließen wie z B Batteriekabel kann dies die Batterie entleeren Hat die Konsole eine Klappe dann stellen Sie bei der Installation des Gerätes sicher dass das Frontpanel beim Öffnen und Schließen nicht g...

Страница 44: ...w ordnungsgemäß funktionieren Das Gerät so anbringen dass der Montagewinkel 30 oder weniger beträgt Bei der Installation des Gerätes im Fahrzeug dürfen Sie nicht zu sehr auf die Paneloberfläche drücken Ansonsten könnte es zu Kratzern Beschädigungen oder Fehlfunktionen kommen Die Empfangsqualität wird u U durch metallische Gegenstände in der Nähe der Bluetooth Antenne beeinträchtigt Bluetooth Anten...

Страница 45: ...den Entnahmeschlüssel Zubehör 3 um die vier Laschen auszuhebeln zwei am linken Teil zwei am rechten Teil 3 2 Ziehen Sie die Zierplatte nach vorn Ñ Ñ Ausbauen des Geräts 1 Entfernen Sie wie unter Schritt 1 von Entfernen der Ziertafel beschrieben die Ziertafel 2 Führen Sie den Entnahmeschlüssel Zubehör 2 tief in den Schlitz ein wie abgebildet Der vorstehende Teil an der Spitze des Entnahmeschlüssels...

Страница 46: ... benötigen Sie einen speziellen Fernbedienungsadapter nicht im Lieferumfang enthalten der auf Ihr Fahrzeug abgestimmt ist An den Rückfahrlicht Kabelbaum des Fahrzeugs anschließen bei Verwendung der optionalen Rückspiegelkamera Hellblau Gelb Lenkrad Fernbedienungskabel Sicherung 15 A Subwoofer Vorverstärker Deckel Deckel UKW MW Antenneneingang UKW MW Antenne Anschluss A Anschluss B USB Gerät 2 USB ...

Страница 47: ...Stecker an das Gerät anschließen Überprüfen Sie ob die Stiftbelegung des Steckers mit dem JVC Gerät übereinstimmt Achten Sie besonders auf das Stromkabel Wenn das Batteriekabel und das Zündkabel nicht übereinstimmen tauschen Sie sie entsprechend aus Verwenden Sie eine handelsübliche Schnittstelle wenn Ihr Auto über kein Zündkabel verfügt 1 Maximale USB Stromversorgung Gleichstrom 5 V 1 0 A 2 Separ...

Страница 48: ...lgem Lautsprecherimpedanz 4 8 Ω Betriebsspannung 12 V DC Autobatterie Urheberrechte Die Bluetooth Wortmarke und Logos sind eingetragene Markenzeichen der Bluetooth SIG Inc und jegliche Verwendung dieser Marken durch die JVCKENWOOD Corporation geschieht unter Lizenz Andere Warenzeichen und Handelsmarken sind Eigentum der jeweiligen Inhaber Use of the Made for Apple badge means that an accessory has...

Страница 49: ... are permitted provided that the following conditions are met Redistributions of source code must retain the above copyright notice this list of conditions and the following disclaimer Redistributions in binary form must reproduce the above copyright notice this list of conditions and the following disclaimer in the documentation and or other materials provided with the distribution Neither the na...

Страница 50: ...n De functie Radio Data System of Radio Broadcast Data System werkt niet als deze functie niet wordt ondersteund door een te ontvangen radiostation Ñ Ñ De monitor beschermen Om te voorkomen dat de monitor beschadigd raakt mag u de monitor niet bedienen met een balpen of een soortgelijk hulpmiddel met scherpe punt Ñ Ñ Het toestel reinigen Als er vlekken op het voorpaneel van dit toestel zitten veeg...

Страница 51: ...ON aan Guidelines SETUP Als u ON selecteert voor Parking Guidelines kunt u de parkeerrichtlijnen aanpassen System Reset Raak System Reset aan en raak dan YES aan om alle instellingen terug te zetten naar de oorspronkelijke standaardinstellingen Bluetooth Geeft het Bluetooth instellingenscherm weer Screen Dimmer Selecteer de dimmerstand High standaard Mid Low Demo Selecteer de demonstratiestand De ...

Страница 52: ...eenheid terugkeren naar de fabrieksinstellingen wanneer er op deze knop wordt gedrukt Basisbediening Ñ Ñ Het inschakelen van de stroom 1 Druk op de knop Ñ Ñ Uitschakelen van de stroom 1 Druk in en houd de knop ingedrukt Startscherm 1 Druk op de knop START scherm verschijnt 2 8 5 3 6 4 7 1 1 Klokweergave 2 Schakelt over naar de radio uitzending P 54 3 USB Speelt bestanden af op een USB apparaat P 5...

Страница 53: ...dio instellen 1 Raak aan 2 Stel de verschillende items als volgt in Service List Geeft het Servicelijst scherm weer Raak aan en raak vervolgens Yes aan voor de meest recente zenderlijst TI Schakelt automatisch naar de verkeersinformatie wanneer er een verkeersbericht wordt uitgezonden ON AAN OFF UIT Standaard PTY Zoekt een programma aan de hand van het programmatype Priority Als de ontvangst van e...

Страница 54: ...in u de zender wilt opslaan Ñ Ñ Oproepen van voorkeurzenders 1 Raak 1 6 aan Installatie van de afstemmer 1 Raak aan 2 Stel de verschillende items als volgt in Auto Store Zoekt automatisch naar de 6 stations met de sterkste signalen voor de geselecteerde band en slaat deze op Auto Store verschijnt Local Seek Stemt alleen af op de zenders met voldoende signaalsterkte LOC indicator licht op ON AAN OF...

Страница 55: ...H Speelt of pauzeert E F Zoekt de vorige volgende inhoud Aangeraakt houden om snel vooruit of snel achteruit te gaan 1 Zoekt bestand P 55 Ñ Ñ Voor het afspelen van Video 1 Wanneer de bedieningsknoppen niet worden weergegeven op het scherm raak dan het scherm aan 6 7 6 U kunt de beeldkwaliteit aanpassen in het videoscherm INITIALIZE Om de aanpassing te wissen 7 U H Speelt of pauzeert E F Zoekt de v...

Страница 56: ...gaat afspelen nadat u de iPod hebt aangesloten wordt eerst de muziek afgespeeld die door de iPod is afgespeeld Plaats de dop op het USB aansluitpunt wanneer u deze niet gebruikt Weergaveopties Ñ Ñ Regel de muziek op het bronregelscherm 1 4 3 2 1 Illustraties Worden weergegeven als het liedje illustraties bevat 2 Informatie over het huidige bestand wordt weergegeven 3 Speelduur bestandsnummer Afspe...

Страница 57: ...P 62 Ñ Ñ Het beeld van de achteruitkijkcamera weergeven Het achteruitkijk scherm wordt weergegeven wanneer u de versnelling schakelt naar de achteruit positie R Om het waarschuwingsbericht te wissen raakt u het scherm aan U kunt verschillende instellingen veranderen zoals geluidbalans of subwooferniveau 1 Druk op de EQ knop 2 Zie de tabel hieronder voor elke bedieningsmethode Algemene audio regele...

Страница 58: ...enster te sluiten Schakelt de weergave van de stem tussen smartphone mobiele telefoon en luidspreker Het volume van de ontvanger aanpassen Druk op de of knop Voer een telefoongesprek uit 1 Druk op de knop 2 Raak Phone aan 3 Zie de tabel hieronder voor elk van de methodes Bellen door een telefoonnummer in te voeren 1 Voer een telefoonnummer in met de nummertoetsen 2 Raak Û aan Een telefoongesprek t...

Страница 59: ...geschakeld Als u de ontstekingskabel verbindt met een spanningsbron waar constant spanning op staat zoals een accukabel kan de accu leeglopen Als de console een deksel heeft moet u er bij de installatie van het toestel op letten dat het voorpaneel het deksel bij het openen en sluiten niet raakt Als de zekering is doorgebrand controleert u eerst of de kabels elkaar niet raken en zo een kortsluiting...

Страница 60: ...t bereikt Duw niet te hard op het paneeloppervlak tijdens de installatie van het toestel in het voertuig Dit kan leiden tot krassen schade of het niet meer goed functioneren De ontvangst wordt mogelijk slechter wanneer zich metalen voorwerpen in de buurt van de Bluetooth antenne bevinden Bluetooth antenne Ñ Ñ Meegeleverde accessoires voor installatie 1 x1 2 x2 3 x1 4 3 m x1 5 2 m x1 Ñ Ñ Installati...

Страница 61: ...erkingsplaat 1 Gebruik de extractiesleutel accessoire 3 om de vier lipjes los te wippen twee aan de linkerkant twee aan de rechterkant 3 2 Trek de afwerkingsplaat naar voren Ñ Ñ De eenheid verwijderen 1 Zie stap 1 in Verwijderen van de afwerkingsplaat voor het verwijderen van het inbouwframe 2 Plaats de extractiesleutel accessoire 2 diep in de opening zoals afgebeeld Het uitsteeksel aan het eind v...

Страница 62: ...g te gebruiken hebt u een adapter nodig niet meegeleverd die bij uw auto past Verbinden met de bedradingsbundel van de achteruitrijlamp van de auto wanneer de optionele achteruitzichtcamera wordt gebruikt Lichtblauw geel stuurafstandsbedieningsingang Zekering 15 A Preout subwoofer Afdekking Afdekking FM AM antenne ingang FM AM antenne Aansluiting A Aansluiting B USB apparaat 2 USB aansluiting 1 0 ...

Страница 63: ...uitingen aansluit aan het apparaat Wees ervan verzekerd dat de pinbezetting van de aansluiting past op het JVC apparaat Let extra op de stroomkabel In het geval dat de batterijkabel en de ontstekingskabel niet overeenkomen wissel ze dan In het geval dat de auto geen ontstekingskabel heeft gebruik dan een vrij verkrijgbare interface 1 Maximale voedingsstroom USB DC 5 V 1 0 A 2 Apart verkocht 3 Opti...

Страница 64: ...Ñ Bluetooth gedeelte Frequentie 2 402 2 480 GHz Uitgangsvermogen 8 dBm AVE Power Class1 Ñ Ñ Algemeen Luidsprekerimpedantie 4 8 Ω Bedrijfsspanning 12 V gelijkstroom autoaccu Auteursrechten Het Bluetooth woordmerk logo s zijn geregistreerde handelsmerken die eigendom zijn van Bluetooth SIG Inc en het gebruik van dergelijke handelsmerken door JVCKENWOOD Corporation is onder licentie Andere handelsmer...

Страница 65: ...THIS SOFTWARE EVEN IF ADVISED OF THE POSSIBILITY OF SUCH DAMAGE libogg Copyright c 2002 Xiph org Foundation Redistribution and use in source and binary forms with or without modification are permitted provided that the following conditions are met Redistributions of source code must retain the above copyright notice this list of conditions and the following disclaimer Redistributions in binary for...

Страница 66: ...dello e che siano utilizzabili nel proprio Paese Le funzioni Radio Data System o Radio Broadcast Data System non funzionano se tale servizio non è fornito dalle emittenti Ñ Ñ Protezione del monitor Per evitare che il monitor si danneggi non toccarlo con una penna a sfera o oggetti simili appuntiti Ñ Ñ Pulizia dell unità Se il frontalino di questa unità è macchiato pulirlo con un panno morbido asci...

Страница 67: ...seleziona ON per Parking Guidelines è possibile regolare le linee guida per il parcheggio System Reset Toccare System Reset e quindi toccare YES per riportare tutte le impostazioni alle impostazioni iniziali predefinite Bluetooth Viene visualizzata la schermata Impostazioni Bluetooth Screen Dimmer Selezionare la modalità di attenuazione High predefinito Mid Low Demo Selezionare la modalità dimostr...

Страница 68: ...ulsante l unità ritorna alle impostazioni predefinite Operazioni comuni Ñ Ñ Accensione 1 Premere il pulsante Ñ Ñ Spegnimento 1 Tenere premuto il pulsante Schermata HOME 1 Premere il pulsante Compare la schermata HOME 2 8 5 3 6 4 7 1 1 Display orologio 2 Passa alla trasmissione radio P 70 3 USB Riproduce i file su un dispositivo USB P 71 iPod Riproduce un iPod iPhone P 72 Quando un iPod iPhone è co...

Страница 69: ...memorizzato 1 Sfiorare 1 5 Configurazione Radio digitale 1 Sfiorare 2 Impostare ogni voce come segue Service List Visualizza la schermata dell elenco servizi Toccare quindi toccare Yes per trovare l elenco più recente dei servizi TI Passa automaticamente alle informazioni sul traffico quando inizia la trasmissione di un bollettino sul traffico ON OFF predefinito PTY Ricerca un programma in base al...

Страница 70: ...e 2 Sfiorare e tenere premuto 1 6 nel quale si desidera memorizzare la stazione Ñ Ñ Richiamo delle stazioni memorizzate 1 Sfiorare 1 6 Configurazione sintonizzatore 1 Sfiorare 2 Impostare ogni voce come segue Auto Store Cerca automaticamente e memorizza le 6 stazioni con il segnale più forte per la banda selezionata Appare Auto Store memorizzazione automatica Local Seek Si sintonizza solo sulle st...

Страница 71: ... H Riproduce o mette in pausa E F Ricerca il contenuto precedente successivo Sfiorare e mantenere il contatto per avanzare tornare indietro velocemente 1 Ricerca il file P 71 Ñ Ñ Per la riproduzione video 1 Quando i pulsanti funzione non sono visualizzati sullo schermo toccare il display 6 7 6 è possibile regolare la qualità dell immagine nella schermata video INITIALIZE per cancellare la regolazi...

Страница 72: ...a dall iPod Mettere sempre il cappuccio al terminale USB quando non è in uso Operazioni di riproduzione Ñ Ñ Controllare la musica che si sta ascoltando dalla schermata di controllo della sorgente 1 4 3 2 1 Copertina mostrata se il brano contiene una copertina 2 Vengono visualizzate le informazioni sul file corrente 3 Tempo di riproduzione Numero file Barra del tempo di riproduzione Per confermare ...

Страница 73: ...e dell immagine dalla telecamera a retrovisione La schermata a retrovisione viene visualizzata quando si innesta la retromarcia R Per cancellare il messaggio di attenzione toccare lo schermo È possibile regolare varie impostazioni per esempio il bilanciamento audio o il livello del subwoofer 1 Premere il pulsante EQ 2 Per ciascun metodo di funzionamento fare riferimento a quanto segue Regolazione ...

Страница 74: ...la finestra Commuta l uscita della voce del parlato tra lo smartphone telefono cellulare e l altoparlante Regolare il volume del ricevitore Premere il pulsante o Effettuare una telefonata 1 Premere il pulsante 2 Sfiorare Phone 3 Per ciascuna funzione fare riferimento alla seguente tabella Chiamata tramite inserimento di un numero di telefono 1 Inserire un numero telefonico utilizzando i tasti nume...

Страница 75: ... si collega il cavo di accensione ad un alimentazione a tensione costante come i cavi della batteria la batteria potrebbe scaricarsi Se la console ha un coperchio installare l unità in modo che il frontalino non urti contro il coperchio durante l apertura e la chiusura In caso di intervento del fusibile verificare prima se l eventuale contatto dei cavi ha provocato un cortocircuito e quindi sostit...

Страница 76: ...re con decisione sulla superficie del pannello durante l installazione dell unità sul veicolo onde evitare possibili deformazioni danni o anomalie La presenza di oggetti metallici in prossimità dell antenna Bluetooth può compromettere l efficacia della ricezione Unità antenna Bluetooth Ñ Ñ Accessori in dotazione per l installazione 1 x1 2 x2 3 x1 4 3 m x1 5 2 m x1 Ñ Ñ Procedura di installazione 1 ...

Страница 77: ...ra di taglio 1 Utilizzare la chiave di estrazione accessorio 3 per estrarre le quattro linguette due sulla parte sinistra due su quella destra 3 2 Tirare la piastra da taglio in avanti Ñ Ñ Rimozione dell unità 1 Rimuovere la piastra di taglio facendo riferimento al passaggio 1 in Rimozione della piastra di taglio 2 Inserire la chiave di estrazione accessorio 2 in profondità nella fessura come most...

Страница 78: ... uno speciale adattatore remoto non in dotazione adatto alla vettura Collegare il cablaggio della luce di retromarcia del veicolo quando si utilizza la telecamera opzionale di retrovisione Celeste giallo cavo di comando remoto del volante Fusibile 15 A Preuscita subwoofer Cappuccio Cappuccio Ingresso antenna FM AM Antenna FM AM Connettore A Connettore B Dispositivo USB 2 Terminale USB 1 0 8 m Conn...

Страница 79: ...unità controllare quanto segue Assicurarsi che l assegnazione del pin del connettore corrisponda all unità JVC Prestare molta attenzione al cavo di alimentazione Nel caso in cui il cavo della batteria e il cavo di accensione non corrispondano cambiarli Nel caso in cui la macchina non disponga di un cavo di accensione utilizzare un interfaccia disponibile in commercio 1 Corrente di alimentazione ma...

Страница 80: ...i esercizio Batteria auto da 12 V CC Copyright La parola denominativa e i loghi Bluetooth sono marchi di fabbrica registrati di proprietà di Bluetooth SIG Inc e il loro uso è concesso su licenza a JVCKENWOOD Corporation Gli altri marchi e nomi commerciali sono di proprietà dei rispettivi proprietari Use of the Made for Apple badge means that an accessory has been designed to connect specifically t...

Страница 81: ...tion are permitted provided that the following conditions are met Redistributions of source code must retain the above copyright notice this list of conditions and the following disclaimer Redistributions in binary form must reproduce the above copyright notice this list of conditions and the following disclaimer in the documentation and or other materials provided with the distribution Neither th...

Страница 82: ...n su región La función Radio Data System o Radio Broadcast Data System no funcionará en lugares donde no existan emisoras compatibles con este servicio Ñ Ñ Cómo proteger el monitor Para proteger el monitor de posibles daños no lo utilice con un bolígrafo con punta de bola o una herramienta similar con una punta afilada Ñ Ñ Limpieza de la unidad Si el panel frontal de esta unidad está manchado límp...

Страница 83: ... predeterminada es ON Guidelines SETUP Si selecciona ON para Parking Guidelines puede ajustar las pautas de aparcamiento System Reset Toque System Reset y después toque YES para establecer todos los ajustes en los ajustes iniciales predeterminados Bluetooth Muestra la pantalla Configuración de Bluetooth Screen Dimmer Seleccione el modo de atenuación High predeterminado Mid Low Demo Seleccione el m...

Страница 84: ...stablece la configuración de fábrica al pulsar este botón Funciones habituales Ñ Ñ Encendido 1 Pulse el botón Ñ Ñ Apagado 1 Pulse y mantenga pulsado el botón Pantalla de INICIO 1 Pulse el botón Aparece la pantalla HOME inicio 2 8 5 3 6 4 7 1 1 Pantalla del reloj 2 Cambia a la emisión del programa de radio P 86 3 USB Reproduce archivos en un dispositivo USB P 87 iPod Reproduce un iPod iPhone P 88 C...

Страница 85: ...ado 1 Toque 1 5 Configuración de la radio digital 1 Toque 2 Ajuste cada elemento del modo siguiente Service List Muestra la pantalla Lista de servicios Toque y luego toque YES para encontrar la lista de servicios más reciente TI Cambia a la información de tráfico automáticamente cuando empieza el boletín de tráfico ON ACTIVADO OFF DESACTIVADO predeterminado PTY Busca un programa por tipo de progra...

Страница 86: ...la emisora Ñ Ñ Volver a una emisora prefijada 1 Toque 1 6 Configuración del sintonizador 1 Toque 2 Ajuste cada elemento del modo siguiente Auto Store Busca y almacena automáticamente las 6 estaciones con las señales más fuertes para la banda seleccionada Aparece Auto Store guardar automáticamente Local Seek Sintoniza solo las emisoras con una fuerza de señal suficiente Se ilumina el indicador LOC ...

Страница 87: ...Selecciona el modo de reproducción Repetir U H Reproduce o pausa E F Busca el contenido anterior siguiente Mantenga pulsado para avanzar o retroceder rápidamente 1 Busca el archivo P 87 Ñ Ñ Para la reproducción de video 1 Si los botones de operación no se visualizan en la pantalla toque la pantalla 6 7 6 Puede ajustar la calidad de la imagen en la pantalla de video INITIALIZE Para eliminar el ajus...

Страница 88: ...iPod se reproducirá primero la música reproducida por el iPod Tape la terminal de USB cuando no se esté utilizando Operaciones de reproducción Ñ Ñ Controle la música que está escuchando en la pantalla de control de fuente 1 4 3 2 1 Material gráfico se muestra si la pista contiene material gráfico 2 Muestra la información del archivo actual 3 Tiempo de reproducción Número de archivo Barra de tiempo...

Страница 89: ...sualización de la imagen desde la cámara de visión trasera Se muestra la pantalla de visión trasera cuando cambia la palanca de cambios a la posición de marcha atrás R Para eliminar el mensaje de precaución toque la pantalla Puede ajustar diversas opciones como el balance de audio o el subwoofer 1 Pulse el botón EQ 2 Consulte la información siguiente para cada método de funcionamiento Controlar el...

Страница 90: ...orrespondientes de la pantalla Toque 6 para cerrar la ventana Cambia la salida de voz entre el teléfono inteligente móvil y el altavoz Ajustar el volumen del receptor Pulse el botón o Realice una llamada telefónica 1 Pulse el botón 2 Toque Phone 3 Consulte la tabla de abajo para cada método de funcionamiento Llamar introduciendo un número telefónico 1 Introducir un número de teléfono con las tecla...

Страница 91: ...la llave de encendido Si conecta el cable de encendido a una fuente de alimentación con un suministro de voltaje constante como con los cables de la batería la batería puede agotarse Si la consola tiene una tapa asegúrese de instalar la unidad de forma que el panel frontal no golpee la tapa al abrirse o cerrarse Si se funden los fusibles asegúrese primero de que los cables no están en contacto pue...

Страница 92: ...ulo de 30 o menos No presione con fuerza la superficie del panel al instalar la unidad en el vehículo De lo contrario pueden producirse marcas daños o fallos La recepción podría ser baja si existen objetos metálicos cerca de la antena Bluetooth Unidad de antena Bluetooth Ñ Ñ Accesorios suministrados para la instalación 1 x1 2 x2 3 x1 4 3 m x1 5 2 m x1 Ñ Ñ Procedimiento de instalación 1 Para evitar...

Страница 93: ...a tecla de extracción accesorio 3 para extraer las cuatro pestañas dos en la parte izquierda dos en la parte derecha 3 2 Tire de la placa hacia adelante Ñ Ñ Desmontaje de la unidad 1 Retire el marco según las indicaciones del paso 1 de Retirada del marco 2 Introduzca la llave de extracción accesorio 2 profundamente en la ranura tal y como se muestra El saliente en la punta de la tecla de extracció...

Страница 94: ...nte es necesario un adaptador remoto exclusivo no suministrado apropiado para su vehículo Conecte el mazo de la luz de marcha atrás del vehículo cuando utilice una cámara de visión trasera opcional Azul claro Amarillo cable del mando a distancia de la dirección Fusible 15A Salida previa del subwoofer Tapa Tapa Entrada de antena FM AM Antena FM AM Conector A Conector B Dispositivo USB 2 Terminal US...

Страница 95: ...idad compruebe la siguiente condición Asegúrese que la asignación de clavijas del conector coincide con la unidad JVC Tome precauciones extra con el cable de alimentación In caso de que el cable de la batería y el cable de encendido no correspondan entonces cámbielos según corresponda En caso de que el coche no tenga un cable de encendido use una interfaz disponible comercialmente 1 Corriente de a...

Страница 96: ...z 4 8 Ω Voltaje de funcionamiento batería de coche de 12 V CC Derechos de autor La marca Bluetooth y sus logotipos son marcas registradas propiedad de Bluetooth SIG Inc y cualquier uso de los mismos por JVCKENWOOD Corporation se realiza bajo licencia El resto de marcas comerciales y nombres comerciales corresponden a sus respectivos propietarios Use of the Made for Apple badge means that an access...

Страница 97: ...ided that the following conditions are met Redistributions of source code must retain the above copyright notice this list of conditions and the following disclaimer Redistributions in binary form must reproduce the above copyright notice this list of conditions and the following disclaimer in the documentation and or other materials provided with the distribution Neither the name of the Xiph org ...

Страница 98: ...esentante JVC que eles funcionam com o seu modelo e na sua zona A função Radio Data System Sistema dados rádio ou Radio Broadcast não funciona onde o serviço não é suportado por nenhuma estação de difusão Ñ Ñ Proteger o monitor Para proteger o monitor de danos não opere o monitor utilizando uma esferográfica ou um objeto semelhante com ponta afiada Ñ Ñ Limpar a unidade Se o painel frontal da unida...

Страница 99: ...nar ON para Parking Guidelines pode ajustar as orientações de estacionamento System Reset Toque em System Reset e em seguida toque em YES para definir todas as definições para as predefinições iniciais Bluetooth Apresenta o ecrã de Definições do Bluetooth Screen Dimmer Selecione o modo de gradação High Padrão Mid Low Demo Selecione o modo de demonstração A predefinição é ON Information Exibe a ver...

Страница 100: ...ando este botão é pressionado Operações comuns Ñ Ñ Ligar a alimentação 1 Pressione o botão Ñ Ñ Desligar a alimentação 1 Pressione e segure o botão Ecrã de INÍCIO 1 Pressione o botão Aparece o ecrã HOME inicial 2 8 5 3 6 4 7 1 1 Mostrador de Relógio 2 Muda para a emissão de rádio P 102 3 USB Reproduz ficheiros num dispositivo USB P 103 iPod Reproduz um iPod iPhone P 104 Quando está conectado um iPo...

Страница 101: ... 5 Configuração do Rádio Digital 1 Toque em 2 Defina cada item da seguinte forma Service List Apresenta o ecrã de Lista de Serviço Toque e depois toque em Yes para encontrar a lista de serviços mais recente TI Muda automaticamente para a informação de trânsito quando começa o boletim de trânsito ON LIGADO OFF DESLIGADO Padrão PTY Procura um programa por tipo Priority Se o mesmo serviço for forneci...

Страница 102: ...e e mantenha pressionado 1 6 em que pretende armazenar a estação Ñ Ñ Recuperar a estação predefinida 1 Toque em 1 6 Configuração de Sintonizador 1 Toque em 2 Defina cada item da seguinte forma Auto Store Procura e guarda automaticamente as 6 estações com o sinal mais forte para a banda selecionada Auto Store aparece Local Seek Sintoniza apenas nas estações com força de sinal suficiente O indicador...

Страница 103: ...ução em repetição U H Reproduz ou pausa E F Procura o conteúdo anterior seguinte Toque sem soltar para avançar rapidamente ou retroceder rapidamente 1 Procura o ficheiro P 103 Ñ Ñ Para reprodução de Vídeo 1 Quando os botões de operação não forem exibidos no ecrã toque no ecrã 6 7 6 Pode ajustar a qualidade da imagem no ecrã do vídeo INITIALIZE Para limpar o ajuste 7 U H Reproduz ou pausa E F Procu...

Страница 104: ... que estava a ser reproduzida pelo iPod é reproduzida primeiro Coloque a tampa no terminal USB quando não o estiver a utilizar Operações de reprodução Ñ Ñ Controle a música que está a ouvir no ecrã de controlo das fontes 1 4 3 2 1 Capa Mostrado se a faixa contiver capa de álbum 2 Mostra a informação sobre o ficheiro atual 3 Tempo de reprodução Número de ficheiro Barra de tempo de reprodução Para c...

Страница 105: ...a traseira P 110 Ñ Ñ Apresentar a imagem a partir da câmara de vista traseira O ecrã de vista traseira é exibido quando for engatada a marcha atrás R Para apagar a mensagem de precaução toque no ecrã Pode ajustar várias definições como o balanço áudio ou o nível de subwoofer 1 Pressione o botão EQ 2 Consulte o seguinte para cada método de operação Controlar o áudio geral 1 Pressione o botão EQ 2 T...

Страница 106: ...r a janela Alterna a saída de voz entre o smartphone telemóvel e o altifalante Ajustar o volume do recetor Pressione o botão ou Fazer uma chamada 1 Pressione o botão 2 Toque em Phone 3 Consulte a seguinte tabela para cada método de operação Ligar introduzindo um número de telefone 1 Introduza um número de telefone utilizando as teclas numéricas 2 Toque em Û Faça uma chamada Toque em para eliminar ...

Страница 107: ...o Se ligar o fio de ignição a uma fonte de alimentação com um débito de tensão permanente como os cabos da bateria a bateria poderá ficar descarregada Se a consola tiver tampa certifique se que instala o aparelho de forma a que o painel frontal não bata na tampa ao abrir e ao fechar Se o fusível fundir certifique se primeiro de que os fios não tocam uns nos outros para não causar um curto circuito...

Страница 108: ...o de montagem seja de 30 ou menos Não faça muita pressão sobre a superfície do painel quando instalar a unidade no automóvel Caso contrário poderão resultar marcas danos ou avarias A receção poderá ser reduzida se existirem objetos metálicos próximos da antena Bluetooth Unidade da antena Bluetooth Ñ Ñ Acessórios fornecidos para instalação 1 x1 2 x2 3 x1 4 3 m x1 5 2 m x1 Ñ Ñ Método de instalação 1...

Страница 109: ...a chave de extração acessório 3 para levantar as quatro abas duas na parte esquerda e duas na parte direita 3 2 Puxe a moldura para a frente Ñ Ñ Retirar a unidade 1 Retire a moldura seguindo o passo 1 em Retirar a moldura 2 Insira a chave de extração acessório 2 profundamente na ranhura conforme mostrado A saliência na ponta da chave de extração deve estar virada para a unidade 2 3 Com a chave de ...

Страница 110: ...essário um adaptador remoto exclusivo não fornecido que corresponda ao seu automóvel Ligue à cablagem de luz de marcha atrás quando utilizar a câmara de visão traseira opcional Azul claro amarelo fio do controlo remoto do volante Fusível 15 A Pré saída do subwoofer Tampa Tampa Entrada da antena FM AM Antena FM AM Conector A Conector B Dispositivo USB 2 Terminal USB 1 0 8 m Conector ISO FRONT OUT R...

Страница 111: ...onibilizados à unidade verifique a seguinte condição Certifique se de que a atribuição de pino do conector corresponde à unidade JVC Tenha precaução redobrada com o cabo de alimentação Caso o cabo da pilha e o cabo de ignição não correspondam altere os adequadamente Caso o carro não tenha um cabo de ignição use uma interface disponível comercialmente 1 Corrente de fornecimento de energia máxima de...

Страница 112: ...ifalante 4 8 Ω Tensão de operação bateria de automóvel de 12 V CC Direitos de autor A palavra marcas e logótipos Bluetooth são marcas comerciais registadas de propriedade da Bluetooth SIG Inc e qualquer utilização de tais marcas pela JVCKENWOOD Corporation está sob licença Outras marcas registadas e nomes de marcas são dos respetivos proprietários Use of the Made for Apple badge means that an acce...

Страница 113: ...ution and use in source and binary forms with or without modification are permitted provided that the following conditions are met Redistributions of source code must retain the above copyright notice this list of conditions and the following disclaimer Redistributions in binary form must reproduce the above copyright notice this list of conditions and the following disclaimer in the documentation...

Страница 114: ...e relativa à Diretiva RoHS 2011 65 UE Fabricante JVCKENWOOD Corporation 3 12 Moriyacho Kanagawa ku Yokohama shi Kanagawa 221 0022 JAPÃO Representante na UE JVCKENWOOD Europe B V Amsterdamseweg 37 1422 AC UITHOORN PAÍSES BAIXOS For Europe sales area Declaration of Conformity with regard to the RE Directive 2014 53 EU Declaration of Conformity with regard to the RoHS Directive 2011 65 EU Manufacture...

Страница 115: ...a internet osoitteesta Slovensko S tem JVCKENWOOD izjavlja da je radijska oprema KW M27DBT v skladu z Direktivo 2014 53 EU Celotno besedilo direktive EU o skladnosti je dostopno na tem spletnem naslovu Slovensky Spoločnosť JVCKENWOOD týmto vyhlasuje že rádiové zariadenie KW M27DBT vyhovuje smernici 2014 53 EÚ Celý text EÚ vyhlásenia o zhode nájdete na nasledovnej internetovej adrese Dansk Herved e...

Страница 116: ... B5K 0672 02_E_QSG_21KWM indb 116 2021 08 11 12 24 ...

Отзывы: