background image


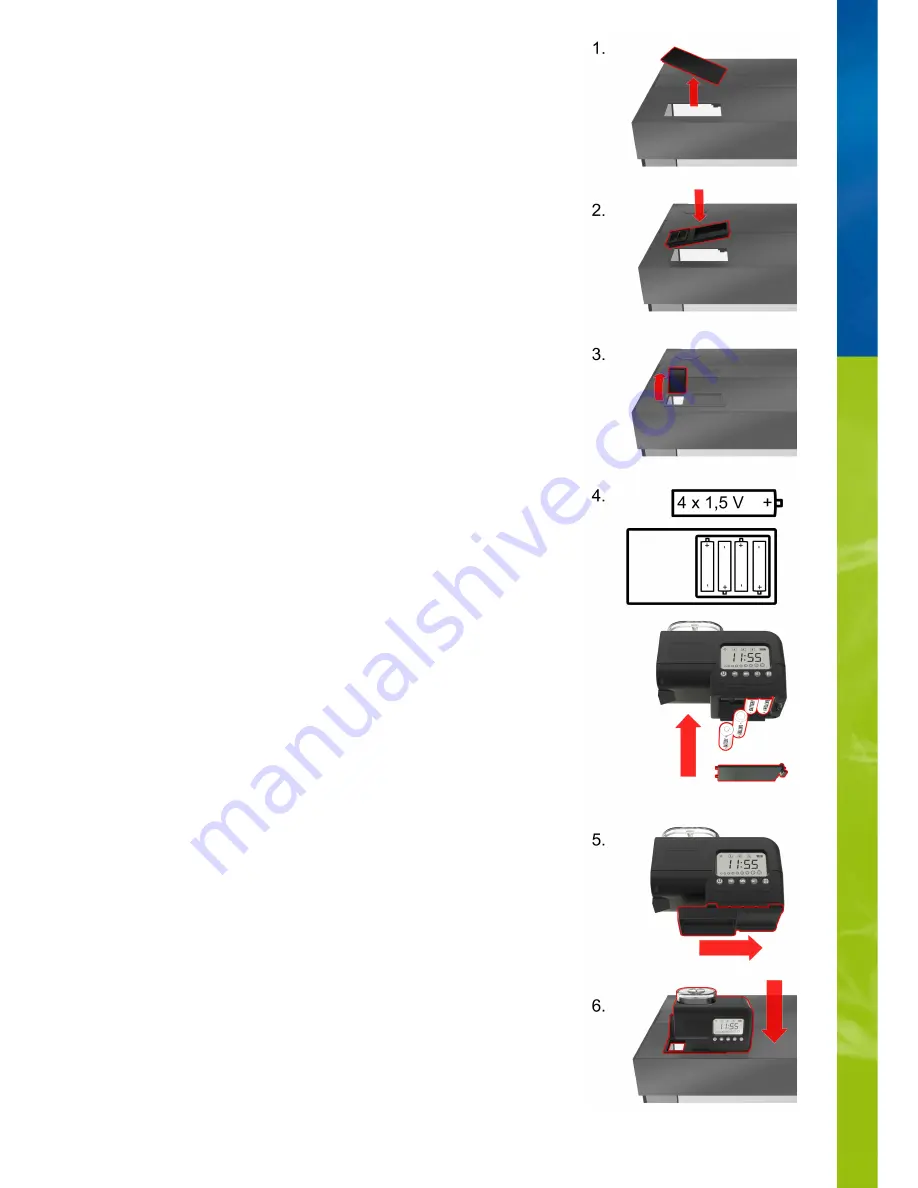
1.  First,  remove  the  lid  that  closes  the  opening  for  your  JUWEL  SmartFeed  automatic
feeder in the cover (if available).

2. Place the holding jacket included in the delivery into the opening.

3. Open the cap of the feed opening.

4. Insert the supplied batteries into the SmartFeed automatic feeder (4xAA).

5. Slide in the stand, as shown in the illustration.

6. Place the automatic feeder in the designated position.


3

Содержание SmartFeed

Страница 1: ...INSTRUCTION MANUAL SmartFeed Automatic Feeder www juwel aquarium com 1...

Страница 2: ...jacket is designed in such a manner that it includes a small cover which closes the feed opening while the automatic feeder is not being used Accordingly no light enters through the cover This openin...

Страница 3: ...r if available 2 Place the holding jacket included in the delivery into the opening 3 Open the cap of the feed opening 4 Insert the supplied batteries into the SmartFeed automatic feeder 4xAA 5 Slide...

Страница 4: ...Feed quantity key 8 levels 6 Number of feedings per day 7 Battery status 8 Symbol for system time setting 9 Time speci cation 10 Feed quantity display Two conveyor screws are available for feeding Bl...

Страница 5: ...Press the clips of the conveyor screw bracket together and remove it as shown in the illustration 3 Pull out the conveyor screw 4 Insert the required conveyor screw 5 Turn the conveyor screw until the...

Страница 6: ...play message 1 Switch on the SmartFeed automatic feeder with the On O key 1 Enlarge the feed volume with the included attachment Please follow the instructions of the feed producer for correct dispens...

Страница 7: ...etting symbol appears 2 Set the hours with the HR key and the minutes for the time with the MIN key 3 Con rm the set time with the Set key Battery replacement After battery replacement the time needs...

Страница 8: ...feeding time with the MIN key 3 Select the required quantity with the Feed quantity key 4 Con rm the settings with the SET key You will automatically reach Feeding 2 and 3 Feeding 2 2 Setting the seco...

Страница 9: ...y key several times The feeding will be performed 5 seconds after selecting the required quantity Replace the batteries if the ashing battery symbol appears in the display 4xAA The JUWEL SmartFeed aut...

Страница 10: ...dispose of this equipment separately from other waste to protect the environment or public health from damage by unregulated waste disposal Recycle the equipment and support the sustained recycling of...

Страница 11: ...r companies not authorised by the manufacturer to do so c the product or its components have been damaged by mechanical means of whatsoever kind in particular broken glass 2 All claims under this guar...

Страница 12: ...12...

Отзывы: