background image

Children shall not carry out cleaning and user maintenance

of the appliance without supervision.

General Safety

Only a qualified person must install this appliance and

replace the cable.

WARNING: The appliance and its accessible parts

become hot during use. Care should be taken to avoid

touching heating elements.

Always use oven gloves to remove or put in accessories or

ovenware.

Before carrying out any maintenance, disconnect the

appliance from the power supply.

WARNING: Ensure that the appliance is switched off

before replacing the lamp to avoid the possibility of electric

shock.

Do not use the appliance before installing it in the built-in

structure.

Do not use a steam cleaner to clean the appliance.

Do not use harsh abrasive cleaners or sharp metal

scrapers to clean the glass door since they can scratch the

surface, which may result in shattering of the glass.

If the mains power supply cable is damaged, it must be

replaced by the manufacturer, its Authorised Service

Centre or similarly qualified persons to avoid an electrical

hazard.

Excessive spillage must be removed before the pyrolytic

cleaning. Remove all parts from the oven.

To remove the shelf supports first pull the front of the shelf

support and then the rear end away from the side walls.

Install the shelf supports in the opposite sequence.

SAFETY INSTRUCTIONS

Installation

WARNING! Only a qualified

person must install this

appliance.

• Remove all the packaging.

• Do not install or use a damaged

appliance.

• Follow the installation instructions

supplied with the appliance.

3

Содержание 949 498 096

Страница 1: ...JB126D0 JB126S0 User Manual Oven Benutzerin formation Backofen ...

Страница 2: ...ty This appliance can be used by children aged from 8 years and above and persons with reduced physical sensory or mental capabilities or lack of experience and knowledge if they have been given supervision or instruction concerning the use of the appliance in a safe way and understand the hazards involved Children between 3 and 8 years of age and persons with very extensive and complex disabiliti...

Страница 3: ... steam cleaner to clean the appliance Do not use harsh abrasive cleaners or sharp metal scrapers to clean the glass door since they can scratch the surface which may result in shattering of the glass If the mains power supply cable is damaged it must be replaced by the manufacturer its Authorised Service Centre or similarly qualified persons to avoid an electrical hazard Excessive spillage must be...

Страница 4: ...l connections should be made by a qualified electrician The appliance must be earthed Make sure that the parameters on the rating plate are compatible with the electrical ratings of the mains power supply Always use a correctly installed shockproof socket Do not use multi plug adapters and extension cables Make sure not to cause damage to the mains plug and to the mains cable Should the mains cabl...

Страница 5: ...door carefully The use of ingredients with alcohol can cause a mixture of alcohol and air Do not let sparks or open flames to come in contact with the appliance when you open the door Do not put flammable products or items that are wet with flammable products in near or on the appliance WARNING Risk of damage to the appliance To prevent damage or discoloration to the enamel do not put ovenware or ...

Страница 6: ...g is a high temperature operation that can release fumes from cooking residues and construction materials as such consumers are strongly advised to provide good ventilation during and after each Pyrolytic cleaning provide good ventilation during and after the first use at maximum temperature operation Unlike all humans some birds and reptiles can be extremely sensitive to potential fumes emitted d...

Страница 7: ... the appliance and dispose of it Remove the door catch to prevent children or pets from becoming trapped in the appliance INSTALLATION WARNING Refer to Safety chapters Building In 18 594 589 114 21 548 595 1 min 550 20 600 min 560 5 1 60 20 80 520 60 198 523 min 550 20 595 1 18 590 min 560 594 589 114 21 548 1 5 70 60 520 60 20 198 523 7 ...

Страница 8: ... 3 2 1 2 1 4 3 1 Control panel 2 Electronic programmer 3 Heating element 4 Lamp 5 Fan 6 Shelf support removable 7 Shelf positions Accessories Wire shelf For cookware cake tins roasts Baking tray For cakes and biscuits Grill Roasting pan To bake and roast or as pan to collect fat 8 ...

Страница 9: ...My Favourite Pro gramme To store your favourite programme Use it to have access to your favourite programme directly or when the oven is off 5 Temperature Fast Heat Up To set or check the temperature Press and hold it for three seconds to turn on and off the function Fast Heat Up 6 Up Down To move up or down in the menu 7 OK To confirm a selection or setting 8 Oven Light To turn the oven lamp on a...

Страница 10: ... operates kg g An automatic programme with a weight in put operates h min A clock function operates Temperature Fast heat up The function operates Temperature The current temperature is indicated Temperature You can change the temperature Door lock The door lock function operates Light You deactivated the light Minute minder The minute minder function operates Heat up indicator If you turn on the ...

Страница 11: ...fficient DAILY USE WARNING Refer to Safety chapters Heating Functions Oven func tion Application True Fan Cooking To bake on up to three shelf positions at the same time and to dry food Set the temperature 20 40 C lower than for Con ventional Cooking Pizza Func tion To bake pizza To make intensive browning and a crispy bottom Slow Cooking To prepare tender suc culent roasts Conventional Cooking To...

Страница 12: ...hows the set temperature the symbol and the number of the heating function 2 Press or to set a heating function 3 Press or the oven starts automatically after 5 seconds If you turn on the oven and do not set any heating function or programme the oven turns off automatically after 20 seconds How to set Temperature Press or to change the temperature in steps 5 C When the oven is at the set temperatu...

Страница 13: ...the operation of the oven How to set Time of Day After the first connection to the mains wait until the display shows and 12 00 12 flashes 1 Press or to set the hours 2 Press 3 Press or to set the minutes 4 Press The display shows the new time To change the time of day press again and again until starts to flash How to set Duration 1 Set a heating function and temperature 2 Press again and again u...

Страница 14: ...ion with a dot and The dot shows which clock function is on in the Clock residual heat display How to set Set Go You can use the Set Go function only when the Duration is set 1 Set a heating function and temperature 2 Set the Duration 3 Press again and again until the display shows flashing 4 Press to set the Set Go function The display shows and with an indicator This indicator shows which clock ...

Страница 15: ...atic programme 3 Touch or to choose the automatic programme 4 Touch or wait five seconds until the appliance automatically starts to work 5 When the set time ends an acoustic signal sounds for two minutes The symbol flashes 6 Touch a sensor field or open the oven door to stop the acoustic signal 7 Deactivate the appliance How to use automatic programmes with weight input If you set the weight of t...

Страница 16: ... safety The indentations are also anti tip devices The high rim around the shelf prevents cookware from slipping of the shelf ADDITIONAL FUNCTIONS Using My Favourite Programme function Use this function to save your favourite temperature and time settings for an oven function or programme 1 Set the temperature and time for an oven function or programme 2 Touch and hold for more than three seconds ...

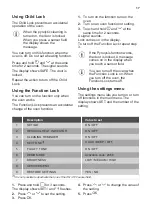
Страница 17: ...ock comes on in the display To turn off the Function Lock repeat step 3 If the Pyrolysis function works the door is locked A message comes on in the display when you touch a sensor field You can turn off the oven when the Function Lock is on When you turn off the oven the Function Lock turns off Using the settings menu The settings menu lets you turn on or turn off functions in the main menu The d...

Страница 18: ...ces of the oven cool If you turn off the oven the cooling fan can continue to operate until the oven cools down Safety thermostat Incorrect operation of the oven or defective components can cause dangerous overheating To prevent this the oven has a safety thermostat which interrupts the power supply The oven turns on again automatically when the temperature drops HINTS AND TIPS WARNING Refer to Sa...

Страница 19: ...king times depend on the type of food its consistency and volume Initially monitor the performance when you cook Find the best settings heat setting cooking time etc for your cookware recipes and quantities when you use this appliance Baking and roasting CAKES Conventional Cooking True Fan Cook ing min C C Whisked rec ipes 170 2 160 3 2 and 4 45 60 Cake mould Shortbread dough 170 2 160 3 2 and 4 2...

Страница 20: ...3 12 20 Baking tray Eclairs 190 3 170 3 25 35 Baking tray Eclairs two levels 170 2 and 4 35 45 Baking tray Plate tarts 180 2 170 2 45 70 Cake mould Ø 20 cm Rich fruit cake 160 1 150 2 110 120 Cake mould Ø 24 cm Victoria sand wich 170 1 160 2 30 50 Cake mould Ø 20 cm Preheat the empty oven BREAD AND PIZZA Conventional Cook ing True Fan Cooking min C C White bread 1 2 pieces 0 5 kg each 190 1 190 1 ...

Страница 21: ...20 Baking tray Deep pan Scones 200 3 190 3 10 20 Baking tray Preheat the empty oven Use the cake mould FLANS Conventional Cook ing True Fan Cooking min C C Pasta flan preheating is not needed 200 2 180 2 40 50 Vegetable flan preheat ing is not needed 200 2 175 2 45 60 Quiches 180 1 180 1 50 60 Lasagne 180 190 2 180 190 2 25 40 Cannelloni 180 190 2 180 190 2 25 40 Use the second shelf position Use ...

Страница 22: ...T Conventional Cook ing True Fan Cooking min C C Pork shoulder with rind 180 2 170 2 120 150 Pork shin 2 pieces 180 2 160 2 100 120 Leg of lamb 190 2 175 2 110 130 Whole chicken 220 2 200 2 70 85 Whole turkey 180 2 160 2 210 240 Whole duck 175 2 220 2 120 150 Whole goose 175 2 160 1 150 200 Rabbit cut in pieces 190 2 175 2 60 80 Hare cut in pieces 190 2 175 2 150 200 Whole pheasant 190 2 175 2 90 ...

Страница 23: ...15 12 14 Beef steak 4 pieces 0 6 10 12 6 8 Sausages 8 12 15 10 12 Pork chops 4 pieces 0 6 12 16 12 14 Chicken half 2 1 30 35 25 30 Kebabs 4 10 15 10 12 Chicken breast 4 pieces 0 4 12 15 12 14 Burgers 6 0 6 20 30 Fish fillet 4 pieces 0 4 12 14 10 12 Toasted sandwiches 4 6 5 7 Toast 4 6 2 4 2 3 Turbo Grilling Preheat the empty oven Use the first or the second shelf position To calculate the roasting...

Страница 24: ...170 90 120 VEAL C min Roast veal 1 kg 160 180 90 120 Veal knuckle 1 5 2 kg 160 180 120 150 LAMB C min Lamb leg Roast lamb 1 1 5 kg 150 170 100 120 Lamb saddle 1 1 5 kg 160 180 40 60 POULTRY C min Poultry portions 0 2 0 25 kg each 200 220 30 50 Chicken half 0 4 0 5 kg each 190 210 35 50 Chicken poulard 1 1 5 kg 190 210 50 70 Duck 1 5 2 kg 180 200 80 100 Goose 3 5 5 kg 160 180 120 180 Turkey 2 5 3 5...

Страница 25: ...0 C for the first 10 minutes The default is 90 C 4 After 10 minutes the oven automatically lowers the temperature to 80 C Set the temperature to 120 C kg min Steaks 0 2 0 3 20 40 3 Fillet of beef 1 1 5 90 150 3 Roast beef 1 1 5 120 150 1 Roast veal 1 1 5 120 150 1 Defrost kg Defrosting time min Further defrost ing time min Chicken 1 100 140 20 30 Place chicken on an upturned saucer placed on a lar...

Страница 26: ...s to simmer after approximately 35 60 minutes with one litre jars stop the oven or decrease the temperature to 100 C see the table Set the temperature to 160 170 C SOFT FRUIT min Cooking time un til simmering Strawberries Blue berries Raspber ries Ripe gooseber ries 35 45 STONE FRUIT min Cooking time until simmering min Continue to cook at 100 C Peaches Quinces Plums 35 45 10 15 VEGETABLES min Coo...

Страница 27: ...ple slices 6 8 Pears 6 9 Moist Fan Baking recommended accessories Use the dark and non reflective tins and containers They have better heat absorption than the light colour and reflective dishes Pizza pan Baking dish Ramekins Flan base tin Dark non reflective 28 cm diameter Dark non reflective 26 cm diameter Ceramic 8 cm diame ter 5 cm height Dark non reflective 28 cm diameter Moist Fan Baking For...

Страница 28: ...ng pan 180 3 20 25 Whole fish 0 2 kg baking tray or dripping pan 180 3 25 35 Fish fillet 0 3 kg pizza pan on wire shelf 180 3 25 30 Poached meat 0 25 kg baking tray or dripping pan 200 3 35 45 Shashlik 0 5 kg baking tray or dripping pan 200 3 25 30 Cookies 16 pieces baking tray or dripping pan 180 2 20 30 Macaroons 24 pieces baking tray or dripping pan 180 2 25 35 Muffins 12 pieces baking tray or ...

Страница 29: ...tion for test institutes Tests according to IEC 60350 1 C min Small cakes 20 per tray Conven tional Cooking Baking tray 3 170 20 30 Small cakes 20 per tray True Fan Cooking Baking tray 3 150 160 20 35 Small cakes 20 per tray True Fan Cooking Baking tray 2 and 4 150 160 20 35 Apple pie 2 tins Ø20 cm Conven tional Cooking Wire shelf 2 180 70 90 Apple pie 2 tins Ø20 cm True Fan Cooking Wire shelf 2 1...

Страница 30: ... True Fan Cooking Baking tray 3 140 150 20 40 Short bread True Fan Cooking Baking tray 2 and 4 140 150 25 45 Short bread Conven tional Cooking Baking tray 3 140 150 25 45 Toast 4 6 pieces Grill Wire shelf 4 max 2 3 minutes first side 2 3 minutes second side Preheat the oven for 3 minutes Beef burger 6 pieces 0 6 kg Grill Wire shelf and dripping pan 4 max 20 30 Put the wire shelf on the fourth lev ...

Страница 31: ...ccessories after each use and let them dry Use a soft cloth with warm water and a cleaning agent Do not clean the accessories in a dish washer Do not clean the non stick accessories using aggressive agents sharp edged objects or in a dishwasher Stainless steel or aluminium ovens Clean the oven door with a damp cloth or sponge only Dry it with a soft cloth Do not use steel wool acids or abrasive ma...

Страница 32: ...umber of the cleaning programme 5 Press 6 Press or to set the duration of the cleaning procedure Option Description 1 1 h 30 min for a light cleaning 2 2 h for a stand ard cleaning 3 2 h 30 min for a thorough clean ing You can use the End function to delay the start of the cleaning procedure 7 Press to confirm How to use cleaning reminder To remind you that the pyrolytic cleaning is necessary the ...

Страница 33: ...face 7 Hold the door trim B on the top edge of the door at the two sides and push inwards to release the clip seal 1 2 B 8 Pull the door trim to the front to remove it 9 Hold the door glass panels by their top edge and carefully pull them out one by one Start from the top panel Make sure the glass slides out of the supports completely 10 Clean the glass panels with water and soap Dry the glass pan...

Страница 34: ...f the cavity CAUTION Always hold the halogen lamp with a cloth to prevent grease residue from burning on the lamp The back lamp 1 Turn the lamp glass cover to remove it 2 Clean the glass cover 3 Replace the lamp with a suitable 300 C heat resistant lamp 4 Install the glass cover TROUBLESHOOTING WARNING Refer to Safety chapters What to do if Problem Possible cause Remedy You cannot activate or oper...

Страница 35: ...e time to activate the display again It takes too long to cook the dishes or they cook too quickly The temperature is too low or too high Adjust the temperature if necessary Follow the ad vice in the user manual Steam and condensation settle on the food and in the cavity of the oven You left the dish in the oven for too long Do not leave the dishes in the oven for longer than 15 20 minutes after t...

Страница 36: ...a solution to the problem yourself contact your dealer or an Authorised Service Centre The necessary data for the service centre is on the rating plate The rating plate is on the front frame of the oven cavity Do not remove the rating plate from the oven cavity We recommend that you write the data here Model MOD Product number PNC Serial number S N ENERGY EFFICIENCY Product Information and Product...

Страница 37: ... to save energy Residual heat If a programme with the Duration or End Time selection is activated and the cooking time is longer than 30 minutes the heating elements automatically turn off earlier in some oven functions The fan and lamp continue to operate When you turn off the oven the display shows the residual heat You can use that heat to keep the food warm When the cooking duration is longer ...

Страница 38: ...tainers to recycle it Help protect the environment and human health by recycling waste of electrical and electronic appliances Do not dispose of appliances marked with the symbol with the household waste Return the product to your local recycling facility or contact your municipal office 38 ...

Страница 39: ... Sicherheit von Kindern und schutzbedürftigen Personen Das Gerät kann von Kindern ab 8 Jahren und Personen mit eingeschränkten physischen sensorischen oder geistigen Fähigkeiten oder mit mangelnder Erfahrung und oder mangelndem Wissen nur dann verwendet werden wenn sie durch eine für ihre Sicherheit zuständige Person beaufsichtigt werden oder in die sichere Verwendung des Geräts eingewiesen wurden...

Страница 40: ... Handschuhe Ziehen Sie bitte vor jeder Wartungsmaßnahme den Netzstecker aus der Steckdose WARNUNG Vergewissern Sie sich dass das Gerät ausgeschaltet ist bevor Sie die Lampe austauschen um einen Stromschlag zu vermeiden Verwenden Sie ds Gerät nicht bevor es in den Einbauschrank gesetzt wird Reinigen Sie das Gerät nicht mit einem Dampfstrahlreiniger Benutzen Sie keine scharfe Scheuermittel oder Meta...

Страница 41: ...Montage des Gerätes ob sich die Ofentür ohne Kraftanwendung öffnen lässt Anderenfalls muss der Backofen angehoben werden Das Gerät ist mit einem elektrischen Kühlsystem ausgestattet Es muss an die Stromversorgung angeschlossen werden Mindesthöhe des Einbaumöbels Min desthöhe des Schranks unter der Arbeitsplatte 590 600 mm Schrankbreite 560 mm Schranktiefe 550 550 mm Höhe der Gerätevor derseite 594...

Страница 42: ...lation muss eine Trenneinrichtung aufweisen mit der Sie das Gerät allpolig von der Stromversorgung trennen können Die Trenneinrichtung muss mit einer Kontaktöffnungsbreite von mindestens 3 mm ausgeführt sein Schließen Sie die Gerätetür ganz bevor Sie den Netzstecker in die Steckdose stecken Das Gerät wird mit einem Netzstecker und Netzkabel geliefert Einsetzbare Kabeltypen für Einbau oder Austausc...

Страница 43: ...s Gerät hinter einer Möbelfront z B einer Tür installiert achten Sie darauf dass die Tür während des Gerätebetriebs nicht geschlossen wird Hinter einer geschlossenen Möbelfront können sich Hitze und Feuchtigkeit ansammeln und das Gerät Gehäuse oder den Boden beschädigen Schließen Sie die Möbelfront nicht bevor das Gerät nach dem Gebrauch vollständig abgekühlt ist Reinigung und Pflege WARNUNG Verle...

Страница 44: ...h während des laufenden Reinigungsprogramms empfindlich auf die lokalen Temperaturschwankungen in der Nähe von Pyrolyse Backöfen Antihaftbeschichtungen auf Töpfen Pfannen Blechen und Kochutensilien usw können durch die hohen Temperaturen während der pyrolytischen Reinigung beschädigt werden und geringfügige Mengen an gesundheitsschädlichen Dämpfen freisetzen Die von den Pyrolyse Backöfen Speiseres...

Страница 45: ...Einbau 18 594 589 114 21 548 595 1 min 550 20 600 min 560 5 1 60 20 80 520 60 198 523 min 550 20 595 1 18 590 min 560 594 589 114 21 548 1 5 70 60 520 60 20 198 523 45 ...

Страница 46: ...Elektronischer Programmspeicher 3 Heizelement 4 Backofenbeleuchtung 5 Ventilator 6 Einhängegitter herausnehmbar 7 Einschubebenen Zubehör Kombirost Für Kochgeschirr Kuchenformen Braten Backblech Für Kuchen und Plätzchen Brat und Fettpfanne Zum Backen und Braten oder zum Auffangen von abtropfendem Fett 46 ...

Страница 47: ...ten Programms Über dieses Feld können Sie direkt auf Ihr bevorzugtes Programm zugreifen selbst wenn der Backofen ausgeschaltet ist 5 Temperatur Schnellaufheizung Einstellen oder Anzeigen der Temperatur Drei Sekunden gedrückt halten um die folgende Funktion ein und auszuschalten Schnellaufhei zung 6 Nach oben unten Menünavigation nach oben oder nach unten 7 OK Bestätigen der Auswahl oder Einstellun...

Страница 48: ...st eingeschaltet Std Min Es ist eine Uhrfunktion eingeschaltet Temperatur Schnellaufheizung Die Funktion ist eingeschaltet Temperatur Anzeige der aktuellen Temperatur Temperatur Die Temperatur kann geändert werden Türschloss Die Türverriegelung ist eingeschaltet Backofenbeleuchtung Sie haben die Lampe ausgeschaltet Kurzzeitwecker Der Kurzzeitwecker ist eingeschaltet Anzeige für die Schnellaufheizu...

Страница 49: ...de Raumbelüftung TÄGLICHER GEBRAUCH WARNUNG Siehe Kapitel Sicherheitshinweise Ofenfunktionen Ofenfunkti on Anwendung Heißluft Zum Backen auf bis zu drei Einschubebenen gleichzeitig und zum Dör ren von Lebensmitteln Stellen Sie eine 20 40 C niedrigere Backofen temperatur als bei Ober Unterhitze ein Pizzastufe Zum Backen von Pizza Für ein intensives Über backen und einen knu springen Boden Niedertem...

Страница 50: ...nd Brötchen auf professio nelle Art zu backen knusprig braun und mit glänzender Kruste Ofenfunkti on Anwendung Warmhalten Zum Warmhalten von Speisen Einstellung Ofenfunktionen 1 Schalten Sie den Backofen mit ein Das Display zeigt die eingestellte Temperatur das Symbol und die Nummer der Ofenfunktion an 2 Drücken Sie oder um eine Ofenfunktion einzustellen 3 Drücken Sie oder der Backofen wird automa...

Страница 51: ...fen ausschaltet Zeitvorwahl Kombinieren der Funktionen Dauer und Ende Set Go Zum späteren Einschalten des Backofens mit den vorein gestellten Funktionen durch das Drücken eines Sensor felds Kurzzeit Wecker Einstellen einer Countdownzeit Diese Funktion wirkt sich nicht auf den Betrieb des Backofens aus Sie können den Kurzzeit Wecker jederzeit und auch bei ausgeschaltetem Backofen einstellen 00 00 G...

Страница 52: ...nstellung Zeitvorwahl 1 Wählen Sie eine Ofenfunktion und die Temperatur 2 Drücken Sie wiederholt bis anfängt zu blinken 3 Drücken Sie zum Einstellen der Minuten von die Taste oder Dauer 4 Drücken Sie 5 Drücken Sie oder um die Stunden für die Dauer einzustellen 6 Drücken Sie Im Display blinkt 7 Drücken Sie oder um Ende einzustellen und drücken Sie Stellen Sie zuerst die Minuten und dann die Stunden...

Страница 53: ... bis im Display 2 Halten Sie gedrückt Wenn das Display 00 00 anzeigt beginnt der Garzeitmesser wieder mit dem Hochzählen AUTOMATIKPROGRAMME WARNUNG Siehe Kapitel Sicherheitshinweise 20 Automatikprogramme sind gespeichert Verwenden Sie ein Automatikprogramm oder rezept wenn Sie nicht wissen wie ein Gericht zubereitet wird oder keine Erfahrung damit haben Das Display zeigt die voreingestellten Garze...

Страница 54: ...nheit kg g 4 Berühren Sie oder warten Sie fünf Sekunden bis die Einstellungen automatisch übernommen werden Das Gerät wird eingeschaltet 5 Sie können das Standardgewicht mit oder ändern Berühren Sie 6 Nach Ablauf der Zeit ertönt zwei Minuten lang ein Signalton und blinkt 7 Zum Ausschalten des Signaltons berühren Sie ein Sensorfeld oder öffnen Sie die Backofentür 8 Schalten Sie das Gerät aus VERWEN...

Страница 55: ...Kindersicherung Die Kindersicherung verhindert ein unbeabsichtigtes Einschalten des Ofens Wenn die Pyrolyse eingeschaltet ist ist die Tür verriegelt Wenn Sie ein Sensorfeld drücken erscheint die Meldung im Display Sie können diese Funktion auch einschalten wenn der Ofen ausgeschaltet ist Stellen Sie keine Ofenfunktion ein Halten Sie und gleichzeitig 2 Sekunden lang gedrückt Das Signal ertönt Im Di...

Страница 56: ...ckt Das Display zeigt SET1 an wobei die 1 blinkt 2 Die entsprechenden Optionen werden mit oder eingestellt 3 Drücken Sie 4 Drücken Sie oder um die eingestellte Option zu ändern 5 Drücken Sie Drücken Sie zum Beenden des Einstellmenüs oder halten Sie gedrückt Automatische Abschaltung Der Backofen wird aus Sicherheitsgründen nach einiger Zeit automatisch ausgeschaltet wenn eine Ofenfunktion eingescha...

Страница 57: ...ät unter Umständen anders als Ihr früherer Backofen Die nachstehenden Tabellen enthalten die standardmäßigen Temperatureinstellungen die Gardauer und die Einschubebene Finden Sie für ein bestimmtes Rezept keine konkreten Angaben orientieren Sie sich an einem ähnlichem Rezept Der Backofen ist mit einem speziellen System ausgestattet das die Luft zirkulieren lässt und den Dampf ständig wiederverwend...

Страница 58: ...6 cm Strudel Stollen 175 3 150 2 60 80 Backblech Marmeladen torte 170 2 165 2 30 40 Kuchenform Ø 26 cm Christstollen Heizen Sie den leeren Back ofen vor 160 2 150 2 90 120 Kuchenform Ø 20 cm Rosinenku chen Heizen Sie den leeren Backofen vor 175 1 160 2 50 60 Brotform Kekse 140 3 140 150 3 25 45 Backblech Baiser 120 3 120 3 80 100 Backblech Baiser Heizen Sie den leeren Backofen vor zwei Ebenen 120 ...

Страница 59: ...Kuchenform Ø 24 cm Englischer Sandwichku chen à la Vic toria 170 1 160 2 30 50 Kuchenform Ø 20 cm Leeren Backofen vorheizen BROT UND PIZZA Ober Unterhitze Heißluft Min C C Weißbrot 1 2 Stück je 0 5 kg 190 1 190 1 60 70 Roggenbrot Vorheizen ist nicht erfor derlich 190 1 180 1 30 45 Brotform Brot Bröt chen 6 8 Brötchen 190 2 180 2 2 und 4 25 40 Backblech Pizza 230 250 1 230 250 1 10 20 Backblech Tie...

Страница 60: ... Vorheizen ist nicht erforderlich 200 2 180 2 40 50 Gemüseauflauf Vorhei zen ist nicht erforderlich 200 2 175 2 45 60 Quiche 180 1 180 1 50 60 Lasagne 180 190 2 180 190 2 25 40 Cannelloni 180 190 2 180 190 2 25 40 Nutzen Sie die zweite Einschubebene Verwenden Sie den Kombirost FLEISCH Ober Unterhitze Heißluft Min C C Rind 200 190 50 70 Schweinefleisch 180 180 90 120 Kalb 190 175 90 120 60 ...

Страница 61: ...eschulter mit Schwarte 180 2 170 2 120 150 Schweinshaxe 2 Stück 180 2 160 2 100 120 Lammkeule 190 2 175 2 110 130 Hähnchen ganz 220 2 200 2 70 85 Pute ganz 180 2 160 2 210 240 Ente ganz 175 2 220 2 120 150 Gans ganz 175 2 160 1 150 200 Kaninchen in Stücke ge schnitten 190 2 175 2 60 80 Kaninchen in Stücke ge schnitten 190 2 175 2 150 200 Fasan ganz 190 2 175 2 90 120 Nutzen Sie die zweite Einschub...

Страница 62: ...ndersteak 4 Stück 0 6 10 12 6 8 Würstchen 8 12 15 10 12 Schweinekoteletts 4 Stück 0 6 12 16 12 14 Hähnchen halbiert 2 1 30 35 25 30 Spieße 4 10 15 10 12 Hähnchenbrust 4 Stück 0 4 12 15 12 14 Frikadellen 6 0 6 20 30 Fischfilet 4 Stück 0 4 12 14 10 12 Belegte Toastbrote 4 6 5 7 Toast 4 6 2 4 2 3 Heißluftgrillen Leeren Backofen vorheizen Nutzen Sie die erste oder zweite Einschubebene Multiplizieren S...

Страница 63: ...1 kg 150 170 90 120 KALB C Min Kalbsbraten 1 kg 160 180 90 120 Kalbshaxe 1 5 2 kg 160 180 120 150 LAMM C Min Lammkeule Lammbraten 1 1 5 kg 150 170 100 120 Lammrücken 1 1 5 kg 160 180 40 60 GEFLÜGEL C Min Geflügelteile je 0 2 0 25 kg 200 220 30 50 Hähnchen hal biert je 0 4 0 5 kg 190 210 35 50 Hähnchen Pou larde 1 1 5 kg 190 210 50 70 Ente 1 5 2 kg 180 200 80 100 Gans 3 5 5 kg 160 180 120 180 Pute ...

Страница 64: ... 3 Wählen Sie die Funktion Niedertemperatur Garen Sie können für die ersten 10 Minuten eine Temperatur zwischen 80 C und 150 C einstellen Voreingestellt ist 90 C 4 Nach 10 Minuten reduziert der Backofen die Temperatur automatisch auf 80 C Stellen Sie die Temperatur auf 120 C ein kg Min Steaks 0 2 0 3 20 40 3 Rinderfilet 1 1 5 90 150 3 Roastbeef 1 1 5 120 150 1 Kalbsbraten 1 1 5 120 150 1 Auftauen ...

Страница 65: ...Backblech Füllen Sie die Einmachgläser gleichmäßig und verschließen Sie sie mit einer Klammer Die Einmachgläser dürfen sich nicht berühren Geben Sie ungefähr 0 5 l Wasser ins Backblech um ausreichend Feuchtigkeit im Backofen sicherzustellen Wenn die Flüssigkeit in den Einmachgläsern zu köcheln beginnt nach ungefähr 35 60 Minuten bei Ein Liter Einmachgläsern schalten Sie den Backofen aus oder reduz...

Страница 66: ... Nacht auskühlen lassen Nutzen Sie für 1 Blech die dritte Einschubebene Für 2 Bleche verwenden Sie die erste und vierte Einschubebene GEMÜSE C Std Bohnen 60 70 6 8 GEMÜSE C Std Paprika 60 70 5 6 Suppengemüse 60 70 5 6 Pilze 50 60 6 8 Kräuter 40 50 2 3 Stellen Sie die Temperatur auf 60 70 C ein OBST Std Pflaumen 8 10 Aprikosen 8 10 Apfelscheiben 6 8 Birnen 6 9 Feuchte Umluft Empfohlenes Zubehör Ver...

Страница 67: ... C Min Brötchen süß 16 Stück Backblech oder tiefes Blech 180 2 20 30 Brötchen 9 Stück Backblech oder tiefes Blech 180 2 30 40 Pizza gefroren 0 35 kg Kombirost 220 2 10 15 Biskuitrolle Backblech oder tiefes Blech 170 2 25 35 Brownie Backblech oder tiefes Blech 175 3 25 30 Soufflé 6 Stück Keramikförmchen auf Kombirost 200 3 25 30 Biskuitboden Biskuitform auf Kombi rost 180 2 15 25 Englischer Sandwic...

Страница 68: ...der tiefes Blech 180 2 25 35 Muffins 12 Stück Backblech oder tiefes Blech 170 2 30 40 Kleingebäck pi kant 20 Stück Backblech oder tiefes Blech 180 2 25 30 Mürbeteigplätz chen 20 Stück Backblech oder tiefes Blech 150 2 25 35 Törtchen 8 Stück Backblech oder tiefes Blech 170 2 20 30 Gemüse po chiert 0 4 kg Backblech oder tiefes Blech 180 3 35 45 Vegetarisches Omelett Pizzapfanne auf Kom birost 200 3 ...

Страница 69: ...r Unterhitze Kombi rost 2 180 70 90 Apfelku chen 2 Formen à Ø 20 cm Heißluft Kombi rost 2 160 70 90 Biskuit Ku chen form Ø 26 cm Ober Unterhitze Kombi rost 2 170 40 50 Backofen 10 Min vorheizen Biskuit Ku chen form Ø 26 cm Heißluft Kombi rost 2 160 40 50 Backofen 10 Min vorheizen Biskuit Ku chen form Ø 26 cm Heißluft Kombi rost 2 und 4 160 40 60 Backofen 10 Min vorheizen Mürbe teigge bäck Heißluft...

Страница 70: ...n die vierte und Fett pfanne in die dritte Einschub ebene des Back ofens einschie ben Wenden Sie das Gargut nach der Hälfte der Gardauer Backofen 3 Min vorheizen REINIGUNG UND PFLEGE WARNUNG Siehe Kapitel Sicherheitshinweise Hinweise zur Reinigung Reinigungs mittel Feuchten Sie ein weiches Tuch mit warmem Wasser und einem milden Rei nigungsmittel an und reinigen Sie damit die Vorderseite des Backo...

Страница 71: ... Sie die Backofentür nur mit einem feuchten Tuch oder Schwamm Trocknen Sie sie mit einem weichen Tuch ab Verwenden Sie keine Stahlwolle Säuren oder Scheuermittel da diese die Oberflächen beschädigen können Reinigen Sie das Bedienfeld auf gleiche Weise Entfernen Einhängegitter Nehmen Sie die Einhängegitter VORSICHT Vorsicht beim Herausnehmen der Einhängegitter 1 Ziehen Sie das Einhängegitter vorne ...

Страница 72: ...nigung Sie können den Start des Reinigungsvorgangs mit der Endefunktion verzögern 7 Drücken Sie zur Bestätigung Verwendung erinnerungsfunktionen Als Erinnerung daran dass eine pyrolytische Reinigung erforderlich ist blinkt nach jedem Ausschalten des Geräts das Symbol 10 Sekunden lang im Display Die Erinnerungsfunktion wird ausgeschaltet Nach Beendigung der pyrolytischen Reinigung Wenn Sie die Funk...

Страница 73: ...auf ein weiches Tuch auf einer stabilen Fläche 7 Fassen Sie die Türabdeckung B an der Oberkante der Tür an beiden Seiten an Drücken Sie sie nach innen um den Klippverschluss zu lösen 1 2 B 8 Ziehen Sie die Türabdeckung nach vorne um sie abzunehmen 9 Halten Sie die Oberkanten der Türglasscheiben fest und ziehen Sie sie vorsichtig nacheinander heraus Beginnen Sie mit der obersten Glasscheibe Achten ...

Страница 74: ...räusch A B Achten Sie darauf die mittlere Glasscheibe richtig in die Aufnahmen einzusetzen A B Ersetzen der Lampe WARNUNG Stromschlaggefahr Die Lampe kann heiß sein 1 Schalten Sie den Backofen aus Warten Sie bis der Backofen abgekühlt ist 2 Trennen Sie den Ofen von der Netzversorgung 3 Breiten Sie ein Tuch auf dem Garraumboden aus VORSICHT Halogenlampen immer mit einem Tuch anfassen um ein Einbren...

Страница 75: ...er Backofen heizt nicht Die Kindersicherung ist ein geschaltet Siehe Verwenden der Kin dersicherung Der Backofen heizt nicht Die Sicherung ist durchge brannt Vergewissern Sie sich dass die Sicherung der Grund für die Störung ist Brennt die Sicherung wiederholt durch wenden Sie sich an eine zu gelassene Elektrofachkraft Die Lampe funktioniert nicht Die Lampe ist defekt Tauschen Sie die Lampe aus Wä...

Страница 76: ...Fehler in der Elektrik aufgetreten Schalten Sie den Back ofen über die Haussiche rung oder den Schutz schalter im Sicherungs kasten aus und wieder ein Wenn der Fehlercode er neut im Display er scheint wenden Sie sich an den Kundendienst Das Gerät ist eingeschaltet heizt aber nicht auf Das Ge bläse funktioniert nicht Im Display wird Demo ange zeigt Der Demo Modus ist einge schaltet Siehe Verwenden ...

Страница 77: ... und 66 2014 Für die Republik Weißrussland gemäß STB 2478 2017 Anhang G STB 2477 2017 Anlagen A und B Für die Ukraine gemäß 568 32020 Die Energieeffizienzklasse gilt nicht für Russland EN 60350 1 Elektrische Kochgeräte für den Hausgebrauch Teil 1 Herde Backöfen Dampf garer und Grillgeräte Verfahren zur Messung der Gebrauchseigenschaften Energie sparen Der Backofen verfügt über Funktionen mit deren...

Страница 78: ...igste Temperatureinstellung wenn Sie die Restwärme zum Warmhalten von Speisen nutzen möchten Die Restwärmeanzeige oder Temperatur werden auf dem Display angezeigt Garen bei ausgeschalteter Backofenbeleuchtung Schalten Sie die Lampe während des Garvorgangs aus Schalten Sie sie nur ein wenn Sie sie benötigen Feuchte Umluft Diese Funktion ist entwickelt worden um während des Garvorgangs Energie zu sp...

Страница 79: ...79 ...

Страница 80: ...867355743 C 332019 ...

Отзывы: