


Replacing an AC Power Cord
63
CHAPTER 10: Replacing Hardware Components
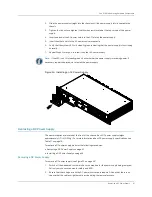
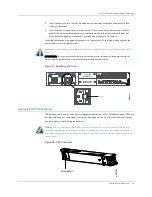
Figure 26: Installing a DC Power Supply
Replacing an AC Power Cord
To replace an AC power cord, perform the following procedures:
z
Disconnecting an AC Power Cord on page 63
z
Connecting an AC Power Cord on page 63
Disconnecting an AC Power Cord
To disconnect the AC power cord:
1.
Attach an electrostatic discharge (ESD) grounding strap to your bare wrist and connect the
strap to the ESD point on the chassis. For more information about ESD, see “Preventing
Electrostatic Discharge Damage” on page 83.
2.
Unplug the power cord from the power source receptacle.
3.
Unplug the power cord from the appliance inlet on the power supply.
Connecting an AC Power Cord
To connect the AC power cord:
1.
Locate a replacement power cord with the type of plug appropriate for your geographical
location; see “AC Power Cord Specifications” on page 77.
2.
Connect one end of the power cord to the power supply.
3.
Insert the power cord plug into an external AC power source receptacle.
4.
Ensure that the power cord does not block the access to gateway.
5.
Verify that the system LED is lit green steadily indicating that the power cable is correctly
installed and the power supply is functioning normally.
6.
Repeat Steps 2 and 3 to connect another AC power cord.
Replacing a DC Power Cable
To replace a power cable on a DC power supply, perform the following procedures:
z
Removing a DC Power Cable on page 63
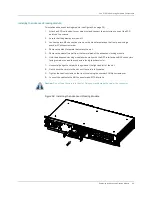
z
Installing a DC Power Cable on page 64
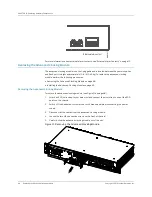
Removing a DC Power Cable
To remove a power cable from a DC power supply:
Содержание BX7000
Страница 10: ... x Copyright 2010 Juniper Networks Inc ...
Страница 12: ... xii Copyright 2010 Juniper Networks Inc ...
Страница 18: ...About This Guide xviii Requesting Support Copyright 2010 Juniper Networks Inc ...
Страница 20: ... 2 Copyright 2010 Juniper Networks Inc ...
Страница 36: ...CHAPTER 1 BX7000 Multi Access Gateway Overview 18 Advanced Clocking Module Copyright 2010 Juniper Networks Inc ...
Страница 60: ...CHAPTER 6 Grounding and Powering the Gateway 42 Powering Off the Gateway Copyright 2010 Juniper Networks Inc ...
Страница 64: ...CHAPTER 7 Accessing and Configuring the Gateway 46 Initial Setup Copyright 2010 Juniper Networks Inc ...
Страница 66: ... 48 Copyright 2010 Juniper Networks Inc ...
Страница 76: ...CHAPTER 9 Troubleshooting 58 Troubleshooting the Advanced Clocking Module Copyright 2010 Juniper Networks Inc ...
Страница 90: ... 72 Copyright 2010 Juniper Networks Inc ...
Страница 122: ... 104 Hardware Compliance Copyright 2010 Juniper Networks Inc ...
Страница 131: ...Copyright 2010 Juniper Networks Inc 113 Appendix E Declaration of Conformity ...
Страница 132: ... 114 Copyright 2010 Juniper Networks Inc ...
Страница 133: ...Copyright 2011 Juniper Networks Inc 115 PART 4 Index z Index on page 117 ...
Страница 134: ... 116 Copyright 2010 Juniper Networks Inc ...