Jumbuck 4 Burner Hooded Comet BBQ Скачать руководство пользователя страница 26


25


Please thoroughly read conditions of 
warranty. 


The appliance must be operated and 
maintained in accordance with the 
instructions supplied in the operating 
manual. 


Any repair does not extend the warranty 
period. 


Any parts other than original Jumbuck 
parts will void this warranty. 

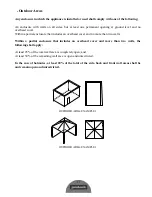
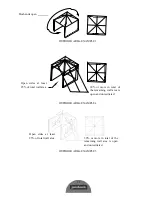
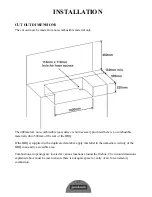
INSTALLATION CONDITIONS 


All installations must conform to the 
applicable Electrical and Building 
standards as laid down by the local codes 
or state or region. 

WHAT IS NOT COVERED IN THE 
WARRANTY 


Removal or re-installation costs. This 
warranty does not cover costs for transit 
nor in home service. 


Lack of maintenance, abuse, neglect, 
misuse, accidental or improper 
installation of this appliance. 


Scratches, dents, corrosion or 
discolouration caused by heat, abrasive 
chemical cleaners or chipping. 


Corrosion or damage caused by 
exposure to the elements such as insects, 
weather or hail. 


Cleaning and wear and tear; service calls 
of this nature are chargeable. 


Commercial use of the product. 


Unauthorised repairs or modifications 
during the warranty period. 


Consumable items, example – heating 
elements. 

RECORD THE FOLLOWING 
INFORMATION 

Attach a copy of the purchase receipt here: 

Date of purchase……………………………….. 

Purchased from………………………………... 

Location……………………………………….. 

Model Name and Number…………………….. 

Date of Manufacture…………………………… 

Receipt number………………………………... 


FOR TECHNICAL ASSISTANCE 


For Australian customers 

If you experience any technical issues with 
your Jumbuck product, in the first instance 
review the instruction manual or call the 
warranty service agent below. 

For New Zealand Customers 

If you experience any technical issues with 
your Jumbuck product, in the first instance 
review the instruction manual or call your local 
Bunnings Warehouse. 

WARRANTY CLAIMS 

For Australian customers 

Please contact Pacific Gas & Heating Pty Ltd,   

Tel: 1300 793978.   

Email: 

[email protected]


For New Zealand Customers 

Please contact the store where the product was 
purchased. 

Содержание 4 Burner Hooded Comet BBQ

Страница 1: ......

Страница 2: ...efore use FOR OUTDOOR USE ONLY DO NOT OPERATE THIS APPLIANCE BEFORE READING THE INSTRUCTION BOOKLET DO NOT PLACE ARTICLES ON OR AGAINST THIS APPLIANCE DO NOT STORE CHEMICALS OR FLAMMABLE MATERIALS OR...

Страница 3: ...2...

Страница 4: ...hen it is operating 8 Do not leave food unattended on the BBQ 9 In case of a fat fire immediately turn the LPG cylinder valve off 10 Particular care must be taken when removing drip tray Hot fat can c...

Страница 5: ...d the installation operating and maintenance instructions thoroughly before installing or servicing this equipment Warning accessible parts may be very hot Keep young children away Do not move the app...

Страница 6: ...ues or you have a fire you cannot extinguish call your fire department immediately NOTE The normal flow of gas through the Regulator and Hose Assembly can create a humming sound A low volume of sound...

Страница 7: ...58mm W x 551mm D x 481 5mm H Gas Connection Point Right hand rear corner under the BBQ Burner Configuration Table Universal LPG BURNERS NOMINAL GAS CONSUMPTION TEST POINT PRESSURE INJECTOR SIZE BBQ 11...

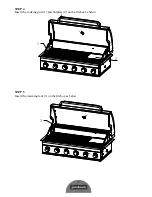
Страница 8: ...7 Assembly instruction steps 4 1 2 5 3 6 7 8...

Страница 9: ...8 1 Cooing grill 2 Hotplate 3 Warming rack 4 Firebox 5 Flame tamer 6 Firebox left support 7 Firebox right support 8 Grease tray Hardware Pack A Bolt M6 12 6 B Screwdriver 1...

Страница 10: ...9 STEP 1 Assembly the firebox left support 6 and firebox right support 7 on the firebox by screw M6 12pcs as below 4 6 7...

Страница 11: ...10 STEP 2 Insert the grease tray 8 on the firebox as below STEP 3 Insert the flame tamer 5 on the firebox as below 8 5...

Страница 12: ...11 STEP 4 Insert the cooking grill 1 and hotplate 2 on the firebox as below STEP 5 Insert the warming rack 3 on the firebox as below 1 2 3...

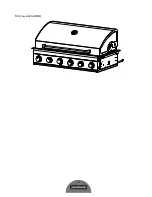
Страница 13: ...12 Fully assembled BBQ...

Страница 14: ...cludes an overhead cover and no more than two walls Within a partial enclosure that includes an overhead cover and more than two walls the following shall apply At least 25 of the total wall area is c...

Страница 15: ...AREA EXAMPLE 5 Both ends open Open sides at least 25 of total wall area 30 or more in total of the remaining wall area is open and unrestricted Open sides at least 25 of total wall area 30 or more in...

Страница 16: ...le material within 500mm of the rear of the BBQ If the BBQ is supplied with a duplicate data label apply this label in the immediate vicinity of the BBQ in an easily accessible area Combustion air ope...

Страница 17: ...as lines with gas Now brush or pour some soapy water onto all connections If there is a leak bubbles should appear within about 20 seconds If you find any leaks tighten the connection and repeat the l...

Страница 18: ...licensed plumber or gas fitter only Remove BBQ Burners and Side Burner and set aeration shutters to 2mm open on BBQ burners and full open on side burner Remove LPG injectors and replace with Natural G...

Страница 19: ...le distance from the burner Turn the control to the High position The burner should light If it fails to light return the control to the OFF position and try again in five minutes FLAME THROWER IGNITI...

Страница 20: ...ting will wear off completely over time Its purpose is to help protect your BBQ during transport and storage It is necessary to season the BBQ plates Firstly wash cooking surfaces with a mild soap and...

Страница 21: ...during the cooking process although be careful to avoid flare ups Avoid burning or charring food Do not leave cooked food standing for too long before eating AFTER USE To turn the BBQ off it is best t...

Страница 22: ...ACK the procedure below should be followed at least once a month in late summer or early autumn when spiders are most active or when your BBQ has not been used for a period of time 1 Turn all burners...

Страница 23: ...operly cooled 2 Storage of this gas BBQ indoors is permissible only if the gas cylinder is disconnected and removed from the BBQ 3 Store the BBQ in a cool dry place 4 Always disconnect the gas cylinde...

Страница 24: ...rous and will void the warranty on this product CARE AND MAINTENANCE Remember to turn off and disconnect the gas before any maintenance is carried out 1 If your BBQ uses a flexible hose to connect to...

Страница 25: ...This warranty is provided in addition to other rights and remedies you may have under law our goods come with guarantees which cannot be excluded under the Australian Consumer Law PRODUCT WARRANTY Yo...

Страница 26: ...ts such as insects weather or hail Cleaning and wear and tear service calls of this nature are chargeable Commercial use of the product Unauthorised repairs or modifications during the warranty period...

Отзывы: