


21
FIG. 38
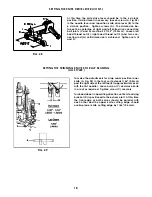
HUNG FOOT ADJUSTMENT
When sewing on extremely lightweight material and/or feed cutting is a problem, the presser foot may be
"hung" by raising stud (B) until guide (A) rests on the shoulder of stud (B). This adjustment will raise the presser
foot slightly, so only the pressure of the presser foot shoes contact the material. Turn handwheel in operating
direction until the feed dogs are below the throat plate surface. At this time there should be a 1/32" (0.8mm)
clearance between the bottom of presser bar guide (A, Fig. 37) and presser bar guide stud (B). To hang
presser foot, loosen lock nut (C Fig. 37) and turn thumbscrew (D Fig. 37) so that the foot comes up slightly,
tighten nut (C Fig. 37).
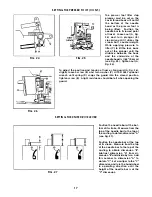
SETTING THE LAP FORMER
Attach gibs (A, Fig. 38) to the cylinder cover but do not tighten screws (B); leave them snug for further
adjustment. Fasten spring (C, Fig. 38 inset) to the bottom of slide block (D) and insert between gibs (A).
Attach lap former (E) to slide block (D) with screws (F) and position it in the center of the presser foot. Position
the slide block so it has a snug (but not tight) fit the entire length of the gibs. Tighten screws (B).
LAP SEAMING
Lap Seaming can be accomplished using three methods:
1. Lap Seaming cutting two plies of material.
A. Remove butt seam presser foot and replace with lap seam presser foot. Refer to pages 15, 16,
& 17 for presser foot adjustments.
B. Attach lap former and slide block with spring. See above for adjustments.
2. Lap seaming cutting only right ply of material.
A. Use butt seam presser foot.
B. Remove front right throat plate screw and attach 36203 edge guide with 22849 screw, and adjust
left or right for proper coverage on bottom.
C. Adjust knives left or right for proper trimming and coverage on top.
3. Lap seaming cutting only left ply of material.
A. Use butt seam presser foot.
B. Remove left front throat plate screw and attach 36203 edge guide with 22849 screw, and adjust
left or right for proper coverage on bottom.
C. Adjust knives left or right for proper trimming and coverage on top.
FIG. 37
Содержание UnionSpecial 36200UAD52
Страница 7: ...7 THREADING 36200 0 0 MACHINE...
Страница 22: ...22 9 16...
Страница 24: ...24 2 31 18 17 14 ____ 12 19 4 3...
Страница 26: ...26 3...
Страница 28: ...28 21 T19DRQUE TO 21 22 241n lbs cm kg I...
Страница 30: ...30 15 12 6 j 38 I I 44 37 28...
Страница 40: ...40 4 40 i li l rrrt l 1 i r C J 4 12 2 27 32 172 2mml 3 5 32 180 2mmJ...
Страница 44: ...44 16 27 Torque to 18 rt lbso I...
Страница 46: ...46 11 3...
Страница 48: ...48 1 17A...
Страница 50: ...50...
Страница 52: ...52 2 4 4 5 8 9 10 20 15 21 25...
Страница 56: ...56 1 4...
Страница 58: ...58 17 18 8 7 6...
Страница 60: ...60 5 I I I 10 8 I I I gi I L I I I I I j J...


