– 3 –
1. Installation of the machine should be carried by a trained technician.
2.
Contact the distributor or a professional electrician to have him/her to carry out electric wiring.
3. The sewing machine weighs 710 kg or more. It is therefore necessary to install it with
two or more persons.
4. Do not connect the power plug until the installation of the sewing machine is complet-
ed. If you press the start switch by mistake, the sewing machine will run to cause an
accident resulting in an injury.
5. Install the sewing machine away from strong elaectrical noise sources such as a
high-frequency welder. Installing the sewing machine near the strong electrical noise
source can cause a malfunction of the machine.
6. Be sure to ground the sewing machine. If the earth connection is improper, an electri-
cal shock can occur.
3. INSTALLATION
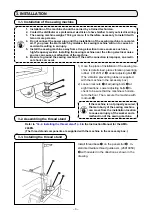
3-1. Installation of the sewing machine
Refer to
"I-3-4. Installing the thread stand" p.6
in the Instruction Manual for the AMS-
224EN.
(The thread stand components are supplied with the machine in the accessory box.)
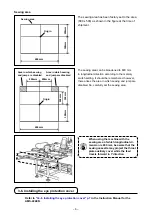
❶
❷
1) Once the place of installation of the sewing ma-
chine is determined, place vibration preventing
rubber
(
40123512
)
❸
under adjusting bolt
❷
.
(The vibration preventing rubber is supplied
with the machine in the accessory box.)
2) Loosen locknuts
❶
of adjusting bolts
❷
at
eight locations. Lower adjusting bolts
❷
to
check to be sure that the machine is horizon-
tal to the floor. Then, secure the machine with
locknuts
❶
.
❸
If the machine is not properly secured,
the main body of the sewing machine
can move from the installation location
to cause an injury of the worker and a
malfunction of the sewing machine.
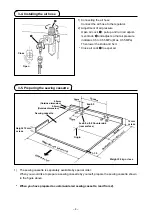
3-2. Assembling the thread stand
3-3. Installing the thread stand
Install thread base
❶
on the panel strut
❷
. In-
stall intermediate thread guide asm. (26910059)
❸
with oriented in the direction as shown in the
drawing.
❶
❷
❸


